
- Recommend Projects
- React
- Vue.js
- Typescript
- TensorFlow
- Django
- Laravel
- D3
- Recommend Topics
- javascript
- web
- server
- Machine learning
- Visualization
- Game
- Recommend Org
- Microsoft
- Alibaba
- D3
- Tencent
- Recommend Projects
- React
- Vue.js
- Typescript
- TensorFlow
- Django
- Laravel
- D3
- Recommend Topics
- javascript
- web
- server
- Machine learning
- Visualization
- Game
- Recommend Org
- Microsoft
- Alibaba
- D3
- Tencent
- Step 1: Set SELinux to permissive mode
- Step 2: Install Zabbix server, frontend, and agent
- Step 3: Install and configure database
- a. Install MariaDB 10.6
- b. Reset root password for database
- c. Create database
- d. Import initial schema and data
- e. Enter database password in Zabbix configuration file
- Step 4: Start Zabbix server and agent processes
- Step 5: Configure firewall
- Step 6: Configure Zabbix frontend
- a. Restart Apache web server and make it start at system boot
- b. Configure web frontend
- Step 7: Login to frontend using Zabbix default login credentials
- Step 8: Create MySQL partitions on History and Events tables
- Step 9: Optimizing Zabbix Server (optional)
- Step 10: Optimizing MySQL/MariaDB database (optional)
- a. Create custom MySQL configuration file
- b. Restart Zabbix Server and MySQL service
- Step 11: How to manage Zabbix / MySQL / Apache service
- Step 12: Enable and configure SELinux on Zabbix
- a) SELinux: Allow http daemon to connect to Zabbix:
- b) SELinux: Allow Zabbix to connect to all TCP ports:
- c) Set SELinux to work in enforcing mode
- d) Create additional SELINUX policy for Zabbix
- Step 13: Upgrade between minor Zabbix versions
- Секционирование (партицирование) БД Zabbix на СУБД PostgreSQL
- Особенности хранения данных в Zabbix
- Установка для новой системы
- Миграция на существующей системе
Recommend Projects

React
Vue.js
🖖 Vue.js is a progressive, incrementally-adoptable JavaScript framework for building UI on the web.

Typescript
TypeScript is a superset of JavaScript that compiles to clean JavaScript output.
TensorFlow
An Open Source Machine Learning Framework for Everyone
Django
The Web framework for perfectionists with deadlines.

Laravel
A PHP framework for web artisans
D3
Bring data to life with SVG, Canvas and HTML. 📊📈🎉

Recommend Topics
javascript
JavaScript (JS) is a lightweight interpreted programming language with first-class functions.
web
Some thing interesting about web. New door for the world.
server
A server is a program made to process requests and deliver data to clients.
Machine learning
Machine learning is a way of modeling and interpreting data that allows a piece of software to respond intelligently.
Visualization
Some thing interesting about visualization, use data art
Game
Some thing interesting about game, make everyone happy.
Recommend Org
Facebook
We are working to build community through open source technology. NB: members must have two-factor auth.
Microsoft
Open source projects and samples from Microsoft.
Google
Google ❤️ Open Source for everyone.
Alibaba
Alibaba Open Source for everyone
D3
Data-Driven Documents codes.
Tencent
China tencent open source team.


Recommend Projects
React
Vue.js
🖖 Vue.js is a progressive, incrementally-adoptable JavaScript framework for building UI on the web.
Typescript
TypeScript is a superset of JavaScript that compiles to clean JavaScript output.
TensorFlow
An Open Source Machine Learning Framework for Everyone
Django
The Web framework for perfectionists with deadlines.
Laravel
A PHP framework for web artisans
D3
Bring data to life with SVG, Canvas and HTML. 📊📈🎉
Recommend Topics
javascript
JavaScript (JS) is a lightweight interpreted programming language with first-class functions.
web
Some thing interesting about web. New door for the world.
server
A server is a program made to process requests and deliver data to clients.
Machine learning
Machine learning is a way of modeling and interpreting data that allows a piece of software to respond intelligently.
Visualization
Some thing interesting about visualization, use data art
Game
Some thing interesting about game, make everyone happy.
Recommend Org
Facebook
We are working to build community through open source technology. NB: members must have two-factor auth.
Microsoft
Open source projects and samples from Microsoft.
Google
Google ❤️ Open Source for everyone.
Alibaba
Alibaba Open Source for everyone
D3
Data-Driven Documents codes.
Tencent
China tencent open source team.
| Issue Title | Created Date | Comment Count | Updated Date |
|---|---|---|---|
| Can you share a training script? | 0 | 2023-04-24 | 2023-04-18 |
| Types: RigidBody and Collider should accept Vector3 positions | 1 | 2022-09-29 | 2023-01-29 |
| Allow being able to remove specific songs from an album that has been saved to the library | 3 | 2022-12-03 | 2023-03-16 |
| 3.0.0dev版本controller切换重复显示 | 4 | 2022-08-30 | 2022-11-20 |
| BUG: 在aws上重启过后公有ip会发生改变,sealos cloud provider无法感知重启过后的实例ip | 0 | 2023-02-27 | 2023-03-07 |
| pct:compile documentation: tempDir missing | 1 | 2022-12-02 | 2023-04-18 |
| Update Helm chart success message for Cloud/Agent installations | 0 | 2023-01-18 | 2023-03-30 |
| Latest prerelease 4.0.0-beta-1, not beta-3 | 16 | 2021-03-08 | 2023-04-17 |
| Yolov5 run slow with python binding | 1 | 2022-12-19 | 2023-02-08 |
| End is being emitted twice. | 14 | 2021-01-24 | 2023-03-29 |
| PET results different from reported in huggingface blog «How many data points is a prompt worth?» study | 1 | 2021-11-22 | 2023-03-11 |
| node-local-dns CrashLoopBackOff | 11 | 2021-05-08 | 2023-02-20 |
| Check snapshot consistency before writing to the xDS cache in the EnvoyConfigRevision controller | 3 | 2020-07-10 | 2023-04-14 |
| Make all external links in guidelines refer to web.archive.org | 0 | 2022-02-24 | 2023-04-25 |
| No such file or directory | 1 | 2021-11-25 | 2023-03-16 |
| Firebase — Quota Exceeded | 1 | 2020-04-18 | 2023-02-13 |
| Chapter: fold command | 3 | 2021-10-25 | 2023-04-17 |
| Chapter: screen | 1 | 2021-10-14 | 2021-12-22 |
| Chapter: add-which-command | 4 | 2021-10-21 | 2023-04-02 |
| Crash: Cannot convert undefined or null to object | 2 | 2022-02-16 | 2022-10-22 |
| Train error | 3 | 2020-12-09 | 2022-01-16 |
| mail tracking pixel link issue | 3 | 2022-03-16 | 2023-03-12 |
| KEY_POWEROFF and KEY_POWERON don’t work on Samsung 2021 | 1 | 2022-03-09 | 2023-01-29 |
| `include` option applies to all submodules and creates empty directories in each | 0 | 2021-02-13 | 2023-04-12 |
| Update examples and docs update generation | 0 | 2022-04-20 | 2023-03-29 |
| How to create a categories | 1 | 2021-01-27 | 2023-04-16 |
| Forward compatible with ERC20 which is`function symbol() view returns (bytes32)` | 2 | 2021-12-29 | 2023-01-30 |
| Bug in mission Minerva Pirate 1 | 1 | 2022-02-06 | 2023-03-24 |
| Crashed chrome while clicking play on Cart Surfer | 1 | 2022-01-25 | 2023-04-17 |
| Esc key does not work in Meat Boy on the desktop app | 0 | 2022-01-25 | 2023-04-17 |
| Curseforge generic egg exit code 1 | 1 | 2022-10-26 | 2022-11-28 |
| disableInsecureEncryption 参数不起作用 | 1 | 2022-04-01 | 2023-04-02 |
| $? is not set to $False even command fails | 20 | 2022-10-21 | 2023-04-17 |
| [Tabs Tray Refactor] Remove `BrowserTrayInteractor` and `BrowserTrayController` and relocate the implemented functions to `TabsTrayInteractor` and `TabsTrayController` | 1 | 2022-12-20 | 2023-01-29 |
| Don’t create .gitignore for husky | 2 | 2021-08-26 | 2023-02-25 |
| Reconnecting to an old session discard some settings | 3 | 2021-11-23 | 2023-02-24 |
| Formbot T-Rex 2+ config issue | 1 | 2022-12-12 | 2023-04-17 |
| [BUG] In MotherBoard Creality v2.2/Does anyone know how I can put the original Firmware? | 1 | 2022-11-29 | 2023-04-17 |
| [BUG] Configuration Samples failed for machines with MAX6675 sensor | 6 | 2022-11-13 | 2023-04-17 |
| [BUG] Can’t Flash Tronxy X5SA Pro v6 | 1 | 2022-10-17 | 2023-04-17 |
| Unit will not move any axis at all. Home command does not do anything outside of produce an electrical whine of the motors getting power. | 0 | 2022-12-13 | 2023-04-17 |
| no audio through mic in ios | 7 | 2021-08-09 | 2023-04-09 |
| not able to run the project locally on my machine | 4 | 2022-03-28 | 2023-04-15 |
| Removed python 2.7 and added support for 3.5 and 3.8 | 1 | 2020-06-08 | 2022-01-05 |
| cvescan on Xenial incorrectly labelling a number of CVEs as still unfixed. | 1 | 2021-11-18 | 2023-04-04 |
| QUESTION: does roller support fused operator? | 0 | 2023-01-04 | 2023-04-09 |
| [Build] met build error when building for arm | 0 | 2023-01-09 | 2023-02-10 |
| When clause contexts support check whether the window is remote(SSH) or not | 1 | 2022-01-21 | 2023-03-24 |
| Allow admin reviewers to create blocklist submissions without VPN that always require sign-off | 2 | 2021-11-26 | 2022-08-12 |
| Add animated spinner to Buttons | 1 | 2022-03-09 | 2023-04-24 |
Зачем к MySQL по адресу-то обращаться, он ведь и поменяться может потом при пересоздании контейнеров? Собрали бы в docker-compose файл, было бы намного удобней.
Согласен. Нужно контейнеры запускать в том порядке, в котором они были установлены, чтобы все подключилось. Освою docker-compose, напишу продолжение с его использованием. 🙂
На контейнер можно вешать alias. Сделайте docker network и залинкуйте к ней контейнеры и внутри network обращайтесь через alias name
В репозитории заббикса есть куча готовых докер-компос файлов
На Raspberry пробовали запускать?
Добавлю одну маленькую, но крайне полезную деталь. Когда контейнеры в одной сети (в данном примере 172.17.*.*), то можно указывать в переменных имена. Например: mysql:3306. При этом докер сам сопоставит имя с адресом.
Так, а докер в итоге зачем нужен?
Можно без докера, обойтись, конечно. С докером проще и быстрей получается. Настраивать меньше.
Прикольно. Были ли у вас мысли создать кластер из малинок? У самого пока руки не дошли, но увидеть статью с таким опытом было бы интересно. Когда дойдут руки возможно сам напишу.
Пока не было необходимости в таком кластере.
Контейнер zabbix-server падает:
Спасибо, может кому-то пригодиться. Не помню, чтобы сталкивался с таким во время установки. В ближайшие дни попробую переустановить, посмотрю. Может упустил это в процессе написания статьи.
Переустановил ОС Raspbian и контейнеры — никаких проблем.
Если будет ошибка связанная с utf8, вот так правильнее будет запускать:
Судя по этой инструкции:
www.zabbix.com/documentation/current/manual/installation/containers
У меня такой вопрос. Судя по статье для базы данных не используются volume, вы не боитесь потерять базы данных после рестарта контейнера или рестарта самой RaspberryPi?
Том создастся.
Свойства контейнера можно посмотреть либо через Portainer, либо командой — docker container inspect mysql.
И Zaabix получается корявый. Он не видит оборудование в локальной сети.
Только в сети Докера. То есть, запросы от сервера Zabbix не продут.
А информация только от активных клиентов, не всегда достаточная.
У меня Zabbix видит и сеть с контейнерами и локальную сеть в которой находится Raspberry. И даже оборудование провайдера. 🙂
Пакеты могут не проходить из-за некорректных настроек сети. Это уже вопрос не к контейнерам, а к конкретной сети.
Чтобы проверить доступность хостов с Zabbix-сервера, из интерфейса самого Zabbix-а можно сделать ping, например.
Круто! Получилось на железке завести ?
Да, проверено на Raspberry Pi 4
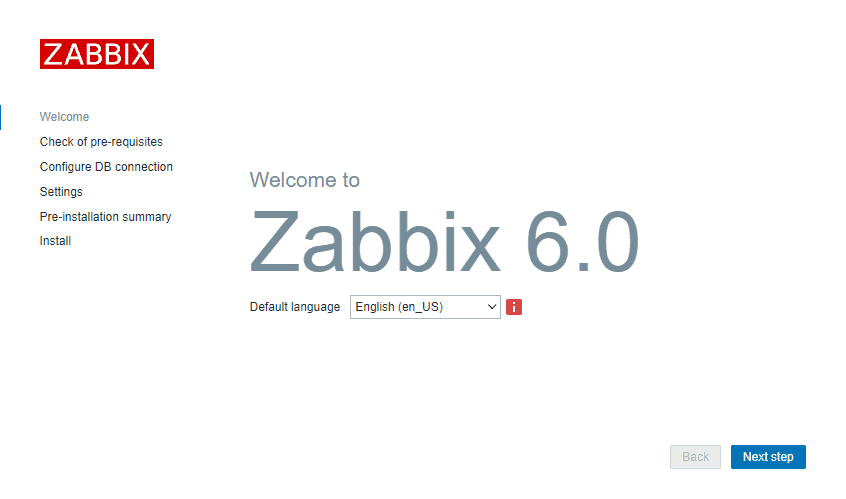
Zabbix server is installable on any Linux distribution, but in this tutorial, I will show you how to install the latest Zabbix 6.0 LTS or 6.4 standard release on RHEL and RHEL based Linux distributions: CentOS 9 or 8 / RHEL 9 or 8 / Oracle Linux 9 or 8 / Alma Linux 9 or 8 / Rocky Linux 9 or 8.
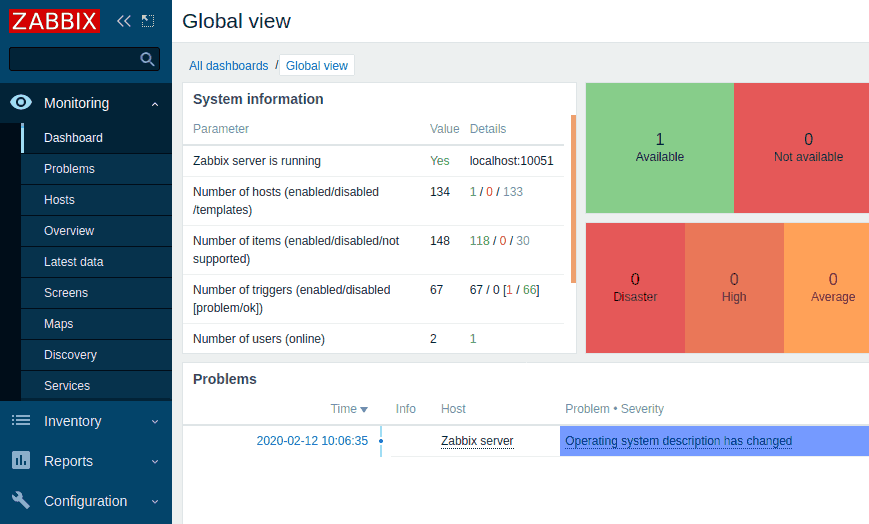
Zabbix is 100% free open-source ultimate enterprise-level software designed for monitoring availability and performance of IT infrastructure components and services. You can read a case-study about Zabbix popularity and find out more about open-source movement in this article.
![6.4 on CentOS 9 or 8 [Step-by-Step]](https://bestmonitoringtools.com/wp-content/uploads/zabbix_6.0_dashboard_1_f-1024x576.jpg)
Enough of talk lets do some work! First, we will install and configure Zabbix server, then a database and lastly the frontend – check the picture bellow for a better understanding of Zabbix architecture.

This guide is for installing Zabbix monitoring system (Server), while guide for installing Zabbix-Proxy on CentOS, RHEL, Oracle/Alma/Rocky Linux can be found on this link.
Step 1: Set SELinux to permissive mode
Configure SELinux to work in permissive mode:
setenforce 0 && sed -i 's/^SELINUX=.*/SELINUX=permissive/g' /etc/selinux/configStep 2: Install Zabbix server, frontend, and agent
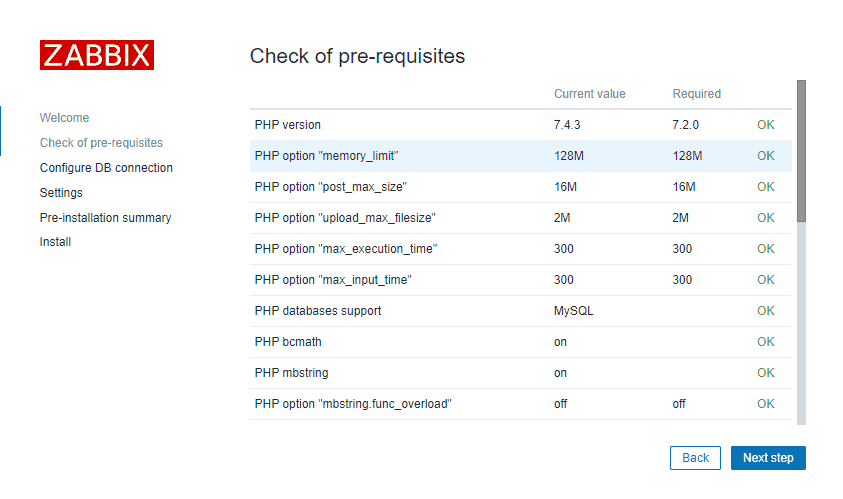
Setup Zabbix 6 RPM package on you favorite Linux (CentOS 8/9, RHEL 8/9, Oracle Linux 8/9, Alma Linux 8/9, Rocky Linux 8/9); clean repo; and install Zabbix server, frontend, and agent.
Zabbix 6.0 LTS version (supported until February, 2027)rpm -Uvh https://repo.zabbix.com/zabbix/6.0/rhel/$(rpm -E %{rhel})/x86_64/zabbix-release-6.0-4.el$(rpm -E %{rhel}).noarch.rpm
dnf clean all
dnf -y install zabbix-server-mysql zabbix-web-mysql zabbix-apache-conf zabbix-sql-scripts zabbix-selinux-policy zabbix-agent ORZabbix 6.4 standard version (supported until November, 2023)rpm -Uvh https://repo.zabbix.com/zabbix/6.4/rhel/$(rpm -E %{rhel})/x86_64/zabbix-release-6.4-1.el$(rpm -E %{rhel}).noarch.rpm
dnf clean all
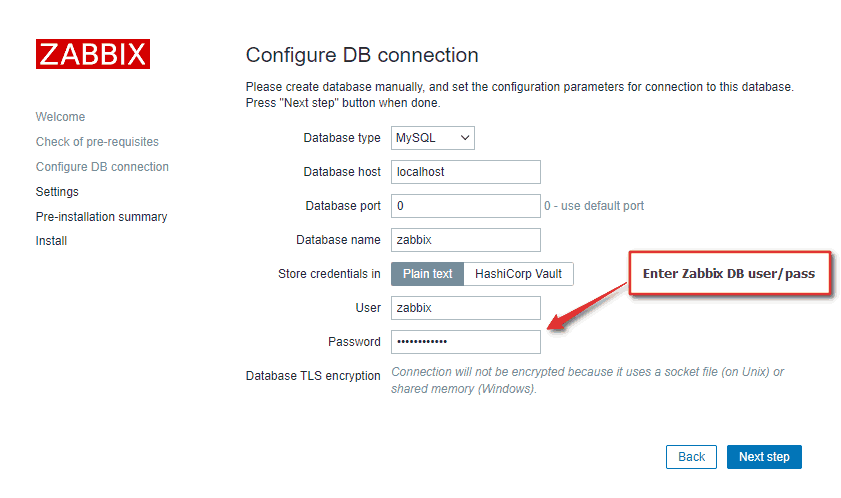
dnf -y install zabbix-server-mysql zabbix-web-mysql zabbix-apache-conf zabbix-sql-scripts zabbix-selinux-policy zabbix-agentStep 3: Install and configure database
In this installation, I will use password as root password and as Zabbix password for DB. Consider changing your password for security reasons.
a. Install MariaDB 10.6
curl -LsS -O https://downloads.mariadb.com/MariaDB/mariadb_repo_setup
sudo bash mariadb_repo_setup --mariadb-server-version=10.6
dnf -y install mariadb-server && systemctl start mariadb && systemctl enable mariadb
b. Reset root password for database
Secure MySQL by changing the default password for MySQL root:
mariadb-secure-installation
Enter current password for root (enter for none): Press EnterSwitch to unix_socket authentication [Y/n] yChange the root password? [Y/n] yNew password: <Enter root DB password>Re-enter new password: <Repeat root DB password>Remove anonymous users? [Y/n]: YDisallow root login remotely? [Y/n]: YRemove test database and access to it? [Y/n]: YReload privilege tables now? [Y/n]: Y
c. Create database
Create a database for Zabbix directly from the terminal using these two commands:
sudo mysql -uroot -p'rootDBpass' -e "create database zabbix character set utf8mb4 collate utf8mb4_bin;"
sudo mysql -uroot -p'rootDBpass' -e "grant all privileges on zabbix.* to [email protected] identified by 'zabbixDBpass';"
d. Import initial schema and data
sudo zcat /usr/share/zabbix-sql-scripts/mysql/server.sql.gz | mysql --default-character-set=utf8mb4 -uzabbix -p'zabbixDBpass' zabbix
e. Enter database password in Zabbix configuration file
Open zabbix_server.conf file with command (use “vi” if you don’t have “nano” installed”):
sudo nano /etc/zabbix/zabbix_server.conf
and add database password in this format anywhere in file:
DBPassword=
Step 4: Start Zabbix server and agent processes
systemctl restart zabbix-server zabbix-agent
systemctl enable zabbix-server zabbix-agent
Step 5: Configure firewall
firewall-cmd --add-service={http,https} --permanent
firewall-cmd --add-port={10051/tcp,10050/tcp} --permanent
firewall-cmd --reload
Step 6: Configure Zabbix frontend
a. Restart Apache web server and make it start at system boot
systemctl restart httpd php-fpm
systemctl enable httpd php-fpm
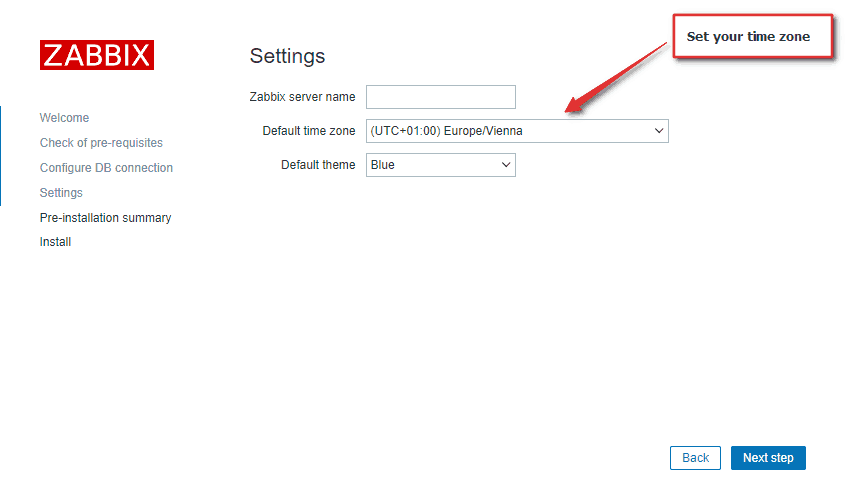
b. Configure web frontend
Connect to your newly installed Zabbix frontend using URL “http:///zabbix” to initiate the Zabbix installation wizard.
In my case, that URL would be “http://192.168.1.161/zabbix” because I have installed Zabbix on the server with IP address 192.168.1.161 (you can find the IP address of your server by typing “ip a” command in the terminal).
NOTE: If you get an error saying that the minimum required version of php is 7.4, upgrade your PHP using these commands:
sudo dnf -y install https://dl.fedoraproject.org/pub/epel/epel-release-latest-8.noarch.rpm
sudo dnf -y install https://rpms.remirepo.net/enterprise/remi-release-8.rpm
sudo dnf module reset php -y
sudo dnf module install php:remi-7.4 -y

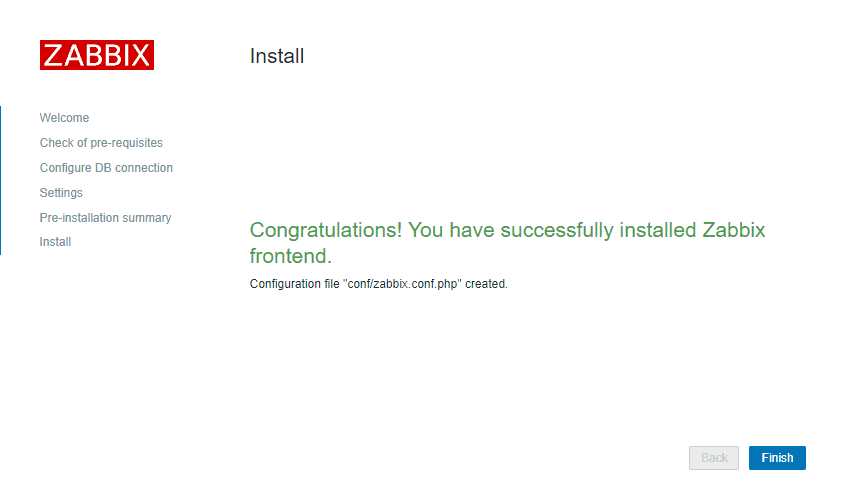
That’s it, you have installed Zabbix monitoring system!
Step 7: Login to frontend using Zabbix default login credentials
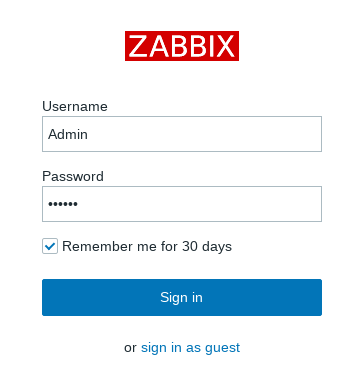
In my example, I have installed Zabbix on server 192.168.1.161 so I will enter in my browsers URL field http:///zabbix (you can find the IP address of your server by typing “ip a” command in the terminal)
CONGRATULATIONS!
You have successfully installed Zabbix 6 on CentOS / RHEL and now you can monitor anything!
No need to change anything else as other steps are optional.
Step 8: Create MySQL partitions on History and Events tables
Zabbix’s housekeeping process is responsible for deleting old trend and history data. Removing old data from the database using SQL delete query can negatively impact database performance. Many of us have received that annoying alarm “Zabbix housekeeper processes more than 75% busy” because of that.
That problem can be easily solved with the database partitioning. Partitioning creates tables for each hour or day and drops them when they are not needed anymore. SQL DROP is way more efficient than the DELETE statement.
You can partition MySQL tables in 5 minutes using this simple guide.
Step 9: Optimizing Zabbix Server (optional)
Don’t bother with this optimization if you are monitoring a small number of devices, but if you are planning to monitor a large number of devices then continue with this step.
Open “zabbix_server.conf” file with command: “nano /etc/zabbix/zabbix_server.conf” and add this configuration anywhere in file:
StartPollers=100
StartPollersUnreachable=50
StartPingers=50
StartTrappers=10
StartDiscoverers=15
StartPreprocessors=15
StartHTTPPollers=5
StartAlerters=5
StartTimers=2
StartEscalators=2
CacheSize=128M
HistoryCacheSize=64M
HistoryIndexCacheSize=32M
TrendCacheSize=32M
ValueCacheSize=256M
This is not a perfect configuration, keep in mind that you can optimize it even more. Let’s say if you don’t use ICMP checks then set the “StartPingers” parameter to 1 or if you don’t use active agents then set “StartTrappers” to 1 and so on. You can find out more about the parameters supported in a Zabbix server configuration file in the official documentation.
Step 10: Optimizing MySQL/MariaDB database (optional)
a. Create custom MySQL configuration file
Create file “10_my_tweaks.cnf" with “nano /etc/my.cnf.d/10_my_tweaks.cnf” and paste this configuration:
[mysqld]max_connections = 404innodb_buffer_pool_size = 800M
innodb-log-file-size = 128M
innodb-log-buffer-size = 128M
innodb-file-per-table = 1
innodb_buffer_pool_instances = 8
innodb_old_blocks_time = 1000
innodb_stats_on_metadata = off
innodb-flush-method = O_DIRECT
innodb-log-files-in-group = 2
innodb-flush-log-at-trx-commit = 2
tmp-table-size = 96M
max-heap-table-size = 96M
open_files_limit = 65535
max_connect_errors = 1000000
connect_timeout = 60
wait_timeout = 28800
chown mysql:mysql /etc/my.cnf.d/10_my_tweaks.cnf
chmod 644 /etc/my.cnf.d/10_my_tweaks.cnf
Two things to remember!
Configuration parameter max_connections must be larger than the total number of all Zabbix proxy processes plus 150. You can use the command below to automatically check the number of Zabbix processes and add 150 to that number:
egrep "^Start.+=[0-9]" /etc/zabbix/zabbix_server.conf | awk -F "=" '{s+=$2} END {print s+150}'295The second most important parameter is innodb_buffer_pool_size, which determines how much memory can MySQL get for caching InnoDB tables and index data. You should set that parameter to 70% of system memory if only database is installed on server.
However, in this case, we are sharing a server with Zabbix and Apache processes so you should set innodb_buffer_pool_size to 40% of total system memory. That would be 800 MB because my CentOS server has 2 GB RAM.
I didn’t have any problems with memory, but if your Zabbix proxy crashes because of lack of memory, reduce “innodb_buffer_pool_size” and restart MySQL server.
b. Restart Zabbix Server and MySQL service
Stop and start the services in the same order as below:
systemctl stop zabbix-server
systemctl stop mysql
systemctl start mysql
systemctl start zabbix-server
Step 11: How to manage Zabbix / MySQL / Apache service
Sometimes you will need to check or restart Zabbix, MySQL or Apache service – use commands below to do that.
Zabbix Serversystemctl <status/restart/start/stop> zabbix-serverMySQL/MariaDB Serversystemctl <status/restart/start/stop> mysqlApache Serversystemctl <status/restart/start/stop> httpdPHP FastCGI Process Managersystemctl <status/restart/start/stop> php-fpmZabbix Agentsystemctl <status/restart/start/stop> zabbix-agent
Step 12: Enable and configure SELinux on Zabbix
While it is acceptable to disable SELinux in a lab environment, depending on the requirements of the local security IT team, you may need to enable and configure SELinux in your production environment.
Don’t worry, this can be easily fixed, so without further delay, let’s configure SELinux for Zabbix!
a) SELinux: Allow http daemon to connect to Zabbix:
Enable SELinux boolean “httpd_can_connect_zabbix” that will allow http daemon to connect to Zabbix:
setsebool -P httpd_can_connect_zabbix 1
b) SELinux: Allow Zabbix to connect to all TCP ports:
Enable SELinux boolean “zabbix_can_network” that will allow Zabbix to connect to all TCP ports :
setsebool -P zabbix_can_network on
And to avoid error “cannot start HA manager: timeout while waiting for HA manager registration” enable daemons_enable_cluster_mode with this command:
setsebool -P daemons_enable_cluster_mode on
c) Set SELinux to work in enforcing mode
Turn on SELinux by setting it to work in enforcing mode:
setenforce 1 && sed -i 's/^SELINUX=.*/SELINUX=enforcing/g' /etc/selinux/config
And check SELinux status :
# sestatusSELinux status: enabled
SELinuxfs mount: /sys/fs/selinux
SELinux root directory: /etc/selinux
Loaded policy name: targetedCurrent mode: enforcingMode from config file: enforcing
Policy MLS status: enabled
Policy deny_unknown status: allowed
Memory protection checking: actual (secure)
Max kernel policy version: 31
d) Create additional SELINUX policy for Zabbix
Just in case, we will create an additional SELinux policy for each error in the audit log (“/var/log/audit/audit.log“)
To do this, we will need the policycoreutils-python tool, so let’s install it:
dnf -y install policycoreutils-python-utils
Create a custom policy package:
grep "denied.*zabbix" /var/log/audit/audit.log | audit2allow -M zabbix_policy
Install custom SELinux policy package:
semodule -i zabbix_policy.pp
Also, to avoid “Database error on login” on CentOS 9 please run these command
sealert -a /var/log/audit/audit.log
It will suggest you to apply additional rules:
ausearch -c ‘php-fpm’ –raw | audit2allow -M my-phpfpm
semodule -X 300 -i my-phpfpm.pp
Well done! You have configured SELinux for Zabbix!
Step 13: Upgrade between minor Zabbix versions
I wrote about upgrade procedures in my post about Zabbix upgrade. Zabbix’s team releases new minor versions at least once a month. The main purpose of minor upgrades is to fix bugs (hotfix) and sometimes even bring new functionality. Therefore, try to do a minor upgrade of Zabbix at least once a month.
There is no need for backups when doing a minor upgrade, they are completely safe. With this command you can easily upgrade minor versions of 6.0.x (for example, from 6.0.1 to 6.0.5):
dnf upgrade 'zabbix*'
And restart Zabbix server afterward:
systemctl restart zabbix-server
Секционирование (партицирование) БД Zabbix на СУБД PostgreSQL
Подробно назначение и область применение секционирования таблиц описано на
https://postgrespro.ru/docs/postgresql/11/ddl-partitioning
Здесь мы рассмотрим практическое применение секционирования таблиц для
базы данных Zabbix.
Особенности хранения данных в Zabbix
Основной поток данных пишется в таблицы: history, history_log, history_str, history_text, history_uint, trends и trends_uint. Для очистки устаревших данных вызывается внутренний обработчик
housekeeper, который уже формирует запросы DELETE к СУБД. Для систем с большим количеством опрашиваемых хостов и отслеживаемых метрик часто складывается ситуация, когда housekeeper не успевает
быстро отработать удаление данных, и система уходит в состояние перманентно высокого iowait. Именно для решения этой проблемы будет применено секционирование таблиц.
Установка для новой системы
Устанавливаем сервер СУБД:
# apt-get install postgresql11-contrib postgresql11-server postgresql11-pg_partman
где postgresql11-pg_partman — серверное расширение PostgreSQL упрощающее управление и сопровождение данных в секционированных таблицах
Проводим установку Zabbix по инструкции.
Останавливаем все процессы Zabbix, с целью недопущения неконтролируемого изменения БД в процессе работы над нет.
systemctl stop zabbix_pgsql.service
shared_preload_libraries = 'pg_stat_statements, pg_partman_bgw' # (change requires restart)
...
enable_partition_pruning = on
pg_partman_bgw.interval = 3600
pg_partman_bgw.role = 'zabbix'
pg_partman_bgw.dbname = 'zabbix'
pg_partman_bgw.analyze = off
pg_partman_bgw.jobmon = on
где: pg_partman_bgw.role — имя пользователя в PostgreSQL, с которым происходит подключение к БД сервера Zabbix; pg_partman_bgw.dbname — название БД, к которой подключается Zabbix. И перезапускаем PostgreSQL.
Подключаемся к СУБД суперпользователем, создаем схему partman, создаем расширение pg_partman, задаем права для пользователя zabbix на схему и расширение:
$ psql -U postgres zabbix
GRANT ALL PRIVILEGES ON DATABASE zabbix to zabbix;
CREATE SCHEMA partman AUTHORIZATION "zabbix";
CREATE EXTENSION pg_partman schema partman;
GRANT ALL ON SCHEMA partman TO zabbix;
GRANT ALL ON ALL TABLES IN SCHEMA partman TO zabbix;
GRANT EXECUTE ON ALL FUNCTIONS IN SCHEMA partman TO zabbix;
GRANT EXECUTE ON ALL PROCEDURES IN SCHEMA partman TO zabbix;
Подключаемся с СУБД пользователем zabbix:
$ psql -U zabbix zabbix
Удаляем изменяемые таблицы:
DROP TABLE history;
DROP TABLE history_log;
DROP TABLE history_str;
DROP TABLE history_text;
DROP TABLE history_uint;
DROP TABLE trends;
DROP TABLE trends_uint;
Процесс housekeeper будет все равно формировать очереди на удаление и вносить их в таблицу housekeeper.
Чтобы не засорять БД лишними данными создаем процедуру заглушку и триггер на таблицу:
CREATE OR REPLACE FUNCTION housekeeper_blackhole() RETURNS trigger AS
$func$
BEGIN RETURN NULL;
END
$func$ LANGUAGE plpgsql;
CREATE TRIGGER housekeeper_blackhole BEFORE INSERT ON housekeeper FOR EACH ROW EXECUTE PROCEDURE housekeeper_blackhole();
DELETE FROM housekeeper;
Создаем таблицы с возможностью секционирования:
CREATE TABLE history ( itemid bigint NOT NULL, clock integer DEFAULT '0' NOT NULL, value numeric(16,4) DEFAULT '0.0000' NOT NULL, ns integer DEFAULT '0' NOT NULL
) PARTITION BY RANGE (clock);
CREATE INDEX history_1 ON history (itemid,clock);
CREATE TABLE history_uint ( itemid bigint NOT NULL, clock integer DEFAULT '0' NOT NULL, value numeric(20) DEFAULT '0' NOT NULL, ns integer DEFAULT '0' NOT NULL
) PARTITION BY RANGE (clock);
CREATE INDEX history_uint_1 ON history_uint (itemid,clock);
CREATE TABLE history_str ( itemid bigint NOT NULL, clock integer DEFAULT '0' NOT NULL, value varchar(255) DEFAULT '' NOT NULL, ns integer DEFAULT '0' NOT NULL
) PARTITION BY RANGE (clock);
CREATE INDEX history_str_1 ON history_str (itemid,clock);
CREATE TABLE history_log ( itemid bigint NOT NULL, clock integer DEFAULT '0' NOT NULL, timestamp integer DEFAULT '0' NOT NULL, source varchar(64) DEFAULT '' NOT NULL, severity integer DEFAULT '0' NOT NULL, value text DEFAULT '' NOT NULL, logeventid integer DEFAULT '0' NOT NULL, ns integer DEFAULT '0' NOT NULL
) PARTITION BY RANGE (clock);
CREATE INDEX history_log_1 ON history_log (itemid,clock);
CREATE TABLE history_text ( itemid bigint NOT NULL, clock integer DEFAULT '0' NOT NULL, value text DEFAULT '' NOT NULL, ns integer DEFAULT '0' NOT NULL
) PARTITION BY RANGE (clock);
CREATE INDEX history_text_1 ON history_text (itemid,clock);
CREATE TABLE trends ( itemid bigint NOT NULL, clock integer DEFAULT '0' NOT NULL, num integer DEFAULT '0' NOT NULL, value_min numeric(16,4) DEFAULT '0.0000' NOT NULL, value_avg numeric(16,4) DEFAULT '0.0000' NOT NULL, value_max numeric(16,4) DEFAULT '0.0000' NOT NULL, PRIMARY KEY (itemid,clock)
) PARTITION BY RANGE (clock);
CREATE TABLE trends_uint ( itemid bigint NOT NULL, clock integer DEFAULT '0' NOT NULL, num integer DEFAULT '0' NOT NULL, value_min numeric(20) DEFAULT '0' NOT NULL, value_avg numeric(20) DEFAULT '0' NOT NULL, value_max numeric(20) DEFAULT '0' NOT NULL, PRIMARY KEY (itemid,clock)
) PARTITION BY RANGE (clock);
Активируем секционирование для таблиц:
SELECT partman.create_parent('public.history', 'clock', 'native', 'daily', null, 7, 'on', null, true, 'seconds');
SELECT partman.create_parent('public.history_uint', 'clock', 'native', 'daily', null, 7, 'on', null, true, 'seconds');
SELECT partman.create_parent('public.history_str', 'clock', 'native', 'daily', null, 7, 'on', null, true, 'seconds');
SELECT partman.create_parent('public.history_text', 'clock', 'native', 'daily', null, 7, 'on', null, true, 'seconds');
SELECT partman.create_parent('public.history_log', 'clock', 'native', 'daily', null, 7, 'on', null, true, 'seconds');
SELECT partman.create_parent('public.trends', 'clock', 'native', 'monthly', null, 12, 'on', null, true, 'seconds');
SELECT partman.create_parent('public.trends_uint', 'clock', 'native', 'monthly', null, 12, 'on', null, true, 'seconds');
Для таблиц history* задаем тип секционирования daily (ежедневный), с предварительным созданием 7 секций; для таблиц trends секционирование monthly, с предварительным созданием 12 секций.
Задаем глубину хранения данных в секциях (для history* 8 дней, для trends* 13 месяцев) и автоматическое обслуживание таблиц:
UPDATE partman.part_config set retention = '8 day', retention_keep_table = false, retention_keep_index = false, automatic_maintenance = 'on' WHERE parent_table = 'public.history';
UPDATE partman.part_config set retention = '8 day', retention_keep_table = false, retention_keep_index = false, automatic_maintenance = 'on' WHERE parent_table = 'public.history_uint';
UPDATE partman.part_config set retention = '8 day', retention_keep_table = false, retention_keep_index = false, automatic_maintenance = 'on' WHERE parent_table = 'public.history_str';
UPDATE partman.part_config set retention = '8 day', retention_keep_table = false, retention_keep_index = false, automatic_maintenance = 'on' WHERE parent_table = 'public.history_text';
UPDATE partman.part_config set retention = '8 day', retention_keep_table = false, retention_keep_index = false, automatic_maintenance = 'on' WHERE parent_table = 'public.history_log';
UPDATE partman.part_config set retention = '13 month', retention_keep_table = false, retention_keep_index = false, automatic_maintenance = 'on' WHERE parent_table = 'public.trends';
UPDATE partman.part_config set retention = '13 month', retention_keep_table = false, retention_keep_index = false, automatic_maintenance = 'on' WHERE parent_table = 'public.trends_uint';
Запускаем обслуживание секций таблиц:
SELECT partman.run_maintenance('public.history');
SELECT partman.run_maintenance('public.history_uint');
SELECT partman.run_maintenance('public.history_str');
SELECT partman.run_maintenance('public.history_text');
SELECT partman.run_maintenance('public.history_log');
SELECT partman.run_maintenance('public.trends');
SELECT partman.run_maintenance('public.trends_uint');
Отключаем автоматический анализатор для секционированных таблиц, так как в противном случае производится блокировка таблицы на время анализа
SELECT partman.run_maintenance(p_analyze := false);
Отключение внутренней очистки истории Zabbix
В веб-интерфейсе Zabbix перейти на: Администрирование -> Общие. В выпадающем списке выбрать пункт «Очистка истории», и в появившемся окне снять все галки, какие там были установлены.
Миграция на существующей системе
Требования: PostgreSQL должен быть версии 11 и новее.
Установка дополнительных пакетов:
Крайне желательно предварительно снять резервную копию БД!
# apt-get install postgresql11-contrib postgresql11-pg_partman
где postgresql11-pg_partman — серверное расширение PostgreSQL упрощающее управление и сопровождение данных в секционированных таблицах
Правим конфиг /var/lib/pgsql/data/postgresql.conf, добавив такие строки:
shared_preload_libraries = 'pg_stat_statements, pg_partman_bgw' # (change requires restart)
...
enable_partition_pruning = on
pg_partman_bgw.interval = 3600
pg_partman_bgw.role = 'zabbix'
pg_partman_bgw.dbname = 'zabbix'
pg_partman_bgw.analyze = off
pg_partman_bgw.jobmon = on
где: pg_partman_bgw.role — имя пользователя в PostgreSQL, с которым происходит подключение к БД сервера Zabbix; pg_partman_bgw.dbname — название БД, к которой подключается Zabbix. И перезапускаем PostgreSQL.
Подключаемся к СУБД суперпользователем, создаем схему partman, создаем расширение pg_partman, задаем права для пользователя zabbix на схему и расширение:
$ psql -U postgres zabbix
GRANT ALL PRIVILEGES ON DATABASE zabbix to zabbix;
CREATE SCHEMA partman AUTHORIZATION "zabbix";
CREATE EXTENSION pg_partman schema partman;
GRANT ALL ON SCHEMA partman TO zabbix;
GRANT ALL ON ALL TABLES IN SCHEMA partman TO zabbix;
GRANT EXECUTE ON ALL FUNCTIONS IN SCHEMA partman TO zabbix;
GRANT EXECUTE ON ALL PROCEDURES IN SCHEMA partman TO zabbix;
Подключаемся с СУБД пользователем zabbix:
$ psql -U zabbix zabbix
Процесс housekeeper будет все равно формировать очереди на удаление и вносить их в таблицу housekeeper.
Чтобы не засорять БД лишними данными создаем процедуру заглушку и триггер на таблицу:
CREATE OR REPLACE FUNCTION housekeeper_blackhole() RETURNS trigger AS
$func$
BEGIN RETURN NULL;
END
$func$ LANGUAGE plpgsql;
CREATE TRIGGER housekeeper_blackhole BEFORE INSERT ON housekeeper FOR EACH ROW EXECUTE PROCEDURE housekeeper_blackhole();
DELETE FROM housekeeper;
Переименовываем таблицы, подлежащие секционированию:
ALTER TABLE history RENAME TO history_temp;
ALTER TABLE history_log RENAME TO history_log_temp;
ALTER TABLE history_str RENAME TO history_str_temp;
ALTER TABLE history_text RENAME TO history_text_temp;
ALTER TABLE history_uint RENAME TO history_uint_temp;
ALTER TABLE trends RENAME TO trends_temp;
ALTER TABLE trends_uint RENAME TO trends_uint_temp;
DROP INDEX history_1;
DROP INDEX history_log_1;
DROP INDEX history_str_1;
DROP INDEX history_text_1;
DROP INDEX history_uint_1;
DROP INDEX trends_pkey;
DROP INDEX trends_uint_pkey;
Выполняем действия, описанные в п.1.2.6 и 1.2.7
Копируем данные из старых таблиц в новые секционированные
INSERT INTO history SELECT * FROM history_temp;
INSERT INTO history_uint SELECT * FROM history_uint_temp;
INSERT INTO history_str SELECT * FROM history_str_temp;
INSERT INTO history_log SELECT * FROM history_log_temp;
INSERT INTO history_text SELECT * FROM history_text_temp;
INSERT INTO trends SELECT * FROM trends_temp;
INSERT INTO trends_uint SELECT * FROM trends_uint_temp;
Выполняем действия, описанные в пунктах c 1.2.8 по 1.2.11
Удаляем старые таблицы:
DROP TABLE history_temp;
DROP TABLE history_uint_temp;
DROP TABLE history_str_temp;
DROP TABLE history_log_temp;
DROP TABLE history_text_temp;
DROP TABLE trends_temp;
DROP TABLE trends_uint_temp;
