

- Useful
- Navigation
- Server solutions
- Telephony
- Corporate networks
- FreePBX 13 — SIP trunk setup
- FreePBX 13 — call routing
- Configuring XMPP on Asterisk
- Automatic phone setup in FreePBX 13
- Install Required Dependencies
- Install Dependencies for Google Voice (Optional)
- Install and Configure Asterisk
- Download Asterisk source files
- Compile and Install jansson
- Install and Configure FreePBX
- Download and extract FreePBX
- A few small modifications to Apache.
- Configure Asterisk database in MYSQL.
- Set permissions on MYSQL database
- Restart Asterisk and install FreePBX
- Finally, one last mod to Make a link to file and start FreePBX
- Now FreePBX is installed, it will be available via Apache. Open up your web browser and visit:
- Tested on:
- Assumptions:
- Install Prerequisites
- Download and install source files
- DAHDI
- PJSIP
- Asterisk
- Freepbx GUI
- Post-install tasks
- Tested on:
- Assumptions:
- Install Prerequisites
- Disable firewall
- Disable Selinux
- Reboot
- Set Timezone
- Download and install source files
- DAHDI
- PJSIP
- Asterisk
- Freepbx GUI
- Post-install tasks
- Optional
- Log File Rotation
- TFTP
- MPG123
- Digum addons
- Password protect http access
- Whitelist protect http access
- A friendly request
- Optional
- Log File Rotation
- TFTP
- Digum addons
- # amportal a ma -help
- Примеры
- Обновление модулей FreePBX13 через CLI (консоль)
- Пожалуйста, расскажите почему?
- не корректна, поэтому удаляю ее: $ sudo pear uninstall DB uninstall ok: channel://pear.php.net/DB-1.8.2 sox и устанавливаю более раннюю по версии, а именно
- ————-FreePBX Control Script———————
Useful
Find out the IP address of a computer on the Internet
Online strong password generator
Online Subnet Calculator
IP Installation Calculator — PBX Asterisk
FreePBX Admin Guide in Russian
Russian Cisco UCM/CME Administrator’s Guide
Navigation
Server solutions
Telephony
FreePBX and Asterisk
Setting up softphones
Corporate networks
Popular and similar
FreePBX 13 — SIP trunk setup
FreePBX 13 — call routing
Configuring XMPP on Asterisk
Automatic phone setup in FreePBX 13
In our previous Blog we introduced FreePBX. Here we are with Installation of FreePBX 12 on Ubuntu Server 14.04 LTS.
Before proceed installation make sure your machine has OpenSSH server and LAMP Packages.
Install Required Dependencies
Install Dependencies for Google Voice (Optional)
Install and Configure Asterisk
Download Asterisk source files
Compile and install DAHDI
Only required if using a physical server and installing telecom hardware.
Compile and install pjproject
Asterisk 12 and later versions contain two SIP stacks: one, the original chan_sip SIP channel driver that has been present in all previous releases of Asterisk, and a new SIP stack that is based on
Compile and Install jansson
Jansson is a C library for encoding, decoding and manipulating JSON data.
Compile and install Asterisk
You will be prompted at the point to pick which modules to build. Most of them will be enabled, but if you want to have MP3 support, you need to manually turn on ‘format_mp3’ on the first page.
Turn on cdr_mysql, as Asterisk store CDRs into mysql server database.
Turn off chan_pjsip in Channel Drivers if you want only chan_sip channel to be on. Otherwise, it will create a conflict of ports.
Incase, you are getting duplicate rows for one call in CDR Reports then, go to Call Detail Recording and Turn off cdr_adaptive_odbc and cdr_odbc respectively.
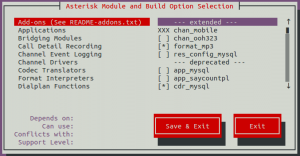
After selecting ‘Save & Exit’ you can then continue.
this installs the (8khz) ‘wav’ soundfiles. If you’re running G722 (High Definition ‘Wideband’) audio, you also want to download the 722 codec pack. If you’re not planning on using Wideband, you can skip that part.
Wideband Audio download
Install and Configure FreePBX
Download and extract FreePBX
A few small modifications to Apache.
Change default “upload_max_filesize” to 120M to allow larger music on hold files.
- NOTE
: this command assumes you are installing to a new machine, and that the file is empty. If this is not a freshly installed machine, please manually verify the contents of the file, rather than just copying and pasting the lines below. The ‘EOF’ does no go in the file, it simply signals to the ‘cat’ command that you have finished pasting.
You may need to verify these paths, if you’re not on a x86_64 machine.
now you need to generate a secure password for FreePBX to use to talk to MySQL.
Configure Asterisk database in MYSQL.
Set permissions on MYSQL database
Restart Asterisk and install FreePBX
You may get errors such as:
****WARNING: ERROR IN CONFIGURATION ***
We would suggest you to enter all passwords carefully. Incase, you are getting such error or You may have to manually set the password in /etc/freepbx.conf if you will get errors during the freepbx installation, specifically, when you run the command:
Finally, one last mod to Make a link to file and start FreePBX
Now FreePBX is installed, it will be available via Apache. Open up your web browser and visit:
that’s all are installation part , will be here soon with modules setup like extensions etc.

This guide will explain how to replace Flash Operator Panel v1
, which is included in FreePBX, with Flash Operator Panel v2
on a RedHat Enterprise Linux server running Asterisk+FreePBX. It is important to note that FOP1 is completely free whereas FOP2 is free only up to 15 buttons. Every element is considered a button. So all extensions + trunks + queues + parking lots + etc. must add up to 15 or less. After that no more buttons will appear until you buy a license.
A key advantage of FOP2 is that it requires an extension and password to view. With FOP1 there is no built in way to prevent everyone from viewing the PBX status.
Command line text is in .
For this procedure we assume you are using:
Redhat Enterprise Linux v5+ (or one of the free generic versions)
FreePBX v2.9+
Flash Operator Panel 2.20+
First install Linux+Asterisk+FreePBX
From a console on your FreePBX server (assuming i386 for the rest of this procedure):
cd /usr/src
tar zxvf fop2-2.20-centos5-i386.tgz
cd fop2
make install
This will copy the files to /usr/local/fop2 and the web pages to /var/www/html/fop2
cd /usr/local/fop2
cat extensions_override_freepbx.conf >>/etc/asterisk/extensions_override_freepbx.conf
This appends the contents of the fop2 version to the existing contents in the asterisk version of this file. In many cases the asterisk version will be empty but we do it this way just in case it’s not.
For Deny use: 0.0.0.0/0.0.0.0
For Permit use: 127.0.0.1/255.255.255.0
With /etc/asterisk/manager_additional.conf
This is the new manager api we created above via the Asterisk API
FreePBX module. In this case we gave it a manager name of fop2
and a manager secret of fop2secret.
secret = fop2secret
REPLACING FOP1 LINKS WITH FOP2
Copy the FOP2 index.html file to index_amp.php which FreePBX expects to find.
cp /var/www/html/fop2/index.html /var/www/html/fop2/index_amp.php
Change ownership
chown -R asterisk.asterisk /var/www/html/fop2
Now reload apache in order for the changes to take effect.
service httpd restart
After installing the module go to the Asterisk SIP settings menu (Tools>Asterisk SIP Settings).
At the bottom set Call Events = Yes

Alternatively if you don’t want to install the Asterisk SIP settings module you can add callevents=yes
to /etc/asterisk/sip_general_custom.conf.
You will have to choose a queue number and name at the very top as well. 123
for example.
TEST MANAGER CONNECTION
You should see «Connection to manager OK!» If you did not set queue as above you will get an error regarding that which is ok as long as you don’t plan to use queues.
CHANGE FOP1 PORT #
FOP v1 is included with FreePBX. Before starting FOP2 we need to change the port # of FOP1 to something other than port 4445. This is because FOP2 also uses 4445 by default.
Alternatively you can prevent FOP1 from starting. This would normally be preferrable however it causes a constant «WARNING» indicator on the FreePBX dashboard. Therefore it is not the recommended approach. If however you prefer to do it this way, in FreePBX v2.9 we do this using the new Advanced Settings Menu (Tools>Advanced Settings).
Find the Flash Operator Panel Section and set S tart FOP with amportal
to FALSE
.
Make sure you restart amportal or reboot to ensure FOP1 is running on the new port.
ENABLE FOP2 on BOOT and START
chkconfig fop2 on
service fop2 start
SERVER STATUS PATCH
On the FreePBX dashboard (FreePBX System Status) there is a server status on the bottom right that will show Op Panel > in yellow if you stopped FOP1. If you did not stop it then it is showing the status of FOP1 not FOP2. In order to correct this we need to patch FreePBX. NOTE1: future updates to FreePBX may reverse this patch which would require this procedure to be repeated. N OTE2: This fix only works with FOP1 configured to start with FreePBX. This is because FreePBX first checks if FOP1 is configured to start before checking the listen port.
This patch assumes we have FOP2 set to the default listen port 4445.
First create the patch file:
— class.procinfo.php 2011-01-06 12:54:05.000000000 -0500
+++ class.procinfo.php.new 2011-01-06 12:47:55.000000000 -0500
$listen_port = 4445;
+ $listen_port = 4445;
Apply the patch:
patch < /usr/src/fop2patch.diff
Once again, this patch only works if FOP1 is configured to start with FreePBX as explained further up in this document. If FOP1 is configured to not start, FreePBX automatically assumes FOP1 is not running, will not run our patch to listen to FOP2 on port 4445, and will always show a warning on the dashboard.

This guide covers the installation of Asterisk®
from source on Ubuntu. Changes in this guide compared to previous guides include the use of Ubuntu v14, Asterisk v12 & v13, Freepbx v12, and the addition of the pjsip
Tested on:
Ubuntu
Server v14.04 LTS 32bit & 64bit
Asterisk v12 & v13
FreePBX v12
Assumptions:
Install Prerequisites
Ensure all required packages are installed.
apt-get update && apt-get install whiptail -y && apt-get upgrade -y && apt-get dist-upgrade -y && reboot
apt-get install -y build-essential autoconf automake curl lua5.1 linux-headers-generic libncurses-dev zlib1g-dev libssl-dev libxml2-dev libsqlite3-dev uuid-dev libspeex-dev libspeexdsp-dev libogg-dev libvorbis-dev libasound2-dev portaudio19-dev libcurl4-gnutls-dev libpq-dev unixodbc-dev libsqlite3-dev libmysqlclient-dev libneon27-dev libgmime-2.6-dev libusb-dev liblua5.1-0-dev libgtk2.0-dev libmysqlclient-dev libbluetooth-dev libradiusclient-ng-dev freetds-dev libsnmp-dev libiksemel-dev libcorosync-dev libnewt-dev libpopt-dev libical-dev libspandsp-dev libjack-dev libresample-dev libc-client-dev binutils-dev libsrtp-dev libgsm1-dev libedit-dev libjansson-dev libldap-dev libxslt1-dev libmyodbc doxygen subversion git mpg123 e2fsprogs php5 php5-curl sqlite3 uuid php5-cli php5-mysql php5-gd php-pear sox bison flex tftpd mailutils nano ntp apache2 mysql-client mysql-server postfix sudo xmlstarlet
Set mysql root password when asked to prevent it from repeatedly asking. Use internet site
for postfix mail configuration.
dpkg-reconfigure tzdata
Download and install source files
DAHDI
Only required if using a physical server and installing telecom hardware.
 cd /usr/src
wget http://downloads.asterisk.org/pub/telephony/dahdi-linux-complete/dahdi-linux-complete-current.tar.gz
tar zxvf dahdi-linux-complete*
cd /usr/src/dahdi-linux-complete*/
make && make install && make config
service dahdi start
PJSIP
 cd /usr/src
wget  http://www.pjsip.org/release/
2.5.5/pjproject-2.5.5.tar.bz2
tar -xjvf pjproject*
cd /usr/src/pjproject*/
#If this is a new source install the following command won't do anything
make distclean
./configure --prefix=/usr --enable-shared --disable-sound --disable-resample \ --disable-video --disable-opencore-amr CFLAGS='-O2 -DNDEBUG'
make uninstall && make dep && make && make install && ldconfig
Asterisk
 cd /usr/src
wget http://downloads.asterisk.org/pub/telephony/asterisk/asterisk-13-current.tar.gz
tar zxvf asterisk-13-current.tar.gz
cd /usr/src/asterisk-13*/
make distclean
./configure
If ./configure
fails with cannot find ptlib-config
then use ./configure --without-pwlib
which is only required if you need to support H.323.
 cd /usr/src/asterisk-13*/
make menuselect.makeopts
#To select compile options manually run  make menuselect  instead of the following command
#To list command line options run  menuselect/menuselect --list-options
#If Asterisk fails to run on a virtual machine try add "--disable BUILD_NATIVE"
#To add asterisk realtime for applications such as A2billing add "--enable res_config_mysql"
menuselect/menuselect --enable cdr_mysql --enable EXTRA-SOUNDS-EN-GSM menuselect.makeopts
 adduser asterisk --disabled-password --no-create-home --home /var/lib/asterisk --shell \
/sbin/nologin --gecos "Asterisk User"
make && make install && chown -R asterisk. /var/lib/asterisk
Freepbx GUI
pear install db-1.7.14
 VERSION=12.0
USERNAME=asteriskuser
PASSWORD=amp109
#The following commands must be entered one at a time in order to enter the mysql root password
mysqladmin -p create asterisk
mysqladmin -p create asteriskcdrdb
mysql -p -e "GRANT ALL PRIVILEGES ON asterisk.* TO $USERNAME@localhost IDENTIFIED BY '$PASSWORD';"
mysql -p -e "GRANT ALL PRIVILEGES ON asteriskcdrdb.* TO $USERNAME@localhost IDENTIFIED BY '$PASSWORD';"
mysql -p -e "flush privileges;"
cd /usr/src
git clone -b release/$VERSION https://github.com/FreePBX/framework.git freepbx
cd /usr/src/freepbx
./start_asterisk start
mv /var/www/html /var/www/html_orig
./install_amp --installdb --skip-module-install --username $USERNAME --password $PASSWORD
#Press ENTER for all the questions including the incorrect IP address.
Do not be concerned by the warning messages.
 # Minimal module install
amportal a ma upgrade framework
amportal a ma upgrade core
amportal a ma upgrade voicemail
amportal a ma upgrade sipsettings
amportal a ma upgrade infoservices
amportal a ma upgrade featurecodeadmin
amportal a ma upgrade logfiles
amportal a ma upgrade callrecording
amportal a ma upgrade cdr
amportal a ma upgrade dashboard
# Alternatively, install all standard modules
amportal a ma upgrade manager
amportal a ma installall
 touch /etc/asterisk/manager_additional.conf
touch /etc/asterisk/manager_custom.conf
amportal restart
amportal a reload
amportal chown
Post install tasks are mandatory.
Post-install tasks
 sed -i 's/\(APACHE_RUN_USER=\)\(.*\)/\1asterisk/g' /etc/apache2/envvars
sed -i 's/\(APACHE_RUN_GROUP=\)\(.*\)/\1asterisk/g' /etc/apache2/envvars
chown asterisk. /var/lock/apache2
service apache2 restart
Enable .htaccess files to protect sensitive webserver directories.
nano +13 /etc/apache2/sites-enabled/000-default.conf
 # Add this underneath the  DocumentRoot /var/www/html
line
<Directory "/var/www/html"> AllowOverride All
</Directory>
Change default “upload_max_filesize” to 20M to allow larger music on hold files.
sed -i 's/upload_max_filesize = .*/upload_max_filesize = 20M/' /etc/php5/apache2/php.ini
Set Freepbx to start on boot.
nano /etc/rc.local
/usr/local/sbin/amportal start
reboot

This guide covers the installation of Asterisk®
from source on CentOS. Changes in this guide compared to previous guides include the use of Asterisk v12 & v13, Freepbx v12, and the addition of the pjsip
library.
Tested on:
CentOS
v6 32 bit & 64 bit
Asterisk
v12 & v13
Freepbx v12
Assumptions:
Install Prerequisites
Ensure all required packages are installed.
yum -y update && yum -y groupinstall core && yum -y groupinstall base && yum -y install epel-release
yum -y install automake gcc gcc-c++ ncurses-devel openssl-devel libxml2-devel unixODBC-devel libcurl-devel libogg-devel libvorbis-devel speex-devel spandsp-devel freetds-devel net-snmp-devel iksemel-devel corosynclib-devel newt-devel popt-devel libtool-ltdl-devel lua-devel sqlite-devel radiusclient-ng-devel portaudio-devel libresample-devel neon-devel libical-devel openldap-devel gmime-devel mysql-devel bluez-libs-devel jack-audio-connection-kit-devel gsm-devel libedit-devel libuuid-devel jansson-devel libsrtp-devel git subversion libxslt-devel kernel-devel audiofile-devel gtk2-devel libtiff-devel libtermcap-devel bison php php-mysql php-process php-pear php-mbstring php-xml php-gd tftp-server httpd sox tzdata mysql-connector-odbc mysql-server fail2ban xmlstarlet
Disable firewall
 service iptables save
service iptables stop
chkconfig iptables off
After completing the entire procedure we can load the firewall rules again by running service iptables start
and have them load on boot by running chkconfig iptables on
Disable Selinux
If not disabled edit /etc/selinux/config
and reboot
SELINUX=disabled
Reboot
To ensure any changes/additions up until now such as updated kernel, selinux disable, email etc. are active.
reboot
Set Timezone
Enable ntpd to syncronize time with public time servers so that it is always exactly correct.
chkconfig ntpd on service ntpd start
Copy timezone from this link
or use tzselect.
tzselect
ln -sf /usr/share/zoneinfo/America/Vancouver /etc/localtime
nano /etc/sysconfig/clock
 ZONE="America/Vancouver"
UTC=false
ARC=false
Download and install source files
DAHDI
Only required if using a physical server and installing telecom hardware.
 cd /usr/src
wget http://downloads.asterisk.org/pub/telephony/dahdi-linux-complete/dahdi-linux-complete-current.tar.gz
tar zxvf dahdi-linux-complete*
cd /usr/src/dahdi-linux-complete*/
make && make install && make config
service dahdi start
PJSIP
 cd /usr/src
wget  http://www.pjsip.org
/release/2.4.5/pjproject-2.4.5.tar.bz2
tar -xjvf pjproject-2.4.5*
cd /usr/src/pjproject-2.4.5*/
#If this is a new source install the following command won't do anything
make distclean
# libdir will be automatically selected
# /usr/lib for 32bit OS
# /usr/lib64 for 64bit OS
ARCH=$(getconf LONG_BIT | grep "64")
./configure --prefix=/usr --libdir=/usr/lib${ARCH} --enable-shared --disable-sound --disable-resample \
--disable-video --disable-opencore-amr CFLAGS='-O2 -DNDEBUG' make uninstall && make dep && make && make install && ldconfig
Asterisk
 cd /usr/src
wget http://downloads.asterisk.org/pub/telephony/asterisk/asterisk-13-current.tar.gz
tar zxvf asterisk-13-current.tar.gz
cd /usr/src/asterisk-13*/
make distclean
 ARCH=$(getconf LONG_BIT | grep "64")
./configure --libdir=/usr/lib${ARCH}
To verify type nano -v config.log
.
 cd /usr/src/asterisk-13*/
make menuselect.makeopts
#To select compile options manually run  make menuselect  instead of the following command
#To list command line options run  menuselect/menuselect --list-options
#If Asterisk fails to run on a virtual machine try add "--disable BUILD_NATIVE"
#To add asterisk realtime for applications such as A2billing add "--enable res_config_mysql"
menuselect/menuselect --enable cdr_mysql --enable EXTRA-SOUNDS-EN-GSM menuselect.makeopts
 adduser asterisk -M -d /var/lib/asterisk -s /sbin/nologin -c "Asterisk User"
make && make install && chown -R asterisk. /var/lib/asterisk
Freepbx GUI
pear install db-1.7.14
 VERSION=12.0
USERNAME=asteriskuser
PASSWORD=amp109
service mysqld start
mysqladmin create asterisk
mysqladmin create asteriskcdrdb
mysql -e "GRANT ALL PRIVILEGES ON asterisk.* TO $USERNAME@localhost IDENTIFIED BY '$PASSWORD';"
mysql -e "GRANT ALL PRIVILEGES ON asteriskcdrdb.* TO $USERNAME@localhost IDENTIFIED BY '$PASSWORD';"
mysql -e "flush privileges;"
cd /usr/src
git clone -b release/$VERSION https://github.com/FreePBX/framework.git freepbx
cd /usr/src/freepbx
./start_asterisk start
mv /var/www/html /var/www/html_orig
./install_amp --installdb --skip-module-install --username $USERNAME --password $PASSWORD
# Press ENTER for all the questions including the incorrect IP address.
Do not be concerned by the warning messages.
 # Minimal module install
amportal a ma upgrade framework
amportal a ma upgrade core
amportal a ma upgrade voicemail
amportal a ma upgrade sipsettings
amportal a ma upgrade infoservices
amportal a ma upgrade featurecodeadmin
amportal a ma upgrade logfiles
amportal a ma upgrade callrecording
amportal a ma upgrade cdr
amportal a ma upgrade dashboard
# Optionally install all standard modules
amportal a ma upgrade manager
amportal a ma installall
 amportal restart
amportal a reload
amportal chown
Post install tasks are mandatory.
Post-install tasks
Setting a mysql root password is recommended.
 MYSQL_ROOT_PW=abcdef
mysqladmin -u root password "$MYSQL_ROOT_PW"
 sed -i 's/User apache/User asterisk/' /etc/httpd/conf/httpd.conf
sed -i 's/Group apache/Group asterisk/' /etc/httpd/conf/httpd.conf
Enable .htaccess files to protect sensitive webserver directories.
sed -i ':a;N;$!ba;s/AllowOverride None/AllowOverride All/2' /etc/httpd/conf/httpd.conf
Prevent external MySQL access.
sed -i '2i bind-address=127.0.0.1' /etc/my.cnf
Set mysql and http servers to start on boot.
 chkconfig mysqld on
chkconfig httpd on
Change default “upload_max_filesize” to 20M to allow larger music on hold files.
sed -i 's/upload_max_filesize = .*/upload_max_filesize = 20M/' /etc/php.ini
Set Freepbx to start on boot.
echo '/usr/local/sbin/amportal start' >> /etc/rc.local
Finally reboot for all changes to take effect.
reboot
Optional
Log File Rotation
If this is not done the log files will keep growing indefinitely.
nano /etc/logrotate.d/asterisk
 /var/log/asterisk/queue_log
/var/spool/mail/asterisk
/var/log/asterisk/freepbx_debug.log
/var/log/asterisk/messages
/var/log/asterisk/event_log
/var/log/asterisk/full
/var/log/asterisk/dtmf
/var/log/asterisk/fail2ban { weekly missingok rotate 5 #compress notifempty sharedscripts create 0640 asterisk asterisk postrotate /usr/sbin/asterisk -rx 'logger reload' > /dev/null 2> /dev/null || true endscript
}
TFTP
If you plan to use hardware SIP phones you will probably want to set up the tftpboot
directory and enable the tftp server.
 yum -y install tftp-server
nano /etc/xinetd.d/tftp
change server_args = -s /var/lib/tftpboot
to server_args = -s /tftpboot
 mkdir /tftpboot
chmod 777 /tftpboot
service xinetd restart
MPG123
This is used in combination with sox
to convert uploaded mp3 music on hold files to Asterisk compatible wav files.
 cd /usr/src
wget http://ufpr.dl.sourceforge.net/project/mpg123/mpg123/1.21.0/mpg123-1.21.0.tar.bz2
tar -xjvf mpg123*
cd mpg123*/
ARCH=$(getconf LONG_BIT | grep "64")
./configure --prefix=/usr --libdir=/usr/lib${ARCH} && make && make install && ldconfig
Digum addons
To register digium®
licenses. Although there is a freepbx module for this it did not appear to be working properly at the time this procedure was written.
 cd /usr/src
wget http://downloads.digium.com/pub/register/linux/register
chmod +x register
./register
To install the individual addons refer to the README files and ignore the register instructions.
Password protect http access
 mkdir -p /usr/local/apache/passwd
htpasswd -c /usr/local/apache/passwd/wwwpasswd someusername
htpasswd -c /usr/local/apache/passwd/wwwpasswd someotherusername
nano /var/www/html/.htaccess
 # .htaccess files require  AllowOverride On  in /etc/httpd/conf/httpd.conf
AuthType Basic
AuthName "Restricted Access"
AuthUserFile /usr/local/apache/passwd/wwwpasswd
Require valid-user
 <Directory /var/www/html>
AuthType Basic
AuthName "Restricted Area"
AuthUserFile /usr/local/apache/passwd/wwwpasswd
Require valid-user
</Directory>
Whitelist protect http access
If http access is only required from certain IP addresses.
nano /etc/httpd/conf.d/whitelist.conf
 <Location />
Order Deny,Allow
Deny from all
#
Allow from x.x.x.x
Allow from x.x.x.x x.x.x.x x.x.x.x
Allow from somedomain.com
Allow from x.x
Allow from x.x.x.0/255.255.255.0
#
#See  http://httpd.apache.org/docs/2.2/mod/mod_authz_host.html  for more examples
#
</Location>
A friendly request
These install instructions show up in many different places around the internet and also inside some install scripts. Link backs and/or acknowledgements of our efforts in other ways would be appreciated.
Optional
Log File Rotation
If this is not done the log files will keep growing indefinitely.
nano /etc/logrotate.d/asterisk
 /var/log/asterisk/queue_log
/var/spool/mail/asterisk
/var/log/asterisk/freepbx_debug.log
/var/log/asterisk/messages
/var/log/asterisk/event_log
/var/log/asterisk/full
/var/log/asterisk/dtmf
/var/log/asterisk/fail2ban { weekly missingok rotate 5 #compress notifempty sharedscripts create 0640 asterisk asterisk postrotate /usr/sbin/asterisk -rx 'logger reload' > /dev/null 2> /dev/null || true endscript
}
TFTP
If you plan to use hardware SIP phones you will probably want to enable the tftp server.
nano /etc/xinetd.d/tftp
 service tftp
{
protocol        = udp
port            = 69
socket_type     = dgram
wait            = yes
user            = nobody
server          = /usr/sbin/in.tftpd
server_args     = /tftpboot
disable         = no
}
Now make the directory and restart the daemon to start tftp.
 mkdir /tftpboot
chmod 777 /tftpboot
service xinetd restart
Digum addons
This is used to register digium
licenses.
 cd /usr/src
wget http://downloads.digium.com/pub/register/linux/register
chmod +x register
./register
To install the individual addons refer to the README files and ignore the register instructions.
# amportal a ma -help
Примеры
Вывод списка установленных и доступных локально модулей
Обновление модулей FreePBX13 через CLI (консоль)
Работает с Asterisk через консоль
1 минута чтения
Привычный и удобный интерфейс FreePBX удобен для обновления модулей Asterisk – к нему мы уже привыкли. Но не многие знают, как обновить модули через командную строку (консоль, CLI). Разберемся сначала, как обновить конкретный модуль, а затем, как обновить все модули сразу.
Разберем обновление модуля framework. Для этого, через любой SSH клиент подключитесь к вашему Asterisk через CLI и зайдите под правами root
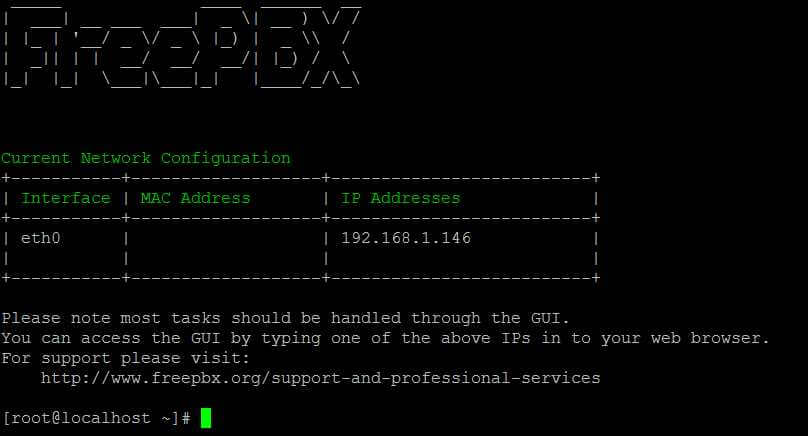
Далее, вводим следующую команду:
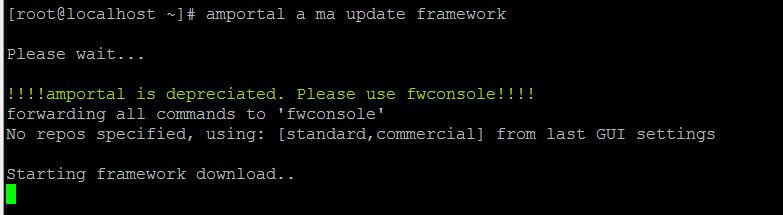
После успешной установки, нам необходимо применить настройки. Как помните, в FreePBX есть красная кнопка «Apply Config». Ее аналог через CLI это следующая команда:

На этом модуль Framework обновлен. Давайте теперь рассмотрим процесс массового обновления всех модулей
сразу. Для этого, введем следующую команду:
После ввода данной команды, Asterisk начнет обновление всех модулей, для которых доступен апгрейд. По окончанию обновления, аналогично применим конфигурацию командой:
Пожалуйста, расскажите почему?

Нам жаль, что статья не была полезна для вас 🙁 Пожалуйста, если не затруднит, укажите по какой причине? Мы будем очень благодарны за подробный ответ. Спасибо, что помогаете нам стать лучше!
Установив Asterisk
по инструкции столкнулся с тем, что при попытки установки необходимых мне модулей, одним из них был модуль Core – Web-
интерфейс
FreePBX
не запустился, точнее наверное запустился но отображал просто белый экран.
Служба asterisk
работала, ниже я привожу все действия посредством которых пришел к правильному решению своей проблемы.
Перезапуск сервисов apache & asterisk
результата не дали
Смотрю логи freepbx.log
$ sudo tail -f /var/log/asterisk/freepbx.log
Ищу где находится файл install_amp
в системе:
$ sudo find / -name install_amp
Смотрю содержимое данного файла amportal.com
$ sudo nano /etc/amportal.conf
Вывожу список всех установленных модулей во FreePBX
:
announcement callforward framework modlist.sh ringgroups update.sh
asteriskinfo callwaiting import.sh recordings status.sh
_cache conferences ivr remove.sh timeconditions
Запускаю утилиту amportal
с целью определить корректность настроек в файле / etc/amportal.conf:
Fetching FreePBX settings with gen_amp_conf.php.
**** WARNING: ERROR IN CONFIGURATION ****
astrundir in ‘/etc/asterisk’ is set to but the directory
does not exists. Attempting to create it with: ‘mkdir -p ‘
mkdir: missing operand
**** ERROR: COULD NOT CREATE ****
Attempt to execute ‘mkdir -p ‘ failed with an exit code of 1
You must create this directory and the try again.
И обнаруживаю, что у меня библиотека
PHP DB
не корректна, поэтому удаляю ее:
$ sudo pear uninstall DB
uninstall ok: channel://pear.php.net/DB-1.8.2 sox
и устанавливаю более раннюю по версии, а именно 1.7.14(более стабильная версия)
$ sudo pear install db-1.7.14
WARNING: «pear/DB» is deprecated in favor of «pear/MDB2»
Starting to download DB-1.7.14.tgz (133,103 bytes)
install ok: channel://pear.php.net/DB-1.7.14
server_args = -s /var/lib/tftpboot и после этого утилита server_args = -s /tftpboot amportal
успешно загрузилась:
Fetching FreePBX settings with gen_amp_conf.php.
start: Starts Asterisk and Flash Operator Panel server if enabled
stop: Gracefully stops Asterisk
restart: Stop and Starts
kill: Kills Asterisk
chown: Sets appropriate permissions on files
and then refresh the page Http://192.168.1.50
work FreePBX
has been restored.
Then click Apply Config
and get an error:
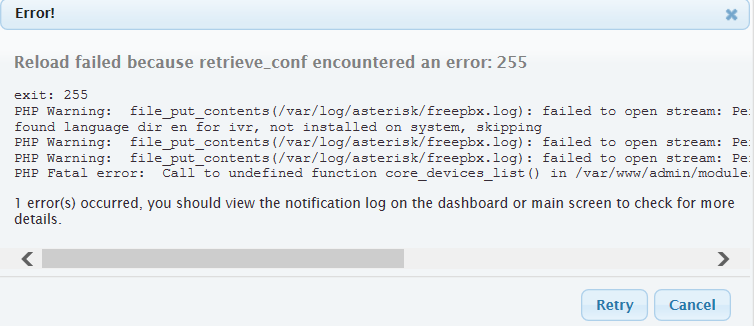
the fact is that I opened the logs with superuser rights, correcting this matter:
$ sudo chown -Rf asterisk:asterisk /var/www/*
$ sudo service apache2 restart
After I press Retry
but the problem does not disappear, so I do this:
Delete module : IVR
and then Call Forward
and the problem disappears.
That’s how the problem was solved.
————-FreePBX Control Script———————
start
— Starts Asterisk and Flash Operator Panel server if enabled
stop
— Gracefully stops Asterisk
restart
— Stop and Starts
kill
— Kills Asterisk
chown
— Make the user of all FreePBX files, the current apache user.
