
- Type the following command to stop the FirewallD service: sudo systemctl stop firewalld.
- Disable the FirewallD service to start automatically on system boot: sudo systemctl disable firewalld.
Learn how to disable the iptables firewall in Linux temporarily for troubleshooting purposes. Also, learn how to save policies and how to restore them back when you enable the firewall back.

- Save iptables policies
- Stop/disable iptables firewall
- Restore firewall policies
- Start iptables firewall
- Disable iptables firewall permanently
- What is FirewallD
- What is Iptables
- How to Start/Stop and Enable/Disable FirewallD Service
- How to Start/Stop and Enable/Disable IPtables Service
- Conclusion
- Отключаем Firewall в CentOS 7
- Method 1: Disable current session
- Method 2: Permanent shutdown
- Step 1: Install or upgrade iptables
- Step 2: Reset default firewall rules
- Step 3: Disable FirewallD
- Step 4: Open ports via iptables
- More articles on this topic:
- Did the article help you?
- Installing iptables services
- Stop and start iptables services
- View and delete rules
- Receiving and dropping traffic in circuits
- Allow and block ports
- Prevention of unauthorized actions on the server
- How do I disable firewall on Linux 7?
- How do I know if my firewall is running CentOS 7?
- How do I know if iptables is running?
- How to start/stop and enable/disable the FirewallD service
- If you’re using or versions, you should follow below instructions to manage FirewallD service.
- # systemctl start firewalld
- # systemctl stop firewalld
- # systemctl status firewalld
- # firewall-cmd --state As an alternative, you can disable the firewalld service so that it doesn’t apply rules to packets and enable ones needed again.
- # systemctl disable firewalld
- # systemctl enable firewalld
- # systemctl mask firewalld Alternatively, you can mask the firewall service, which creates a symbolic link firewall.service to /dev/ null, thus disabling the service.
- # systemctl unmask firewalld This is reverse of masking the service. This removes the symlink of the service created during masking, thus re-enabling the service.
- How do I unmask Firewalld?
- How do I disable iptables in Linux 7?
- How do I know if I have iptables in RHEL 7?
- How do I view iptables on CentOS 7?
- Как запустить / остановить и включить / отключить службу IPtables
- On / and iptables firewall comes as pre and later, the service can be installed via:
- # yum install iptables-services
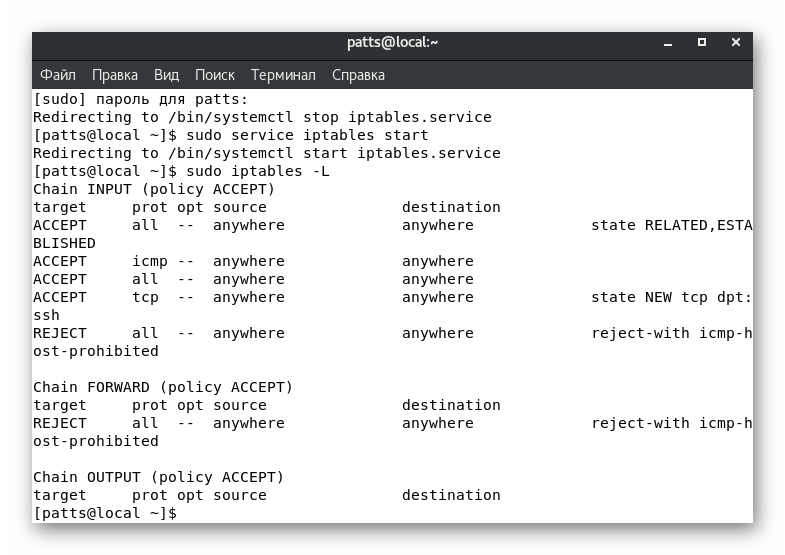
- # systemctl start iptables # service iptables start
- # systemctl stop iptables # service iptables stop
- # systemctl disable iptables # service iptables save # service iptables stop
- # systemctl enable iptables # service iptables start
- # systemctl status iptables
- $ sudo ufw enable Disable Ufw Iptables Firewall $ sudo ufw disable Check Status of Ufw Iptables Firewall # sudo ufw status # iptables -L -n -v How do I check if a firewall is blocking a port Linux? You can first try to use ping to check if there is network connectivity. then do a telnet to the host name for a specific port. If the firewall to the specific host and port is enabled, then it will make a connection. otherwise, it will fail and display an error message. How do I disable Firewalld and enable iptables? Disable the FirewallD Service and Enable the Iptables Services sudo systemctl enable iptables. sudo systemctl enable ip6tables. How permanently disable firewall in Linux? How to permanently disable firewall in Red Hat Linux Login as the root user. Next enter the following three commands to disable firewall. service iptables save service iptables stop chkconfig iptables off. Disable IPv6 firewall. service ip6tables save service ip6tables stop chkconfig ip6tables off.
Save iptables policies
The first step while disabling the iptables firewall temporarily is to save existing firewall rules/policies. iptables-save
command lists all your existing policies which you can save in a file on your server.
 root@kerneltalks # iptables-save
# Generated by iptables-save v1.4.21 on Tue Jun 19 09:54:36 2018
*nat
:PREROUTING ACCEPT [1:52]
:INPUT ACCEPT [1:52]
:OUTPUT ACCEPT [15:1140]
:POSTROUTING ACCEPT [15:1140]
:DOCKER - [0:0]
---- output trucated----
root@kerneltalks # iptables-save > /root/firewall_rules.backup
So iptables-save is the command with you can take iptables policy backup.
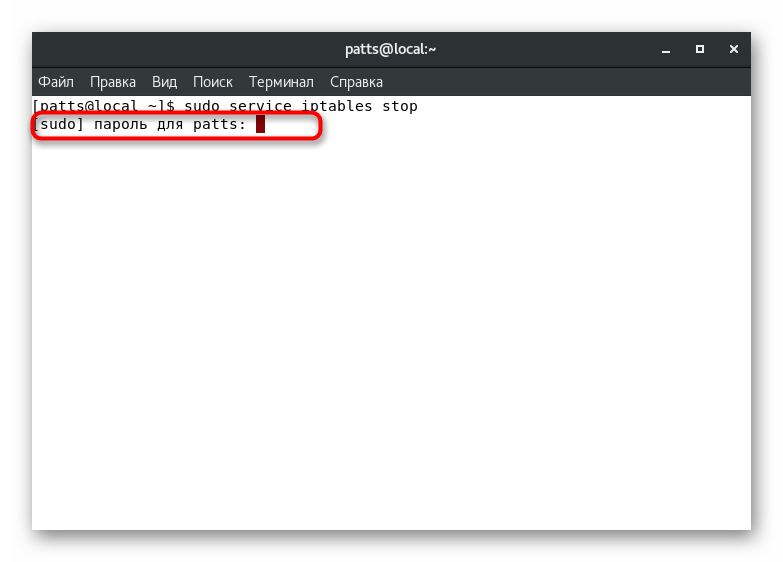
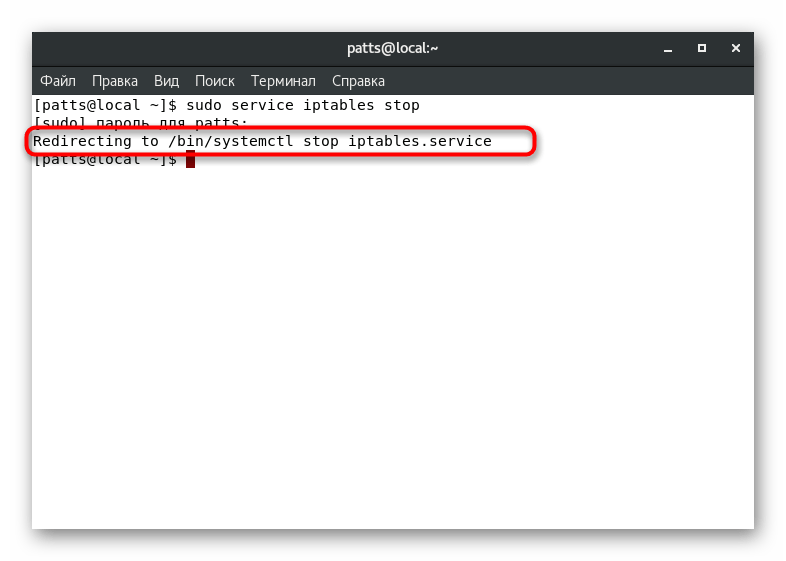
Stop/disable iptables firewall
For older Linux kernels you have an option of stopping service iptables with service iptables stop
but if you are on the new kernel, you just need to wipe out all the policies and allow all traffic through the firewall. This is as good as you are stopping the firewall.
Use below list of commands to do that.
 root@kerneltalks # iptables -F
root@kerneltalks # iptables -X
root@kerneltalks # iptables -P INPUT ACCEPT
root@kerneltalks # iptables -P OUTPUT ACCEPT
root@kerneltalks # iptables -P FORWARD ACCEPT
- -F: Flush all policy chains
- -X: Delete user-defined chains
- -P INPUT/OUTPUT/FORWARD: Accept specified traffic
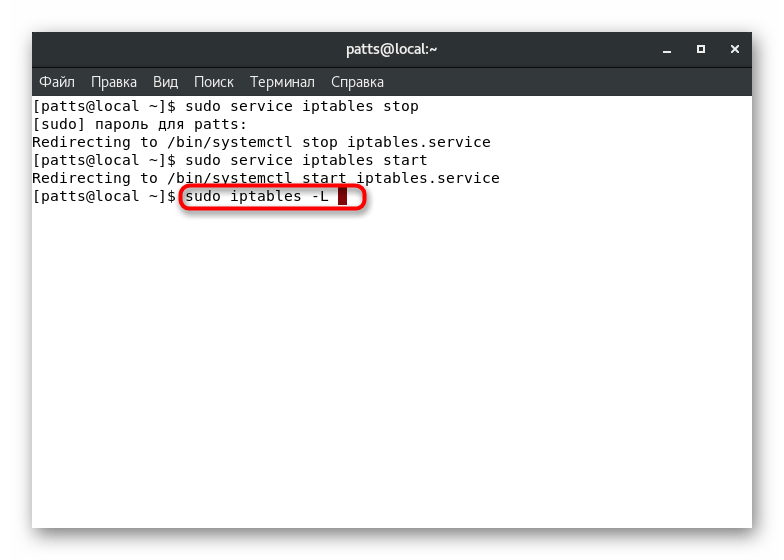
Once done, check current firewall policies. It should look like below which means everything is accepted (as good as your firewall is disabled/stopped)
 # iptables -L
Chain INPUT (policy ACCEPT)
target prot opt source destination
Chain FORWARD (policy ACCEPT)
target prot opt source destination
Chain OUTPUT (policy ACCEPT)
target prot opt source destination
Restore firewall policies
Once you are done with troubleshooting and you want to turn iptables back on with all its configurations. You need to first restore policies from the backup we took in the first step.
root@kerneltalks # iptables-restore </root/firewall_rules.backup
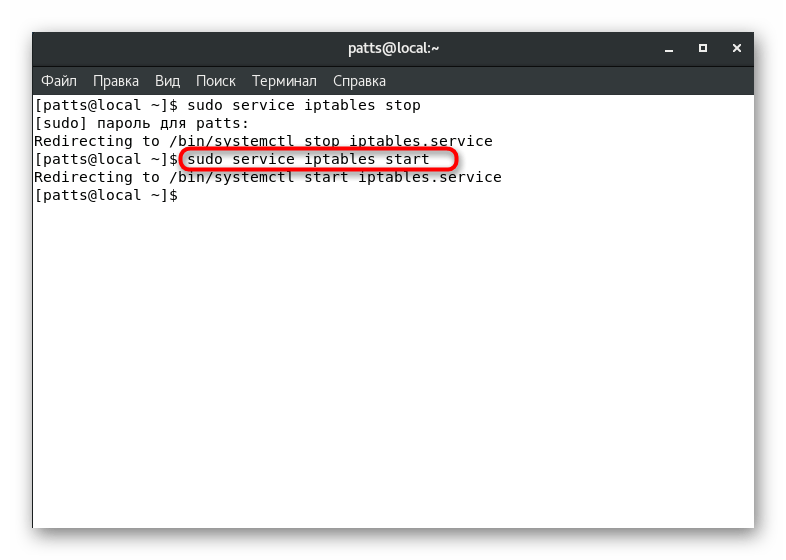
Start iptables firewall
And then start iptables service in case you have stopped it in the previous step using service iptables start
. If you haven’t stopped service then only restoring policies will do for you. Check if all policies are back in iptables firewall configurations :
 root@kerneltalks # iptables -L
Chain INPUT (policy ACCEPT)
target prot opt source destination
Chain FORWARD (policy DROP)
target prot opt source destination
DOCKER-USER all -- anywhere anywhere
DOCKER-ISOLATION-STAGE-1 all -- anywhere anywhere
-----output truncated-----
That’s it! You have successfully disabled and enabled the firewall without losing your policy rules.
Disable iptables firewall permanently
- Stop iptables service
- Disable iptables service
- Flush all rules
- Save configuration
This can be achieved using below set of commands.
 root@kerneltalks # systemctl stop iptables
root@kerneltalks # systemctl disable iptables
root@kerneltalks # systemctl status iptables
root@kerneltalks # iptables --flush
root@kerneltalks # service iptables save
root@kerneltalks # cat /etc/sysconfig/iptables
Each rule has a target action which is to be applied in case the packet fails to satisfy it. On Linux systems, firewall as a service is provided by many softwares, most common which are: firewalld
and iptables
.
In Linux there are many different types of firewalls used, but most standard ones are Iptables
and Firewalld
, which is going to discuss in this article.
What is FirewallD
Corresponding to these configurations, firewallD has two directories, default/fallback one ( /usr/lib/firewall
) which is lost ones system is updated and the system configuration ( /etc/firewall
) which remains permanent and overrides the default one if given. This is found as a default service in RHEL/CentOS 7 and Fedora 18.
What is Iptables
Iptables
is another service which decides to allow, drop or return IP packets. Iptables service manages Ipv4 packets while Ip6tables manages Ipv6 packets. This service manages a list of tables where each table is maintained for different purpose like: ‘ filter
‘ table is for firewall rules, ‘ nat
‘ table is consulted in case of new connection, ‘ mangle
‘ in case of packet alterations and so on.
In this article we will explain how to start, stop or restart Iptables
and FirewallD
services in Linux.
How to Start/Stop and Enable/Disable FirewallD Service
Start FirewallD Service
# systemctl start firewalld
Stop FirewallD Service
# systemctl stop firewalld
Check the Status of FirewallD
# systemctl status firewalld
Check the State of FirewallD
# firewall-cmd --state
As an alternative, you can disable the firewalld service so that it doesn’t apply rules to packets and enable ones needed again.
Disable FirewallD Service
# systemctl disable firewalld
Enable FirewallD Service
# systemctl enable firewalld
Mask FirewallD Service
# systemctl mask firewalld
Also, you can mask the firewall service which creates a symbolic link of the firewall.service
to /dev/null
, thus disabling the service.
Unmask FirewallD Service
# systemctl unmask firewalld
This is reverse of masking the service. This removes the symlink of the service created during masking, thus re-enabling the service.
How to Start/Stop and Enable/Disable IPtables Service
On RHEL
/ CentOS
6/5/4
and Fedora 12-18
iptables firewall comes as pre and later, the iptables
service can be installed via:
# yum install iptables-services
Start Iptables Service
 # systemctl start iptables
OR
# service iptables start
Stop Iptables Service
 # systemctl stop iptables
OR
# service iptables stop
Disable Iptables Service
 # systemctl disable iptables
Or
# service iptables save
# service iptables stop
Enable Iptables Service
 # systemctl enable iptables
Or
# service iptables start
Check Status of Iptables Service
 # systemctl status iptables
OR
# service iptables status
Enable Ufw Iptables Firewall
$ sudo ufw enable
Disable Ufw Iptables Firewall
$ sudo ufw disable
Check Status of Ufw Iptables Firewall
# sudo ufw status
# iptables -L -n -v
Conclusion
These are the techniques which can help you start, stop, disable and enable the packet management services in Linux Based Systems. Different Linux distros can have different services as default, like: Ubuntu can have iptables as the default and pre-installed service, while CentOS can have firewalld as the default configured service for managing incoming and outgoing of IP packets.
Presented in this article are the most common tricks to manage these services on almost all Linux Distros, however, if you find something and would like to add on to this article, your comments are always welcome.

В операционной системе CentOS 7 по умолчанию используется FirewallD — инструмент управления брандмауэром. Решение поддерживает протоколы IPv4 и IPv6 и позволяет администрировать отдельные участки сети. Некоторые службы и приложения обращаются к этой утилите для настройки брандмауэра, а она, в свою очередь, оперативно синхронизирует все правила. Возможны ситуации, когда такой инструмент необходимо отключить, например, для наладки работы интернета. На помощь придут два разных метода, каждый из которых удобен по-своему.
Отключаем Firewall в CentOS 7
Сегодня мы не будем рассматривать доступные альтернативы FirewallD, устанавливающиеся в систему дополнительно. О методах отключения таких инструментов вы можете узнать в официальной документации к ним. Единственное — в конце статьи мы приведем основные команды, которые будут полезны для пользователей, активно использующих стандартный инструмент под названием iptables. Однако сейчас давайте остановимся на упомянутом выше фаерволе.
Before proceeding to the instructions, I would like to show how the current state of FirewallD is determined through a standard command, because if it is already inactive, you do not have to disable it.
- Open the classic console, for example, through the menu «Applications»
. - Enter command
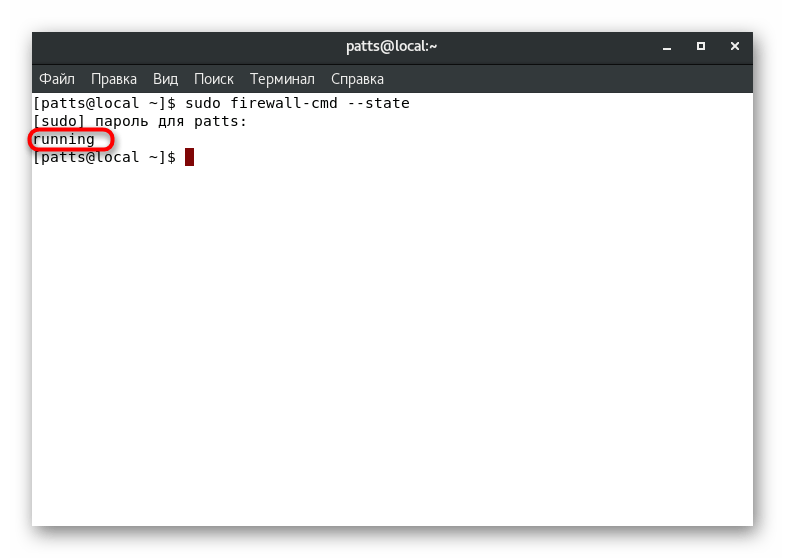
sudo firewall-cmd --state
. - Confirm the superuser account by entering a password.
- Only one line will be displayed, which will indicate the status of the firewall. Meaning «running»
indicates that the service is currently running.

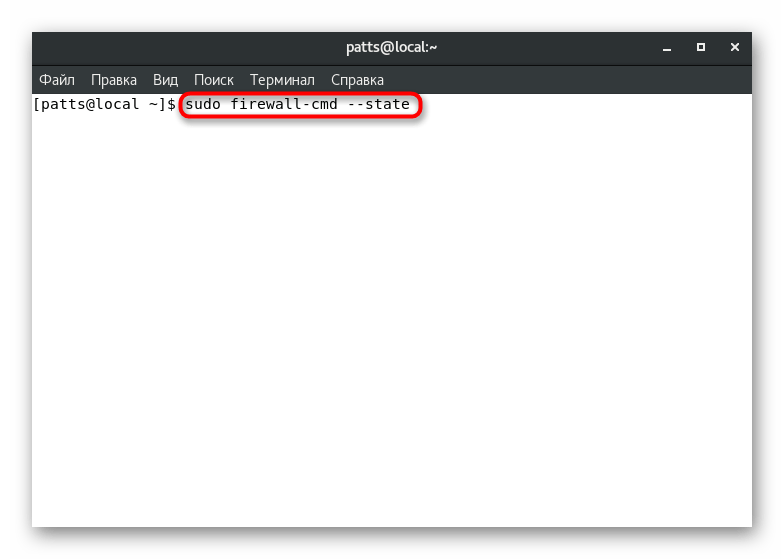

We advise you to use the above command every time you need to know the state of FirewallD functioning.
Method 1: Disable current session
Temporarily disabling the firewall will allow you to perform all the necessary actions with the network in the current session, and after restarting it, the utility will return to working condition again. Stopping is done with a single built-in command. Run «Terminal»
and enter sudo systemctl stop firewalld
, and then press Enter
.

Unfortunately, after activating the command, no notifications will be displayed on the screen, by which it would be possible to understand that the process was completed successfully. We strongly recommend to write sudo firewall-cmd --state
to see the status of FirewallD at the moment. You should see the result «not running»
.
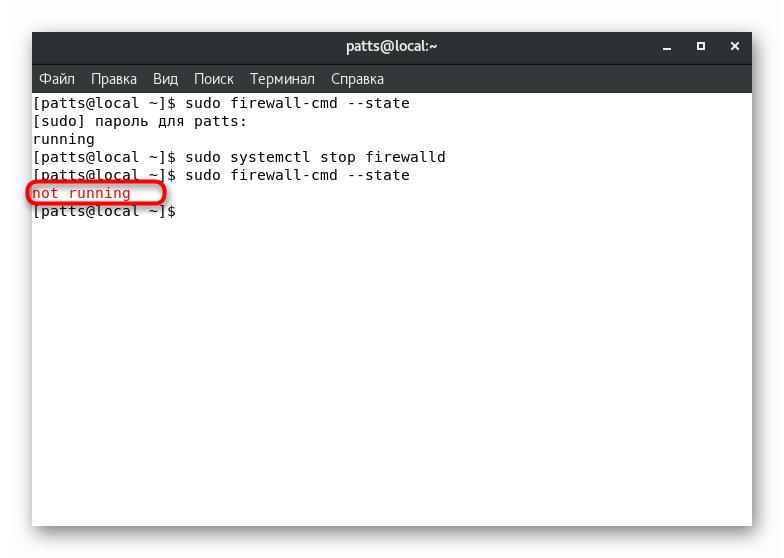
Of course, such disabling of the Firewall is performed quite quickly, but, as already mentioned, only for one active terminal session. However, some users are not satisfied with this option, so they are better off referring to the following guide.
Method 2: Permanent shutdown
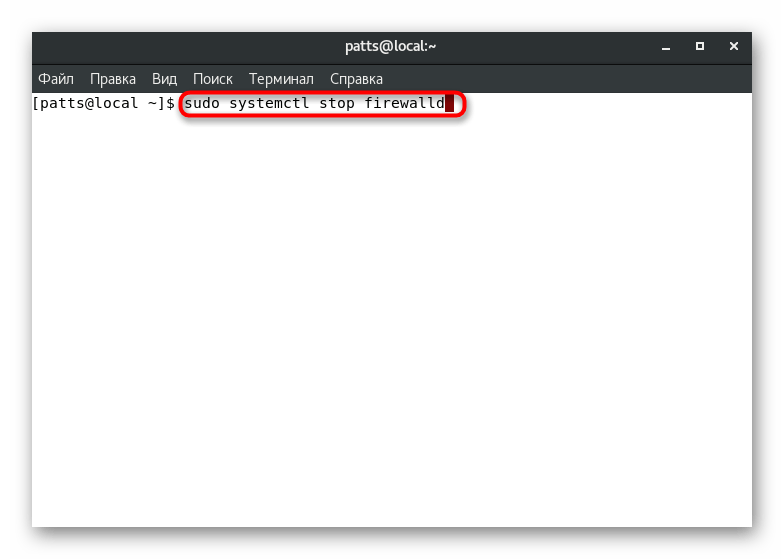
Disabling the firewall on a permanent basis is done by making changes to the configuration file. You won’t have to enter or change anything on your own, the whole operation consists in entering several commands. It’s worth starting from the defender’s stop:
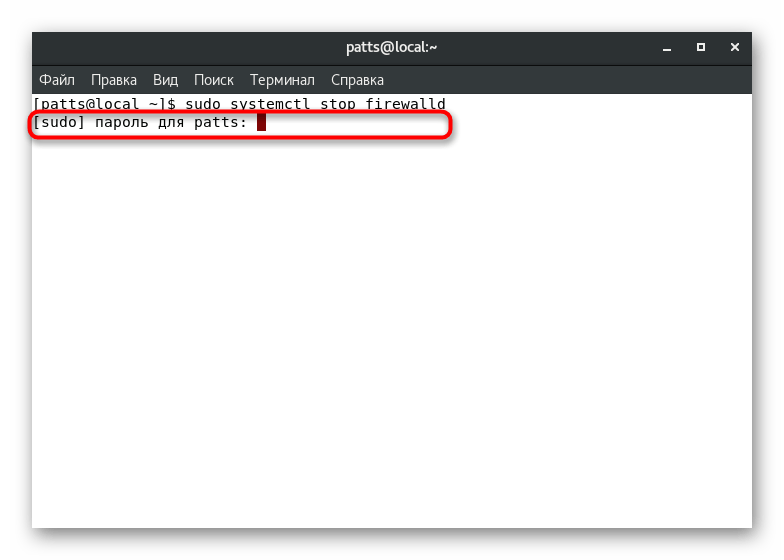
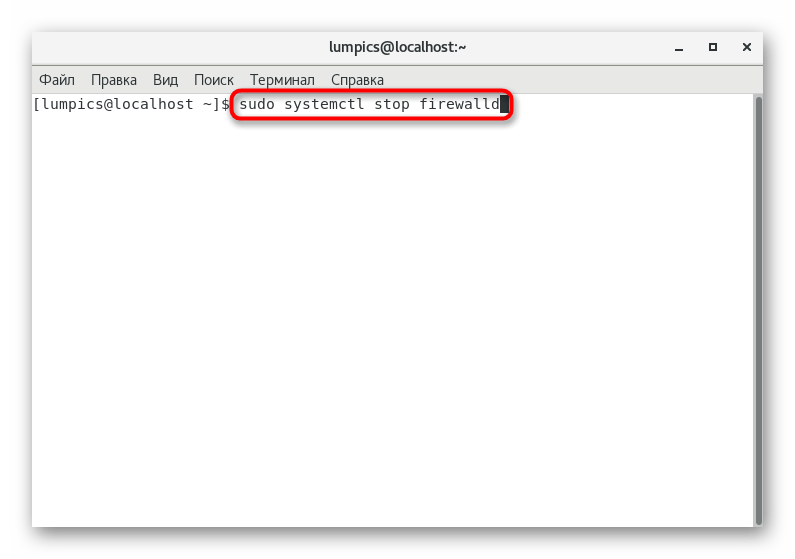
- Insert into input line
sudo systemctl stop firewalld
to stop the firewall. - Type the password to grant superuser rights. The characters you enter will not be displayed.
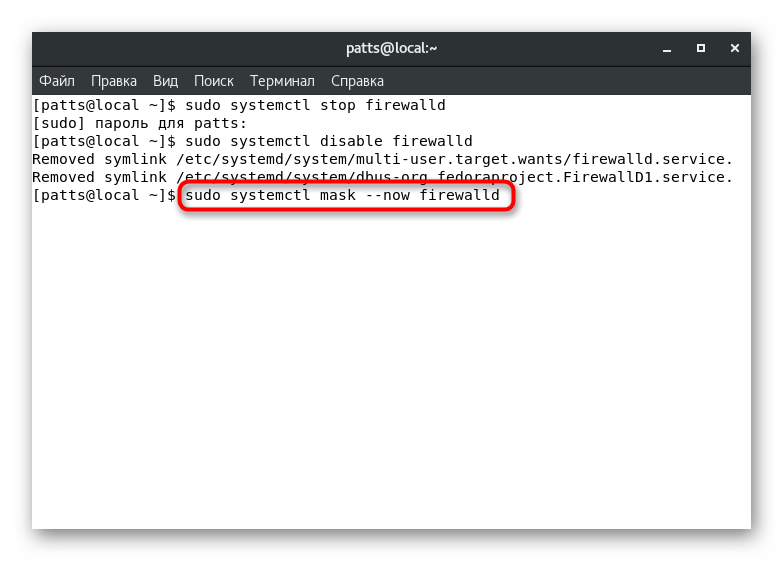
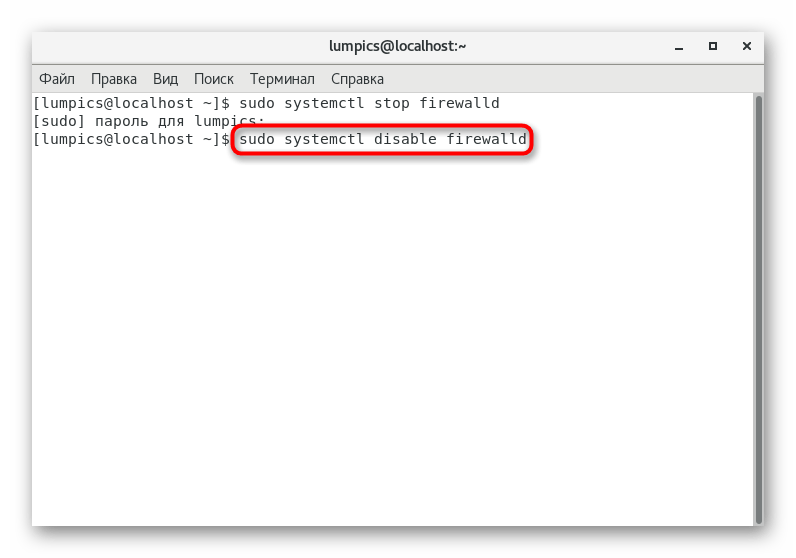
- Disable the service responsible for automatically launching the firewall at operating system startup by specifying
sudo systemctl disable firewalld
. - Prevent other services from starting FirewallD via command
sudo systemctl mask --now firewalld
. As a result, a line should appear with a notification about the creation of a new file «Created symlink from /etc/systemd/system/firewalld.service to /dev/null»
, indicating that the operation completed successfully.

As promised, we will additionally show commands that allow you to disable another popular Firewall in the CentOS system — iptables
. If you are using the IPv4 protocol, activate the following lines one by one:
sudo service iptables save
 sudo service iptables stop
 sudo chkconfig iptables off
For IPv6, the content changes slightly to:
sudo service ip6tables save
sudo service ip6tables stop
sudo chkconfig ip6tables off
Sometimes there are situations when even after disabling the firewall, network connection problems still remain. In this case, the trouble may be hiding in the SELinux security system. Disable it and see if this helps. Detailed instructions on this topic can be found in our other article at the following link.
Now you know about the available methods to disable the Firewall in CentOS 7. If you are not sure that this tool is the problem, you should not permanently disable it: first, it is better to use the first method and check the effectiveness.
- Opening ports in CentOS 7
- Questions and Answers

Almost all users of the CentOS 7 distribution install various tools into the system, for the correct operation of which it is necessary to open ports of certain numbers. This is required to ensure a normal connection with nodes and a secure exchange of information. The task is carried out by changing the rules of the firewall. Of course, each user can use a variety of firewalls, but the standard is iptables
. It is on his example that we propose to open ports by following the instructions below.
Opening ports is a simple task, because it requires only a few commands to be entered into the console. However, if you did not initially make additional settings with the firewall or use a third-party tool, you will have to additionally change important parameters. Therefore, we have divided our article into stages to make it easier for novice users to understand each step, and now let’s start with a direct installation iptables
in CentOS 7.
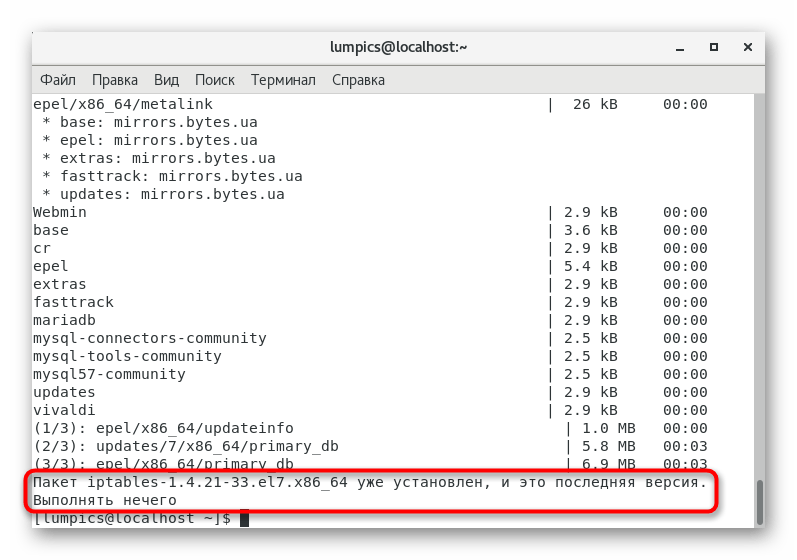
Step 1: Install or upgrade iptables
As mentioned above, iptables
on CentOS 7 it acts as the default firewall. If no changes have been made manually, you can safely skip this step and perform only the last step with installing the firewall utilities. If you need to check for updates or reinstall this tool, we recommend using the following guide.
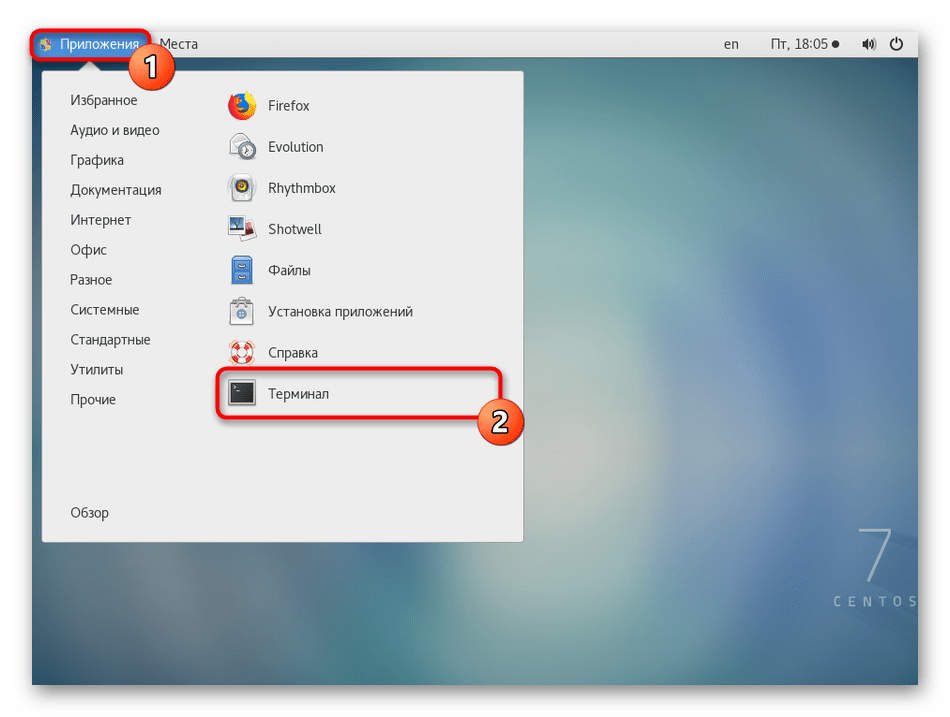
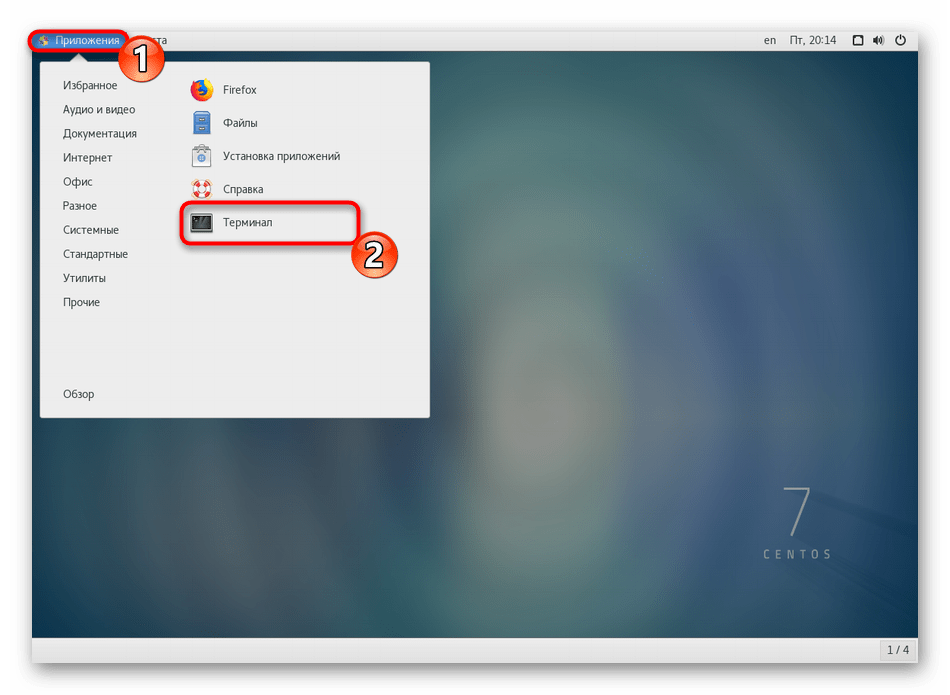
- All actions described today will be performed in “Terminal”
, so it all starts with running it. Use the hotkey for this Ctrl + Alt + T
or an icon added to the section «Favorites»
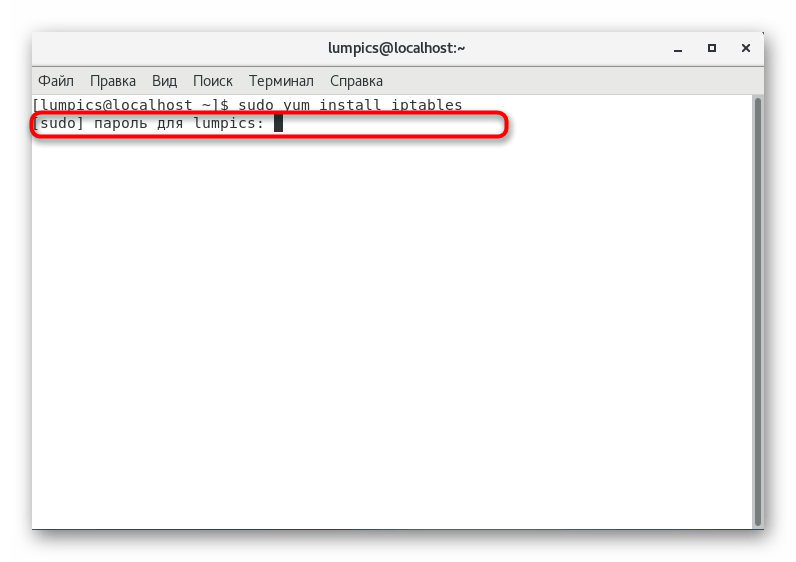
in the application menu. - Enter command here
sudo yum install iptables
, and then press the key Enter
. - To confirm this command, you will need to specify the superuser password. Please note that with this type of writing, the entered characters are not displayed.
- You will be notified that the installation or update is successful. If the latest version of iptables is already added to the operating system
, the screen will display the line “There is nothing to do”
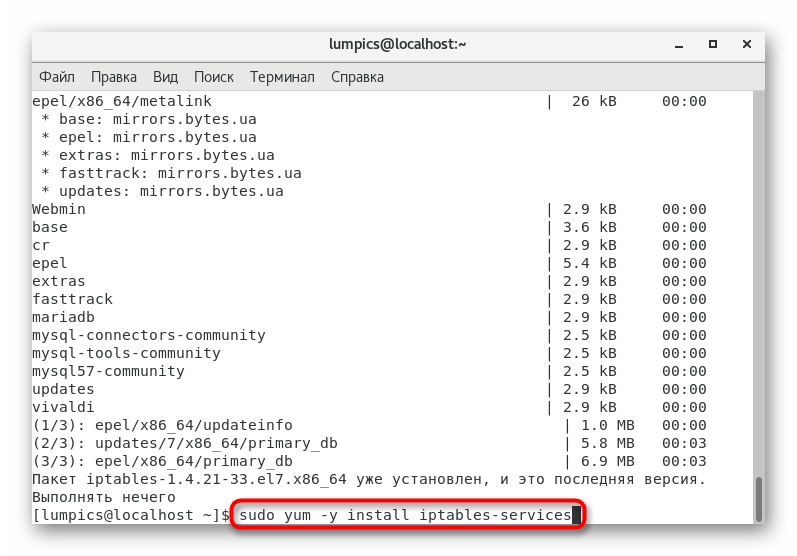
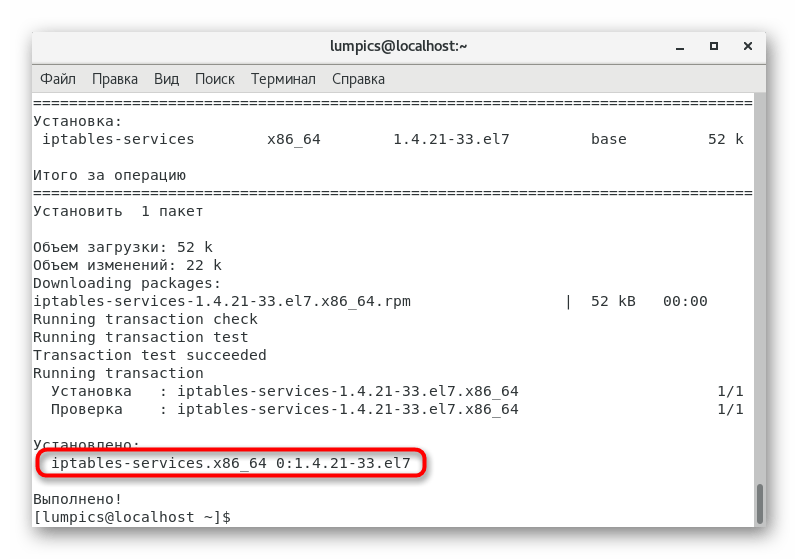
. - Finish this step with the command
sudo yum -y install iptables-services
. This will start the installation of the required services. - You can proceed to the next step if a message appears on the screen that the components have been added successfully.

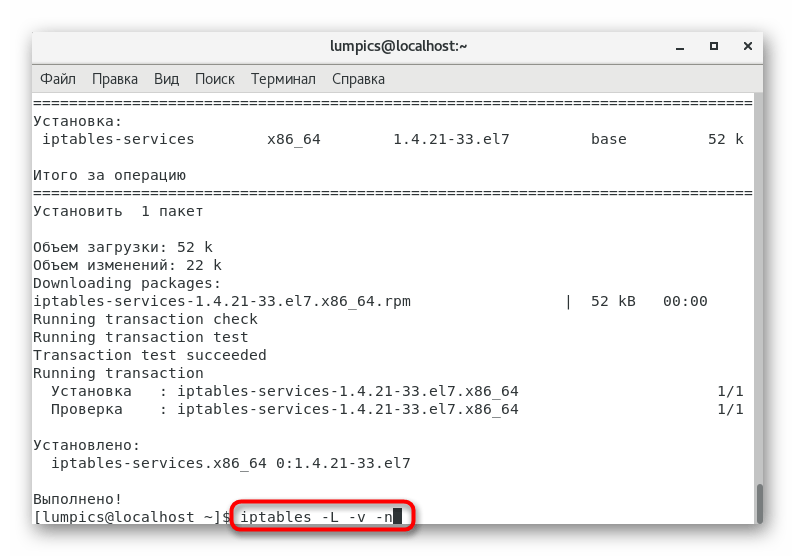
Step 2: Reset default firewall rules
If the system administrator or user has not previously configured iptables
, the default settings should be reset to avoid future rule compatibility issues. Additionally, you will need to specify the standard rules, ensuring the correct execution of incoming and outgoing connections. It all happens like this:
- Enter the command in the console
iptables -L -v -n
to view a list of current settings. - If they do not suit you, then you will have to reset and manually configure.
- Removing existing rules is done with just one line
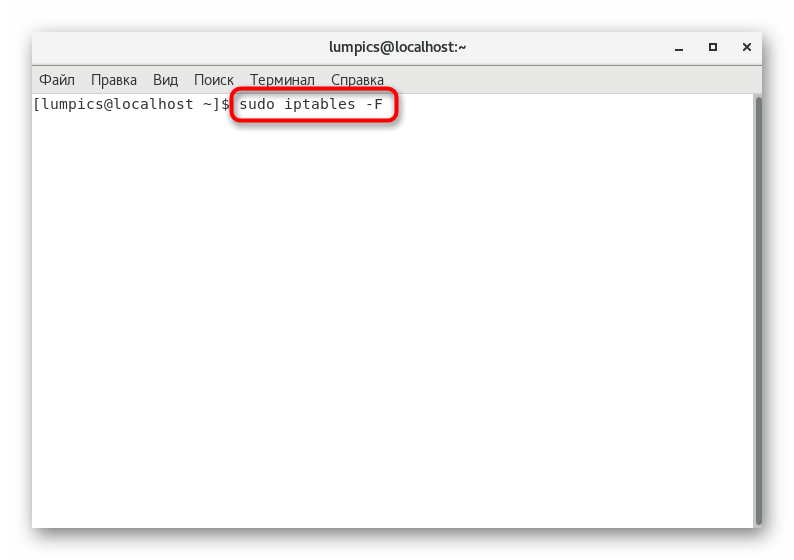
sudo iptables -F
. - Next, allow all server input by inserting
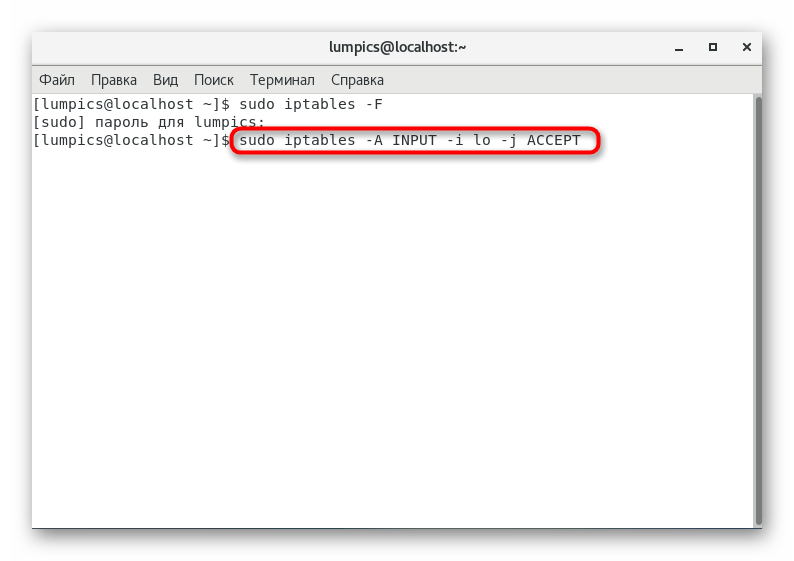
sudo iptables -A INPUT -i lo -j ACCEPT
. - Almost the same command applies to outgoing connections:
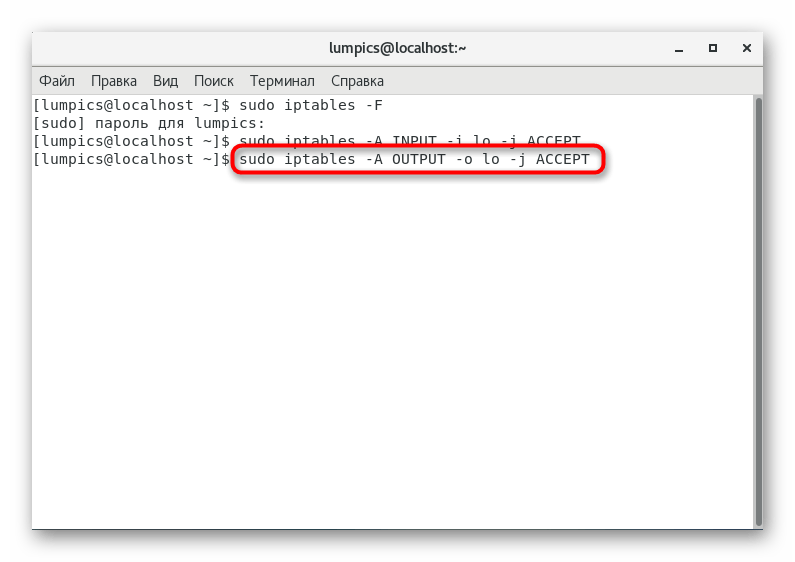
sudo iptables -A OUTPUT -o lo -j ACCEPT
. - It is recommended to restrict new connections and allow existing ones to ensure security and improve the operation of the previously mentioned rules. It happens through
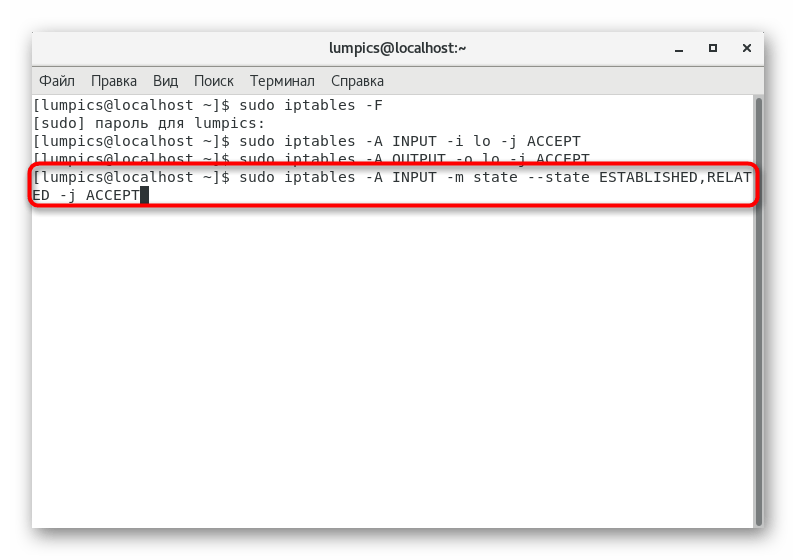
sudo iptables -A INPUT -m state --state ESTABLISHED,RELATED -j ACCEPT
.

All further settings of the considered utility are carried out manually by the user, including opening ports. We will talk about the last topic in the next steps, and the advanced configuration is not included in the scope of today’s material. Instead, we encourage you to read the dedicated tutorial on this topic using the link below.
Read more: Setting up iptables on CentOS 7
Step 3: Disable FirewallD
This step should be considered by those users who have previously installed FirewallD or it was added automatically. When configuring ports through iptables, this tool may interfere with the correct execution of the rules, so it will need to be deactivated.
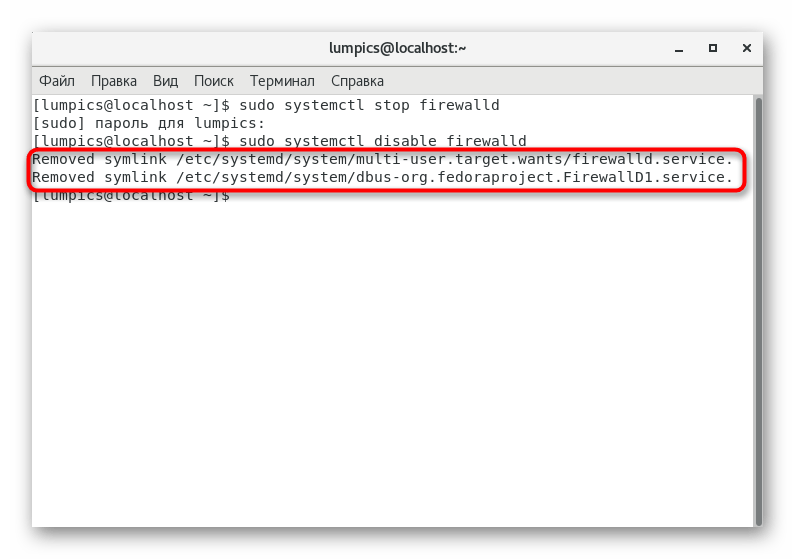
- First, stop the service through
sudo systemctl stop firewalld
. - Next, perform a complete shutdown using the command
sudo systemctl disable firewalld
. - You will be informed that the symlinks have been removed, hence FirewallD is not working from now on.
If you want to manually delete the folders that store the FirewallD settings, skipping the commands listed above, paste into “Terminal”
the following lines in turn and activate them.
rm '/etc/systemd/system/dbus-org.fedoraproject. FirewallD1.service'
rm '/etc/systemd/system/basic.target.wants/firewalld.service'
In the future, any user may need to activate and further configure FirewallD, especially when working with various web servers and utilities. We suggest doing this using the guide below.
Read more: Configuring Firewall in CentOS 7
Step 4: Open ports via iptables
It’s time to take the main action, which is what today’s article is devoted to. Above, we have done absolutely all the preparatory work in order to now open ports in CentOS 7. Now there should be no problems with this, so you can enter the following commands.
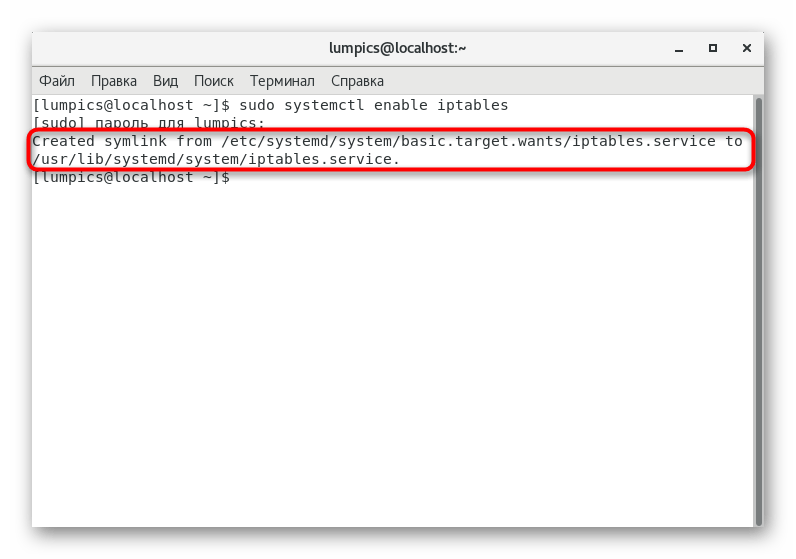
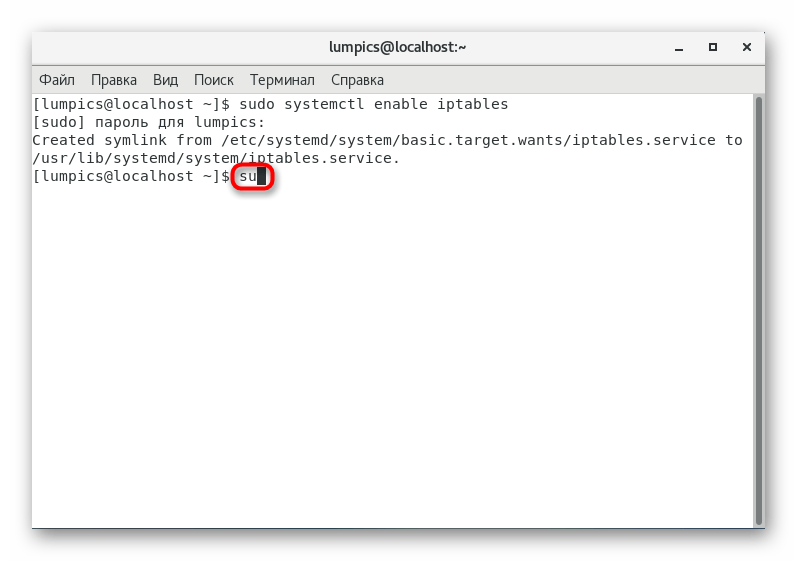
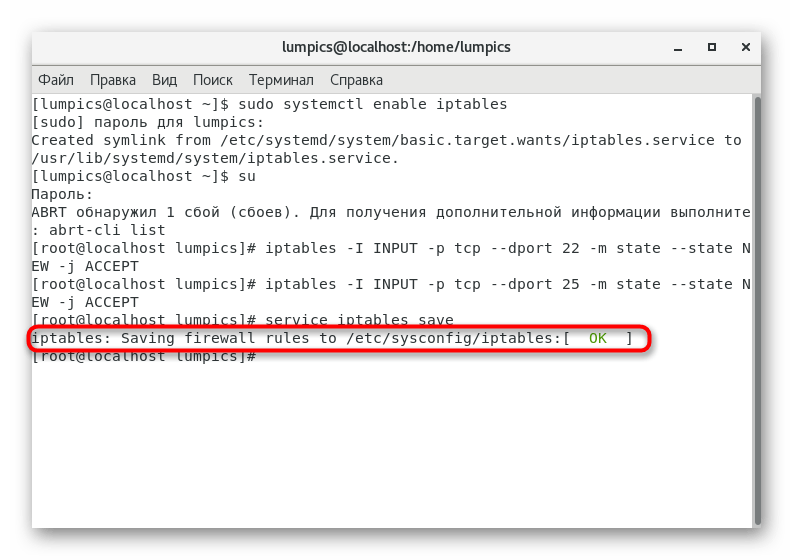
- Be sure to add the firewall to startup, so as not to start it manually all the time. The team will help with this
sudo systemctl enable iptables
. - You will be notified when a symbolic link is created.
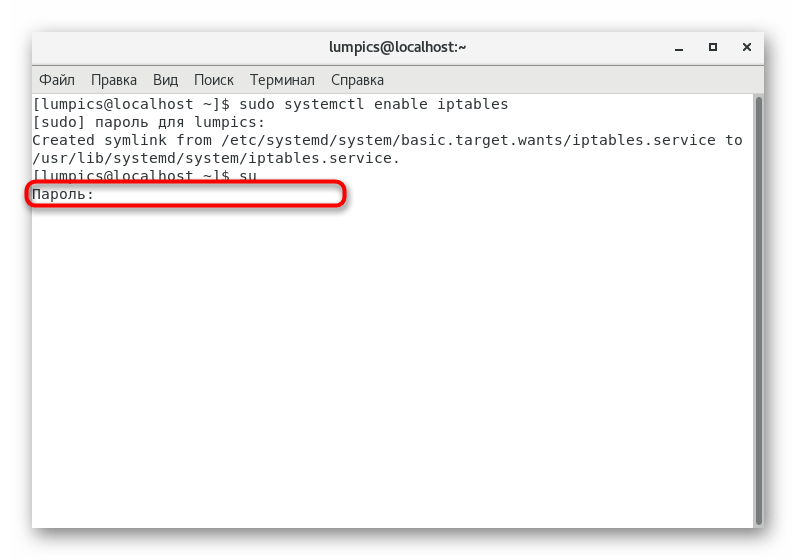
- Activate permanent superuser rights by entering
su
so that for each command of this terminal session it is not necessary to assign sudo
. - Confirm this action by writing your password.
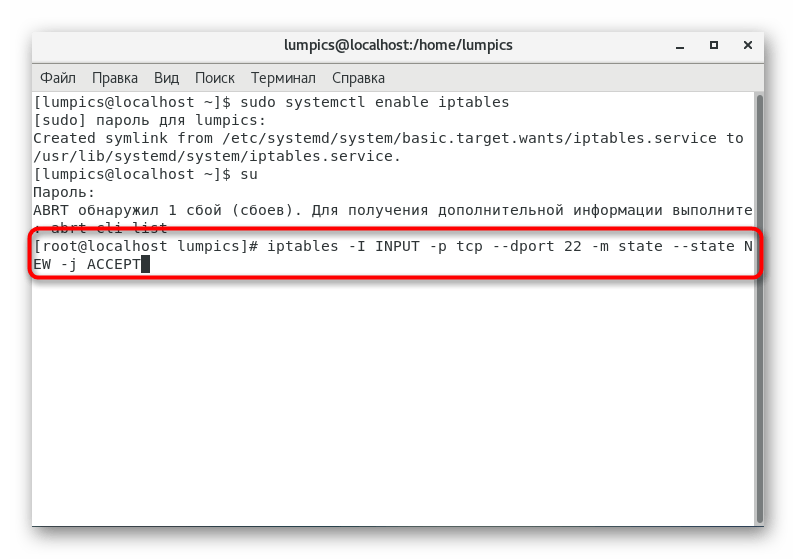
- Open port via command
iptables -I INPUT -p tcp --dport 22 -m state --state NEW -j ACCEPT
, where 22
replace with the desired number. - You can immediately open the next port, for example, under the number 25
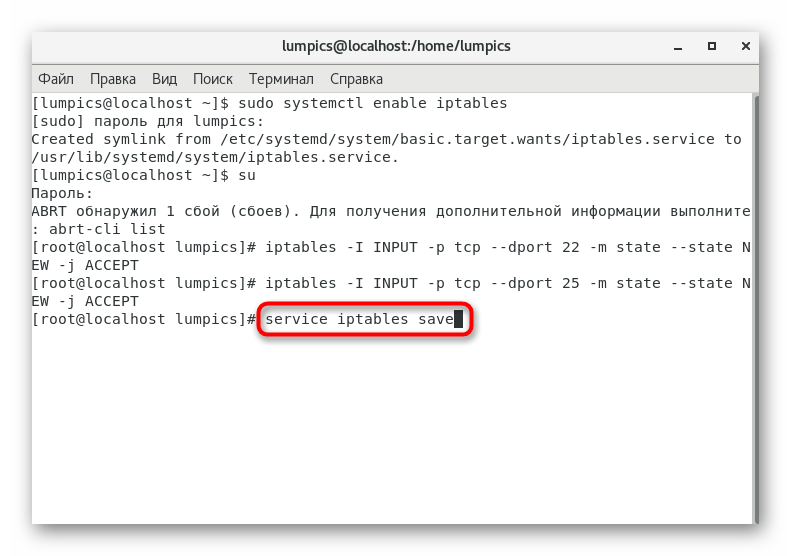
(SMTP server). To do this, enteriptables -I INPUT -p tcp --dport 25 -m state --state NEW -j ACCEPT
. - Save all changes by inserting a line
service iptables save
. - You will be notified that the configuration has been applied successfully.
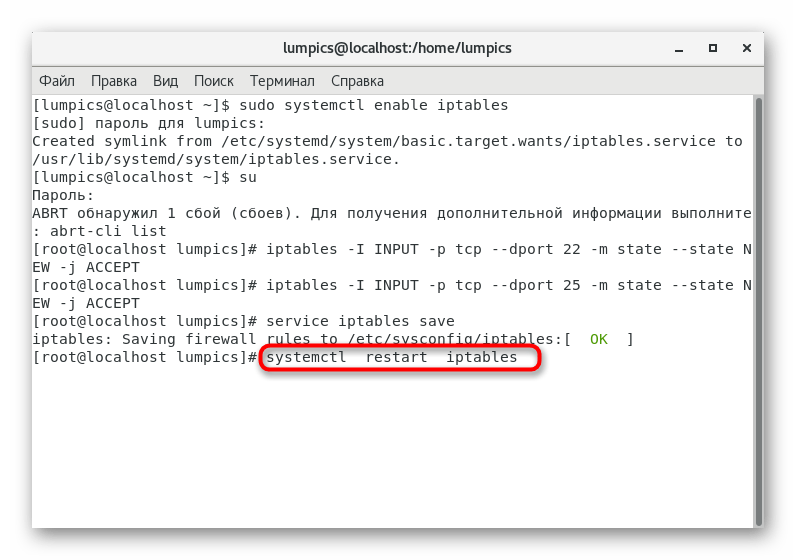
- Restart the firewall for all changes to take effect. This is done through the command
systemctl restart iptables
. - At the end we suggest using
sudo iptables -nvL
to explore all open ports.


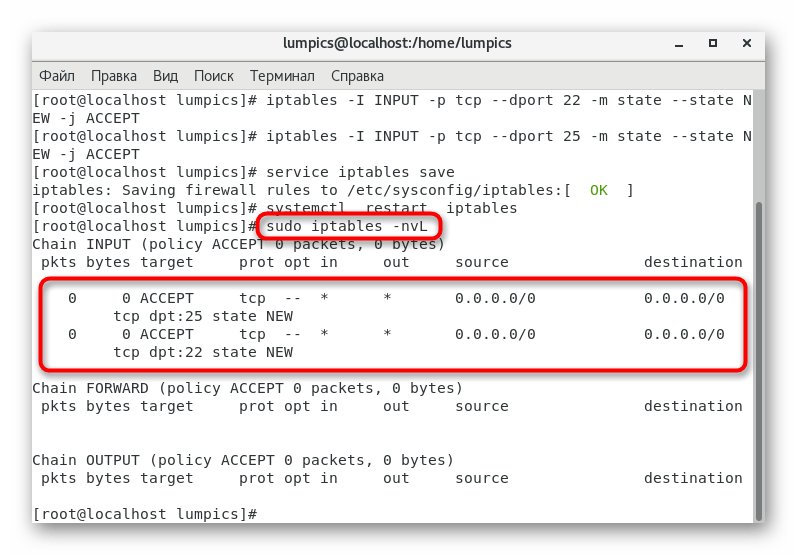
In this article, you learned everything about opening ports in CentOS 7. As you can see, it won’t take long, and all changes will be applied immediately after restarting the services. Use the commands discussed above, changing only the port numbers, so that everything goes well.
More articles on this topic:
Did the article help you?
- Setting up iptables in CentOS 7
- Questions and Answers

All operating systems based on the Linux kernel have a built-in firewall that controls and filters incoming and outgoing traffic based on rules set by the user or platform. In the CentOS 7 distribution, by default, this function is performed by the utility iptables
by interacting with the built-in netfilter firewall. Sometimes a system administrator or network manager has to configure the operation of this component by prescribing the appropriate rules. As part of today’s article, we would like to talk about the basics of configuration iptables
in the OS mentioned above.
The tool itself is available to work immediately after the installation of CentOS 7 is completed, but you will additionally need to install some services, which we will talk about later. The platform under consideration has another built-in tool that performs the function of a firewall called FirewallD. To avoid conflicts during further work, we recommend disabling this component. Read detailed instructions on this topic in our other material at the following link.
Read more: Disabling firewallD in CentOS 7
As you know, IPv4 and IPv6 protocols can be used in the system. Today we will focus on the example of IPv4, but if you want to configure for another protocol, you will need instead of the command iptables
in console use ip6tables
.
Installing iptables services
First of all, you should add additional components of the utility we are considering today to the system. They will help in setting up rules and other parameters. The download is carried out from the official repository, so it will not take much time.
- All further actions will be performed in the classic console, so launch it using any convenient method.
- The team is responsible for installing services
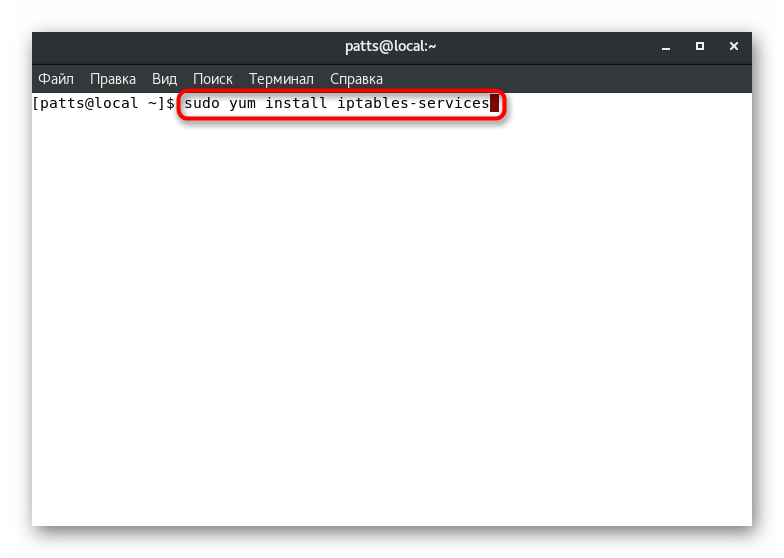
sudo yum install iptables-services
. Enter it and press the key Enter
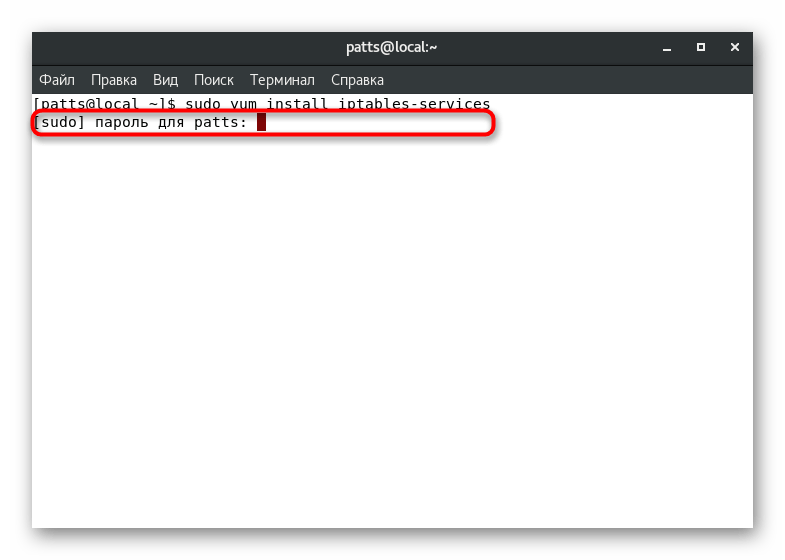
. - Confirm the superuser account by entering its password. Please note that when prompted sudo
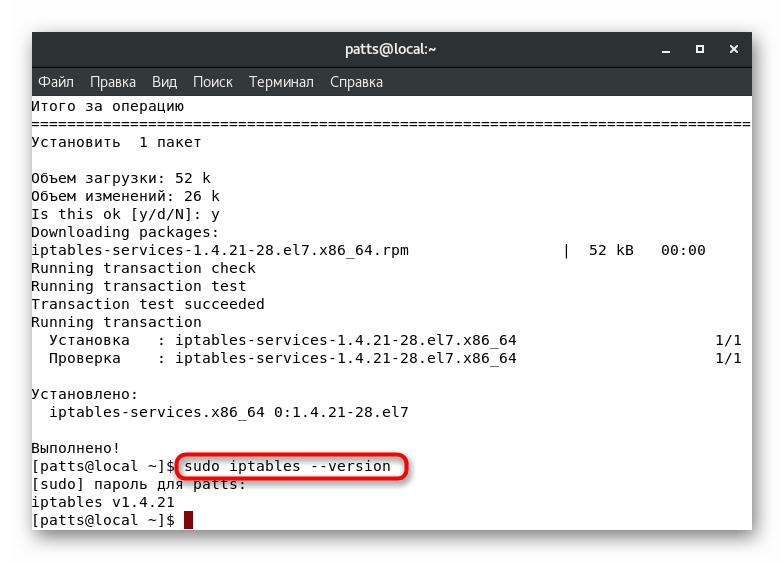
characters entered in the string are never displayed. - You will be prompted to add one package to the system, confirm this action by selecting y
. - After the installation is completed, check the current version of the tool:
sudo iptables --version
. - The result will appear on a new line.


Now the OS is completely ready for further firewall configuration through the utility iptables
. We suggest that you familiarize yourself with the configuration point by point, starting with service management.
Stop and start iptables services
Operation mode management iptables
required in cases where you need to check the effect of certain rules or simply restart the component. This is done using built-in commands.
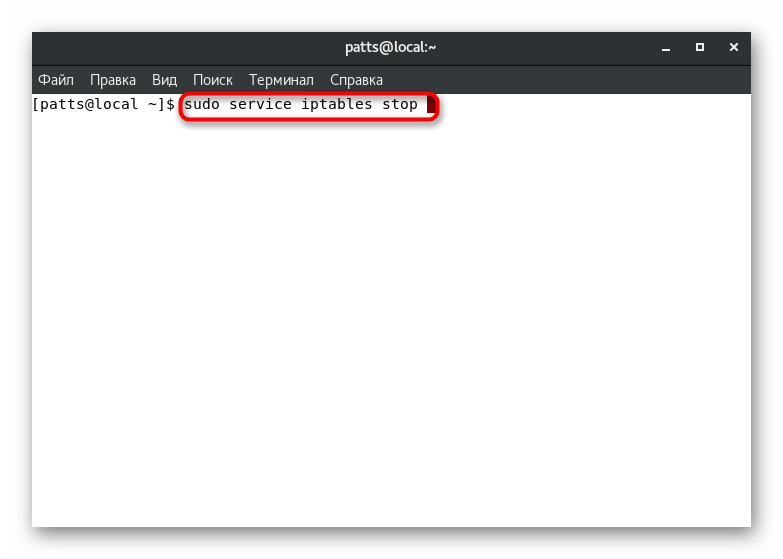
- Enter
sudo service iptables stop
and press the key Enter
to stop services. - Specify the superuser password to confirm this procedure.
- If the process is successful, a new line will be displayed indicating that changes have been made to the configuration file.
- Services are launched in almost the same way, only the line takes the form
sudo service iptables start
.
Such a restart, start or stop of the utility is available at any time, do not forget to return the reverse value when it is requested.
View and delete rules
As mentioned earlier, firewall management is done by manually or automatically adding rules. For example, some additional applications may access the tool by modifying certain policies. However, most of these actions are still done manually. Viewing a list of all current rules is available through the command sudo iptables -L
.
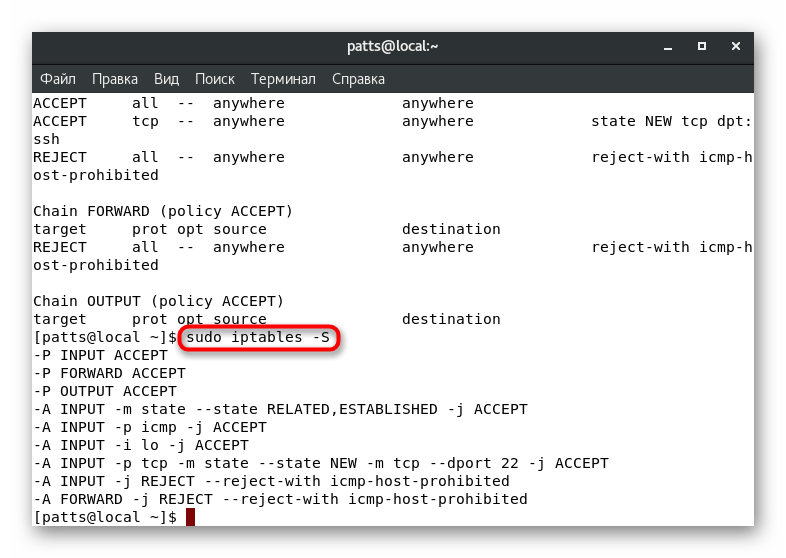
The displayed result will contain information on three chains: «INPUT»
, «OUTPUT»
and «FORWARD»
— incoming, outgoing and forwarded traffic, respectively.
You can check the status of all chains by entering sudo iptables -S
.
If the rules you see do not suit you, they are simply deleted. The entire list is cleared like this: sudo iptables -F
. After activation, the rules will be erased absolutely for all three chains.

When it is necessary to affect only policies from one chain, an additional argument is added to the line:
sudo iptables -F INPUT
sudo iptables -F OUTPUT
sudo iptables -F FORWARD
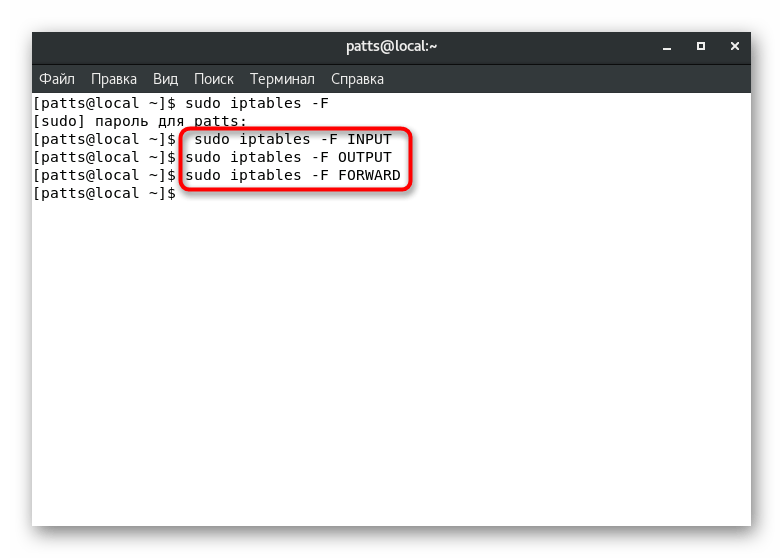
The absence of all rules means that currently no traffic filtering settings are applied to either side. Further, the system administrator independently sets new parameters using the same console, command, and various arguments.
Receiving and dropping traffic in circuits
Each circuit is configured separately to accept or block traffic. By setting a certain value, you can ensure that, for example, all incoming traffic will be blocked. To do this, the command must be sudo iptables --policy INPUT DROP
, where INPUT
— chain name, and DROP
— reset value.
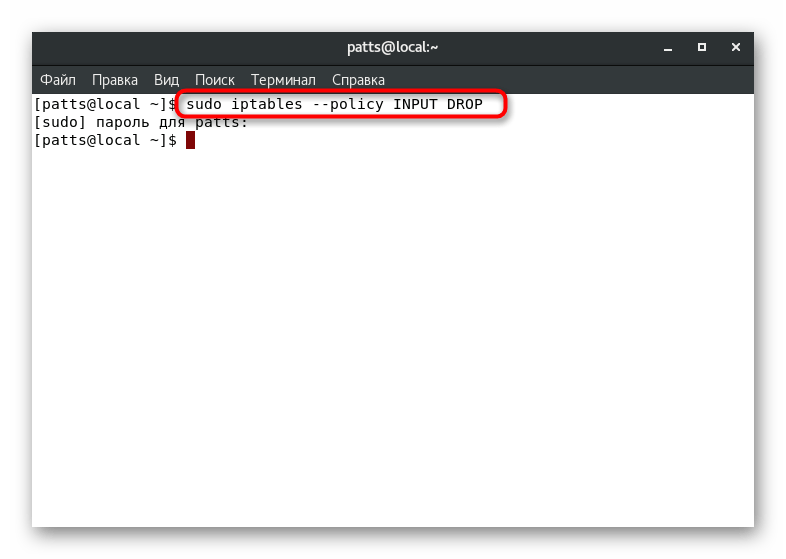
Exactly the same parameters are set for other circuits, for example, sudo iptables --policy OUTPUT DROP
. If it is necessary to set the value for receiving traffic, then DROP
changes to ACCEPT
and it turns out sudo iptables --policy INPUT ACCEPT
.
Allow and block ports
As you know, all network applications and processes work through a specific port. By blocking or allowing specific addresses, access to all network targets can be controlled. Let’s look at port forwarding using the example 80
. In «Terminal»
it will be enough to enter the command sudo iptables -A INPUT -p tcp --dport 80 -j ACCEPT
, where -A
— adding a new rule, INPUT
— chain indication, -P
is the protocol definition, in this case TCP, and —dport
— port of destination.
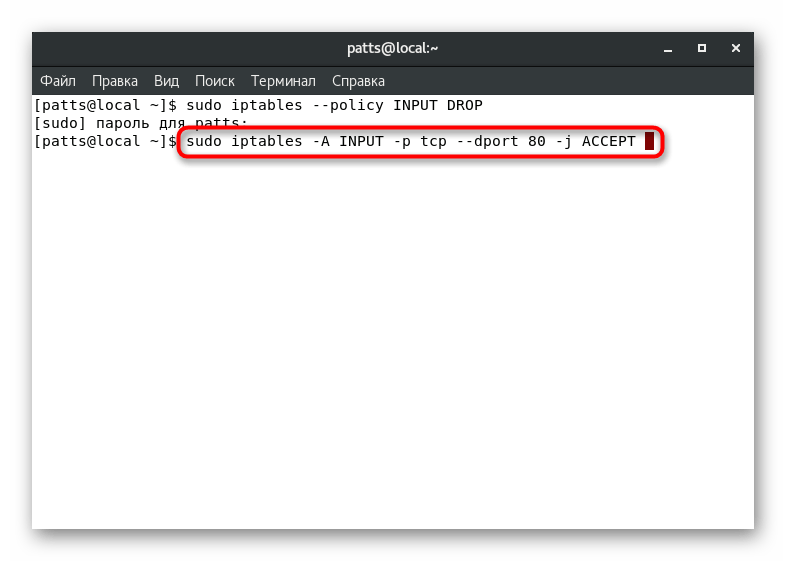
Exactly the same command applies to port 22
, which is used by the SSH service: sudo iptables -A INPUT -p tcp --dport 22 -j ACCEPT
.
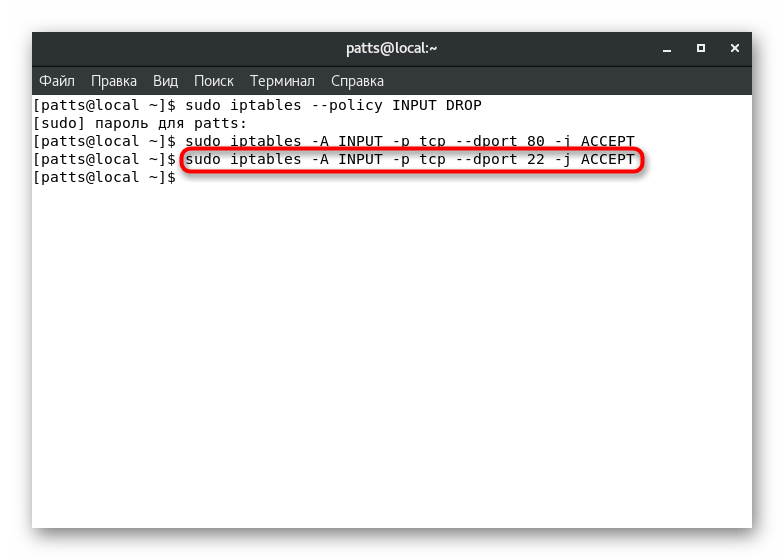
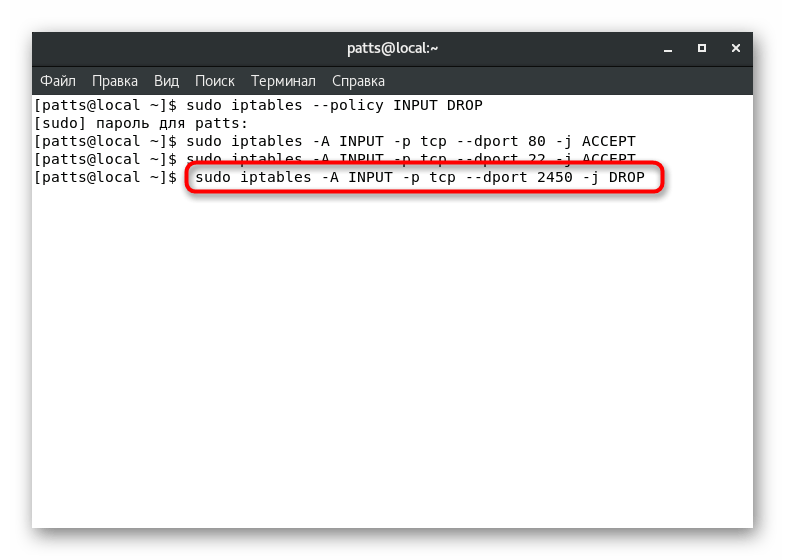
To block the specified port, a string of exactly the same form is used, only at the end ACCEPT
changes to DROP
. The result is, for example, sudo iptables -A INPUT -p tcp --dport 2450 -j DROP
.

Blocking occurs according to the same principle, changing the value at the end ACCEPT
on DROP
. Then it turns out, for example, sudo iptables -A INPUT -p tcp -s 12.12.12.0/24 --dport 22 -j DROP
.

ICMP (Internet Control Message Protocol) is a protocol that is part of TCP / IP and is used to send error and emergency messages when working with traffic. For example, when the requested server is not available, it is this tool that performs service functions. Utility iptables
allows you to block it through the firewall, and you can do this with the command sudo iptables -A OUTPUT -p icmp --icmp-type 8 -j DROP
. It will block requests from and to your server.
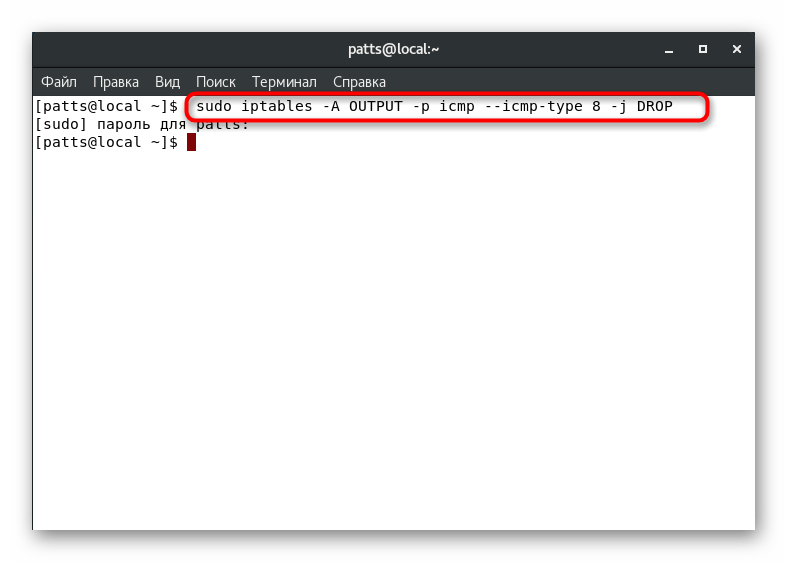
Incoming requests are blocked a little differently. Then you need to enter sudo iptables -I INPUT -p icmp --icmp-type 8 -j DROP
. After activating these rules, the server will not respond to ping requests.

Prevention of unauthorized actions on the server
Sometimes servers are subjected to DDoS attacks or other unauthorized actions by intruders. Properly configuring the firewall will help protect yourself from this kind of hacking. To begin with, we recommend setting the following rules:
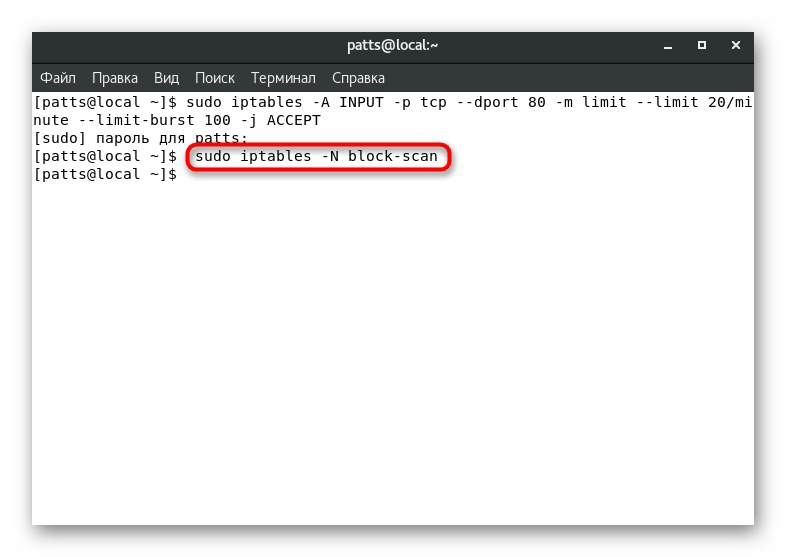
- Type in console
iptables -A INPUT -p tcp --dport 80 -m limit --limit 20/minute --limit-burst 100 -j ACCEPT
, where —limit 20/minute
— restriction on the frequency of positive results. You can specify the unit of measurement yourself, for example,/second, /minute, /hour, /day
. —limit-burst number
— limit on the number of skipped packets. All values are set individually according to the preferences of the administrator. - Next, you can disable scanning of open ports to remove one of the possible causes of hacking. Enter the first command
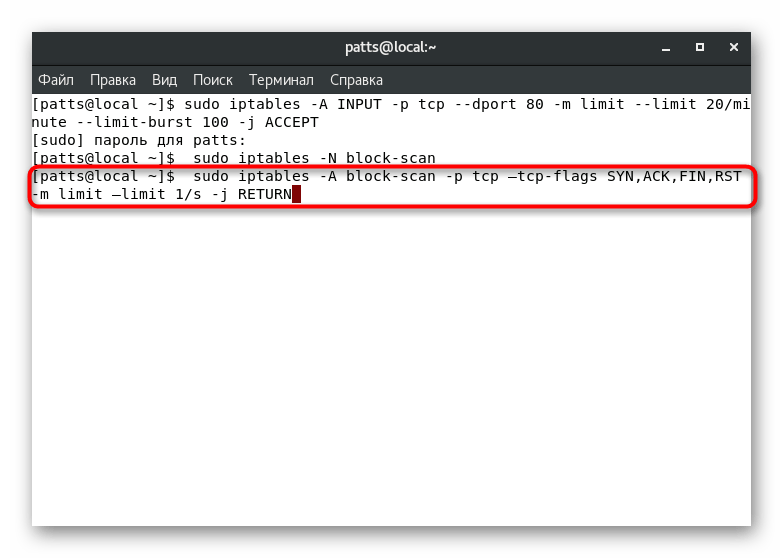
sudo iptables -N block-scan
. - Then specify
sudo iptables -A block-scan -p tcp —tcp-flags SYN,ACK,FIN,RST -m limit —limit 1/s -j RETURN
. - The last third command is:
sudo iptables -A block-scan -j DROP
. Expression block-scan
in these cases, the name of the circuit used.


The settings shown today are just the basics of the firewall management tool. In the official documentation of the utility, you will find a description of all available arguments and options and will be able to configure the firewall specifically for your needs. The standard security rules that are used most often and in most cases are mandatory have been discussed above.
How do I disable firewall on Linux 7?
How to Stop and Disable Firewalld on CentOS 7
- Disable Firewalld. To disable firewalld, run the following command as root: systemctl disable firewalld.
- Stop Firewalld. To stop firewalld, run the following command as root: systemctl stop firewalld.
- Check the Status of Firewalld. And finally, to check the status of firewalld, run the following command as root:
How do I know if my firewall is running CentOS 7?
How To Check firewalld Status
- Start by booting up your CentOS 7 server and checking whether firewalld is running. .
- If the output reads Active: active (running) , the firewall is active. .
- If the output reads Active: inactive (dead) , the firewall is not running.
How do I know if iptables is running?
You can, however, easily check the status of iptables with the command systemctl status iptables. service or maybe just the service iptables status command — depending on your Linux distribution. You can also query iptables with the command iptables -L that will list the active rules.
How to start/stop and enable/disable the FirewallD service
If you’re using or versions, you should follow below instructions to manage FirewallD service.
Start Firewall Service
# systemctl start firewalld
Stop Firewall Service
# systemctl stop firewalld
Check the Status of FirewallD
# systemctl status firewalld
Check the State of FirewallD
# firewall-cmd --state
As an alternative, you can disable the firewalld service so that it doesn’t apply rules to packets and enable ones needed again.
Disable Firewall Service
# systemctl disable firewalld
Enable Firewall Service
# systemctl enable firewalld
Mask FirewallD Service
# systemctl mask firewalld
Alternatively, you can mask the firewall service, which creates a symbolic link firewall.service to /dev/ null, thus disabling the service.
Unmask FirewallD Service
# systemctl unmask firewalld
This is reverse of masking the service. This removes the symlink of the service created during masking, thus re-enabling the service.
How do I unmask Firewalld?
How To mask And unmask Firewalld Service on Rhel/Centos 7. X
- Prerequisite.
- Install Firewalld. # sudo yum install firewalld.
- Check the Status of Firewalld. # sudo systemctl status firewalld.
- Mask the Firewall on system. # sudo systemctl mask firewalld.
- Start the firewall Service. .
- Unmask Firewalld service. .
- Start Firewalld Service. .
- Check Status of Firewalld Service.
How do I disable iptables in Linux 7?
How to Disable the Firewall for Red Hat Linux
- Stop the ipchains service. Type: # service ipchains stop.
- Stop the iptables service. Type: # service iptables stop.
- Stop the ipchains service from starting when you restart the server. Type: # chkconfig ipchains off.
- Stop the iptables service from starting when you restart the server. .
- Reboot the PXE/DHCP server.
How do I know if I have iptables in RHEL 7?
How to list all iptables rules on Linux
- Open the terminal app or login using ssh: ssh user@server-name.
- To list all IPv4 rules : sudo iptables -S.
- To list all IPv6 rules : sudo ip6tables -S.
- To list all tables rules : sudo iptables -L -v -n | more.
- To list all rules for INPUT tables : sudo iptables -L INPUT -v -n.
How do I view iptables on CentOS 7?
Install and configure iptables
- Install the iptables-services package (if it is not already installed) by running the following command: $ yum install iptables-services.
- Enable the service to start at boot time by running the following commands: $ systemctl enable iptables $ systemctl enable ip6tables.
Как запустить / остановить и включить / отключить службу IPtables
On / and iptables firewall comes as pre and later, the service can be installed via:
# yum install iptables-services
Start Iptables Service
  # systemctl start iptables
# service iptables start
Stop Iptables Service
  # systemctl stop iptables
# service iptables stop
Disable Iptables Service
  # systemctl disable iptables
# service iptables save
# service iptables stop
Enable Iptables Service
  # systemctl enable iptables
# service iptables start
Check Status of Iptables Service
# systemctl status iptables
# service iptables status Enable Ufw Iptables Firewall
$ sudo ufw enable
$ sudo ufw enable
Disable Ufw Iptables Firewall
$ sudo ufw disable
Check Status of Ufw Iptables Firewall
# sudo ufw status
# sudo ufw status
# iptables -L -n -v
How do I check if a firewall is blocking a port Linux?
You can first try to use ping to check if there is network connectivity.
then do a telnet to the host name for a specific port.
If the firewall to the specific host and port is enabled, then it will make a connection. otherwise, it will fail and display an error message.
How do I disable Firewalld and enable iptables?
Disable the FirewallD Service and Enable the Iptables Services
sudo systemctl enable iptables.
sudo systemctl enable ip6tables.
How permanently disable firewall in Linux?
How to permanently disable firewall in Red Hat Linux
Login as the root user.
Next enter the following three commands to disable firewall. service iptables save service iptables stop chkconfig iptables off.
Disable IPv6 firewall. service ip6tables save service ip6tables stop chkconfig ip6tables off.Can I disable Firewalld?
Permanently Disable firewalld
To permanently disable the firewall on CentOS 7, you will need to stop the firewall service and then disable it altogether. This is also the same command we used to temporarily stop firewalld. Check firewall status. The output should state that the service is inactive.
How do I permanently disable the firewall in RHEL 7?
- First, stop the FirewallD service with: sudo systemctl stop firewalld.
- Disable the FirewallD service to start automatically on system boot: sudo systemctl disable firewalld. .
- Mask the FirewallD service which will prevent the firewall from being started by other services: sudo systemctl mask --now firewalld.
