
In the previous article,
Tunneling: Part 1 — PPTP Server + EoIP(IPsec)
We set up a PPTP server, created tunnel interfaces and prepared settings for connecting a client router.
Now let’s connect our client router to this server.
Moving on to PPP interfaces
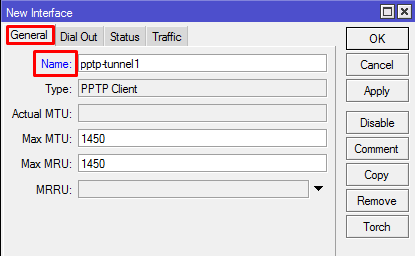
Add a PPTP client interface
Set up a tunnel interface to connect to a PPTP server.
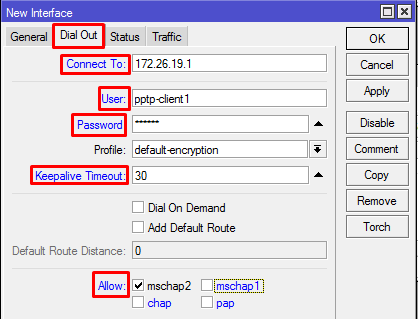
Recall that on the PPTP server side, we created a PPP profile pptp-client1 with a password.
In the field, we substitute the static IP of the router with the PPTP server received from the mobile provider.
Checking the operation of the tunnel, everything works!
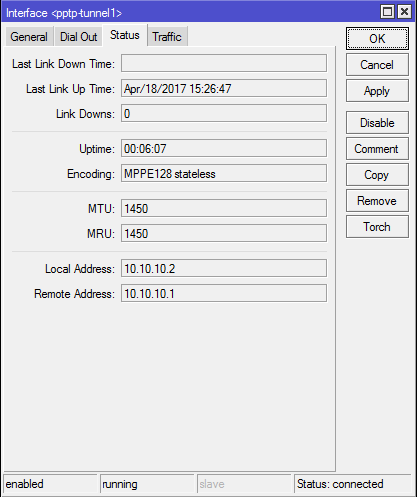
PPTP client tunnel setup is completed.
EoIP tunnel + IPsec encryption
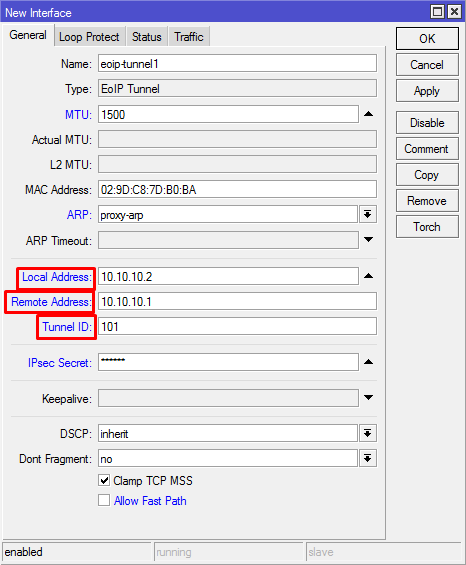
Just like in the first part, we create a similar EoIP tunnel.
We will not describe the process in detail, because everything is identical, except for the fields and they will swap places.
Don’t forget the ID() of our EoIP tunnel!!
Similarly, we add the EoIP tunnel interface to the network bridge.
eoip-tunnel1 1500 proxy-arp 10.10.10.2 10.10.10.1 101 0123456789 no
/interface bridge port eoip-tunnel1 bridge1
Creation of the second side of the EoIP tunnel is completed.
Local network and blocking of DHCP requests to the tunnel.
We determined in the first article that we would separate local IP addresses so that they would not be repeated in our facilities.
Accordingly, we will configure the local network of our client router to work independently of the main router and at the same time together with it.
3.1. Setting up the local network of the GTX router with a PPTP client.
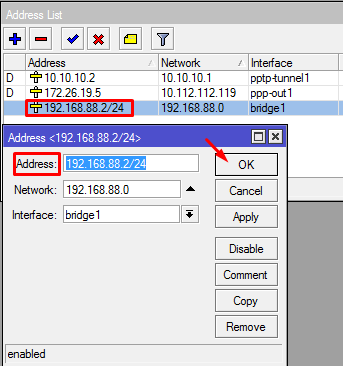
Change the local IP address of the router to 192.168.88.2 (If you remember, the main one is 192.168.88.1, IP addresses cannot be repeated)
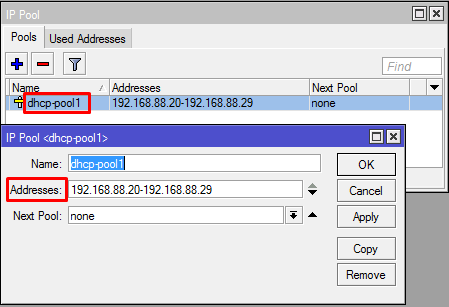
We also change the group of distributed IP addresses for the DHCP server on this router
Set up a range of IP addresses (192.168.88.20-192.168.88.29). You can choose your quantity by changing the range.
3.2. DHCP Request Filtering
Let’s block DHCP packets in the same way as in the first part.
If you forgot how, refer to the first part of the article.


Console equivalent: dhcp-pool1 192.168.88.20-192.168.88.29/interface bridge filter forward ip udp 6768 drop
After carrying out all the procedures, we will see something like this list.
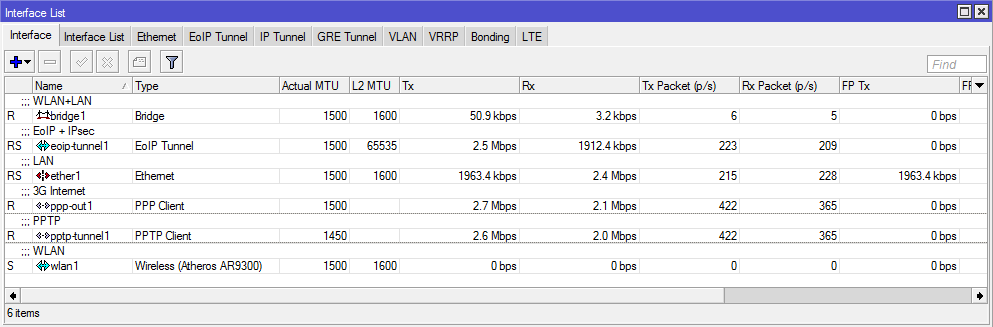
All interfaces must be active, you can try to scan the local network for PCs, printers and other devices.
Related articles: How to connect to the GTX router? How to send commands to the terminal (console) of the router?
Additional information: TELEOFIS GTX300/400 routers. Quick start guideRouter models on the TELEOFIS websiteFirmware and utilities for GTX routers
An overview article on the use of modern private tunnels in routers of a popular Latvian brand. I will talk about how to set up a vpn server in mikrotik based on technologies such as l2tp, ipsec, openvpn, pptp, gre and eoip. Along the way, I will briefly talk about what these technologies are, how they differ, and also compare the performance of Mikrotik with all the indicated tunnels.
You can learn how to set up MikroTik from scratch or systematize your existing knowledge in an advanced MikroTik administration course. The author of the course, a certified MikroTik trainer Dmitry Skoromnov, personally checks laboratory work and monitors the progress of each of his students. Three times more information than in the MTCNA vendor program, over 20 hours of practice and access forever.
This article is part of a single series of articles about Mikrotik.
- Introduction
- Mikrotik vpn server options
- Setting up a l2tp tunnel in mikrotik
- L2tp client
- Set up ipsec
- Setting up a pptp server in mikrotik
- Pptp client
- Setting up openvpn server in Mikrotik
- Openvpn client
- EOIP Tunnel + Ipsec Setup
- GRE tunnel + Ipsec in mikrotik, creation and configuration
- Speed comparison of L2tp, Pptp, EoIP, GRE and OpenVPN tunnels
- Conclusion
- Mikrotik online courses
- Did the article help? Subscribe to the author’s telegram channel
- Configuring IPIP, GRE and EoIP tunnels
- Important
Introduction
I want to draw your attention right away that this article will be more of an overview than a transfer of real experience, since I myself most often use openvpn as a vpn server. Nevertheless, I also had to deal with vpn in Mikrotik. I set up both pptp servers to connect remote clients, and l2tp to combine two or more Mikrotiks into a common private network. Mostly by default, without delving into the subtleties of the settings.
Today I want to consider this issue more carefully and see what Mikrotik offers out of the box for setting up vpn connections. I want to share my research with you by writing a short review on the topic of organizing a vpn server in mikrotik. And along the way, I want to collect feedback and corrections on the topic of what was written in order to strengthen my knowledge. In the comments to my articles, I draw a lot of advice, for which I am grateful to all who wrote useful things. So comments, additions and corrections are categorically welcome.
For those who want to have a good understanding of networks, but for some reason still don’t know how to do it, I recommend this series of articles — networks for the smallest. Also, if you are not very familiar with Mikrotik, I recommend my article on setting up Mikrotik from scratch.
Mikrotik vpn server options
Everything is complicated with vpn server options in Mikrotik 🙂 In the sense that there are many vpn implementations, which is not so easy to choose if you do not understand network technologies in detail. I don’t know much about them, but I think I get the gist a little. I will try to explain to you in my own words what the differences are.
There are 2 fundamentally different solutions for organizing connections between two Mikrotiks and external subscribers:
I’ll tell you a little more about each type of vpn connections separately.
From everything written, we can draw the following conclusion. In general, it is best to use vpn based on l2tp + ipsec in Mikrotik. Main reasons:
If you need maximum performance without encryption, then build connections between networks or offices using EOIP Tunnel — Mikrotik’s proprietary development.
Next, I will show you how to set up all the described tunnels, except for SSTP, and I will take speed measurements for comparison. My test bench of two Mikrotik RB951G-2hnD will have the following settings.
Let’s start setting up and testing vpn connections in mikrotik.
Setting up a l2tp tunnel in mikrotik
First, let’s set up a simple l2tp tunnel without encryption and measure the speed. To set up l2tp vpn in mikrotik, follow the steps below.
Now start the l2tp server. Go to PPP and click on the L2TP Server button.
Set up settings for l2tp server. do not enable ipsec yet.
VPN server is configured. Now we will create a permanent interface for it in order to create static routes based on it. Go to Interfaces and create L2tp Server Binding.
I did not consider the issue of configuring the firewall, because I do not want to inflate an already voluminous article. This is not directly related to this topic. Read more about setting up a firewall separately at the link provided. Here I will only indicate what needs to be opened on the firewall in order to correctly configure l2tp.
Separately, we add one more rule that allows the ipsec-esc protocol.
Everything is ready on the server. We are going to configure the l2pt client on a remote Mikrotik.
L2tp client
Everything is quite simple here. Go to PPP and add L2TP Client. Specify the settings that were previously set on the server.
We add a static route so that the clients of this router know where to contact subscribers of the remote local network for vpn.
That’s all. We set up l2tp on a remote mikrotik and thus connected 2 local networks using vpn. In the list of ip addresses with an active l2tp connection on the server and client, you should see ip addresses from the range specified on the server for the vpn network — 10.10.5.1-10.10.5.100. Now you can ping the opposite networks from both networks.
I have laptops connected to both Mikrotiks for the test. Now I will measure the connection speed using iperf3. Behind the m-remote router on a laptop 10.30.1.254 I start the server, and on 10.20.1.3 the agent. Run vpn connection speed test:
Average speed 194 Mbps. Frankly, I did not understand why such a low speed. My test bench is assembled on two Mikrotik routers and a Gigabit Mikrotik switch between them. I expected to see something in the region of 500 Mbps. Let me remind you that the tunnel is not yet encrypted. At the same time, the processor load on the routers was in the region of 90-95%. That is, in fact, the ceiling of these pieces of iron.
Now let’s try to enable ipsec encryption and measure the speed with it.
Set up ipsec
I’ve been stuck with setting up ipsec for l2tp for a while. There are many instructions on the net, but they are all outdated. As it turned out, in the latest firmware versions, starting ipsec in default settings is not easy, but very simple. To do this, you just need to specify Use IPsec — yes in the l2tp server properties and set a password.
All necessary ipsec settings will be created automatically. On the agent, do the same — enable ipsec encryption and specify a password.
After connecting the l2tp client, you will see similar lines in the log:
In the same place, in the Remote Peers section, you can see the list of remote clients for which ipsec encryption works, see the algorithms used. All default ipsec settings live in this section. You can view them, edit or add new profiles. By default, the sha1 authorization algorithm and AES encryption are used. You can change these settings if you are familiar with the topic. I will not be smart, I did not dig the topic of encryption. I don’t know which algorithms are the fastest and most secure.
Let’s test l2tp + ipsec vpn connection speed.
I got it like this — 26 Mbps on average. At the same time, the processor load is 100%. Not much. These pieces of iron for encrypted channels are very poorly suited. In these tests, they are not loaded with anything other than the test itself. In real conditions, the speed will be even lower.
Done with vpn settings based on l2tp + ipsec. Let’s continue setting up other vpn tunnels and compare their speed.
Setting up a pptp server in mikrotik
This profile contains the default encryption settings, in which it is disabled. Let’s first check the speed of the vpn channel without them. Create a new user for a remote pptp connection.
Turn on the pptp server in the PPP section.
Now let’s create a PPTP Server Binding in the Interface List by analogy with the previous section.
And finally, we add a static route to the remote network via a pptp connection.
The pptp server setup is finished. On the firewall, you will need to open the following things for incoming connections from the external interface:
Let’s set up the pptp client.
Pptp client
We go to a remote router and set up a connection through a pptp client there. We go, as usual, to the PPP section and add the PPTP Client. On the General tab, we do not touch anything, but on Dial Out we indicate the pptp server address and the username to connect to.
Adding a static route to a remote office via vpn tunnel.
Everything is ready. We activate the pptp connection and try to ping addresses on the local network. You can make sure that encryption is disabled in the pptp connection status on the client.
Now let’s check the speed of the vpn connection via pptp.
The same 194 Mbps as unencrypted l2tp at 100% CPU usage. In general, it was a little strange to see exactly the same numbers. I tested several times, but everywhere the same result was stably. Without encryption, there is no difference in speed between l2tp and pptp connections.
Check the status of the client that the encryption is working.
I’m testing the speed of a vpn connection via pptp with encryption enabled.
It turned out to be an average of 71 Mbps. Not a bad result compared to ipsec encryption in l2tp. As I said earlier, a pptp server is well suited where encryption is either not needed at all, or it is possible that encrypted traffic will be decrypted. But at the same time, it is still closed by encryption and everyone passing through will not be able to see anything. You need to at least take a traffic dump and somehow select a key from a dictionary or brute force. I don’t know exactly how this works in practice. Didn’t study the issue.
Now let’s move on to the openvpn server in Mikrotik. It is very curious to look at the speed tests of this type of vpn connections.
Setting up openvpn server in Mikrotik
There is nothing complicated in setting up an openvpn server on mikrotik, except for the nuance with certificates. To someone who has never worked with them, everything may seem too confused. In addition, Mikrotik itself does not have any means for creating server and client certificates. Third party utilities must be used. If you have a linux machine, you can follow my instructions for creating certificates for openvpn on linux.
Perform the installation as an administrator and specify a component called EasyRSA 2 Certificate Management Scripts in the process.
Go to the C:Program FilesOpenVPN directory. We move the easy-rsa folder from there to somewhere else so that you don’t have to constantly stumble over UAC, which will prevent you from working calmly in Program files. I moved to D: mpeasy-rsa. Rename the vars.bat.sample file to vars.bat. We open it for editing and bring it approximately to the following form.
For those who do not understand, these are just variables that I specified for my needs. There you can write anything you want, it is not essential for our task. You can not change anything at all, but leave it as it is. Create a folder keys in the directory. Next, run the command line as an administrator and move to the specified directory D: mpeasy-rsa.
Next, on the command line, write vars and press enter. This will load the variables from the vars.bat file, then we will enter clean-all. Next, we generate the Root CA with the build-ca command.
Answering the questions asked and completing the creation of the root certificate. It will appear in the D:mpeasy-rsakeys folder. Next, create an openvpn server certificate with the command — build-key-server server_name.
Now let’s generate a certificate for the client. I have only one client in the form of a remote Mikrotik. You create exactly as much as you need. We use the build-key command certificate_name.
Finished with the creation of certificates. They all lie in the keys directory. On Mikrotik, which will act as an openvpn server, you need to transfer files:
Go to the PPP section and click OVPN Server. Specify the settings and the downloaded ca certificate.
Next, by analogy with other vpn servers, we add OVPN Server Binding and static routes.
This completes the setup of openvpn server in Mikrotik. By default, the BF-128-CBC encryption protocol will be used. It can be changed in the properties of the client, and the list of all supported ciphers in the properties of the vpn server.
For the specified openvpn server setting to work, it is necessary to open the incoming tcp port 1194 on the firewall. Now let’s set up the openvpn client and test the connection speed through vpn based on openvpn.
Openvpn client
To configure the openvpn client on mikrotik, you need to transfer the certificates generated in the previous step there. Specifically, these files:
We import, as on the server, a certificate from these files. I draw your attention to the fact that there should be KT characters opposite the name of the certificate.
Now configures the openvpn client. Go to PPP and add OVPN Client.
Add a static route to access remote network resources behind an openvpn server.
Everything is ready. You can connect and test the speed of a vpn connection through openvpn.
Got an average of 24 Mbps at 100% CPU usage. The result is comparable to l2tp + ipsec. A little surprised by the result. I thought it would be worse than l2tp, but in reality it’s the same. Personally, I like the openvpn option better in general, although due to the limited openvpn settings in Mikrotik, the advantages of openvpn are difficult to realize. Let me remind you that I tested with BF-128-CBC encryption, that is, blowfish.
Here is the result with AES-128-CBC — 23 Mbps, about the same.
We figured out the client-server implementations of the vpn server in mikrotik. Now let’s look at the speed of l2-vpn in the form of eoip tunnel.
EOIP Tunnel + Ipsec Setup
Set up vpn network based on EOIP in Mikrotik. Here you need to understand one important difference from all the previous settings that we did earlier. E OIP tunnel operates at level l2, that is, both network segments will consider that they are in the same physical network. The address space for both will be the same. In my example it is 10.20.1.0/24. D There should be only one HCP server for both networks. In my case, it will remain on m-server.
From the settings, it is enough to specify only the remote address of the second Mikrotik. The new EoIP interface needs to be added to the local bridge along with the physical interfaces.
We go to the remote Mikrotik and do the same there, only specify a different Remote Address.
This is enough to get the EoIP tunnel up and running immediately. His condition will be RS.
On the second Mikrotik, the EoIP interface also needs to be added to the local bridge with the rest of the interfaces.
The easiest way to check that everything is in order is to request via dhcp on m-slave ip the address for the bridge interface. It should get an ip address from a dhcp server on m-server, provided there are no other dhcp servers on the network. The same will happen with local machines on the network behind m-slave. They will get ip addresses from dhcp server on m-server.
Now let’s check the performance of such a vpn tunnel based on EoIP.
Showing the maximum result that I got — 836 Mbps. For some reason, in different tests, the speed floated between 600-850 Mbps. In order for the speed to change, it was necessary to disable and re-enable the EoIP interface. The speed is impressive. At the same time, the processor is not loaded at 100%. That is, it is not a bottleneck. It looks like I ran into network performance. Let me remind you that there is no encryption and traffic routing. Direct l2 channel between two Mikrotiks via EoIP vpn.
Let’s add Ipsec encryption to the EoIP tunnel and look at the speed. To do this, change the channel settings on both Mikrotiks. Add an Ipsec password and local addresses, disable Fast Path.
Measure the connection speed.
I got vpn speed when using EoIP + Ipsec on average 27 Mbps. The speed is comparable to L2tp and Openvpn encrypted tunnels. There were no pleasant surprises in this regard. Encryption is very difficult for this piece of iron. It can be said that it was not intended for him at all.
GRE tunnel + Ipsec in mikrotik, creation and configuration
Immediately create a static route to access the resources of the remote network.
To organize a vpn connection through the GRE tunnel, we do the same on a remote Mikrotik, only we change the corresponding addresses.
Create GRE Tunnel.
Assign an ip address.
Adding a route to a remote local network.
After that, traffic routing between local networks should work. Don’t forget to enable the gre protocol on the firewall.
Now let’s check the connection speed over the GRE tunnel.
I got 247 Mbps. Let me remind you that this is an unencrypted routable vpn tunnel. The difference from the l2 EoIP tunnel is about 3 times lower in speed. Draw your own conclusions which tunnels to use. If routing is not needed, then definitely EoIP.
Now let’s check the same thing, only by configuring Ipsec encryption in GRE. Add the appropriate settings to the GRE tunnels on both Mikrotiks.
Measuring GRE + Ipsec speed, encryption algorithm aes-128 cbc.
It turned out to be an average of 29.7 Mbps, which is approximately the same as all the results with ipsec. Not surprising, because the encryption algorithm is the same in all cases. But nevertheless, in GRE Tunnel, the speed is slightly higher than all other participants. From this we can conclude that only for l3 site-to-site connections GRE Tunnel is best suited in terms of performance.
Speed comparison of L2tp, Pptp, EoIP, GRE and OpenVPN tunnels
I will bring all the measurement data into a single table for a visual and convenient analysis and comparison of the speeds of all the mentioned vpn connections in Mikrotik.
The following table clearly shows the difference in different encryption methods. With it, you can quickly assess what performance losses encryption can cause. Now everything is encrypted by default, but if you look, very often this is not required. You can make a compromise and use a pptp server, which, although it does not provide 100% secure encryption, nevertheless hides traffic from just prying eyes and has good performance. In any case, the traffic cannot be read just like that, it is necessary to purposefully make efforts to decrypt it. In some cases, such protection will be sufficient.
Conclusion
Initially, I did not plan to write such a large and detailed article. Appetite comes with eating. As I began to delve into the topic, it became more and more interesting to try different options and compare them. As a result, I went through all the known vpn connections in mikrotik. We didn’t get our hands on only SSTP, but I know for sure that it will work very slowly on RB951G-2hnD and, in general, on Mikrotiks, slower than all other solutions. I don’t think its use is justified.
I wrote the article for several days, I could confuse something, misspell or make a mistake. I accept all comments in the comments. I hope my research material on setting up vpn connections in Mikrotik was interesting and useful to you. The only thing I regret is that I did not touch on the topic of setting up pptp, l2tp and openvpn connections on employee client devices. Without them, the material on the topic of setting up vpn turned out to be incomplete, because this is an important part of the work of vpn tunnels. They are used not only to combine offices, but also to connect remote employees.
I remind you that this article is part of a single series of articles about Mikrotik.
Mikrotik online courses
If you have a desire to learn how to work with MikroTik routers and become a specialist in this field, I recommend taking courses based on information from the official MikroTik Certified Network Associate course. In addition to the official program, the courses will include laboratory work in which you can test and consolidate your knowledge in practice. All the details on the IT Courses website.
The cost of training is very democratic, a good opportunity to gain new knowledge in the subject area that is relevant today. Course features:
Did the article help? Subscribe to the author’s telegram channel
Announcements of all articles, plus a lot of other useful and interesting information that does not make it to the site.
Configuring IPIP, GRE and EoIP tunnels
In Keenetic routers, starting from version 2.08, it became possible to create tunnels (IP over IP), (Generic Routing Encapsulation), (Ethernet over IP) both in a simple form and in combination with a tunnel, which will allow use security standards to protect these tunnels
Support for tunnels , , in Keenetic routers allows you to establish a VPN connection with hardware gateways, Linux routers, computers and servers running UNIX/Linux OS, as well as other network and telecommunications equipment that support these tunnels.
To work with tunnels, you need to additionally install the corresponding system components in the Keenetic settings:
You can do this on the «» page in the «Updates and components» section by clicking on «Change component set».

Brief description
(IP over IP) one of the easiest tunnels to set up (encapsulates only unicast traffic). It can be configured both on a UNIX/Linux system and on various routers (for example, Cisco).
(Generic Routing Encapsulation) tunnel is one of the popular types of VPN. The tunnels are compatible with hardware security gateways, Mikrotik routers, Linux routers, as well as with equipment that can work with GRE (for example, Cisco, Juniper, etc.).
— tunnel (Ethernet over IP) is a tunnel (L2) of the OSI model over (L3). Data through this tunnel is transmitted at the level of Ethernet frames. allows you to create a transparent network environment that emulates a direct connection between networks. In this case, all -addresses are visible, and it is possible to connect two local networks at the level via the Internet using this type of tunnel. Uses as a transport. — the tunnel can work over, and any other connections capable of transmitting IP packets. Through it, except for IP, any traffic can be transmitted, including , , , etc. By default, when changing the security level to private / protected, subnet scanning will work in the tunnel using . It is represented in the system as an EoIPX interface.
was developed by MikroTik, so there is compatibility with them, as well as with Linux routers that can work with
Important
In simple terms, there are no security mechanisms for these tunnels (there are no encryption and authentication mechanisms).
Tunnels, and tunnels work without saving the connection state (they are called stateless or connectionless), that is, it is impossible to understand whether the tunnel is in a healthy state or not. We can only set up both sides and then check the data transfer.
Starting with version 2.10, the ability to use the Ping Check mechanism on tunnel interfaces , and
has been added
Tunnels , and work directly on top of the -protocol. uses -protocol 4, and uses -protocol 47.
Examples
Tunnels, and tunnels are configured both in the router’s web interface and in the command line interface (CLI). You can find the complete syntax for the commands in this article in the Command Interface (CLI) reference on the Download Center.
Setting up a GRE/IPIP tunnel between two Keenetic routers.
Setting up an EoIP tunnel between two Keenetic routers.
In the case of the tunnel, the settings will be exactly the same, except for two points:
Tuning at one end of the tunnel:
«Mirror» setting at the other end of the tunnel:
After that, you can try to ping the address of the remote side in the tunnel from either side to check if the tunnel is working.
For tunnel interfaces , and , the value is automatically calculated based on the interface through which the traffic will pass, but it can also be manually set using the interface ip mtu command
Using IPIP, GRE and EoIP tunnels with IPSec
If you install a special component of the IPSec VPN system, it becomes possible to protect these tunnels using security standards, both automatically and in full manual mode. We will not describe the manual mode, since experienced users can independently set up the tunnel with the correct mode, and then raise the tunnel on top. In the case of automatic tuning, several problems of manual mode are solved at once:
The component adds the following settings to tunnels:
Since it separates the client and the server, now to configure the client (the initiator, the side that will try to establish a connection), you must use the interface tunnel destination command, and to enable server mode (the side that will respond to connection attempts ) you must use the interface tunnel source command.
An example of setting up an EoIP tunnel with IPsec (in our example, the side with -address 8.6.5.4 is the server):
Tunnels based and incompatible with -connections due to using the same protocol In this case, there is only one available option left to use:
Pay attention to the isolate-private parameter
Connection between private interfaces is prohibited by default, but if necessary, access can be allowed. If you need to allow connections between private interfaces (i.e. do not isolate access), to do this, run the no isolate-private
command
Use the system configuration save command to save the router settings.
