

How I built the router I use at home, from hardware to configuration.

The finished router. Clearly, the most important thing about a router is support for googly eyes.
For one machine to be able to find another over a network,
there must be a mechanism in place to describe how to get
from one to the other. This is called routing
. A «route» is a defined pair of
addresses: a «destination» and a «gateway». The pair
indicates that if you are trying to get to this ,
communicate through this . There are three types of
destinations: individual hosts, subnets, and «default». The
«default route» is used if none of the other routes apply.
We will talk a little bit more about default routes later on.
There are also three types of gateways: individual hosts,
interfaces (also called «links»), and Ethernet hardware
addresses (MAC addresses).
This tutorial explains how to set up a FreeBSD
system that will act as a network router that takes advantage of the ported version of OpenBSD’s PF packet filter. A network router is a system that forwards packets from one interface to another.
1.
Install FreeBSD by using this
tutorial.
Now that you have FreeBSD installed, lets proceed with the next step.
2. FreeBSD Network Configuration
Open /etc/rc.conf in your favorite editor. You need to add a line for each network card present on the system, for example in our case we’ll use two network cards:
### rc.conf
# WAN connection
ifconfig_xl0=»inet 10.0.0.2 netmask 255.255.255.0″
# If you are using dhcp for WAN connection use ifconfig_xl0=»dhcp»
# LAN connection
ifconfig_xl1=»inet 192.168.0.1 netmask 255.255.255.0″
# Default gateway
defaultrouter=»10.0.0.1″ # Set the gateway
# Enable ip forward
gateway_enable=»YES»
# Hostname
hostname=»freebsd.my.domain»
### end rc.conf
You have to replace xl0, xl1 with the correct device for your cards, and the addresses with the proper ones.
defaultrouter is needed only if you are not using dhpc for WAN connection.
NOTE:
If you configured the network during installation, some lines about the network cards may be already present. Double check /etc/rc.conf before adding any lines.
You will also have to edit /etc/hosts to add the names and the IP addresses of various machines of the LAN, if they are not already there.
127.0.0.1 localhost localhost.my.domain
192.168.0.1 freebsdrouter.my.domain freebsdrouter
Set the DNS in /etc/resolv.conf :
NOTE:
You need to manually set up the nameserver only if you are not using dhcp for WAN connection.
3. Set up DHCP Server
The Dynamic Host Configuration Protocol (DHCP) is a network protocol used by hosts (DHCP clients) to retrieve IP address assignments and other configuration information. Each computer connected to a network must have a unique IP, and without DHCP TCP/IP information must be assigned manually on each computer. D HCP Server (or DHCPd) is the server that provides the DHCP client the information it needed.
# cd /usr/ports/net/isc-dhcp3-server
# make install clean
Next we will configure the DHCP service. Start off by copying a sample configuration file to /usr/local/etc.
# cp /usr/local/etc/dhcpd.conf.sample /usr/local/etc/dhcpd.conf
Then edit /usr/local/etc/dhcpd.conf. (local DNS server,lease time, the network gateway, and the available IP address range). Below is an example configuration.
### dhcpd.conf
# name server
option domain-name-servers 10.0.0.1;
# lease time
default-lease-time 600;
max-lease-time 7200;
# If this DHCP server is the official DHCP server for the local
# network, the authoritative directive should be uncommented.
authoritative;
# ad-hoc DNS update scheme — set to «none» to disable dynamic DNS updates.
ddns-update-style none;
# Use this to send dhcp log messages to a different log file
# you also have to hack syslog.conf to complete the redirection
log-facility local7;
Enable dhcp to start on boot by modifying /etc/rc.conf.
dhcpd_enable=YES
dhcpd_ifaces=»xl1″ # LAN card
4. Set up FreeBSD Firewall using OpenBSD’s PF packet filter
A firewall (in this context) is a set of rules that allows or denies certain types of network packets from entering or leaving your FreeBSD router. This section deals with building a firewall.
We’ll use one of the example PF configuration files as a basis for our configuration.
This sample file has everything we need for a basic FreeBSD router.
### pf.conf
### macross
## internal and external interfaces
int_if = «xl1»
ext_if = «xl0»
### nat/rdr
# NAT traffic from internal network to external network through external
# interface
nat on $ext_if from $int_if:network to any -> ($ext_if)
# redirect FTP traffic to FTP proxy on localhost:8021
# requires ftp-proxy to be enabled in /etc/inetd.conf
rdr on $int_if proto tcp from any to any port 21 -> 127.0.0.1 port 8021
# allow access to tcp_services on external interface
pass in on $ext_if inet proto tcp from any to ($ext_if) port
$tcp_services flags S/SA keep state
# allow in ping replies
pass in inet proto icmp all icmp-type $icmp_types keep state
# allow all traffic from internal network to internal interface
pass in on $int_if from $int_if:network to any keep state
pass out on $int_if from any to $int_if:network keep state
# pfctl -n -f /etc/pf.conf
### rc.conf
pf_enable=»YES» # Enable PF (load module if required)
pf_rules=»/etc/pf.conf» # rules definition file for pf
pf_flags=»» # additional flags for pfctl startup
pflog_enable=»YES» # start pflogd
pflog_logfile=»/var/log/pflog» # where pflogd should store the logfile
pflog_flags=»» # additional flags for pflogd startup
pflogd_enable=»YES»
pfsync_enable=»YES»
### end rc.conf
Now you have to reboot the system for the changes to take effect.
# shutdown -r now
When the system comes back up, the LAN clients should be able to access the Internet through this FreeBSD router.
Настройка маршрутизатора на базе FreeBSD сервера (freebsd router firewall nat rip)
  Ключевые слова:   freebsd
,  router
,  firewall
,  nat
,  rip
, (  найти похожие документы
)
  Date: Mon, 27 Feb 2007 14:31:37 +0000 (UTC)    Subject: Настройка маршрутизатора на базе FreeBSD сервера
Automatic failover of the uplink
Once I no longer live on 3G:
Use link aggregation
to seamlessly failover from ethernet to 3G and back.
Complete and publishable configuration
I want to have all the configuration in ansible
(using my BSDops
) and thereby make it completely trivial to reproduce my setup. That is not quite the case yet.
Software
I chose to use FreeBSD and configure it as a router “by hand”. If you’d prefer to use a ready-made solution which can be configured using a web interface, but still has the full power of FreeBSD underneath, pfSense
is a great option.
6
Troubleshooting
Sometimes, there is a problem with routing propagation,
and some sites are unable to connect to you. Perhaps the
most useful command for trying to figure out where routing
is breaking down is the
command. It
is equally useful if you cannot seem to make a connection
to a remote machine (i.e.
fails).
The
command is
run with the name of the remote host you are trying to
connect to. It will show the gateway hosts along the path
of the attempt, eventually either reaching the target host,
or terminating because of a lack of connection.
3 Dual Homed
Hosts
There is one other type of configuration that we should
cover, and that is a host that sits on two different
networks. Technically, any machine functioning as a gateway
(in the example above, using a PPP connection) counts as a
dual-homed host. But the term is really only used to refer
to a machine that sits on two local-area networks.
In one case, the machine has two Ethernet cards, each
having an address on the separate subnets. Alternately, the
machine may only have one Ethernet card, and be using
aliasing. The
former is used if two physically separate Ethernet networks
are in use, the latter if there is one physical network
segment, but two logically separate subnets.
Either way, routing tables are set up so that each
subnet knows that this machine is the defined gateway
(inbound route) to the other subnet. This configuration,
with the machine acting as a router between the two
subnets, is often used when we need to implement packet
filtering or firewall security in either or both
directions.
If you want this machine to actually forward packets
between the two interfaces, you need to tell FreeBSD to
enable this ability.
IPv6
I need to get IPv6 connectivity (via an OpenVPN tunnel, as my provider doesn’t offer native IPv6) and then also enable IPv6 on my wifi.
 pkg wireguard
wireguard-go wg0# generate keys0777
wg genkey private
wg genkey < private public# send public to ungleich :-) (or whoever :D)# configure the interface
2 Default
Routes
When the local system needs to make a connection to a
remote host, it checks the routing table to determine if a
known path exists. If the remote host falls into a subnet
that we know how to reach (Cloned routes), then the system
checks to see if it can connect along that interface.
If all known paths fail, the system has one last option:
the «default» route. This route is a special type of
gateway route (usually the only one present in the system),
and is always marked with a c
in
the flags field. For hosts on a local area network, this
gateway is set to whatever machine has a direct connection
to the outside world (whether via PPP link, DSL, cable
modem, T1, or another network interface).
If you are configuring the default route for a machine
which itself is functioning as the gateway to the outside
world, then the default route will be the gateway machine
at your Internet Service Provider’s (ISP) site.
Let us look at an example of default routes. This is a
common configuration:
The hosts Local1
and Local2
are at your site. Local1
is connected to an ISP via a dial up
PPP connection. This PPP server computer is connected
through a local area network to another gateway computer
through an external interface to the ISPs Internet
feed.
The default routes for each of your machines will
be:
A common question is «Why (or how) would we set the
T1-GW to be the default gateway for Local1, rather than the
ISP server it is connected to?».
Remember, since the PPP interface is using an address on
the ISP’s local network for your side of the connection,
routes for any other machines on the ISP’s local network
will be automatically generated. Hence, you will already
know how to reach the T1-GW machine, so there is no need
for the intermediate step of sending traffic to the ISP
server.
As a final note, it is common to use the address X. X. X.1
as the gateway address for your
local network. So (using the same example), if your local
class-C address space was 10.20.30
and your ISP was using 10.9.9
then
the default routes would be:
SCION!
Make SCION
runnable on FreeBSD and become one of the first households with native SCION connectivity.
Notes to self:
- add zfs-periodic
- backups via zfs-send
- run SCION with runit
- check that the SCION web UI is read-only and if yes, make it accessible over the network
- add runit and run things like my homemade thermostat
Hardware
I used a PCEngines APU3
, because PCEngines hardware is great, because it is passively cooled, because it has all the connectivity/expansion I want, and because the cases look awesome (see above).
I also got one of their wireless modules and a pair of antennas + pigtails, and the nice aluminium case. I added a 3rd party SSD and a 3G modem.
If you don’t need a large SSD, it is possible (and cheaper) to boot from an SD card.
You really shouldn’t bother with 3G unless you know you want to.
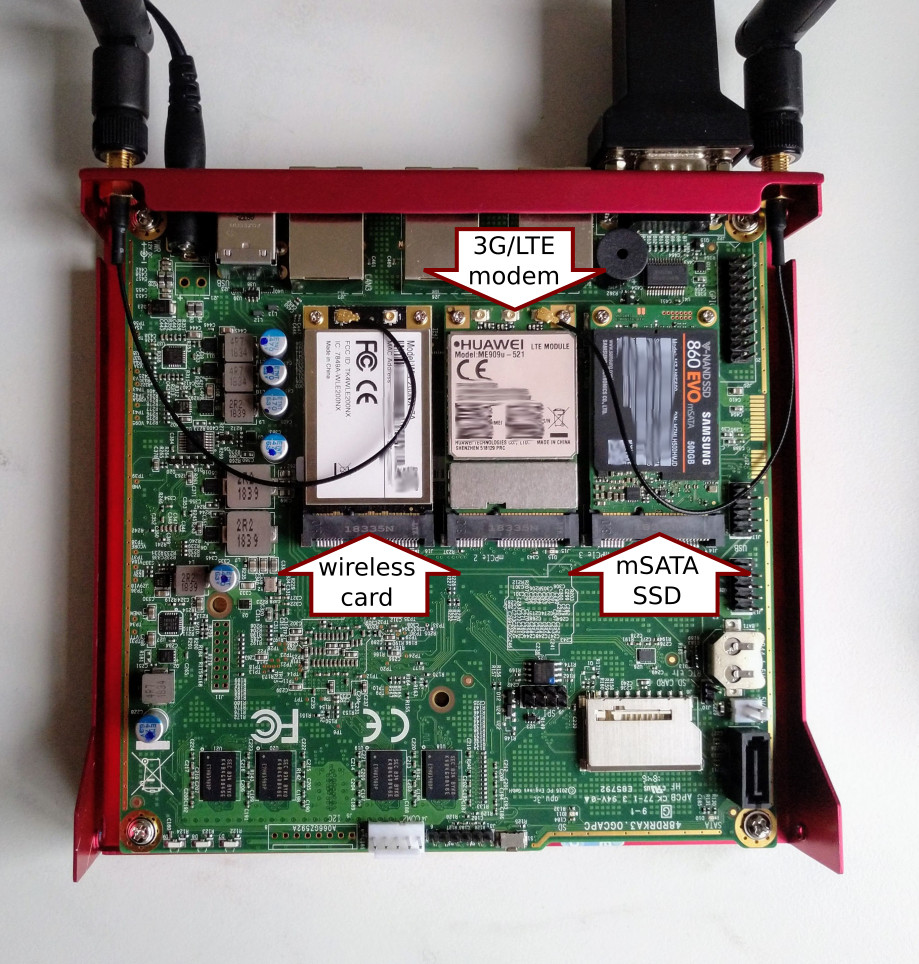
The modules I added to the APU. Note that for my use case I connected one of the antennas to the modem.
Because my wireless card is 11g only, I actually only need one antenna for WiFi. I decided to use the other antenna for 3G, because, conveniently, it is there. I will replace it with a proper 3G antenna (so, 2.1GHz instead of the WiFi’s 2.4) once I get one. In the meantime, this setup works surprisingly well.
- In case only one antenna is used for wireless, it should be connected to the first connector (so, 0 if they are labelled 0 and 1, or 1 if they are labelled 1 and 2).
- This 3G modem has 3 antenna connectors, and according to its datasheet these are ‘M’ for “main”, ‘G’ for GPS, and ‘A’ for “auxiliary” (¯\_(ツ)_/¯). The antenna should be connected to “main”.
Installation
Booting the installation image
I used a USB stick (FreeBSD-12.0-RELEASE-amd64-mini-memstick.img). Booting it over network also works.
- The APU’s baud rate is 115200 ( PCEngines
). - One of the many options for opening a serial console:
cu -l /dev/ttyUSB0 -s 115200
. - At boot menu, press 3 to escape to loader prompt. Don’t mind the messed up screen, we’ll fix that now. Set up serial by typing:
set comconsole_speed="115200" set console="comconsole" - Avoid an annoying race condition by typing
kern.cam.boot_delay="10000" - Then type
boot
to boot.
Installation options
I got a 500GB mSATA SSD because it was kinda cheap and I want to do more than just routing. Therefore, I installed with root-on-ZFS because it shouldn’t eat that much RAM with just one disk and ZFS is awesome. After installation and with everything set up, I am using only about 400M of memory and a quick dd conv=sync
test shows write speed of 280MB/s, so it appears that the system is happy with ZFS.
I checked all security options besides the ones that would interfere with debugging (the reasoning being that I want to be able to debug any problems and otherwise I can afford to enable everything.)
Post-installation config
After the installation finished, I opened a shell to immediately configure a few things:
-
/etc/sshd/sshd_config
: setPermitRootLogin without-password
so I can ssh in - add my SSH key to the root account
- configure serial console, so that it’s there: in
/boot/loader.conf
:console="comconsole" comconsole_speed="115200"
5 Routing
Propagation
We have already talked about how we define our routes to
the outside world, but not about how the outside world
finds us.
We already know that routing tables can be set up so
that all traffic for a particular address space (in our
examples, a class-C subnet) can be sent to a particular
host on that network, which will forward the packets
inbound.
When you get an address space assigned to your site,
your service provider will set up their routing tables so
that all traffic for your subnet will be sent down your PPP
link to your site. But how do sites across the country know
to send to your ISP?
There is a system (much like the distributed DNS
information) that keeps track of all assigned
address-spaces, and defines their point of connection to
the Internet Backbone. The «Backbone» are the main trunk
lines that carry Internet traffic across the country, and
around the world. Each backbone machine has a copy of a
master set of tables, which direct traffic for a particular
network to a specific backbone carrier, and from there down
the chain of service providers until it reaches your
network.
It is the task of your service provider to advertise to
the backbone sites that they are the point of connection
(and thus the path inward) for your site. This is known as
route propagation.
Things it can do + how
3G modem
This Just Works (TM) with the default configuration file.
(My SIM card has no PIN.)
(In case something needs to be changed, the settings live in /etc/ppp/ppp.conf
.)
To start ppp on boot, enable it in /etc/rc.conf
:
 ppp_enable="YES"
ppp_profile="u3g"
ppp_mode="ddial" # brings the link up if it is dropped
Modems are evil and might not work after a reboot because they haven’t been sufficiently power-cycled. Mine does that. Workaround: Pull out the power cable for a few seconds instead of a soft reboot.
Idea (NOT working for me yet):
 # Power off the 3G modem before shutting down
usbconfig -d `usbconfig | grep -i huawei | cut -d: -f1` power_off
Basic router setup (gateway + NAT for v4)
I used dhcpd
as my DHCP server ( pkg install dhcpd
).
Files that need editing:
-
/etc/rc.conf
:
add:gateway_enable="YES" ipv6_gateway_enable="YES" pf_enable="YES" dhcpd_enable="YES" -
/usr/local/etc/dhcpd.conf
:option domain-name "home.kamila.is" option domain-name-servers 9.9.9.9 # or use local DNS, e.g. with unbound default-lease-time 86400; max-lease-time 604800; subnet 192.168.0.0 netmask 255.255.0.0 { range 192.168.0.100 192.168.0.200; option routers 192.168.0.1; } -
/etc/pf.conf
:
Here’s a minimal and too permissive config:##### Macros ################################################################ int_net = "192.168.0.0/16" ext_if = "tun0" ##### Tables ################################################################ ##### Options ############################################################### set skip on lo ##### Traffic normalization ################################################# scrub in all ##### Queueing ############################################################## ##### Translation ########################################################### nat log on $ext_if inet from $int_net to any -> ($ext_if) ##### Packet filtering ###################################################### block log all # this should probably block more pass in from $int_net pass out on $ext_if all pass inet proto icmp from $int_net # allow some ICMP for troubleshooting ##### Packet filtering overrides ########################################### pass quick inet proto icmp all icmp-type echoreq # always allow ping pass quick proto tcp from any to any port ssh # always allow ssh
You probably also need to add ifconfig
lines for your wired interfaces, and probably bridge some things. I didn’t bother, as none of my usual devices have an Ethernet port, so if I end up using those wired NICs, I’ll configure them separately.
Wireless AP
- in
/etc/rc.conf
:wlans_ath0="wlan0" # replace CH with your country code to select # the right regulatory domain for wireless transmission create_args_wlan0="wlanmode hostap country CH" # use 11n if you have it; pick a reasonable channel; # experiment with txpower to find the lowest that works for you ifconfig_wlan0="inet 192.168.0.1/16 mode 11g channel 3 txpower 7" hostapd_enable="YES" -
/etc/hostapd.conf
:interface=wlan0 debug=1 ctrl_interface=/var/run/hostapd ctrl_interface_group=wheel ssid=<SSID> wpa=2 wpa_passphrase=<PASSPHRASE> wpa_key_mgmt=WPA-PSK wpa_pairwise=CCMP
1 An
Example
% netstat -r Routing tables Destination Gateway Flags Refs Use Netif Expire default outside-gw UGSc 37 418 ppp0 localhost localhost UH 0 181 lo0 test0 0:e0:b5:36:cf:4f UHLW 5 63288 ed0 77 10.20.30.255 link#1 UHLW 1 2421 example.com link#1 UC 0 0 host1 0:e0:a8:37:8:1e UHLW 3 4601 lo0 host2 0:e0:a8:37:8:1e UHLW 0 5 lo0 => host2.example.com link#1 UC 0 0 224 link#1 UC 0 0
The first two lines specify the default route (which we
will cover in the next section
) and the
localhost
route.
The interface ( Netif
column)
that this routing table specifies to use for localhost
is lo0
, also known as the loopback device.
This says to keep all traffic for this destination
internal, rather than sending it out over the LAN, since it
will only end up back where it started.
The next thing that stands out are the addresses
beginning with 0:e0:
. These are
Ethernet hardware addresses, which are also known as MAC
addresses. FreeBSD will automatically identify any hosts
( test0
in the example) on the local
Ethernet and add a route for that host, directly to it over
the Ethernet interface, ed0
.
There is also a timeout ( Expire
column) associated with this type of route, which is used
if we fail to hear from the host in a specific amount of
time. When this happens, the route to this host will be
automatically deleted. These hosts are identified using a
mechanism known as RIP (Routing Information Protocol),
which figures out routes to local hosts based upon a
shortest path determination.
FreeBSD will also add subnet routes for the local subnet
( 10.20.30.255
is the broadcast
address for the subnet 10.20.30
,
and example.com
is the domain name
associated with that subnet). The designation link#1
refers to the first Ethernet card in
the machine. You will notice no additional interface is
specified for those.
Both of these groups (local network hosts and local
subnets) have their routes automatically configured by a
daemon called routed
. If this is
not run, then only routes which are statically defined
(i.e. entered explicitly) will exist.
The host1
line refers to our
host, which it knows by Ethernet address. Since we are the
sending host, FreeBSD knows to use the loopback interface
( lo0
) rather than sending it
out over the Ethernet interface.
The two host2
lines are an
example of what happens when we use an
alias (see
the section on Ethernet for reasons why we would do this).
The =>
symbol after the lo0
interface says that not only
are we using the loopback (since this address also refers
to the local host), but specifically it is an alias. Such
routes only show up on the host that supports the alias;
all other hosts on the local network will simply have a link#1
line for such routes.
The final line (destination subnet 224
) deals with multicasting, which will be
covered in another section.
Finally, various attributes of each route can be seen in
the Flags
column. Below is a short
table of some of these flags and their meanings:
4
Building a Router
gateway_enable=YES # Set to YES if this host will be a gateway
This option will set the
variable net.inet.ip.forwarding
to 1
. If you should need to stop routing
temporarily, you can reset this to 0
temporarily.
Even when FreeBSD is configured in this way, it does not
completely comply with the Internet standard requirements
for routers. It comes close enough for ordinary use,
however.
Up next
Things I haven’t done yet but want to in the future.
