

- Материал из Xgu.ru
- Sum Up
- For KVM dynamic migration, there are the following suggestions and precautions
- Готовим виртуальную машину к установке агента QEMU
- Установка драйверов агента QEMU
- [править] Восcтановление виртуальной машины из резервной копии снятой скриптом vmsnapshot
- Автоматическое восстановление ВМ
- Ручное восстановление ВМ
- С холодного бэкапа
- С горячего бэкапа
- How to clone KVM VM with command line?
- [править] Материалы по виртуализации, паравиртуализации и эмуляции на Xgu
- V2V migration
- Server-side configuration:
- Client configuration
- QEMU guest agent is not connected
- [править] См. также
- How to backup and restore VMs on KVM-based platforms simply?
- How to make incremental backup in KVM environment?
- Case #
- How to take a snapshot in KVM as a short-term backup?
- [править] Резервное копирование виртуальных машин kvm
- Если все диски виртуальной машины находятся на lvm томах
- Если виртуальная машина имеет хоть один жесткий диск в файле
- How to make KVM backup with command line?
- Solution #
- Option 1: Use bash scripts and out-of-the-box KVM features #
- Option 2: Use third party backup software #
- На хосте2
- Verify in the host
- Утилита virt-clone
- На хосте1
- Разбор полетов
- 2-й вариант (ручками)
- Conclusion
Материал из Xgu.ru
Table of contents
- For KVM dynamic migration, there are the following suggestions and precautions
- V2V migration
- Verify in the host
Table of Contents
- Case
- Solution
главная
— Статьи — Виртуализация
Теги: Виртуальные машины Linux kvm

Метод: самый простой, связанный с простоем vm: остановка vm, копирование файлов диска и конфига на новый хост и запуск vm на новом хосте.
Подсмотрено тут. Забегая вперед: все вышло ок, это проверенный руками материал. Переносим vm4 с хоста1 на хост2. Хосты: CentOS 7, но суть все равно едина для всех.
Table of contents
- How to take a snapshot in KVM as a short-term backup?
- How to make KVM backup with command line?
- How to clone KVM VM with command line?
- How to backup and restore VMs on KVM-based platforms simply?
- Conclusion
Are you looking for a robust backup solution for KVM-based platforms like Red Hat Virtulization, oVirt, Oracle Linux KVM, OpenStack, etc.? Try Vinchin Backup & Recovery!
главная
— Статьи — Виртуализация
Дата обновления: 31.03.2020
Теги: Виртуальные машины Linux kvm
Перед клонированием убедитесь, что исходник содержит все необходимое для будущих клонов. Если вы только что установили операционную систему, подумайте, возможно имеет смысл доустановить mc, nano, traceroute, настроить сети, hostname, motd для ssh, iptables и др. Проверьте работу сети, установите последние обновления. А может быть, и httpd с почтовым сервером настройте. Убедитесь, что оригинал для клонирования не вызывает подозрений и работает стабильно. Готовы? Поехали!
Смотрим список виртуальных машин:
# virsh list --all Id Name State
---------------------------------------------------- 4 vm1 running
Создадим копию vm1 и назовем ее vm2.
Для начала остановим оригинал:
# virsh suspend vm1
или выключим его:
# virsh shutdown vm1
Дальше предлагаю рассмотреть два варианта:
Table of contents
- How to make incremental backup in KVM environment?
- Sum Up
Incremental backup is one of the popular backup types. It means backup only the changed or new-created data based on the previous full backup. Incremental backup saves backup and restore time and backup storage, so it is a crucial solution for voluminous data.
Server virtualization is accepted by more and more companies because hypervisor lets companies use a single physical machine as multiple virtual machines, saving a lot of budgets and increasing the work efficiency of IT environment.
KVM is one of the most popular hypervisors and it is often used together with QUMU Emulator. Compared with VMware, it is free to use and provides satisfactory performance. In KVM environment, virtual hard disks are saved as .qcow2 files sometimes .raw files, storing the applications and other data of KVM virtual machine so they are worth backing up.
In fact, making KVM incremental backup can be very easy.
главная
— Статьи — Виртуализация
Дата обновления: 16.04.2020
Теги: kvm Windows Linux
Есть хост CentOS 7, KVM, гость vm1 (Windows 7 x64, но что Windows, что Linux, отличаться по сути будет только установка драйвера внутри гостевой vm). Пока виртуальная машина работает, копировать ее диск — идея неправильная. Непонятно, что будет скопировано и непонятно, восстановится ли потом. Идея live backup (т.е. backup без остановки) состоит в следующем — делаем снапшот виртуальной машины, при этом чтение/запись начинает выполняться в этот снапшот. Сразу после создания снапшота исходный диск виртуальной машины уже ничем не занят — все новое копируется в файл снапшота. Можно спокойно скопировать этот диск. Это займет какое-то время, в течении которого vm работает, что-то записывается, удаляется. После того, как мы спокойно скопируем диск, нужно будет дать команду все из снапшота залить в основной диск vm. Снапшот нам нужен был только как временная мера.
Снепшот -> бекап диска -> объединение снепшота с бекапом диска:
# virsh snapshot-create-as —domain vm1 —name vm1-snapshot —disk-only —atomic —quiesce –no-metadata
Бекап диска vm1:
# cp /vms/vm1.iso /backup/vms/vm1/
где vda — это устройство (сокет системного диска) vm1, на котором установлена гостевая OS:
# virsh domblklist vm1
Target Source
————————————————
vda /vms/vm1.iso
hda —
Т.е. в работающей vm1 файл диска — /vms/vm1.iso, устройство — vda.
Но прямо с первой команды мы получим ошибку:
error: argument unsupported: QEMU guest agent is not configured
Для того, чтобы гостевую виртуальную машину можно было бекапить без ее остановки, нужно сделать несколько шагов:
- указать в конфиге vm агента QEMU
- в гостевой vm установить службу агента QEMU
- убедиться, что хост и агент взаимодействуют.
- делать бекапы.
Sum Up
However, with Vinchin Backup & Recovery, incremental backup for KVM virtual machine can be easily configured and used. Don’t forget the free trial.
For KVM dynamic migration, there are the following suggestions and precautions
In order to improve the success rate of dynamic migration, try to perform dynamic migration on hosts with the same type of CPU. Although KVM dynamic migration also supports migration from Intel platform to AMD platform, it is not recommended to do so in terms of security and stability.
64-bit clients can only run migration between 64-bit hosts, while 32-bit clients can migrate between 32-bit hosts and 64-bit hosts.
During dynamic migration, the name of the migrated client is unique, and there cannot be a client with the same name as the migrated client of the source host on the destination host.
The software of the destination host and the source host are the same as possible as VMware, kvm, xen, etc.
Готовим виртуальную машину к установке агента QEMU
Способ первый (с выключением гостевой виртуальной машины).
В конфигурацию гостевой vm нужно добавить специальное устройство — агент QEMU.
# virsh edit vm1
В параметре source указывается имя сокета, которое должно быть уникальным в рамках хоста. Также надо отметить, что при включенном SELinux могут быть проблемы с соединением к этому сокету, из-за чего может возникать ошибка «QEMU guest agent is not connected».
# virsh edit vm1
Domain vm1 XML configuration edited.
Выключить и включить гостевую виртуальную машину (перезагрузка может не помочь).
Второй способ (без выключения виртуальной машины):
Этот способ я нашел позднее и не проверял лично, но, тем не менее, он указан в руководстве Red Hat.
Готовим файл agent-win7.xml:
<channel type=’unix’>
<source mode=’bind’ path=’/var/lib/libvirt/qemu/vm1-win7.agent’/>
<target type=’virtio’ name=’org.qemu.guest_agent.0’/>
</channel>
# virsh attach-device vm1 agent-win7.xml
Применительно к CentOS/RedHat указывать уникальный путь bind не требуется, поэтому шаблон может быть одинаковым для разных vm. Итак, готовим файл agent.xml:
<channel type=’unix’>
<target type=’virtio’ name=’org.qemu.guest_agent.0’/>
</channel>
# virsh attach-device vm1 agent.xml
Установка драйверов агента QEMU
# yum install qemu-guest-agent
# systemctl start qemu-guest-agent
# apt install qemu-guest-agent
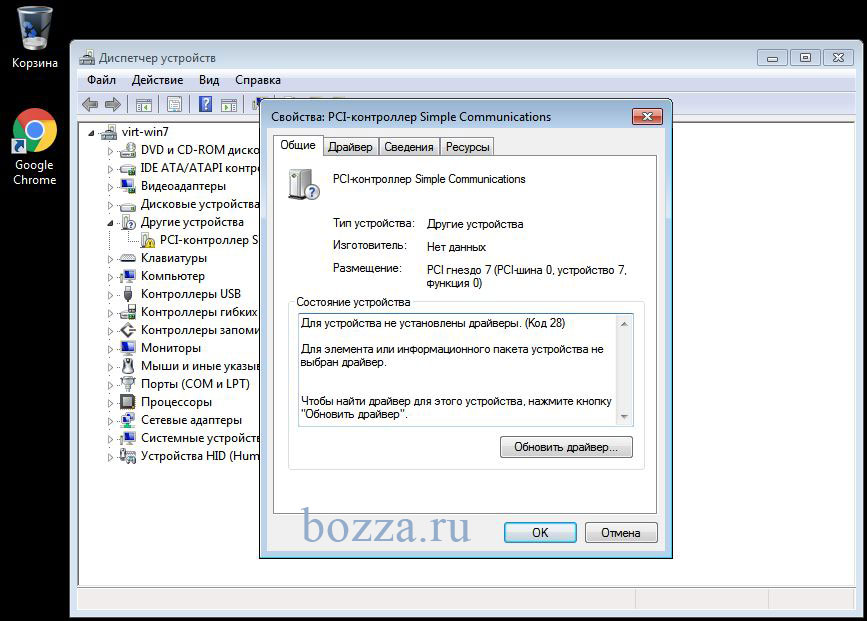
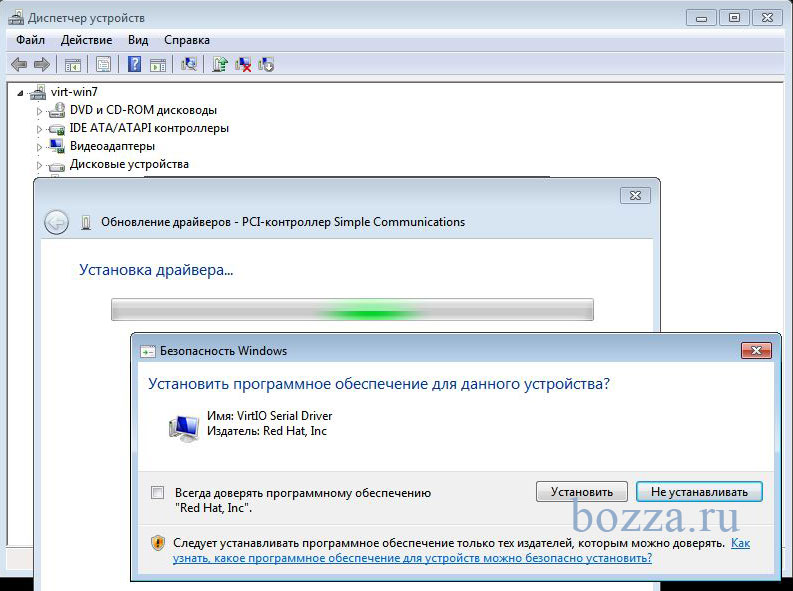
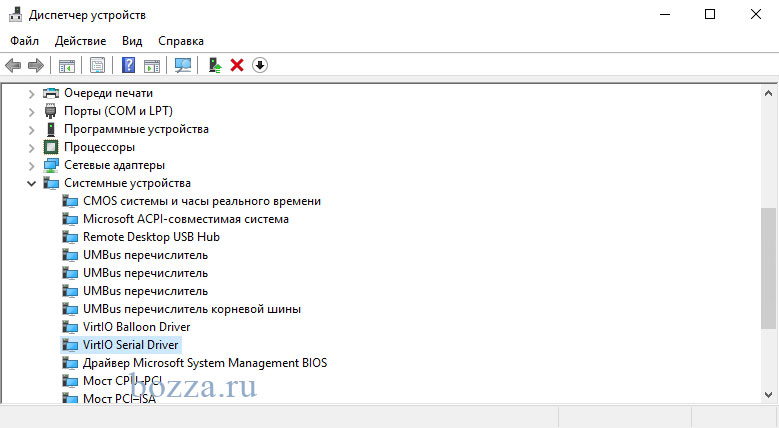
Установить virtio-win драйверы в гостевую vm:
Внутри гостевой виртуальной машины:
1) Установите CD-Drive:\guest-agent\qemu-ga-x64 (или x86).
2) В диспетчере устройств обновите драйвер внутри vm и перезагрузите ее (перезагрузка может и не потребоваться, но надо будет запустить службы QEMU Guest Agent и QEMU Guest Agent VSS Provider):
[править] Восcтановление виртуальной машины из резервной копии снятой скриптом vmsnapshot
Автоматическое восстановление ВМ
Cкрипт восстановления: Файл:Vmrestore.txt.
Скрипт предназначен только для восстановления 1 к 1 бэкапов созданных скриптом vmsnapshot ( xml файл конфигурации домена должен присутствовать в бэкапе, по умолчанию так и есть, из него берется имя ВМ и типы дисков), lvm группы томов должны существовать в системе на которой происходит восстановление( сами тома или папка где храниться raw образ диска ВМ могут быть созданы автоматически при указании force=yes ). Параметры задаются в самом скрипте или в конфиге( любой переданный первым аргументом файл содержащий список переменных):
# Путь к лог файлу
logPath=/var/log/vmrestore
# Кому слать сообщения об ошибках
email=root
# Путь до бэкапа созданного скриптом vmsnapshot
srcRestore="/opt/backup/vm_states/test_30/20130808_11:28"
# Создавать lv и папки где храняться диски ВМ. Если не существуют
force=yes
# Запускать ВМ после востановленя, актуально только для холодного бэкапа,
# Виртуалки снятые на «горячую» запустяться с восстановлением памяти
startAfterRestore=yes
Ручное восстановление ВМ
С холодного бэкапа
Восстанавливаем диски вм в нужное место , пример:
lzop -dc disk1.lzo > /new/path/disk1.img
lzop -dc disk1.lzo > /dev/vg_name/vm_disk1
Пример:
Преносим вм из файла(/opt/vm/disk1.img) на lvm (/dev/vg_system/disk1)
<disk type='file' device='disk'> <driver name='qemu' type='raw' io='native'/> <source file='/opt/vm/disk1.img'/> <target dev='vda' bus='virtio'/> <address type='pci' domain='0x0000' bus='0x00' slot='0x04' function='0x0'/>
</disk>
<disk type='block' device='disk'> <driver name='qemu' type='raw' io='native'/> <source dev='/dev/vg_system/disk1'/> <target dev='vda' bus='virtio'/> <address type='pci' domain='0x0000' bus='0x00' slot='0x04' function='0x0'/>
</disk>
Определяем домен из xml конфигурации
virsh define domain.xml
Если все сделано правильно, можем запустить ВМ
visrsh start vm_name
Если не запускается — смотрим /var/log/messages
С горячего бэкапа
Восстанавливаем диски вм в нужное место , пример:
lzop -dc disk1.lzo > /new/path/disk1.img
lzop -dc disk1.lzo > /dev/vg_name/vm_disk1
Пример:
Преносим вм из файла(/opt/vm/disk1.img) на lvm (/dev/vg_system/disk1)
<disk type='file' device='disk'> <driver name='qemu' type='raw' io='native'/> <source file='/opt/vm/disk1.img'/> <target dev='vda' bus='virtio'/> <address type='pci' domain='0x0000' bus='0x00' slot='0x04' function='0x0'/>
</disk>
<disk type='block' device='disk'> <driver name='qemu' type='raw' io='native'/> <source dev='/dev/vg_system/disk1'/> <target dev='vda' bus='virtio'/> <address type='pci' domain='0x0000' bus='0x00' slot='0x04' function='0x0'/>
</disk>
Восстанавливаем домен из снимка памяти:
visrh restore vm_name.vmstate --xml domain.xml
Если не восстанавливаеться — смотрим /var/log/messages.
При этом важно чтобы на хост системе был доступен объем памяти указанный для виртуальной машины, и хост система максимально повторяла хост систему на которой стояла резервируемая виртуальная машина.
Дампим новое определение домена и восстаналиваем его:
virsh dumpxml /tmp/domain.xml
Восстанавливаем определение домена:
virsh define /tmp/domain.xml
How to clone KVM VM with command line?
Virt-clone is the command line tool for KVM VM clone. Before you use it to clone VM, make sure the guest is powered off.
For instance, if you have a QEMU VM in Red Hat Virtualization environment, and its name is demo, type the command below to clone it:
# virt-clone —connect qemu:///system —original demo —name newdemo —file /var/lib/libvirt/images/newdemo.img —file /var/lib/libvirt/images/newdata.img
If you would like to perform a simple automatic clone, type the command below:
# virt-clone —original demo —auto-clone
[править] Материалы по виртуализации, паравиртуализации и эмуляции на Xgu
- Управление ресурсами * cgroups
- Контейнеры * LXC * OpenVZ * VServer
- Паравиртуализация * Xen (Windows XP в Xen, FreeBSD в Xen) * lguest * UML
- Виртуализация * KVM * Hyper-V * VMware ESX Server * bhyve
- Эмуляция * QEMU * PEMU * Dynamips
V2V migration
Deploy NFS server to realize file sharing between Linux and Linux. NFS usually runs on port 2049
Because before using the NFS service for file sharing, you need to use the RPC (Remote Procedure Call) service to send information such as the IP address and port number of the NFS server to the client. Therefore, before starting the NFS service, you also need to restart and enable the rpcbind service program.
Server-side configuration:
Downlaod nfs and rpcbind
Configure nfs file
[root@localhost ~]# mkdir /nfsdate[root@localhost ~]# vim /etc/exports/nfsdate 192.168.127.133/24(rw)
Reboot nfs and rpcbind
Client configuration
1 [root@localhost ~]# showmount -e 192.168.127.1302 Export list for 192.168.127.130:3 /nfsdate 192.168.127.133/24
Mount server nfs to local
1 [root@localhost ~]# mkdir /nfsdate 2 [root@localhost ~]# mount -t nfs 192.168.127.130:/nfsdate /nfsdate 3 [root@localhost ~]# df -h 4 文件系统 容量 已用 可用 已用% 挂载点 5 /dev/mapper/cl-root 17G 8.3G 8.8G 49% / 6 devtmpfs 478M 0 478M 0% /dev 7 tmpfs 489M 0 489M 0% /dev/shm 8 tmpfs 489M 7.1M 482M 2% /run 9 tmpfs 489M 0 489M 0% /sys/fs/cgroup10 /dev/sda1 1014M 141M 874M 14% /boot11 tmpfs 98M 0 98M 0% /run/user/012 192.168.127.130:/nfsdate 17G 10G 7.1G 59% /nfsdate
1 [root@localhost ~]# cd /var/lib/libvirt/images/2 [root@localhost images]# ls3 centos7.0.qcow2 CentOS-7-x86_64-DVD-1611.iso test.qcow2 vm1.qcom2 vm2.qcow24 [root@localhost images]# mv vm1.qcom2 /nfsdate
Back up the configuration file of vm1 to /root
[root@localhost ~]# cd /etc/libvirt/qemu/[root@localhost qemu]# lscentos7.0.xml networks test.xml vm1.xml vm2.xml[root@localhost qemu]# cp vm1.xml /root
Delete vm1 virtual machine domain
1 [root@localhost qemu]# ls2 centos7.0.xml networks test.xml vm1.xml vm2.xml3 [root@localhost qemu]# virsh undefine vm14 域 vm1 已经被取消定义5 6 [root@localhost qemu]# ls7 centos7.0.xml networks test.xml vm2.xml
Switch to /root to modify the vm1 configuration file and modify its disk file path
1 [root@localhost ~]# vim vm1.xml2 <disk type='file' device='disk'>3 <driver name='qemu' type='qcow2'/>4 <source file='/nfsdate/vm1.qcom2'/> #把源路径修改为/nfsdate5 <target dev='vda' bus='virtio'/>6 <boot order='1'/>7 <address type='pci' domain='0x0000' bus='0x00' slot='0x07' function='0x0'/>8 </disk>
1 [root@localhost ~]# virsh define vm1.xml 2 定义域 vm1(从 vm1.xml) 3 4 [root@localhost ~]# virsh list --all 5 Id 名称 状态 6 ---------------------------------------------------- 7 - centos7.0 关闭 8 - test 关闭 9 - vm1 关闭10 - vm2 关闭
Both the server and the client need to do domain name resolution
1 [root@localhost ~]# vim /etc/hosts2 127.0.0.1 localhost localhost.localdomain localhost4 localhost4.localdomain43 ::1 localhost localhost.localdomain localhost6 localhost6.localdomain64 192.168.127.130 yun15 192.168.127.133 yun2
[root@localhost ~]# cd /nfsdate[root@localhost nfsdate]# lsvm1.qcom2
QEMU guest agent is not connected
Убедитесь, что агент в гостевой виртуальной машине действительно взаимодействует с хостом. Иначе при попытке создания снапшота можем получить получить сообщение:
error: Guest agent is not responding: QEMU guest agent is not connected
Если сделать дамп состояния vm1, то видно, что агент не подключен (disconnected):
А должно быть <target type='virtio' name='org.qemu.guest_agent.0' state='connected'/>
Это может быть из-за:
- ошибки запуска агента в гостевой vm1 (например, виртуальная машина не была перезагружена или не были запущены службы QEMU Guest Agent и QEMU Guest Agent VSS Provider);
- из-за включенного SELinux на хосте (попробуйте отключить
"setenforce 0» и посмотреть, будет connected или нет) - или еще из-за чего-нибудь.
Исправляем и пробуем наконец-то сделать бекап виртуальной машины без ее остановки:
# virsh snapshot-create-as —domain vm1 —name vm1.snap —disk-only —atomic —quiesce –no-metadata
Domain snapshot snapshot created
# cp /vms/vm1.iso /backup/vms/vm1/
# virsh dumpxml vm1 > /backup/vms/vm1/vm1-dumpxml.xml
Слияние снапшота с копией
Теперь данные будут записываться в основной диск vm1, а в backup будет копия диска и конфиг, восстановиться из которых можно с помощью virsh create.
Авторизуйтесь для добавления комментариев!
[править] См. также
- virt-backup.pl
 — скрипт на Perl для резервного копирования виртуальных машин;
How to backup and restore VMs on KVM-based platforms simply?
It might take a long time to backup VMs on the native KVM but you can have a better solution to backup VMs on KMV-based platforms. Vinchin Backup & Recovery is a professional backup and disaster recovery solution for KVM-based platforms, like Oracle Linux KVM, Red Hat Virtualization, oVirt, etc. (Native KVM is not supported for now)

Besides, Vinchin Backup & Recovery will also help manage heterogeneous virtual environment by allowing you to move VM between different virtualization platforms.
You can try this solution with a 60-day full-featured free trial. It just takes a few minutes to deploy in your virtual environment.
How to make incremental backup in KVM environment?
To easily make incremental backup for KVM virtual machine, you can choose Vinchin Backup & Recovery, a professional backup disaster recovery solution for virtual environment. It will let you quickly backup KVM virtual machines on servers agentlessly. You can add hosts of Red Hat Virtualization, oVirt, Oracle Linux KVM, etc. to the backup system. (Native KVM is not supported for now)
Step 1. Add KVM host to Vinchin Backup System
After deploying Vinchin Backup & Recovery in virtual environment, you can log in to the backup system via a web browser. To add KVM host to Vinchin backup system, you just need to click VM Backup option on the left and then select Virtual Infrastructure.
This page will present all the hosts you have added to Vinchin backup system. When you need to add new KVM host, just click the button Add.

Then you will go back to Virtual Infrastructure page and see the host has been added to the list. To make VMs on the KVM host selectable later, you need to click Auth and authorize the host.
After that, the KVM host has been successfully added to Vinchin backup system.
Step 2. Select KVM virtual machines to backup
Still in VM Backup option, you need to select Backup this time. The KVM hosts will be presented and you can expand them to preview and select the virtual machines. The selected virtual machines will be presented on the right.
After adding all the virtual machines, click Next at the bottom.

You will be then navigated to configure the backup storage. Select the Target Node and Target Storage to store the KVM backup. Click Next at the bottom.
Step 3. Configure incremental backup strategy for KVM virtual machine
In Backup Strategies section, you can backup your KVM virtual machine in every way.
Expand Schedule tab, select Backup as scheduled and then you will find Incremental Backup option. Although it doesn’t require you to create a full backup first, you still need to check Full Backup and then you can check Incremental Backup. Vinchin Backup & Recovery also supports Forever Incremental Backup to let save backup storage.

In Backup Strategies section, you can select other strategies like Speed Kit to increase the speed of KVM incremental backup.
After configuring everything, you can click Next to review the job details and then submit the job. You can monitor the job in Monitor Center. Backup job will be automatically triggered at the right time. You don’t have to manually power off the KVM virtual machine because Vinchin Backup & Recovery can backup running KVM virtual machine. After the incremental backup is created, you can find the recovery point and use it to restore KVM virtual machine.
P.S. If you have different KVM hosts or hosts of other platforms like VMware, XenServer, etc., Vinchin Backup & Recovery allows you to use the recovery point to perform cross-platform migration.
You can try Vinchin Backup & Recovery with a 60-day full-featured free trial. Just click the download button to get the installation package and deploy it in a few minutes.
Case #
You have a KVM-based virtualization solution and you need to create a backup and restore plan for your KVM virtual machines. This article provides high level guidance on how to backup KVM virtual machines.

How to take a snapshot in KVM as a short-term backup?
Snapshot can be regarded as a kind of quick backup. It is often created before system patching or updating for saving the status of the VM including power, memory, etc. When you restore VM from snapshot, VM will be reverted to the previous state.
Taking a snapshot takes much less time than creating backup and snapshot works in the way similar to backup when restoring VM, but it is still suggested to take KVM VM backup. Using snapshot to recover KVM VM relies on both of the VM files and snapshot files so that it can’t recover VM from severe disaster. In addition, storing snapshot for too long (more than 72 hours) will increase the load of VM and affect VM performance. Therefore, KVM snapshot is good, but you need to use it as backup correctly.
Creating snapshot backup in KVM environment needs virsh command. Just type the command below,
virsh snapshot-create-as domain snapshot-name
Domain is the name of the KVM VM, and snapshot-name is the name you give to the snapshot.
To check the list of KVM VM snapshots, type the command below:
virsh snapshot-list domain
To restore VM from KVM VM snapshot, type the command below:
virsh snapshot-revert domain snapshot-name
To delete one KVM VM snapshot, type the command below:
virsh snapshot-delete domain snapshot-name
[править] Резервное копирование виртуальных машин kvm
Написано (переделано) по мотивам: https://github.com/Win2ix/vmsnapshot/blob/master/vmsnapshot
Сам скрипт: Файл:Vmsnapshot.txt.
Скрипт использует команду virsh, тоисть с чистым kvm не работает.
За раз бэкапит одну машину, работает в двух режимах:
Если все диски виртуальной машины находятся на lvm томах
делается снимок ее оперативной памяти (при этом она сама переходит в состояние suspend ), далее делаются снапшоты всех lvm томов и виртуальная машина снова переходит в рабочее состояние с последующим снятием резервной копии со снапшотов.
- Бэкап будет включать в себя:
- образы всех жестких дисков с расширением .lzo;
- снимок памяти с расширением .vmstate;
- определение домена с расширением .xml (если dumpDomain=yes);
Если виртуальная машина имеет хоть один жесткий диск в файле
или явно установлен параметр shutdownGuest=yes, делается холодный бэкап дисков виртуальной машины и ее xml определение.
- Бэкап будет включать в себя:
- образы всех жестких дисков с расширением .lzo;
- определение домена с расширением .xml (делается всегда);
Бэкапы будут лежать по пути: $backupDest/ИмяВиртуальнойМашины/ГодМесяцДень_Час:Минута.
Все параметры могут быть явно заданы в самом скрипте или переопределены в файле конфигурации. В качестве единственного аргумента выступает имя файла со списком переопределенных параметров. Ниже приведен возможный список параметров:
# Путь к лог файлу
logPath=/var/log/vmbackup
# Делать снимок оперативной памяти
saveState=yes
# Имя виртуальной машины
guest="test_10"
# Размер снапшота lvm, суммарно в группе томов должно быть свободно
# n*snapshotSize, где n — количество виртуальных дисков vm
snapshotSize=5G
# Кому слать сообщения об ошибках
email=root
# Опции для команды dd( менять не нужно)
ddOptions="bs=100M conv=notrunc"
# Папка куда делать бэкап
backupDest="/opt/backup/vm_states"
# Имя команды для сжатия образа жесткого диска с опциями
lzop="lzop -c -1"
# Сохранять xml описание домена
dumpDomain=yes
# Выключать ВМ перед сохранением резервной копии
shutdownGuest=no
# Команда через которую будет осуществляться выключение ВМ, если не определено
# используется virsh shutdown vm_name
shutdownCommand=""
# Включать ВМ после бэкапа, имеет смысл только при shutdownGuest=yes
startGuestAfterBackup=yes
# Таймаут времени перед повторной проверкой состояния ВМ
# после отправки команды на выключение
sleepShutdown=30
# Важно!
# Максимальное количество попыток проверки выключилась ли ВМ.
# Тоесть после выполнения команды virsh shutdown скрипт будет ждать
# sleepShutdown*sleepCount секунд, чтобы она выключилась и если результат отрицательный
# -прекратит свою работу.
sleepCount=5
# Запускать гостя после холодного бэкапа
startGuestAfterBackup=yes
# Диски ВМ, которые не будут сохраняться в резервной копии
# формат строго один диск на строчку
# Пример:
# excludeDisk="
# /dev/sda
# /dev/sdb
# "
excludeDisk="
"
How to make KVM backup with command line?
Virsh commands can also help export VM configuration and virtual hard disk. You can use them to create new virtual machine .
To export the VM configuration, type the command below:
# virsh dumpxml vm_name > /etc/libvirt/qemu/vm_name_backup.xml
Vm_name is the name of the KVM VM and the last part is the directory you would like to store the configuration file
To check the directory of virtual hard disk, type the command below:
# virsh domblklist vm_name
To copy the virtual hard disks, type the command below:
# cp /var/lib/libvirt/images/vm_name.qcow2 /var/lib/libvirt/images/vm_name_backup.qcow2
Replace the directories in this command with the real directory that you have checked.
To modify the configuration file, type the command below:
# vim /etc/libvirt/qemu/vm_name_backup.xml
Note: Virsh editing is not supported because the VM hasn’t been registered, so it can be only edited by vi/vim.
Things need to be modified:
Change vm_name into vm_name_backup
Modify any number to make it distinct from the original one
3. virtual disk label
Change the directory into the new one
VNC port should be unique
To register VM, type the command below:
# virsh define /etc/libvirt/qemu/vm-name_backup.xml
# virsh start vm_name_backup
Solution #
Option 1: Use bash scripts and out-of-the-box KVM features #
Option 2: Use third party backup software #
Linux Kernel-based Virtual Machine (KVM) virtualization platform providers, such as Redhat, provide their own backup and restore solution, which is bundled into their virtualization platform.
When looking for a backup solution for a custom KVM-based implementation, other party solutions can be used to backup KVM virtual machines. They do come at a certain cost but they provide numerous benefits. The most important benefit in a third party KVM backup solution is the overall management overhead. All backup and restore functionality can be managed by a single pane of glass using the third party tool’s management console. Also the restoration procedure will be available with the peace of mind that the underlying code has been tested in production environments, which is far better than a in-house developed Linux Bash script. Last but not least, a third party solution can provide a supportability statement which covers all supported Linux distributions and KVM versions, while a custom-made bash script may run into issues when executed against a non-tested Linux distribution or kernel version.
- Proxmox
- oVirt
- QEMU
If you are using a different KVM management tool that is not on the list above, such as Cloudstack for example, it does not mean that it is not supported. The detection of KVM hypervisor by the backup agent installed inside VM is done by checking signatures of virtual hardware. These checks are independent of the type of KVM management tools used so the above list is intended to be used only as a quick reference. If you have Acronis Cyber Backup 12.5, it is highly recommended to upgrade to Acronis Cyber Protect 15.x as soon as possible.
Yet another interesting KVM virtual machine backup solution is virtnbdbackup. Virtnbdbackup is a backup utility for Libvirt / qemu / kvm supporting incremental and differential backups and instant recovery.
How to troubleshoot Acronis Cyber Protect issuesHow to upgrade from Acronis Cyber Backup to Cyber Protect 15
На хосте2
# mv /data/vms-tmp/vm4.iso /vms
# chown qemu:qemu /vms/vm4.iso
# chmod 600 /vms/vm4.iso
У меня SELinux включен, поэтому:
# restorecon -R -v /vms
restorecon reset /vms/vm4.iso context unconfined_u:object_r:unlabeled_t:s0->unconfined_u:object_r:virt_image_t:s0
# ls -aZ /vms
# virsh define /data/vms-tmp/vm4-export-config.xml
Domain vm4 defined from /data/vms-tmp/vm4-export-config.xml
При экспорте конфига на хосте1 пароль VNC не сохранился, поэтому для доступа к vm4 по VNC на хосте2 надо править конфиг:
# virsh edit vm4
<graphics type=’vnc’ port=’-1′ autoport=’yes’>
<listen type=’address’/>
</graphics>
<graphics type=’vnc’ port=’-1′ autoport=’yes’ passwd=’12345d’>
<listen type=’address’/>
</graphics>
# virsh start vm4
# virsh autostart vm4
vm4 запустилась, все ок.
Авторизуйтесь для добавления комментариев!
Verify in the host
It is recommended to modify the host names of the two hosts to avoid the same host names. Prevent some unnecessary errors.
hostnamectl set-hostname 主机名exit
Click Connect, then enter yes and account password respectively, the connection is created
Because it is a hot migration, turn on the migrated virtual machine; then click Migrate
Утилита virt-clone
Clone ‘vm2’ created successfully.
Т.к. команду мы выполняли от root, то virt-clone создала клон диска vm1.img с именем vm2.img с владельцем root:root, а не qemu:qemu. На скорость не влияет. Главное, убедиться, что диск создан:
# ls -al /data/vms/
total 3104656
drwxr-xr-x. 2 root root 4096 Apr 27 06:17 .
drwxr-xr-x. 5 root root 4096 Apr 19 17:45 ..
-rw-r—r—. 1 qemu qemu 21478375424 Apr 27 06:17 vm1.img
-rw-r—r—. 1 root root 1587609600 Apr 27 06:17 vm2.img
При запуске vm2 можете увидеть такое сообщение:
# virsh start vm2
error: Failed to start domain vm2
error: internal error: process exited while connecting to monitor: 2016-04-27T10:19:21.991952Z qemu-kvm: -chardev socket,id=charchannel0, path=/var/lib/libvirt/qemu/channel/target/domain-vm1/org.qemu.guest_agent.0,server,nowait: Failed to bind socket: Permission denied 2016-04-27T10:19:21.992122Z qemu-kvm: -chardev socket,id=charchannel0,path=/var/lib/libvirt/qemu/channel/target/domain-vm1/org.qemu.guest_agent.0, server,nowait: chardev: opening backend «socket» failed
Обратите внимание на domain-vm1 в тексте ошибки. Исправляем это (ищем domain-vm1 и заменяем на domain-vm2):
# virsh edit vm2
Domain vm2 XML configuration edited.
# virsh start vm2
Domain vm2 started
На хосте1
# virsh shutdown vm4
Domain vm4 is being shutdown
На хосте1 vm4 запускать автоматически не планирую:
# virsh autostart vm4 —disable
Domain vm4 unmarked as autostarted
# virsh dumpxml vm4 > /root/vm4-export-config.xml
В моем случае vm4 в бридже br0, на хосте1 и хосте2 он настроен, его настройки дампить не надо. На целевом хосте2 бридж, конечно же, уже настроен.
Копирую файлы на новый хост:
На старом хосте диски vm находятся в директории /vms, если примонтируются образы iso, то из /vms-iso, сеть для VMs типа bridge (br0).
Новый хост я готовил аналогично.
Разбор полетов
В чем я увидел отличия, так это в том, что в первом случае размер диска vm2 сильно отличался от размера vm3:
Судя по всему, virt-clone при создании клона копирует только реально занятое виртуальной машиной место. Размер vm2.img лишь чуть-чуть больше, чем показания «df -h», выполненной в vm1, vm2 или vm3 (т.к. между клонированиями я ничего с гостями не делал, то и размер их не менялся относительно «предка» vm1).
Вообще, когда вы с чем-то сталкиваетесь впервые, старайтесь анализировать изменения после каждого шага. Сделали «sed -i /uuid/d /tmp/vm3-template.xml» — посмотрели. Сравнили с оригиналом. Потом склонировали vm2, на всякий случай просмотрите директорию, где у вас хранятся диски гостей. Создали новую сеть — поинтересуйтесь, был ли создан файл настроек сети в /etc/libvirt/qemu/networks. Ну и в таком роде.
Где бы вы что-то ни увидели, старайтесь все, что вам незнакомо, проверять до выполнения в консоли. Увидели в этой статье пример команды virt-clone, не поленитесь, сходите в интернет и поищите, кто еще так предлагает, что пишет man.
Старайтесь все ваши действия документировать, записывать, комментировать и тогда вы получите свой собственный how-to и будете его использовать, когда надо будет через год создать еще парочку гостей. Если вы не создаете виртуальные машины регулярно, то будет нормально, если вы забудете синтаксис, а history может быть очищена или заполнена таким количеством всяких команд, да еще и с очепятками, что вам опять придется разбираться по-новой.
# virsh list --all Id Name State
---------------------------------------------------- 7 vm2 running 9 vm1 running 10 vm3 running
Авторизуйтесь для добавления комментариев!
2-й вариант (ручками)
Т.к. vm2 уже есть, создадим vm3 и сравним результаты.
# virsh shutdown vm1
Делаем дамп xml от vm1:
# virsh dumpxml vm1 > /tmp/vm3-template.xml
Удаляем UUID оригинала, libvirt добавит новые значения:
# sed -i /uuid/d /tmp/vm3-template.xml
# sed -i ‘/mac address/d’ /tmp/vm3-template.xml
Переименовываем имена со старого на новое:
# sed -i s/vm1/vm3/ /tmp/vm3-template.xml
Создаем новую vm3:
# virsh define /tmp/vm3-template.xml
# virsh start vm1
# virsh start vm3
Этот вариант я подсмотрел здесь: http://unix.stackexchange.com/questions/8351/
Conclusion
KVM becomes more and more popular and KVM backup is always necessary. To make backup, you can use the commands in this post to backup and clone VM.
The procedures of type commands might be tedious. You can use Vinchin Backup & Recovery to easily configure backup and restore jobs for VMs on KVM-based platforms, greatly improving work efficiency. Don’t miss the free trial.
