

Make your HTTP (or HTTPS) network service available using a protocol-aware configuration mechanism, that understands web concepts like URIs, hostnames, paths, and more. The Ingress concept lets you map traffic to different backends based on rules you define via the Kubernetes API.
An API object that manages external access to the services in a cluster, typically HTTP.
Ingress may provide load balancing, SSL termination and name-based virtual hosting.
- Terminology
- What is Ingress?
- Prerequisites
- The Ingress resource
- Ingress rules
- DefaultBackend
- Resource backends
- Path types
- Examples
- Hostname wildcards
- Ingress class
- IngressClass scope
- Deprecated annotation
- Default IngressClass
- Types of Ingress
- Simple fanout
- Name based virtual hosting
- TLS
- Load balancing
- Updating an Ingress
- Failing across availability zones
- Alternatives
- What’s next
- Additional controllers
- Развёртывание NGINX Ingress-контроллера
- Добавление helm-репозитория
- Настройка параметров развёртывания контроллера
- Способ публикации ingress-контроллера
- Изменение количества реплик
- Развёртывание ingress-контроллера в кластере
- Развёртывание тестового приложения
- Поиск и устранение возможных проблем развёртывания web-приложения
- Проверка работоспособности pod
- Проверка работоспособности сервиса
- Проверка доступности сервиса через Ingress
- Проверка доступности сервиса из локальной сети
- Настройка TLS с использованием сертификатов Let’s Encrypt
- Как это работает?
- Развёртывание cert-manager в кластере
- Настройка cert-manager на использование Let’s Encrypt в качестве эмитента сертификатов
- Что такое ingress?
- Как входящий трафик попадает на Ingress Controller
- NodePort
- HostPort
- Host network
- Что выбрать
Terminology
- Node: A worker machine in Kubernetes, part of a cluster.
- Cluster: A set of Nodes that run containerized applications managed by Kubernetes. For this example, and in most common Kubernetes deployments, nodes in the cluster are not part of the public internet.
- Edge router: A router that enforces the firewall policy for your cluster. This could be a gateway managed by a cloud provider or a physical piece of hardware.
- Cluster network: A set of links, logical or physical, that facilitate communication within a cluster according to the Kubernetes networking model.
- Service: A Kubernetes Service that identifies a set of Pods using label selectors. Unless mentioned otherwise, Services are assumed to have virtual IPs only routable within the cluster network.
What is Ingress?
Ingress exposes HTTP and HTTPS routes from outside the cluster to
services within the cluster.
Traffic routing is controlled by rules defined on the Ingress resource.
Here is a simple example where an Ingress sends all its traffic to one Service:
An Ingress may be configured to give Services externally-reachable URLs, load balance traffic, terminate SSL / TLS, and offer name-based virtual hosting. An Ingress controller is responsible for fulfilling the Ingress, usually with a load balancer, though it may also configure your edge router or additional frontends to help handle the traffic.
An Ingress does not expose arbitrary ports or protocols. Exposing services other than HTTP and HTTPS to the internet typically
uses a service of type Service.Type=NodePort or
Service.Type=LoadBalancer.
Prerequisites
You must have an Ingress controller to satisfy an Ingress. Only creating an Ingress resource has no effect.
You may need to deploy an Ingress controller such as ingress-nginx. You can choose from a number of
Ingress controllers.
Ideally, all Ingress controllers should fit the reference specification. In reality, the various Ingress
controllers operate slightly differently.
The Ingress resource
A minimal Ingress resource example:
— : /testpath
An Ingress needs apiVersion, kind, metadata and spec fields.
The name of an Ingress object must be a valid
DNS subdomain name.
For general information about working with config files, see deploying applications, configuring containers, managing resources.
Ingress frequently uses annotations to configure some options depending on the Ingress controller, an example of which
is the rewrite-target annotation.
Different Ingress controllers support different annotations. Review the documentation for
your choice of Ingress controller to learn which annotations are supported.
The Ingress spec
has all the information needed to configure a load balancer or proxy server. Most importantly, it
contains a list of rules matched against all incoming requests. Ingress resource only supports rules
for directing HTTP(S) traffic.
If the ingressClassName is omitted, a default Ingress class
should be defined.
There are some ingress controllers, that work without the definition of a
default IngressClass. For example, the Ingress-NGINX controller can be
configured with a flag
—watch-ingress-without-class. It is recommended though, to specify the
default IngressClass as shown below.
Ingress rules
- An optional host. In this example, no host is specified, so the rule applies to all inbound
HTTP traffic through the IP address specified. If a host is provided (for example,
foo.bar.com), the rules apply to that host. - A list of paths (for example, /testpath), each of which has an associated
backend defined with a service.name and a service.port.name or
service.port.number. Both the host and path must match the content of an
incoming request before the load balancer directs traffic to the referenced
Service. - A backend is a combination of Service and port names as described in the
Service doc or a custom resource backend by way of a CRD. HTTP (and HTTPS) requests to the
Ingress that match the host and path of the rule are sent to the listed backend.
A defaultBackend is often configured in an Ingress controller to service any requests that do not
match a path in the spec.
DefaultBackend
An Ingress with no rules sends all traffic to a single default backend and .spec.defaultBackend
is the backend that should handle requests in that case.
The defaultBackend is conventionally a configuration option of the
Ingress controller and
is not specified in your Ingress resources.
If no .spec.rules are specified, .spec.defaultBackend must be specified.
If defaultBackend is not set, the handling of requests that do not match any of the rules will be up to the
ingress controller (consult the documentation for your ingress controller to find out how it handles this case).
If none of the hosts or paths match the HTTP request in the Ingress objects, the traffic is
routed to your default backend.
Resource backends
A Resource backend is an ObjectRef to another Kubernetes resource within the
same namespace as the Ingress object. A Resource is a mutually exclusive
setting with Service, and will fail validation if both are specified. A common
usage for a Resource backend is to ingress data to an object storage backend
with static assets.
— : /icons
kubectl describe ingress ingress-resource-backend
Path types
Each path in an Ingress is required to have a corresponding path type. Paths
that do not include an explicit pathType will fail validation. There are three
supported path types:
- ImplementationSpecific: With this path type, matching is up to the
IngressClass. Implementations can treat this as a separate pathType or treat
it identically to Prefix or Exact path types. - Exact: Matches the URL path exactly and with case sensitivity.
- Prefix: Matches based on a URL path prefix split by /. Matching is case
sensitive and done on a path element by element basis. A path element refers
to the list of labels in the path split by the / separator. A request is a
match for path p if every p is an element-wise prefix of p of the
request path.
Examples
In some cases, multiple paths within an Ingress will match a request. In those
cases precedence will be given first to the longest matching path. If two paths
are still equally matched, precedence will be given to paths with an exact path
type over prefix path type.
Hostname wildcards
Hosts can be precise matches (for example “foo.bar.com”) or a wildcard (for
example “*.foo.com”). Precise matches require that the HTTP host header
matches the host field. Wildcard matches require the HTTP host header is
equal to the suffix of the wildcard rule.
— :
— : Prefix
— :
— : Prefix
Ingress class
Ingresses can be implemented by different controllers, often with different
configuration. Each Ingress should specify a class, a reference to an
IngressClass resource that contains additional configuration including the name
of the controller that should implement the class.
The .spec.parameters field of an IngressClass lets you reference another
resource that provides configuration related to that IngressClass.
The specific type of parameters to use depends on the ingress controller
that you specify in the .spec.controller field of the IngressClass.
IngressClass scope
Depending on your ingress controller, you may be able to use parameters
that you set cluster-wide, or just for one namespace.
The default scope for IngressClass parameters is cluster-wide.
If you set the .spec.parameters field and don’t set
.spec.parameters.scope, or if you set .spec.parameters.scope to
Cluster, then the IngressClass refers to a cluster-scoped resource.
The kind (in combination the apiGroup) of the parameters
refers to a cluster-scoped API (possibly a custom resource), and
the name of the parameters identifies a specific cluster scoped
resource for that API.
# The parameters for this IngressClass are specified in a
# ClusterIngressParameter (API group k8s.example.net) named
# «external-config-1». This definition tells Kubernetes to
# look for a cluster-scoped parameter resource.
If you set the .spec.parameters field and set
.spec.parameters.scope to Namespace, then the IngressClass refers
to a namespaced-scoped resource. You must also set the namespace
field within .spec.parameters to the namespace that contains
the parameters you want to use.
The kind (in combination the apiGroup) of the parameters
refers to a namespaced API (for example: ConfigMap), and
the name of the parameters identifies a specific resource
in the namespace you specified in namespace.
Namespace-scoped parameters help the cluster operator delegate control over the
configuration (for example: load balancer settings, API gateway definition)
that is used for a workload. If you used a cluster-scoped parameter then either:
- the cluster operator team needs to approve a different team’s changes every
time there’s a new configuration change being applied. - the cluster operator must define specific access controls, such as
RBAC roles and bindings, that let
the application team make changes to the cluster-scoped parameters resource.
The IngressClass API itself is always cluster-scoped.
Here is an example of an IngressClass that refers to parameters that are
namespaced:
# The parameters for this IngressClass are specified in an
# IngressParameter (API group k8s.example.com) named «external-config»,
# that’s in the «external-configuration» namespace.
Deprecated annotation
Before the IngressClass resource and ingressClassName field were added in
Kubernetes 1.18, Ingress classes were specified with a
kubernetes.io/ingress.class annotation on the Ingress. This annotation was
never formally defined, but was widely supported by Ingress controllers.
The newer ingressClassName field on Ingresses is a replacement for that
annotation, but is not a direct equivalent. While the annotation was generally
used to reference the name of the Ingress controller that should implement the
Ingress, the field is a reference to an IngressClass resource that contains
additional Ingress configuration, including the name of the Ingress controller.
Default IngressClass
You can mark a particular IngressClass as default for your cluster. Setting the
ingressclass.kubernetes.io/is-default-class annotation to true on an
IngressClass resource will ensure that new Ingresses without an
ingressClassName field specified will be assigned this default IngressClass.
There are some ingress controllers, that work without the definition of a
default IngressClass. For example, the Ingress-NGINX controller can be
configured with a flag
—watch-ingress-without-class. It is recommended though, to specify the
default IngressClass:
Types of Ingress
There are existing Kubernetes concepts that allow you to expose a single Service
(see alternatives). You can also do this with an Ingress by specifying a
default backend with no rules.
If you create it using kubectl apply -f you should be able to view the state
of the Ingress you added:
kubectl get ingress test-ingress
NAME CLASS HOSTS ADDRESS PORTS AGE
test-ingress external-lb * 203.0.113.123 80 59s
Where 203.0.113.123 is the IP allocated by the Ingress controller to satisfy
this Ingress.
Simple fanout
A fanout configuration routes traffic from a single IP address to more than one Service,
based on the HTTP URI being requested. An Ingress allows you to keep the number of load balancers
down to a minimum. For example, a setup like:
Figure. Ingress Fan Out
would require an Ingress such as:
— : foo.bar.com
— : /foo
— : /bar
When you create the Ingress with kubectl apply -f:
kubectl describe ingress simple-fanout-example
Name: simple-fanout-example
Namespace: default
Address: 178.91.123.132
Default backend: default-http-backend:80 (10.8.2.3:8080)
Rules:
Host Path Backends
—- —- ———
foo.bar.com
/foo service1:4200 (10.8.0.90:4200)
/bar service2:8080 (10.8.0.91:8080)
Events:
Type Reason Age From Message
—- —— —- —- ——-
Normal ADD 22s loadbalancer-controller default/test
The Ingress controller provisions an implementation-specific load balancer
that satisfies the Ingress, as long as the Services (service1, service2) exist.
When it has done so, you can see the address of the load balancer at the
Address field.
Name based virtual hosting
Name-based virtual hosts support routing HTTP traffic to multiple host names at the same IP address.
Figure. Ingress Name Based Virtual hosting
— : foo.bar.com
— : Prefix
— : bar.foo.com
— : Prefix
If you create an Ingress resource without any hosts defined in the rules, then any
web traffic to the IP address of your Ingress controller can be matched without a name based
virtual host being required.
— : first.bar.com
— : Prefix
— : second.bar.com
— : Prefix
— : Prefix
TLS
You can secure an Ingress by specifying a Secret
that contains a TLS private key and certificate. The Ingress resource only
supports a single TLS port, 443, and assumes TLS termination at the ingress point
(traffic to the Service and its Pods is in plaintext).
If the TLS configuration section in an Ingress specifies different hosts, they are
multiplexed on the same port according to the hostname specified through the
SNI TLS extension (provided the Ingress controller supports SNI). The TLS secret
must contain keys named tls.crt and tls.key that contain the certificate
and private key to use for TLS. For example:
: base64 encoded cert
: base64 encoded key
Referencing this secret in an Ingress tells the Ingress controller to
secure the channel from the client to the load balancer using TLS. You need to make
sure the TLS secret you created came from a certificate that contains a Common
Name (CN), also known as a Fully Qualified Domain Name (FQDN) for https-example.foo.com.
— : https-example.foo.com
— : /
Load balancing
An Ingress controller is bootstrapped with some load balancing policy settings
that it applies to all Ingress, such as the load balancing algorithm, backend
weight scheme, and others. More advanced load balancing concepts
(e.g. persistent sessions, dynamic weights) are not yet exposed through the
Ingress. You can instead get these features through the load balancer used for
a Service.
It’s also worth noting that even though health checks are not exposed directly
through the Ingress, there exist parallel concepts in Kubernetes such as
readiness probes
that allow you to achieve the same end result. Please review the controller
specific documentation to see how they handle health checks (for example:
nginx, or
GCE).
Updating an Ingress
To update an existing Ingress to add a new Host, you can update it by editing the resource:
Name: test
Namespace: default
Address: 178.91.123.132
Default backend: default-http-backend:80 (10.8.2.3:8080)
Rules:
Host Path Backends
—- —- ———
foo.bar.com
/foo service1:80 (10.8.0.90:80)
Annotations:
nginx.ingress.kubernetes.io/rewrite-target: /
Events:
Type Reason Age From Message
—- —— —- —- ——-
Normal ADD 35s loadbalancer-controller default/test
kubectl edit ingress
This pops up an editor with the existing configuration in YAML format.
Modify it to include the new Host:
— : foo.bar.com
— : bar.baz.com
After you save your changes, kubectl updates the resource in the API server, which tells the
Ingress controller to reconfigure the load balancer.
Name: test
Namespace: default
Address: 178.91.123.132
Default backend: default-http-backend:80 (10.8.2.3:8080)
Rules:
Host Path Backends
—- —- ———
foo.bar.com
/foo service1:80 (10.8.0.90:80)
bar.baz.com
/foo service2:80 (10.8.0.91:80)
Annotations:
nginx.ingress.kubernetes.io/rewrite-target: /
Events:
Type Reason Age From Message
—- —— —- —- ——-
Normal ADD 45s loadbalancer-controller default/test
You can achieve the same outcome by invoking kubectl replace -f on a modified Ingress YAML file.
Failing across availability zones
Techniques for spreading traffic across failure domains differ between cloud providers.
Please check the documentation of the relevant Ingress controller for details.
Alternatives
You can expose a Service in multiple ways that don’t directly involve the Ingress resource:
What’s next
In order for an Ingress to work in your cluster, there must be an ingress controller running. You need to select at least one ingress controller and make sure it is set up in your cluster. This page lists common ingress controllers that you can deploy.
In order for the Ingress resource to work, the cluster must have an ingress controller running.
Unlike other types of controllers which run as part of the kube-controller-manager binary, Ingress controllers
are not started automatically with a cluster. Use this page to choose the ingress controller implementation
that best fits your cluster.
Kubernetes as a project supports and maintains AWS, GCE, and
nginx ingress controllers.
Additional controllers
You may deploy any number of ingress controllers using ingress class
within a cluster. Note the .metadata.name of your ingress class resource. When you create an ingress you would need that name to specify the ingressClassName field on your Ingress object (refer to IngressSpec v1 reference). ingressClassName is a replacement of the older annotation method.
If you do not specify an IngressClass for an Ingress, and your cluster has exactly one IngressClass marked as default, then Kubernetes applies the cluster’s default IngressClass to the Ingress.
You mark an IngressClass as default by setting the ingressclass.kubernetes.io/is-default-class annotation on that IngressClass, with the string value «true».
Ideally, all ingress controllers should fulfill this specification, but the various ingress
controllers operate slightly differently.
You should read the content guide before proposing a change that adds an extra third-party link.
Last modified March 29, 2023 at 5:19 PM PST: Update ingress-controllers.md (58ad4ee221)
Время на прочтение
Я продолжаю цикл статей по приручению домашнего сервера разработчика, который хочет уметь в DevOps. В первой своей статье я рассказал о развёртывании Xen Project гипервизора и миграции Windows-виртуалок из Hyper-V. Во второй о развёртывании на базе виртуалок этого сервера Kubernetes-кластера. Перед написанием данной я ставил перед собой следующие цели:
- Развернуть тестовый сайт, состоящий из статических ресурсов и front-end API в vanila Kubernetes-кластере.
- Обеспечить доступ к этому сайту с использованием NGINX Ingress Controller.
- Сайт должен быть доступен по HTTPS-протоколу с автоматически обновляемым TLS-сертификатом Let’s Encrypt.
Развёртывание NGINX Ingress-контроллера
Развернуть NGINX ingress Controller довольно просто, однако есть пара моментов. Во-первых, на официальной странице, посвящённой развёртыванию контроллера, в разделе Quick start даётся пример с использованием Helm, пригодный только для облака. Во-вторых, в разделе о развёртывании в bare-metal кластере, сказано, что нужно воспользоваться готовым YAML-файлом, специально предназначенным для такого случая.
На самом деле для развёртывания контроллера и в облаке и на железе можно и нужно использовать helm-chart, но перед этим нужно разобраться с его параметрами (values), коих более 300. Не вполне полная документация по ним дана на странице git-репозитория контроллера. В файле значений по умолчанию также есть масса полезных комментариев.
Добавление helm-репозитория
Первое, что нужно сделать, чтобы получить возможность установить наш ingress-контроллер, это добавить его репозиторий в helm-клиент с помощью следующих команд:
helm repo add ingress-nginx https://kubernetes.github.io/ingress-nginx
helm repo update
Настройка параметров развёртывания контроллера
Далее необходимо создать файл nginx-values.yaml. Для моего случая получилось следующее:
controller:
replicaCount: 2
service:
type: NodePort
externalTrafficPolicy: Local
nodePorts:
http: 30100
https: 30101
ingressClassResource:
default: true
watchIngressWithoutClass: true
affinity:
podAntiAffinity:
requiredDuringSchedulingIgnoredDuringExecution:
— labelSelector:
matchExpressions:
— key: app.kubernetes.io/component
operator: In
values:
— controller
— key: app.kubernetes.io/instance
operator: In
values:
— ingress-nginx
— key: app.kubernetes.io/name
operator: In
values:
— ingress-nginx
topologyKey: «kubernetes.io/hostname»
Далее я поясню значение этих настроек.
Способ публикации ingress-контроллера
Так как предполагается использовать в качестве балансировщика нагрузки внешний не управляемый кластером роутер, сервис контроллера нужно публиковать с помощью controller.service.type: NodePort, а не LoadBalancer. Чтобы настроить DNAT на внешнем роутере, необходимо зафиксировать порты для HTTP и HTTPS, прописав их с помощью controller.nodePorts.http: 30100 и controller.nodePorts.https: 30101, соответственно.
Изменение количества реплик
В одном кластере одновременно могут использоваться различные продуты, выступающие в качестве ingress-контроллеров. При создании ingress-ресурса можно (и желательно) указать так называемый класс контроллера, соответствующий ingress-продукту (в данном случае nginx == NGINX Ingress Controller). Однако, пользователь может и не указать его. Чтобы кластер работал предсказуемым образом, один из классов ingress-контроллера рекомендуется пометить как используемым по умолчанию. Для этого предназначена настройка controller.ingressClassResource.default: true. Для большей надёжности и для совместимости с ingress-ресурсами, созданными до установки данного ingress-контроллера, также используется возможность NGINX Ingress Controller по отслеживанию ingress-ресурсов без указанного класса ingress-контроллера: controller.watchIngressWithoutClass: true.
Развёртывание ingress-контроллера в кластере
Выполняем следующую команду:
helm install ingress-nginx ingress-nginx/ingress-nginx —namespace ingress-nginx —create-namespace —values nginx-values.yaml
Если вы хотите перед развёртыванием в кластере проанализировать полученные ресурсы, в данную команду можно добавить пару ключей: —dry-run —debug.
Развёртывание занимает некоторое время. Чтобы отследить его окончание можно воспользоваться следующей командой, которая завершится по его окончанию:
kubectl wait —namespace ingress-nginx —for=condition=ready pod —selector=app.kubernetes.io/component=controller —timeout=120s
Развёртывание тестового приложения
В качестве теста и выявления возможных проблем можно развернуть web-приложение, имитирующее широко распространённый случай: статические файлы SPA + front-end web API. В качестве первого я буду использовать nginx, в качестве второго chentex/go-rest-api.
Для начала нам нужно определить необходимые Kubernetes-ресурсы в файле site-sample.yaml:
apiVersion: v1
kind: Namespace
metadata:
name: test-ingress-app
labels:
app.kubernetes.io/name: test-ingress-app
—
apiVersion: apps/v1
kind: Deployment
metadata:
name: spa-deployment
namespace: test-ingress-app
labels:
app.kubernetes.io/name: spa
app.kubernetes.io/component: spa
spec:
replicas: 2
selector:
matchLabels:
app.kubernetes.io/name: spa
app.kubernetes.io/component: spa
template:
metadata:
labels:
app.kubernetes.io/name: spa
app.kubernetes.io/component: spa
spec:
containers:
— name: spa
image: nginx
ports:
— containerPort: 80
name: http
protocol: TCP
affinity:
podAntiAffinity:
requiredDuringSchedulingIgnoredDuringExecution:
— labelSelector:
matchExpressions:
— key: app.kubernetes.io/name
operator: In
values:
— spa
— key: app.kubernetes.io/component
operator: In
values:
— spa
topologyKey: «kubernetes.io/hostname»
—
apiVersion: v1
kind: Service
metadata:
name: spa
namespace: test-ingress-app
labels:
app.kubernetes.io/component: spa
spec:
type: ClusterIP
selector:
app.kubernetes.io/name: spa
app.kubernetes.io/component: spa
ports:
— port: 80
targetPort: 80
name: http
protocol: TCP
—
apiVersion: apps/v1
kind: Deployment
metadata:
name: frontend-api
namespace: test-ingress-app
labels:
app.kubernetes.io/name: frontend-api
app.kubernetes.io/component: frontend-api
spec:
replicas: 2
selector:
matchLabels:
app.kubernetes.io/name: frontend-api
app.kubernetes.io/component: frontend-api
template:
metadata:
labels:
app.kubernetes.io/name: frontend-api
app.kubernetes.io/component: frontend-api
spec:
containers:
— name: frontend-api
image: chentex/go-rest-api
ports:
— containerPort: 8080
name: http
protocol: TCP
affinity:
podAntiAffinity:
requiredDuringSchedulingIgnoredDuringExecution:
— labelSelector:
matchExpressions:
— key: app.kubernetes.io/name
operator: In
values:
— frontend-api
— key: app.kubernetes.io/component
operator: In
values:
— frontend-api
topologyKey: «kubernetes.io/hostname»
—
apiVersion: v1
kind: Service
metadata:
name: frontend-api
namespace: test-ingress-app
labels:
app.kubernetes.io/name: frontend-api
app.kubernetes.io/component: frontend-api
spec:
type: ClusterIP
selector:
app.kubernetes.io/name: frontend-api
app.kubernetes.io/component: frontend-api
ports:
— port: 80
targetPort: 8080
name: http
protocol: TCP
—
apiVersion: networking.k8s.io/v1
kind: Ingress
metadata:
name: ingress-test-site
namespace: test-ingress-app
spec:
ingressClassName: nginx
rules:
— host: es.moysite.ru
http:
paths:
— path: /
pathType: Prefix
backend:
service:
name: spa
port:
number: 80
— path: /test
pathType: Prefix
backend:
service:
name: frontend-api
port:
number: 80
Самым интересным, с точки зрения данной статьи, является последний ресурс, собственно, ingress. В нём я определяю следующее:
- Класс используемого ingress-контроллера указывает на только что развёрнутого нами NGINX Ingress Controller: ingressClassName: nginx.
- Ingress будет следить за доступом к сайту es.moysite.ru: host: es.moysite.ru. Для этого ingress-контроллер будет анализировать заголовок host: HTTP-запроса.
- В рамках этого сайта используются два сервиса: статические файлы SPA, доступные в корневой папке домена (/), и frontend Web API, запросы к которому определяются по префиксу /test.
Более подробно работа с ingress-ресурсами описана в статье про Ingress, а описание API на странице документации.
Тестовый сайт развёртываем командой:
kubectl apply -f site-sample.yaml
Поиск и устранение возможных проблем развёртывания web-приложения
В моём случае я наступил, пожалуй, на большинство «граблей», но для меня это хорошо. Это — опыт.
Простейший тест доступности развёрнутого сайта делается с помощью навигации по адресу http://es.moysite.ru в браузере. Если всё хорошо, вы увидите страницу по умолчанию nginx, на которой он поприветствует вас: Welcome to nginx!. Чтобы протестировать доступность симулякра frontend Web API, в браузере пытаемся посмотреть страницу по адресу http://es.moysite.ru/test. Ответом должен быть JSON:
Если оба теста прошли удачно, как из локальной сети, так и с устройства, не подключённого к ней, например, мобильника, поздравляю! Однако, как я сказал ранее, у меня так не получилось. Начинаем искать проблему.
Проверка работоспособности pod
К любому pod можно обратиться с worker-узла, на котором запущен pod. Для этого, во-первых, необходимо определить worker-узел и адрес самого pod:
kubectl get pod —n test-ingress-app -owide
Вы должны получить что-то подобное:
Для примера, я хочу протестировать работоспособность pod spa-deployment-7577c8974d-rh9kw, расположенного на узле worker01 и доступного по адресу 192.168.5.17. Для этого необходимо подключиться во ssh к узлу worker01 и выполнить следующую команду:
Если видим кусок HTML с жизнерадостным Welcome to nginx!, идём к следующему шагу. Если нет, начинаем анализировать жизнеспособность pod.
Проверка работоспособности сервиса
Если pod жив и отвечает, тестируем сервис. Сервисы spa и frontend-api имеют тип ClusterIP. Такие сервисы доступны только изнутри кластера. Для проверки их доступности нужно использовать какой-либо pod внутри кластера, например curlimages/curl.
Для начала определяем адрес интересующего нас сервиса:
kubectl get service -n test-ingress-app
Получим примерно такой вывод:
Развёртываем pod curlimages/curl в кластере и подключаемся к его консоли и выполняем команду curl с адресом нашего сервиса:
kubectl run -i —tty curl —image=curlimages/curl — sh
/ $ curl 10.26.111.126
Если всё работает нормально, мы должны увидеть всё тот же кусок HTML с приветствием от nginx.
Далее можно проверить доступность сервиса по его имени. Для этого в консоли того же curlimages/curl пытаемся обратиться к сервису по его имени:
/ $ curl spa
В моём случае я неосторожно поменял какие-то настройки сети уже после установки Calico CNI. В результате DNS в кластере не работал. Это также проявлялось в том, что не работали validation webhooks ingress-контроллера и cert-manager. Решить эту проблему помогла переустановка Calico CNI.
В конце не забываем удалить ненужный более pod:
kubectl delete pod curl
Проверка доступности сервиса через Ingress
Если все предыдущие тесты оказались успешными, пришло время проверить доступность сервисов через ingress-контроллер. Делать это нужно с одного из worker-узлов кластера, в моём случае, например, с worker01. Нужно помнить, во-первых, о том, что HTTP выведен на порт 30100, а также о том, что маршрутизация ведётся по HTTP-заголовку запроса host. Поэтому необходимо указать заголовок host:
curl worker01:30100 —header «host: es.moysite.ru»
Как обычно, успешным результатом стоит считать HTML с приветствием nginx. Если есть какие-то проблемы, скорее всего вы что-то напутали с определением ingress-ресурса.
Проверка доступности сервиса из локальной сети
curl 10.44.55.14:30100 —header «host: es.moysite.ru»
Если не получили приветствие nginx, значит у вас не настроен или настроен неправильно DNAT и SNAT на вашем роутере. Как это правильно настроить, можно посмотреть, например, в этой статье: Проброс портов и Hairpin NAT в роутерах Mikrotik. Детали будут зависеть от марки и модели роутера, но общие принципы в статье описаны верно.
Настройка TLS с использованием сертификатов Let’s Encrypt

На данный момент мы развернули наш сайт в кластере и можем открыть его, используя HTTP. На самом деле сайт уже доступен по HTTPS, что легко проверить, открыв его в браузере по ссылке https://es.moysite.ru. Правда, по понятным причинам, браузер ругнётся, что сертификат «не торт», так как он действительно самовыпущенный ingress-контроллером. Наша задача заменить этот сертификат на имеющий признанную цепочку доверия.
Как это работает?
Для того, чтобы использовать HTTPS для вашего сайта, в принципе, достаточно иметь два файла: сертификат и ключ. Содержимое этих файлов сохраняется в кластере в виде secret-ресурса, откуда его использует соответствующий сайту ingress-ресурс. В случае покупных публичных сертификатов вы должны оплатить выпуск этих файлов у сертификационного центра и время от времени обновлять их (обычно раз в год), занося, понятное дело, новую денежку. Let’s Encrypt является центром сертификации, но не берёт с вас денег. Сертификаты Let’s Encrypt нужно обновлять не реже, чем каждые 3 месяца, если я помню правильно. Это тот ещё «геморрой» раз в 3 месяца не забыть запросить новый сертификат и заменить его в кластере. А если сайт не один? Если их несколько десятков? Поэтому появились решения, автоматизирующие этот процесс. Одно из самых известных — cert-manager, cloud native решение для управления сертификатами. cert-manager будет помнить за вас, что сертификаты нужно перевыпустить, обновить соответствующие ресурсы, а всё, что будет нужно от вас, это описать, для каких сайтов нужно выпускать сертификаты, и подключить эти сертификаты, хранящиеся в secret-ресурсах, к соответствующим ingress-ресурсам.
Развёртывание cert-manager в кластере
Я буду использовать helm-способ развёртывания. Для начала добавляем новый репозиторий Helm:
helm repo add jetstack https://charts.jetstack.io
helm repo update
Разворачиваем cert-manager в кластере (installCRDs=true говорит, что нужно автоматически установить дополнительные типы ресурсов в кластер, иначе придётся это делать руками.):
helm install cert-manager jetstack/cert-manager —namespace cert-manager —create-namespace —version v1.8.0 —set installCRDs=true
Настройка cert-manager на использование Let’s Encrypt в качестве эмитента сертификатов
Далее я подразумеваю, что у вас есть доменное имя, которое имеет публичную DNS-запись. В моём случае это будет es.moysite.ru. Также стоит отметить, что cert-manager поддерживает два варианта размещения своих ресурсов эмитента и сертификата: в пространствах имён и вне них (cluster wide). Я разберу только первый вариант. Cluster wide ресурсы нужны в случае, когда ваш сертификат выпускается на несколько доменов, приложения которых расположены в разных пространствах имён. В kubectl командах я подразумеваю, что пространство имён test-ingress-app установлено в качестве пространства имён по умолчанию в вашем контексте.
У Let’s Encrypt есть два окружения: staging и production. Продуктовый имеет очень строгий лимит на количество запросов. Поэтому, пока вы не будете до конца уверены, что всё у вас работает устойчиво, лучше пользоваться staging окружением.
Первое, что нам нужно сделать — это создать ресурс эмитента для staging ресурса в файле lestencrypt-staging.yaml.
Важными полями здесь являются: spec.acme.email, в котором нужно указать ваш e-mail адрес, на который будут приходить уведомления об истечении срока действия сертификатов. spc.acme.privateKeySecretRef.name — имя secret-ресурса, в котором будет храниться сертификат, используемый cert-manager. Это не тот же сертификат, который используется нашим сайтом! spec.acme.server указывает на staging окружение.
Применяем этот файл:
kubectl apply -f letsencrypt-staging.yaml
Проверяем, что был создан issuer:
~ kubectl get issuers
NAME READY AGE
letsencrypt-staging True 138m
Регистрация учётки занимает некоторое время, поэтому поначалу READY будет False. Если False держится более 2 минут, стоит посмотреть, что с ним не так с помощью команды: kubectl describe issuer. В поле Events можно посмотреть в чём проблема.
Также для диагностики проблем полезно посмотреть на ресурсы типов certificaterequests и challenges. В моём случае была проблема с настройкой роутера. Во-первых, нужно пробросить порты 80 и 443 с WAN-интерфейса роутера на порты 30100 и 30101 соответственно, для чего нужно создать DNAT-правила. Во-вторых, разрешить пакеты в цепочке forward к портам 30100 и 30101 worker-узлов кластера с WAN-интерфейса. Более подробно о поиске проблем с cert-manager рассказано в статье Troubleshooting Issuing ACME Certificates.
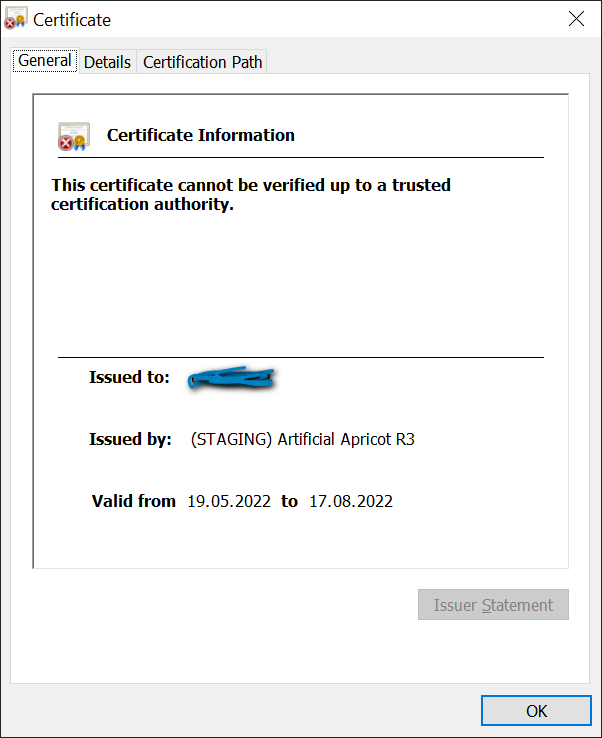
В финале вы должны иметь возможность открыть стартовую страницу сайта в браузере по протоколу HTTPS. Браузер всё также будет ругаться на сертификат, но это ожидаемо, так как мы используем staging-окружение Let’s Encrypt. В качестве эмитента сертификата (см. иконку замочка рядом с адресной строкой) должен быть указан (STAGING) Artificial Apricot R3, а не Kubernetes Ingress Controller, как это было ранее :
После того, мы добились работоспособности в staging-окружении, пора перейти на production-окружение Let’s Encrypt. Сделать это довольно просто. Во-первых, создаём issuer-ресурс в файле letsencrypt-production.yaml и применяем его командой kubectl apply -f letsencrypt-production.yaml:
Меняем описание ingress-ресурса:
apiVersion: networking.k8s.io/v1
kind: Ingress
metadata:
name: ingress-test-site
namespace: test-ingress-app
annotations:
cert-manager.io/issuer: letsencrypt-production
spec:
ingressClassName: nginx
rules:
— host: es.moysite.ru
http:
paths:
— path: /
pathType: Prefix
backend:
service:
name: spa
port:
number: 80
— path: /test
pathType: Prefix
backend:
service:
name: frontend-api
port:
number: 80
tls:
— hosts:
— es.moysite.ru
secretName: test-ingress-app-production

Через минуту-две сертификат будет получен и можно будет обновить страницу в браузере. На этот раз никаких предупреждений о плохом сертификате быть на должно, а информация о нём должна выглядеть примерно так:
Теперь можно удалить issuer-ресурс и секрет, относящиеся к staging-окружению.
Что такое ingress?
Ingress это базовый тип ресурса в кубертенесе. Если просто объявить объект типа Ingress в кубернетисе то ничего не произойдет.
Что бы этот ресурс начал работу в кластере кубернетиса должен быть установлен Ingress Controller, который настроит реверсивный прокси в соответствии с Ingress объектом.
Ingress Controller состоит из 2х компонентов — реверсивного прокси и контроллера который общается с API сервером кубернетеса. Реверсивный прокси слушает входящий трафик на портах которые указаны в настройках (обычно в настройках по умолчанию указан только порт 80). Контроллер может быть как отдельным демоном (как в nginx), так и встроенным в прокси (как в traefik).
Не все клауд провайдеры кубернетеса предустанавливают Ingress Controller по умолчанию.
Контроллеры могут запускаться либо как DaemonSet либо как Deployment. DaemonSet идеально использовать как единственный Ingress Controller, что бы реверсивное прокси слушало на всех IP адресах воркеров. Deployment отлично подходит если перед Ingress контроллером стоит балансировщик — от провайдера кубернетиса (GKE, AKS), MetalLB если онпремис или обычный haproxy/nginx установленный на сервере (требутеся ручная настройка). При этой установке возможно установить несколько Ingress Controller.
Как входящий трафик попадает на Ingress Controller
Во всех случаях реверс прокси в Ingress Controller слушает порты где ожидает http/https соединения.
Трафик на этоти порты может попасть тремя путями:
- NodePort (на случайных портах в диапазоне 30000-32767)
- HostPort (можно повесить на порты 80, 443)
- Host network — Pod повестит свои порты на публичном сетевом интерфейсе (т.е. будут открыты все порты контейнера)
NodePort
Для этого варианта лучше использовать Deployments. Это позволит проще скейлить количество подов ответственных за входящий трафик, прописывать им nodeAffinity и запускать несколько ingress controller (например для production и staging).
HostPort
При использовании HostPort порт пробрасывается с хоста где запущен под в этот самый Pod. LoadBalancer на вход не нужен, но для работы сайта в DNS нужно указывать что адрес домена находится на всех узлах.
Пример конфигурации DNS для 3х воркеров:
ingress.example.org A 10.0.0.1
ingress.example.org A 10.0.0.2
ingress.example.org A 10.0.0.3
www.example.org CNAME ingress.example.org
Для этой установки лучше всего использовать DaemonSet т.к. он позволяет запустить не более одного Pod на хосте. Deployment возможен, но имеет мало смысла т.к. надо прописывать affinity что бы не назначилось 2 Pod на один хост, иначе будет конфликт по портам.
Пример конфигурации для traefik
Host network
При запуске Ingress Controller в общей сети с хостом не требуется никаких пробросов портов, но в этом случае все порты которые открыты в Pod будут доступны из интернета. Для запуска лучше использовать DaemonSet. Причины такие же как и с HostPort — что бы избежать конфликта портов.
Что выбрать
Если есть LoadBalancer на входе — NodePort, если нет — HostPort + DNS Round Robin. Для экспериментов можно попробовать Host network, но это не безопасно.
