

интерпретируемый язык программирования на котором разрабатывают: веб-приложения, видеоигры, занимаются Data Science и машинным обучением, разрабатывают софт, работающий в реальном мире, а также встроенные приложения и многое другое.
The main problem related to VSCode Python import not being resolved is that the interpreter cannot find the module or package that you are trying to import. This can be caused by a variety of issues, such as incorrect file paths, missing dependencies, or incorrect configuration settings. To resolve this issue, you need to ensure that the correct interpreter is selected in VSCode and that all necessary modules and packages are installed correctly. Additionally, you may need to check your environment variables and make sure they are configured correctly.
 This is likely due to a missing module or package. Try running the following command in your terminal:
pip install <module_name>
- # Make sure the correct Python interpreter is selected in your IDE
- # Try to install the module in a Virtual environment
- Как разрешить в Windows выполнение скриптов PowerShell
- Registering the path in the Virtualenv virtual environment in PyCharm
- Import pyTelegramBotAPI in venv.
- # Make sure you haven’t named a file or a variable module_name
- Error importing library into PyCharm pycharm Telebot.
- How to add Telebot to PyCharm
- Activating Virtualenv
- # alternative, use a comment to disable the warning
- # Import «X» could not be resolved from source Pylance [Fixed]
Visual Studio Code (VSCode) is a popular code editor for Python development. It is open source and available on Windows, Mac, and Linux. V SCode has a built-in terminal that allows you to run your Python code directly from the editor. It also includes an integrated debugger, which makes it easy to find and fix errors in your code. Additionally, VSCode supports many popular Python libraries such as NumPy, SciPy, and Matplotlib. With its powerful syntax highlighting and autocompletion features, VSCode makes writing Python code faster and easier than ever before.
Fixing an import could not be resolved error in Python can be done by making sure the module you are trying to import is installed and available in your environment. You can also check that the path of the module is correctly set in your system’s environment variables. Additionally, you can try using a virtual environment to isolate the project from other installed packages and make sure it has all the necessary dependencies. Finally, if all else fails, you may need to reinstall the package or look for alternative solutions.
Experts programming in Python. Our intention is to spread this language and help people with programming problems related to Python and its Frameworks.
Здравствуйте!
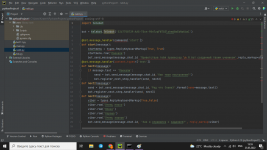
Делаю первого телеграм бота. Но у меня питон не видит модуль telebot.
pyTelegramBotAPI установила.
В чем может быть проблема?


удалила telebot. Все равно такая же ошибка(
Возможно линки не туда смотрят(2 раза встречал за всю жизнь). Если убить все импорты и заново добавить?

Наблюдаю pyCharm, ты установила через терминал пичарма, запускаешь из него же?
Библиотека называется pyTelegramBotApi, ее и импортируй
Импортировала. But still a mistake
Imported. But still an error
Edited it, blunted it myself, telebot
faithful
I watch pyCharm, you installed pycharm through the terminal, do you run it from it?
In picarm, each project uses its own virtual environment for working with libraries and python, if you installed something from the outside, then that same virtual environment will not see the library from the outside, and vice versa.
I watch pyCharm, you installed pycharm through the terminal, do you run it from it?
Installed via command line
Installed via command line
Pycharma or Windows?
pip install telebot via pycharma terminal
pip install telebot via pycharma terminal

Wait, which one of them do you need? If pyTelegramBotApi, then delete telebot, conflict.
Wait, which one of them do you need? If pyTelegramBotApi, then delete telebot, conflict.
deleted telebot. Still the same error(
Perhaps the links are looking in the wrong place (I met 2 times in my life). If you kill all imports and re-add?
Help please, what’s the problem? Haven’t tried anything already
-

164.8 KB Views: 40
-
135.3 KB Views: 27
-

115.6 KB Views: 25
pip uninstall telebot
pip install pyTelegramBotAPI
pip uninstall telebot
pip install pyTelegramBotAPI
The code doesn’t work anyway

just haven’t tried it
Have you tried it?
bot = telebot.TeleBot('твой токен')
Try to completely remove the Telebot library and then re-install pip Install.
 import configparser
import config
import telebot
from telebot import types #buttons
from string import Template
bot = telebot.TeleBot(config.token)
user_dict = {}
class User: def __init__(self, city): self.city = city keys = ['fullname', 'phone'] for key in keys: self.key = None
# если /help, /start
@bot.message_handler(commands=['start','help'])
def send_welcome(message): chat_id = message.chat.id bot.send_message(chat_id, "Здравствуйте." + "{message.from_user.first_name}" + " Я бот! Я могу вам помочь связаться с оператором для консультации.", reply_markup=markup) return(chat_id) markup = types.ReplyKeyboardMarkup(resize_keyboard=True, row_width=2)
#bot.send_message(message.chat.id, "Здравствуйте. {message.from_user.first_name}" + " Я бот! Я могу вам помочь связаться с оператором для консультации.", chat_id=call, reply_markup=markup)
def process_city_step(message): try: chat_id = message.chat.id user_dict[chat_id] = User(message.text) # удалить старую клавиатуру markup = types.ReplyKeyboardRemove(selective=False) msg = bot.send_message(chat_id, 'Как к вам обращаться?', reply_markup=markup) bot.register_next_step_handler(msg, process_fullname_step) except Exception as e: bot.reply_to(message, 'ooops!!')
def process_fullname_step(message): try: chat_id = message.chat.id user = user_dict[chat_id] user.fullname = message.text msg = bot.send_message(chat_id, 'Ваш номер телефона') bot.register_next_step_handler(msg, process_phone_step) except Exception as e: bot.reply_to(message, 'ooops!!')
def process_phone_step(message): try: int(message.text) chat_id = message.chat.id user = user_dict[chat_id] user.phone = message.text except Exception as e: msg = bot.reply_to(message, 'Вы ввели что то другое. Пожалуйста введите номер телефона.') bot.register_next_step_handler(msg, process_phone_step)
def process_social_step(message): try: chat_id = message.chat.id user = user_dict[chat_id] user.carModel = message.text markup = types.ReplyKeyboardMarkup(one_time_keyboard=True, resize_keyboard=True) itembtn1 = types.KeyboardButton('Только телефон') itembtn2 = types.KeyboardButton('Telegram') itembtn3 = types.KeyboardButton('Viber') itembtn4 = types.KeyboardButton('WhatsApp') markup.add(itembtn1, itembtn2, itembtn3, itembtn4) msg = bot.send_message(chat_id, 'Ваши соц сети', reply_markup=markup) bot.register_next_step_handler(msg) except Exception as e: bot.reply_to(message, 'ooops!!') # ваша заявка "Имя пользователя" bot.send_message(chat_id, getRegData(user, 'Ваша заявка', message.from_user.first_name), parse_mode="Markdown") # отправить в группу bot.send_message(config.chat_id, getRegData(user, 'Заявка от бота', bot.get_me().username), parse_mode="Markdown") except Exception as e: bot.reply_to(message, 'ooops!!')
# формирует вид заявки регистрации
# нельзя делать перенос строки Template
# в send_message должно стоять parse_mode="Markdown"
def getRegData(user, title, name): t = Template('$title *$name* \n ФИО: *$fullname* \n Телефон: *$phone* ') return t.substitute({ 'title': title, 'name': name, 'fullname': user.fullname, 'phone': user.phone })
# произвольный текст
@bot.message_handler(content_types=["text"])
def send_help(message): bot.send_message(message.chat.id, 'О нас - /about\nРегистрация - /reg\nПомощь - /help')
# Enable saving next step handlers to file "./.handlers-saves/step.save".
# Delay=2 means that after any change in next step handlers (e.g. calling register_next_step_handler())
# saving will hapen after delay 2 seconds.
bot.enable_save_next_step_handlers(delay=2)
# Load next_step_handlers from save file (default "./.handlers-saves/step.save")
# WARNING It will work only if enable_save_next_step_handlers was called!
bot.load_next_step_handlers()
if __name__ == '__main__': bot.polling(none_stop=True)
# Make sure the correct Python interpreter is selected in your IDE
If you have multiple Python versions installed on your machine, you might have
installed the package using the incorrect version or your IDE might be set up to
use a different version.
For example, In Visual Studio Code you can:
- Press
CTRL + Shift + P
or (⌘
+Shift
+P
on macOS) to open the
command palette.
Then type «Python select interpreter»
in the search field.
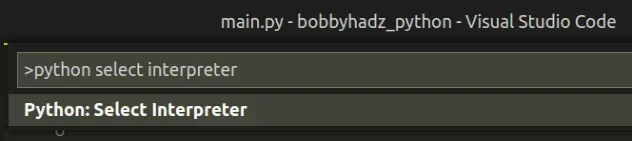
- Select the correct python version from the dropdown menu.
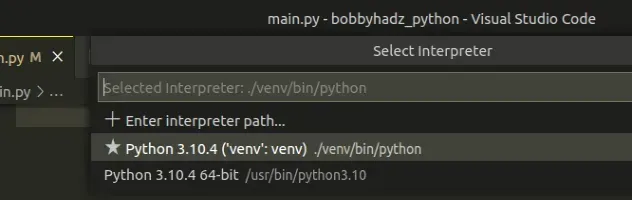
Your IDE should be using the same version of Python (including the virtual environment) that you are using to install packages from your terminal.
If the error persists, try restarting your IDE and development server/script.
VSCode often glitches and a reboot resolves the issue.
If the error is not resolved, try to use the Visual Studio Code terminal to
install the module.
You can press CTRL + ` (Backtick) on your keyboard to open the Visual Studio
code terminal.
You can also open the terminal in Visual Studio Code by pressing CTRL+Shift+P
and then typing «View: Toggle Terminal».

Once you open the terminal, Visual Studio Code will automatically activate your
virtual environment (if you have one).
Run the pip install <module-name>
command.
pip requests Make sure to replace requests
with the actual name of the module you’re trying to install.
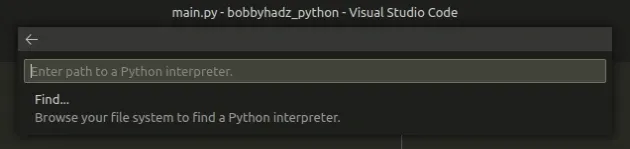
If the error persists, try to select the Python interpreter by specifying the
path:
- Press
CTRL + Shift + P
or (⌘
+Shift
+P
on Mac) to open the command
palette. - Type «Python select interpreter»
in the field.
- Select «Enter interpreter path.»
.
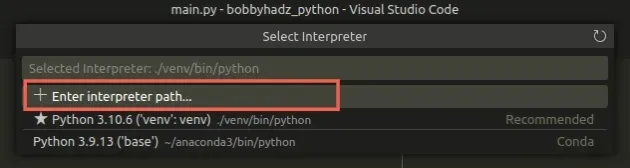
- Click on «Find»
.
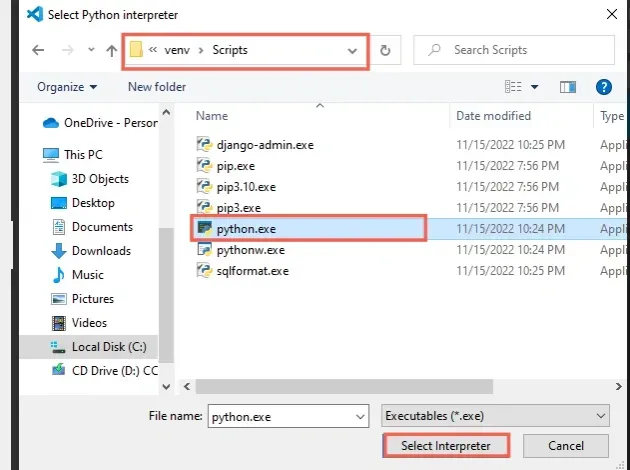
- In the window that opens, navigate to your Python executable:
- If you have a virtual environment on Windows, click on your
venv
folder,
then double-click on theScripts
folder, select thepython.exe
file and
then Select interpreter
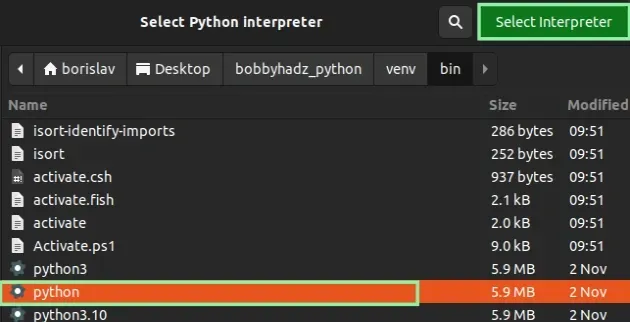
.
- If you have a virtual environment on macOS or Linux, click on your
venvfolder, then double-click on the
bin
folder, select thepython
file and
then Select interpreter
.
- If you don’t have a virtual environment, use one of the following commands to
get your path to yourpython.exe
orpython
executable, specify the path to
the file and select the executable.
 where python
python -c "import os, sys; print(os.path.dirname(sys.executable))" 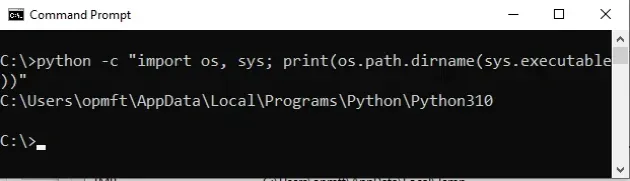
If the error persists, try restarting your IDE and development server/script.
# Try to install the module in a Virtual environment
- Create a virtual environment.
- Activate the virtual environment.
- Run the
pip install <module-name>
command with the virtual environment
active.
# 👇️ use correct version of Python when creating VENVpython -m venv venv# 👇️ activate on Unix or MacOS venv/bin/activate# 👇️ activate on Windows (cmd.exe)venvScriptsactivate.bat# 👇️ activate on Windows (PowerShell)venvScriptsActivate.ps1# 👇️ install the specific package in the virtual environmentpip requests Make sure to replace requests
with the actual name of the module you’re trying to install.
-
py -m venv venv -
python3 -m venv venv
Make sure to use the correct command to activate your virtual environment depending on your operating system and your shell.
Your virtual environment will use the version of Python that was used to create
it.
Как разрешить в Windows выполнение скриптов PowerShell
Изначально политика выполнения скриптов запрещает выполнять подобные скрипты в PyCharm.
Итак, откроем PowerShell.
В Windows нажмем сочетание кнопок Windows + R и напишем в окне «PowerShell» и нажмем OK.

Запустится, непосредственно, сам PowerShell.
Узнаем текущее значение политики:
У меня стоит значение:
Чтобы разрешить выполнение нашего требуемого скрипта, выполните команду:
Выберите требуемое разрешение, я выбрал «A» это полное, и введите «Y».

As a result, our virtual environment was activated, pay attention to the beginning of the terminal line: (venv) in brackets

Registering the path in the Virtualenv virtual environment in PyCharm
Now it remains for us to tie up the path to the virtual environment so that everything works.
in the Python Interpreter tab, click on the selected interpreter (as in the screenshot below)

The following window will open:

Choose this icon path:

In the Interpreter Paths window that opens, add the path with a «+» to our virtual environment:
You can link, for example, the path to the Lib folder and venv

Issue with import error resolved. Which confirms the screen below:

Import pyTelegramBotAPI in venv.
When creating a chatbot at the beginning of work, using the pyTelegramBotAPI library, PyCharm immediately underlines «import telebot» in red, i.e. PyCharm does not see telebot, so you need to load this library.

# Make sure you haven’t named a file or a variable module_name
For example, if you were trying to import the requests
module, make sure you
haven’t named a module in your project as requests.py
because that would
shadow the original requests
module.
You also shouldn’t be declaring a variable named requests
as that would also
shadow the original module.
If the error is not resolved, try to uninstall the package and then install it.
# 👇️ check if you have requests installedpip show requests# 👇️ uninstall requestspip uninstall requests# 👇️ if you don't have pip set up in PATHpython -m pip uninstall requests# 👇️ install requestspip requests# 👇️ if you don't have pip set up in PATHpython -m pip requests Make sure to replace requests
with the actual name of the module you’re trying to install.
Try restarting your IDE and development server/script.
You can also try to upgrade the version of the requests package.
pip requests --upgrade # 👇️ if you don't have pip set up in PATH python -m pip requests --upgrade You can check if you have the module installed by running the
pip show <module-name>
command.
# 👇️ check if you have requests installed pip show requests # 👇️ if you don't have pip set up in PATH python -m pip show requests The pip show <module-name>
command will either state that the package is not
installed or show a bunch of information about the package, including the
location where the package is installed.
If the package is not installed,
make sure your IDE is using the correct version of Python
.
Error importing library into PyCharm pycharm Telebot.
How to add Telebot to PyCharm
It is logical to load this pyTelegramBotAPI library into PyCharm right away. You can immediately click on the underlined word and PyCharm prompts will suggest installing this library, and often they do. But here you have to be more careful, because there are a great many libraries (which is a huge plus of the python itself) and the imports of some libraries can be the same, from this you can get a problem out of the blue, sometimes you have to look for a long time.
For example, for the pyTelegramBotAPI and Telebot libraries, the import is called by the same «import telebot» command.
But before importing, you need to install the required library (although it is better to start by activating the virtual environment, this is written further
).
Let’s add that there are other libraries for creating chat bots. For example, by following the link, you can check out python-telegram-bot and aiogram
.
How to install Telebot in PyCharm, this can be done in several ways, 2 options are more commonly used:
1. In the PyCharm Terminal via pip install, write the command:
pip install pyTelegramBotAPI
(more about pip install
can be found in a separate article)


2. Next, in the Python Interpreter tab, all our installed packages in the global or virtual environment, depending on which one we chose when creating the project

2. Press «+» find the required library, and install using the «Install Package» button
After installation, as we can see, the problem remained.

Activating Virtualenv
Next, check and activate the venv virtual environment.
We go back to the PyCharm terminal and see what folders and files are in our project and write the command:

We can activate with the following command:
Or first go to the folder and activate it there:

If an error occurs and you have a ban on script execution, you need to open the permission in the Windows PowerShell environment.
# alternative, use a comment to disable the warning
If none of the suggestions helped, you can use a comment to disable the Pylance
warning in your IDE.
requests # type: ignorerequests You simply have to add the # type: ignore
command on the same line as the
import statement to disable the check for the specific import.
# Import «X» could not be resolved from source Pylance [Fixed]
The error «Import «X» could not be resolved from source Pylance» occurs when
the imported module is not installed or you have selected the incorrect Python
interpreter in your IDE (e.g. Visual Studio Code).
To solve the error, install the module and select the correct Python interpreter
in your IDE.

Import could not be resolved from PylancereportMissingModuleSource Ln , Col Make sure you have the specific module installed. You can type «pypi
module-name»
in google to get instructions on the installation command.
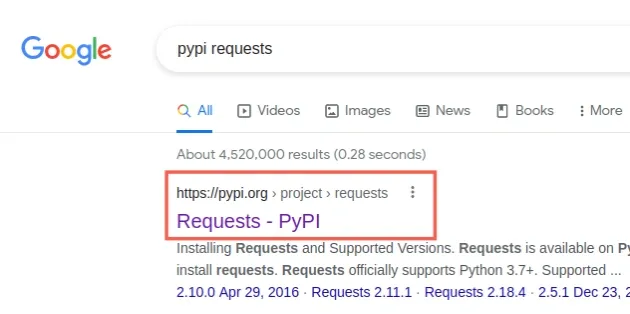
Click on the Pypi page of the package and look at the installation command.
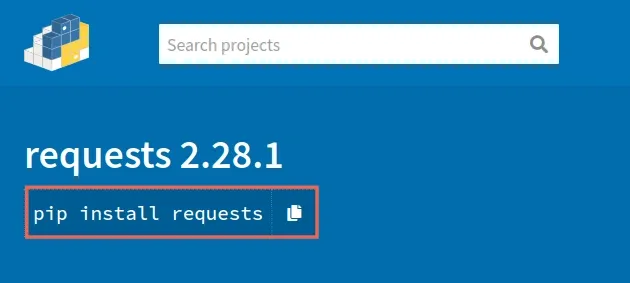
Note that some modules differ in the name of the import and the name of the actual module you have to install.
Here is an example of how I’d install the
requests
module.
# 👇️ in a virtual environment or using Python 2pip requests# 👇️ for python 3 (could also be pip3.10 depending on your version)pip3 requests# 👇️ if you get permissions errorpip requests --user# 👇️ if you don't have pip in your PATH environment variablepython -m pip requests# 👇️ for python 3 (could also be pip3.10 depending on your version)python3 -m pip requests# 👇️ using py alias (Windows)py -m pip requests# 👇️ for Anacondaconda -c anaconda requests# 👇️ for Jupyter Notebookpip requests Make sure to replace requests
with the actual name of the module you’re trying to install.
If the error persists, get your Python version and make sure you are installing
the package using the correct Python version.

For example, my Python version is 3.10.4
, so I would install the requests
package with pip3.10 install <package-name>
.
pip3.10 requests Notice that the version number corresponds to the version of pip
I’m using.
If the error persists, make sure your IDE is using the correct version of
Python.
