

I started testing the latest CentOS 7 yesterday as a guest machine on VirtualBox software to see how much it has changed from previous releases. As you may record, CentOS version 7 was just recently released.
NetInstall will allow you to install only the packages and services you want and nothing more.
Before you continue, make sure that you have a reliable Internet connection, since you’ll need to download all packages you select in the customization section of the setup.
Without a reliable and good Internet connection, you may run into trouble and may not finish what you started. For me, I did all from a guest VirtualBox guest machine created for CentOS 7.
First, download the NetInstall version of CentOS. Then burn it to a CD/DVD and boot the computer from it. If you’re using a virtualization software like VirtualBox or VMware Workstation, then just create a guest machine and boot from the downloaded ISO file.
Here’s the download link: http://isoredirect.centos.org/centos/7/isos/x86_64/
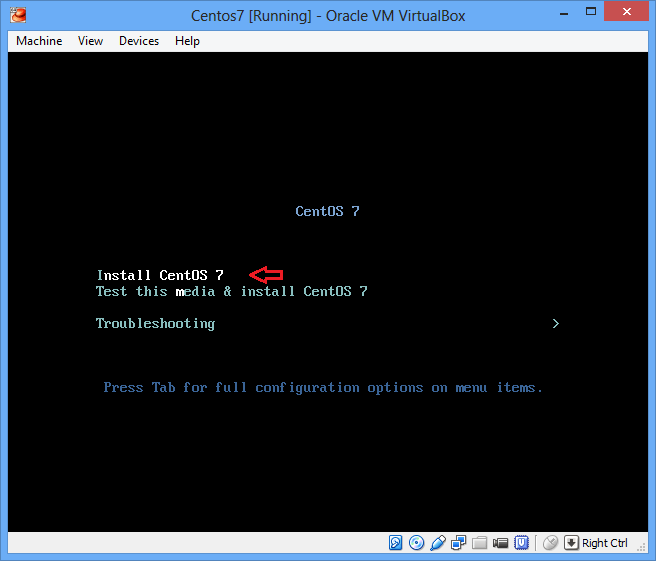
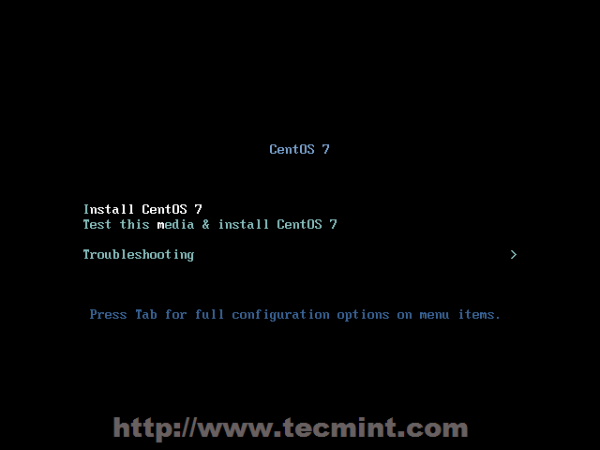
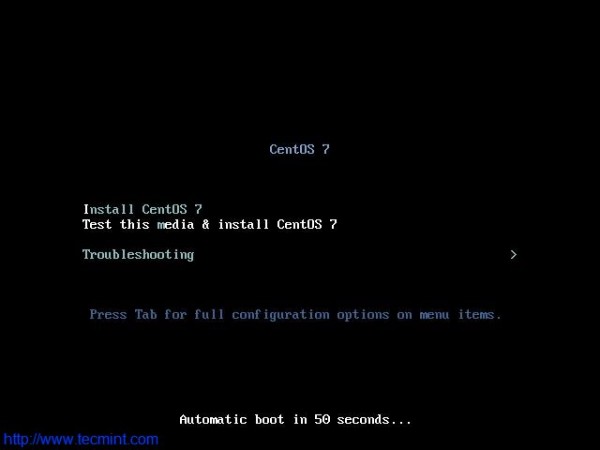
When the file is downloaded, boot from the ISO CD/DVD or ISO file if you’re using virtual machine. When prompted select to install CentOS 7
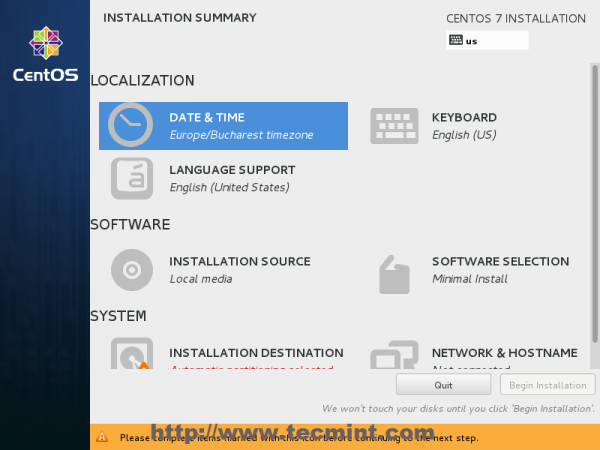
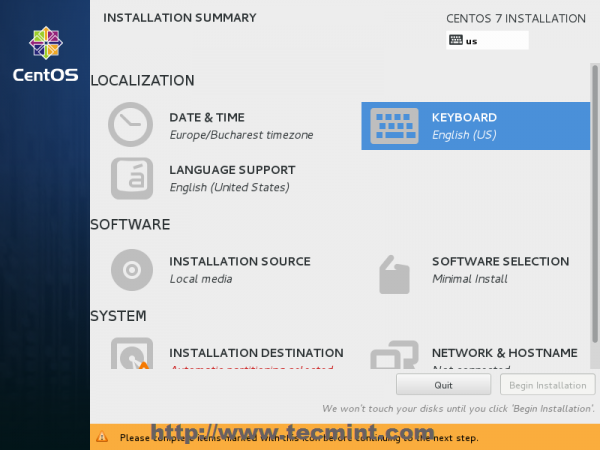
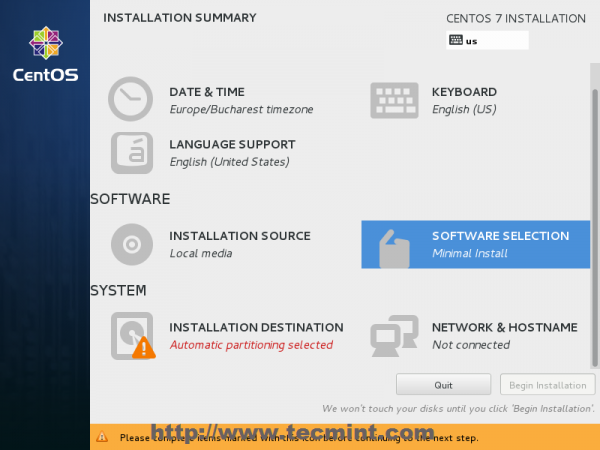
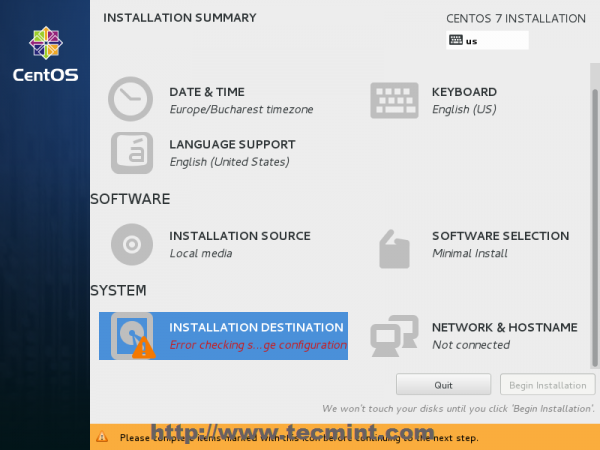
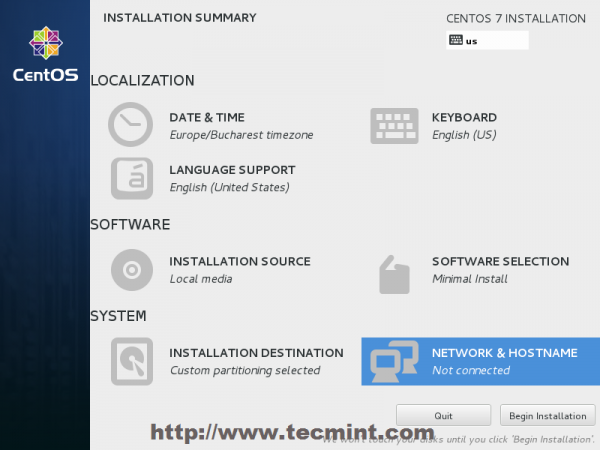
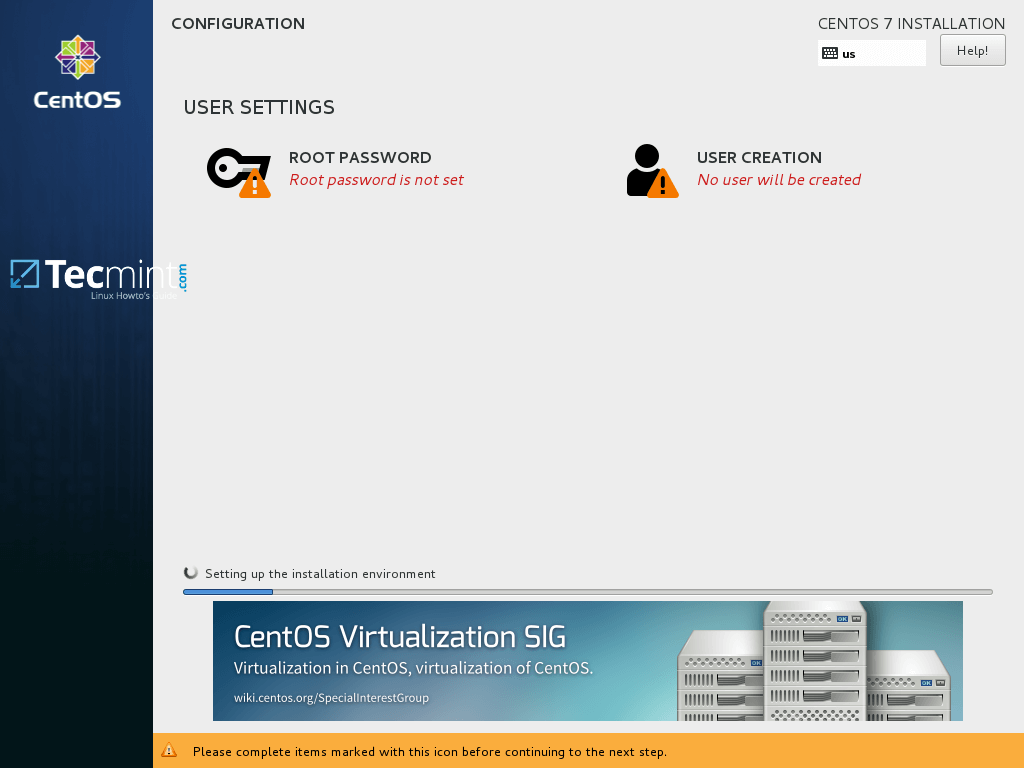
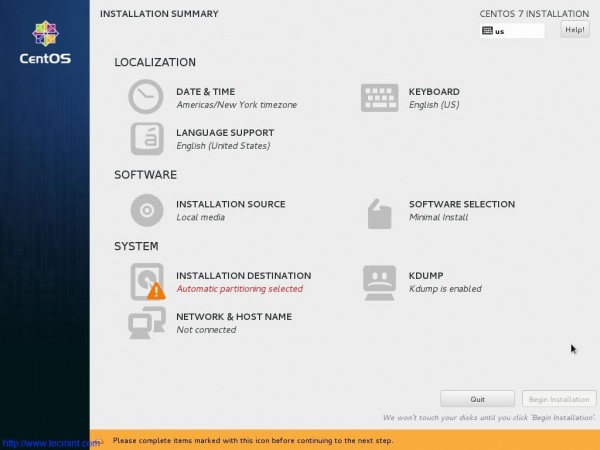
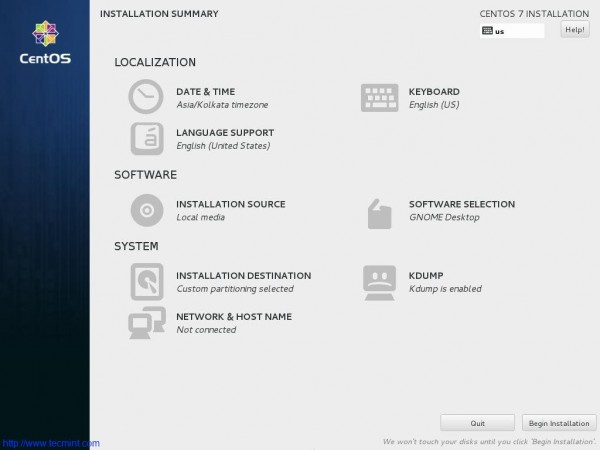
On the installation summary page, you may see different selections with yellow exclamation or warning marks. These are areas that required some setup.
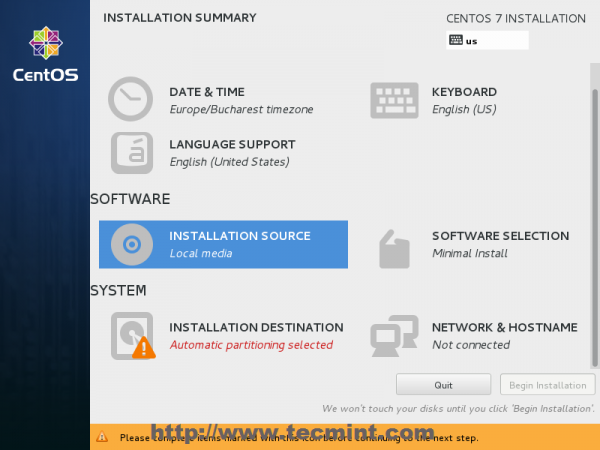
The Installation Source, Software Selection and Installation Destination are areas that you’ll have to specify before you will be able to continue with the installation.
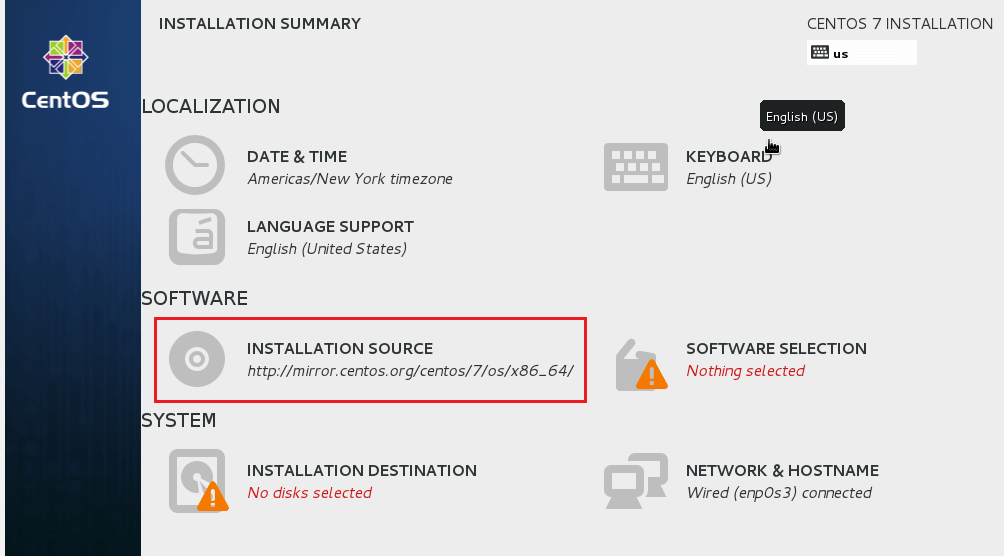
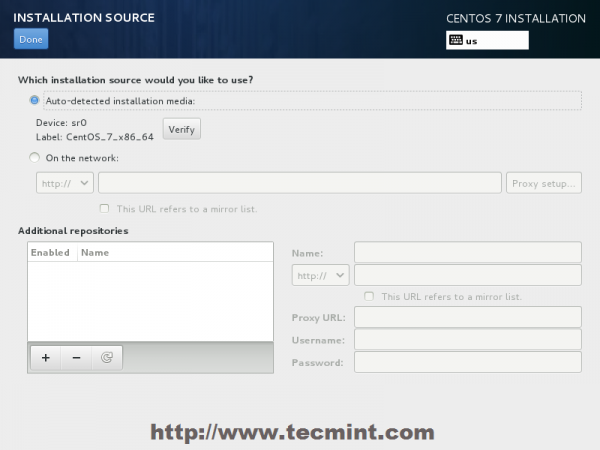
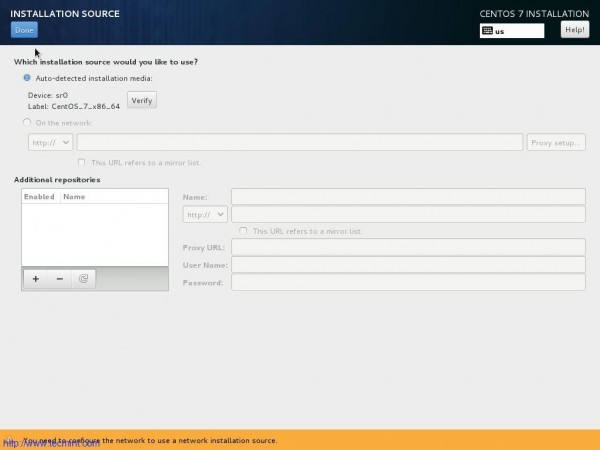
The first area you select is the Installation Source. This is where you’ll have to enter the mirror URL of CentOS. To configure it, select it and continue.
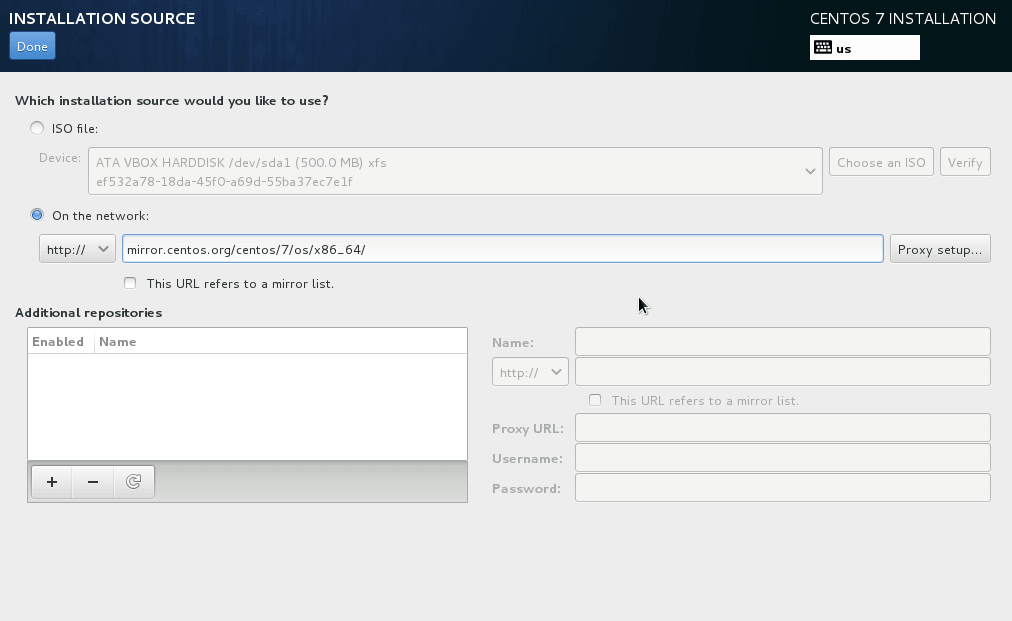
Then enter the software repository mirror to use to install the CentOS. There are many mirrors to choose from, but there two are popular.
http://mirror.centos.org/centos/7/os/x86_64/
Type either the 32-bit or 64-bit mirror to install the correct version. Most folks prefer CentOS 7 64-bit. When you’re finished, click Done to go back to the next screen.
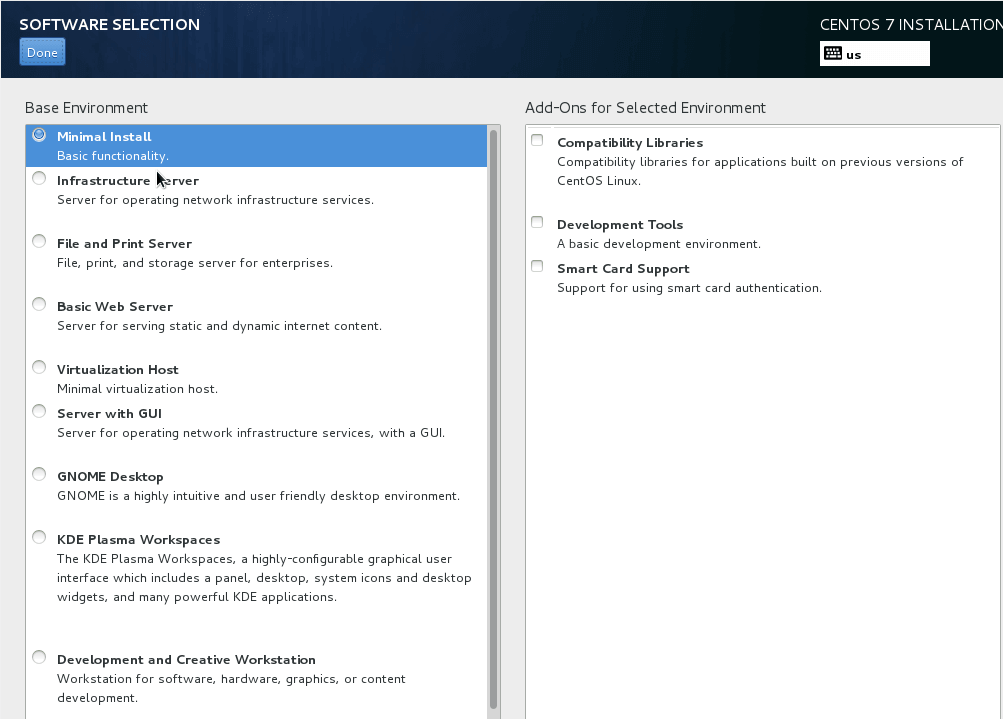
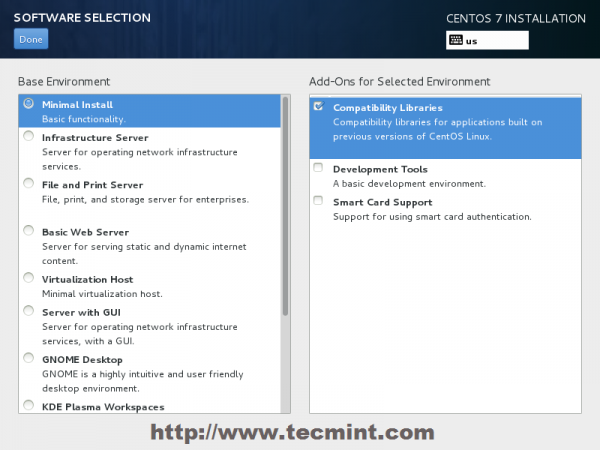
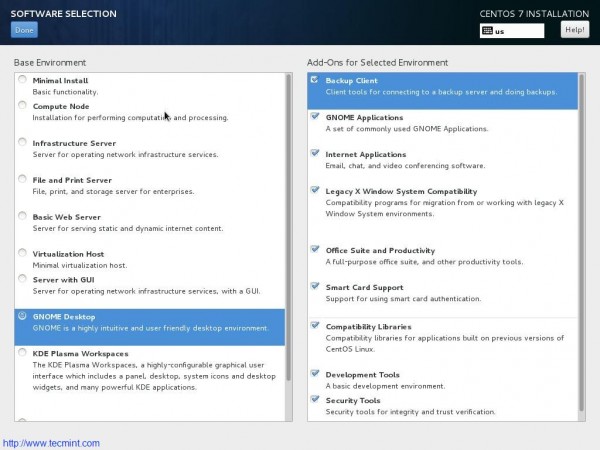
Next, select Software Selection to choose the packages and services to install. For my setup, I chose Minimal Install. This will only install the bare minimum of packages to get your system up and running. When you’re finished, click Done to go back to the previous screen.
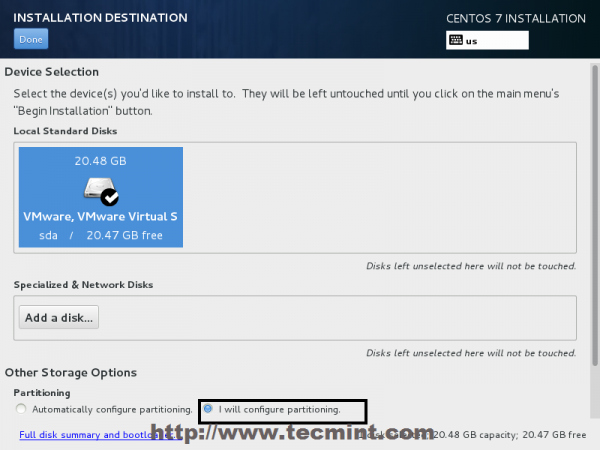
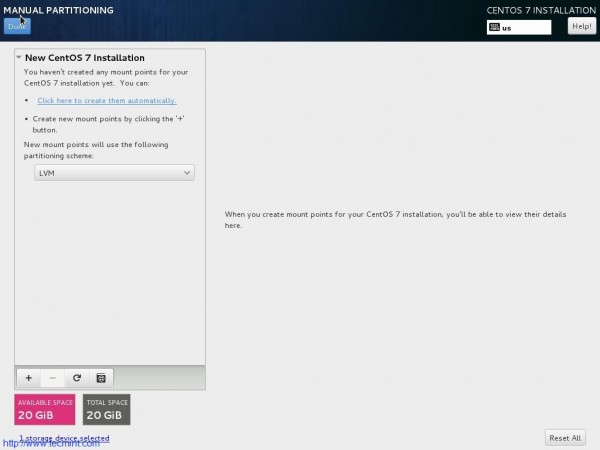
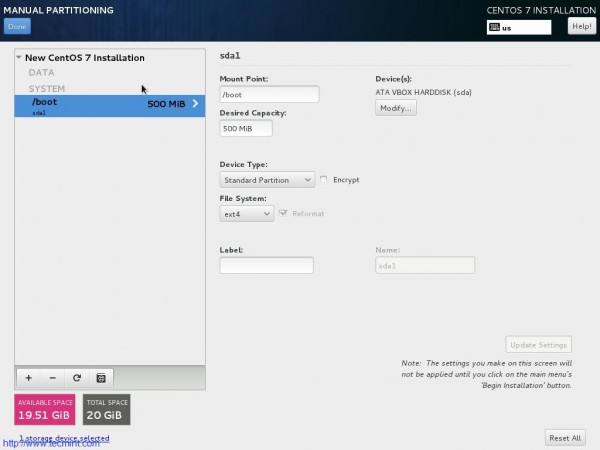
Then next area to is to select the Installation destination (Hard Drive). Select the hard drive partition and click Done with finished to go back to the previous screen.
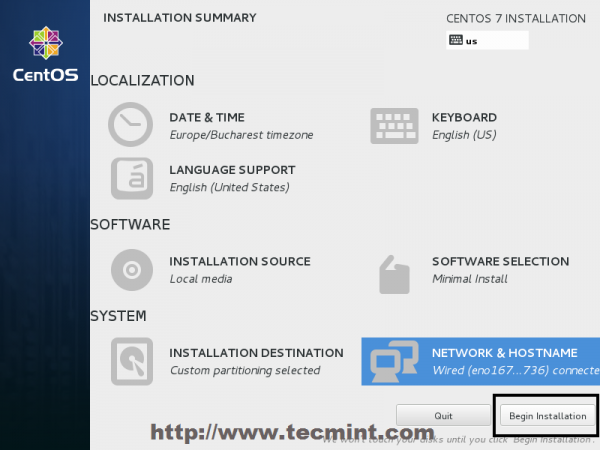
After satisfying all the areas that required setup, your screen should look complete. Click Begin Installation to start the installation.
That’s it! Reboot the machine and you’re done.
We all know CentOS – Community Enterprise Operating System as a linux distribution aiming at enterprise class community-supported computing platform.
CentOS aims to be 100% compatible with it’s upstream source Red Hat Enterprise Linux (RHEL). CentOS 7 was released on 7 th of July 2014 (RHEL 7 on 10th of June 2014) and its brings some major differences from it’s predecessor CentOS 6.
Only emphasising some of the big ones:
- Kernel 3.10.0
- Apache 2.4
Ifconfig is also gone so we all need to start using “ip addr list” and Grub2 is here so learn how to use it – mostly how to manually boot your system with Grub2 in case you ever need it! Finally Apache version from official repositories is 2.4.6 and MySQL Server is ditched from official repos – instead you can find MariaDB.
- Download CentOS 7 ISO
- Boot CentOS 7 ISO
- Choose Installation Language
- Installation Summary
- Date and Time
- Keyboard Layout
- Installation Source
- Software Selection
- Installation Destination (Partitioning 1)
- Manual Partitioning (Partitioning 2 & 3)
- Network & Hostname
- Begin Installation
- User Settings
- Login Prompt
- Requirements
- Download CentOS 7. 5 DVD ISO’s
- CentOS 7. 5 Installation
- Upgrade CentOS 7. 0 to CentOS 7
- Conclusion
Download CentOS 7 ISO
CentOS 7 ISO is available for download HERE.
Boot CentOS 7 ISO
Since we will be installing CentOS 7 on a virtual machine we have created a new VM and loaded CentOS 7 ISO.
Install CentOS 7 – Boot ISO
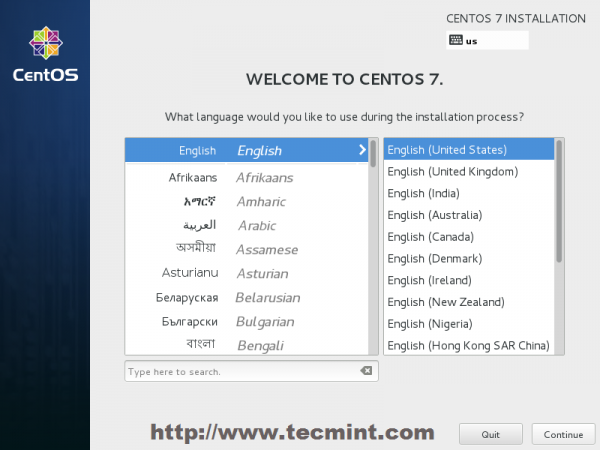
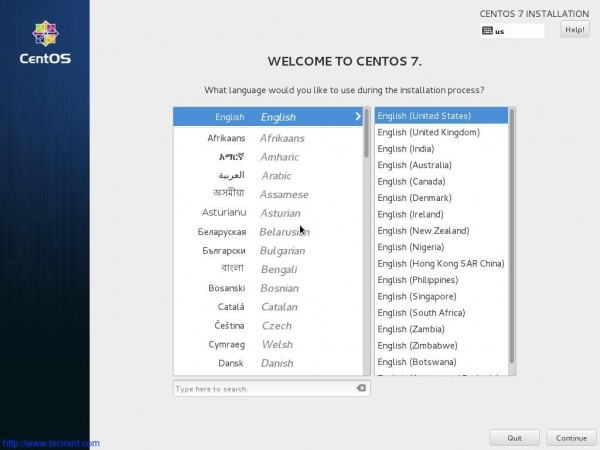
Choose Installation Language
Please choose the installation language in this step.
Install CentOS 7 – Installation Language
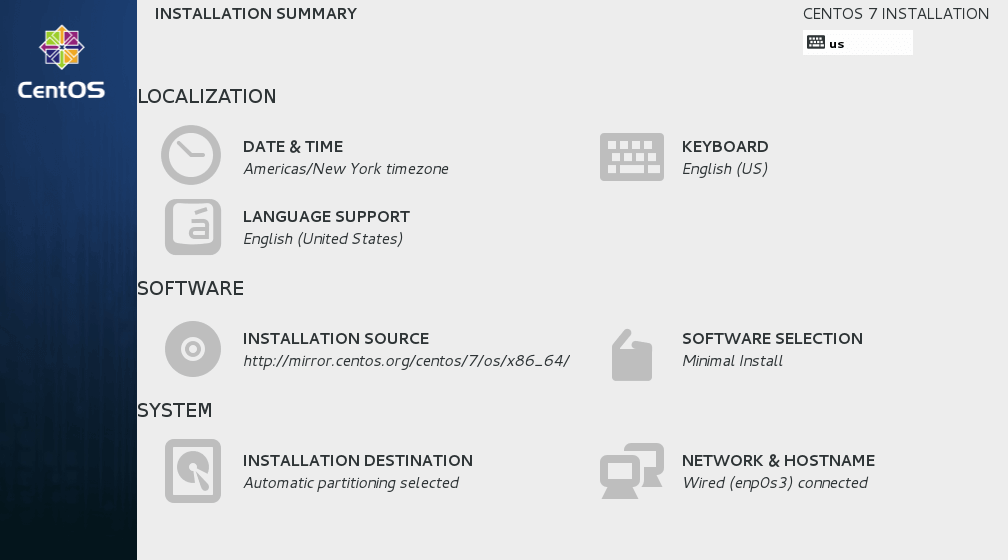
Installation Summary
Here is a summary of everything needed to configure in order to start installing CentOS 7 on your system.
Install CentOS 7 – Installation Summary
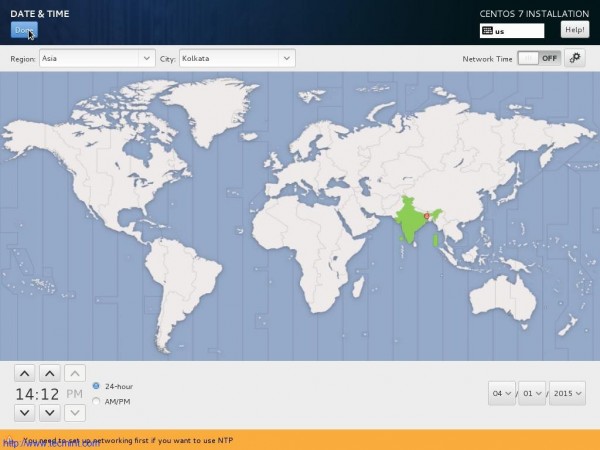
Date and Time
Please configure the date and time of your operating system.
Install CentOS 7 – Date and Time
Keyboard Layout
Please select your keyboard layout.
Install CentOS 7 – Keyboard Layout
Installation Source
Choose the installation source – usually CD/DVD ROM.
Install CentOS 7 – Installation Source
Software Selection
Choose the software you want to install.
Install CentOS 7 – Software Selection
Installation Destination (Partitioning 1)
Please choose the disk you want to install operating system on. Also check the box “I will configure partitioning” to manually partition the disk.
Install CentOS 7 – Installation Destination (Partitioning 1)
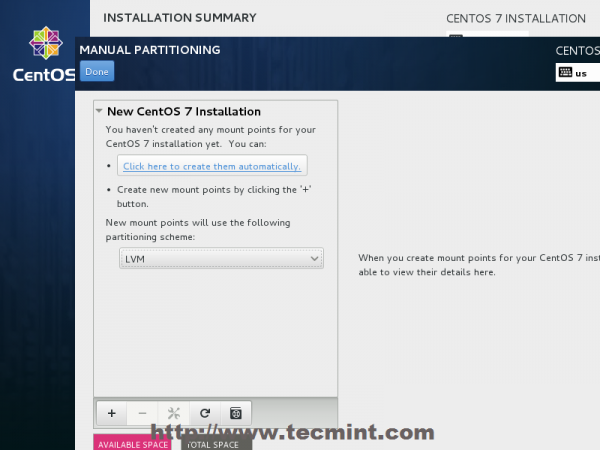
Manual Partitioning (Partitioning 2 & 3)
Configure partitions as desired and write changes to disk.
Install CentOS 7 – Manual Partitioning (Partitioning 2)
Install CentOS 7 – Manual Partitioning (Partitioning 3)
Network & Hostname
Configure networking and hostname.
Install CentOS 7 – Network & Hostname
Begin Installation
Finally start the CentOS 7 installation.
Install CentOS 7 – Begin Installation
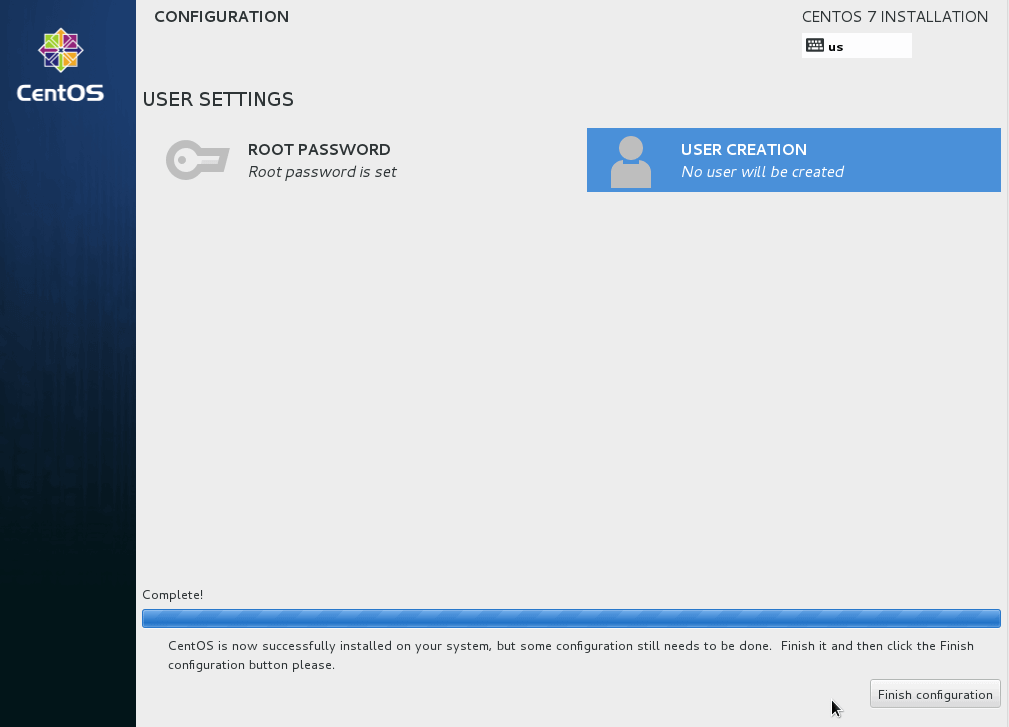
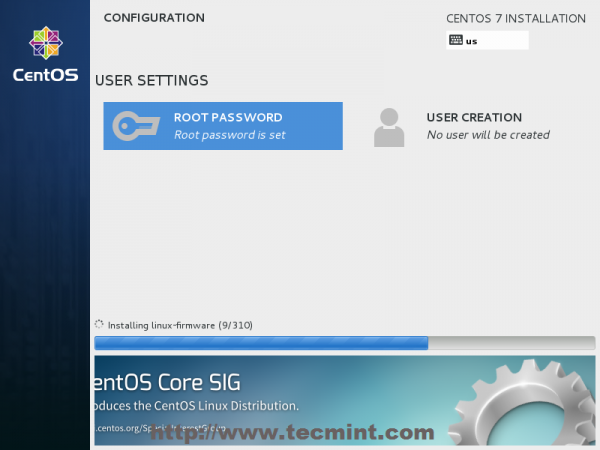
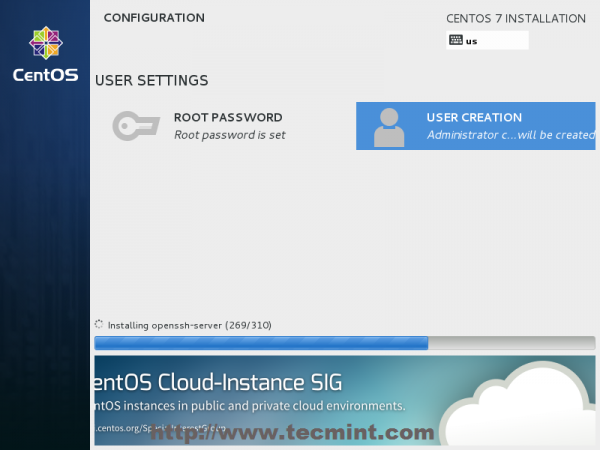
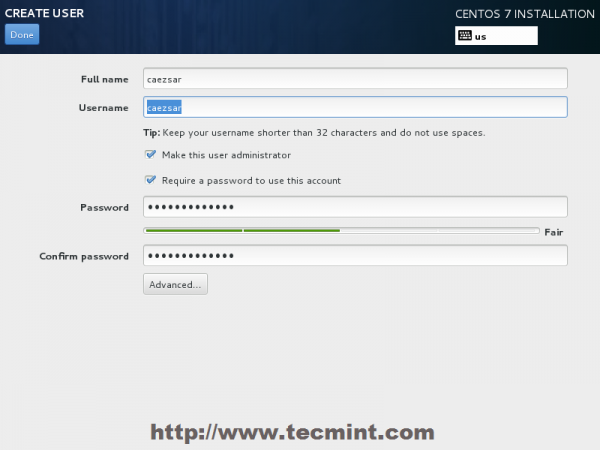
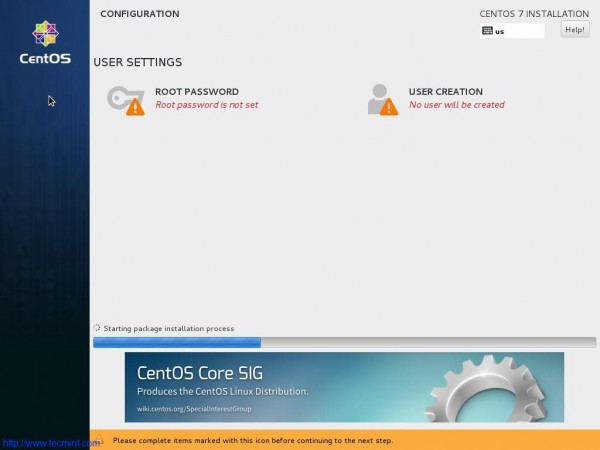
User Settings
When the CentOS 7 installation has completed click the “Reboot” button.
Install CentOS 7 – End Installation
Login Prompt
Install CentOS 7 – Login Prompt
Overall the CentOS 7 made one more step towards Fedora – wether we like it or not!
Installation of CentOS 7
If you want to find out more about what’s new in this release of CentOS 7.0 holds and download links, I suggest reading the previous article on release announcements:
Requirements
1. After downloading the last version of CentOS using above links or using official CentOS download page. Burn it to a DVD or create a bootable USB stick using LiveUSB Creator called Unetbootin.
CentOS 7 Boot Menu
3. The system will start loading media installer and a Welcome screen should appear. Select your Installation Process Language, that will assist you through the entire installation procedure and click on Continue.

CentOS Installer Loading
Select Installation Process Language
4. The next step, present screen prompt is Installation Summary. It contains a lot of options to fully customize your system. First thing you may want to setup is your time settings. Click on Date & Time and select your server physical location from the provided map and hit on upper Done button to apply configuration.
Select Date & Time and Location
5. The next step is to choose your Language Support and Keyboard settings. Choose your main and extra language for your system and when you’re finished hit on Done button.
Select Language and Keyboard
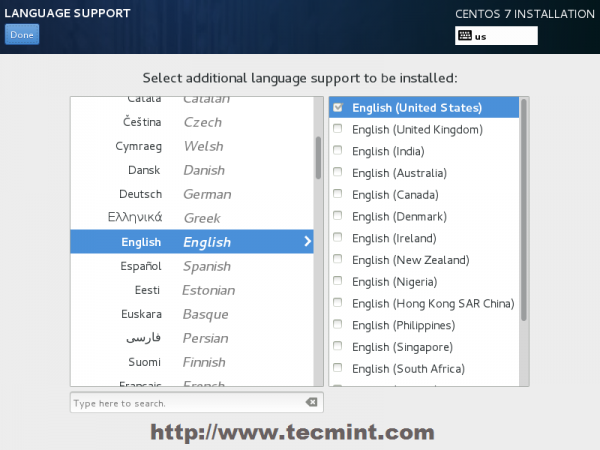
Select English Language
6. The same way choose your Keyboard Layout by hitting the plus button and test your keyboard configuration using the right input filed. After you finish setting up your keyboard, again hit on upper Done button to apply changes and go back to main screen on Installation Summary.
Choose Keyboard Layout
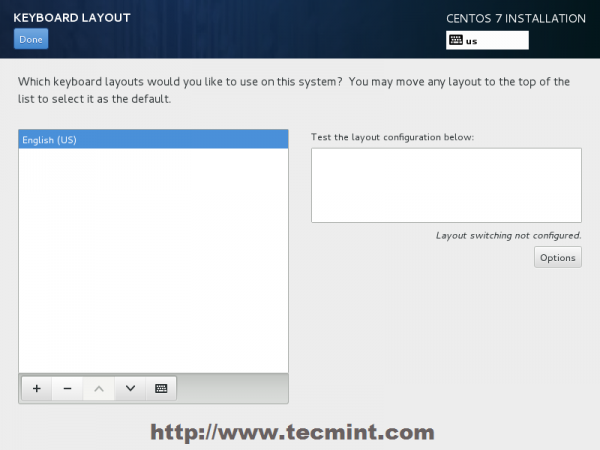
Choose English Keyboard
7. On the next step you can customize your installation by using other Installation Sources than your local DVD/USB media, such as a network locations using HTTP, HTTPS, FTP or NFS protocols and even add some additional repositories, but use this methods only if you know what you’re doing. So leave the default Auto-detected installation media and hit on Done to continue.
Choose Installation Sources
Auto Detect Installation Type
8. On the next step you can choose your system installation software. On this step CentOS offers a lot of Server and Desktop platform environments that you choose from, but, if you want a high degree of customization, especially if you are going to use CentOS 7 to run as a server platform, then I suggest you select Minimal Install with Compatibility Libraries as Add-ons, which will install a minimal basic system software and later you can add other packages as your needs require using yum groupinstall command.
Select CentOS 7 Minimal Install
9. Now it’s time to partition your hard-drive. Click on Installation Destination menu, select your disk and choose I will configure partitioning.
Choose Installation Destination
Installation Device Selection
Select LVM Partition Type
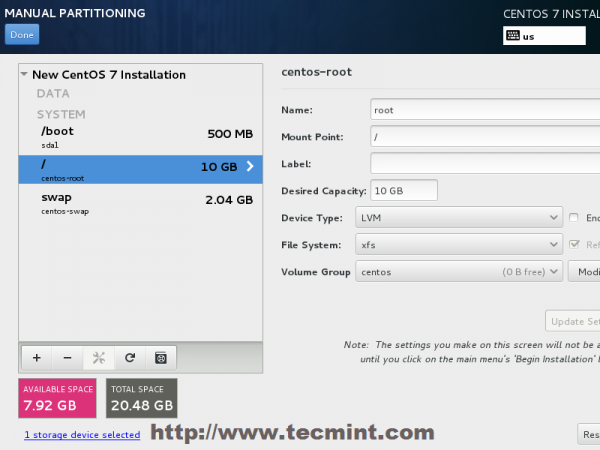
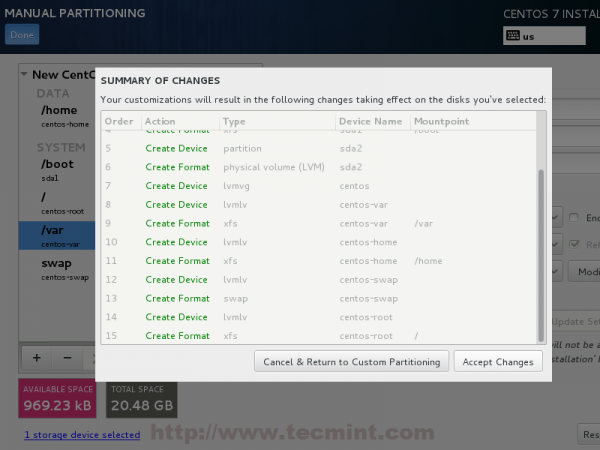
11. If you are not pleased with the default partition layout done automatically by the installer you can completely add, modify or resize your partition scheme and when you finish hit on Done button and Accept Changes on the Summary of Changes prompt.
Summary of Partition Changes
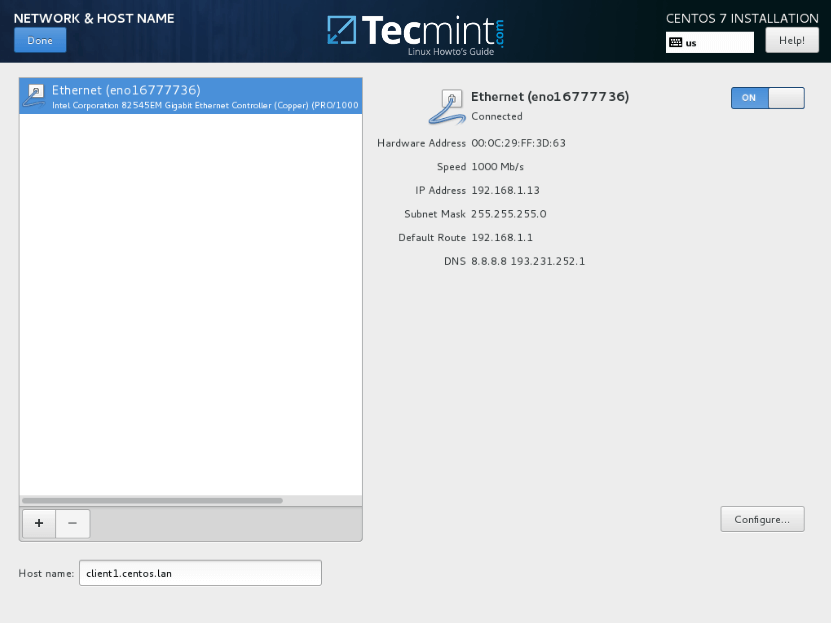
12. The next step is to set your system hostname and enable networking. Click on Network & Hostname label and type your system FQDN (Fully Qualified Domain Name) on Hostname filed, then enable your Network interface, switching the top Ethernet button to ON.
If you have a functional DHCP server on you network then it will automatically configure all your network setting for enabled NIC, which should appear under your active interface.
Set System Hostname
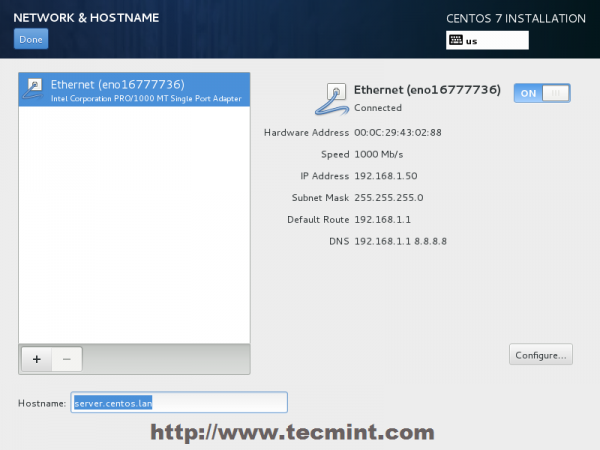
Enable Ethernet Interface
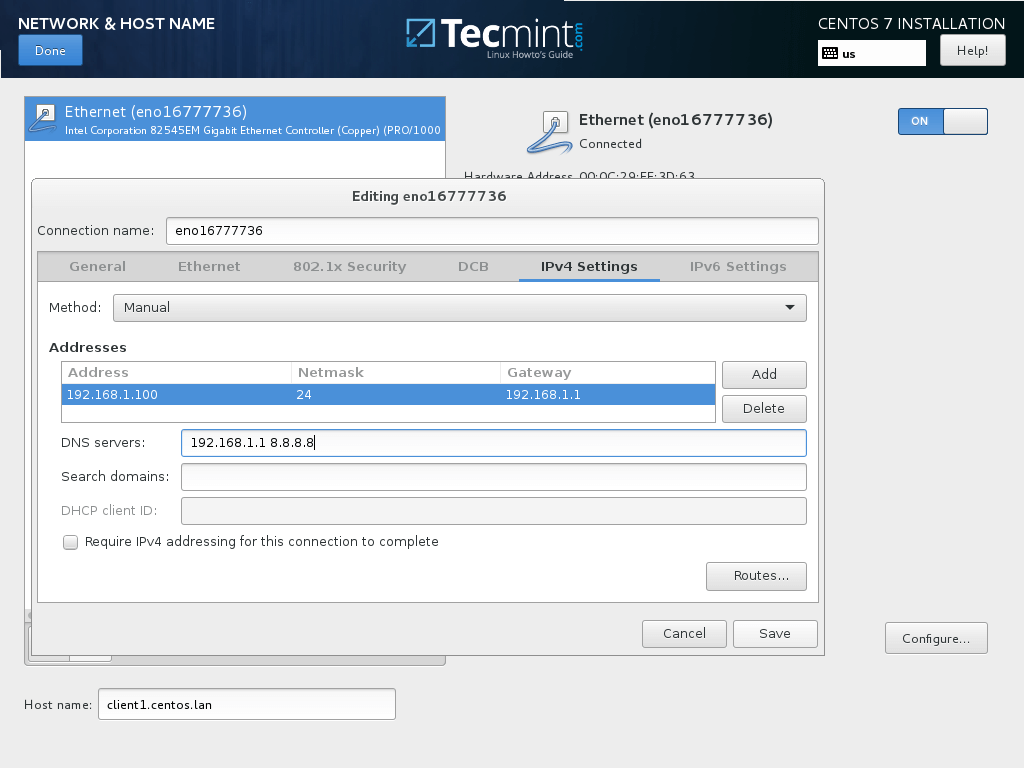
13. If your system will be destined as a server it’s better to set static network configuration on Ethernet NIC by clicking on Configure button and add all your static interface settings like in the screenshot below, and when you’re finished hit on Save button, disable and enable Ethernet card by switching the button to OFF and ON, and, then hit on Done to apply setting and go back to main menu.
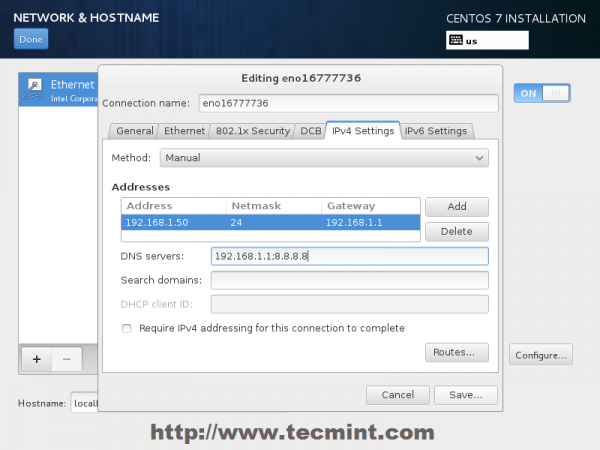
Enter Network Settings
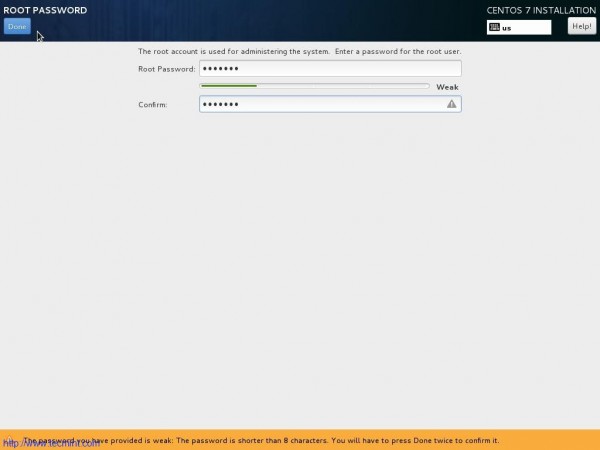
14. Now it’s time to start installation process by pressing on Begin Installation button and set up a strong password for root account.
Click on Begin Installation
Select Root Password
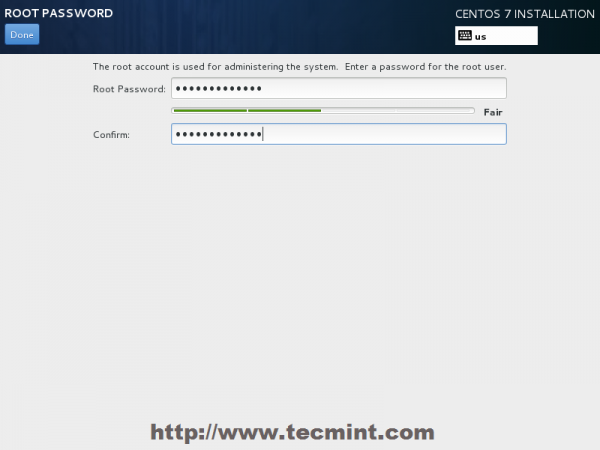
Enter Root Password
CentOS 7 Installation Process
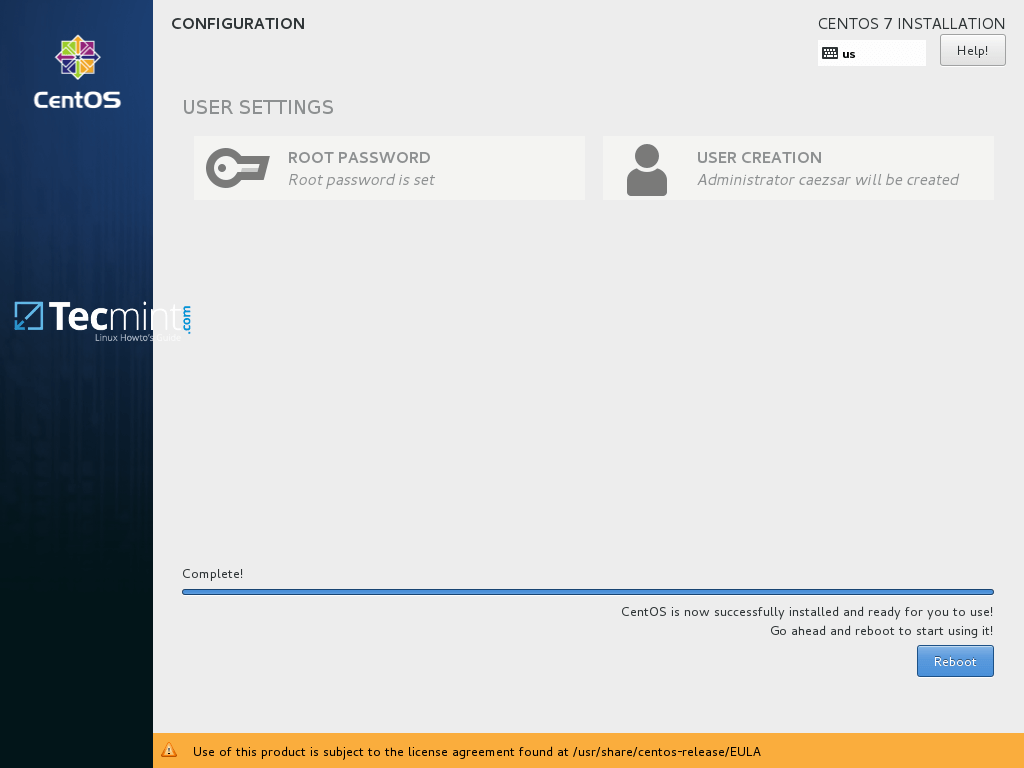
16. After the installation process finishes, the installer will show a successfully message on screen, demanding to reboot your system in order to use it.
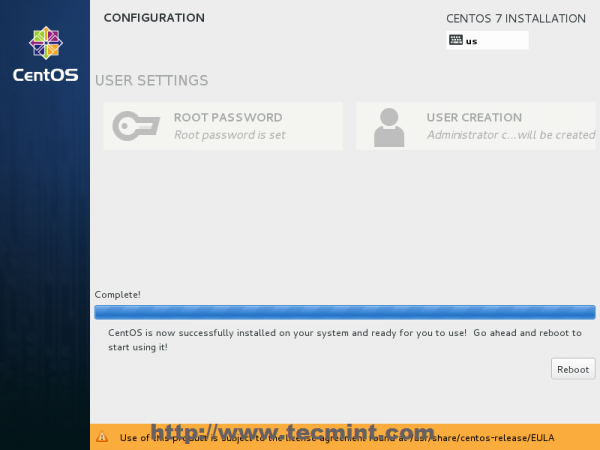
CentOS 7 Installation Complete
Congratulation! You have now installed last version of CentOS on your bare new machine. Remove any installation media and reboot your computer so you can login to your new minimal CentOS 7 environment and perform other system tasks, such as update you system and install other useful software needed to run day to day tasks.
The latest version of CentOS 7.5, a Linux platform based on sources of Red Hat Enterprise Linux 7.5, has been released in May this year with many bug fixes, new packages & upgrades, such as Microsoft Azure, Samba, Squid, libreoffice, SELinux, systemd and others and support for the 7th generation of Intel Core i3, i5, i7 processors.
It’s highly recommended to go through release notes as well as the upstream technical notes about the changes before an installation or up-gradation.
Download CentOS 7. 5 DVD ISO’s
# yum udpate
We strongly recommend you to perform a fresh installation rather than upgrading from other major CentOS versions.
In order to properly perform the installation of CentOS 7.5 on a UEFI based machine, first enter your motherboard UEFI settings by pressing a special key (F2, F11, F12 depending on motherboard specifications) and assure that QuickBoot/FastBoot and Secure Boot options are disabled.
CentOS 7. 5 Installation
1. After you’ve downloaded the image from the above link, burn it to a DVD or create a bootable UEFI compatible USB drive using Rufus utility.
Place the USB/DVD in the appropriate motherboard drive, reboot your machine and instruct the BIOS/UEFI to boot-up from the DVD/USB by pressing a special function key (usually F12, F10 depending on the vendor specifications).
Once the ISO image boots-up, the first screen will appear on your machine output. From the menu select Install CentOS 7 and hit Enter to continue.
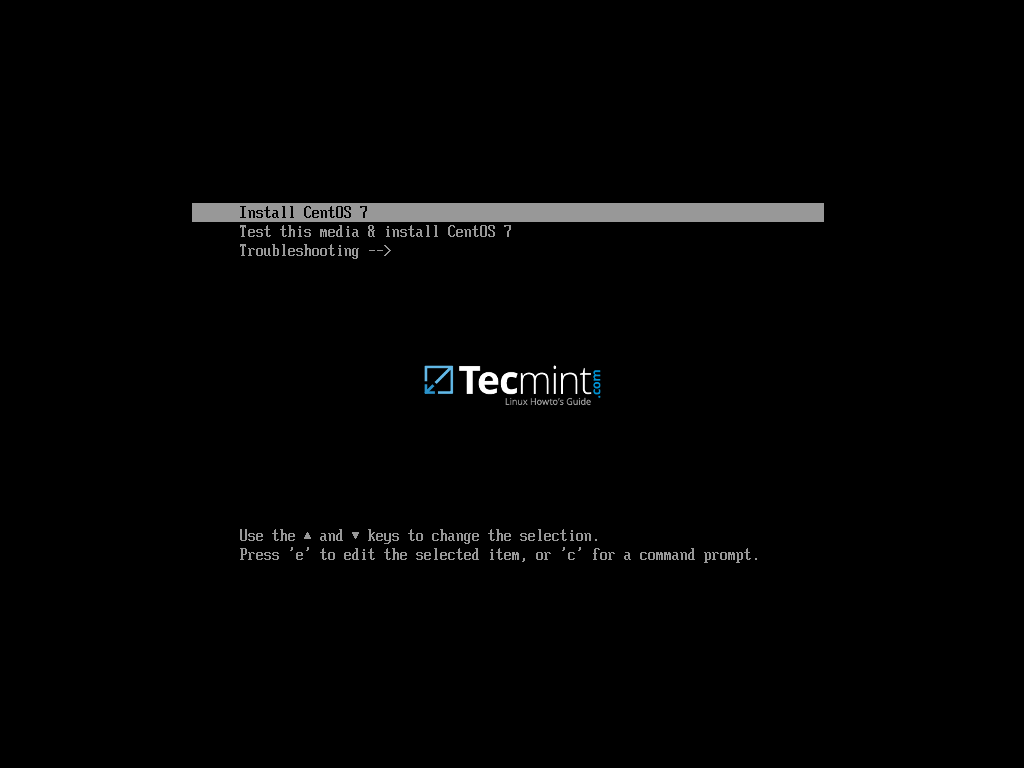
CentOS 7.5 Boot Menu
2. After the install ISO image has been loaded into your machine RAM, the welcome screen will appear. Choose the language you want to perform the installation process and press hit on Continue button.
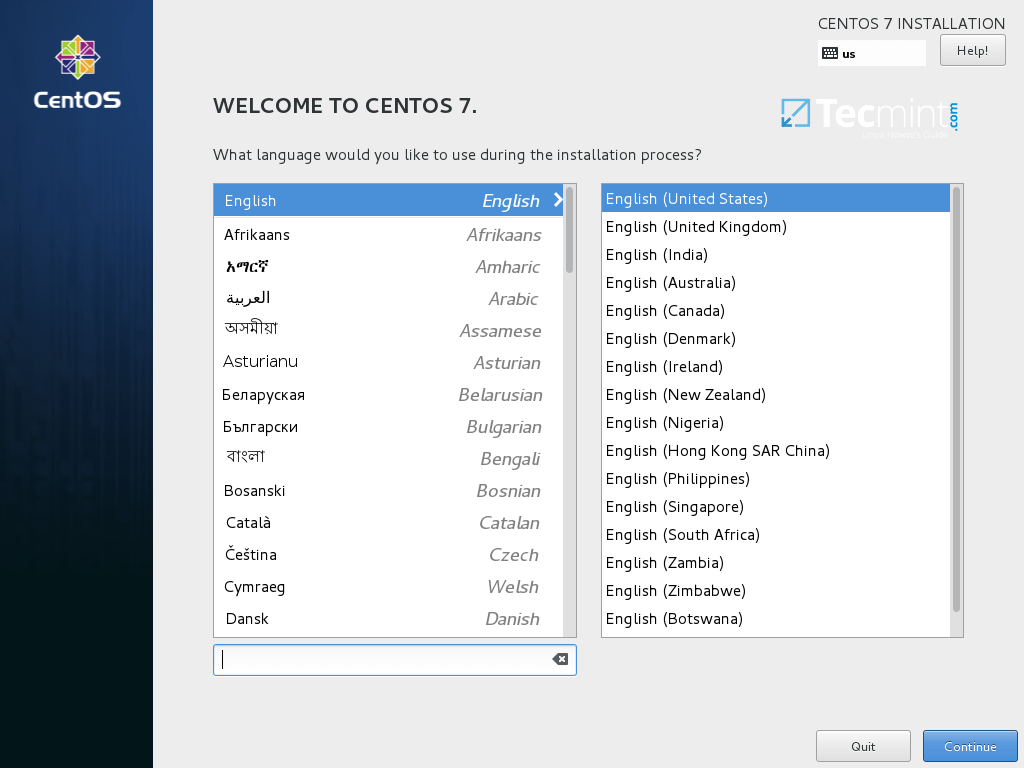
Select CentOS 7.5 Installation Language
3. On the next screen hit on Date and Time and choose your geographical location from the map. Make sure the date and time are correctly configured and hit on Done button to go back to the main installer screen.
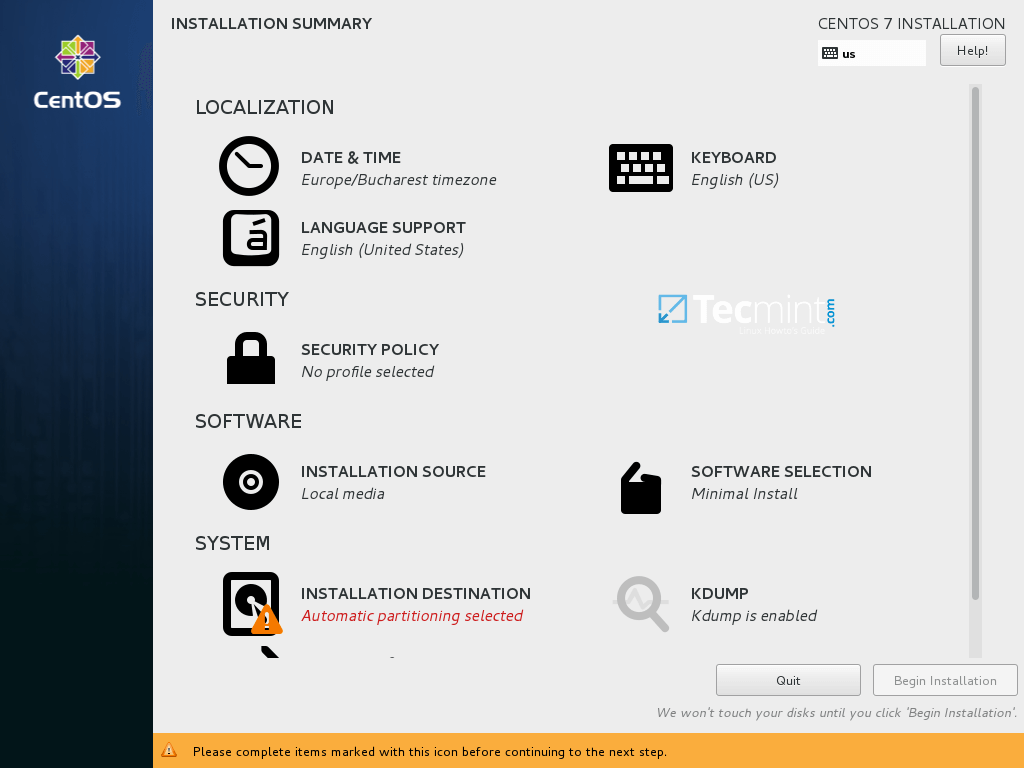
CentOS 7.5 Installation Summary
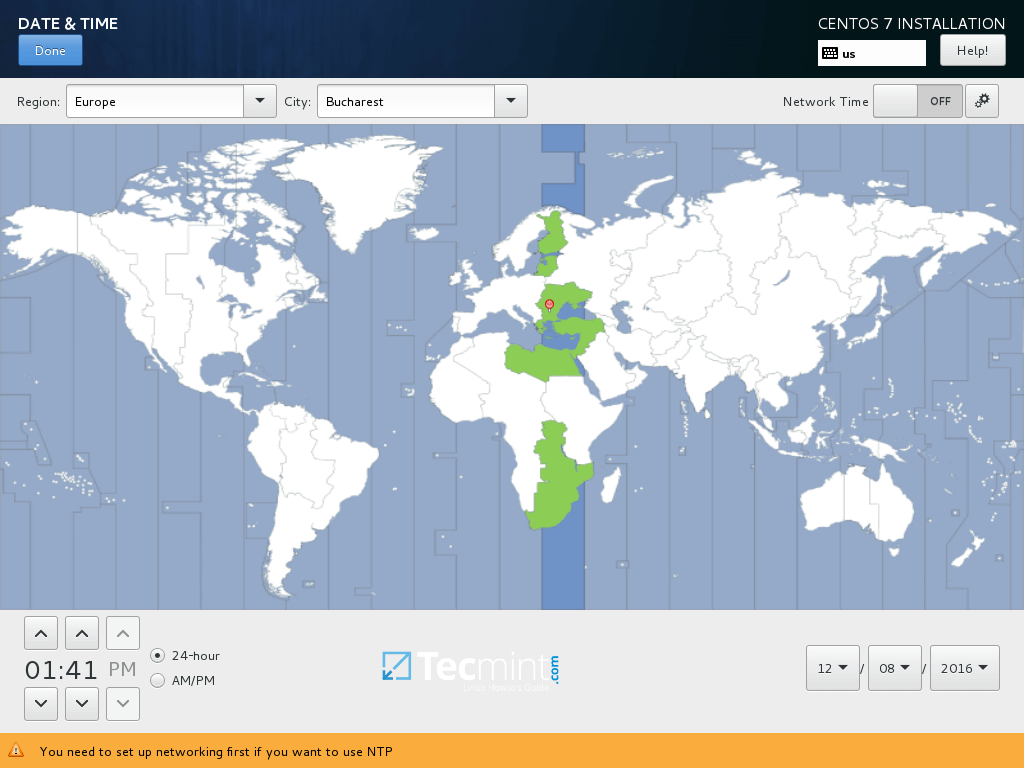
Select Date and Time
4. On the next step setup the keyboard layout by hitting on Keyboard menu. Choose or add a keyboard layout and hit on Done to continue.
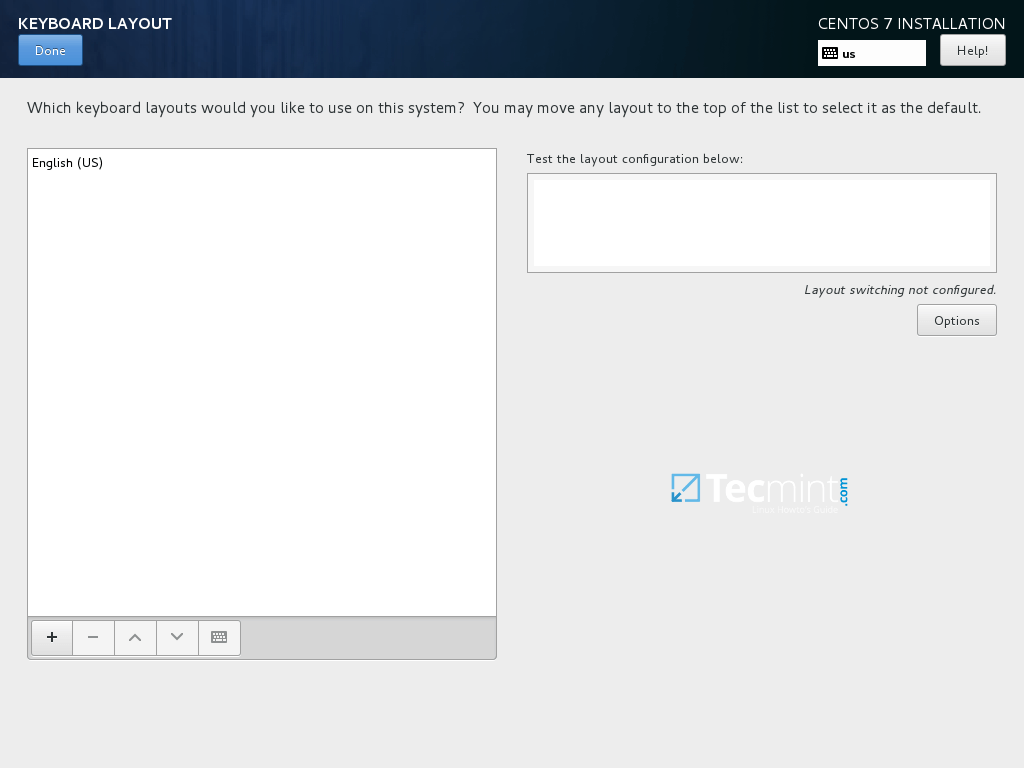
Select Keyboard Layout
5. Next, add or configure the language support for your system and hit Done to move to the new step.
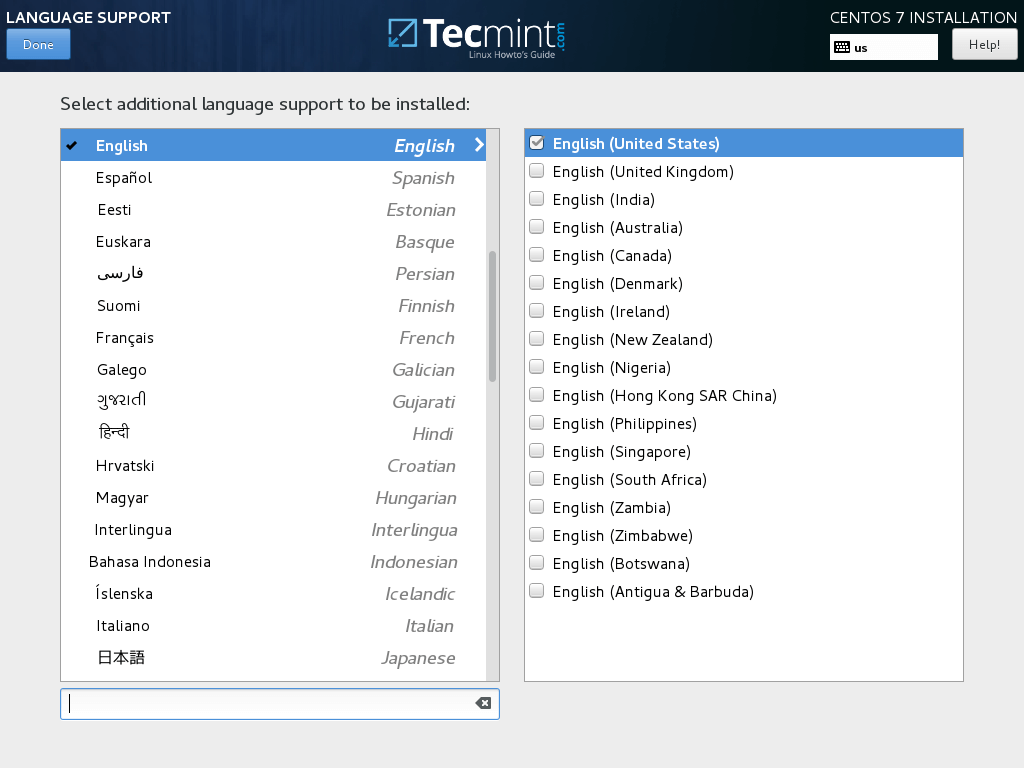
Select Language Support
6. In this step you can setup your system Security Policy by choosing a security profile from the list.
Set the desired security profile by hitting on Select profile button and Apply security policy button to ON. When you finish click on Done button to continue with the installation process.
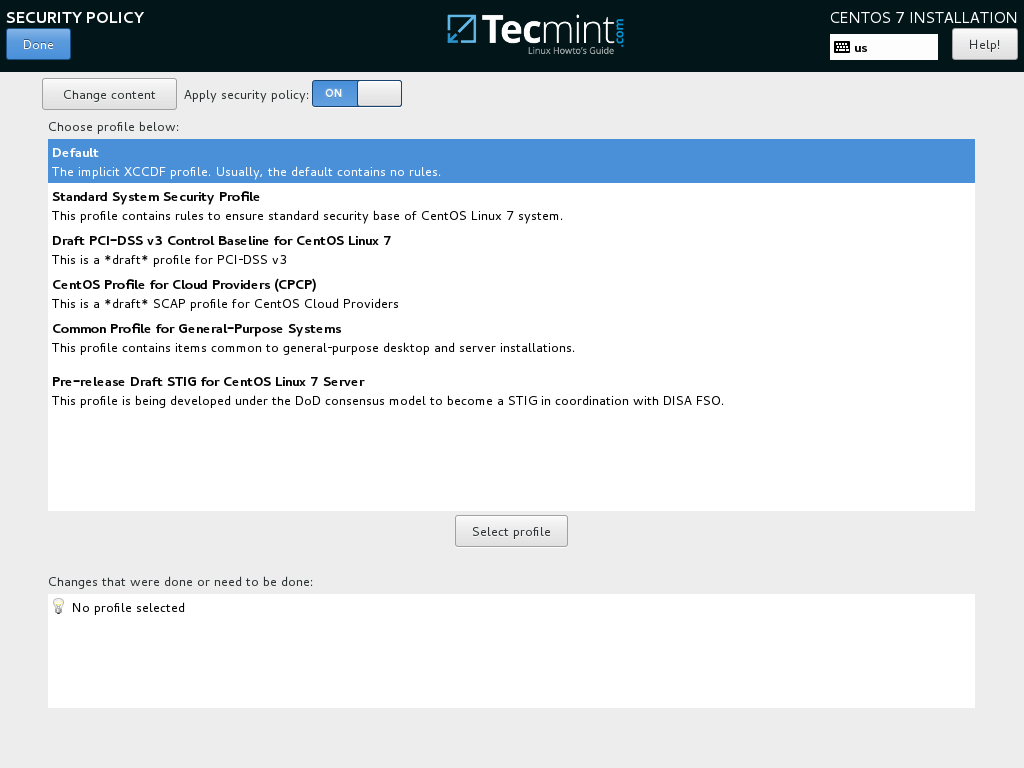
Enable CentOS 7.5 Security Policy
7. On the next step you can configure your base machine environment by hitting on Software Selection button.
From the left list you can opt to install a desktop environment (Gnome, KDE Plasma or Creative Workstation) or choose a server custom installation type (Web server, Compute Node, Virtualization host, Infrastructure server, Server with a graphical interface or File and Print Server) or perform a minimal installation.
In order to subsequently customize your system, select Minimal Install with Compatibility Libraries add-ons and hit on Done button to continue.

CentOS 7.5 Software Selection
For a full Gnome or KDE Desktop environment use the below screenshots as a guide.
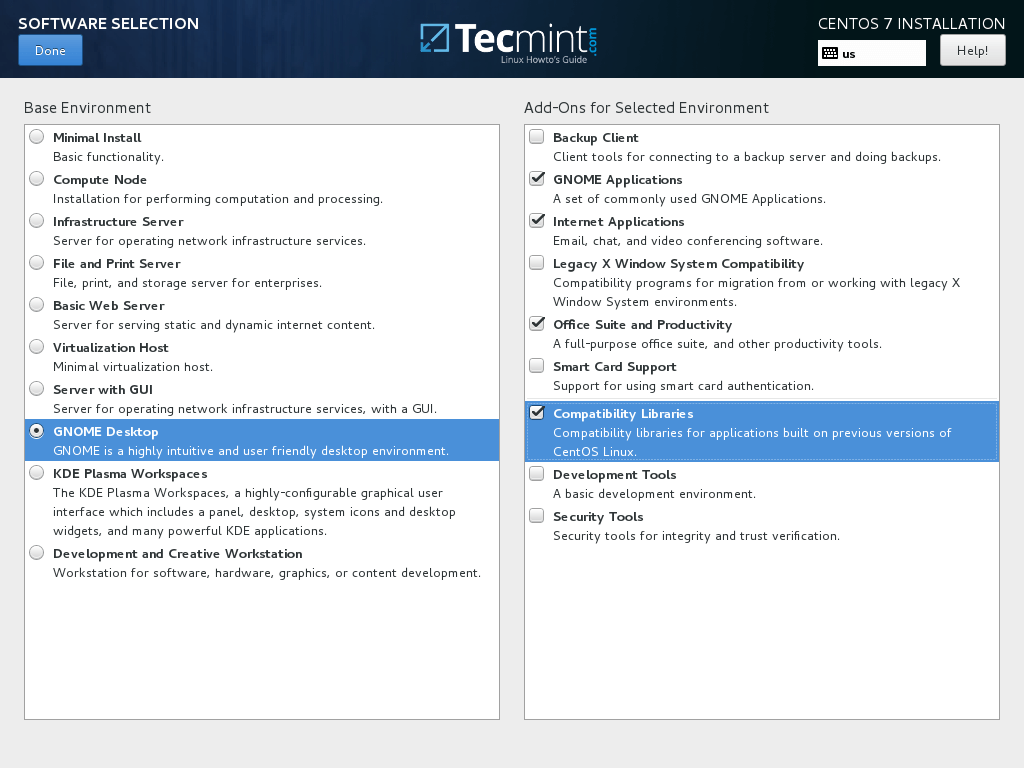
Gnome Desktop Software Selection
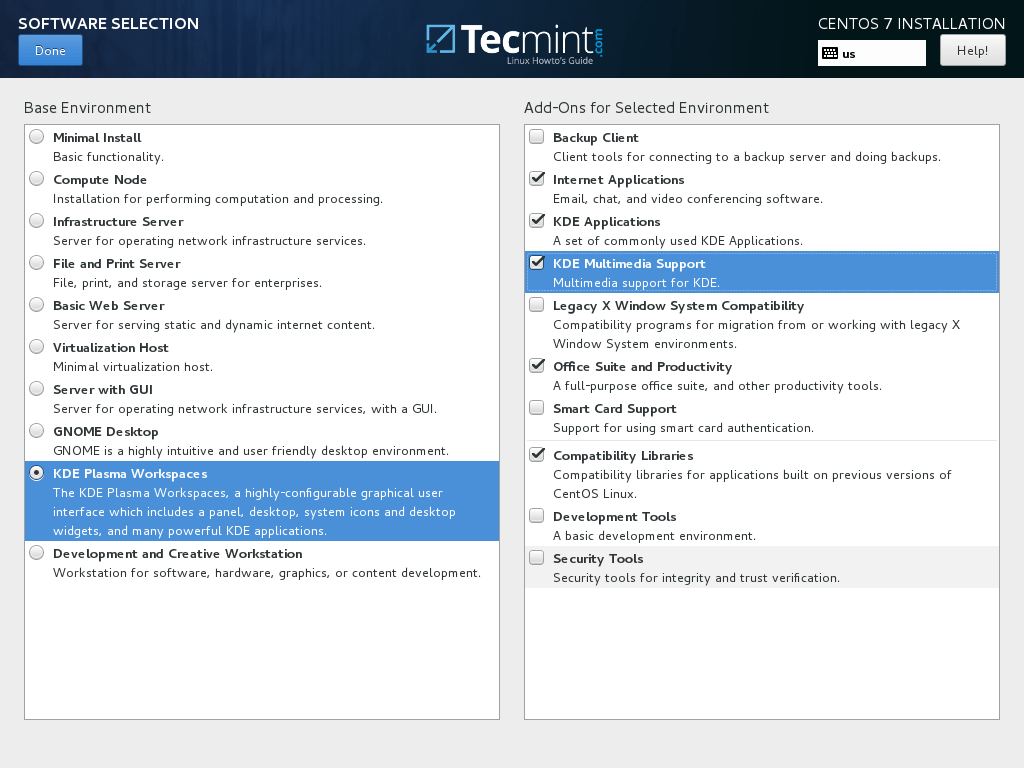
KDE Desktop Software Selection
The range of services you can choose from is diversified, from Backup, DNS or e-mail services to File and Storage services, FTP, HA or Monitoring tools. Choose only the services that are crucial for your network infrastructure.
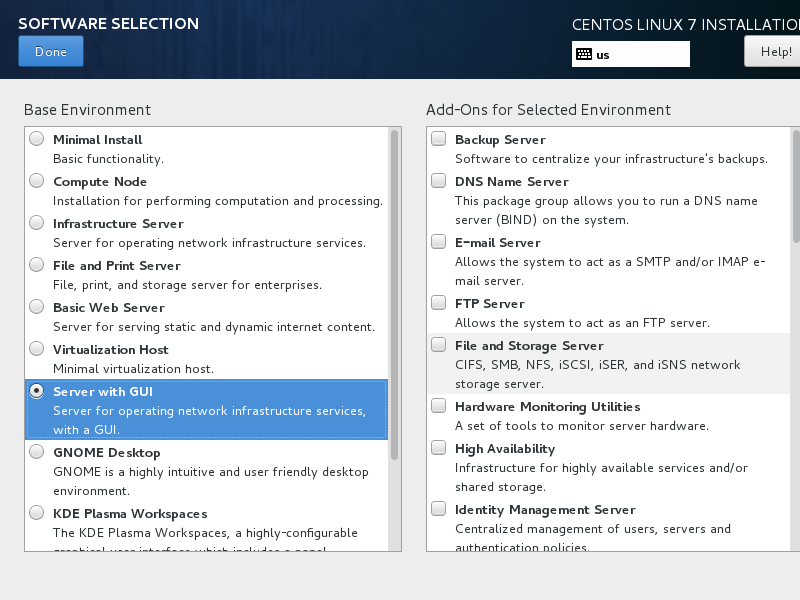
Select Server with GUI
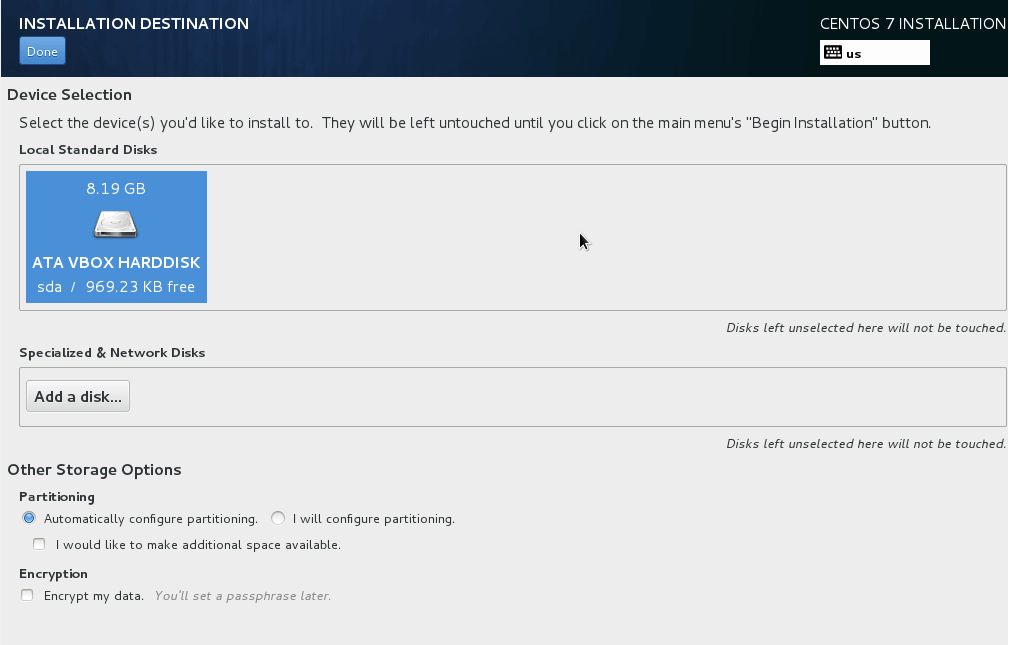
9. Leave the Installation Source as default in case you’re not using other specific network locations such as HTTP, HTTPS, FTP or NFS protocols as additional repositories and hit on Installation Destination in order to create hard disk partitions.
On the Device selection screen make sure your local machine hard disk is checked. Also, on Other Storage Options assure that Automatically configure partitioning is selected.
This option ensures that your hard disk will be properly partitioned according to your disk size and Linux file system hierarchy. It will automatically create /(root), /home and swap partitions on your behalf. Hit on Done to apply the hard drive partition scheme and go back to the main installer screen.
Important: If you want to create custom layout with custom partition sizes, you can select “I will configure partitioning” option to create custom partitions.
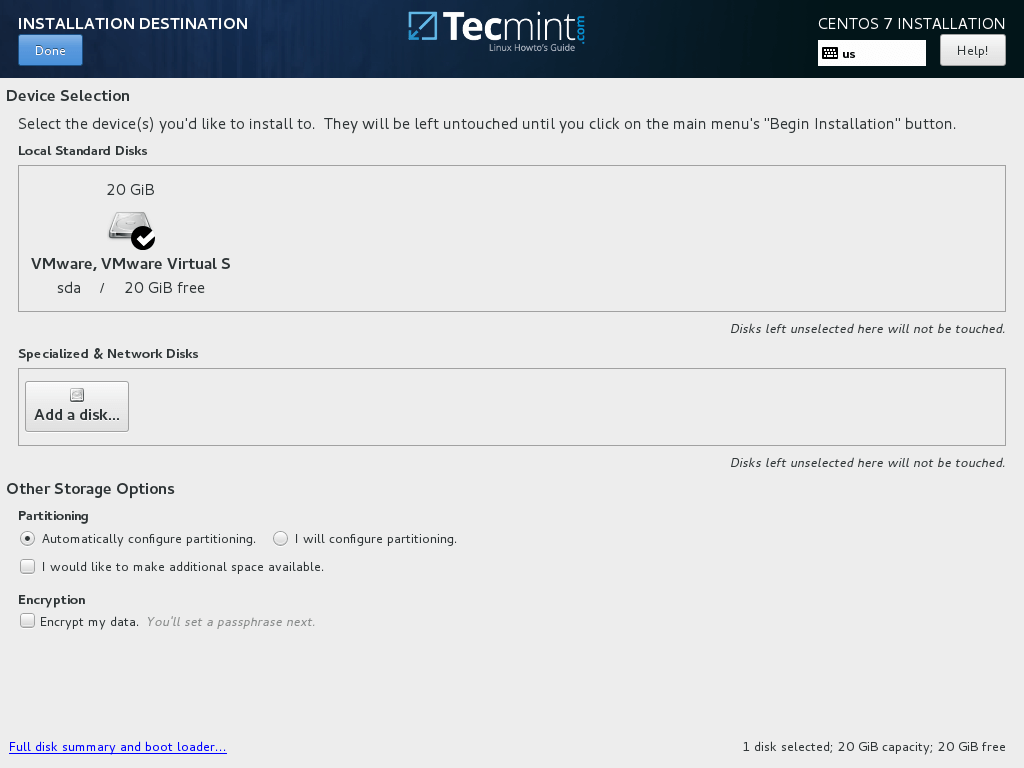
Select CentOS 7.5 Installation Destination
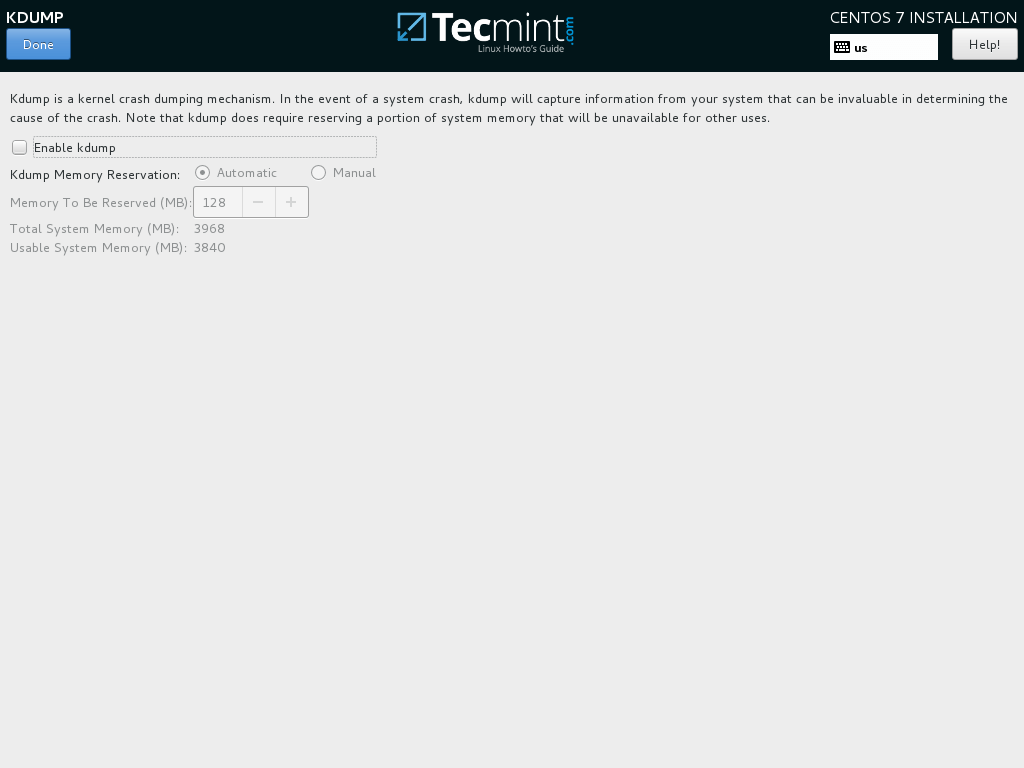
10. Next, hit on KDUMP option and disable it if you want to free RAM in your system. Hit Done to apply changes and go back to main installation screen.
11. In the next step set-up your machine hostname and enable network service. Hit on Network & Hostname, type your system Fully Qualified Domain Name on Host name and activate the network interface by switching the Ethernet button from OFF to ON in case you have a DHCP server in your LAN.
Set Network and Hostname
12. In order to statically configure your network interface hit on Configure button, manually add your IP settings as illustrated in the below screenshot and hit on Save button to apply changes. When you finish, hit on Done button to return to main installer menu.
Configure Network and IP Address
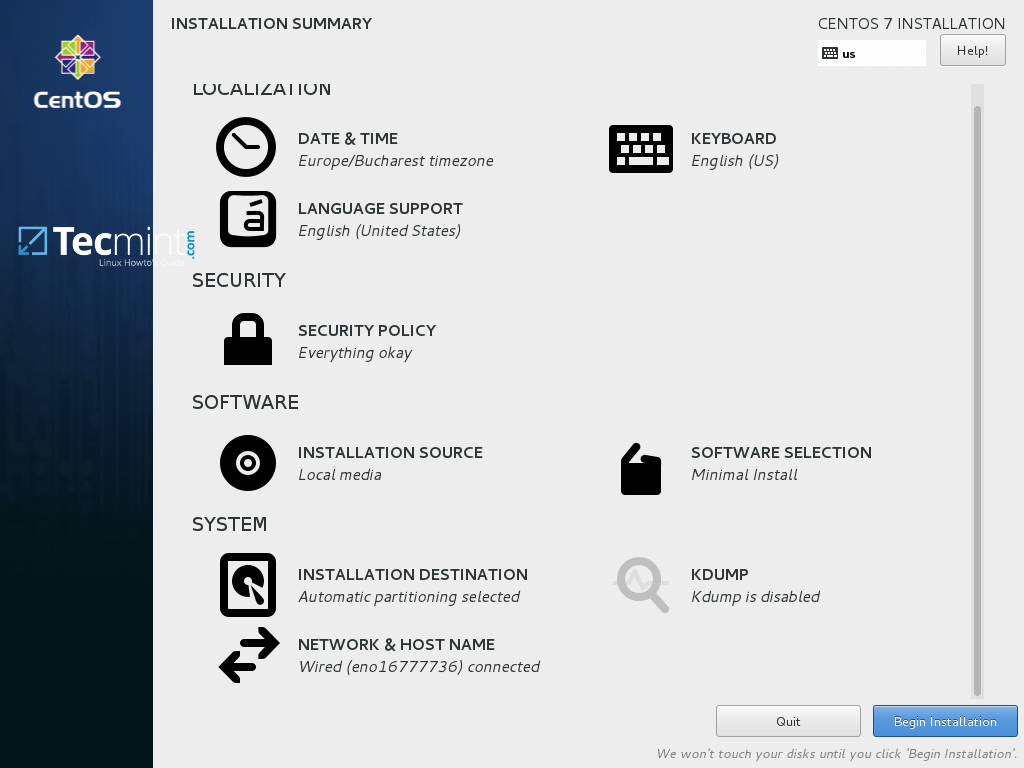
13. Finally, review all configurations so far and if everything seems in place, hit on Begin Installation button to start the installation process.
Begin CentOS 7.5 Installation Guide
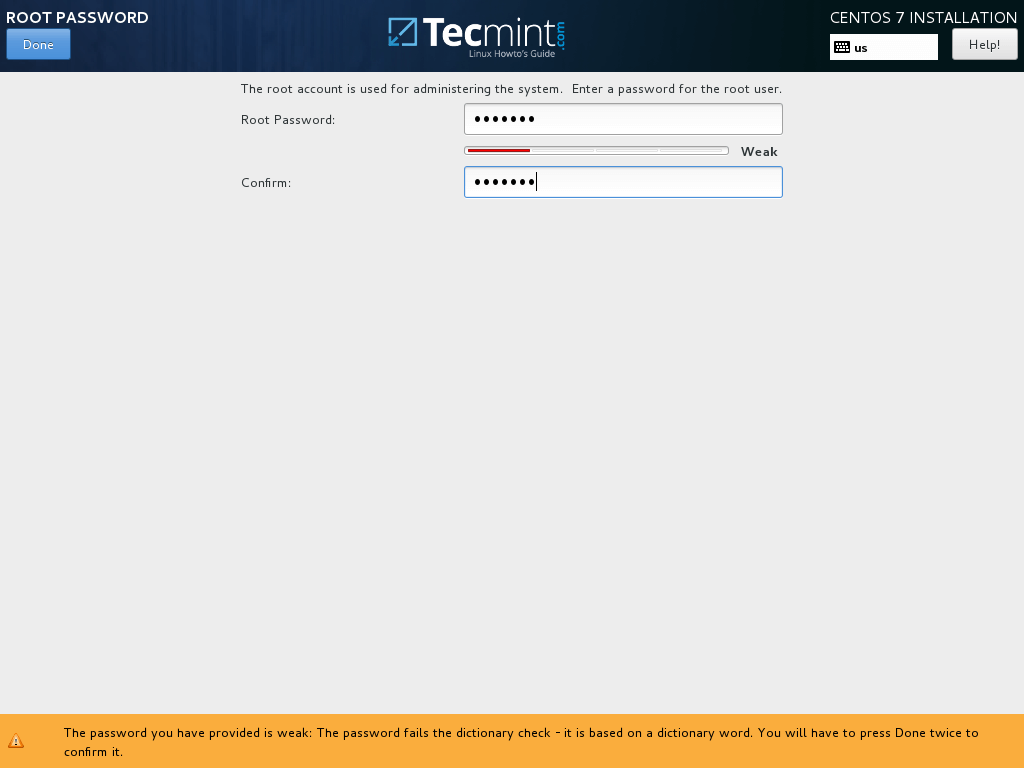
Set Root Password
When you finish this last section hit on Done button and wait for the installation process to finish.
16. After a few minutes the installer will report that CentOS has been successfully installed on your machine. In order to use the system you just have to remove the installation media and reboot the machine.
CentOS 7.5 Installation Complete
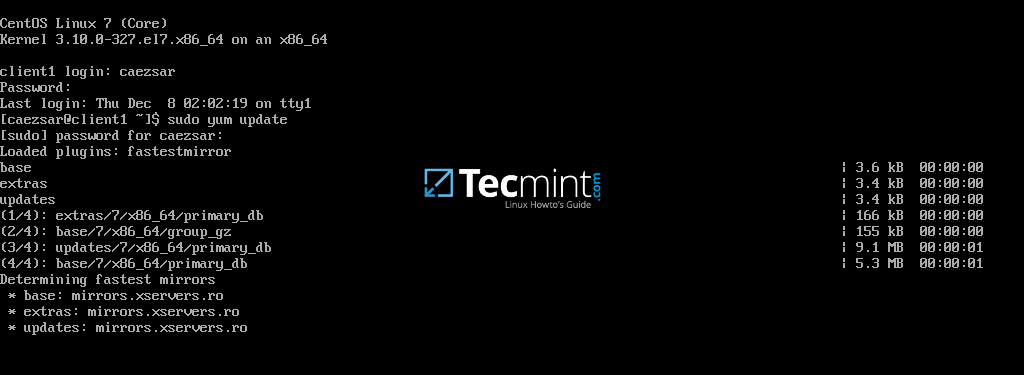
17. After reboot, log in to the system using the credentials created during the installation process and make sure perform a full system update by issuing the below command with root privileges.
$ sudo yum update
Update CentOS 7.5
Answer with yes to all questions asked by yum package manager and finally, reboot the machine again (use sudo init 6) in order to apply new kernel upgrade.
$ sudo init 6
That’s all! Enjoy the latest release of CentOS 7.5 on your machine.
The Community Enterprise Operating System (CentOS) has proudly announced the availability of first point release of CentOS 7. Derived from Red Hat Enterprise Linux 7.1, this release has been tagged as 1503 and it is available for x86 compatible x86_64 bit machines.
Major Changes
For those who are new to CentOS and installing it for the first time, the may download CentOS from this link. Download DVD ISO if you are not sure what to download.
Minimum Requirements
1. Once downloaded, check the sha256sum against the one provided by official site to ensure integrity of downloaded ISO.
$ sha256sum /downloaded_iso_image_path/CentOS-7-x86_64-DVD-1503.iso
2. Burn the image to a DVD or make a boot-able USB stick. If you interested in knowing how to make a boot-able USB stick you may like to refer to Unetbootin tool.
3. Select the device to boot from, in your BIOS option. As soon as CentOS 7.1 (1503) boots, select Install Centos 7.
CentOS-7.1 Boot Menu
4. Select the desired Language for the installation process.
Select Installation Language
5. The interface to configure Date, Time, Keyboard, Language, Installation Source, Software selection, Installation Destination, Kdump, Networks and Hostname.
6. Set Date and Time. Click done.
Select Date Time
7. Set Installation Source. You may include network source as well. If you are not sure of network source better stick to auto-detected Installation Media. Click Done.
Auto Detect Installation Source
8. Next select Software selection. If you are setting up production server, You should go with Minimal Install.
Minimal Install will install just the basic software and services required for basic setup and nothing extra. This way you can configure your server and packages, more on a monolithic side. ( I am selecting Gnome Desktop, since I will be using GUI and I will not be using it in production).
9. Next is Installation Destination. Select disk and Choose “I will configure Partitioning”. You may encrypt your data with paraphrase for additional security. Click done.

10. Time to partition Manually. Select LVM in Partitioning Scheme.
Select LVM Partitioning
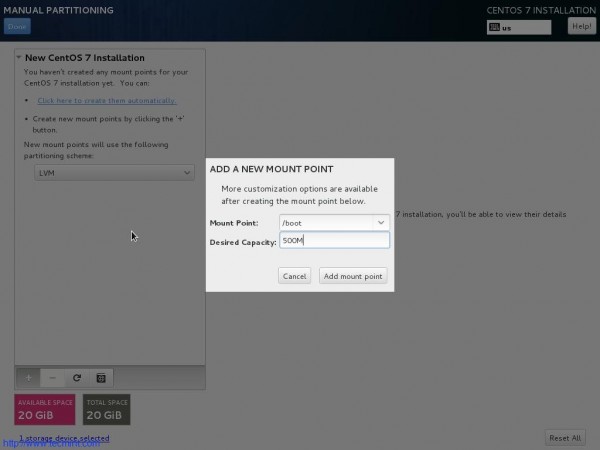
11. Add a new Mount Point (/boot) by clicking on + also enter Desired Capacity. Finally Click “Add Mount Point”.

Create Boot Partition
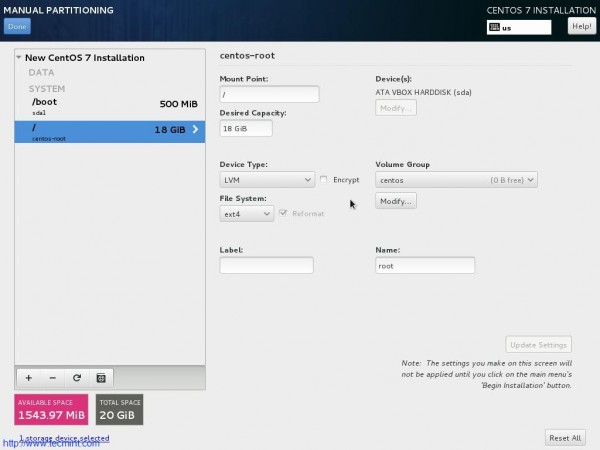
12. From the resulting interface change file system to ext4 and click “Update Settings”.
Set ext4 Filesystem
13. Click on + and add another Mount Point (/). Enter Desired Capacity and Click “Add Mount Point”.
14. Again, from the resulting interface select ‘ext4‘ as file System and Click “Update Settings”.
Select ext4 Filesystem
15. Again Click on + icon and add another mount point (swap). Enter Desired capacity and click “Add Mount Point”.
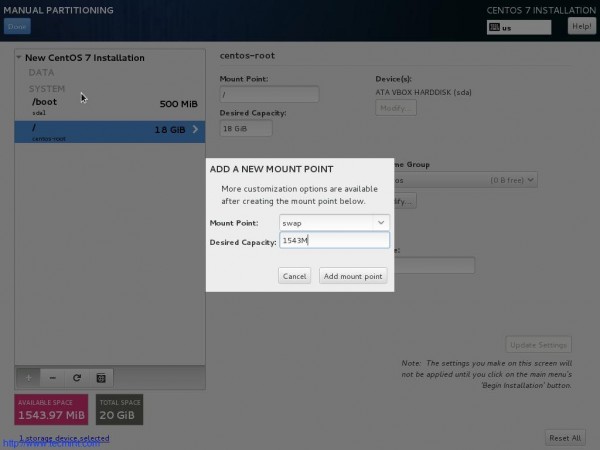
Create Swap Partition
16. Finally “Accept Changes” when prompted for disk format and create.
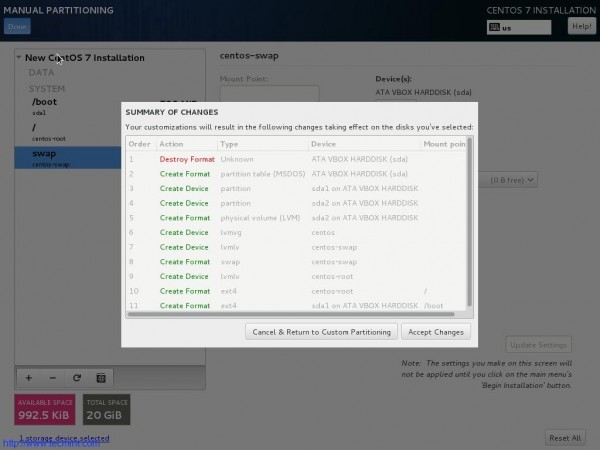
17. Back to the Installation Summary Interface. Now everything seems at its place. Click “Begin Installation”.
Begin Installation of CentOS 7.1
Installation Process of CentOS 7.1
19. Enter Root password and click done.
Create Root Password
21. Complete!!! Time to reboot the machine.

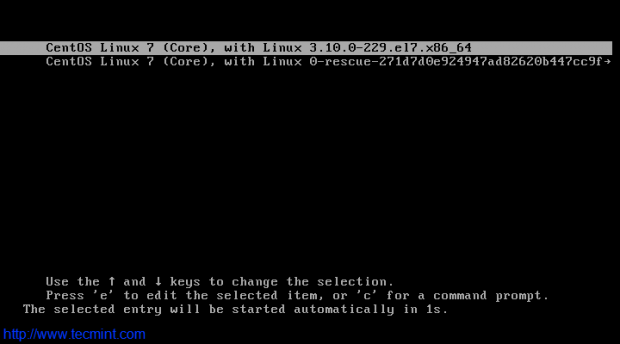
22. After Successful Installation, here is the boot prompt and login screen.
23. The first Impression – Interface After successful login.
24. Check the release information.
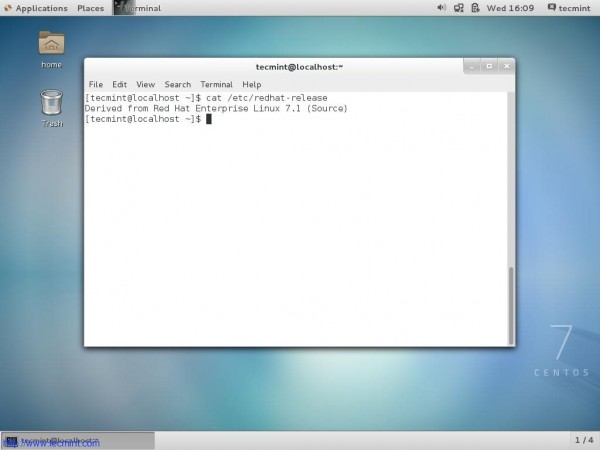
Check CentOS Version
For those who are not new to CentOS and have installed and using a previous version of CentOS can update it to latest point Release CentOS 7.1 (1503).
Upgrade CentOS 7. 0 to CentOS 7
1. Make sure you have backup of everything. So that is anything goes bad you can just restore.
2. Have a stable Internet connection. You know you cant update with that 😉
3. Fire the below command.
# yum clean all && yum update
OR
# yum -y upgrade
Note: Using ‘-y‘ option with Yum is discouraged. You must review the changes that are going to take place in your system.
Conclusion
CentOS is so popular and so widely used as Sever Operating System. CentOS is a very stable, manageable, Predictable and reproducible derivative of Commercial RHEL. Available for free (as in terms of free in beer as well as free in speech) and a wonderful community support makes it very suited for Server platforms and General use. Nothing needs to be said after that and anything said past it is just a gossip.
