

- 3 Start and enable the DNS Server
- Другие методы перезапустить сеть CentOS 8
- How to configure BIND 9 DNS Server on CentOS 8?
- How to Set up Static IP Address on CentOS 8?
- How to install DNS Server on CentOS 8?
- How to configure Bind 9 DNS Server?
- How to Test the DNS Server?
- How to change the DNS Server Address of Network Interface?
- How to test the DNS Server of your CentOS 8 machine from other Computers?
- Need to configure BIND 9 DNS Server on CentOS 8? We are available to help you today.
- More about DNS Server?
- What is DNS Cache Server?
- The advantages of using caching-only DNS Servers includes;
- How to configure Cache-only DNS Server?
- How to install BIND 9 on CentOS 8?
- How to start the BIND Service?
- How to configure DNS cache Server via its configuration file?
- How to update the SELinux context?
- How to check BIND configuration?
- How to Restart BIND Service?
- How to configure Firewall for DNS?
- Testing the DNS caching-only Server
- How to set up DNS cache-only on the client’s machine?
- Testing the DNS Caching-only settings for the client machine
- Working with the Named service.
- Need support in configuring the DNS Caching-only server on CentOS? We are available to help you today.
- An Introduction
- DNS Installation & Configuration
- Primary DNS Server Installation
- Secondary DNS Server
- Setup Host Machine
- Test DNS Server
- Final Words
- 2 Create BIND Zone Files
- Install CentOS operating system on Virtual Machine
- Настройка сети CentOS 8 через конфигурационные файлы
- Установка IFCONFIG в CentOS 8
- Настройка сети CentOS 8 через Nmcli
- Как настроить DNS в CentOS 8
- Setup and Configure DNS Server on CentOS 7
- 1 Configure DNS Server
- 4 Firewall Configuration
- 6 Test DNS Server
- Настройка сети при установке CentOS 8
- Настройка IPv6 при установке CentOS 8
- Как изменить имя в CentOS 8
- Centos 7 настройка сети
- Настройка сети во время установки
- Установка в centos ifconfig
- Centos настройка сети из консоли
- Install Oracle VirtualBox in Windows 10
- Настройка шлюза по-умолчанию в CentOS 8
- Troubleshoot
- Что мы научимся делать
- Настройка DNS на сетевом интерфейсе CentOS 7
- Третий способ. Утилита system-config-network-tui
- Четвертый способ через консоль mc
3 Start and enable the DNS Server
Step 9: use below command to start and enable
systemctl start named systemctl enable named
Другие методы перезапустить сеть CentOS 8
Чтобы так же поднять сетевой интерфейс вы можете ввести команду:
systemctl restart NetworkManager.service
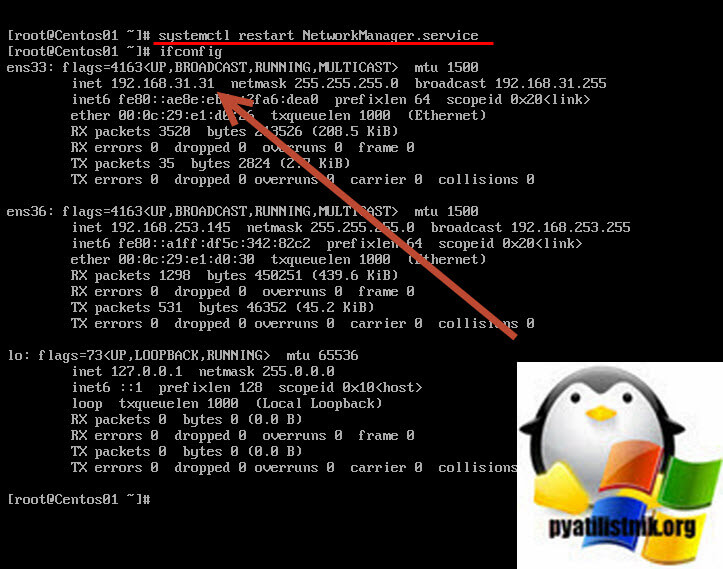
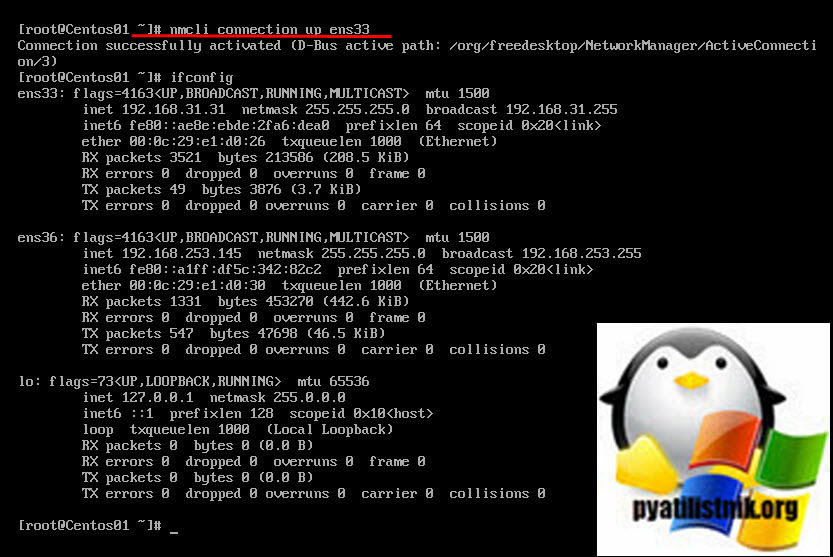
Снова потушу сетевой интерфейс командой:
Для перезапуска сети введите команду:
nmcli connection up ens33
This article provides guidance to configure DNS server on CenteOS. First, let’s see what is a DNS server?
DNS stands for Domain Name System. It translates human-friendly domain names into machine-readable IP addresses.
DNS is a distributed system which is arranged in a hierarchy with lots of DNS servers. A DNS server is any computer that is registered to join the DNS and it has an index of domain names and IP addresses. When there is a request, it will give the current IP address associated with a domain name.
For example, if you type ‘www.google.com’ in the browser, the DNS server translates the domain name into its associated IP address; 173.194.32.195
Purpose of DNS server: It makes easy to remember the domain names instead of its IP address

Get BitLaunch and instantly provision a server to edit the CentOS DNS server config.
Unfortunately, though, the process isn’t the same across all Linux distros, leading to some confusion. Today we’re going to be focusing on CentOS 7 DNS config, which differs quite a bit from Ubuntu but has less guidance available.
CentOS DNS config files are found conveniently in /etc/sysconfig/network-scripts/. Here you’ll also find options to configure your IP, gateway, and DNS server and will find information like the hardware address and UUID. You’ll need a couple of pre-requisites before we jump into the guide, which will focus on setup on a VPS:
- The VPS credentials, which should be found in your provider’s control panel
- PuTTy or another SSH client for VPS connection
How to Connect to SSH with PuTTYWhen connecting to your Linux-based VPS from a Windows system, the most common way of doing that is via SSH, using PuTTY. PuTTY is a free utility which will allow command-line access to your server.
You can find general network configuration for a specific adapter with the command:
Simply edit the fields that are required, such as IPADR. You may have additional lines in your config file, with a DNS showing as:
Once complete press Ctrl+O to write out the changes and Ctrl+X to exit nano, or Shift+zz to save and quit with vi.
We can now edit the CentOS DNS config with:

You can use a similar technique to edit the gateway independently. Type nano /etc/sysconfig/network and edit the gateway if it’s located there instead.
A DNS is a database of the internet. When you enter a domain name on a web browser, the DNS is responsible for finding the IP address for the site.
Basically, a DNS server contains several public IP addresses.
Here at LinuxAPT, as part of our Server Management Services, we regularly help our customers to Install Software, and install DNS Server on their Server.
How to configure BIND 9 DNS Server on CentOS 8?
In this guide, we shall set up a CentOS 8 machine as a DNS Server with a Static IP address lets say «».
The other computers on the network will be configured in such a way that they would be able to access the DNS Server to resolve domain names.
How to Set up Static IP Address on CentOS 8?
To enable you set up a DNS Server it is very important to configure a static IP address on your CentOS 8 machine.
How to install DNS Server on CentOS 8?
You can get BIND 9 from CentOS 8 official package repository.
To install it, start by updating the DNF package repository cache with the command below;
sudo dnf makecache
Next, proceed with the installation of Bind 9 with the command below;
sudo dnf install bind -y
Then Bind 9 will be installed successfully.
How to configure Bind 9 DNS Server?
Configuring Bind can be implemented via its main configuration file located at .
Additionally, you can add your custom DNS databases in the directory «».
As soon as the DNS databases are created, then you can add your custom zone files in the directory » «.
The zone files can be included into the configuration file «».
Start by creating a DNS database for «» domain name.
sudo vim /var/named/db.linuxapt.local
After adding a DNS database for domain , Next, check if the syntax is correct with the command below;
sudo named-checkzone linuxapt.local /var/named/db.linuxapt.local
Next, create a zone file in the directory for domain with the command below;
sudo vim /etc/named/linuxapt.local.zones
Next, modify the «» file with the command below;
sudo vim /etc/named.conf
Now you can add your network subnet to allow query ). This is to allow the computers in your network to be able to access the DNS Server otherwise none of the computers in your network will be able to use the DNS Server.
Lets say , the network subnet is «192.168.10.0/24» then the allow-query line in the «» file will look like this;
You can also add the IP address of your CentOS 8 machine you are working with as a DNS Server as listen-on address. So the listen-on line will look like this;
sudo systemctl start named
If active, the named service should be running. Run the command below to know the status of the named service;
sudo systemctl status named
To enable the DNS Server to start automatically on boot, add the named service to the system startup of CentOS 8 with the command below;
sudo systemctl enable named
Whenever you make any changes to the DNS server configuration file after starting the named service, you must run the named service restart command stated below to enable it take effect;
sudo systemctl restart named
How to Test the DNS Server?
To test the DNS nameserver, you can simply use the «dig» tool.
To check if the DNS Server is listening on the outgoing network interface on CentOS 8, use the command below;
To check whether the DNS nameserver is accessible locally from within the CentOS 8 machine, use the command below;
To check whether «www.linuxapt.local» resolves, run the command below;
How to change the DNS Server Address of Network Interface?
To allow DNS requests to be accessible via the firewall, simply open the DNS Server port 53 which is the default port for dns with the command below;
sudo firewall-cmd —add-service=dns —permanent
To make the changes to take effect, run the command below;
sudo firewall-cmd —reload
How to test the DNS Server of your CentOS 8 machine from other Computers?
Lets say a Windows 10 machine was configured on the same network as the CentOS 8 machine under the same network subnet to use the DNS Server, you can get the DNS to resolve for «».
Need to configure BIND 9 DNS Server on CentOS 8? We are available to help you today.
DNS signifies Domain Name System which is basically a Database of the Internet.
DNS is important as it helps to translate a domain name to IP address to enable the web browser to loads the Internet resource.
Here at LinuxAPT as part of our Server Support Services, we regularly help our customers to install Software, configure DNS on their Server.
In this context, we shall look into how to set up Caching DNS Server on CentOS 8 Machine.
More about DNS Server?
There are four types of DNS Server as outlined below;
i. Master DNS Server also known as Primary DNS Server.
ii. Slave DNS Server also known as Secondary DNS Server.
iii. Forwarding-only DNS Server.
iv. Caching-only DNS Server.
What is DNS Cache Server?
A DNS Cache Server relates with the remote DNS Server at a time and then stores the addresses locally from the query. This means that it is only valid for a specific time known as TTL (Time To Live). Basically, during this time, any request for a domain name will return the response automatically.
Therefore a Caching-only DNS Server does not have a full database. How it works is that it queries dns servers to get a response and then send it to the requester.
The advantages of using caching-only DNS Servers includes;
i. to achieve a faster response time when a dns lookup of server is performed or cached.
ii. An enhanced security to make internal servers to access dns lookup within the internal network and close the dns port to the public.
How to configure Cache-only DNS Server?
In this guide, we are going to use two system. One would represent the DNS Cache Server while the second one will server as a client.
The Operating System is CentOS 8/RHEL 8
The Hostname for our demonstration is
The IP address is
How to install BIND 9 on CentOS 8?
yum updatednf install bind bind-utils
You can use «yum» instead of dnf as stated above to perform the installation of Bind.
From the above command, «» represents the name of the DNS software package while «» signifies a collection of utilities used for querying DNS name Servers to get information about internet hosts.
How to start the BIND Service?
You can start the BIND service and enable it to start automatically on boot. Note that the name of the BIND Service is «named». Now run the command below to start it;
systemctl enable —now named
Now you can test the BIND service to see if it is running with the command below;
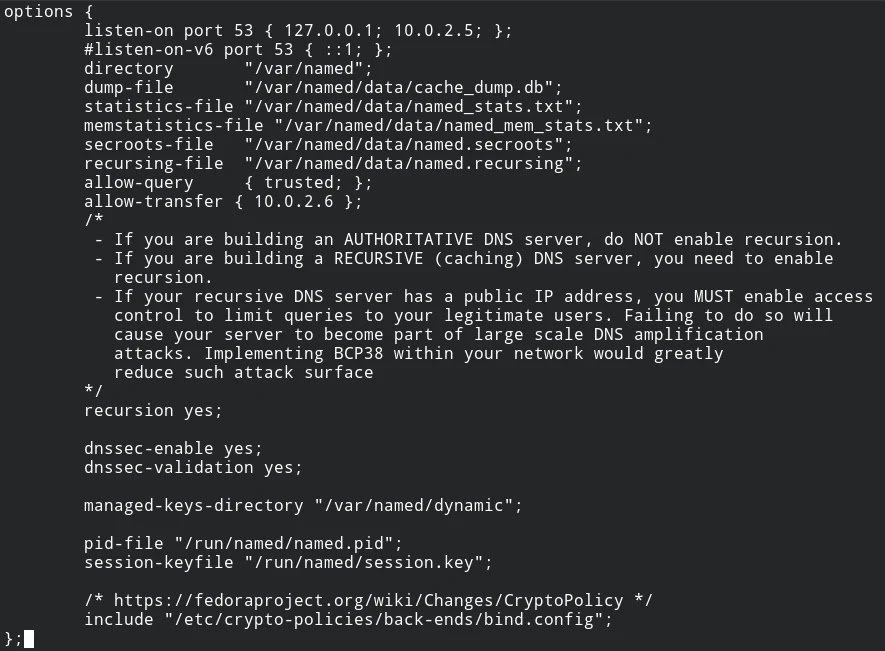
How to configure DNS cache Server via its configuration file?
To configure DNS cache server, simply locate the configuration file located at «».
Run the command below to edit the configuration file;
From the attributes above, note that;
«» means that the query from any range of the network will be accepted. This instructs BIND to be accessible to all available interfaces, public or private.
Also the is set to .
The complete «» configuration file will look like this;
«» will query the response and returns it.
How to update the SELinux context?
For a great performance you need to change the group of the file to be «named» by running the command below;
chown root:named /etc/named.conf
Also, restore the original SELinux context with the command below;
chcon system_u:object_r:named_conf_t:s0 /etc/named.conf
How to check BIND configuration?
To check if the syntax for BIND configuration file is correct, run the command below;
How to Restart BIND Service?
Now that we have completed the BIND configuration, you can restart the «named» service by running the command below;
How to configure Firewall for DNS?
firewall-cmd —permanent —add-port 53/tcpfirewall-cmd —permanent —add-port 53/udp
Testing the DNS caching-only Server
With the «dig» command, the DNS can be tested.
Let’s sat we wand to test «google.com», then run the command below;
How to set up DNS cache-only on the client’s machine?
This involves modifying the DNS address on the client’s machine.
Start by knowing the name of the network interface with the command below;
Lets say its name is «», then you can run the command to edit the network configuration file;
After the DNS modification, perform an restart of the network manager with the command below;
Testing the DNS Caching-only settings for the client machine
You can test the DNS for client with the dig command below;
Working with the Named service.
To start the named service, run the command below;
To enable the named service to startup automatically on boot with the command below;
systemctl is-enabled named
To disable the named service, run the command below;
systemctl disable named
Additionally, if you want to mask the named service so it will not start by any other program, you can run the below command;
systemctl mask named
To unmask the named service, run the command below;
systemctl unmask named
Need support in configuring the DNS Caching-only server on CentOS? We are available to help you today.
In this post we will learn
how to setup, install and configure DNS server in Redhat/Centos 8 base system. but before that we will get a brief introduction about DNS and its functionality
An Introduction
What is DNS
DNS stands for «Domain Name System» , DNS is responsible for converting human readable name into IP address and vice-versa. Because its human nature that we can more easily remember names over numbers and IP address assign to any computer system is in decimal numbers. So we need a server who works for human to convert name into IP and vice versa. And thus DNS came in existence
You can read/learn the basic functionality of DNS in fun learning way from howdns.works. Its a fun learning way of DNS. Enjoy reading😀.
DNS Installation & Configuration
So now we know what is DNS and how it works. Now we are ready to install and configure DNS server. We perform this in our LAB environment. For this we will use CentOS 8 machines configured in our virtual box . We will also try to know its configuration parameters and purposes. Before installing and configuring our DNS server there are some prerequisites required as below.
1: You need three systems (VM machines) with Redhat/CentOS 8/7 operating system
2: Your machines should be in same network e.g using same subnet mask
3: Internet connection is required in order to install some packages.
Setup: We will setup our DNS with one primary server as our master DNS server and one secondary server that will serve as backup server. One host machine which we use to resolve queries.
Domain Name: For this tutorial we will create DNS server with itguyakay.local domain name . You can choose any name but make sure it should not be existed already in real world
Hostname & IP Addresses : We will use below hostname and IP addresses for this tutorial. You are free to choose any name scheme and network.
Primary/Master DNS Server
ns1.itguyakay.local
10.0.2.5/24
Secondary/Backup DNS Server
ns2.itguyakay.local
10.0.2.6/24
Host Client Machine
host1.itguyakay.local
10.0.2.100/24
Primary DNS Server Installation
Setting Up Hostname
1: Login as root in your master DNS server machine & set the hostname for the machine as below. This will be a FQDN name for your server which will be resolved with in a domain. The hostname will be reflect after re-login.
$ hostnamectl set-hostname ns1.itguyakay.local
Installing BIND Packages
2: Now check for the update in your server and install neccessary packages to configure DNS. In redhat based system the package name for DNS server is BIND.
$ yum update && yum install bind bind-utils
Setting Up Static IP
3: Once packages are installed, make sure your IP address should be static as DNS works only on static IP. For this , first of all make copy of your current active network configuration file.
$ cp /etc/sysconfig/network-scripts/ifcfg-enp0s3 /etc/sysconfig/network-scripts/ifcfg-enp0s3.orig
Note: replace the network interface name as per your machine , here in example it is enp0s3.
4: Edit the network interface configuration file with any terminal based text editor (e.g vim,vi,nano).
$ vi /etc/sysconfig/network-scripts/ifcfg-enp0s3
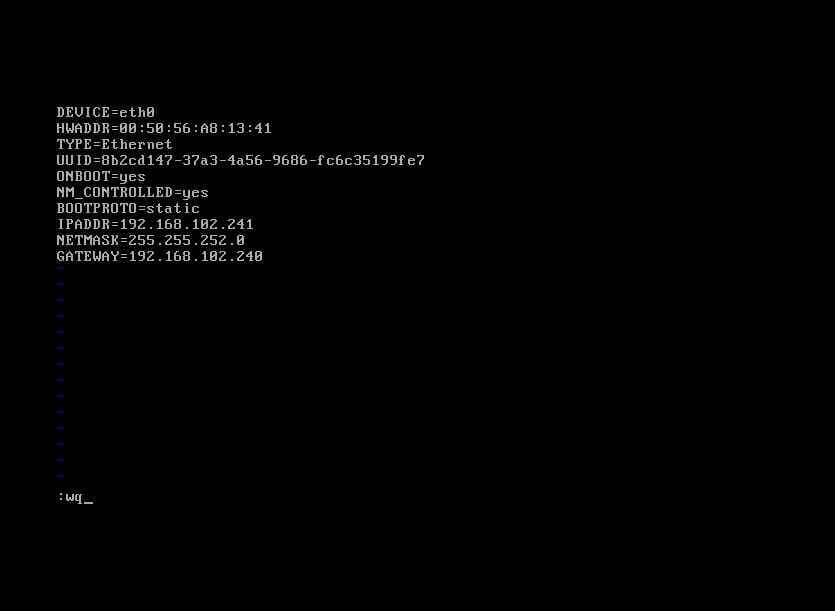
5: Edit/add below lines in network configuration file.
And save & exit
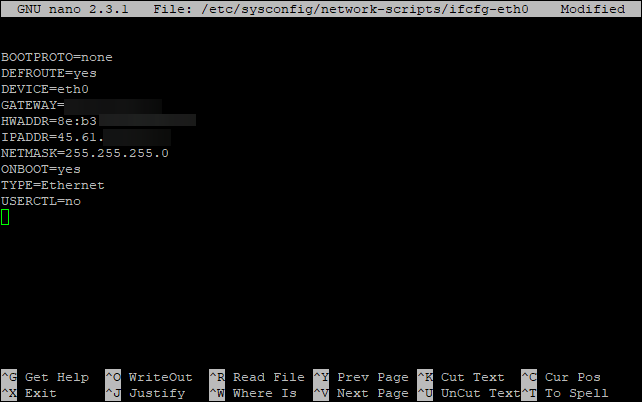
Example: Secreenshot of static network configuration for ethernet .
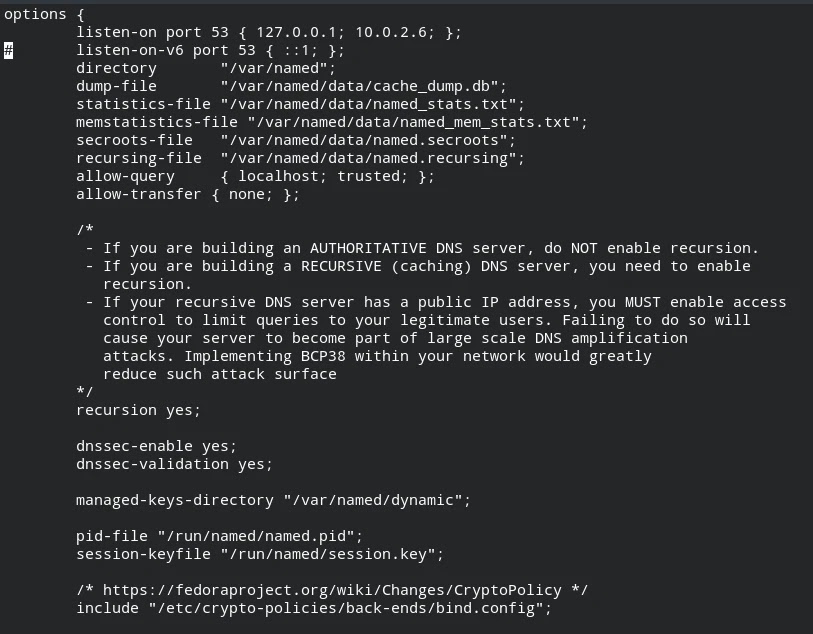
Configuring DNS Main File
6: Now you have to configure DNS main configuration file named.conf. You can find this file under /etc/named.conf.
i) Before edit the file make a backup copy incase you need default configuration file.
$ cp /etc/named.conf /etc/named.conf.orig
a)
Option Statement : Option statement is used to define options related to our named service.
— you have to edit/add below elements in option statement.
After edit the option element, it should be looks like below
Points To Notedown
listen-on port : It defines the network interface on which DNS will listen to resolve queries.
allow-query : Defines who will allow to query DNS
allow-transfer : Transfer queries to secondary/backup DNS server
comment : any line start with
# character will be omitted
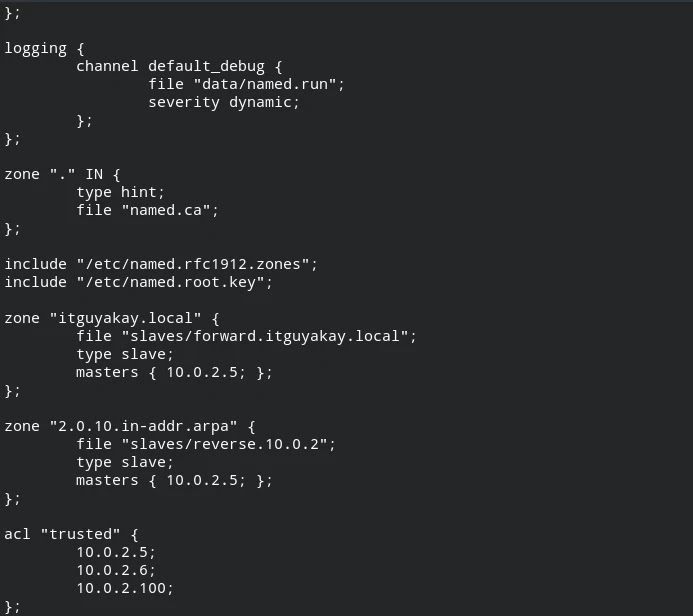
b)
ACL statement: ACL statments defines match number of network address , which we can use to allow or restrict the access or query.
— Create acl statement as shown below in named.conf file.
c)
Zone Statement : A zone statement defines the properties of a zone such as the location of its configuration file , Server type and other zone-specific options. This statement can be used to override the global options statements.
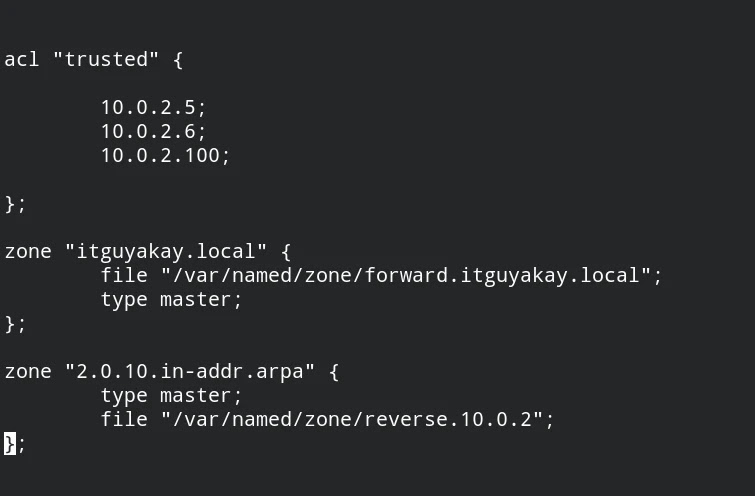
iii) Don’t delete/make any changes in any other statements. Save the named.conf file and exit
Configuring Zone Files
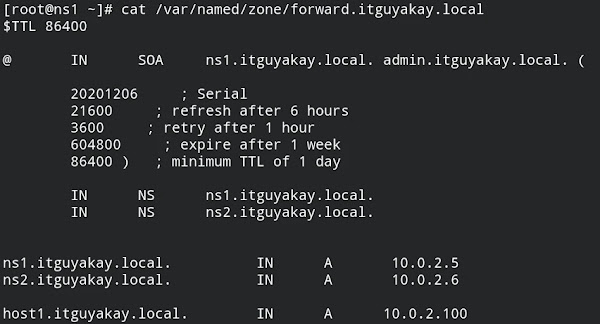
i) First create a «forward name resolution» zone file in /var/named/zone/
mkdir /var/named/zone
vi /var/named/zone/forward.itguyakay.local
ii) add below enteries in the above file
; name servers — NS records
IN NS ns1.itguyakay.local.
IN NS ns2.itguyakay.local.
; name servers — A records
ns1.itguyakay.local. IN A 10.0.2.5
ns2.itguyakay.local. IN A 10.0.2.6
; host machines — A records
host1.itguyakay.local. IN A 10.0.2.100
Example: Screenshot of forward zone file
iii) Save the file and exit.
IN : The internet .
TTL: Time To Live, minimum refresh time for zone to keep values in its cache by resovler.
NS: Name Servers, the authoritative name server for the domain.
A: Address Record, mapped ip address with its hostname
iv) Now create the «reverse name resolution zone file» by running below command
v) add below enteries in the that file
Example: Screenshot of reverse zone file
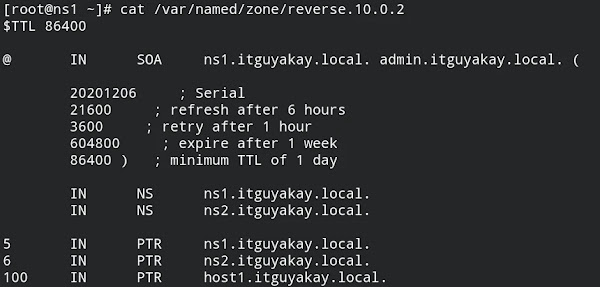
vi) Now save and exit from reverse zone file.
PTR: Pointer, work same as A record but for recursive purposes, the IP address part will be in reverse order e.g 5.2.0.10 is PTR for IP address 10.0.2.5 , here we only mapped the host bit of IP address because the rest part we already has defined in the reverse zone file name
8: Now you are ready to check if all the configuration we do in above steps are OK. For this run below command to check the configuration files parameters for any syntax errors
If syntax error will found then you will get some error as a reply otherwise you will get no output.
9: Now run below commands to check and verify the zones files for any errors
named-checkzone itguyakay.local /var/named/zone/forward.itguyakay.local
named-checkzone 2.0.10.in-addr.arpa /var/named/zone/reverse.10.0.2
You should get the
syntax OK as a reply
Example: screenshot fo zone file configuration parameters checking

10: Now restart and enable the DNS (named.services) with below commands
sudo systemctl start named
sudo systemctl enable named
11: Now enable port number for DNS to listen queries out from your local machine
firewall-cmd —permanent —add-port=53/udp
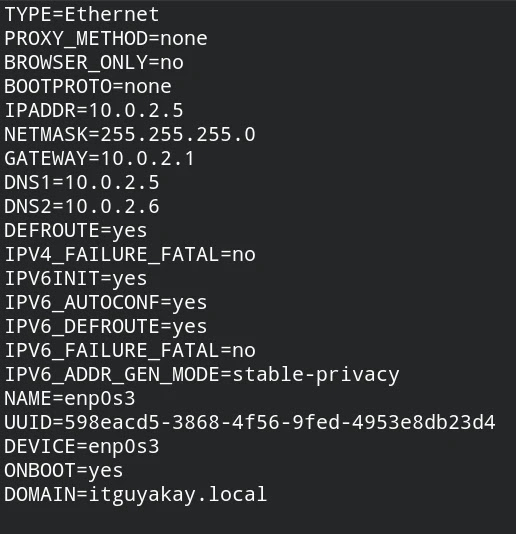
12: Now at last you have to edit your network configuration file in order to add DNS server addresses and Domain Name.
i) Edit network interface configuration file
ii) Append below lines in the ifcfg-xxxx file
DNS1=10.0.2.5
DNS2=10.0.2.6
DOMAIN=itguyakay.local
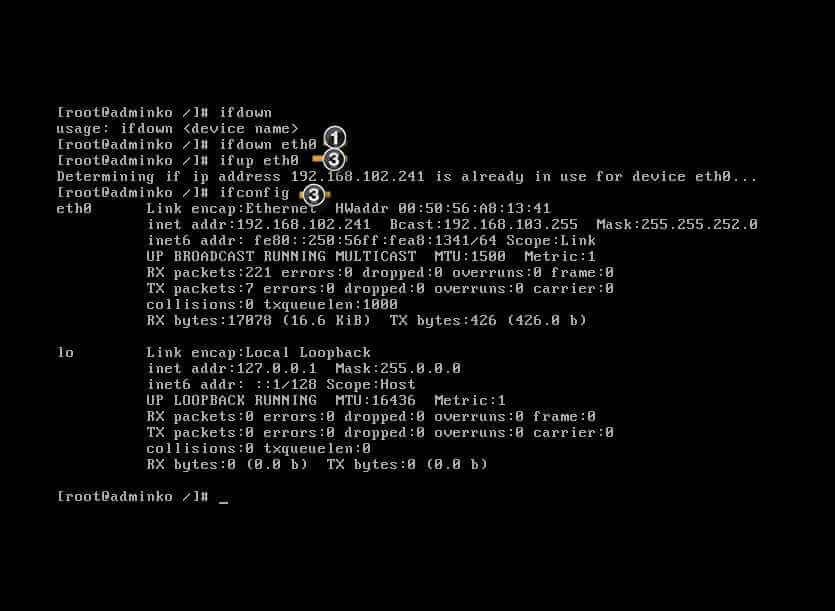
iii) Restart your interface with below command, please change your network interface name in below command
ifdown enp0s3 && ifup enp0s3
Example: screenshot of network configuration file
13 : Verify your DNS enteries in /etc/resolv.conf file and it should have below entries.
search itguyakay.local
nameserver 10.0.2.5
nameserver 10.0.2.6
Secondary DNS Server
1: Change hostname of your secondary DNS server with below command
hostnamectl set-hostname ns2.itguyakay.local
2: Check for system update and install BIND packages
Configure Static IP
3: Configure static IP in your current active network interface configuration file.
4: Create copy of your default /etc/named.conf file if required later.
mv /etc/named.conf /etc/named.conf.orig
i) Open file with any text editor
sudo vi /etc/named.conf
ii) Add/edit below statements in the /etc/named.conf file
a)
Option statement : In option statement add/edit below lines
b)
ACL satement: Create ACL statement to allow which hostname/ip addresses are allowed to query to server
c)
Zone Statements: Create Zone statements in the end of /etc/named.conf file
d) Your final /etc/named.conf file should be looks like this 👇
5: Verify your configuration for any syntax error
6: Now run below commands to restart & enable named services and allow firewall to communicate our secondary DNS server to communicate outside from local machine.
$ sudo systemctl start named
$ sudo systemctl enable named
$ firewall-cmd —permanent —add-port=53/udp
Add DNS Entries
7: At last again edit the network configuration file /etc/sysconfig/network-scripts/ifcfg-enp0s3 and add below entries in it
Setup Host Machine
Now we have to configure our host machine so it can query our DNS servers. we can add multiple machines in our domain to resolve thier FQDN but we have to edit the ACL statements add IP and hostname for that host machine in DNS server’s named.conf file.
1: Change the hostname for your host machine
$ hostnamectl set-hostname host1.itguyakay.local
Installing Required Package
2: Now check for system update and install bind-utils package in it
yum update && yum install bind-utils
3: Now edit the network configuration file and give a static ip which is allowed by our named.conf file in primary server
4: Add below lines in /etc/sysconfig/network-scripts/ifcfg-enp0s3 file ,then save and exit
5: Verify /etc/resolv.conf file, and check below enteries in that file.
search itguyakay.local
nameserver 10.0.2.5
nameserver 10.0.2.6
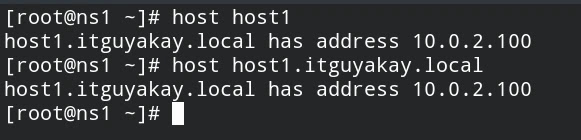
Test DNS Server
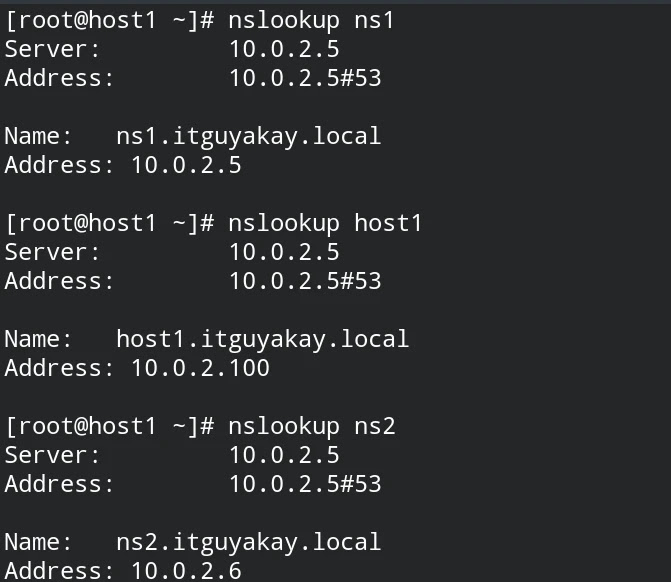
Now its time to test our DNS server. run below command from your host machine to query DNS server. There are three utilities included in bind-utils package which we can use to make query request to resolve names.
1: Using nslookup utility
You should get response from your server
Example: Screenshot of nslookup queries on host machine
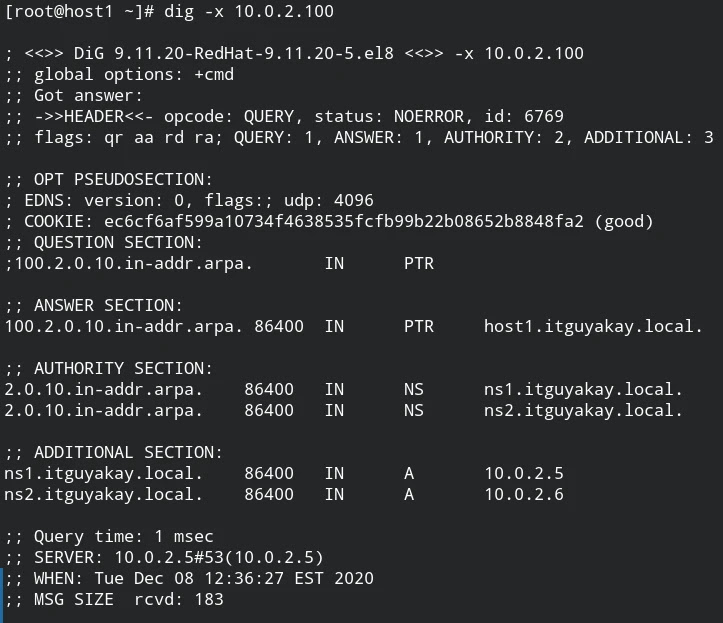
2: Reverse query using dig utility
dig -x 10.0.2.100
Example: Screenshot of dig queries on host machine
3: Make query using host utility
Example: Screenshot of host queries on host machine
Final Words
references : wiki, bind9, digitalocean, redhat .
2 Create BIND Zone Files
Create forward and reverse zone files which we mentioned in the ‘/etc/named.conf’ file.
Step 7: Create forward.ane.lk file in the ‘/var/named’ directory using below commandvi /var/named/forward.ane.lk
Step 8: Create reverse.ane.lk file in the ‘/var/named’ directory using below commandvi /var/named/reverse.ane.lk
Install CentOS operating system on Virtual Machine
Step 1: Download the official CentOS ISO from the official website
Step 2: Run your VirtualBox and click the ‘New’ icon on it
Step 3: Give your new OS name as ‘KLN-DC1-CentOS-x86’
Set name for the OS
Step 4: Set your RAM memory
Set the memory size
Step 5: On the Hard Disk step, select “Create a virtual hard drive now” and then click Create
Select Hard Disk option
Step 6: Select “VID (VirtualBox Disk Image)” and click Next
Select Hard disk file type
Step 7: Select “Dynamically allocated” and click Next
Select Storage on the physical hard disk
Step 8: Set the file location and size
Step 9: You can see the new icon of your CentOS in the left menu bar. Write click and go to settings
Select settings of the CentOS
Step 10: From the settings click on Storage and then click the ‘Empty’ under Controller: IDE and add the ISO file to the optical drive
Select storage from settings
Add ISO file to the optical drive
Step 11: Now you have successfully configured your CentOS, Power on by clicking on ‘Start’ icon
Step 12: From the boot menu select “Install CentOS 7” and press Enter
Step 13: Select your language and set up your time settings, location, network and click “Begin Installation”
Step 14: After the installation is completed, press on Reboot.
Настройка сети CentOS 8 через конфигурационные файлы
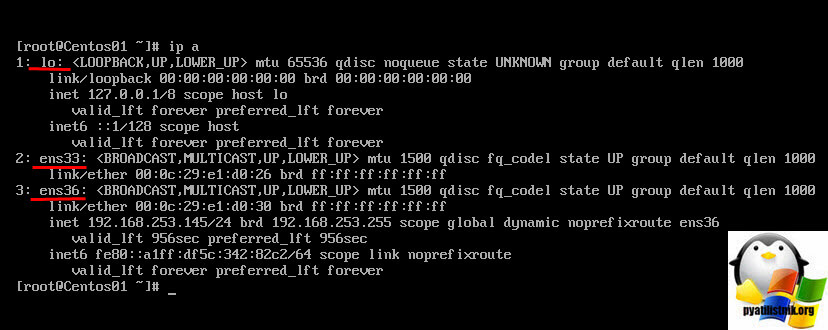
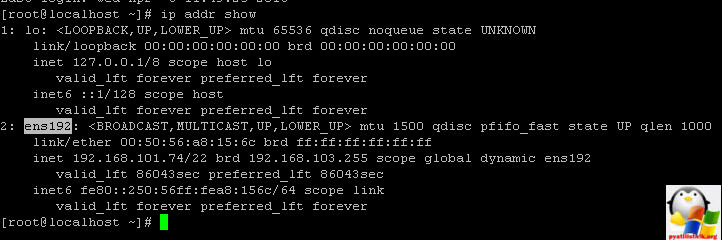
Первый метод мы с вами разобрали, он подходит всем, кто делает установку системы сам. Теперь ситуация, когда вам передали уже готовую CentOS 8, пусть в установке Minimal, это стандартный нормальный вариант использования CentOS 8, в качестве серверной ОС. Нет графики, нет кучи компонентов, меньше фронт атаки. Подключаемся к вашему терминалу. Первое, что вам необходимо сделать, это посмотреть список и названия всех ваших сетевых интерфейсов, для этого есть команда:
ip a (То же самое, что и ввести ip addr show)
Как видим у меня два сетевых интерфейса ens33 и ens36. У меня почему, то у интерфейса ens33 нет IPv4 адреса, у второго я получил 192.168.253.145, это мой интернет шнурок.
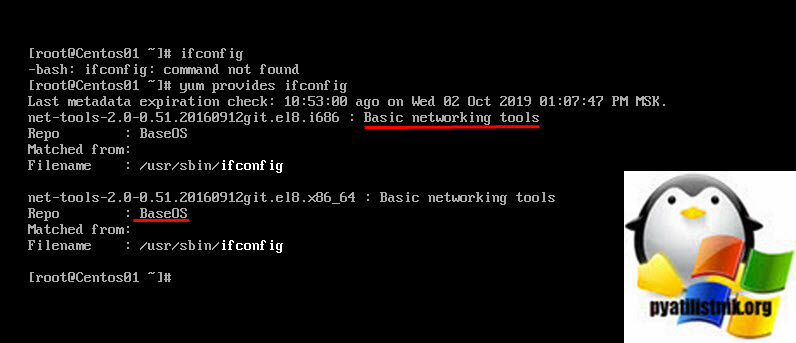
Пробуем с вами посмотреть текущие сетевые настройки IP адреса, маску, шлюз в более удобном виде, для этого мы использовали утилиту IFCONFIG. Пишем команду:
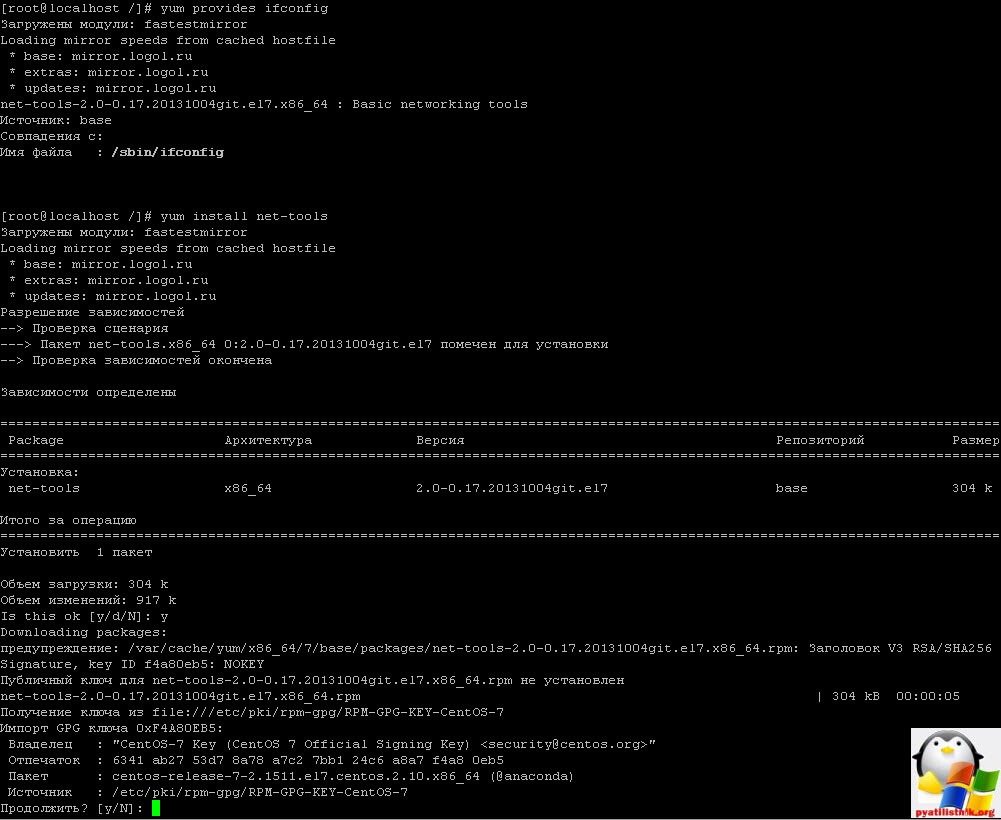
Но в случае с CentOS 8 Minimal у вас выскочит ошибка «Command not found» или в русском варианте «ifconfig команда не найдена». Нам ее нужно установить
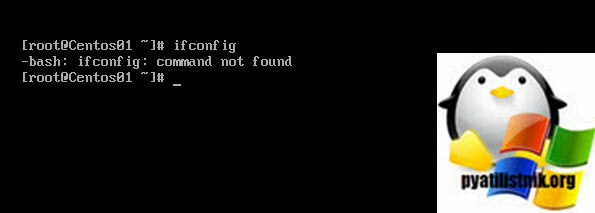
Установка IFCONFIG в CentOS 8
Давайте выясним, в каком пакете у нас идет утилита IFCONFIG, для этого вам необходимо выполнить команду:
На выходе я получил «Basic networking tools (BaseOS)»
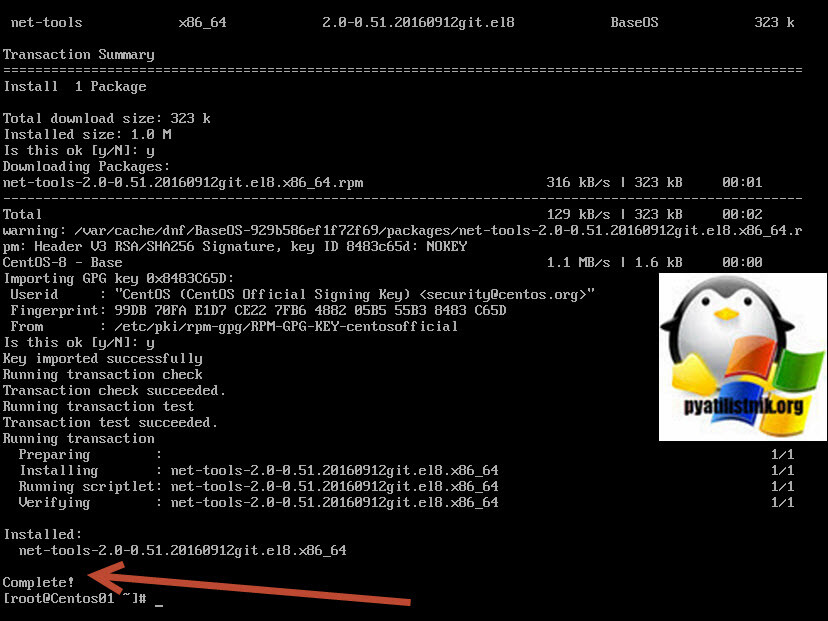
Установим данный пакет, пишем команду:

Вас спросят хотите ли вы установить данный пакет net-tools, нажмите «Y». Видим, что все успешно установилось.
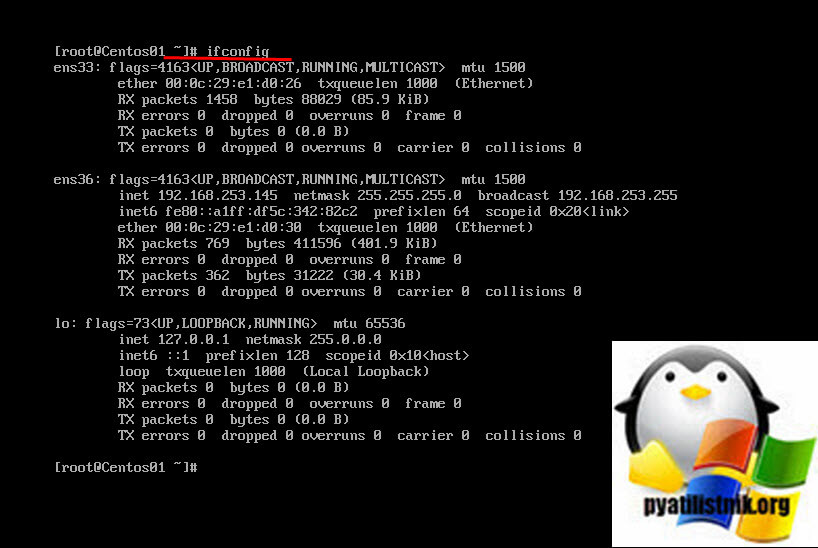
Пробуем теперь запустить IFCONFIG. Как видим в таком варианте считывание информации, о настройках сети CentOS 8 куда приятнее.
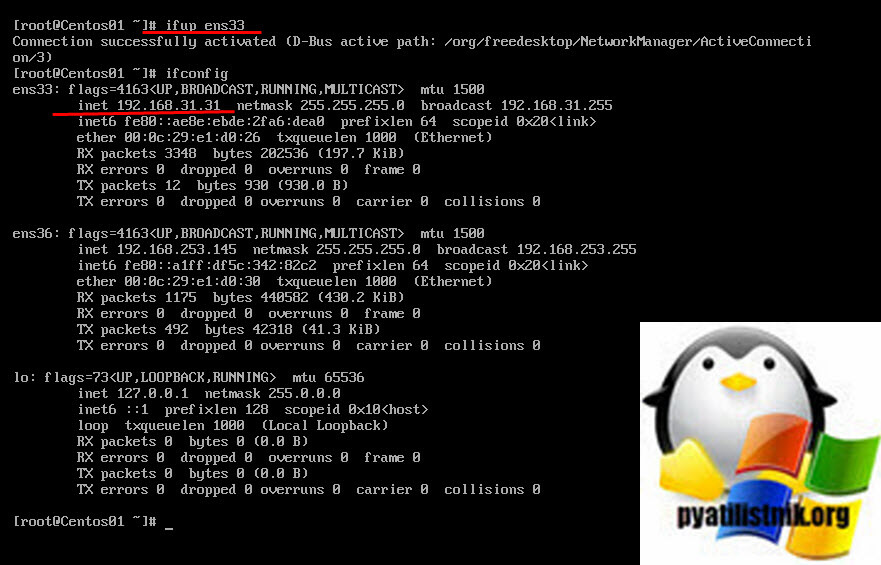
Давайте теперь я отредактирую сетевые настройки для интерфейса ens33 и задам ему:
- IP — 192.168.31.31
- Маску — 255.255.255.0
- Шлюз — 192.168.31.1
- DNS — 192.168.31.1, 192.168.31.2
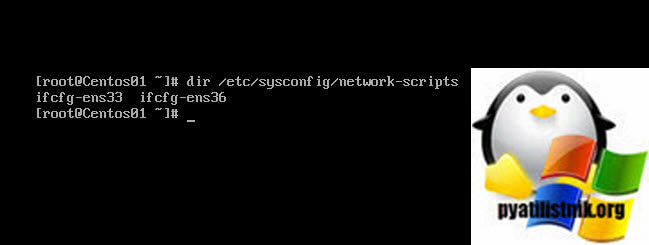
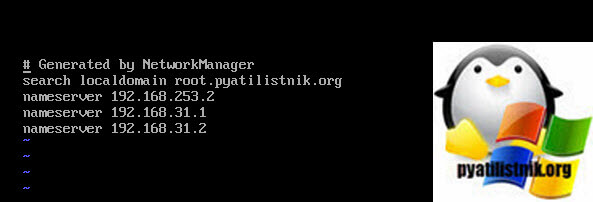
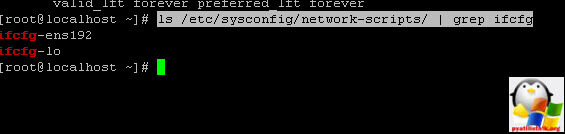
В операционных системах CentOS настройки сетевых интерфейсах лежат по пути /etc/sysconfig/network-scripts/. Давайте посмотрим содержимое Для этого введите:
Вы увидите конфигурационные файлы ваших сетевых интерфейсов, в моем случае, это ens33 и ens36
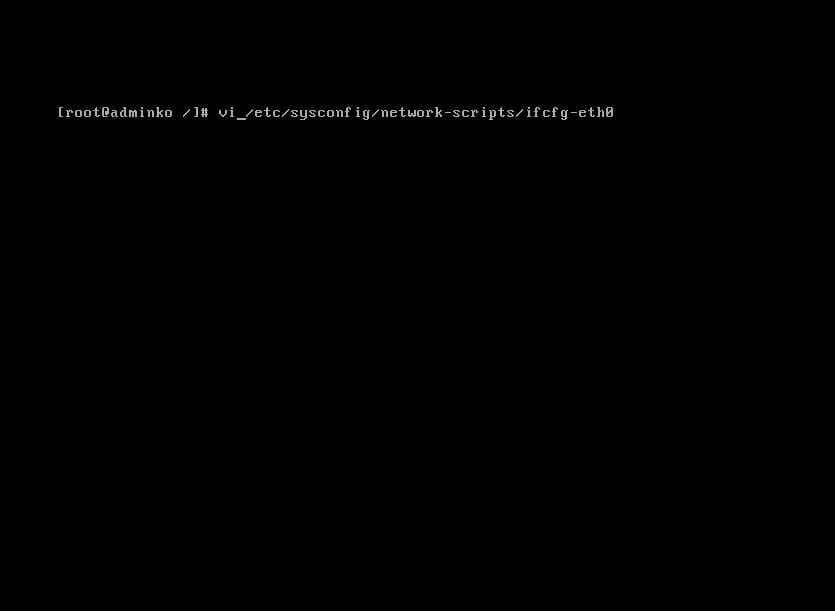
Чтобы настроить сеть на интерфейсах CentOS 8, вам необходимо отредактировать нужный конфигурационный файл. Для этого я воспользуюсь встроенным редактором vi. Пишем команду:
Чтобы начать редактировать файл нажмите клавишу «INSERT»
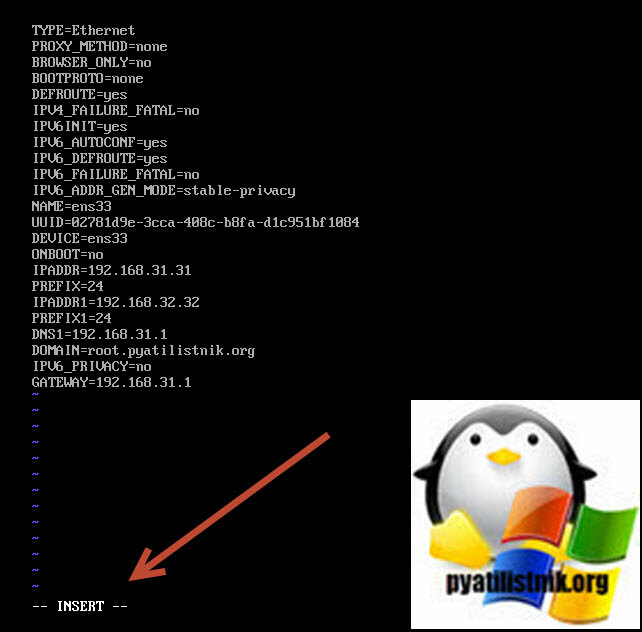
- TYPE=Ethernet
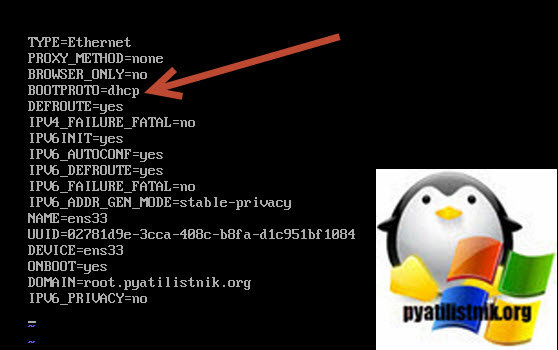
- BOOTPROTO=none (означает задать статические настройки), можно поменять значение на DHCP
- NAME=ens33
- ONBOOT=yes (иначе не будет стартовать при запуске)
- NAME=ens33 мое имя интерфейса
- UUID можно менять при клонировании конфигурационного файла
- PREFIX=24 маска 255.255.255.0
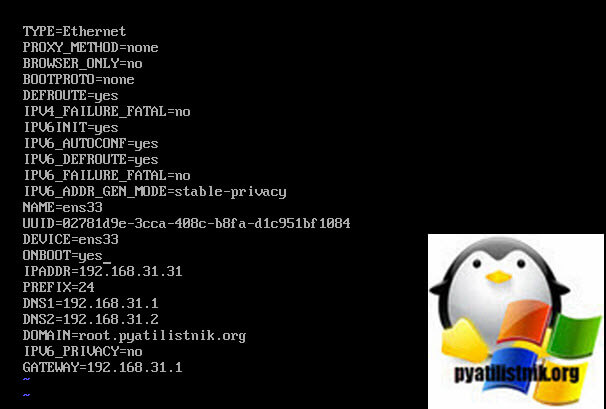
- DNS1=192.168.31.1 мой основной DNS
- DNS2=192.168.31.2 дополнительный DNS
- DOMAIN=root.pyatilistnik.org
- GATEWAY=192.168.31.1 основной шлюз
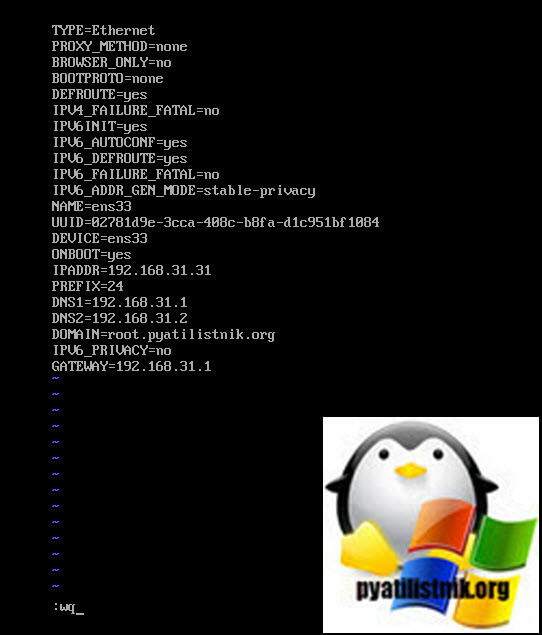
Чтобы сохранить настройки нажмите ESC, потом введите :wq если нужно выйти без сохранения введите :qa!
осталось теперь поднять наш сетевой интерфейс для этого есть несколько методов, самый простой использование ifup введите:
Как видим, у меня сетевой интерфейс стал в состояние подключено и я вижу через ifconfig его ip адрес.
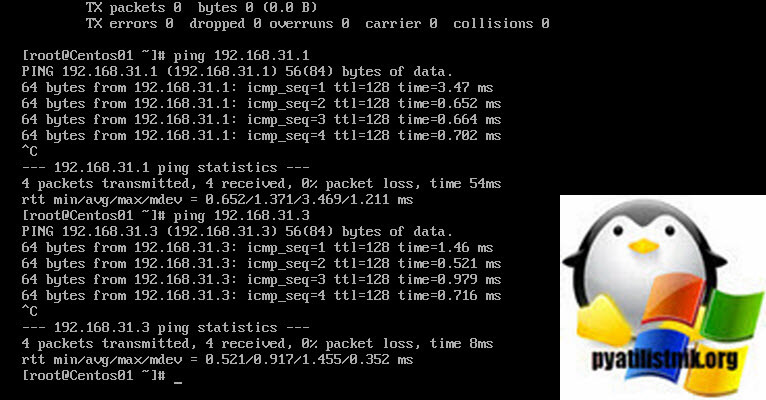
Проверим через утилиту PING доступность контроллера домена и другого сервера, отлично пакеты ходят.
Настройка сети CentOS 8 через Nmcli
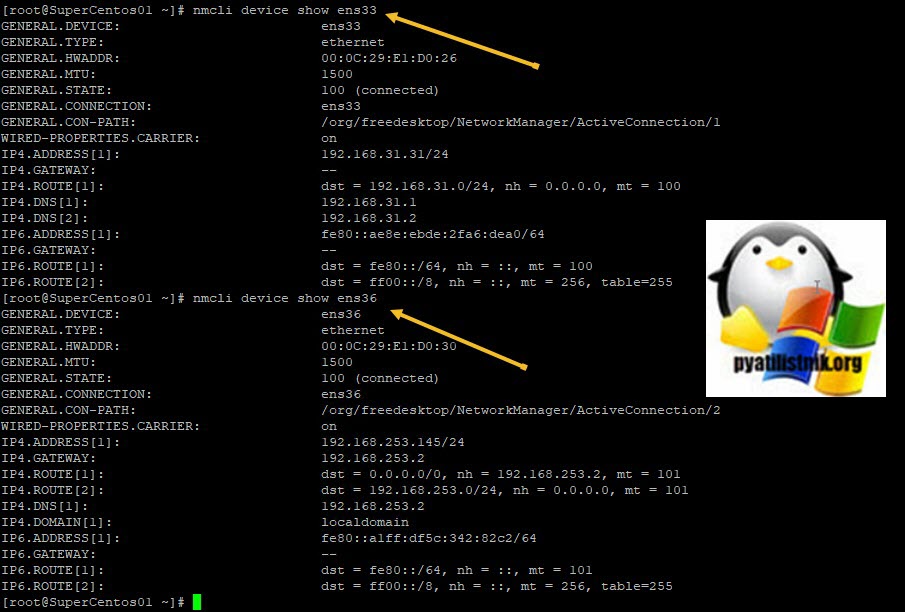
Давайте теперь для интерфейса настроим сеть вот с такими параметрами:
- Ip — поменяем на 192.168.31.10/24
- Шлюзом сделаю 192.168.31.131
- DNS 192.168.31.231
nmcli con mod ens33 ipv4.address 192.168.31.10/24
далее зададим шлюз:
nmcli con mod ens33 ipv4.gateway 192.168.31.131
nmcli con mod ens33 ipv4.dns 192.168.31.231
Теперь нужно перезапустить ваш сетевой интерфейс или сеть centOS 8. Сделать, это можно командой:
ifdown ens33 && ifup ens33
Эти изменения также будут сохранены в файле /etc/ sysconfig/network-scripts/ens33.
nmcli con mod ens33 +ipv4.addresses 192.168.31.32/24
Добавить дополнительный DNS:
nmcli con mod ens33 +ipv4.dns 8.8.8.8
Как настроить DNS в CentOS 8
Начиная с CentOS 6, основные настройки DNS стали прописываться в файлах /etc/sysconfig/network-scripts/, но в CentOS есть специальный файл куда попадают настройки из конфига интерфейса, называется он resolv.conf. Честно не знаю, почему так сделали. Resolv.conf — это имя компьютерного файла, используемого в различных операционных системах для настройки преобразователя системы доменных имен (DNS). Файл представляет собой простой текстовый файл, который обычно создается сетевым администратором или приложениями, которые управляют задачами конфигурации системы. Программа resolvconf — это одна из таких программ на FreeBSD или других Unix- машинах, которая управляет файлом resolv.conf.
ссылка на руководство resolf.conf http://man7.org/linux/man-pages/man5/resolv.conf.5.html
Хочу отметить, что если вы соберетесь редактировать отдельно файл Resolv.conf и вносить альтернативные DNS сервера отличные от тех, что прописаны на сетевых интерфейсах, то после перезагрузки сервера они снова будут затерты на те, что прописаны в конфигурационных файлах сетевых интерфейсов. Давайте я для примера добавлю в это файл сервера Google 8.8.8.8 и 8.8.4.4.
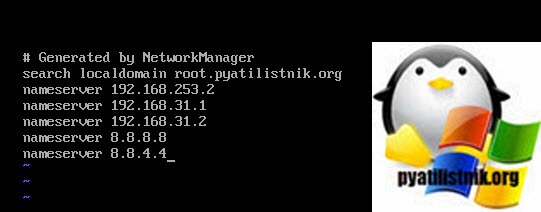
После снова смотрим файл и, о чудо ранее добавленные DNS сервера пропали, так, что учитывайте, что все настройки делаются в одном конфиг файле.
Setup and Configure DNS Server on CentOS 7
Stet 1: Start the installed CentOS using start icon and Log in to your CentOS 7 server using root credentials
Log in using root credentials
Step 2: Update your CentOS 7 server with latest updates and security updatesyum update
1 Configure DNS Server
Step 4: The default configuration file of BIND is ‘named.conf’ which is located inside ‘/etc/’ directory. Open it using below command to edit the file.vi /etc/named.conf
Step 5: Edit the ‘named.conf’ file as below
Edited configuration file
Step 6: Creating BIND ZonesCreate forward zone
Here, define the below configuration
‘ane.lk’ is the Domain name ‘master’ is the Primary DNS ‘forward.ane.lk’ is the Forward lookup file ‘allow-update’ will be none, it’s the primary DNS
Create reverse zone
4 Firewall Configuration
Step 10: Allow the DNS service default port 53 through the firewall
firewall-cmd — permanent — add-port=53/tcpfirewall-cmd — permanent — add-port=53/udp
Firewall configuration tcp and udp
Step 11: Restart firewallfirewall-cmd — reload
6 Test DNS Server
Step 18: dig primary.ane.lk
‘dig’ command output
Step 19: nslookup ane.lk
You have now successfully installed, configured and tested your own DNS server. Now you are ready to start using it.
Настройка сети при установке CentOS 8
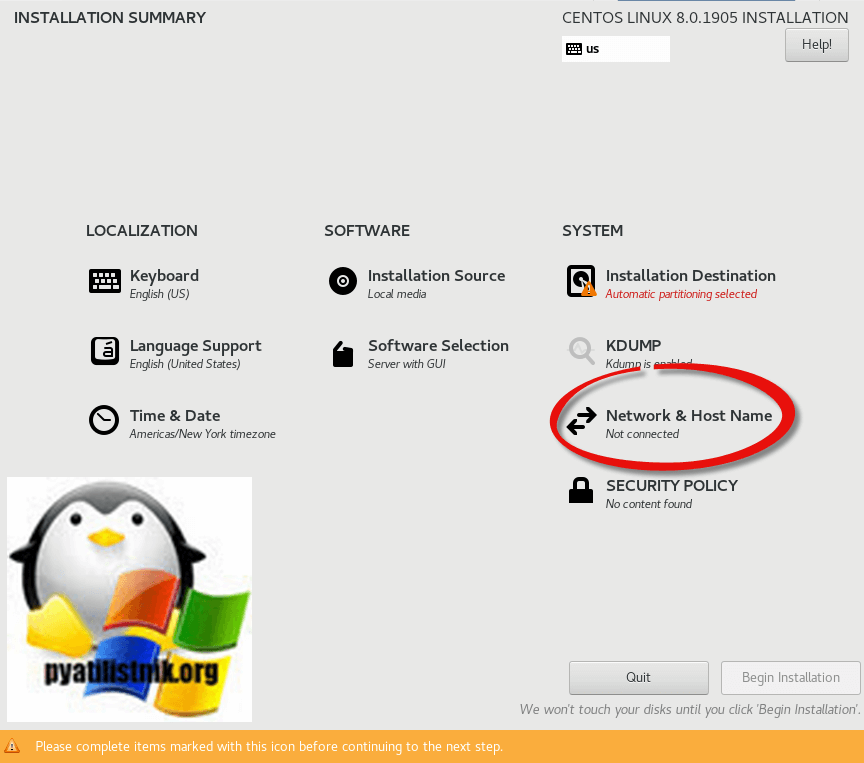
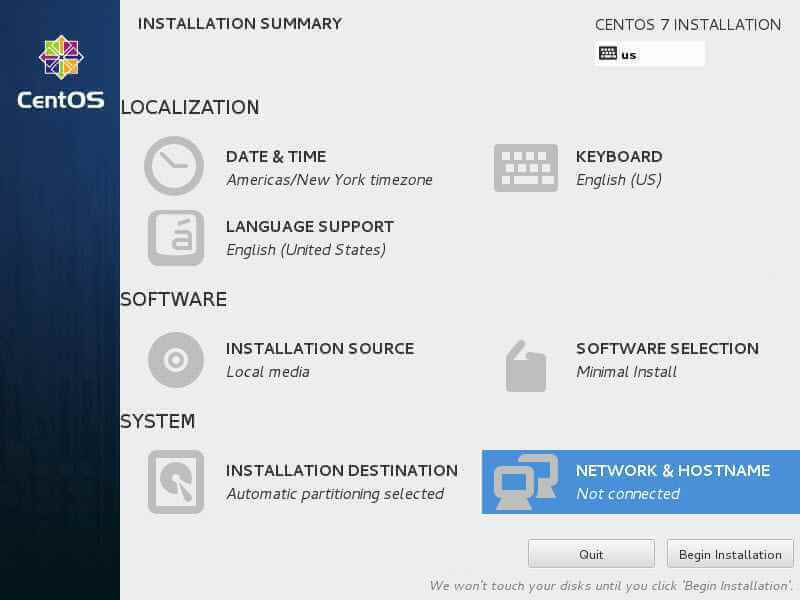
Подобный методом мы рассматривали, когда во время установки задавали статический Ip адрес CentOS 7, кто не помнит может посмотреть по ссылке. Данный способ хорош тем, что если вы инсталлируете новый сервер, можете все сделать из красивого, графического интерфейса. Находясь на окне «Installation Summary» вам необходимо выбрать пункт «Network & Host Name».
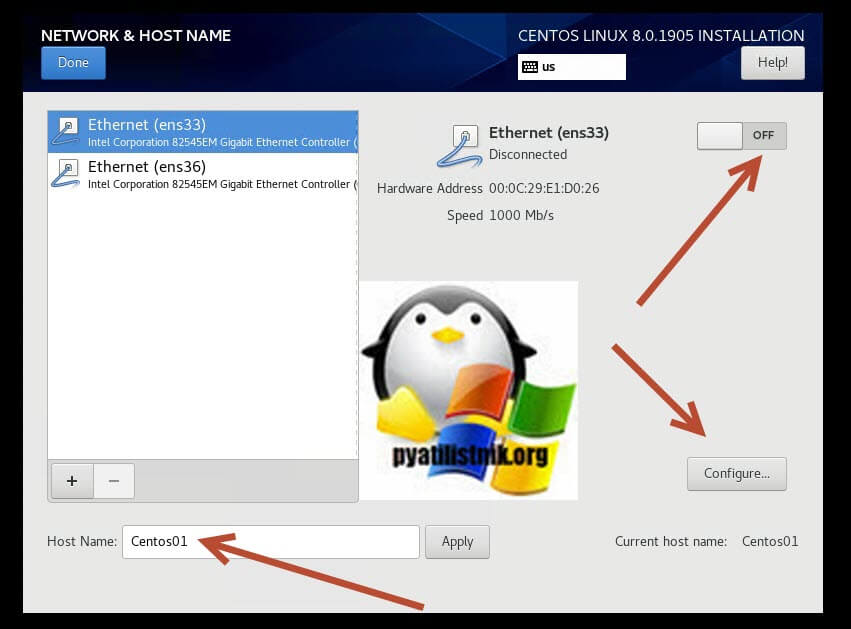
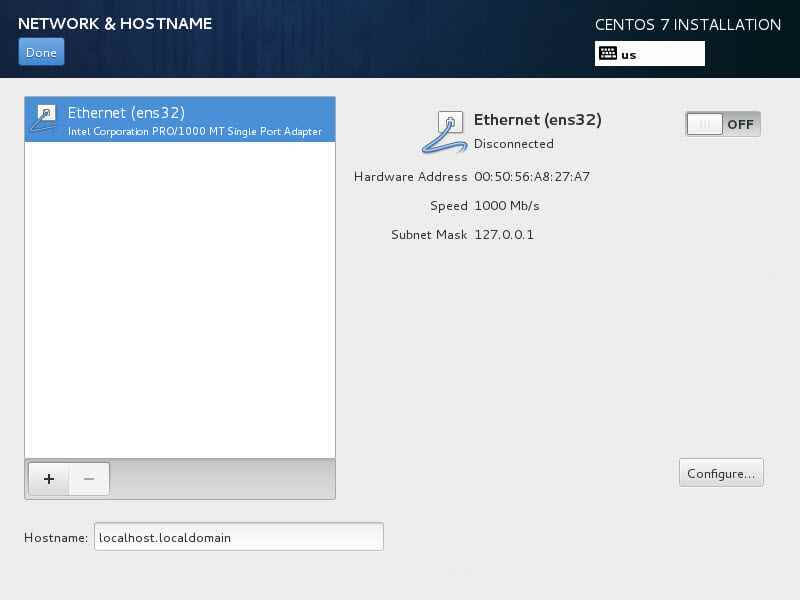
В окне «Network & Host Name» вы увидите список ваших сетевых интерфейсов, они по умолчанию отключены. В моем примере их два. Каждый сетевой интерфейс имеет отличительное имя, в моем примере, это ens33 и ens36. Видно, что текущий статус «Disconnected», чтобы это изменить переведите тумблер с состояния «Off» на «On».
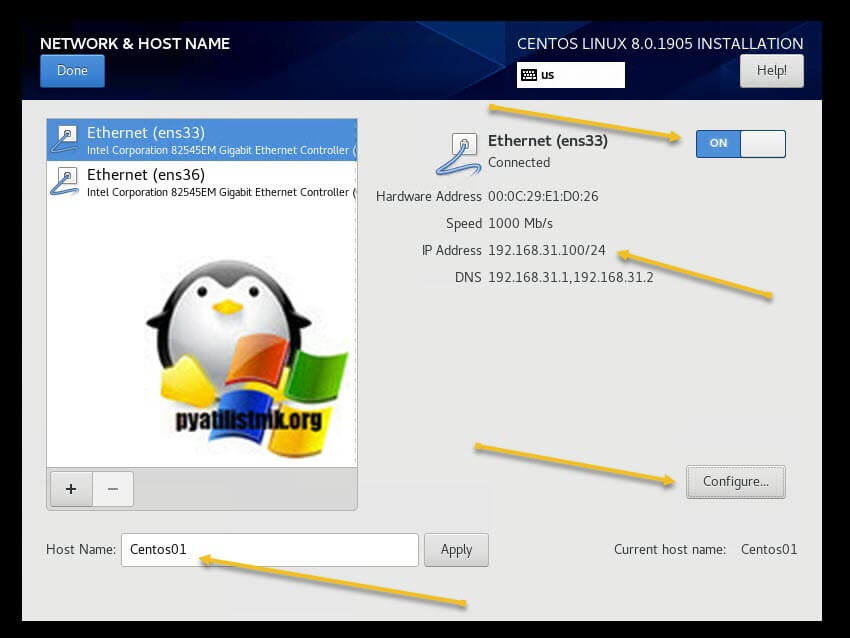
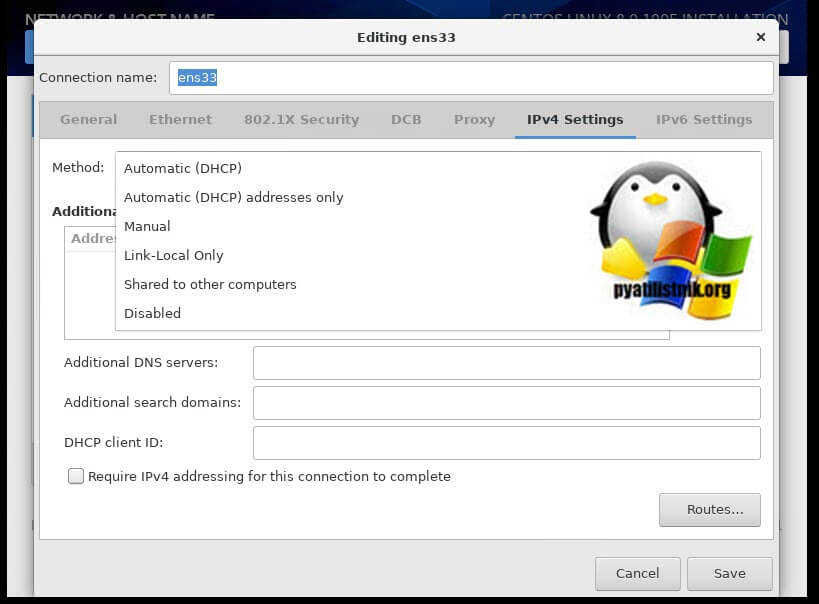
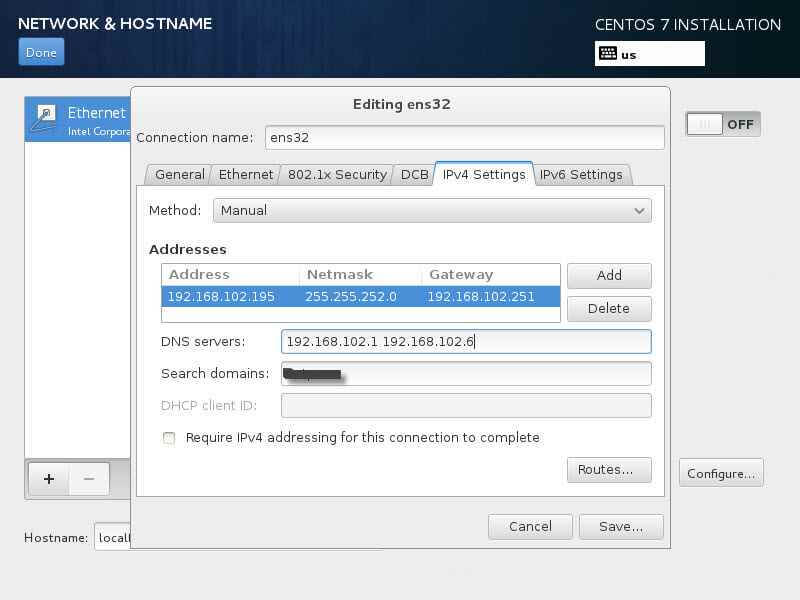
В окне свойств сетевого интерфейса найдите вкладку IPV4 Settings, обратите внимание, что тут будет поле «Method», в котором по умолчанию стоит «Automatic (DHCP)», то есть динамическое получение сетевых настроек в CentOS 8. На выбор у вас будут вот такие пункты:
- Automatic (DHCP) — автоматическое получение всех настроек: IP, маску, DNS, Основной шлюз, маршруты
- Disabled — отключение получения настроек
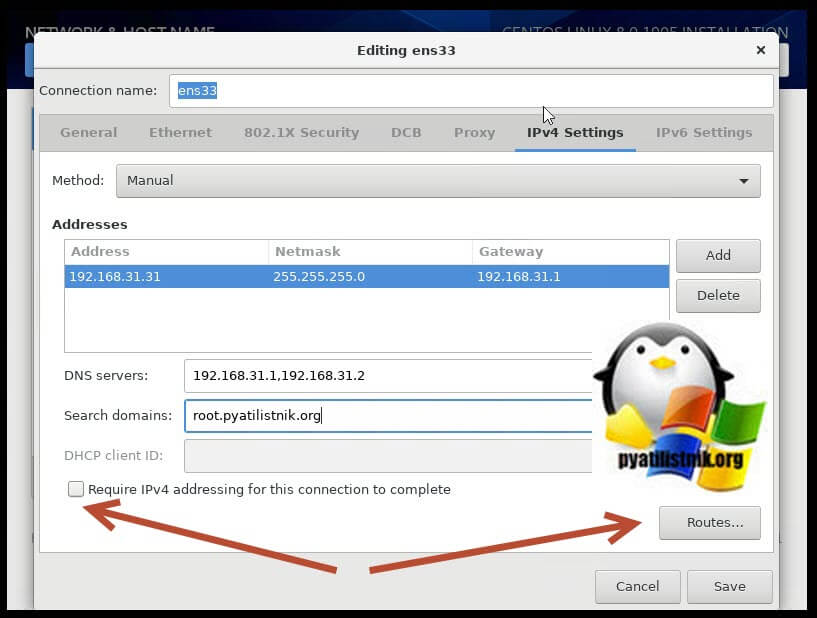
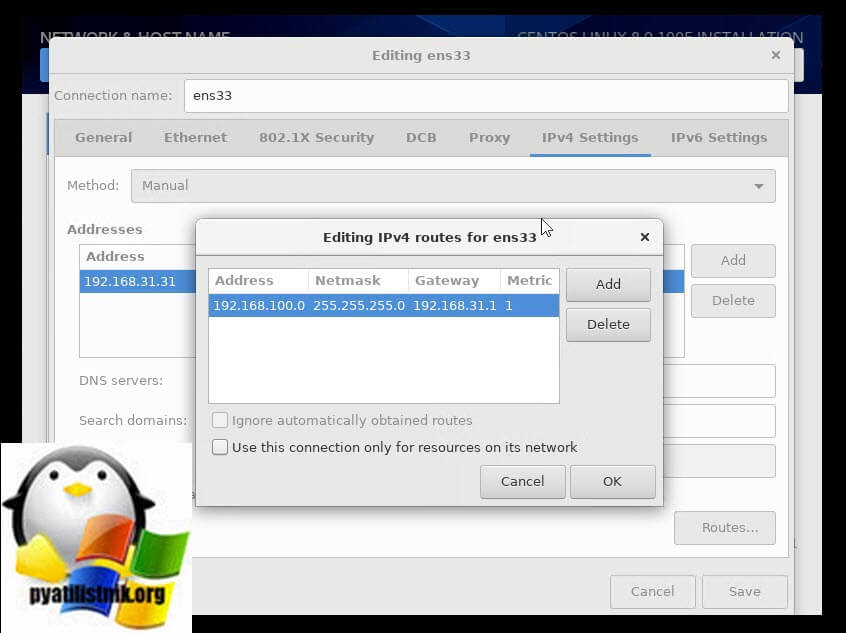
Галка «Require IPv4 addressing for this connection to complete (Требовать адресацию IPv4 для этого соединения)» — Чтобы разрешить системе устанавливать это соединение в сети с поддержкой IPv6, если конфигурация IPv4 завершится неудачно, но конфигурация IPv6 будет успешной. Кнопка «Routes» позволяет вам настроить дополнительные маршруты в CentOS 8.
If it returns nothing, your configuration file is valid.
Step 13: Check Forward zone and Reverse zonenamed-checkzone ane.lk /var/named/forward.ane.lknamed-checkzone ane.lk /var/named/reverse.ane.lk
Test forward file and output
Step 14: Add the DNS Server details in your network interface config file.vi /etc/sysconfig/network-scripts/ifcfg-enp0s3
Step 15: Add the nameserver ip address vi /etc/resolv.conf
Step 16: Restart network serviceSystemctl restart network
Настройка IPv6 при установке CentOS 8
Если вы хотите задать настройки для IPv6, то перейдите на соответствующую вкладку. Возможные варианты настройки:
- Игнорировать (Ignore) — IPv6 игнорируется для этого соединения.
- Автоматическая (Automatic) — NetworkManager использует объявление маршрутизатора (RA) для создания автоматической конфигурации без сохранения состояния.
- Автоматически, только адреса (Automatic, addresses only) — NetworkManager использует RA для создания автоматической конфигурации без сохранения состояния, но DNS-серверы и поисковые домены игнорируются и должны настраиваться вручную.
- Автоматический, только DHCP (Automatic, DHCP only) — NetworkManager не использует RA, но запрашивает информацию у DHCPv6 напрямую для создания конфигурации с сохранением состояния.
- Ручная (Manual) — Параметры IPv6 настраиваются вручную для статической конфигурации.
- Link-Local Only — link-local адрес с FE80 ::/10 префиксом назначается интерфейсу
Как изменить имя в CentOS 8
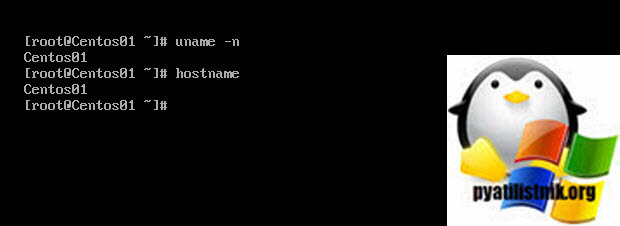
Давайте я покажу вам какой конфигурационный файл отвечает за имя хоста (Hostname). Если вы или не вы во время установки CENTOS 8 не удосужились задать правильное DNS имя вашего сервера, то у вас оно по умолчанию будет localhost.localdomain. Посмотреть, это можно командой uname или hostname.
Предположим, что я хочу сделать имя SuperCentOS01, для этого отредактируйте конфигурационный файл etc/hostname. Пишем команду;

либо вы можете воспользоваться и вот такой командой, чтобы задать нужное имя хоста в CentOS 8:
hostnamectl set-hostname SuperCentos01
Centos 7 настройка сети
Начнем мы с самых простых методов инсталляции, так сказать все поэтапно, а именно с графического, этот метод удобен при разовой установке, ну аж если у вас она массовая, то в помощь вам скрипты и PXE.
Настройка сети во время установки
Логично, что для упрощения настройки разработчики CentOS позаботились сделать все как можно дружелюбнее. У вас как у пользователя есть возможность на вкладке Network & Hostname сразу задать статический ip адрес при установке.
Выбираем нужный сетевой интерфейс и нажимаем справа Configure.
Переходим в пункт ipv4 и выбираем manual, то есть в ручную.

Прописываем ваши данные такие как
- ip адрес
- маску подсети
- шлюз
- dns сервера
Как видите, это очень простой способ, но мы же учимся администрированию, поэтому ниже будут представлены консольные методы.
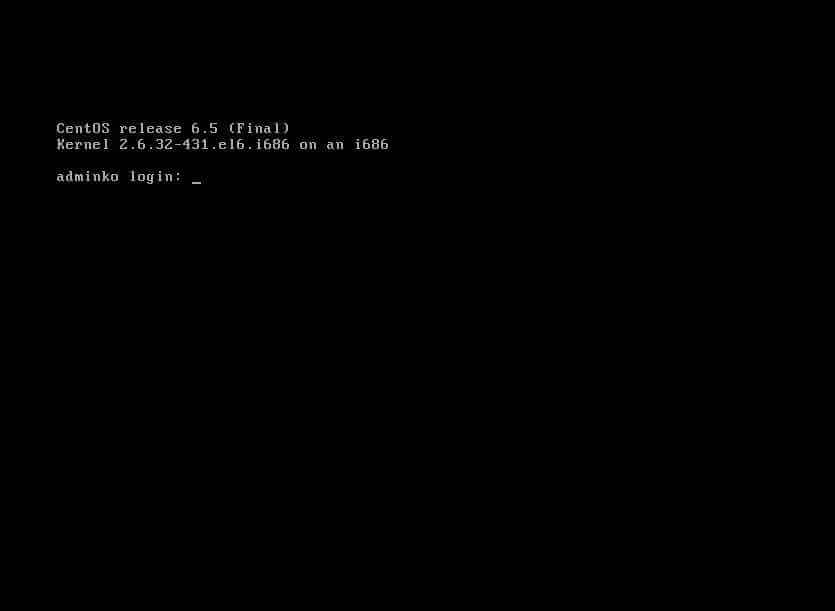
Для того, чтобы у вас все получилось вам нужно быть администратором (root) данной системы, о чем будет говорить значок решетки #.
Вводим ifconfig. Команда выводит текущие сетевые интерфейсы. У вас их может быть много, но заведите себе правило, если это сервер, то он обязательно должен иметь статику, ни в коем случае не оставляйте DHCP.
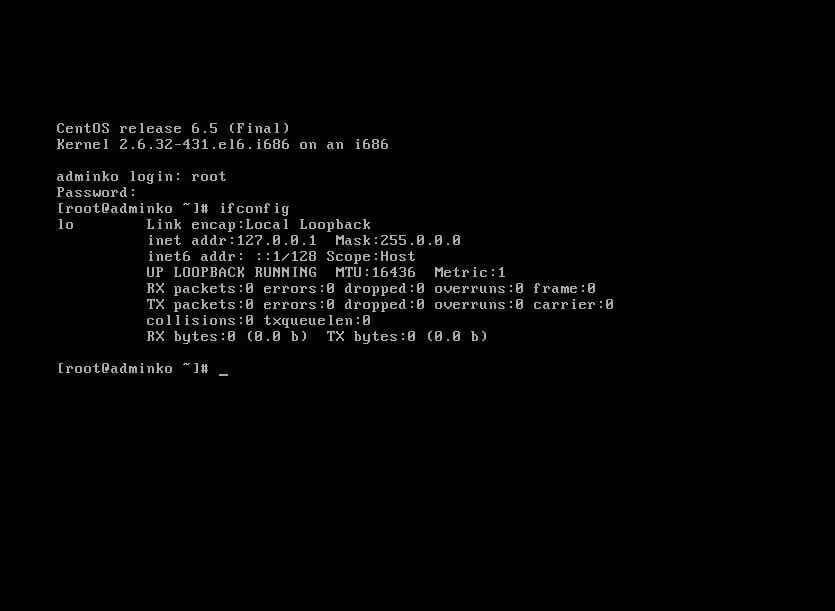
Видим, что только есть интерфейс замыкания. В CentOS по умолчанию сетевой интерфейс отключен. Как его включить читаем ниже.
Установка в centos ifconfig
Если у вас выскакивает ifconfig: команда не найдена или ifconfig: command not found то не расстраивайтесь, ее забыли добавить в минимальную версию, как только настроите сеть по инструкции ниже, то сможете установить ее, только после настройки сети.
Посмотрим в состав какого пакета она входит
Centos настройка сети из консоли
Самый распространенный метод, который позволяет произвести в centos настройку сети из консоли, да то самое черное окно, его преимущества в том, что требуется минимальная скорость сетевого подключения к серверу, в отличии от графики, очень пригодится если редактировать настройки Centos при большой нагрузке на сервер. Пишем vi или nano кому что нравится.
Хочу отметить, что название интерфейса у вас может быть другое, отличное от ifcfg-eth0, но тоже будет начинаться с ifcfg-. Посмотреть список интерфейсов можно командой
Вот пример названия ifcfg-ens192
Еще можно посмотреть командой
Внесите/измените записи в файле для задания статической настройки сетевого интерфейса:
Собственно как понятно из файла, IP адрес он получает от DHCP сервера, поэтому выключаем DHCP и меняем настройки на ститику.Для редактирования жмем Insert.
После редактирования жмем ESC потом :wq (Что значит записать и выйти)
После выхода пишем ifdown eth0 на всякий случай тушим интерфейс, потом ifup eth0 поднимаем интерфейс.
Видим, что сетевой интерфейс поднялся.
Install Oracle VirtualBox in Windows 10
Note: I have already downloaded and installed the Oracle Virtual Machine. Therefore, I will provide the basic steps without screenshots for this process
Step 1: Download VirtualBox from the official Oracle VirtualBox website.
Step 2: Start the installation process by double click on the installer
Step 3: Custom setup dialog box
Step 4: Click the install button and wait for the installation process
Step 5: After completing the installation you can search for VirtualBox in windows search taskbar
Настройка шлюза по-умолчанию в CentOS 8
Если есть необходимость поменять шлюз по умолчанию, или задать его при его отсутствии, то это легко делается. Для начала вам необходимо посмотреть текущие параметры, кто в вашей системе шлюз по умолчанию, для этого есть старая, добрая команда:
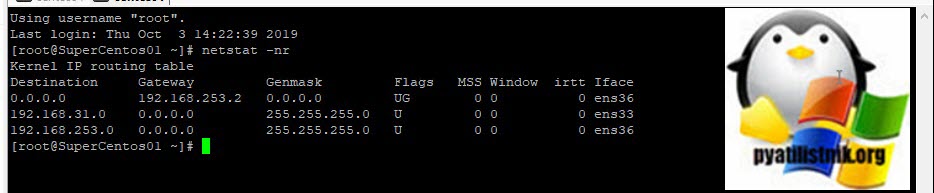
Destination Gateway Genmask Flags MSS Window irtt Iface 0.0.0.0 192.168.253.2 0.0.0.0 UG 0 0 0 ens36 192.168.31.0 0.0.0.0 255.255.255.0 U 0 0 0 ens33 192.168.253.0 0.0.0.0 255.255.255.0 U 0 0 0 ens36
В итоге в моем примере есть основной шлюз 0.0.0.0 192.168.235.2. Напоминаю, что в системе может быть только один шлюз по умолчанию.
Если хотите поменять его, то для этого вы можете ввести команду:
route add default gw 192.168.31.1
Если нужно удалить шлюз или маршрут, то для этого есть ключ del.
route del default gw 192.168.31.1
Troubleshoot
When you try to update using ‘yum update’, sometimes it will not update and give an error
yum update error
Then type below command in the terminal and then update the CentOSdhclient
Step 3: Install bind9 packages on your server using below commandyum install bind bind-utils –y
Что мы научимся делать
- Разберем утилиты Network Manager, System config network tui, Nmcli
- Находить и дублировать сетевую конфигурацию сети
- Как создать конфигурацию виртуального интерфейса
- Разберем траблшутинг сети, отсутствие сетевых карт, недоступен шлюз. Разберем использование утилит ping, traceroute, dig
Настройка DNS на сетевом интерфейсе CentOS 7
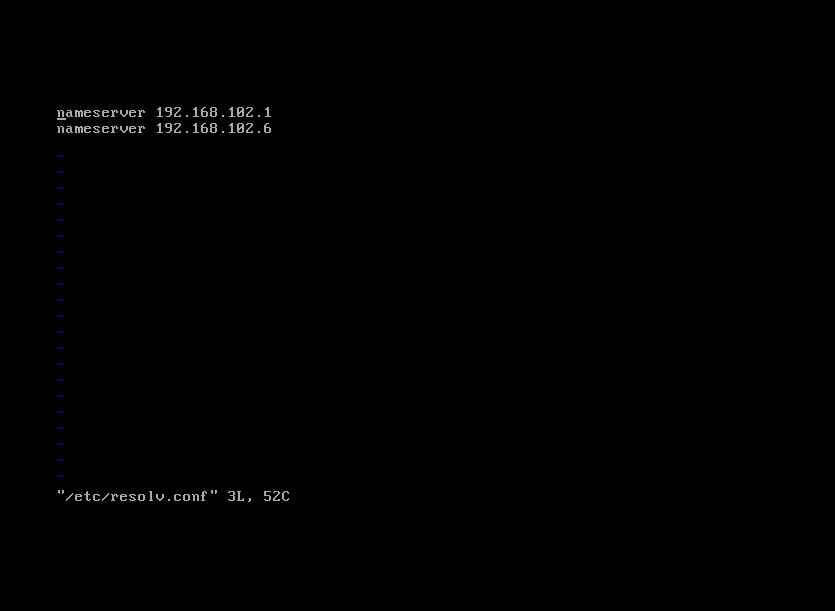
Пропишем DNS. они находятся в файле resolv.conf. Пишем.
И прописываем в нем nameserver 192.168.102.1
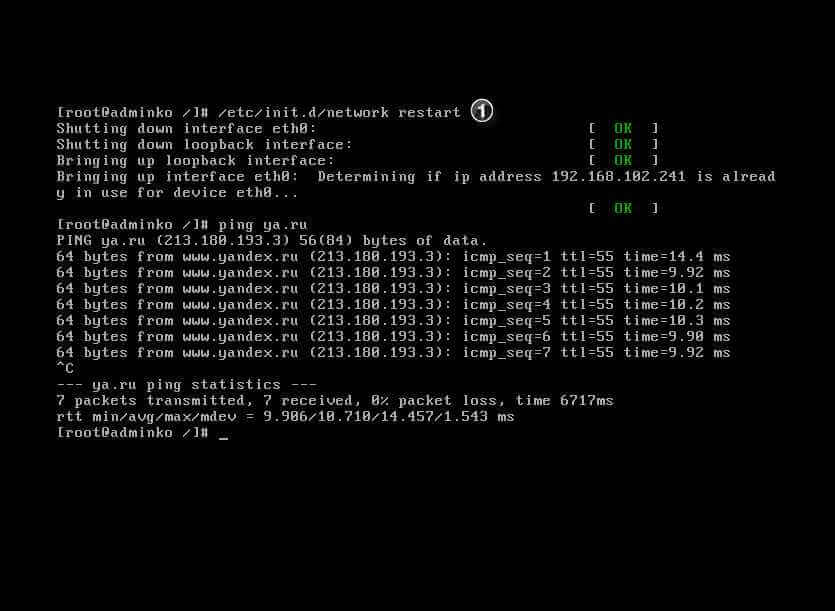
перезапускаем интерфейс командой
service network restart
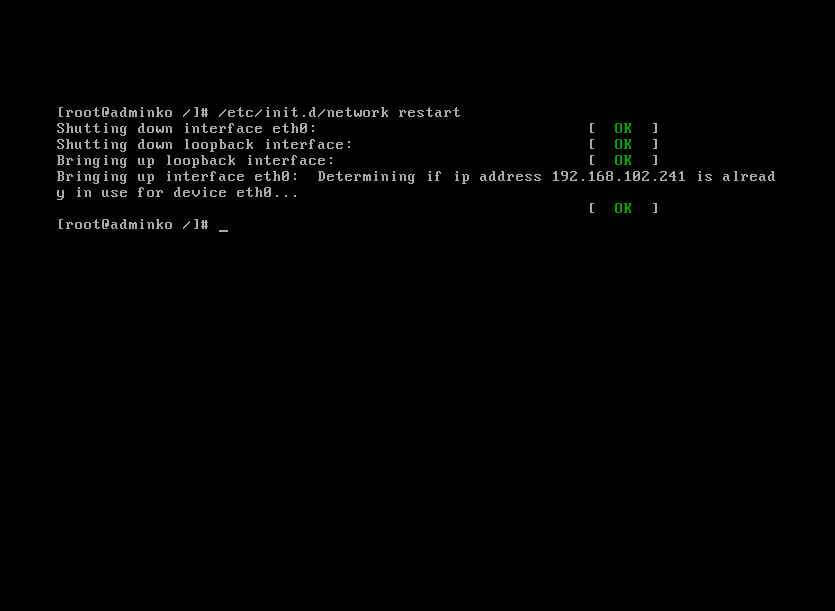
Пингуем яндекс, видим, что все ок.
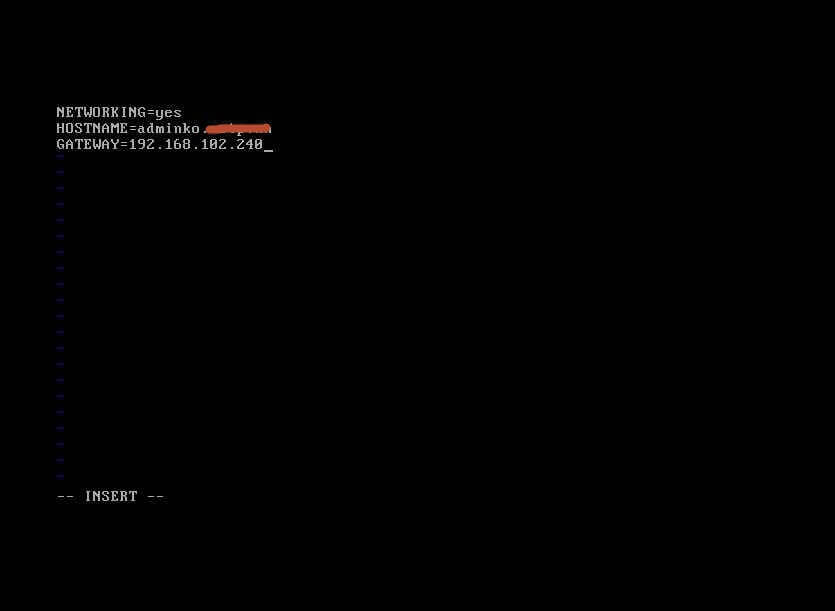
Если у вас два интерфейса и вам нужно поставить основной, то делается это в файле /etc/sysconfig/network
Так же тут можно поменять имя хоста.
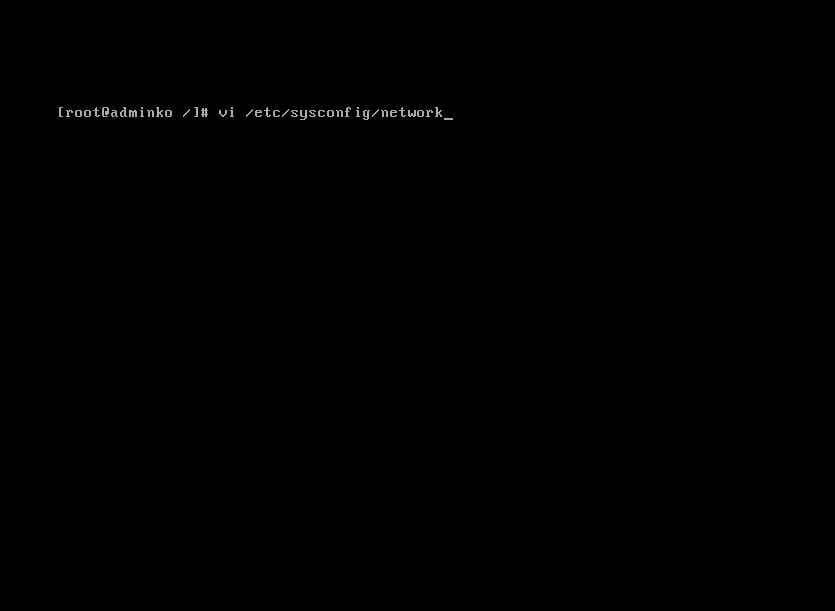
Задаем шлюз и имя сервера
Третий способ. Утилита system-config-network-tui
поставить ее можно из репозитория.
yum install -y system-config-network-tui
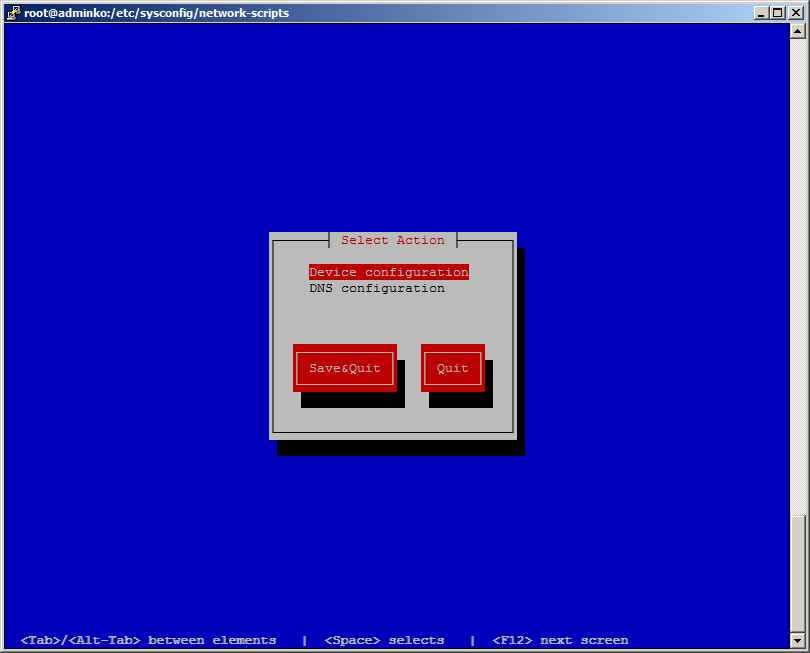
После установки пишем system-config-network-tui

Выбираем Device configuration
Выбираем нужный интерфейс
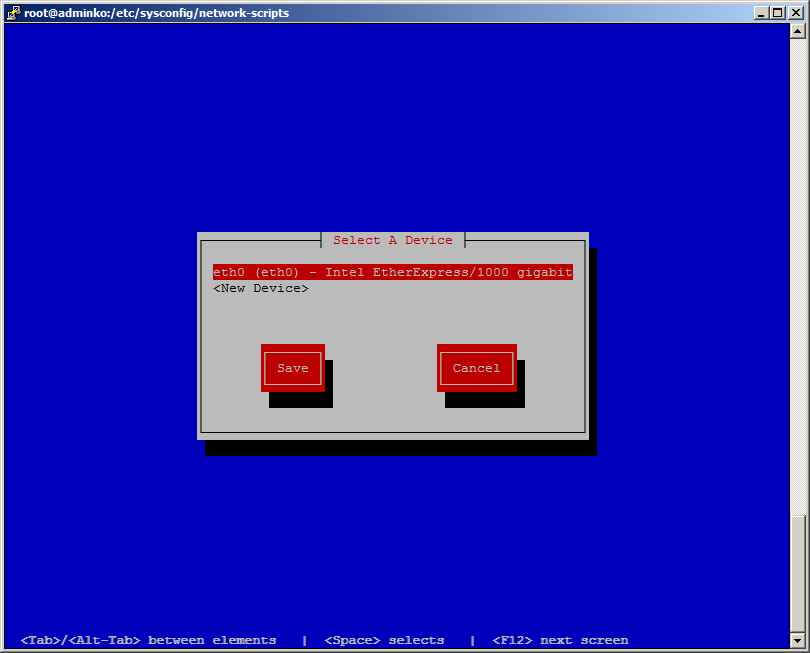
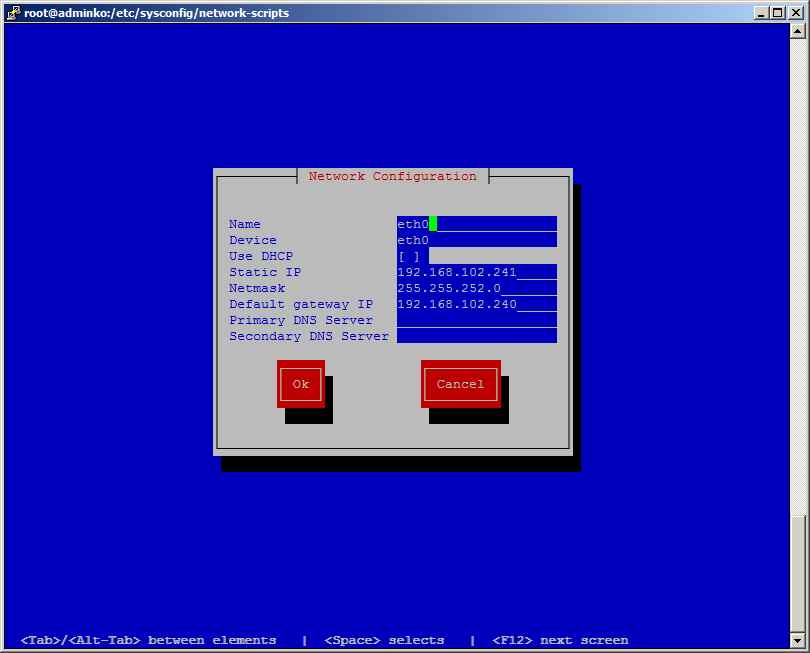
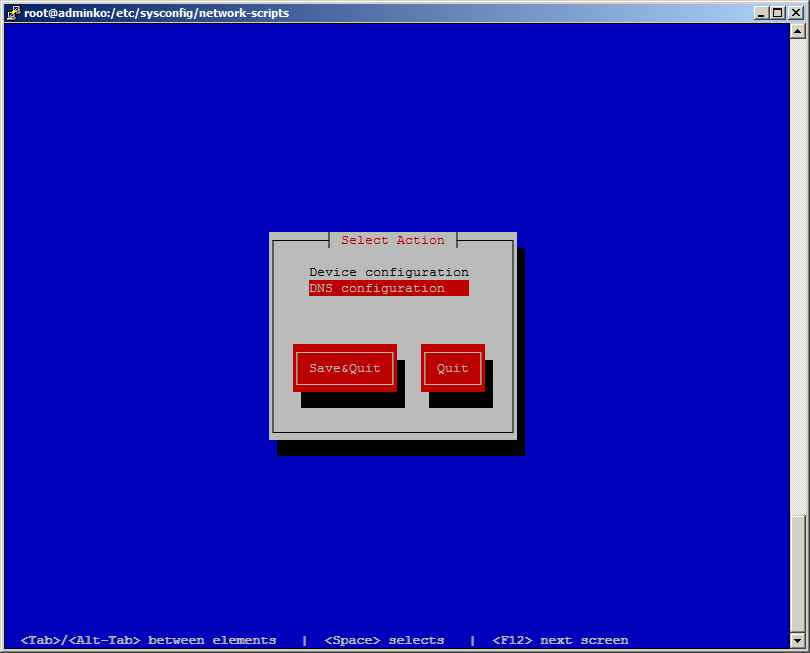
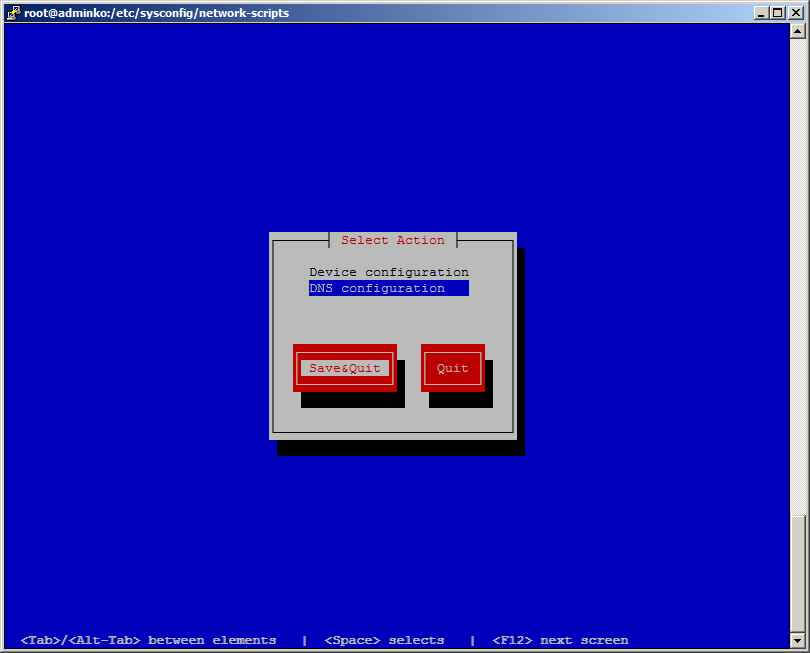
Задаем нужные DNS сервера и имя сервера
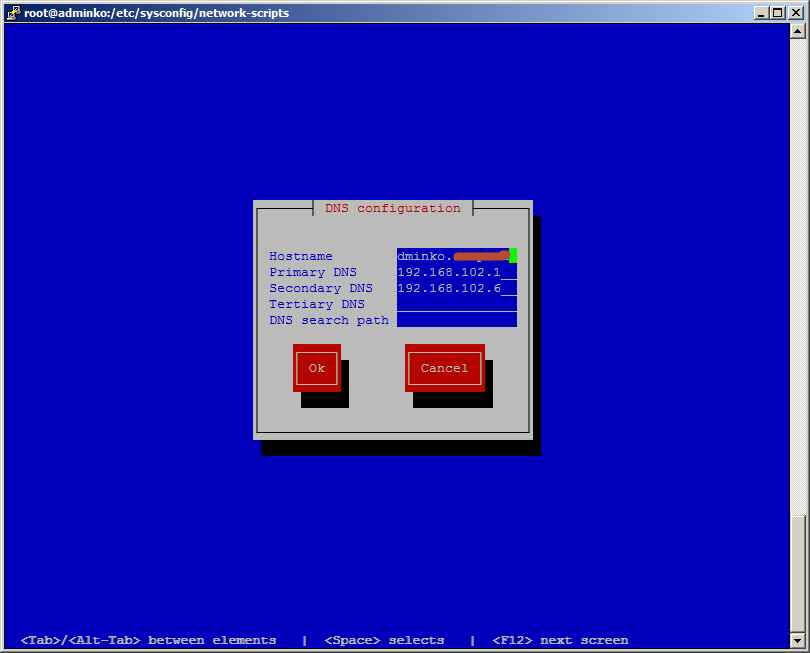
Save & out.
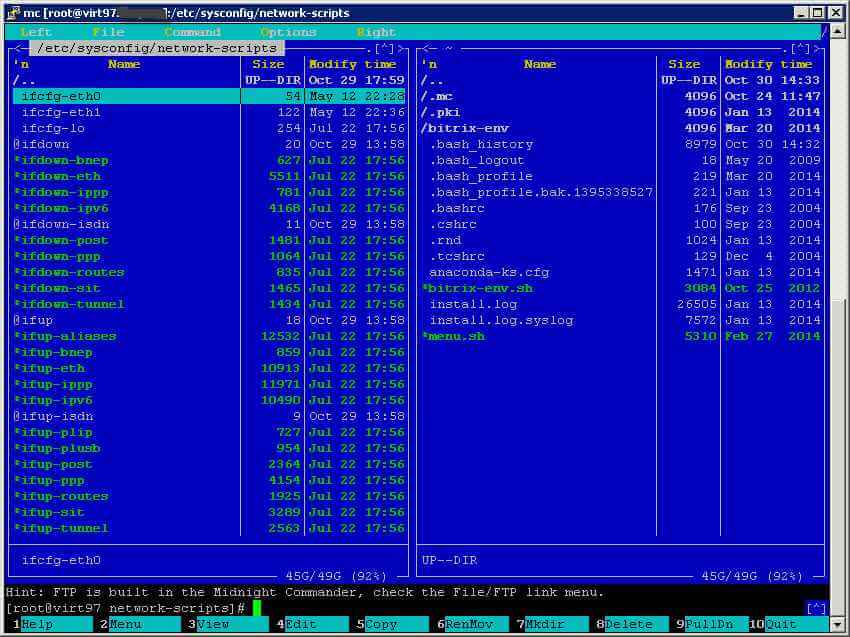
Четвертый способ через консоль mc
ставим ее yum install mc -y
Запускаем командой mc. Переходим для примера в каталог /etc/sysconfig/network-scripts
выбираем ifcfg-eth0 и нажимаем F4. Выбираем 3 пункт редактировать с помощью mc.
Как в CentOS 6-7 настроить статический ip адрес-01
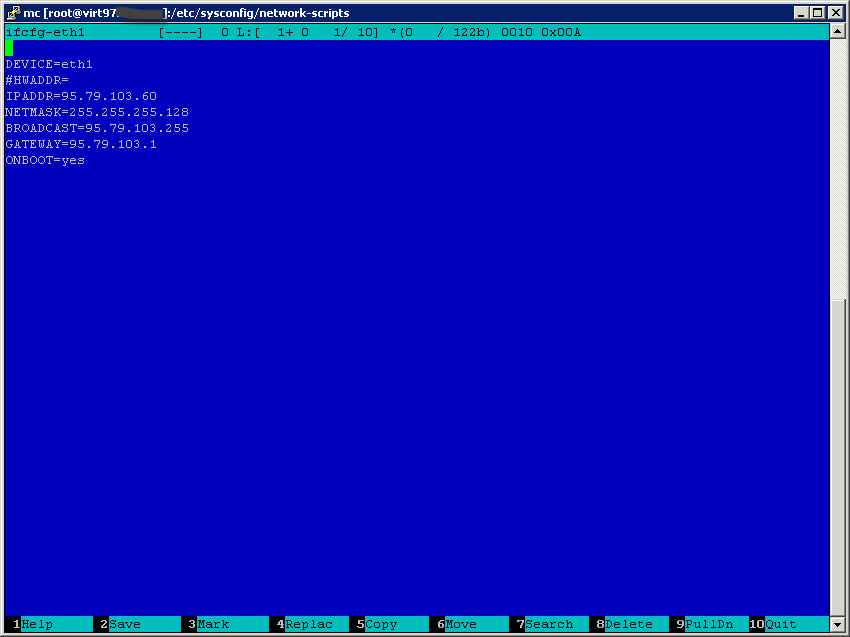
Как в CentOS 6-7 настроить статический ip адрес-02
F10 чтобы выйти.
Вот уважаемые читатели мы с вами разобрались как происходит в centos настройка сети. На этом думаю закончим данную статью, если есть какие либо вопросы пишите помогу чем смогу.
