

- Overview
- Network Interfaces Files
- Setting a Static IP address
- Setting a DHCP Address
- Applying New Network Settings
- Verifying network settings in Debian 9 and Debian 10
- Verifying network settings in Debian 8
- GNOME Desktop
- IPv4 Static Address
- IPv4 DHCP
- IPv6 Static Address
- IPv6 DHCP
- Terminal
- Understanding Network Interface Names
- IPv4 Static Address
- IPv4 DHCP
- IPv6 Static Address
- IPv6 DHCP
- Prerequisites
- Configure Static IP Address using the Graphical User Interface ( GUI )
- Configure Static IP Address using the terminal
- Conclusion
- Configure Static IP through Command Line
- Configure Static IP through GUI
- Настроить статический IP-адрес в Debian 11 с помощью терминала
- Как проверить доступные сетевые интерфейсы в Debian 11
- Как настроить статический IP-адрес в Debian 11
- Как перезапустить сетевую службу в Debian 11
- Настроить статический IP-адрес в Debian 11 с помощью графического интерфейса.
- Заключение
- Set Static IP Address via Command Line
- Set Static IP Address on Minimal Installed Debian 11
- How to Set a Static IP on Debian ?
- We can help you
- How to Configure Static IP in Debian 10?
- 1. How to Configure Static IP via Command Line ?
- 2. How to Configure Static IP via GUI ?
- Method 1: Set up a static IP address on Debian 11 using terminal
- How to check available network interfaces on Debian 11
- How to restart the networking service on Debian 11
- Method 2: Set up a static IP address on Debian 11 using GUI
- Conclusion
- About the author
- What is an IP Address?
- What is DHCP?
- What is a Static IP?
- How to Configure A Static IP on Debian 10
- How to Fix Wired Unmanaged Issue
- How to Configure static IP – GUI
- Conclusion
- About the author
- 1. If you want, you can print the IP address of a specific interface or device, just use the below command:
- 2. IP command can also be used to show the network performance statistics as follows:
- 3. Using nmcli or Network Manager Command Line Interface tool to create a DHCP network connection
- 4. To create a static connection using nmcli, we will need to specify the IP address and the gateway as the argument
- 5. Configuring the network with Network Interfaces File
- 6. Setting Hostname with the “Sysctl” command
- 7. DNS configuration
- 8. Using Bonding on Debian 10
- 9. Configuring bridging on Debian
- 10. Configuring Networking from Command-line tools
- i) Adding an additional IP address to a network card:
- ii) Changing the mac address of an interface.
- iii) Enable and disable interfaces.
- iv) Remove an IP address from a network interface.
- v) Set the Default Gateway
- About the author
Overview
In this tutorial, you will learn how to configure network in Debian to use static IP addresses and DHCP. You will also learn how to configure the DNS name servers, Gateways, and subnets.
- Debian 8 Jessie
- Debian 9 Stretch
- Debian 10 Buster
Network Interfaces Files
Debian’s network interfaces can be configured in two places. The primary location for network configurations is in the /etc/networks/interfaces file.
The second location for network configurations is under /etc/networks/interfaces.d, where you can drop network config files rather than storing everything in the interfaces file.
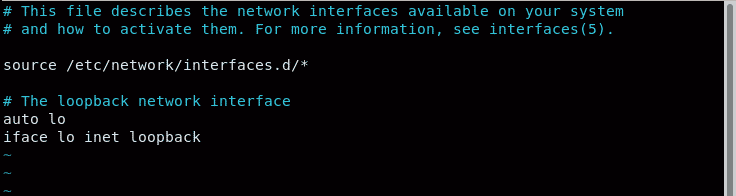
# This file describes the network interfaces available on your system
# and how to activate them. For more information, see interfaces(5).
source /etc/network/interfaces.d/*
# The loopback network interface
auto lo
iface lo inet loopback
# The primary network interface
allow-hotplug enp0s3
iface enp0s3 inet dhcp
The first thing the interfaces file does it load additional configuration files from /etc/network/interfaces.d, if any files are stored there. It then proceeds to load network configurations from defined below that line.
Setting a Static IP address
iface enp0s3 inet static address 192.168.1.2/24 gateway 192.157.1.1- static sets the interface as static
- address sets the IP address to 192.168.1.2 and its subnet using CIDR /24, or subnet 255.255.255.0.
- gateway sets the network gateway IP address for routing traffic outside of the interface’s subnet.
This configuration can be added to the interfaces file or written to a configuration file under /etc/network/interfaces.d.
For example, the file could be saved as /etc/network/interfaces.d/enp0s3.conf.
To apply your new network settings you will need to bring the interface down and then back up again.
- Bring the interface you just updated down.
ifdown enp0s3 - Bring the interface back online.
ifup enp0s3
Verify your network settings are applied correctly. For Debian 10 and Debian 9, you can use the ip a command. For Debian 8 you would use the ifconfig command.
Setting a DHCP Address
A DHCP address is configured as shown in the example below. Unlike the the static IP address it’s a one-liner, as we do not need to set an address or gateway. These values will automatically be assigned by your network.
iface enp0s3 inet dhcpApplying New Network Settings
To apply your new network settings you will need to bring the interface offline and then back online.
- Bring the interface down.
ifdown enp0s3 - Bring the interface back online
ifup enp0s3
Verifying network settings in Debian 9 and Debian 10
With Debian 9 and Debian 10 you must use the ip command to view the current state of your network interfaces.
ip a2: enp0s3: <BROADCAST,MULTICAST,UP,LOWER_UP> mtu 1500 qdisc pfifo_fast state UP group default qlen 1000 link/ether 08:00:27:de:14:99 brd ff:ff:ff:ff:ff:ff inet 10.0.0.41/24 brd 10.0.0.255 scope global dynamic enp0s3 valid_lft 562759sec preferred_lft 562759sec inet6 2607:fea8:4de0:b900:a00:27ff:fede:1499/64 scope global dynamic mngtmpaddr valid_lft 298sec preferred_lft 298sec inet6 fe80::a00:27ff:fede:1499/64 scope link valid_lft forever preferred_lft foreverIn the output of the ip a command we can see that our interface, enp0s3, is in an UP state, has been assigned IP address 10.0.0.41/24. If you set your IP address to 10.0.0.41/24, then your changes have been applied successfully.
Verifying network settings in Debian 8
Network interfaces states can be check in Debian 8 using the ifconfig command.
ifconfiglo Link encap:Local Loopback inet addr:127.0.0.1 Mask:255.0.0.0 inet6 addr: ::1/128 Scope:Host UP LOOPBACK RUNNING MTU:16436 Metric:1 RX packets:8 errors:0 dropped:0 overruns:0 frame:0 TX packets:8 errors:0 dropped:0 overruns:0 carrier:0 collisions:0 txqueuelen:0 RX bytes:480 (480.0 b) TX bytes:480 (480.0 b)
p2p1 Link encap:Ethernet HWaddr 00:1C:C0:AE:B5:E6 inet addr:192.168.0.1 Bcast:192.168.0.255 Mask:255.255.255.0 inet6 addr: fe80::21c:c0ff:feae:b5e6/64 Scope:Link UP BROADCAST RUNNING MULTICAST MTU:1500 Metric:1 RX packets:41620 errors:0 dropped:0 overruns:0 frame:0 TX packets:40231 errors:0 dropped:0 overruns:0 carrier:0 collisions:0 txqueuelen:1000 RX bytes:21601203 (20.6 MiB) TX bytes:6145876 (5.8 MiB) Interrupt:21 Base address:0xe000
This tutorial will walk you through configuring your network setting for Debian 9 Stretch. I will show you how to set static address and dynamic address for IPv4 and IPv6.
GNOME Desktop
The default desktop environment for Debian 9 Stretch is GNOME 3. We will focus on this environment,
IPv4 Static Address
IPv4 DHCP
IPv6 Static Address
IPv6 DHCP
Terminal
All configuration can be found under /etc/network. You may either define all of your interfaces in a single file or place them in individual files under /etc/network/interfaces.d.
Understanding Network Interface Names
Most recent distributions have switched over to predictable naming. Prior to this an interfaces name was derived from the order it was discovered; the first interface would be named eth0, the second eth1, and so on. The problem with this approach is eth0 wasn’t always the same slot, making troubleshooting difficult.
<interface type><bus number><slot number>
For example, an Ethernet interface – the most common – found on bus 0 and slot 3 of your motherboard would be named:
enp0s3
IPv4 Static Address
- Open the network interface configuration file into a text editor, such as VI.
- Add the following lines.
auto enp0s3
iface enp0s3 inet static
address 192.168.1.20
netmask 255.255.255.0
gateway 192.167.1.1
- Save your changes and exit the text editor.
- Bring the interface down.
ifdown enp0s3
- Bring the interface back up.
ifup enp0s3
- Verify your network settings have been applied.
ip a
IPv4 DHCP
- Open the network interface configuration file into a text editor, such as VI.
- Add the following lines.
auto enp0s3
iface enp0s3 inet dhcp
- Save your changes and exit the text editor.
- Bring the interface down.
ifdown enp0s3
- Bring the interface back up.
ifup enp0s3
- Verify your network settings have been applied.
ip a
IPv6 Static Address
- Open the network interface configuration file into a text editor, such as VI.
- Add the following lines.
auto enp0s3
iface enp0s3 inet6 static
address fd9f:2685:51fa:2e4e:xxxx:xxxx:xxxx:xxxx
netmask 64
gateway fd9f:2685:51fa:2e4e:xxxx:xxxx:xxxx:xxxx
- Save your changes and exit the text editor.
- Bring the interface down.
ifdown enp0s3
- Bring the interface back up.
ifup enp0s3
- Verify your network settings have been applied.
ip a
IPv6 DHCP
- Open the network interface configuration file into a text editor, such as VI.
- Add the following lines.
auto enp0s3
iface enp0s3 inet6 auto
- Save your changes and exit the text editor.
- Bring the interface down.
ifdown enp0s3
- Bring the interface back up.
ifup enp0s3
- Verify your network settings have been applied.
ip a
On a DHCP network, your Linux system will usually receive an IP address automatically from the DHCP server which, in most cases, is the router. The IP configuration will usually comprise the IPv4 address, the netmask, gateway, and the DNS settings. This is usually convenient for desktop or client PCs which only need to access the internet or network resources.
However, the case is different when you want to set up a server. In this case, you would need to configure a static IP to make the server always available via the same IP address. With DHCP, the IP address is bound to change once the lease time is over leading to the unavailability of the server.
In this guide, we will take you through a walk-through of how to set a static IP on Debian 11. We will demonstrate how you can configure a static IP on both the desktop GUI and server instances.
Prerequisites
There are two ways of configuring a static IP on Debian. You can achieve this using GUI or on command-line.
Configure Static IP Address using the Graphical User Interface ( GUI )
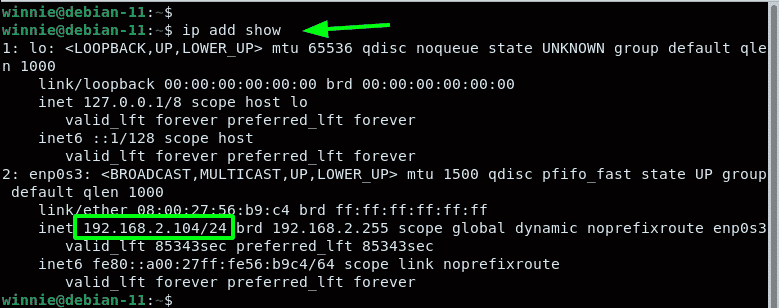
You can verify this using the command shown.
$ ip addr show
In our system, enp0s3 interface is the active link that is assigned the IP address. This may be something else in your case.
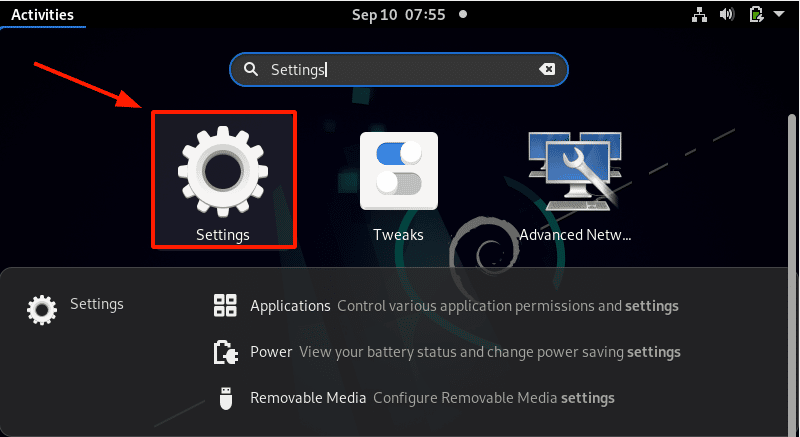
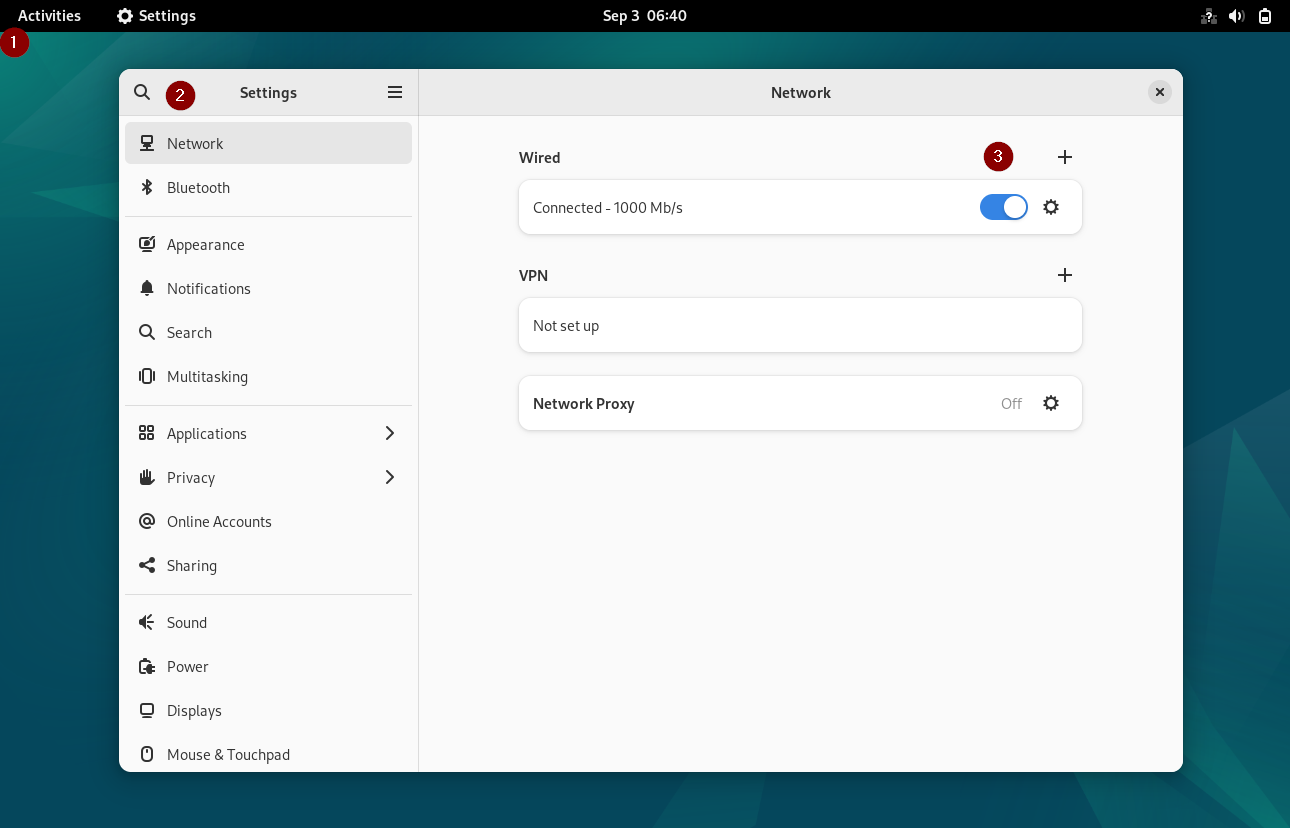
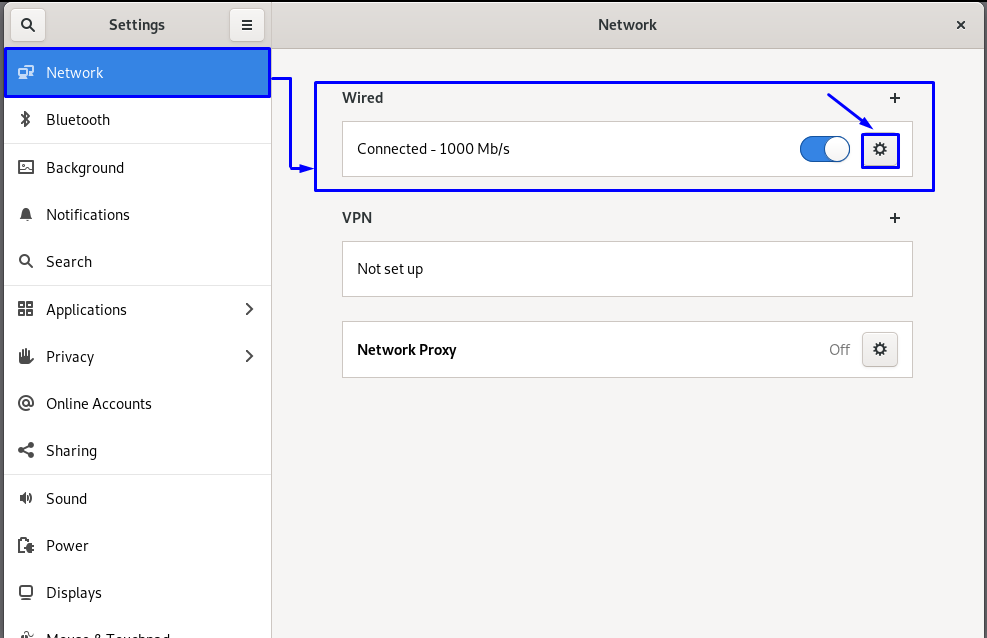
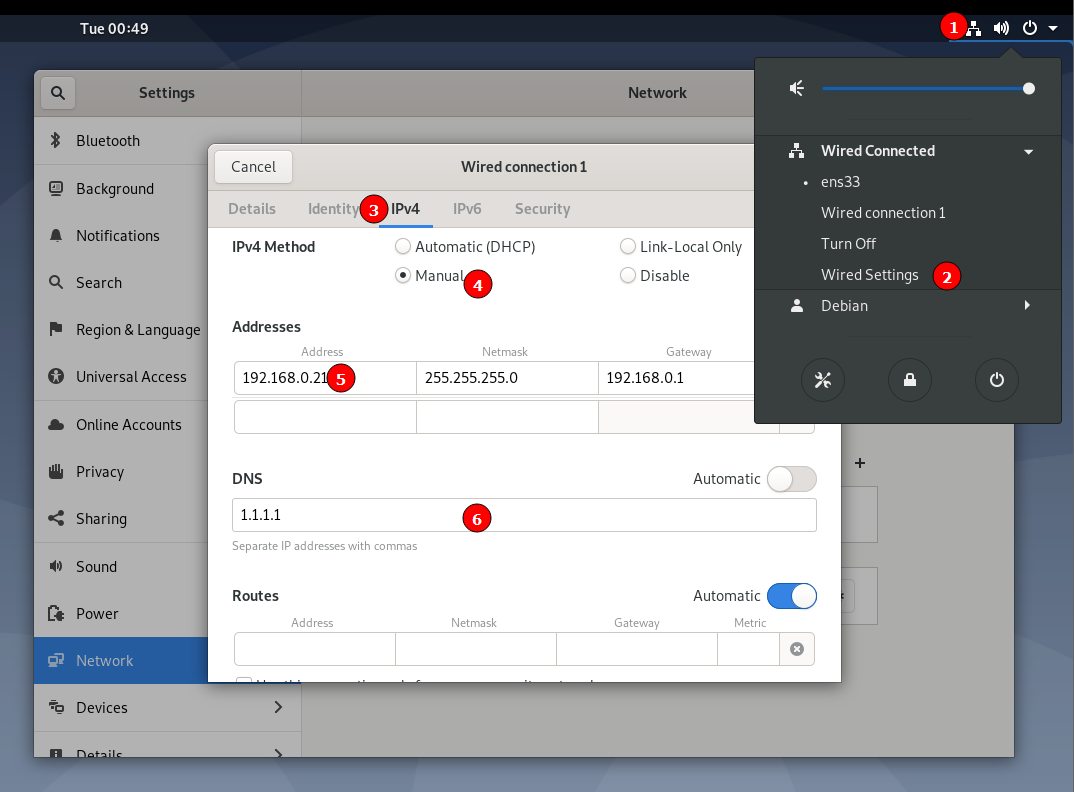
To get started with setting the static IP, click on ‘Activities’ on the left far corner. Search for and click on the ‘Settings’ icon.
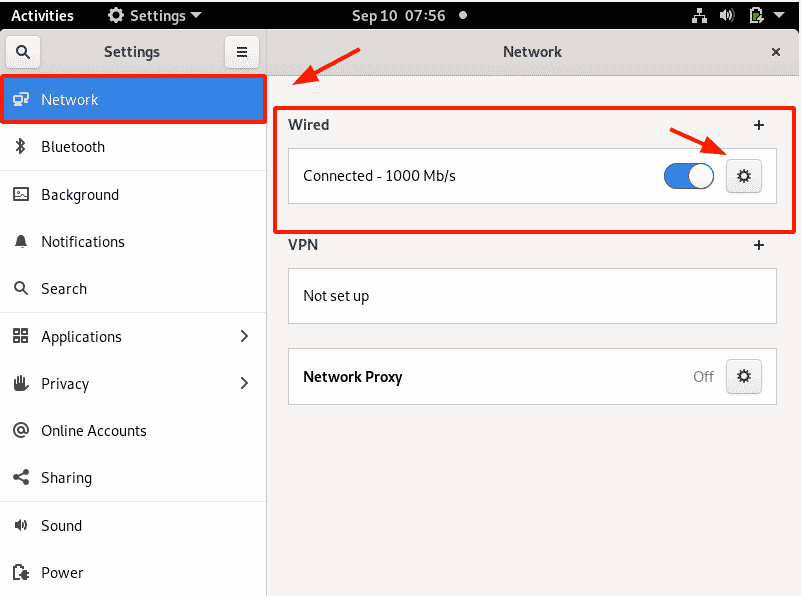
On the ‘Settings’ page, select the ‘Network’ tab. Next, head over to the ‘Wired’ section and click on the small gear wheel as indicated.
This displays the current IP address configuration as shown. As we confirmed earlier, our current IP address is 192.168.2.104. This has been dynamically allocated to the active interface using the DHCP service.
We are going to override the DHCP settings and manually set a static IP which will persist even upon a reboot.
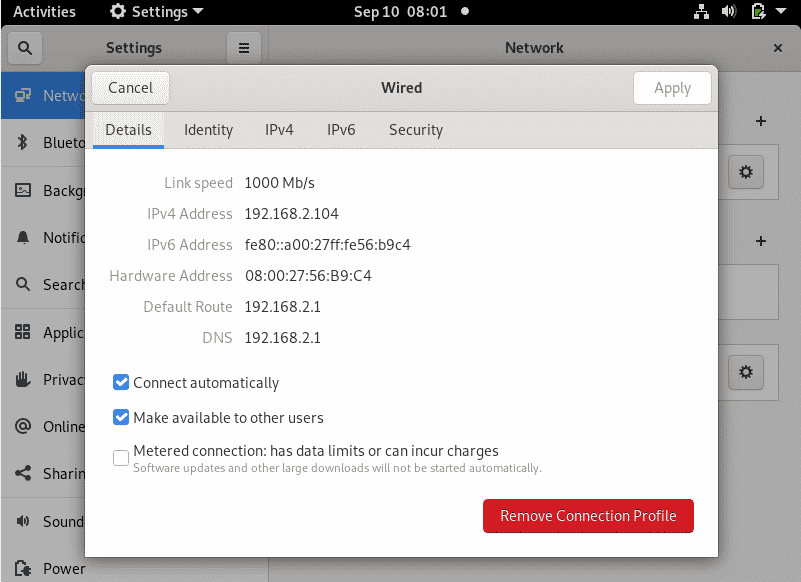
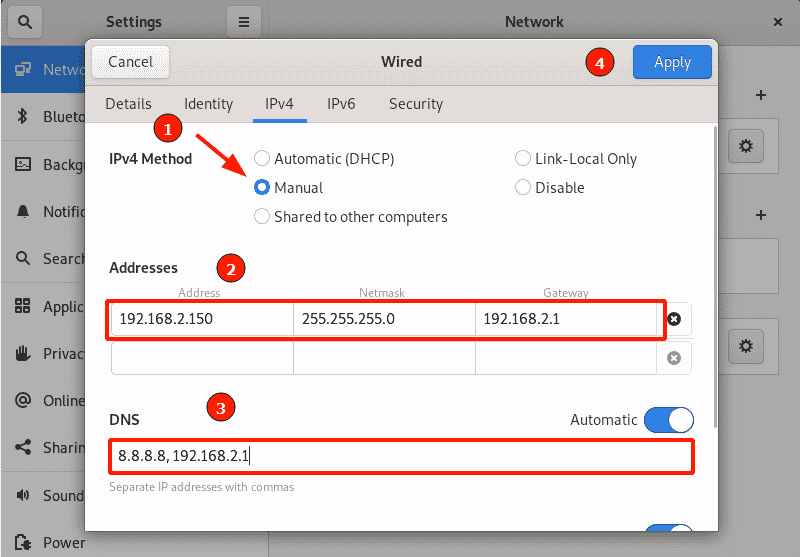
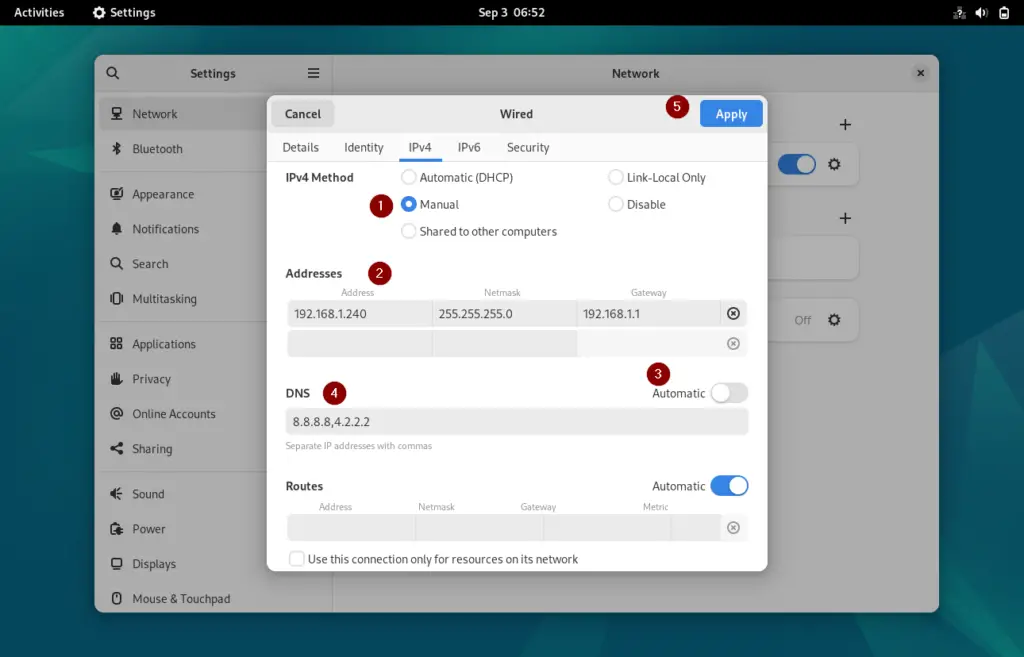
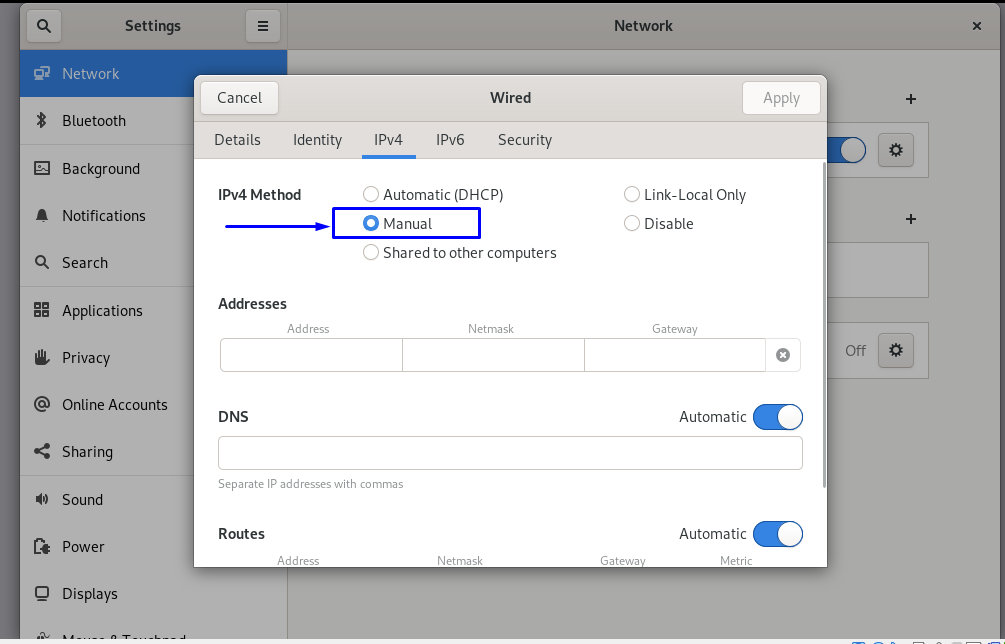
Click the IPv4 tab. Switch from ‘Automatic’ to ‘Manual’ in the IPv4 method section. Thereafter, specify your desired IP address, netmask, and default gateway. Be sure to also provide the preferred DNS settings.
To apply the changes made, click the ‘Apply’ button.
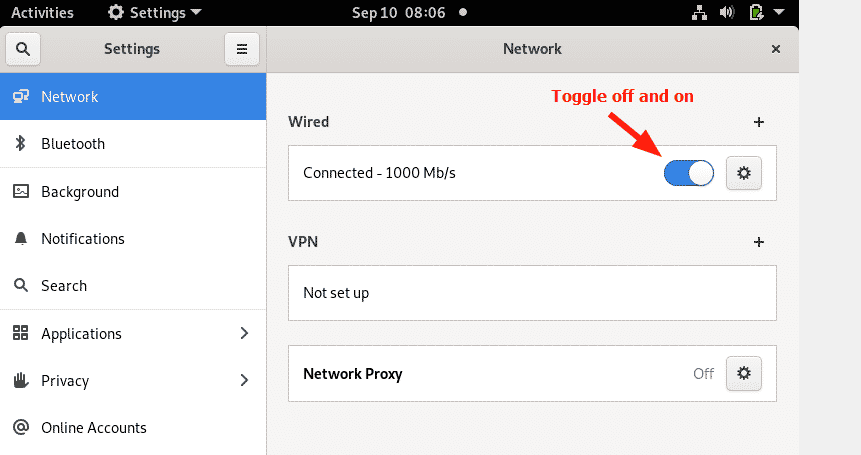
You need to restart the networking daemon or service for the Debian system to implement the new static IP settings. So, turn the toggle button off and then on.
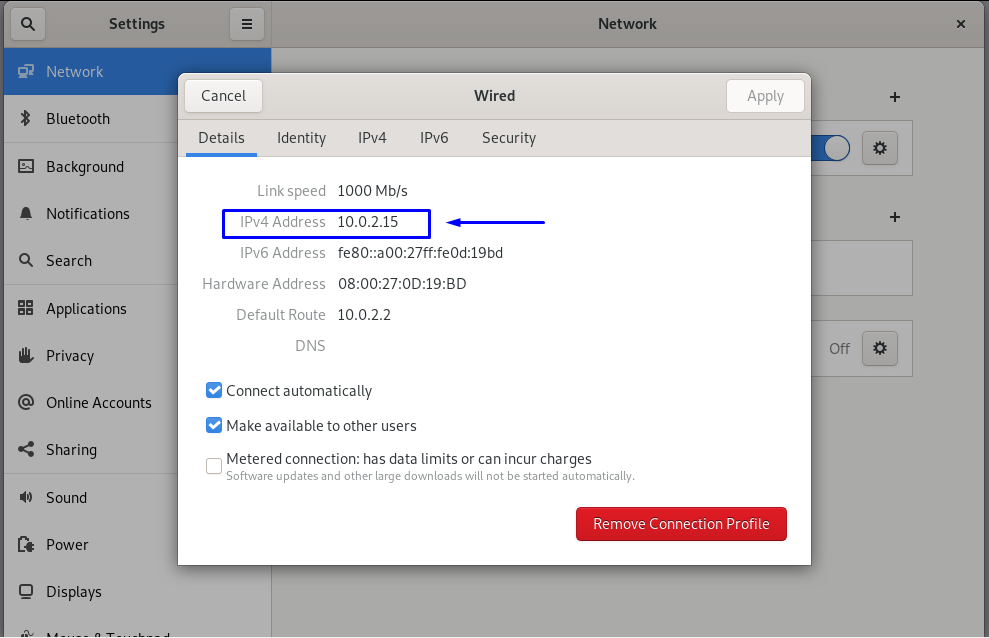
Click on the gear icon once more to verify that the static IP settings have been applied.

On the terminal, verify that the network interface has acquired the newly configured IP address:
$ ip addr show
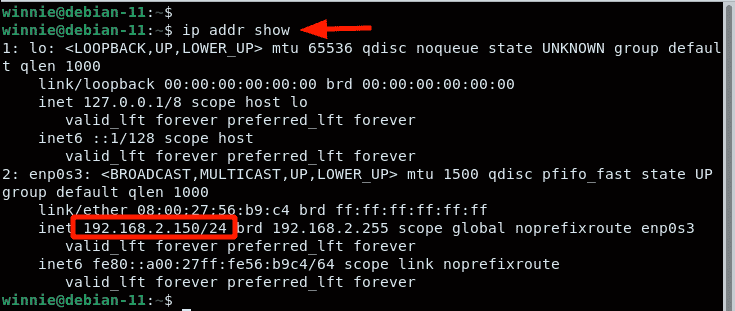
The output is a confirmation that the system was successfully configured using a static IP. Let’s now shift gears and explore setting a static IP on the command line.
Configure Static IP Address using the terminal
If you are running a headless server, or are connecting to a remote server via SSH, the only option available is to configure the static IP on the command line.
$ sudo vim /etc/network/interfaces
By default, only the loopback settings are specified.
We are going to specify the IP settings for our active network interface. But before making any changes, make a backup of the configuration file.
$ sudo cp /etc/network/interfaces /etc/network/interface.bak

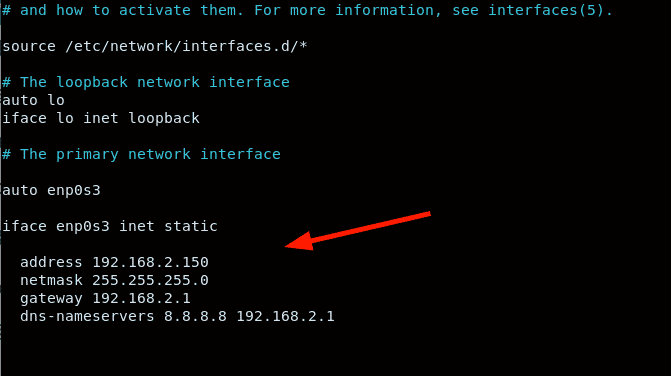
Specify the IP settings as provided. Ensure to make your settings in accordance with your network subnet.
auto enp0s3iface enp0s3 inet static address 192.168.2.150 netmask 255.255.255.0 gateway 192.168.2.1 dns-nameservers 8.8.8.8 192.168.2.1
To apply the changes, restart the networking service.
$ sudo systemctl restart networking
This will disconnect you from the server if you are connected via SSH. Reconnect using the newly set static IP address.

Conclusion
We have outlined two methods of assigning a static IP on your Debian 11 PC – using GUI and the terminal. The former is the easier option when working on a Debian desktop and the latter comes in handy when configuring a remote server via an SSH client.

When you install a new OS, by default it is configured to obtain a dynamic IP address from the DHCP server. However, sometimes you have to configure the static IP address on your machine. It can be for various reasons like when a service needs to connect through an IP address instead of a domain name or when you are hosting a web server or to give someone remote access to your system. Whatever the reason is, you must know how to configure a static IP in your system. This post will explain to you how to do this.
- Configure Static IP through Command Line
- Configure Static IP through GUI
Let’s get started.
Configure Static IP through Command Line
You can configure the static IP through /etc/network/interfaces file from your command line. However, for this, you first need to know the network interface name.
You can find the currently available network interface by running the below command in Terminal:
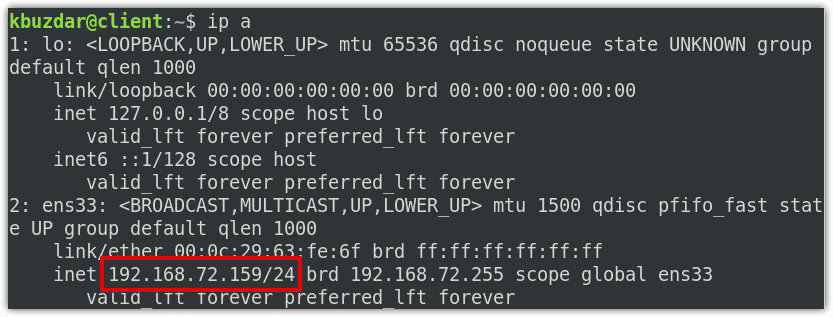
$ ip a
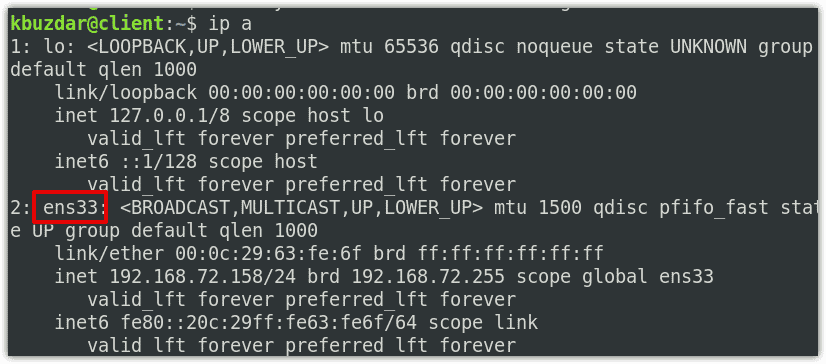 The above output of “ip a” command shows that there are two interfaces currently available. We want to configure the static IP for the interface ens33. The current IP address of ens33 is 192.168.72.158 which is dynamically assigned by the DHCP.
Now we will open the interface configuration file and configure static IP for ens33.
$ sudo nano /etc/network/interfaces
auto interface
iface interface inet static
address xxx.xxx.xxx.xxx #enter your IP addressgateway xxx.xxx.xxx.xxx #enter gateway ip address
auto ens33iface ens33 inet static
dns-nameservers 8.8.8.8 8.8.4.4
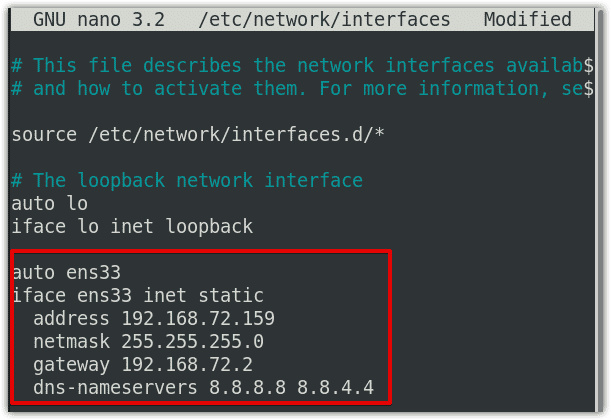
Once you have completed the configurations, save and close the file.
Then restart the networking services. Use the below command to do so:
$ sudo systemctl restart networking.service
You can also use the ifdown and ifup command to apply the configuration changes. First, run the ifdown command to bring down the interface:
$ ifdown ens33
Then bring up the interface using ifup:
$ ifup ens33
Now to verify if the IP address has been changed successfully, issue the below command in Terminal:
$ ip a
Configure Static IP through GUI
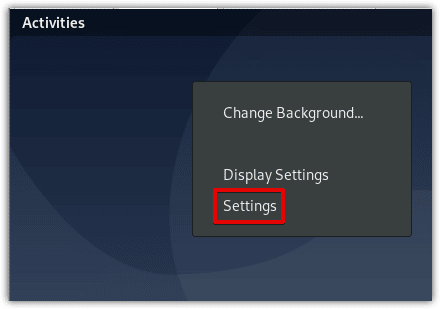
You can also change the static IP through the Settings utility in your Debian system. To launch the Settings utility in your system, right-click the desktop and then click Settings.
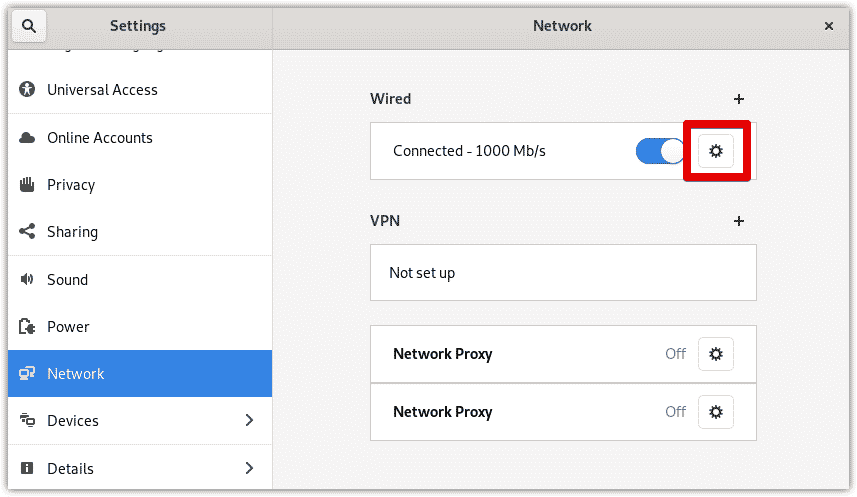
Then from the left pane in the Settings window, select the Network tab.

On the right pane, click the cog icon in front of the network interface you want to configure.
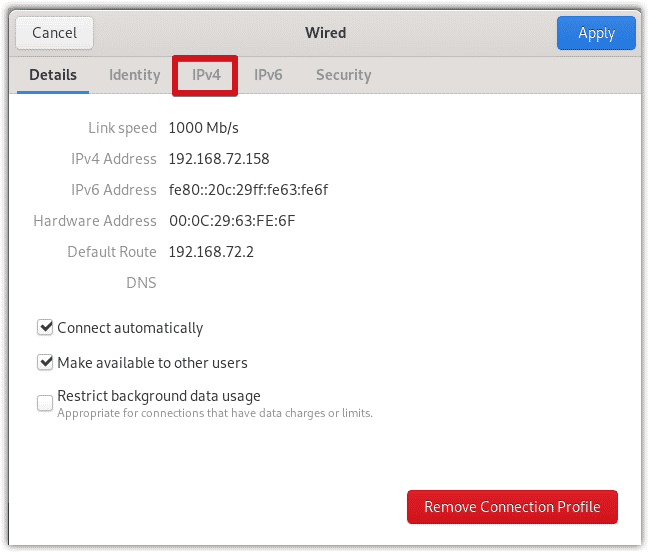
Then in the IPv4 Method, choose Manual.
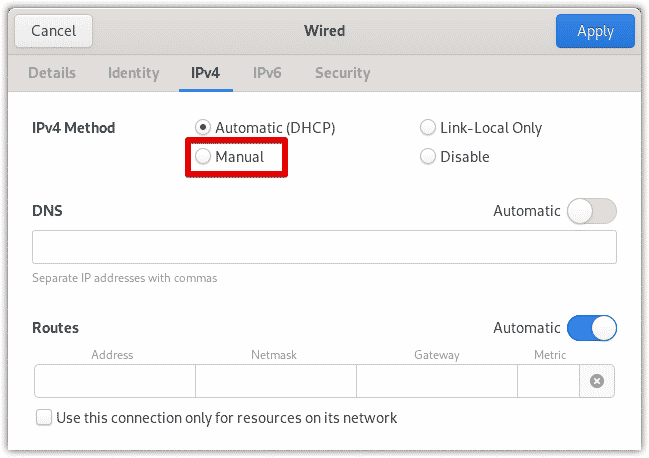
Now the Addresses field will appear. Enter the IP address, Netmask, and Gateway for your interface. If you also want to set the DNS address manually, switch off the Automatic button and enter the DNS server address.
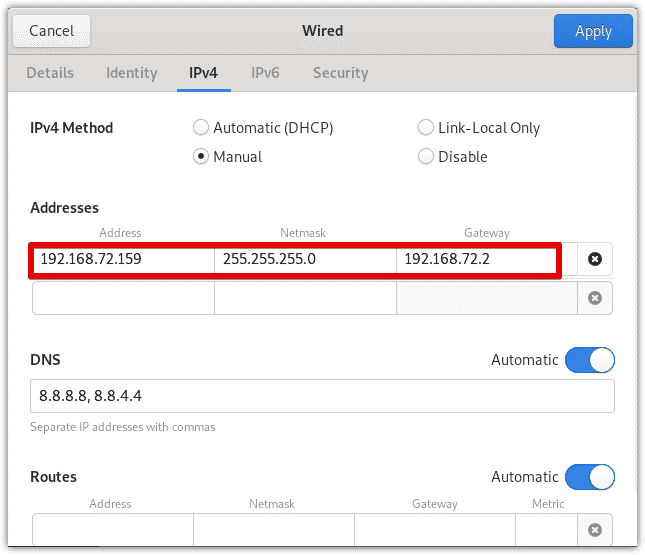
Here, we have specified 192.168.72.159 as our interface IP address, 255.255.255.0 as netmask, and the 192.168.72.2 ad the default gateway. Then we have specified 8.8.8.8 and 8.8.4.4 as our DNS servers.
Now click the Apply button to apply all the configuration changes.
Now to confirm if the new IP address has been successfully configured, go to the Details tab. Alternatively, you can also use the “ip a” command in Terminal to verify the IP address.
There you have the static IP configuration in Debian 10. Using either the command line or GUI method, you can easily configure the static IP address on your system.

Debian — операционная система, состоящая из свободного ПО с открытым исходным кодом. В настоящее время Debian GNU/Linux — один из самых популярных и важных дистрибутивов GNU/Linux, в первичной форме оказавший значительное влияние на развитие этого типа ОС в целом. Debian может использоваться в качестве операционной системы как для серверов, так и для рабочих станций.
Смотрим какие сетевые интерфейсы подняты в системе
user@debian:~# ip addr show
1: lo: <LOOPBACK,UP,LOWER_UP> mtu 65536 qdisc noqueue state UNKNOWN group default qlen 1000 link/loopback 00:00:00:00:00:00 brd 00:00:00:00:00:00 inet 127.0.0.1/8 scope host lo valid_lft forever preferred_lft forever inet6 ::1/128 scope host valid_lft forever preferred_lft forever
2: enp0s3: <BROADCAST,MULTICAST,UP,LOWER_UP> mtu 1500 qdisc pfifo_fast state UP group default qlen 1000 link/ether 08:00:27:33:07:93 brd ff:ff:ff:ff:ff:ff inet 192.168.1.15/24 brd 192.168.1.255 scope global dynamic enp0s3 valid_lft 86277sec preferred_lft 86277sec inet6 fdd4:a148:ea1:7a00:a00:27ff:fe33:793/64 scope global dynamic mngtmpaddr valid_lft 7078sec preferred_lft 3478sec inet6 fe80::a00:27ff:fe33:793/64 scope link valid_lft forever preferred_lft forever
Редактируем файл настроек сети
user@debian:~# sudo nano /etc/network/interfacesМеняем параметр dhcp на static, и дописываем параметры сети
iface enp0s3 inet static address 192.168.1.15 netmask 255.255.255.0 network 192.168.1.0 broadcast 192.168.255.255 gateway 192.168.1.1 dns-nameservers 192.168.1.1 #dns-nameservers 8.8.8.8 8.8.4.4user@debian:~# systemctl restart networkinguser@debian:~# ip addr show
1: lo: <LOOPBACK,UP,LOWER_UP> mtu 65536 qdisc noqueue state UNKNOWN group default qlen 1000 link/loopback 00:00:00:00:00:00 brd 00:00:00:00:00:00 inet 127.0.0.1/8 scope host lo valid_lft forever preferred_lft forever inet6 ::1/128 scope host valid_lft forever preferred_lft forever
2: enp0s3: <BROADCAST,MULTICAST,UP,LOWER_UP> mtu 1500 qdisc pfifo_fast state UP group default qlen 1000 link/ether 92:00:b4:b2:f5:ac brd ff:ff:ff:ff:ff:ff inet 192.168.1.15/24 brd 192.168.12.255 scope global enp0s3 valid_lft forever preferred_lft forever inet6 fe80::9000:b4ff:feb2:f5ac/64 scope link valid_lft forever preferred_lft foreverЕсли сетевой интерфейс не поднялся, выполняем команду
user@debian:~# sudo ifup enp0s3
У блога появился хостинг, его любезно предоставила компания Облакотека. Облакотека — облачные сервисы для создания и управления виртуальной ИТ-инфраструктурой.
Если вам понравился мой блог и вы хотели бы видеть на нем еще больше полезных статей, большая просьба поддержать этот ресурс.
Если вы размещаете материалы этого сайта в своем блоге, соц. сетях, и т.д., убедительная просьба публиковать обратную ссылку на оригинал
В этом посте вы узнаете, как настроить статический IP на Debian 11 с использованием двух различных методов. Итак, начнем!
Настроить статический IP-адрес в Debian 11 с помощью терминала
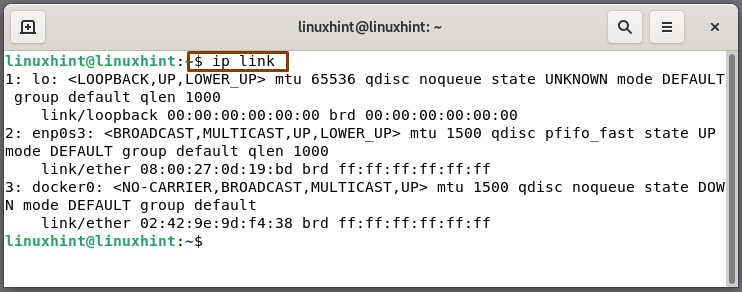
Как проверить доступные сетевые интерфейсы в Debian 11
Вы можете использовать команду » ip «, чтобы получить подробную информацию о доступных в настоящее время сетевых интерфейсах вашей системы. » IP » — это сокращение от » Интернет-протокол «. Команда » ip » — это утилита, используемая сетевыми и системными администраторами в системах на базе Linux для настройки сетевых интерфейсов. В команде » ip » » ссылка » — это подкоманда, добавленная для просмотра и изменения сетевого интерфейса. Запишите приведенную ниже команду в свой терминал Debian 11 для просмотра доступных в настоящее время сетевых интерфейсов:

Как настроить статический IP-адрес в Debian 11
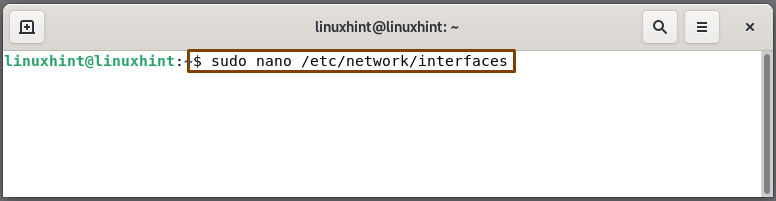
Теперь откройте файл конфигурации сетевых интерфейсов » / etc / network / interfaces » в редакторе nano:

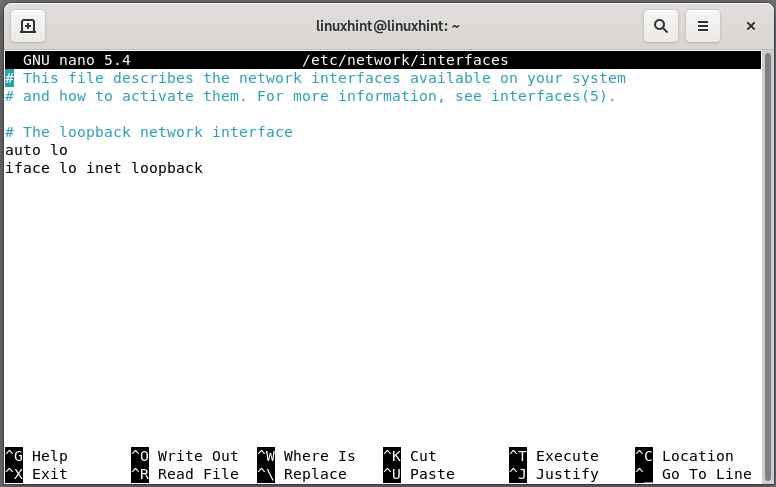
С настройками по умолчанию ваш файл конфигурации сетевых интерфейсов будет выглядеть так:

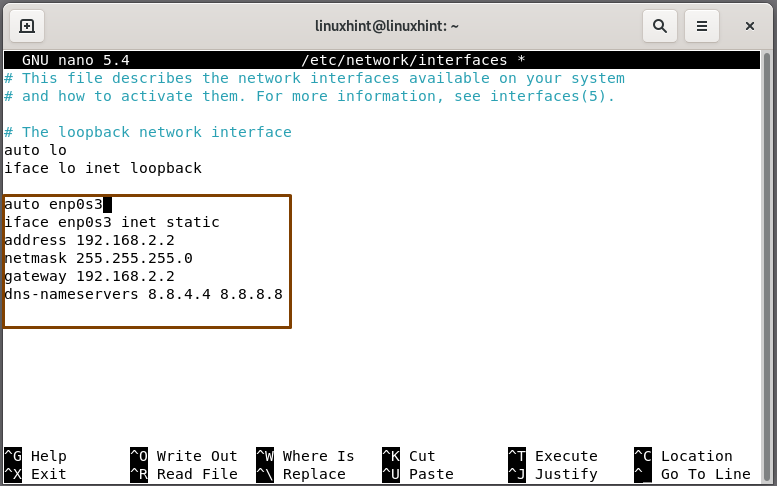
auto enp0s3
iface enp0s3 inet static
address 192.168.2.2
netmask 255.255.255.0
gateway 192.168.2.2
dns-nameservers 8.8.4.4 8.8.8.8

Чтобы сохранить изменения, внесенные в файл конфигурации сетевого интерфейса, нажмите » CTRL + O «:

Как перезапустить сетевую службу в Debian 11
systemctl restart NetworkManager.service


Настроить статический IP-адрес в Debian 11 с помощью графического интерфейса.

Из различных категорий, представленных в левом боковом меню, выберите » Сеть «. Откройте настройки активного сетевого подключения, нажав на значок шестеренки:

В открывшемся окне сетевых настроек перейдите на вкладку » IPv4 «. Выберите для своей сети метод IPv4 » Вручную «:


Заключение
Debian 11 предоставляет вам возможность настроить статический IP-адрес для вашей системы, независимо от того, хотите ли вы сделать это для размещения вашего веб-сервера или предоставления кому-либо удаленного доступа. DHCP автоматически включает динамический сервер при установке новой операционной системы. Однако вы можете настроить свой IP-адрес с помощью терминала Debian и графического интерфейса. В этом посте вы узнали, как настроить статический IP-адрес на вашем Debian 11 двумя разными способами.
In this guide, we will demonstrate how to set static ip address on Debian 11 (Bullseye).
When we install Debian Linux on our system then during the installation it tries to get DHCP ip address from modem (or dhcp server) if available. But it is always to recommended to have a static IP address on your system. The main benefit of Static IP address is that it will be persistent across the reboot.
Login to your Debian Desktop environment, From –> Choose

To disable IPv6, go to IPv6 tab and choose ‘Disable’ option
Click on IPv4 Tab

Above window shows that is configured, so to configure Static IP choose and then specify the IP details like IP address, netmask, gateway and dns server IP.
To Specify the dns server IP first disable the automatic dns IP by toggling it.
Click on to save the changes.
Now, disable and enable the interface by toggling it so that new IP address is assigned to the Interface.

Now again click on wired settings to verify whether the new static ip address is assigned or not.

Perfect, above confirms that new static IP address is configured successfully. Now let’s see the alternate way to configure IP address in Debian Linux.
Set Static IP Address via Command Line
Open the terminal and identify the interface on which we will configure static IP address. Run below ,
$ ip add show

Now run nmcli command to get connection name,
$ nmcli connection
Once we get the connection name, run below nmcli command to assign static ipv4 address,
$ nmcli con mod ‘connection-name’ ipv4.address <IP-Address>
$ nmcli con mod 'eth0' ipv4.address 192.168.1.151/24
Set the gateway by running below
$ nmcli con mod 'eth0' ipv4.gateway 192.168.1.1
Change Configuration from DHCP to Manual , so that IP will be static and persistent, run
$ nmcli con mod 'eth0' ipv4.method manual
Set the DNS server IP by running below command,
$ nmcli con mod 'eth0' ipv4.dns '8.8.8.8'
Disable and enable the connection so that above changes come into the effect.
$ nmcli connection down eth0
$ nmcli connection up eth0
Now Run IP Command to check IP address,
$ ip add show eth0
Output of above commands would look like below:

Perfect, above output confirms that static IP address has been configured successfully on eth0 interface.
Set Static IP Address on Minimal Installed Debian 11
Whenever we install minimal Debian 11 then we will have only the CLI console and don’t have any nmcli utility. So, to configure static ip address we will edit the file ‘’.
$ cat /etc/network/interfaces

Edit the file and set the static IP address as shown below,
$ sudo vi /etc/network/interfaces
Delete the line ‘’ and change parameter to . Below is my sample file, change interface name and ip details as per your environment.
# This file describes the network interfaces available on your system
# and how to activate them. For more information, see interfaces(5).
source /etc/network/interfaces.d/*
# The loopback network interface
auto lo
iface lo inet loopback
# The primary network interface
auto enp0s3
iface enp0s3 inet static
 address 192.168.1.183
 netmask 255.255.255.0
 gateway 192.168.1.1
 dns-nameservers 8.8.8.8
save & close the file.

To make above changes into the effect the restart the network service
$ sudo systemctl restart networking.service
Now, run ip command to verify the ip address,
$ ip add show

: How to Install Kubernetes Cluster on Debian 11 with Kubeadm
On a DHCP network, your Linux system will usually receive an IP address automatically from the DHCP server which, in most cases, is the router. The IP configuration will usually comprise the IPv4 address, the netmask, gateway, and the DNS settings. This is usually convenient for desktop or client PCs which only need to access the internet or network resources.
However, the case is different when you want to set up a server. In this case, you would need to configure a static IP to make the server always available via the same IP address. With DHCP, the IP address is bound to change once the lease time is over leading to the unavailability of the server.
Here at , as part of our Server Management Services, we regularly help our Customers to perform related Linux system DHCP queries.
In this context, we shall look into how to set a static IP on Debian 11. This also entails how you can configure a static IP on both the desktop GUI and server instances.
How to Set a Static IP on Debian ?
- If you are running a Debian 11 desktop instance, log in using your username and password. Before we configure the static IP, first confirm the IP address assigned to your system. In our case, we had a Debian PC with an IP address of in a DHCP network.
- Now to verify this, simply execute the below command: $ ip addr show
- From the output of the above command, you will see that enp0s3 interface (Which could be something else in your case) is the active link that is assigned the IP address.
- To get started with setting the static IP, click on » on the left far corner. Search for and click on the » icon.
- On the ‘Settings’ page, select the » tab. Next, head over to the » section and click on the small gear wheel.
- Next, you will see the current IP address configuration.
- Now, you will see that the system IP address has been dynamically allocated to the active interface using the DHCP service.
- To override the DHCP settings and manually set a static IP which will persist even upon a reboot, follow the below process.
- Click the IPv4 tab. Switch from ‘Automatic’ to ‘Manual’ in the IPv4 method section. Thereafter, specify your desired IP address, netmask, and default gateway. Be sure to also provide the preferred DNS settings.
- To apply the changes made, click the » button.
- You need to restart the networking daemon or service for the Debian system to implement the new static IP settings. So, turn the toggle button off and then on.
- Click on the gear icon once more to verify that the static IP settings have been applied.
- On the terminal, verify that the network interface has acquired the newly configured IP address by running the below command: $ ip addr show
- The output is a confirmation that the system was successfully configured using a static IP.
2. How to Configure Static IP Address using the terminal ?
If you are running a headless server, or are connecting to a remote server via SSH, the only option available is to configure the static IP on the command line.
The network configuration settings are stored in the file. You can edit this file by running the below command:
$ sudo vim /etc/network/interfacesBy default, only the loopback settings are specified.
Now, specify the IP settings for our active network interface. But before making any changes, make a backup of the configuration file with the below command:
$ sudo cp /etc/network/interfaces /etc/network/interface.bakIn this file, You can Specify the IP settings as provided below. Also Ensure that your settings is in accordance with your network subnet:
auto enp0s3
iface enp0s3 inet static
 address 192.168.2.150
 netmask 255.255.255.0
 gateway 192.168.2.1
 dns-nameservers 8.8.8.8 192.168.2.1
Finally, To apply the changes, restart the networking service:
$ sudo systemctl restart networkingThis will disconnect you from the server if you are connected via SSH. Reconnect using the newly set static IP address.
We can help you
When you install a new OS, by default it is configured to obtain a dynamic IP address from the DHCP server.
However, sometimes you have to configure the static IP address on your machine.
It can be for various reasons like when a service needs to connect through an IP address instead of a domain name or when you are hosting a web server or to give someone remote access to your system.
Whatever the reason is, you must know how to configure a static IP in your system.
Here at LinuxAPT, as part of our Server Management Services, we regularly help our Customers to configure packages on their Linux Server.
In this context, we shall look into how to set up a static IP in your Linux system.
How to Configure Static IP in Debian 10?
i. Configure Static IP via Command Line
ii. Configure Static IP via GUI
Now, Let’s get started.
1. How to Configure Static IP via Command Line ?
You can configure the static IP through file from your command line.
However, for this, you first need to know the network interface name.
i. You can find the currently available network interface by running the below command in Terminal:
$ ip a«» command shows that there are two interfaces currently available.
We want to configure the static IP for the interface .
Let’s say that the current IP address of ens33 is which is dynamically assigned by the DHCP.
Now we will open the interface configuration file and configure static IP for ens33.
$ sudo nano /etc/network/interfacesauto interface
iface interface inet static
address xxx.xxx.xxx.xxx #enter your IP address
netmask xxx.xxx.xxx.xxx
gateway xxx.xxx.xxx.xxx #enter gateway ip address
dns-nameservers xxx.xxx.xxx.xxxauto ens33
iface ens33 inet static
address 192.168.72.150
netmask 255.255.255.0
gateway 192.168.72.2
dns-nameservers 8.8.8.8 8.8.4.4v. Once you have completed the configurations, and the file.
vi. Then restart the networking services. Use the below command to do so:
$ sudo systemctl restart networking.servicevii. You can also use the and command to apply the configuration changes. First, run the ifdown command to bring down the interface:
$ ifdown ens33viii. Then bring up the interface using ifup:
$ ifup ens33ix. Now to verify if the IP address has been changed successfully, issue the below command in Terminal:
$ ip a2. How to Configure Static IP via GUI ?
You can also change the static IP through the utility in your Debian system.
i. To launch the utility in your system, right-click the desktop and then click .
ii. Then from the left pane in the Settings window, select the tab.
iii. On the right pane, click the cog icon in front of the network interface you want to configure.
iv. You will see a configuration window where you will see the current IP which is the IP address obtained from DHCP server.
Go to tab.
v. Then in the IPv4 Method, choose .
Now the field will appear. Enter the IP address, Netmask, and Gateway for your interface. If you also want to set the DNS address manually, switch off the button and enter the server address.
Here, we have specified 192.168.72.150 as our interface IP address, 255.255.255.0 as netmask, and the 192.168.72.2 ad the default gateway.
Then we have specified 8.8.8.8 and 8.8.4.4 as our DNS servers.
vi. Now click the button to apply all the configuration changes.
vii. Now to confirm if the new IP address has been successfully configured, go to the tab.
Alternatively, you can also use the » command in Terminal to verify the IP address.
When you install a new operating system on your computer, the DHCP server assigns you a dynamic IP address. However, you may need to set up a static IP address on your machine in various situations, such as when you are hosting a web server, or any service requires an IP address rather than a domain name, or in a case where you are about to grant someone remote access to your system. Whatever the reason is, you should know how to set up a static IP address on your system.
In this post, you will learn how to set up static IP on Debian 11 using two different methods. So, let’s start!
Method 1: Set up a static IP address on Debian 11 using terminal
How to check available network interfaces on Debian 11
From the output, we will note down the name of our active network interface, which is “enpos3”. As “enpos3” is the network interface for which we will set up a static IP:
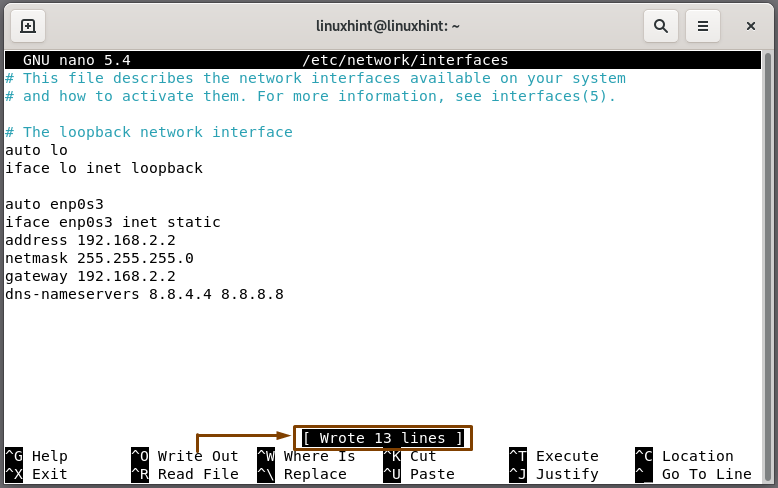
Now, open the configuration file of the network interfaces “/etc/network/interfaces” in the nano editor:
etcnetworkinterfaces
With the default settings, your network interfaces configuration file will look like this:
auto enp0s3
iface enp0s3 inet static
address 192.168.2.2
netmask 255.255.255.0
gateway 192.168.2.2
dns-nameservers 8.8.4.4 8.8.8.8
Here, the first two lines declare that we are setting a static IP address for the “enpos3” network interface:
To save the changes you have made in the network interface configuration file, press “CTRL+O”:
How to restart the networking service on Debian 11
After configuring the static IP address for the “enpos3” network interface, now we will restart the networking service using the systemctl command:
systemctl restart NetworkManager.service
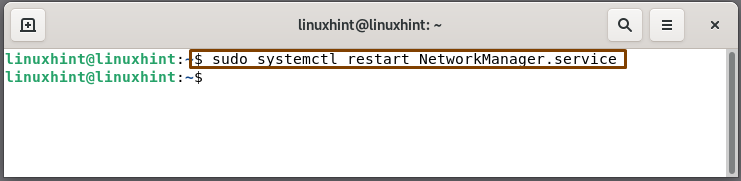
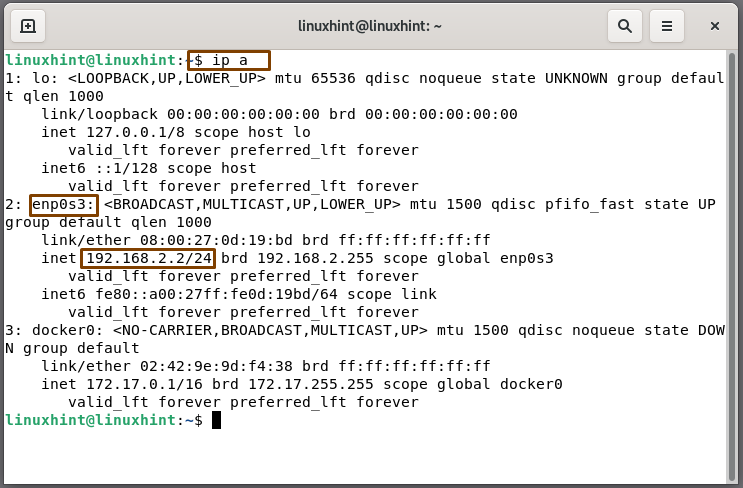
You can verify if your Debian system has configured the static IP for your selected network interface:
From the output, you can see that we have successfully configured static IP address our “enpos3” network interface to “192.168.2.2”:
Method 2: Set up a static IP address on Debian 11 using GUI
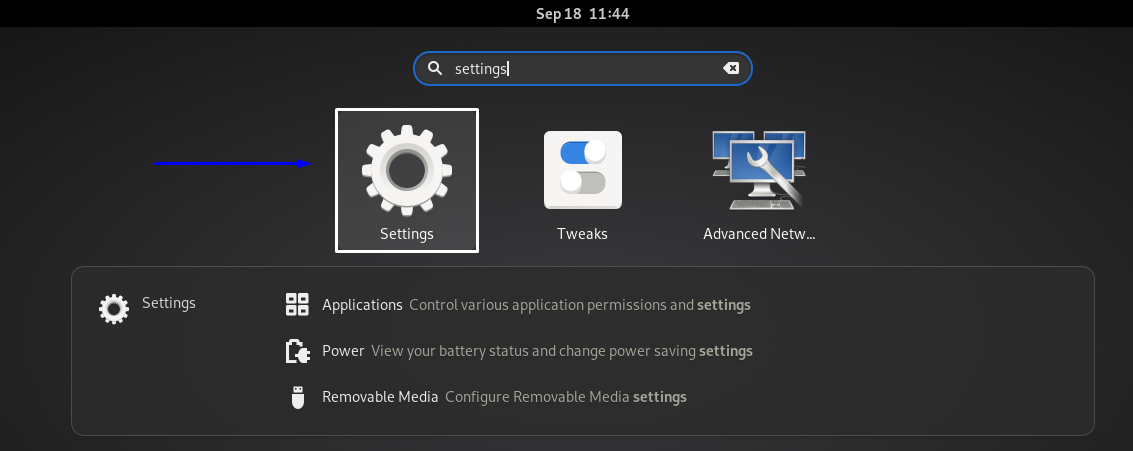
Debian 11 also provides you the facility to set the static IP address of your active network interface using its GUI. If you want to utilize the Debian GUI method for configuring the static IP address, then open your system settings by searching “settings” in the Application’s bar:
From the different categories present in the left side menu, select “Network”. Open settings of your active network connection by clicking on the gear icon:
In the opened network settings window, click on the “IPv4” tab. Select the “Manual” IPv4 method for your network:
After that, add your static IP address, Netmask, Gateway, DNS for your network, and then click on the “Apply” button:

Now, open the “Details” tab. Here, you will verify the added details for your network, such as its IP address:
That’s how you set up the static IP address for your network interface on Debian 11 using its GUI.
Conclusion
Debian 11 provides you the option to set up a static IP address for your system, whether you want to do it for hosting your web server or granting remote access to anyone. DHCP automatically enables a dynamic server when you install a new operating system. However, you can configure your IP address using Debian terminal and GUI. In this post, you have learned how to set up a static IP address on your Debian 11 using two different methods.
About the author
I am a Linux enthusiast, I love to read Every Linux blog on the internet. I hold masters degree in computer science and am passionate about learning and teaching.
Any device connected to a network gets assigned an IP address that allows other devices in the network to locate and communicate with it. Typically, an IP address gets assigned by the DHCP server on a router.
A DHCP server assigns any available IP address to the connected network. That means the IP address of a device may change from time to time. In certain instances, you may need to set up a static IP for your device. Doing this tells the router to reserve a specific IP for that device and assign it every time it connects to the network.
This tutorial aims to give you the basics of IP addresses, how DHCP works, and show you how to set up a static IP on your Linux machine.
What is an IP Address?
An example of an IP address is 192.168.0.20
What is DHCP?
At the most basic level, DHCP or Dynamic Host Configuration Protocol is a network protocol that dynamically assigns IP addresses to hosts connected to a network. DHCP has a server responsible for managing IP addresses, subnet masks, default gateways, etc., on a network.
DHCP is essential in networking as it removes the need for network engineers to assign IP addresses manually to every device.
What is a Static IP?
A static IP address is a fixed or constant IP value assigned to a device in a specific network.
That means instead of your router or ISP providing you with a dynamic IP address (which may change), you have one fixed IP address in the network.
There are advantages and disadvantages to using static IP addresses. For example, it allows you to perform other network settings such as port forwarding and tunneling.
However, it also does not lack its disadvantages; static IP addresses need manual assigning, and you need to keep track of the unassigned IP values. That can be a lot of work, especially on large networks.
How to Configure A Static IP on Debian 10
Let us get into the essence of this guide. First, to set up a static IP on Debian, you need to edit the network interface configuration file.
You will find that located in /etc/network/interfaces.
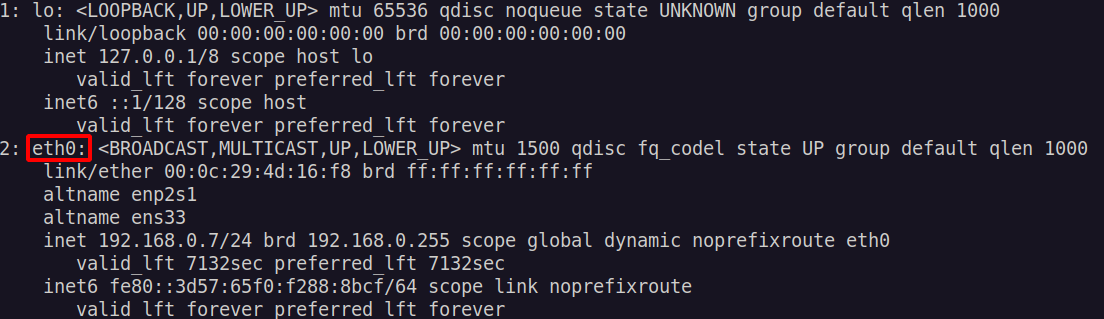
First, you will need to identify the network interface (name) you wish to set a static IP. Use the command:
This will show you all the network interfaces available in your system, name, and IP address. In the example below, I have the loopback interface and my ethernet interface (eth0).
Now, to set a static IP address for the ethernet interface, edit the /etc/network/interfaces file with your favorite text editor.
etcnetworkinterfaces
In the file, locate an entry as one shown below:
$ auto eth0
$ iface eth0 inet dhcp
$ auto eth0
iface eth0 inet static
How to Fix Wired Unmanaged Issue
In some instances, if you set a static IP by editing the interface file, you might encounter a “Wired unmanaged” error caused by the NetworkManager service.
To resolve the issue, edit the /etc/NetworkManager/NetworkManager.conf
Change the entry managed=false to managed=true. Finally, restart the Network Manager service with systemd
systemctl restart network-manager.service
How to Configure static IP – GUI
A simpler and quick method to configure static IP on Debian desktop is to use the network manager GUI tool.
Start by selecting the interface in the top bar, go to Wired settings and select your interface. Next, click on the Settings icon to launch the configuration window.
In the IPv4 tab, select the IPv4 method as manual. Then, add the IP address, Netmask, and Gateway as shown in the image below.
Finally, set DNS manually (optional) in the DNS tab.
Conclusion
In this tutorial, we discussed the basics of IP addresses and DHCP. We also discussed how to set up a static IP address on Debian 10.
About the author
In this guide, we will see various ways to configure various network operations on the Debian system. Although this guide is for the Debian system, most operations should run on other Debian based systems like Ubuntu and other Linux operating systems as well.
1. If you want, you can print the IP address of a specific interface or device, just use the below command:

here enp0s8 is any interface or device. The naming convention may vary depending upon the naming mechanism used.
2. IP command can also be used to show the network performance statistics as follows:
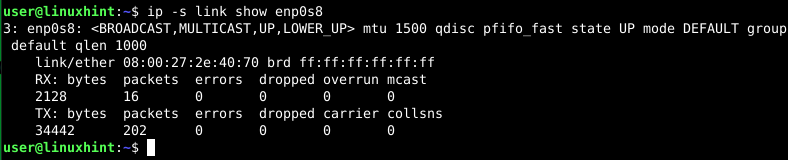
The above command output reveals the number of packets transmitted and received, packets dropped, and the packet with errors. This information can be used to troubleshoot network issues like low memory, connectivity issues, packet congestion, etc.
3. Using nmcli or Network Manager Command Line Interface tool to create a DHCP network connection
nmcli con add con-name ethernet ifname enp0s8

The above command will create a new connection named “MyCon1” on the device enp0s8. Let us see some details about this command:
- The configuration of this connection will be based on DHCP. The type of this connection is ethernet. Other types of network connection can be wifi, Bluetooth, vlan, bond, team, bridge, etc.
- The con-name argument defines the name of the connection.
- The ifname option specifies the name of the interface or the device assigned for this connection.
4. To create a static connection using nmcli, we will need to specify the IP address and the gateway as the argument
nmcli con add con-name “MyCon2” ethernet ifname eth1 ip4 192.168.2.10 gw4 192.168.2.0

nmcli con up
To verify the new connection, run:
$ nmcli con show –active
$ show enp0s3
5. Configuring the network with Network Interfaces File
The /etc/network/interfaces file contains the definitions of various interface configurations. We can add configuration details to create a new connection. Let us see some manual configuration:
I. Adding a static IP address:
1. Open the /etc/network/interfaces file with sudo privileges:
etcnetworkinterfaces
iface enp0s3 inet static

You can add this configuration to the /etc/network/interfaces file or add it to a new file under the /etc/network/interfaces.d directory.
After modifying the above file, let’s restart the networking service for changes to take effect:
systemctl restart networking
$ enp0s3
$ enp0s3

The ifup and ifdown commands are used to manage the interfaces defined in this file. These tools are very helpful while configuring the network from the command-line interface. These commands can be found in /sbin/ifup and /sbin/ifdown.
II. Adding a DHCP Address:
The dhcp IP address is automatically assigned from the IP address pool of the DHCP server.

Now restart the networking service and again run the command ifdown and ifup as above:
$ systemctl restart networking
$ enp0s3
$ enp0s3
Note: DHCP Ip is generally good for clients, but the server usually works on a Static IP address.
6. Setting Hostname with the “Sysctl” command
Linux provides a sysctl utility to display and set the hostname as shown below:
i) Displaying the hostname:
$ sysctl kernel.hostname
kernel.hostname = debian

ii) Setting the hostname
sysctl kernel.hostname= linuxhint
Now run the command bash exec to verify the new hostname:

Now to make this hostname permanent, we will have to edit the /etc/hosts and /etc/hostname files, so open the files and put the new hostname there:

etc

Now from this point, you should see your new hostname every time you open a new terminal.
7. DNS configuration
DNS or domain name service is a naming system that is used to translate domain names into network addresses (IPv4 or IPv6). The DNS service has much more capability than simply translating domain names. The DNS service can work on both internet as well as on a private network.
etcresolv.conf
Go to the line containing the string “nameserver” and add the IP address of the DNS server(8.8.8.8) as shown below:
8. Using Bonding on Debian 10
Bonding is a method in which two or more interfaces are merged to make a new logical interface. This bonded interface makes the network more reliable. In case a link fails, the other link will automatically balance all the network traffic. This increases the network availability as well. You can try bonding your wireless interface with the cable interface. If for some reason, the ethernet cable is unplugged or not working, the network traffic will automatically start flowing over the wireless interface.
Tip: We can use bonding to add multiple network interfaces (NICs) with the same IP address.
bonding bootconfig-$ -r
An output like “CONFIG_BONDING=m” shows that the bonding is enabled as a module
Step 1. Install the ifenslave package to configure bonding:
apt ifenslave
Step 2. Now bring down the interface before configuring it:
Note: Before proceeding, make sure that the interface you are modifying should not be in use; otherwise, it will break your network connectivity.
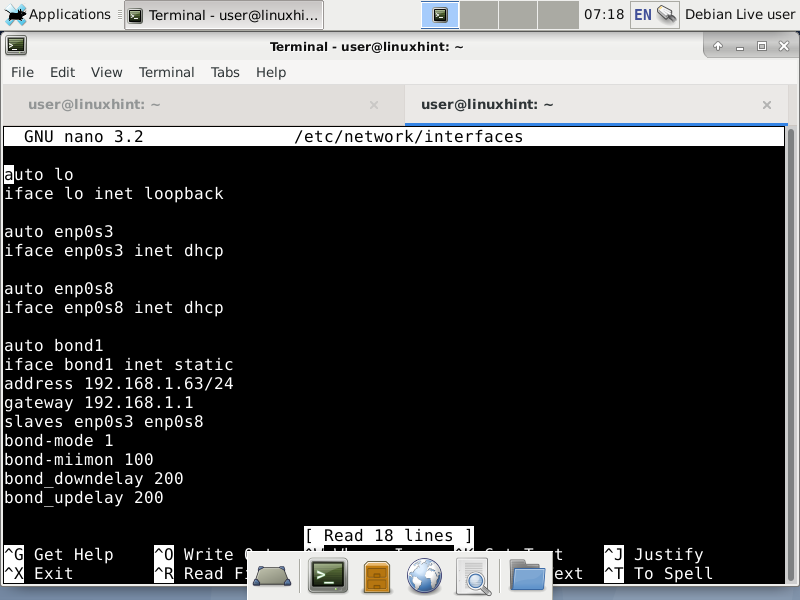
Step 3. Create a new bonding configuration and called it “bond1”. To do this, open the default network configuration file:
etcnetworkinterfaces
iface bond1 inet static
Restart the networking service
systemctl restart networking
Linux supports different bond modes: balance-rr (mode=0), active-backup (mode=1), balance-xor (mode=2), broadcast (mode=3), 802.3ad (mode=4), balance-tlb (mode=5), balance-alb (mode=6). In this example we are using mode 1 or active backup as a bond mode.
Step 4. Bring the new bonded interface (bond1) up with command ifup. Now check if it works:
9. Configuring bridging on Debian
Bridging is the most common way to connect two different networks. A bridge (hardware) device is used when connecting two different networks of an organization, usually located at different locations. Linux system also has the capability to create a bridge between two interfaces having different networks. This way we can pass traffic between them.
Let us create a bridge between two different interfaces, “eth0″ and” eth1,” on a Debian system.
Step 1. Install the “brctl” tool to configure bridging on the Debian system:
apt bridge-utils
Step 3. create a new interface using the brtcl tool:
This will create a new virtual interface to link between eth0 and eth1.
Step 4. Now add both the interfaces to this virtual interface.
brctl addif br1 eth0 eth1
Step 5. To make this configuration permanent, we will add the new interface details to the file /etc/network/interfaces.
# The loopback network interface
iface lo inet loopback
# Set up interfaces manually, avoiding conflicts with, e.g., network manager
iface eth0 inet manual
iface eth1 inet manual
# Bridge setup
iface br0 inet dhcp
bridge_ports eth0 eth1
Now run the below command to bring the interface up:
# The loopback network interface
auto lo br1
iface lo inet loopback
# Set up interfaces manually, avoiding conflicts with, e.g., network manager
iface eth0 inet manual
iface eth1 inet manual
# Bridge setup
iface br1 inet static
bridge_ports eth0 eth1
Now run the below command to bring the interface up:
If the network does not work after rebooting, try removing /etc/network/interfaces.d/setup file to fix the issue.
10. Configuring Networking from Command-line tools
i) Adding an additional IP address to a network card:
While running “ifconfig,” you may encounter an error: “ifconfig: command not found”. For fixing this error, we need to install the “net-tools” package:
apt net-tools
Step 2. From the output of the above command, you can select the interface on which you want to add an extra IP address. Let us add an extra IP address (10.0.2.65) to the interface enps03.
add 10.0.2.65 dev enp0s3
Step 3. Verify if the IP has been added to this interface:
You should see here the new and old IP address in the output.
# The network interface enp0s3 is dhcp enabled
iface enp0s3 inet dhcp
iface enp0s3 inet static
Step 5. Now save the file and bring down the interface and then again bring up the interface to apply the changes:
$ enpo3
$ enpo3
Now verify the connectivity of the interface with the ping command:
If everything goes right, you should see a ping coming from the new IP address.
ii) Changing the mac address of an interface.
Step 1. Run the below command to select the interface for you which you want to change the MAC address for:
It will show you all the interfaces with their mac address, state, and other information.
Step 2. Let us change the mac address of the “eth0” interface and bring it down:
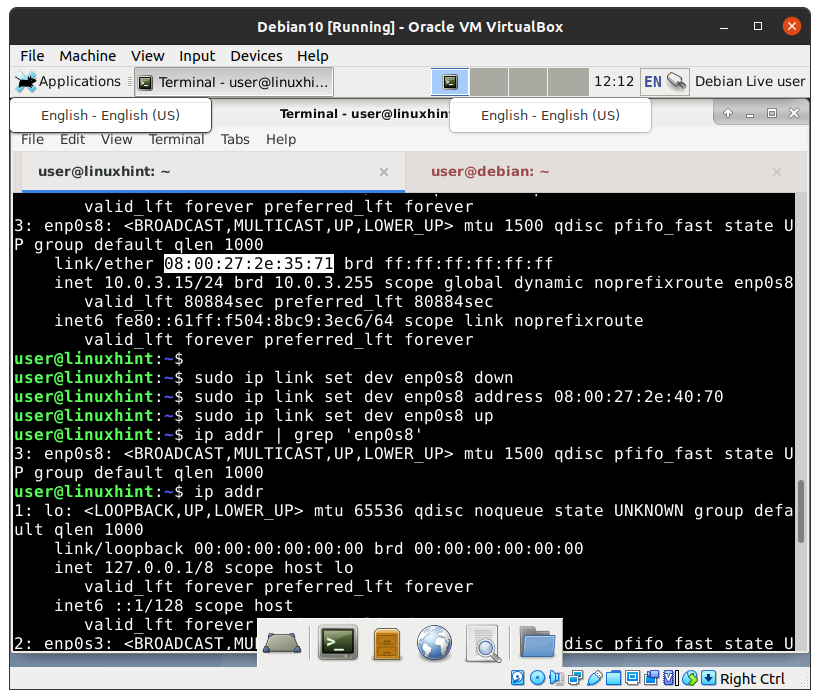
Note: Before proceeding, make sure that the interface you are modifying should not be in use. Otherwise, it will break your network connectivity.
dev eth0 down
Step 3. Now enter the new mac address as below:
dev eth0 address «enter new mac address here.»
Step 4. Now bring up the interface again:
dev eth0 up
That’s all configuring the new mac address; you should see the new mac address:

The output of the above command should show you the new mac address. Macchanger can also be used for changing the mac address from the command line.
iii) Enable and disable interfaces.
Besides ifup and ifdown tools, the ifconfig command can also be used to bring up and bring down an interface.
a) To bring down an interface:
b) To bring up an interface:
iv) Remove an IP address from a network interface.
To delete an IP from the network interface, use the below command:
del ‘your IP address’ dev enp0s3
del 192.168.2.2 dev enp0s3
If you have multiple IP addresses for an interface, you can delete all as shown below:
flush dev enp0s3
v) Set the Default Gateway
The route or ip command can be used to set a Default Gateway:
route add default gw 10.0.2.20
add default via 10.0.2.20 dev enp0s3

