
In this article we will setup/install LAMP stack (Apache, MariaDB, PHP) on Ubuntu 22.04 including SSL via Certbot and basic firewall with UFW. If you would like to know more about Ubuntu 22.04, check this article.
To start with we will update the system first.
apt update && apt upgrade
Next we will enable only specific ports and disable everything else via UFW firewall.
ufw default allow outgoing
ufw default deny incoming
ufw allow 22
ufw allow 80
ufw allow 443
ufw enable
ufw status
- LAMP stack installation
- PHP configuration
- Database setup
- Apache vhost
- SSL certificate
- Apache vhost 443 block
- Introduction
- Install SSL
- Applying For SSL
- Configure Apache 2
- Site Wide HTTPS
- Login HTTPS For WordPress
- Установка Debian 11
- Wi-Fi Setup
- Setting up sudo
- FTP Setup
- Setting mariadb
- Installing and configuring php and phpMyAdmin
LAMP stack installation
Ubuntu 22.04 comes with pretty much all the latest stable packages for Apache, MariaDB and PHP. So we don’t need to add any extra PPA.
This will install all the required packages and modules we may need in the future.
apt install apache2 mariadb-server libapache2-mod-php8.1 php8.1 php8.1-gmp php8.1-bcmath php8.1-gd php-json php8.1-mysql php8.1-curl php8.1-mbstring php8.1-intl php8.1-imagick php8.1-xml php8.1-zip php8.1-fpm php8.1-redis php8.1-apcu php8.1-opcache php8.1-memcache php8.1-memcached php8.1-ldap bzip2 zip unzip imagemagick vim ffmpeg redis-server
Next is to enable Apache modules.
a2enmod ssl rewrite headers proxy proxy_http deflate cache proxy_wstunnel http2 proxy_fcgi env expires
We will use PHP FPM. This will enable us to use http2 when needed.
a2enconf php8.1-fpm
a2dismod php8.1
a2dismod mpm_prefork
a2enmod mpm_event
systemctl restart apache2
Enable them at boot time.
systemctl enable apache2
systemctl enable mariadb
systemctl enable php8.1-fpm
PHP configuration
As we will be using PHP FPM, we will modify php.ini at fpm dir.
* Line numbers are for guidance only
** For timezone check out PHP timezone manual.
output_buffering = off (line 226)
max_execution_time = 180 (line 409)
memory_limit = 512M (line 430)
post_max_size = 200M (line 698)
upload_max_filesize = 200M (line 850)
date.timezone = Europe/London (line 968)
opcache.enable=1 (line 1767)
opcache.enable_cli=1 (line 1770)
opcache.memory_consumption=128 (line 1773)
opcache.interned_strings_buffer=8 (line 1776)
opcache.max_accelerated_files=10000 (line 1780)
opcache.revalidate_freq=1 (line 1798)
opcache.save_comments=1 (line 1805)
Save and restart PHP FPM.
systemctl restart php8.1-fpm
Database setup
Apache vhost
Create a vhost file in /etc/apache2/sites-available/
cd /etc/apache2/sites-available
vim my-domain.conf
Enable the virtual host and restart Apache.
a2dissite 000-default.conf
a2ensite my-domain.conf
apachectl -t
systemctl restart apache2
This will get you going with a simple web server with web root as /var/www/html.
SSL certificate
You can either use your own certificates provided by your vendor or just use Certbot to get one for free.
* Make sure your domain is pointed to the server IP.
Install Certbot and get a certificate for web root.
snap install certbot —classic
certbot certonly —webroot -w /var/www/html -d DOAMIN. COM
Check the link below for renewals and other details.
Apache vhost 443 block
This will also enable http2 on your server.
Finally check the configuration and restart Apache.
Along the lines we also installed Redis server available at localhost:6379 and opcache/memcache/apcu.
Hope this was helpful in setting up your server. Happy coding!
Introduction
This post assumes Apache 2 is installed on Ubuntu 10.04 (other versions may apply) with no issues. The default virtual host will be used as the example.
Install SSL
Only run steps in this section if the certificate to be used is not going to be issued by a vendor.
Once complete go to Configure Apache 2
Applying For SSL
The steps may vary but this is what I had to go through to obtain an SSL certificate:
Depending on the level of the SSL certificate applied there is always at least 2 certificates that have to be included in Apache. One is the Vendor who signs the SSL and the SSL certificate itself.
Configure Apache 2
There are various ways to enable HTTPS on a website. The options described below are the ones discussed in this article:
For Login / Accounts only part, WordPress will be used as the example.
Example of the secure virtual host configuration file so far:
SSLEngine On
SSLCertificateChainFile /etc/apache2/ssl/ICaCert.pem
SSLCertificateFile /etc/apache2/ssl/www.dannytsang.com.crt
SSLCertificateKeyFile /etc/apache2/ssl/www.dannytsang.com.key
Note that my example does not contain SSLCACertificateFile. For a self generated SSL the only SSLCertificateFile is needed.
Update 27/05/2012: For a self signed certificated (a certificate no issued by a CA) then the only 2 lines that need to be added are:
SSLEngine On
SSLCertificateFile /etc/apache2/ssl/www.dannytsang.com.crt
Site Wide HTTPS
One of the pit falls of site wide encryption is that all content must reside on the https domain or from other https sources. Below is an example of what Google’s Chrome browser would show if content didn’t come from a secured resource. In my case it was Ads:
Login HTTPS For WordPress
Whilst going through this setup process myself it has been a long and arduous process (even if it doesn’t look it from this write up). I have learnt:
Generate a CSR: Apache (Open SSL)
apache2 – redirect http to https
Intermediate Certificate Authority (CA) & SSL Installation Instructions for Apache
Время на прочтение
Приветствую всех habr’овчан! Это моя первая статья, поэтому прошу отнестись с пониманием. Хочу рассказать как я случайно получил в руки материнскую плату от ноутбука, еще пару комплектующих и решил попробовать сэкономить на хостинге и сделать некий «сервер» для моего сайта, которого еще нет 🙂
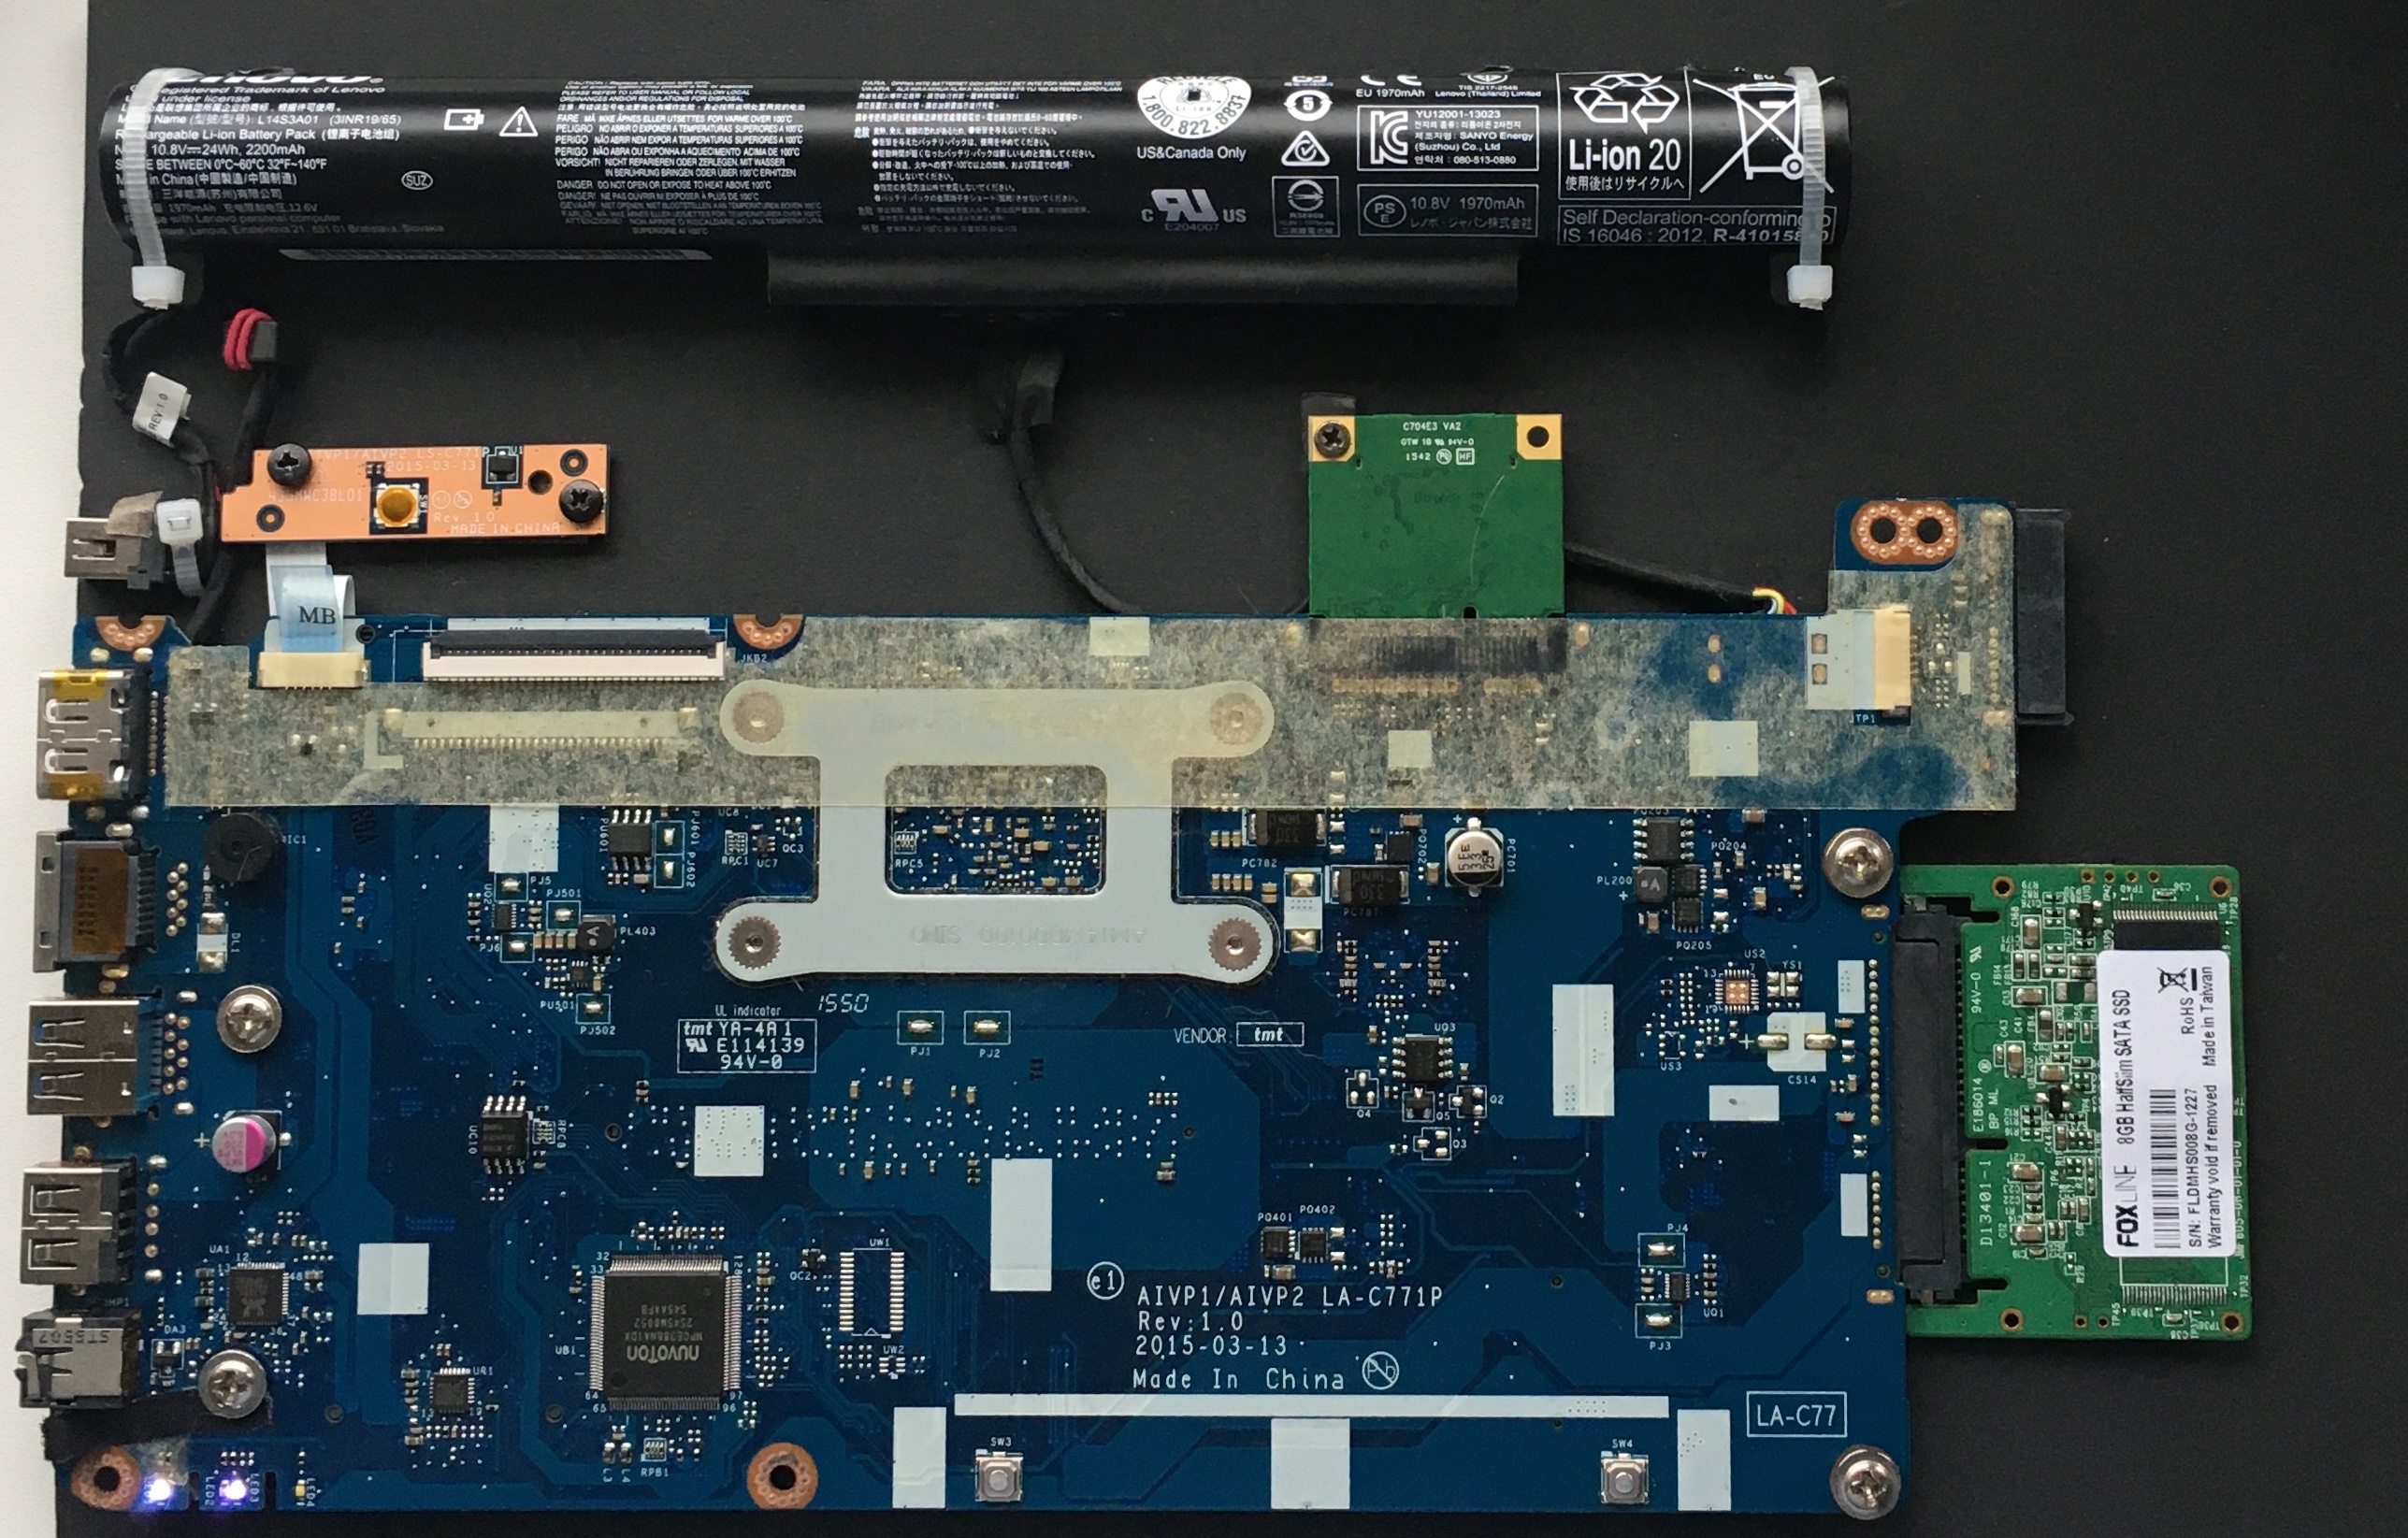
Вот такой device у меня получился
Для моих нужд вполне подойдет. Потребление электроэнергии смешное, охлаждение пассивное, даже батарея живая, ее хватает примерно на 4 — 5 часов работы. Сайт будет совершенно простым — это мой учебный проект.
Кратко о характеристиках:
Установка Debian 11
Для начала я скачал iso-образ Debian 11, затем скачал Rufus и создал загрузочную флешку. Описывать особенно нечего, программа интуитивно понятная: просто выбираем образ для записи, выбираем носитель, но который этот образ писать и нажимаем start.
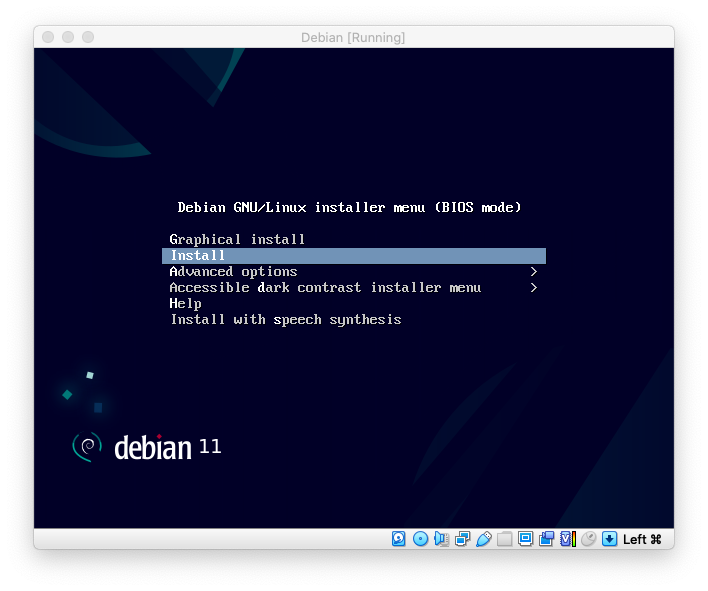
Загрузочная флешка готова — приступим к установке. Я не стал использовать графическую установку, а выбрал пункт Install.
Первый экран — это выбор языка (я выбрал English), затем предлагается выбрать страну (мой выбор: other — Europe — Russian Federation), далее locale (United States), наконец, раскладка клавиатуры (American English). А вот после этого у меня выпало такое сообщение:

прошу прощения за качество картинки
Сообщение говорит примерно следующее: некоторое из устройств требует не бесплатное (несвободное) микропрограммное обеспечение. Оно может быть загружено с внешнего носителя, например с флешки. В моем случае у материнской платы только два usb-порта: один занят клавиатурой, другой — флешкой, с которой устанавливается система. Но есть еще и кард-ридер!
Я нашел карту SD и, записав на нее требуемый файл (сслыка на rtl8723befw_36.bin), нажал yes. Теперь будет работать wi-fi модуль. После этого выпадает окно с выбором сетевого адаптера, который будет нами использоваться. Я выбрал wi-fi.
Тут многие скажут — СТОП, wi-fi канал уже проводного и будут правы, но я делаю не профессиональный хостинг, это просто проект для саморазвития, к тому же разве не интересно, как это будет работать после того как установщик подхватил прошивку 😉 Итак, выбираю wi-fi модуль и в следующем окне вижу доступные беспроводные сети. Выбираю свою nik’s_wireless, ввожу пароль и все подключилось.
Далее задал имя хоста (debian), имя домена (lan), пароль root, полное имя пользователя (Nikolai Kutuzov), имя учетной записи (nikkutuzov), пароль учетной записи, часовой пояс.
Потом работа с разделами (Guided — use entire disk), выбор диска, на который будем устанавливать систему. Схему я выбрал рекомендуемую (All files in one partition). Нажимаю Finish partitioning and write changes to disk — заканчиваю с разметкой и записываю изменения на диск. Настраиваю менеджер пакетов (Russian Federation — proxy (если не используется прокси, оставьте строку пустой) — deb.debian.org — NO). Я почти у финиша и мне предлагают выбрать какое программное обеспечение установить, я оставил звездочки только у web server и ssh server:
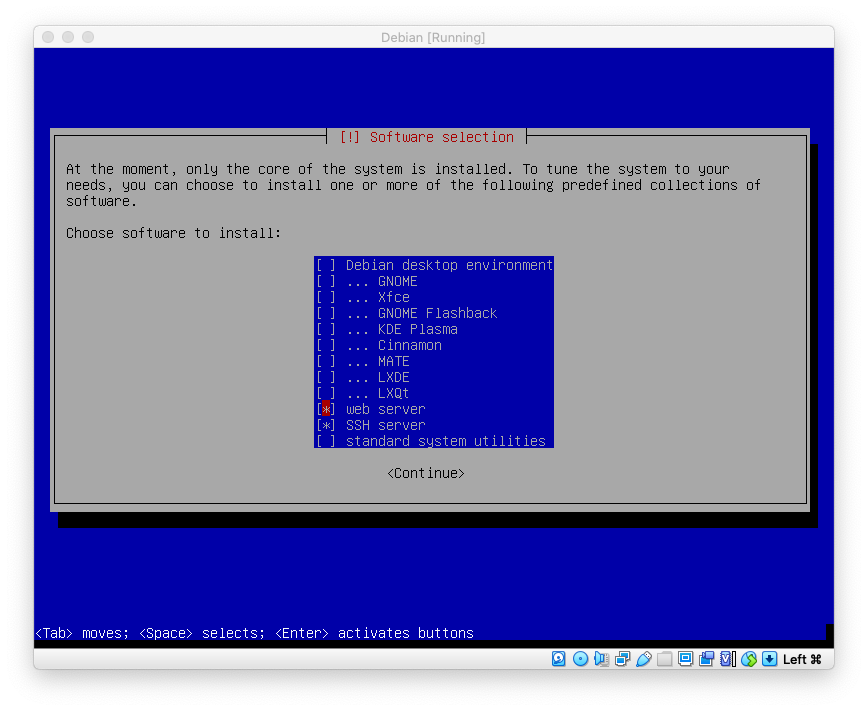
На запрос об установке Grub даю положительный ответ, выбираю диск, на который его установить. On the next screen I see a message about the end of the installation, I click continue and after reboot I see:
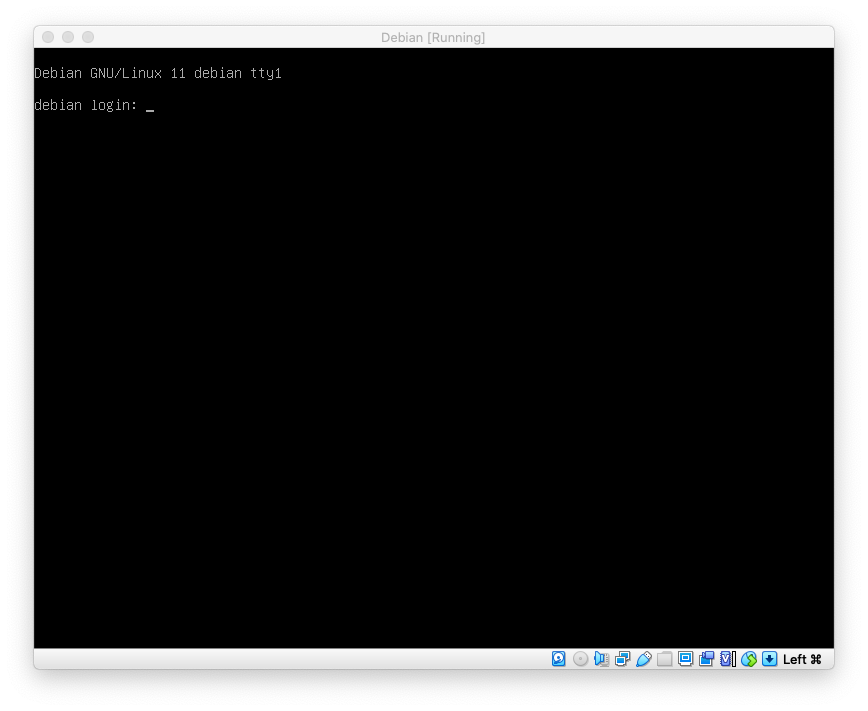
Wi-Fi Setup

wlp4s0 is our interface (you may call it differently), it is not connected to any network. We’ll fix everything now.
# chmod 0600 /etc/network/interfaces
# nano /etc/network/interfaces
«auto» will enable the wlp4s0 interface at system startup. If this is not required, you can remove or comment out this line.
to obtain an address via DHCP — use the word dhcp:
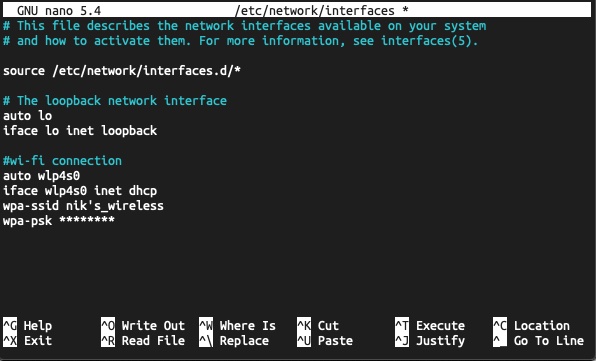
For a static address, the word static is used:
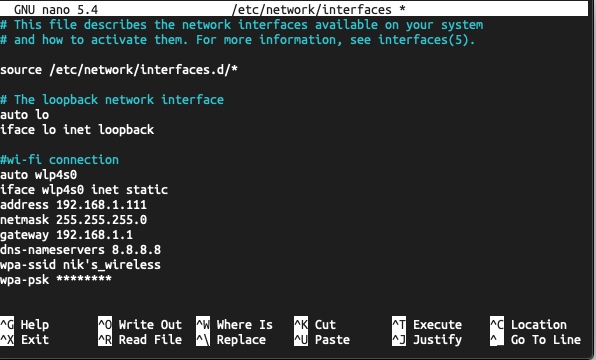
# systemctl reboot
Setting up sudo
After the reboot, ssh login will be available, which I will use. I will show on the example of MacOS, because I myself use this particular system. I think that on other systems, connecting via ssh will not be a problem.
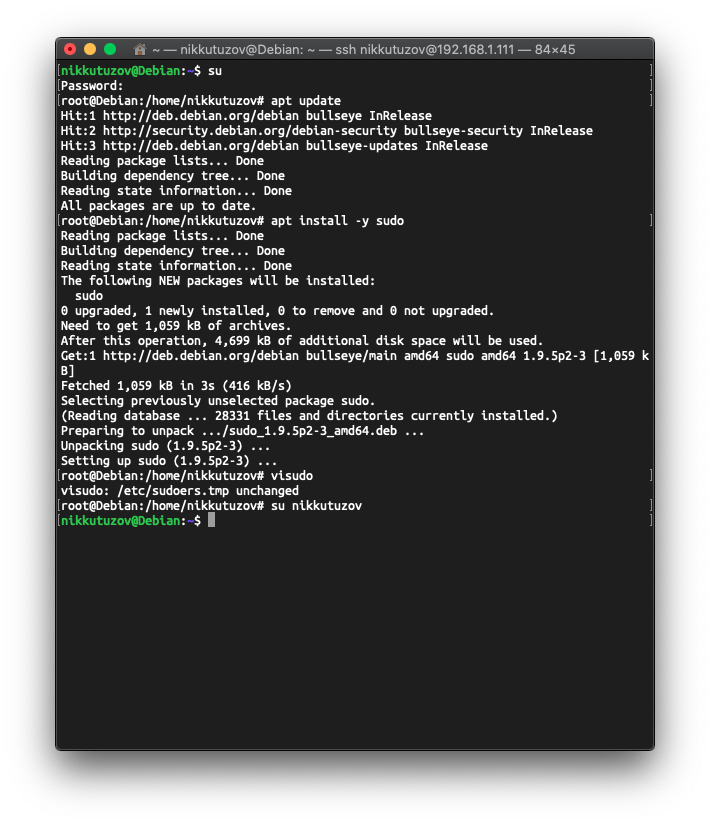
$ su — to switch to root and enter the password
# apt update — update package list
# apt install -y sudo — install sudo
After installation, I typed the command:
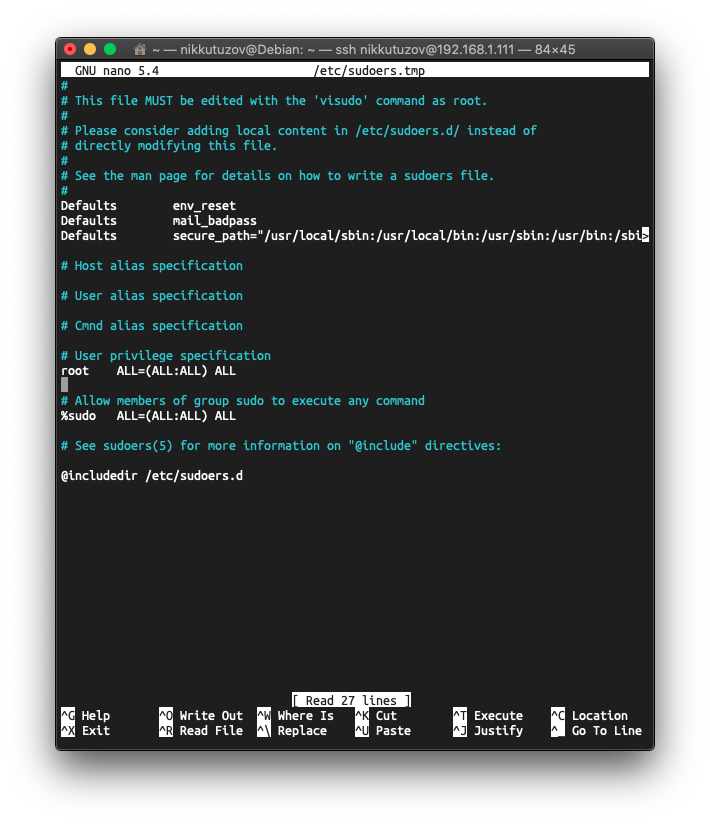
I go to the line after root ALL=(ALL:ALL) ALL and write there nikkutuzov ALL=(ALL:ALL) ALL, where instead of nikkutuzov enter your username.
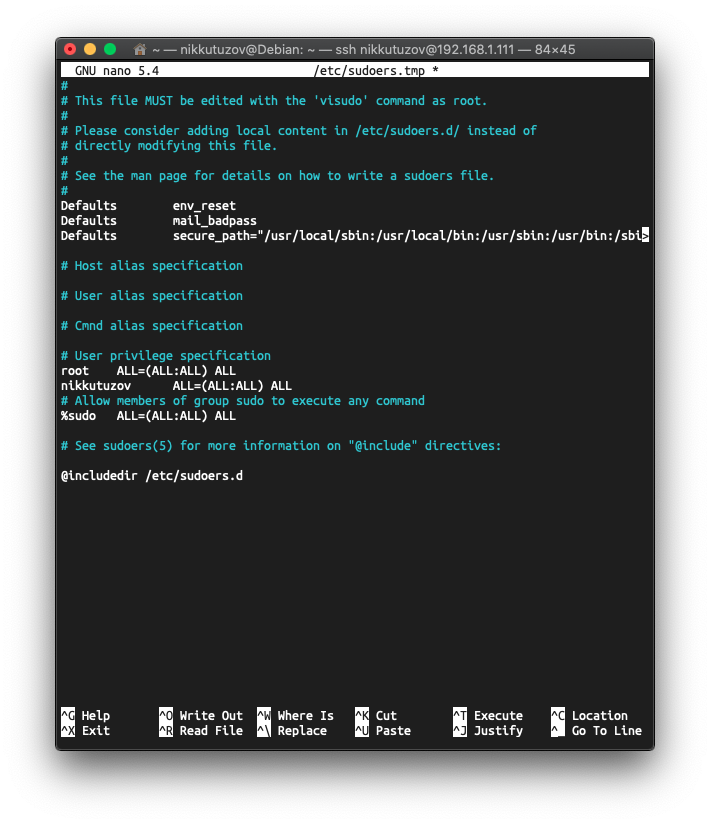
Save changes to the file (ctrl+o), exit nano (ctrl+x) and switch from root to my user:
#su nikkutuzov
FTP Setup
To set up FTP I execute the following commands. By the way, now you can feel the beauty of sudo. I will use the previously installed sudo:
$ sudo apt install vsftpd — to install vsftpd (link to Wikipedia)
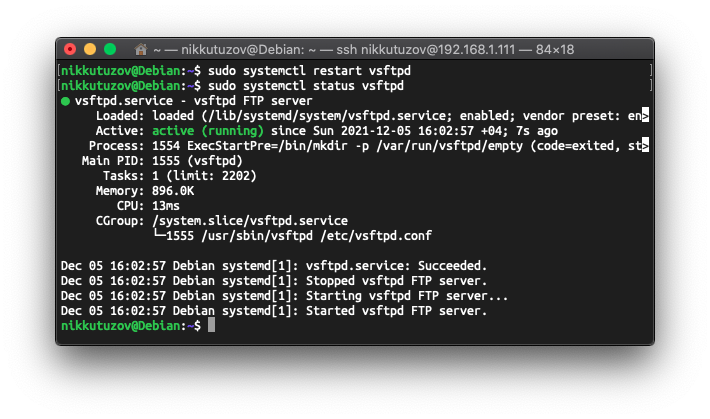
$ sudo systemctl status vsftpd
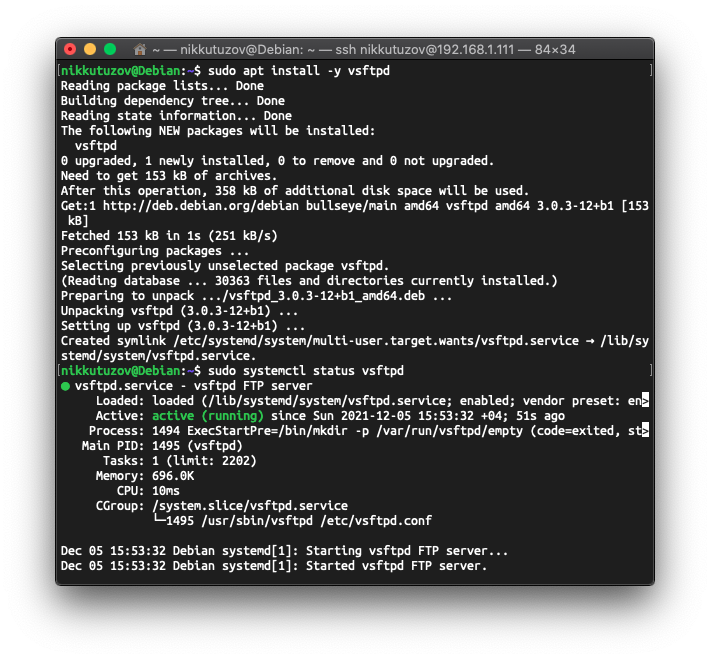
active (running) — says that everything is working and everything is fine.
Now let’s create a unique user for ftp:
Add the created FTP user to the list of allowed login users:
Create and assign appropriate directory access and ownership rights:
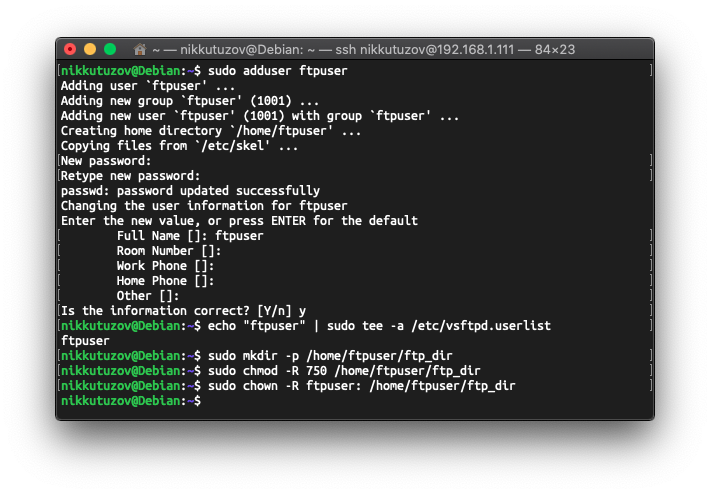
It took a few more manipulations for the final adjustment. To do this, I slightly corrected the configuration file, having previously installed vim:
$ sudo apt install -y vim
$ sudo vim /etc/vsftpd.conf
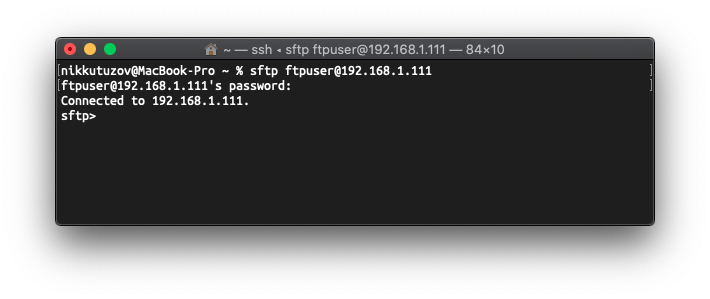
I will not list each line separately, but rather show on the screenshots what needs to be uncommented, what to change and what to add. If someone wants to repeat my experience or just take some of the information, I will only be happy, but this article is not a guide.
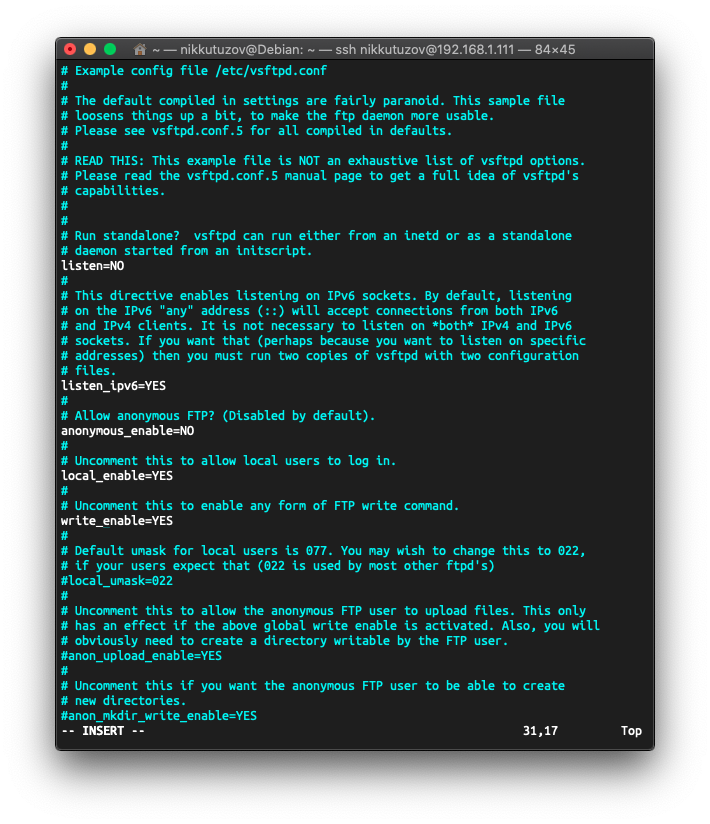
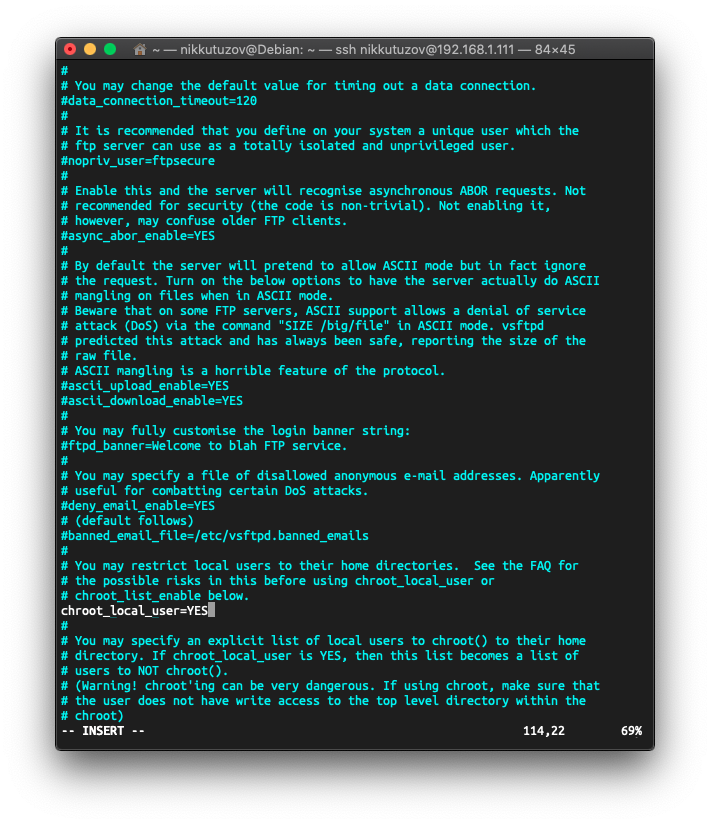
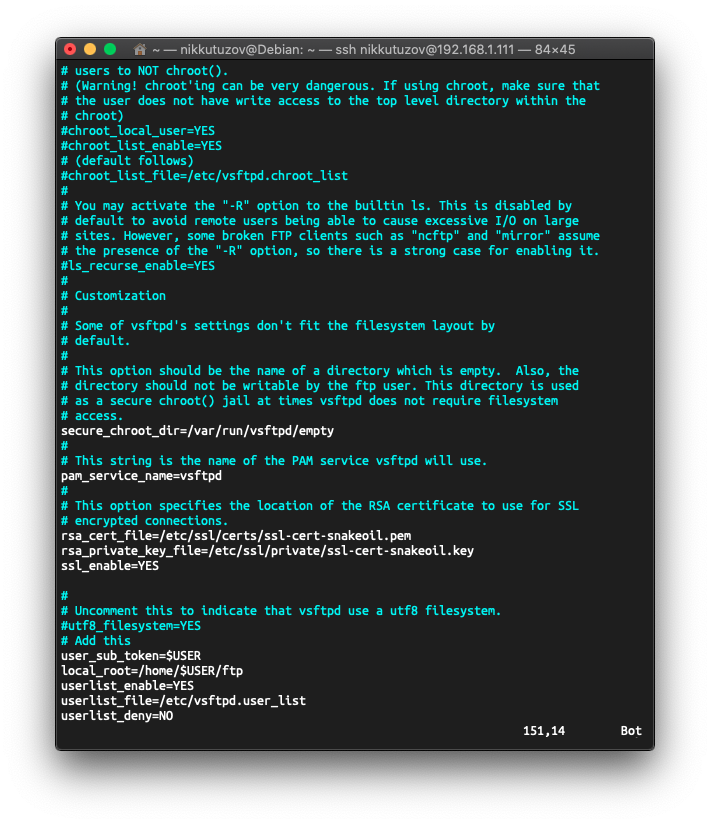
Restarted the service and checked its status:
Setting mariadb
The next step was to set up the database. I am using mariadb. Its installation is done by a simple command:
$ sudo apt install -y mariadb-server
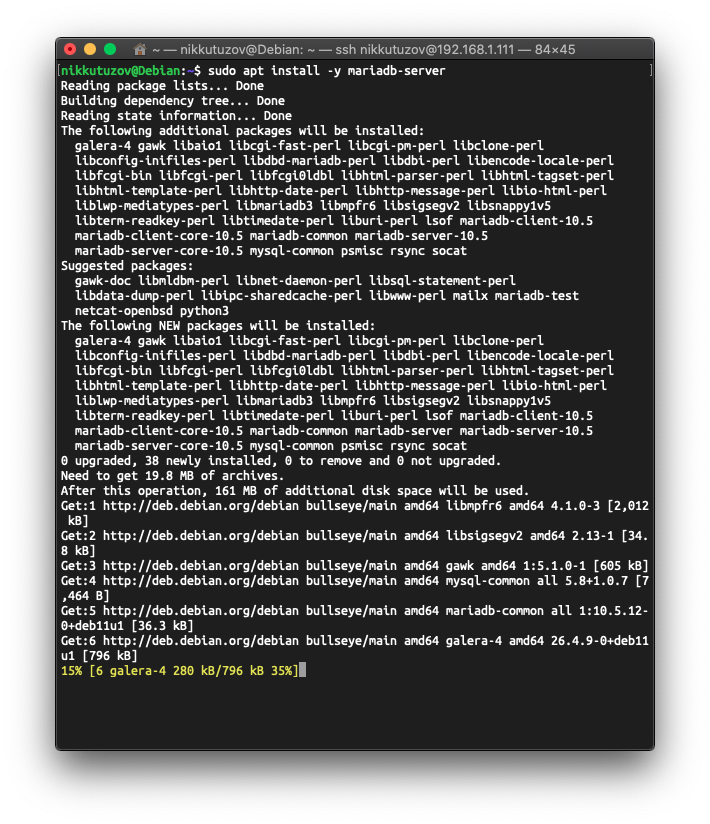
After installation, you need to execute the initial setup script:
$ sudo mysql_secure_installation
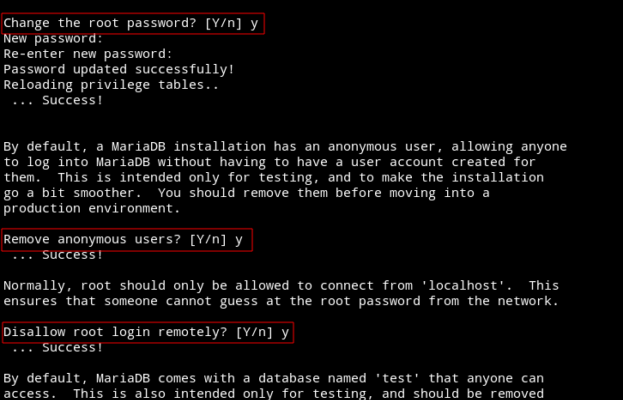
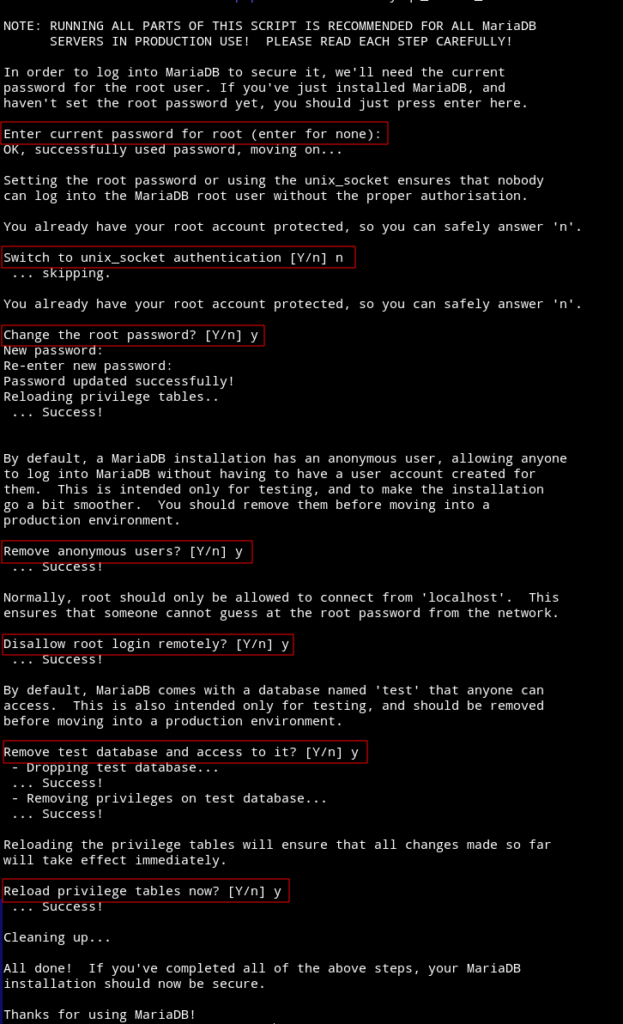
The whole pre-setting comes down to a few answers:
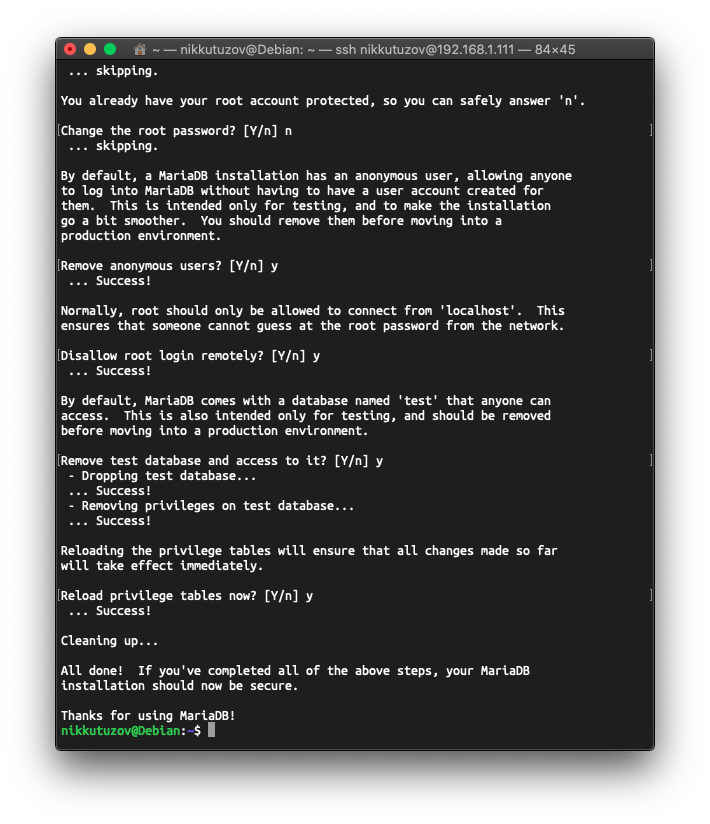
Now, as I said in point 3, I set up an additional account for logging in with a password:
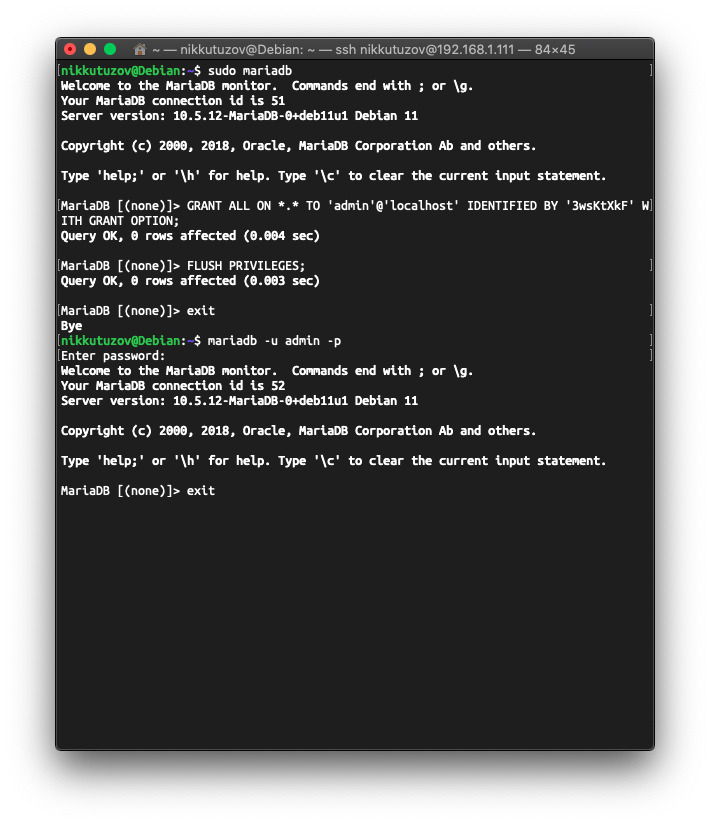
Installing and configuring php and phpMyAdmin
$ sudo apt install -y php libapache2-mod-php php-mysql
Then fix the file:
$ sudo vim /etc/apache2/mods-enabled/dir.conf
It should look like this:
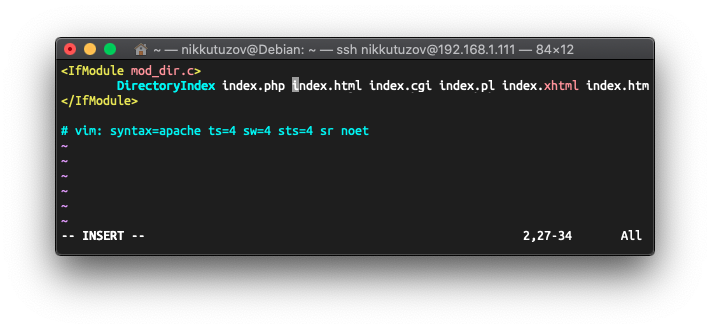
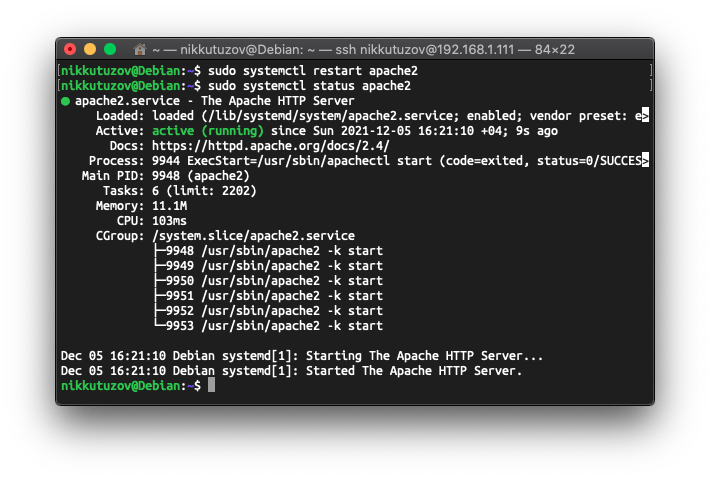
Write changes to the file and restart apache:
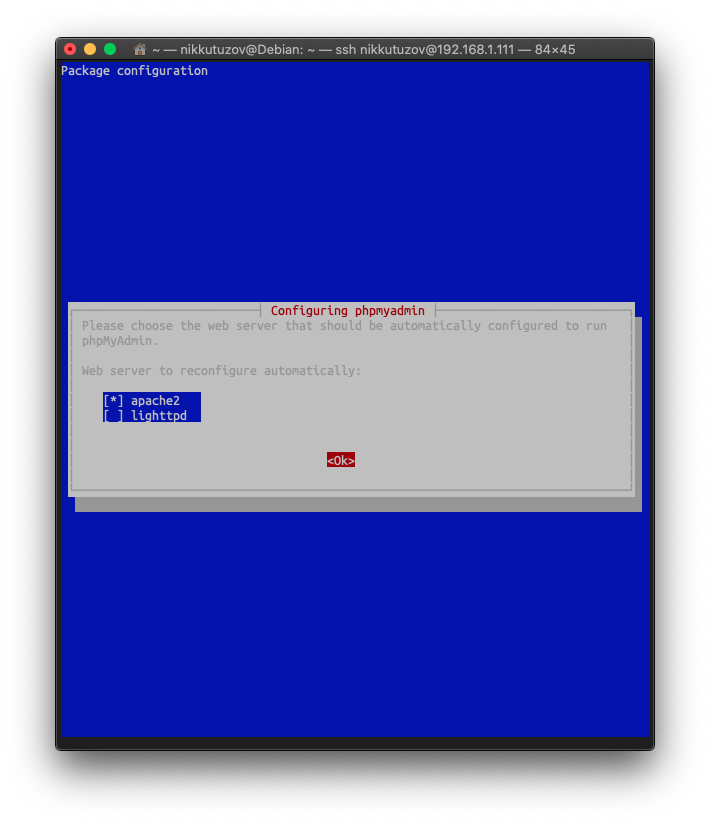
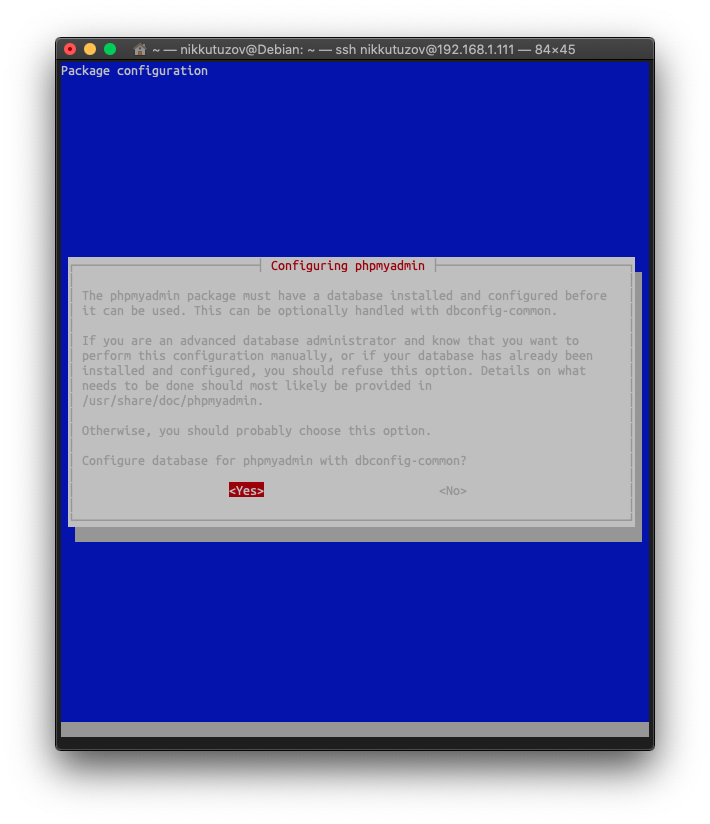
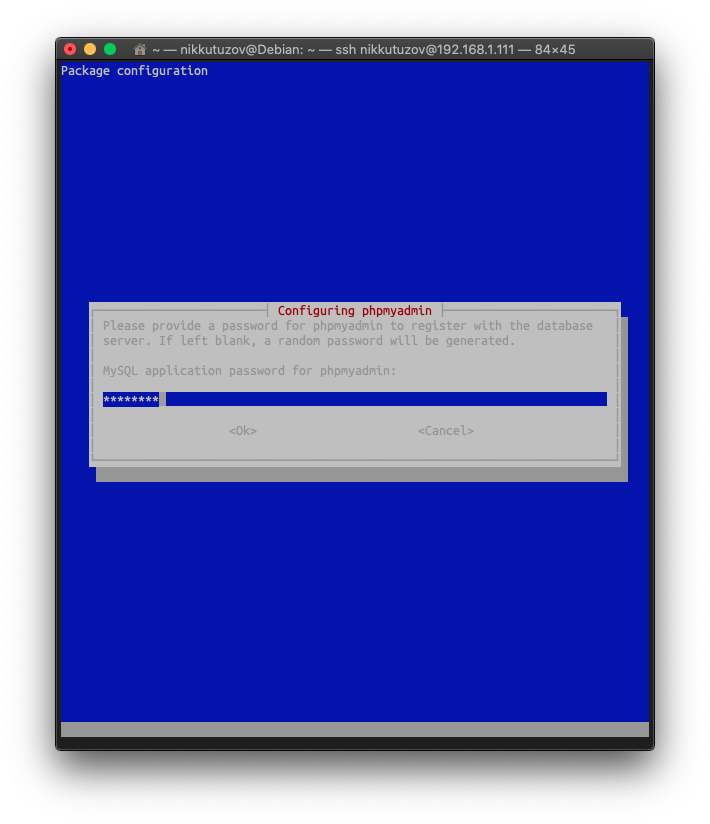
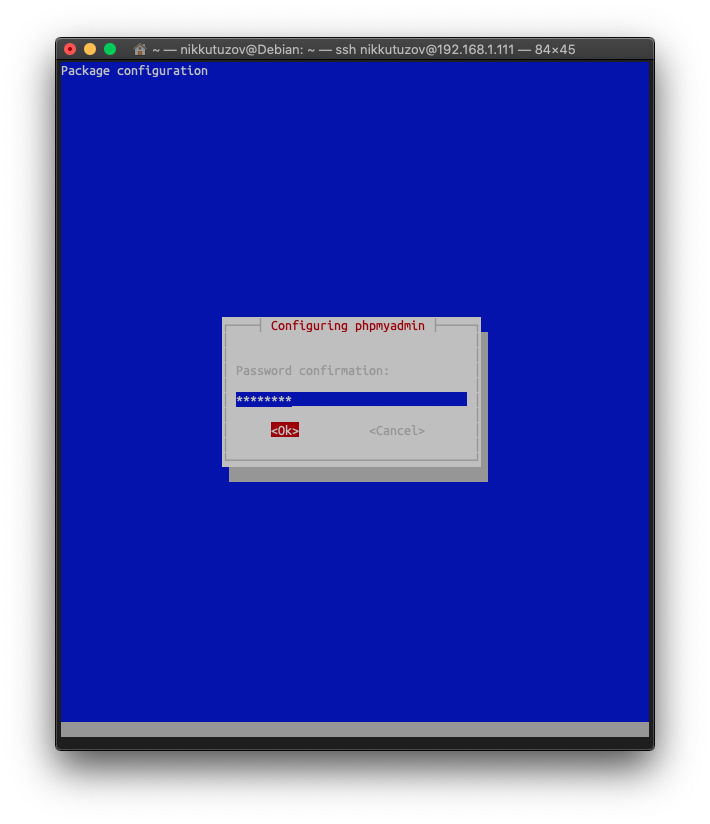
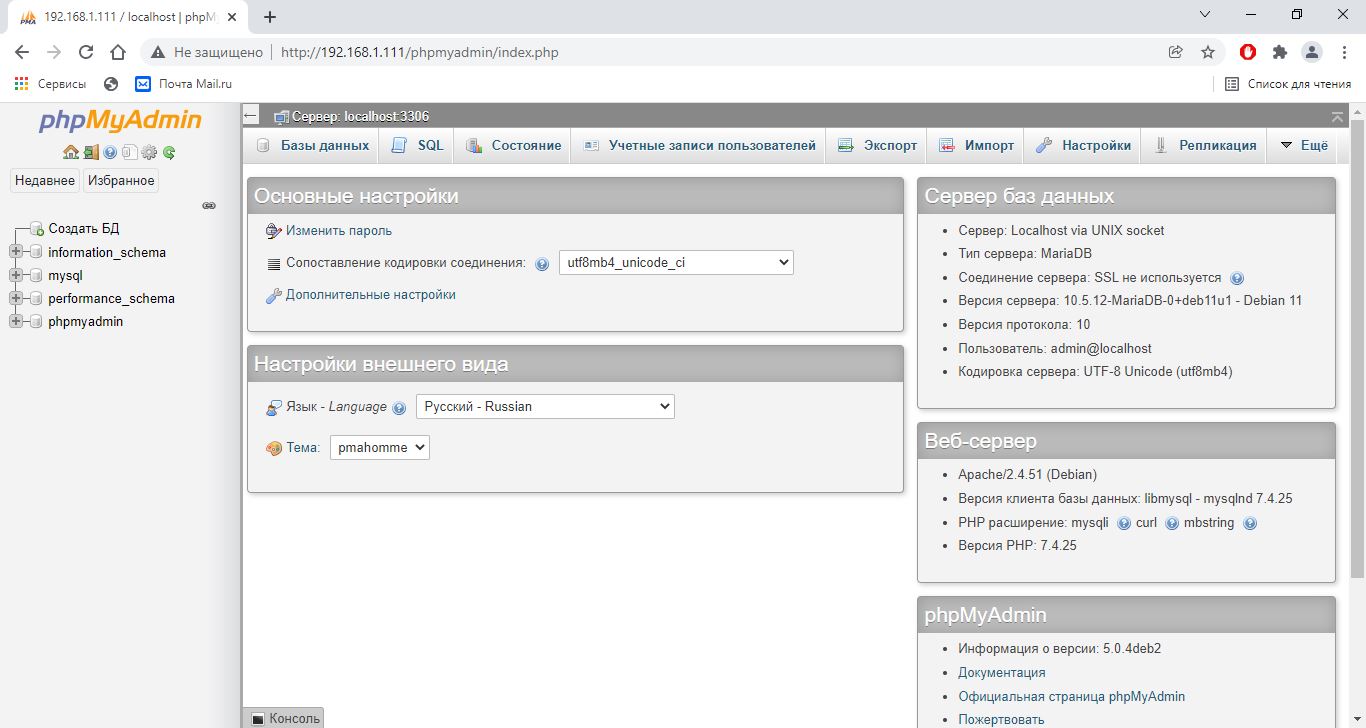
During installation, several settings windows will open, do everything as in the screenshots (I set the password the same as when setting up the additional mariadb user):

It will also describe how to set up virtual hosts, obtain a certificate for a future site (for free!) and install wordpress. There was a lot of information, perhaps it was necessary to break it into several parts, but it turned out as it happened.
