
🏎️")
Let’s talk about storage tech and disk speed. The invention of SSD showed everyone just how much difference a faster storage disk can make. And when it comes to speed, there is also the matter of measuring disk speed. You may be interested in testing your PC storage device or perhaps you want to know if your VPS provider actually delivers on their promises of SSD storage — for these and many other reasons, you can use this guide to measure disk speed. Instead of obtaining a single number as ‘speed’, we are interested in measuring what better represents the real-world speed of storage devices such as Hard Disk Drive (HDD), Solid State Drive (SSD), SD cards, and USB memory stick/flash drives, etc. Every storage device provides a certain level of efficiency at a certain financial cost and we’ll run different disk speed tests to discover just how fast each of them is.
Also Read: HDD vs SSD Server Comparison
As a case in point, HDDs are rather more affordable but also are only appropriate for transferring bulk files to/from disks which has a sequential read/write pattern as opposed to having a random read/write pattern. Accordingly, not every speed measurement method may be good for every disk.
In this article, I will walk you through how to use the “dd”, “hdparm” utility, and “fio” methods to test disk speed in Linux.
We’re also going to cover Linux disk speed test using the Graphical Method. Also, I will be elaborating on why the first two mentioned approaches provide rather poor estimates in certain use cases.

Linux Hosting Simplified
Want a better way to host your websites and web apps? Developing something new? Simply don’t like Windows? That’s why we have Linux VPS.
Get your Linux VPS
- Test disk speed in Linux using commands
- Test Disk Speed in Linux using dd
- Getting Disk Speed Test Result
- Clearing Cache and Re-testing
- Test your HDD, SSD Read Speed using Hdparm
- Install hdparm
- Run hdparm
- Better Test Disk Speed in Linux via fio
- Install fio
- Run an SSD Disk Speed Test
- Run an HDD Disk Speed Test
- Linux Disk Speed Test Using the Graphical Method
- Open the Disk Utility
- Run the Benchmark Feature
- Perform Tests
- Improving Linux Disk Speed Using NVMe
- FAQ
- How do I increase disk read speed in Linux?
- What is the command to check disk speed in Linux?
- Almost Useless Methods
- Methods of testing I/O performance which gives useful information reflecting real-world use
- Fio — The «flexible I/O tester»
- Drives With Special Characteristics
- «Shingled magnetic recording» (SMR) drives
- Benchmarking Cloud/VPS storage solutions
- References
- ТЕСТ Скорости ЗАПИСИ Диска
- ТЕСТ Скорости ЧТЕНИЯ Диска
- ТЕСТ Скорость Чтения/Записи Внешнего Накопителя
- Проверка Производительности HDD, SSD, USB Флэш Накопителья
- Other Tools
- Как найдите скорость передачи данных с жесткого диска на Linux
- Тестирование жесткого диска из командной строки
- Дисковая утилита Gnome
- Ubuntu
- Debian
- Arch Linux
- Fedora
- OpenSUSE
Test disk speed in Linux using commands
Well, there are multiple approaches to do this and you can use any of them.
Test Disk Speed in Linux using dd
dd is a Linux built-in tool and can be used to generally indicate how much time it takes to complete an operation.
Getting Disk Speed Test Result

Clearing Cache and Re-testing

Also Read: How to delete a directory in Linux?
Test your HDD, SSD Read Speed using Hdparm
“hdparm” is another Linux command-line tool that can be used to derive a sequential read speed of a storage device.
Install hdparm
To install “hdparm” on CentOS, RHEL distributions:
sudo yum install hdparm
To install “hdparm” on Mint, Ubuntu, Debian:
sudo apt-get install hdparm
Run hdparm
Run the hdparm utility by entering the command below into the Linux Terminal
sudo hdparm -Tt/dev/sda
The output should look like this:

Better Test Disk Speed in Linux via fio
Also Read: What is Linux bashrc and How to Use It?
Install fio
“fio”, which is not available on Linux by default, can be installed easily nonetheless. To install this utility:
sudo apt-get install fio
Run an SSD Disk Speed Test
Data volume: 250MB, Reads: 80% of the whole data, Write: 20% of the whole data

Run an HDD Disk Speed Test
Now let’s run the exact same commands for an HDD:
This random write speed test on HDD shows weaker performance than that of an SSD. Overall, an SSD outperforms an HDD in random access usage and that is why it is more recommended.
The advantage of “fio” is that you can go for sequential reads and writes tests as well. To do that for our HDD, we will need to type in “seqread” and “seqwrite” for – – readwrite.
Linux Disk Speed Test Using the Graphical Method
You can also use the native Linux Disk utility to perform disk speed tests without entering commands into the Terminal. Here, we’re going to use Ubuntu 21 as an example, but most Linux distros have the same utility.
Open the Disk Utility
On the left panel, you’ll see a list of all the disks available on your computer. Select the one you want to test by clicking on it.
Run the Benchmark Feature
On the Disk Utility’s right panel, find and click on the ”Benchmark – Measure Drive Performance” button to start Benchmark up.
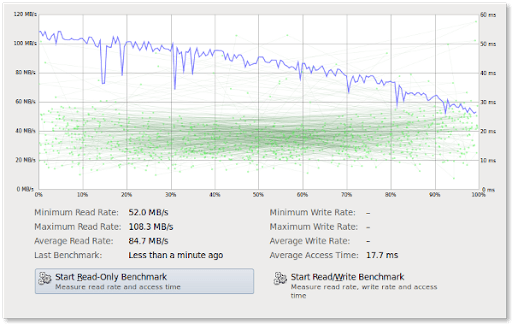
Perform Tests
On the new screen with the chart, you’ll find two buttons. The first one is “Start Read-Only Benchmark” and it does just what it says: measure how fast your disk is when just reading from it. The other one is “Start Read/Write Benchmark” and it measures the speed of both I/O operations, which is bound to be slower. Click on each one in turn or simply select the one you want.
Improving Linux Disk Speed Using NVMe
Linux readily has a built-in tool named dd for measuring disk speed, which is particularly efficient for HDDs speed test as the hard drives are commonly used for large sequential writes and read. However, dd and also “hdparm” are two easy-to-use methods to test disk speed in Linux, they only address sequential access patterns. In other words, they miserably fail to provide a decent speed estimate of disks like SSDs that are used for both large and small files. also, you can read my detailed comparison of NVMe vs SSD.
This is because an SSD can have a random read and write usage. “fio” is a more reliable utility as it mimics the real-world condition for speed test and runs a disk speed test for both random access and large sequential writes and reads. So the next time you purchase a service, make sure you rightly test the throughput to and from your disk so that you do not experience latency.
FAQ
You can use different command-line utilities like hdparm and fio, or you can use the graphical GONME application Disk Utility for a disk speed test.
How do I increase disk read speed in Linux?
There are several ways to do that, but without getting into too many technical details, I can say using hdparm with the “–direct” option is a good example since it lets you bypass cache.
What is the command to check disk speed in Linux?
There are three commands for disk speed test in Linux: dd, hdparm, and fio. This article will tell you how to use these commands in the Terminal.
Here’s several methods for testing I/O performance on GNU/Linux ranging from irrelevant tools like dd that are utterly worthless for this purpose to actually useful ways to determine a drives real-world performance.
Almost Useless Methods
These methods are highly recommended on a lot of pages on the Internet even though they are close to utterly useless. However, they will provide you with some very basic data which can help troubleshoot if a drive is connected to a lower SATA version than expected (you should be checking that with smartctl —all /dev/sda but..) and you can get a very rough idea how a drive performs.
hdparm can give an indication of a drives sequential read and reads from a drives and it’s cache. The typical way of using it is hdparm —direct -t -T /dev/sdX where
It’s output will look like:
# The Seagate Momentus 5400.6, ST9160301AS
# hdparm —direct -t -T /dev/sda
/dev/sda:
Timing O_DIRECT cached reads: 122 MB in 2.02 seconds = 60.31 MB/sec
Timing O_DIRECT disk reads: 184 MB in 3.02 seconds = 61.02 MB/sec
# Western Digital Red (WDC WD30EFRX-68EUZN0)
# hdparm —direct -t -T /dev/sda
/dev/sda:
Timing O_DIRECT cached reads: 946 MB in 2.00 seconds = 472.43 MB/sec
Timing O_DIRECT disk reads: 464 MB in 3.01 seconds = 154.26 MB/sec
# Samsung SSD 750 EVO 500GB (S36SNWAH582670L)
# hdparm —direct -t -T /dev/sde
/dev/sde:
Timing O_DIRECT cached reads: 984 MB in 2.00 seconds = 491.87 MB/sec
Timing O_DIRECT disk reads: 1470 MB in 3.00 seconds = 489.76 MB/sec
You may notice that there’s quite the difference between the three outputs above. hdparm can give you an general idea how a drive performs. But that’s all you get. Two drives with similar numbers could perform very differently in situations where there’s many random reads and writes; large sequential disk reads is not a very typical load. Then again, if the numbers are wildly different — like the above numbers are — and you have one drive with O_DIRECT disk reads at 60 MB/sec and other at 490 MB/sec it’s very much likely that the one capable of doing 490 MB/sec is faster in just about every single workload.
- if= an input device like /dev/zero or /dev/random
- of= a file to write like test.file
- bs= is important for «benchmarking». It specifies how many bytes are written per operation. It can be specified using k, M, G, etc.
- count= specifies how many operations to do. bs=2M count=10 writes 10*2 MB = 20MB data.
dd if=/dev/zero of=test.file bs=64M count=1 oflag=dsync
would output something like
# dd if=/dev/zero of=test.file bs=64M count=1 oflag=dsync
1+0 records in
1+0 records out
67108864 bytes (67 MB, 64 MiB) copied, 0.285204 s, 235 MB/s
while increasing the count to 16 changes the above command so it writes 64MB 16 times = 1 GB:
# dd if=/dev/zero of=test.file bs=64M count=16 oflag=dsync
16+0 records in
16+0 records out
1073741824 bytes (1.1 GB, 1.0 GiB) copied, 4.45435 s, 241 MB/s
The output of this test on the «The Seagate Momentus 5400.6» (ST9160301AS) from the hdparm example above shows that dd can be useful to get an idea how a drive performs:
# dd if=/dev/zero of=test.file bs=64M count=16 oflag=dsync
16+0 records in
16+0 records out
1073741824 bytes (1.1 GB, 1.0 GiB) copied, 20.4171 s, 52.6 MB/s
Keep in mind that using a high bs= will increase the amount of data written to a very high amount if count= is used, bs=1G count=64 will write 64 GB of data.
A low number bs= number as in bs=512 count=1000 will write 512 bytes a 1000 times which amounts to a mere 512 KB. However, the throughput will be much lower since a disk sync is done each time 512 bytes is written. And the will be a difference between newer and older machines.
$ dd if=/dev/zero of=test.file bs=512 count=1000 oflag=dsync
1000+0 records in
1000+0 records out
512000 bytes (512 kB, 500 KiB) copied, 71.6597 s, 7.1 kB/s
$ dd if=/dev/zero of=test.file bs=512 count=1000 oflag=dsync
1000+0 records in
1000+0 records out
512000 bytes (512 kB, 500 KiB) copied, 5.80012 s, 88.3 kB/s
The above outputs are very different and they do give an indication how these machines perform — but it’s not that useful.
Methods of testing I/O performance which gives useful information reflecting real-world use
Two small programs for disk I/O testing stand out as more useful than most other methods: fio and bonnie++.
Fio — The «flexible I/O tester»
fio is available on most distributions as a package with that name. It won’t be installed by default, you will need to get it. You can click apt://fio (Ubuntu) or appstream://fio (Plasma Discover) to install it (on some distributions, anyway).
fio is not at all strait-forward or easy to use. It requires quite a lot of parameters. The ones you want are:
Put all the above together and we have some long commands for testing disk I/O in various ways.
The resulting output will have a line under Run status group 0 (all jobs): which looks like:
- WD Blue 500 GB SSD (WDC WDS500G2B0A-00SM50): bw=527MiB/s (552MB/s), 527MiB/s-527MiB/s (552MB/s-552MB/s), io=10.0GiB (10.7GB), run=19442-19442msec
- The Seagate Momentus 5400.6: READ: bw=59.0MiB/s (62.9MB/s), 59.0MiB/s-59.0MiB/s (62.9MB/s-62.9MB/s), io=3630MiB (3806MB), run=60518-60518msec
The result should be close to what the hard drive manufacturer advertised and they won’t be that far off the guessimates hdparm provides with the -t option. Testing this on a two-drive RAID1 array will result in both drives being utilized:
This will a line under «Run status group 0 (all jobs):» like
Testing random 4K reads
Testing random reads is best done with a queue-depth of just one (—iodepth=1) and 32 concurrent jobs (—numjobs=32).
This will reflect real-world read performance.
Some example results:
- The Seagate Momentus 5400.6: READ: bw=473KiB/s (484kB/s), 473KiB/s-473KiB/s (484kB/s-484kB/s), io=27.9MiB (29.2MB), run=60334-60334msec
- WD Blue 500 GB SSD (WDC WDS500G2B0A-00SM50): READ: bw=284MiB/s (297MB/s), 284MiB/s-284MiB/s (297MB/s-297MB/s), io=16.6GiB (17.8GB), run=60001-60001msec
As these example results show: The difference between an older 5400 RPM HDD and a average low-end SSD is staggering when it comes to random I/O. There is a world of difference between half a megabyte and 284 megabytes per second.
Mixed random 4K read and write
The —rw option randrw tells fio to do both reads and writes. And again, a queue-depth of just one (—iodepth=1) and 32 concurrent jobs (—numjobs=32) will reflect high real-world load. This test will show the absolute worst I/O performance you can expect. Don’t be shocked if a HDD shows performance-numbers that are in the low percentages of what it’s specifications claim it can do.
bonnie++ is a disk and filesystem benchmark suite. Installing it (the package is typically named bonnie++) and running it with no parameters will start a benchmark of the disk and file system in the current working directory.
bonnie++ will take care of caching and syncing and test random reads, writes and test small and large file system updates. It’s tests do take some time, and by «some time» we mean hours on an old machine with an older HDD.
bonnie++ providers more real-world like testing than hdparm and dd do. However, it does have some flaws: It is single-threaded which means that some operations will appear to be slower than they actually are on any multi-core machine.
bonnie++ is a nice tool if you just want to install something and run it without having to think about adding parameters and wait and get usable results.
Drives With Special Characteristics
Some HDDs and storage-solutions have special properties which should be accounted for.
«Shingled magnetic recording» (SMR) drives
Seagate has a technology called «Shingled magnetic recording» (SMR) which crams tracks closer together than they should be. Writing to a track on a SMR drive makes the drive re-write nearby tracks too. These drives will have a large on-board memory buffer and a «normal» area on the platters for caching writes that need to be done the «SMR-way» later on. This area is typically 20-40 GB depending on the drives size. The result is that SMR drives behave in a way regular drives don’t: The first 20 GB written to a SMR drive will be written at expected speeds that are fairly normal for a modern HDD. Additional data written after that will bring write speeds to a crawling halt as in near-zero while the drive writes the data in its «write-buffer» and re-writes tracks near those were the new data is placed.
SMR drives can be accurately benchmarked by writing a really large amount of data to it (60 GB or so). What you’ll find is that read and write speeds are absolutely dismal once it’s buffer is full. This is why it’s best to simply avoid Shingled magnetic recording drives.
Most modern consumer SSDs have slower TLC (triple layer cell) nand and a small area of SLC (single layer cell) which is used to cache immediate writes. The drives firmware will move the data in the SLC area to the TLC area when the drive is mostly idle. What this means, in practical terms, is that a 1 GB write-test, be it sequential or random writes, will indicate a performance-level which is far higher than what you get if you exceed the SLC area. If the SLC area is 20 GB and you copy 40 GB you’ll find that write performance drops by a noticeable amount. Account for this if you will be using a SSD to copy many very large files on a regular basis.
Enterprise grade SSDs will mostly not have this problem — which is something their price will reflect. You can be sure all the cheaper consumer grade SSDs like Kingson’s A400 and A1000 series, WD Green and WD Blue and similarly priced drives do have this kind of behaviour.
Benchmarking Cloud/VPS storage solutions
It is actually quite hard to benchmark the performance you can expect from a cloud provider or a virtual private server provider. You can run benchmarks and get results which may or may not mean something when you deploy real-world applications. Your VPS instance could be writing to the host OS’s cache when you think it’s doing actual disk writes.
References
- ↑ 1.0 1.1 1.2 hdparm’s manual page
- ↑ 2.0 2.1 dd’s manual page
ТЕСТ Скорости ЗАПИСИ Диска
Выполните следующую команду для определения скорости ЗАПИСИ на накопитель:
ТЕСТ Скорости ЧТЕНИЯ Диска
Файл , сгенерированный предыдущей командой, был закэширован в буфер и скорость его чтения будет намного выше чем реальная скорость чтения непосредственно с жесткого диска.
Чтобы получить реальную скорость, необходимо предварительно очистить кэш.
Выполни следующую команду, чтобы узнать скорость ЧТЕНИЯ из буфера:
Очистите кэш и измерьте реальную СКОРОСТЬ чтения непосредственно с жесткого диска:
ТЕСТ Скорость Чтения/Записи Внешнего Накопителя
Для проверки производительности какого-либо внешнего HDD, SSD, USB Флэшки либо другого съемного носителя или удаленной файловой системы, просто перейдите в точку монтирования и выполните приведенные выше команды.
Либо, вместо , можно непосредственно прописать путь к точке монтирования, например:
Напоминание: Все приведенные выше команды используют временный файл . Не забудьте удалить его по окончанию тестов.
Проверка Производительности HDD, SSD, USB Флэш Накопителья
— это утилита для командной строки в Linux, которая позволяет просматривать и менять параметры жестких дисков.
Так же она может использоваться в качестве простой утилиты для сравнительного анализа, которая позволяет быстро узнать скорость ЧТЕНИЯ с диска.
доступен из стандартных репозиториев в большинстве Linux дистрибутивах.
Установите , в зависимости от вашего Linux дистрибутива.
Запустите , как показано ниже, для измерения скорости ЧТЕНИЯ с устройства :
You can use fio — the Multithreaded IO generation tool. It is packaged by several distributions, e.g. Fedora 25, Debian and OpenCSW.
A simple example (a sequence of simple scenarios: sequential/random X read/write):
Other Tools
The hdparm utility provides a very simple read benchmark, e.g.:
# hdparm -t -T /dev/sdz
It’s not a replacement for a state-of-the-art benchmarking tool like fio, it
just should be used for a first plausibility check. For example, to check if
the external USB 3 drive is wrongly recognized as USB 2 device (you would see ~
100 MiB/s vs. ~ 30 MiB/s rates then).
Тест скорости USB и SSD дисков в Linux
Как быстр ваш USB? Как быстр ваш SSD-накопитель? Это очень распространенный вопрос. Я собрал и скомпилировал несколько тестов, которые помогут вам выполнить тест скорости USB и SSD в Linux. Когда я говорю speedtest, я тестирую скорость чтения / записи USB и SSD дисков. Это также сообщит вам, работают ли ваши накопители на максимальной скорости.
Скорость привода измеряется с точки зрения того, сколько данных он может читать или записывать за единицу времени. Команда dd — это простой инструмент командной строки, который может использоваться для чтения и записи произвольных блоков данных на диск и измерения скорости передачи данных. В этом посте мы будем использовать команду dd для проверки скорости чтения SSD и USB-накопителей .
Скорость передачи данных зависит не только от диска, но и от интерфейса, к которому он подключен. Например, порт USB 2.0 имеет максимальную скорость работы 35 Мбайт / с, поэтому, даже если вы подключите высокоскоростной накопитель USB 3 к порту USB 2, скорость будет ограничена нижним пределом.
То же самое касается SSD. SSD подключаются через порты SATA, которые имеют разные версии. Sata 2.0 имеет максимальный теоретический предел скорости 3Gbits / s, который составляет примерно 375 Мбайт / с. В то время как Sata 3.0 поддерживает вдвое большую скорость.
Установите привод и перейдите в него с терминала. Затем с помощью команды dd сначала запишите файл, используя блоки фиксированного размера. Затем прочитайте тот же файл, используя тот же размер блока.
Общий синтаксис команды dd выглядит следующим образом:
При записи на диск мы просто читаем /dev /zero, который является источником бесконечных бесполезных байтов. И когда читаем с диска, мы читаем файл, написанный ранее, и отправляем его в /dev /null, который нигде не существует. Во всем процессе dd отслеживает скорость, с которой происходит передача, и сообщает об этом.
Тест скорости чтения жесткого диска с помощью команды dd
Файл , который только что был создан предыдущей командой, был кэширован в буфере, и его скорость чтения намного выше реальной скорости чтения непосредственно с жесткого диска. Чтобы получить реальную скорость, нам нужно очистить кэш.
Выполните следующую команду, чтобы узнать скорость чтения из буфера:
$ dd if=tempfile of=/dev/null bs=1M count=1024
1024+0 records in
1024+0 records out
1073741824 bytes (1.1 GB) copied, 0.159273 s, 6.7 GB/s
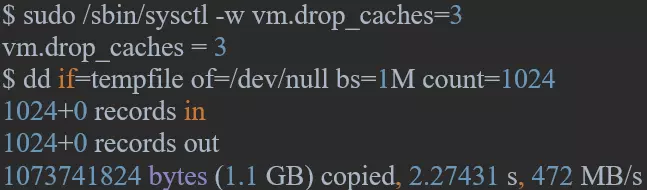
Очистите кэш Linux и измерите реальную скорость чтения напрямую с жесткого диска:
$ sudo /sbin/sysctl -w vm.drop_caches=3
vm.drop_caches = 3
$ dd if=tempfile of=/dev/null bs=1M count=1024
1024+0 records in
1024+0 records out
1073741824 bytes (1.1 GB) copied, 2.27431 s, 472 MB/s
Тест скорости записи жесткого диска с помощью команды dd
Выполните следующую команду для проверки скорости записи на жестком диске:
$ sync; dd if=/dev/zero of=tempfile bs=1M count=1024; sync
1024+0 records in
1024+0 records out
1073741824 bytes (1.1 GB) copied, 3.28696 s, 327 MB/s
Теперь давайте начнем с инструкций для проверки скорости чтения SSD. Наш SSD подключается к порту SATA 2.0 для этого теста.
$ dd if=/dev/zero of=./largefile bs=1M count=1024
1024+0 records in
1024+0 records out
1073741824 bytes (1.1 GB) copied, 4.82364 s, 223 MB/s
Размер блока на самом деле довольно большой. Вы можете попробовать с меньшими размерами, такими как 64k или даже 4k.
Теперь прочитайте тот же файл. Однако сначала очистите кэш памяти, чтобы убедиться, что файл действительно считывается с диска.
Выполните следующую команду, чтобы очистить кэш памяти:
Теперь прочитайте файл:
$ dd if=./largefile of=/dev/null bs=4k
165118+0 records in
165118+0 records out
676323328 bytes (676 MB) copied, 3.0114 s, 225 MB/s
В этом тесте мы будем измерять скорость чтения и записи обычных USB / PEN-дисков. Диски подключены к стандартным портам USB 2. Первый — это USB-накопитель Sony 4GB, а второй — Strontium 16-Гбайт.
Сначала подключите диск к порту и установите его, чтобы он читался. Затем перейдите в каталог монтирования из командной строки.
Скорость чтения / записи внешнего жесткого диска
Чтобы проверить производительность некоторых внешних жестких дисков, USB-накопителей или любого другого съемного устройства или удаленной файловой системы, просто обратитесь к точке монтирования и повторите указанные выше команды.
Или вы можете заменить временный файл на путь к точке монтирования, например
Sony 4GB — Запись
В этом тесте команда dd используется для записи 10 000 блоков по 8 Кбайт каждый в один файл на диске.
# dd if=/dev/zero of=./largefile bs=8k count=10000
10000+0 records in
10000+0 records out
81920000 bytes (82 MB) copied, 11.0626 s, 7.4 MB/s
Таким образом, скорость записи составляет около 7,5 Мбайт / с. Это низкая цифра.
Sony 4GB — Чтение.
Тот же файл считывается обратно для проверки скорости чтения. Выполните следующую команду, чтобы очистить кэш памяти:
Теперь прочитайте файл, используя команду dd.
# dd if=./largefile of=/dev/null bs=8k
8000+0 records in
8000+0 records out
65536000 bytes (66 MB) copied, 2.65218 s, 24.7 MB/s
Скорость чтения составляет около 25 Мбайт / с, что является более или менее стандартным для дешевых USB-накопителей.
Максимальная скорость передачи USB 2.0 составляет 480 Мбит / с или 60 Мбайт / с. Однако из-за различных ограничений максимальная пропускная способность ограничена примерно 280 Мбит / с или 35 Мбайт / с. Помимо этого, фактическая скорость зависит от качества Pen приводов и других факторов.
Вышеупомянутый USB-накопитель был подключен к порту USB 2.0 и достиг скорости чтения 24,7 Мб / с, что не очень плохо. Но скорость записи значительно отстает
Теперь давайте сделаем тот же тест с приводом Stronium 16GB. — Stronium еще один очень дешевый бренд, хотя USB-накопители надежны.
Скорость записи Stronium 16 ГБ
# dd if=/dev/zero of=./largefile bs=64k count=1000
1000+0 records in
1000+0 records out
65536000 bytes (66 MB) copied, 8.3834 s, 7.8 MB/s
Скорость чтения Stronium 16gb
Скорость чтения ниже, чем у накопителя Sony.
Проверка производительности жесткого диска с помощью hdparm.
Hdparm — это утилита Linux, которая позволяет быстро узнать скорость чтения жесткого диска. Установите hdparm в зависимости от дистрибутива Linux.
В Linux Mint, Ubuntu, Debian:
$ sudo apt-get install hdparm
Запустите hdparm следующим образом, чтобы измерить скорость чтения жесткого диска /dev/sda:
$ sudo hdparm -Tt /dev/sda
/dev/sda:
Timing cached reads: 16924 MB in 2.00 seconds = 8469.95 MB/sec
Timing buffered disk reads: 1386 MB in 3.00 seconds = 461.50 MB/sec
Это руководство научит вас определять скорость передачи данных на жестком диске Linux.
Другими словами, мы собираемся определить, насколько быстро ваш жесткий диск доставляет данные в Linux и Unix-подобных операционных системах.
Мы также собираемся поговорить о других полезных вещах, таких как количество секторов, которые может читать жесткий диск одновременно, функция упреждающего чтения, кэширование с обратной записью, тестирование жесткого диска и т.д.
В рамках этого руководства мы будем использовать утилиту командной строки hdparm для проверки скорости чтения, записи жесткого диска и тестирования производительности жесткого диска.
Теперь давайте воспользуемся этой утилитой hdparm для измерения скорости передачи жесткого диска.
Несмотря на то, что hdparm предлагает значительные преимущества для увеличения производительности диска, он также ЧРЕЗВЫЧАЙНО ОПАСНЫЙ. При неправильном использовании некоторых параметров это, скорее всего, приведет к массовой потере данных. В документации hdparm говорится, что НЕ СЛЕДУЕТ ИСПОЛЬЗОВАТЬ НЕКОТОРЫЕ КОМАНДЫ ПРИ ЛЮБЫХ ОБСТОЯТЕЛЬСТВАХ. Поэтому я исключил из этого руководства такие опасные команды. Что еще более важно, всегда рекомендуется делать резервную копию жесткого диска перед тестированием жесткого диска с помощью hdparm в системе Linux.
Как найдите скорость передачи данных с жесткого диска на Linux
Чтобы проверить скорость передачи данных жесткого диска в Linux, выполните команду «hdparm» с флагом -t, как показано ниже:
$ sudo hdparm -t /dev/sda
/dev/sda:
Timing buffered disk reads: 246 MB in 3.00 seconds = 81.97 MB/sec
Как видите, скорость передачи данных составляет 81,97 МБ в секунду.
Убедитесь, что никакие другие программы не работают в фоновом режиме.
Выполните команду hdparm не менее двух или трех раз и по результатам вычислите среднюю скорость передачи данных вашего диска.
Как видно из вышеприведенного вывода, ядро Linux помещает данные, полученные с жесткого диска, в буфер при передаче данных.
Если вы хотите измерить более точную скорость передачи данных, используйте:
$ sudo hdparm -t —direct /dev/sda
/dev/sda:
Timing O_DIRECT disk reads: 242 MB in 3.02 seconds = 80.21 MB/sec
Теперь программа hdparm не будет использовать буфер и будет читать данные прямо с жесткого диска
Как вы заметили в приведенном выше выводе, скорость передачи данных без буфера снизилась.
Hdparm всегда будет читать данные с самого начала устройств хранения.
Если вы хотите, чтобы hdparm читал данные из другой области устройства хранения, вы можете использовать параметр «offset», как показано ниже.
$ sudo hdparm -t —direct —offset 10 /dev/sda
Здесь 10 означает количество пропущенных гигабайт.
Согласно приведенной выше команде, первые 10 ГБ будут пропущены при чтении данных с диска.
На диске 20 ГБ указанная выше команда доставит данные из середины диска.
dev/sda:
Timing O_DIRECT disk reads (offset 10 GB): 244 MB in 3.01 seconds = 81.15 MB/sec
Тестирование жесткого диска из командной строки
Чтобы протестировать жесткий диск и проверить читаемую скорость диска, используйте вместе флаги верхнего регистра “T” и нижнего регистра “t”, как показано ниже.
/dev/sda:
Timing cached reads: 7232 MB in 1.99 seconds = 3629.42 MB/sec
Timing buffered disk reads: 250 MB in 3.01 seconds = 82.99 MB/sec
Повторите эту команду не менее 2-3 раз, чтобы получить значимый результат.
Для получения более подробной информации проверьте страницы руководства.
$ man hdparm
В этом руководстве мы обсудили, как определить скорость передачи данных с жесткого диска в Linux (т.е. насколько быстро жесткий диск передает данные).
Вам нужно проверить скорость вашего жесткого диска в Linux, но вы не можете понять это? Мы можем помочь! Следуйте этому руководству, пока мы узнаем, как вы можете проверить скорость своего диска в Linux!
- Дисковая утилита Gnome
- HDParm
Дисковая утилита Gnome
Если вы хотите проверить скорость диска в Linux, лучший способ сделать это — использовать Gnome Disk Utility. Это удобная, простая для понимания программа, которая может измерять и тестировать скорость жесткого диска.
Однако приложение Gnome Disk Utility не входит в предустановку в каждой операционной системе Linux, поэтому, прежде чем мы перейдем к тому, как использовать его для проверки скорости жесткого диска, вам необходимо установить программу.
Чтобы начать установку Gnome Disk Utility на вашем ПК с Linux, откройте окно терминала. Вы можете открыть окно терминала, нажав Ctrl + Alt + T на клавиатуре. Или откройте меню приложения и найдите «Терминал».
Когда окно терминала откроется и будет готово к использованию, следуйте приведенным ниже инструкциям по установке, чтобы установить приложение Gnome Disk Utility на вашем ПК с Linux.
Ubuntu
В Ubuntu установите приложение Gnome Disk Utility, используя приведенную ниже команду apt install.
sudo apt install gnome-disk-utility
Debian
Те, кто использует Debian Linux, смогут установить приложение Gnome Disk Utility, выполнив команду apt-get install.
sudo apt-get install gnome-disk-utility
Arch Linux
В Arch Linux приложение Gnome Disk Utility можно установить с помощью команды Pacman ниже.
sudo pacman -S gnome-disk-utility
Fedora
Те, кто использует Fedora Linux, могут заставить программу Gnome Disk Utility работать с помощью команды dnf install.
sudo dnf install gnome-disk-utility
OpenSUSE
В OpenSUSE Linux программу Gnome Disk Utility легко установить с помощью приведенной ниже команды установки zypper.
sudo zypper install gnome-disk-utility
Теперь, когда открыто приложение Gnome Disk Utility, запустите программу, выполнив поиск «Диски» в меню приложения. Затем следуйте пошаговым инструкциям ниже, чтобы проверить скорость вашего диска в Linux.
Шаг 1. Внутри приложения Gnome Disk Utility посмотрите на левую боковую панель и найдите диск, скорость которого вы хотите проверить. Затем щелкните по нему мышью, чтобы просмотреть обзор диска приложения.
Шаг 2: Найдите кнопку меню в Gnome Disk Utility и выберите ее мышью, чтобы открыть. Если вы не можете найти меню, посмотрите слева от кнопки свертывания.
В меню Gnome Disk Utility найдите кнопку «Benchmark Disk» и выберите ее с помощью мыши. Выбрав кнопку «Benchmark Disk», вы откроете инструмент тестера.
Шаг 3: Когда инструмент тестирования будет открыт, найдите кнопку «Start Benchmark» и нажмите на нее, чтобы запустить тест. Имейте в виду, что выполнение этого теста может занять некоторое время, поэтому наберитесь терпения.

Когда инструмент тестирования будет завершен, утилита Gnome Disk Utility создаст полное считывание вашего жесткого диска. Чтобы проверить скорость, найдите «Средняя скорость чтения» и «Средняя скорость записи». Это скажет вам скорость вашего жесткого диска.
HDParm — еще одно приложение, которое вы можете использовать для проверки скорости вашего диска в Linux. Ее не так просто использовать, как Gnome Disk Utility, и графического интерфейса пользователя нет, но она столь же полезна.
Приложение HDParm не устанавливается по умолчанию во всех операционных системах Linux, но оно есть во многих. Чтобы проверить, установлен ли HDParm на вашем компьютере, запустите команду hdparm –help в окне терминала.
Если на вашем ПК с Linux не установлен HDParm, откройте окно терминала на рабочем столе Linux, нажав Ctrl + Alt + T на клавиатуре. После открытия окна терминала следуйте приведенным ниже инструкциям по установке.
Вы можете установить HDParm в Ubuntu с помощью команды apt.
sudo apt install hdparm
Чтобы установить HDParm в Debian, используйте apt-get.
В Arch Linux установите HDParm с помощью команды Pacman.
sudo pacman -S hdparm
В Fedora установите HDParm с dnf.
sudo dnf install hdparm
Установите HDParm в OpenSUSE с помощью zypper.
sudo zypper install hdparm
После установки HDParm на ваш компьютер следуйте пошаговым инструкциям ниже, чтобы проверить скорость вашего диска.
Шаг 1. Сначала запустите команду lsblk, чтобы просмотреть все подключенные жесткие диски в системе.
Просмотрите и найдите жесткий диск, который вы планируете протестировать. В этом примере мы протестируем / dev / sda. Для получения дополнительной информации о поиске информации о жестком диске в lsblk прочтите это руководство по этому вопросу.
Шаг 2: Выполните команду hdparm -Tt на жестком диске, чтобы начать тест.
Когда тест будет завершен, вы увидите результаты теста на экране.

