
Time to read
IPSec uses network layer protocols to transfer data that NAT cannot process. To solve the problem, the NAT-T protocol (an extension in IKE and part of IKEv2) is used. The essence of NAT-T is in the additional encapsulation of IPSec packets in UDP packets that NAT processes.
IPSec (IP Security) is a set of protocols and algorithms for data encryption in IPv4 and IPv6 networks. It does not sound difficult, but IPSec does not set clear rules for traffic encryption, instead, developers implement a set of tools (protocols and algorithms) using which the administrator creates a secure channel for data.
I want to touch on the topic of IPSec in RouterOS a little deeper than a simple HOWTO, with a minimal dive into theory and examples on setting up and debugging IPSec. This is not a guide, and without practice on a test bench, it is not recommended to start setting up real tunnels and VPN servers.
Used for extended peer authentication.
RSA keys: generation, import, export. Not supported in IKEv2.

xAuth user database, for «server». The client specifies the xAuth settings in the peer configuration. It is possible to forward xAuth authentication to a RADIUS server.

List of all peers that are establishing and have established an auxiliary tunnel (Phase 1). You can remove peers to update the keys of the auxiliary tunnel.

SAD database or list of all negotiated SAs. You can see the data protection algorithms and keys used.


The Hardware AEAD flag indicates the use of hardware encryption.

Administrator can reset SA, but only all of the same type (esp or ah) at the same time.
To offload the CPU, some MikroTik router models add hardware acceleration of encryption, a complete list can be found on the wiki. The most budget options: RB750Gr3, RB3011, HAP AC^2.
I tested the IPSec speed on my own between two RB1100AHx2 and between two RB750Gr3.
To achieve the maximum result on RB1100AHx2 you need:
On RB750Gr3 without optimizations about 200Mb/sec.
Qualcomm single-core routers show 10-40mb/sec result depending on the model, optimizations and other processes load.
I recommend that you read the presentation from a mikrotik employee, it touches on the topics of optimizing settings to reduce CPU load and increase speed, which I did not add to the text.
This article is about how to stop worrying about certificates for IKEv2-RSA and installing them.
There are many articles and videos on the Internet on setting up IKEv2 authentication using certificates. The main problem with this configuration is the need to generate many certificates, deliver and install them on each client device. Pretty confusing process, agree?
In the seventh version of RouterOS, very useful features have appeared that allow you to turn MikroTik into a full-fledged VPN server. Among the things that make life much easier for the admin, two innovations are very suitable for our task:
Now, a separate MikroTik vpn server no longer requires a third-party certificate generator and installer. The mechanism for requesting and installing a valid certificate from Let’s Encrypt allows you to do this in a few seconds. An embedded Radius server solves the problem of not having one in a small local network or being unable to use it for other reasons.
- Important clarification on certificates from Let’s Encrypt as part of the OS.
- How key agreement protocols work
- We connect the windows client.
- Protocols within IPSec
- Check
- IPSec in Mikrotik
- Initial data
- A few words about the analysis of IPSec logs
- IPSec and Firewall
- Protocols and ports used in IPSec
- IPSec Configuration
- Peers and Peers Profiles
- Configuring Remote IPSec Peers
- Setting up profiles (Proposals) for Phase 1 negotiation
- Security Associates Database (SAD)
- Policies and Policy Proposals
- Policy setting
- Setting up Proposals for SA negotiation
- Groups
- Differences 6. X and 6
- Cisco FTD (Firepower Management Center)
- Mikrotik (Winbox)
- Security Policy Database (SPD)
- Why all this
- Setting up MikroTik RouterOS. Preparation
- Obtaining and installing additional user-manager package on MikroTIk
- IKEv2 setup
- And a couple of examples of typical IPSec configuration problems
- Advantages and disadvantages of IPSec
- How to establish an IPSec connection
- IPSec and Endpoints
- IPSec in tunnel mode
- L2TP/IPSec
- Firewall configuration to create L2TP connections only after IPSec
- IKEv2 VPN
Important clarification on certificates from Let’s Encrypt as part of the OS.
You need to make sure that valid certificates from Let’Encrypt are installed correctly on the client. This is important not only for our task, but also for the correct operation of other services and applications that use certificates.
The fact is that the Let’s Encrypt trust chain looks like this today:
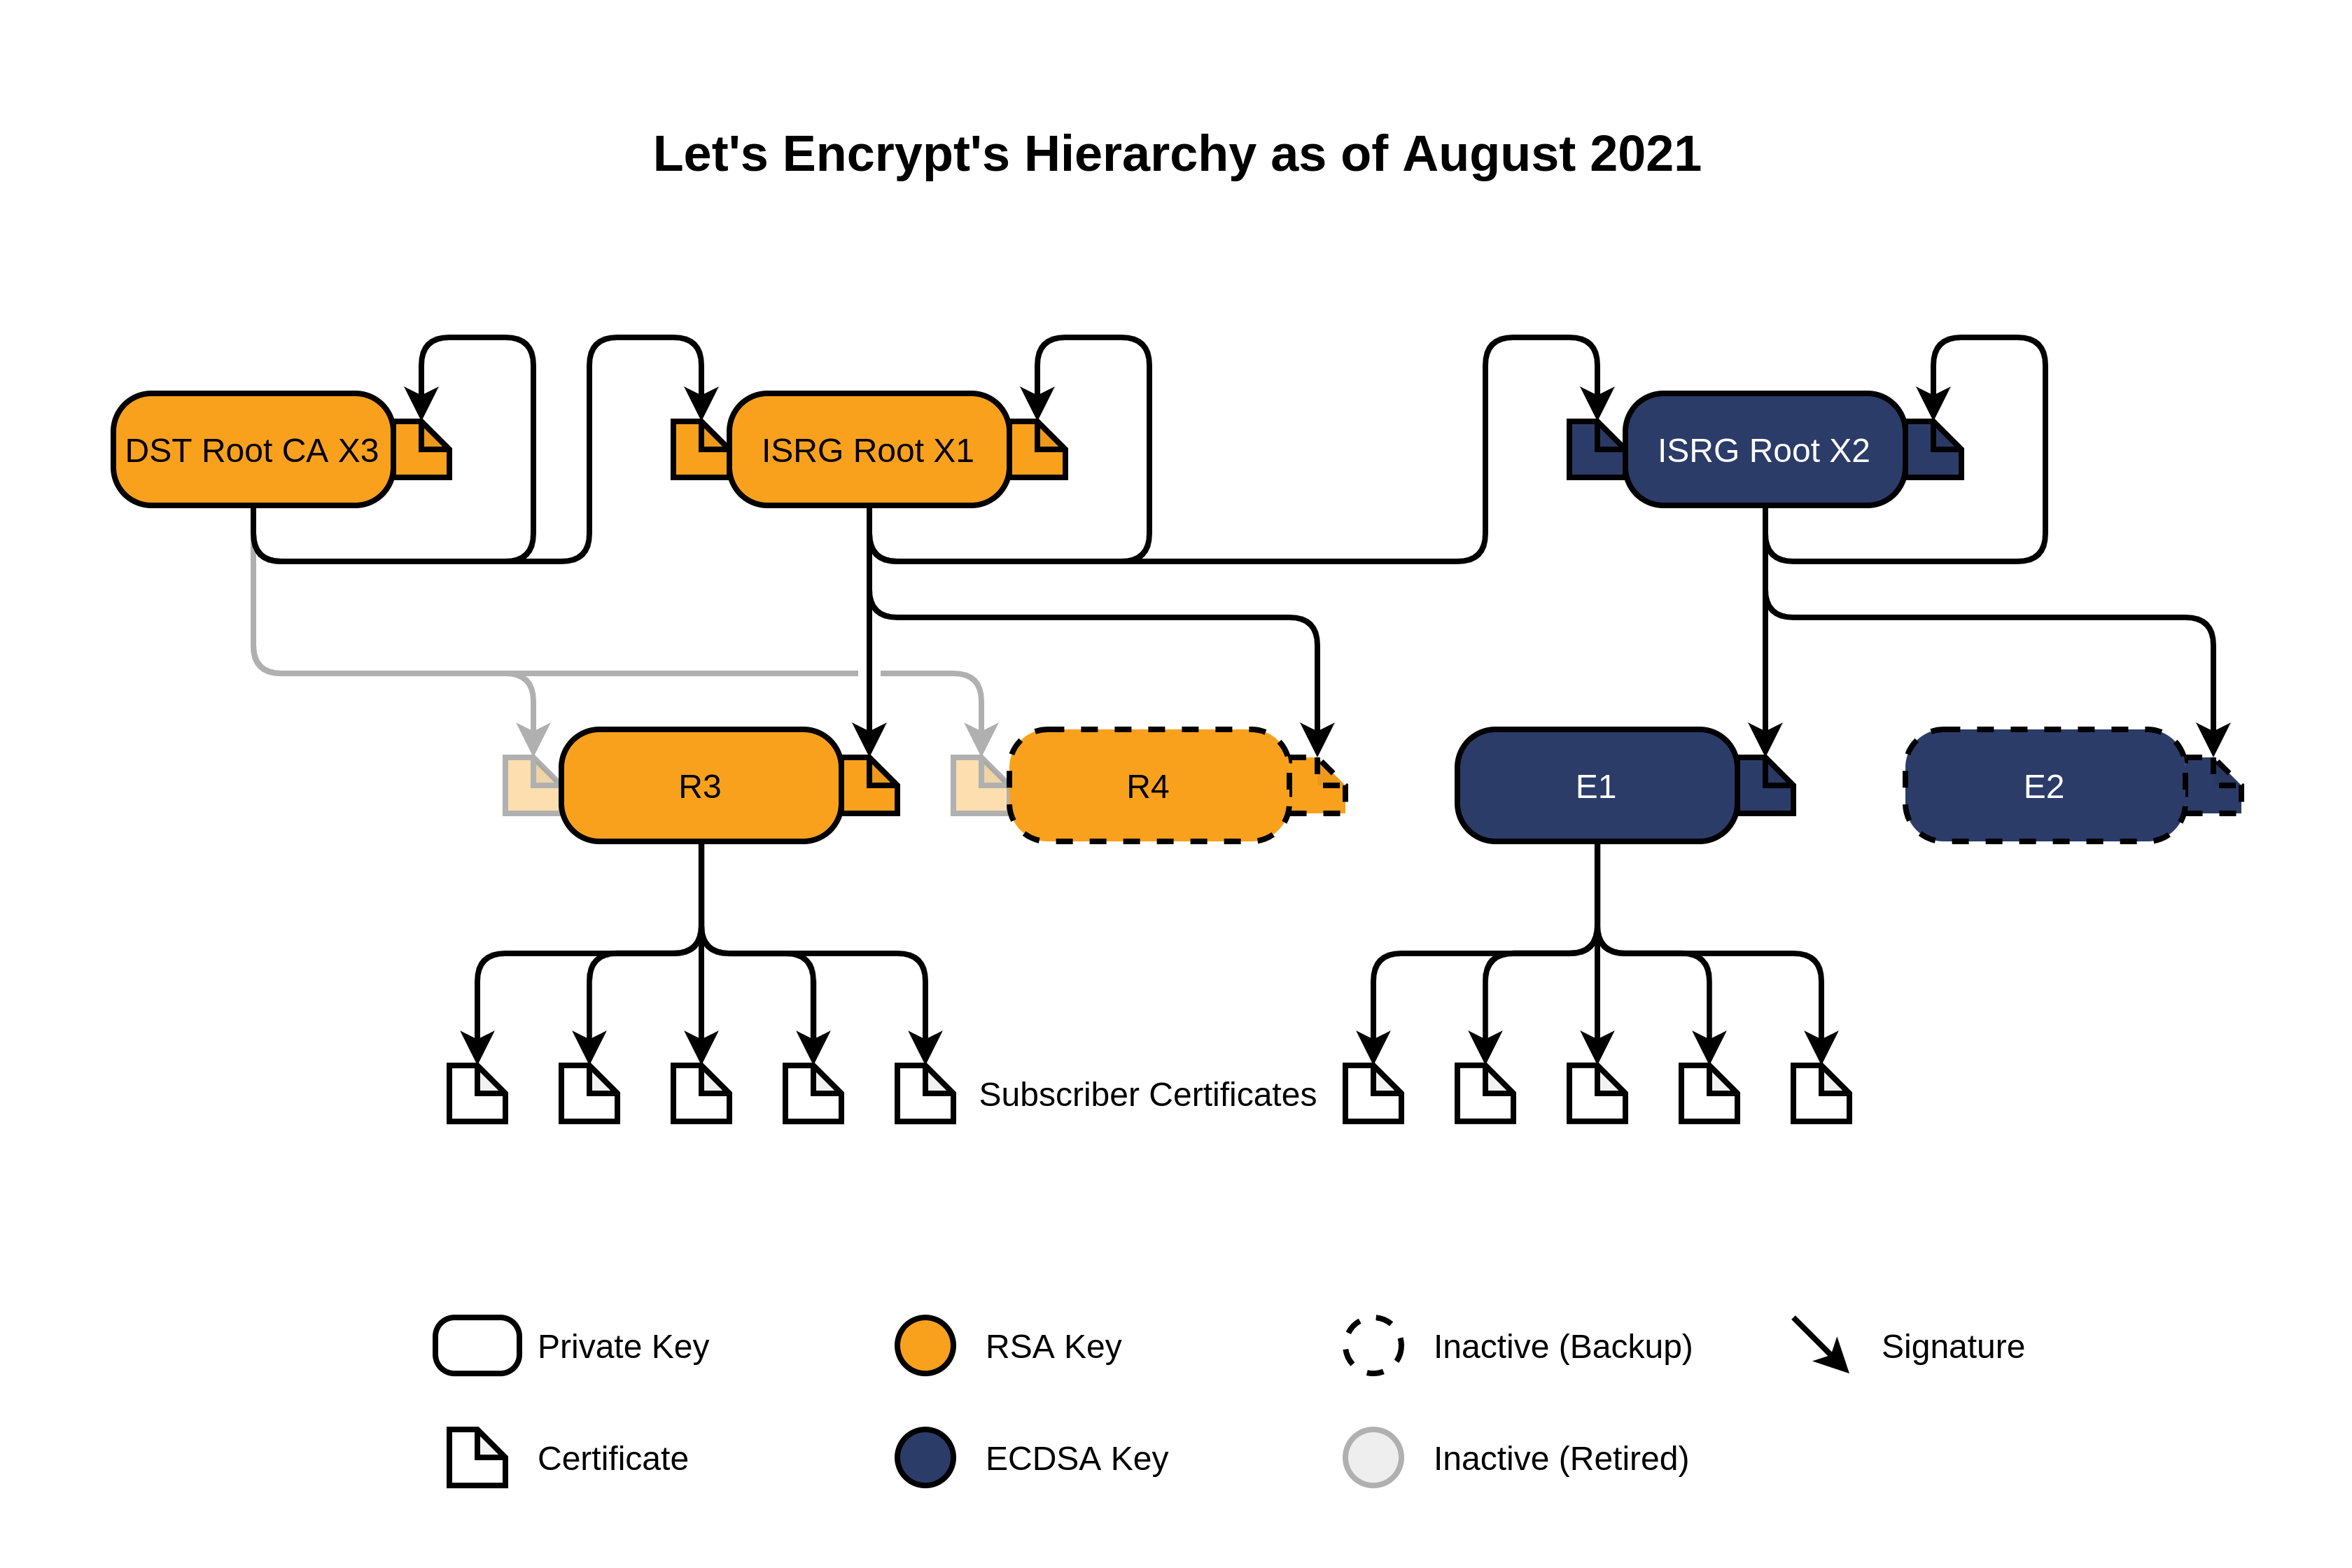
Let’s Encrypt Certificate Hierarchy
All certificates automatically issued to Mikrotik clients are signed on behalf of R3. On a Windows client OS, the R3 certificate must be installed as an «intermediate trusted certification authority» in the COMPUTER (Local Machine) storage. The most common problem when importing a certificate is usually a meter from the PC and clicks with the mouse. A By default, Windows tries to install this certificate in the user’s store, which leads to access problems.
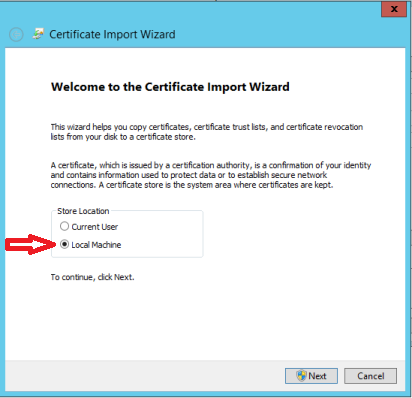
Selecting the correct store for the certificate
How key agreement protocols work
The IKE protocol can work in two modes: main (main) and aggressive (aggressive), the IKEv2 protocol contains one mode.

The first phase consists of six packages: 1-2: Negotiation of auxiliary tunnel encryption parameters and various IPSec options3-4: Information exchange for secret key generation5-6: Peer authentication using auxiliary encrypted channel
The second phase consists of three packages: 1-3: Using an encrypted auxiliary channel. Negotiation of traffic protection parameters, exchange of information to generate a secret key

The first phase consists of three packets: 1: Sending an offer to set up an auxiliary encrypted channel and information to generate a secret key 2: Response to the offer, information to generate a secret key, authentication data 3: Authentication data
In aggressive mode, the initiator sends only one set of parameters in the offer. The peer authentication information is exchanged before the secure auxiliary tunnel is established. Aggressive mode negotiates faster but is less secure.

In IKEv2, the phases are named: IKE_SA_INIT and IKE_AUTH. But if below in the text I am talking about Phase1 and Phase2, then this also applies to IKEv2 phases.
Each phase of IKEv2 consists of two packets: IKE_SA_INIT: Negotiation of auxiliary tunnel encryption parameters, exchange of information to generate a secret key
IKE_AUTH: using an encrypted auxiliary channel. Peer authentication, negotiation of traffic protection parameters, exchange of information to generate a secret key
We connect the windows client.
Create a new VPN connection.
Server name/address: specify the FQDN, your own, for which the certificate was issued (I have it gw1.mt-courses.ru)

Parameters of the created connection
If everything is done correctly, then a successful connection to the VPN should occur.
If an IKE error occurs with code 13801, then, most likely, the R3 certificate is installed incorrectly or in the wrong place in the system.
Protocols within IPSec

Globally, all the protocols that you will deal with during the configuration can be divided into two groups: key exchange protocols and data protection protocols.
Key Exchange Protocols (IKE)
The main task is to authenticate the participants in the connection and agree on the parameters and encryption keys to protect the transmitted information.
In practice, most of the IPSec connections are implemented using IKE, due to outdated equipment, or the unwillingness of administrators to change something.
Check
FTD, unfortunately, does not show as much information as we would like. you can see the status of the tunnel and possible errors along the path Devices — VPN — Troubleshooting.
From the Mikrotik side, we firstly need to see our connection in the established state on the IPsec — Active Peers tab

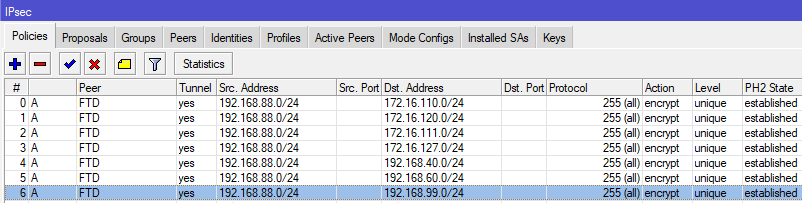
and secondly, in IPsec — Policies all policies must become A (active) and PH2 State established.
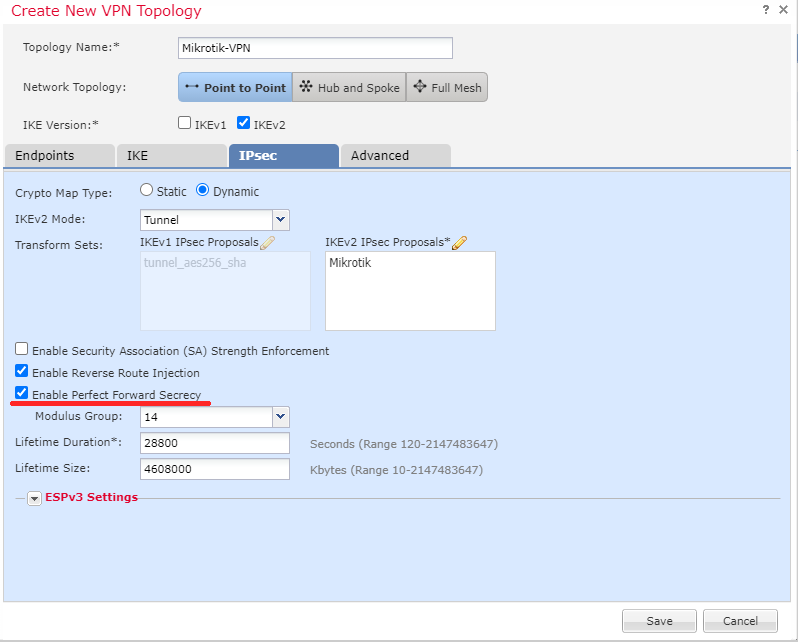
If the policies hang in the no phase 2 state, all but one, then first of all we look at the Level (unique) setting in Policies on Mikrotik and the Enable Perfect Forward Secrecy checkbox in the tunnel setting on cisco FTD.
UPD: in the comments it was suggested that a more serious protocol can be set in the DH group. For example, ecp521 from Mikrotik (group 21 from Cisco) — this practically does not affect the data transfer rate and CPU load of Mikrotik (checked).
Also, Filter Rules on Mikrotik are redundant if there are default rules (accept inout ipsec policy) that allow everything in and out of ipsec.
IPSec in Mikrotik
IPSec is available free of charge on any RouterOS device with the Security package installed.
Initial data
We have:
A few words about the analysis of IPSec logs
Logs in Mikrotik are a separate story, and sometimes they are detailed enough to analyze the problem, but the lack of commonplace features: clear, copy, find forces you to install a separate syslog server.
As for IPSec, here is a quick log analysis option (we leave only the necessary on a separate tab):

/system logging action
add memory-lines=100000 name=ipsec target=memory
/system logging
add action=ipsec topics=ipsec,error
add action=ipsec topics=ipsec,debug,!packet
add action=ipsec topics=ipsec,info
IPSec and Firewall
In the Firewall, you can check if the traffic is incoming or outgoing IPSec policy or not. The obvious use is L2TP/IPSec, you can disable the establishment of L2TP connections if the traffic has not been previously encrypted.
Protocols and ports used in IPSec
- IKE — UDP:500
- NAT-T-UDP:4500
IPSec Configuration

Peers and Peers Profiles
Configuring IPSec peers to establish an IKE connection and create an auxiliary secure tunnel.

Configuring Remote IPSec Peers

Setting up profiles (Proposals) for Phase 1 negotiation

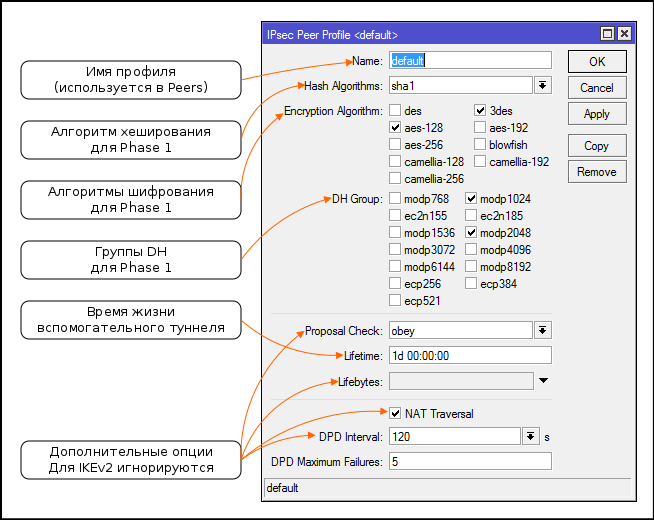

Security Associates Database (SAD)
The result of IKE (and IKEv2) are Security Assotiations (SA), which define traffic protection parameters and encryption keys. Each SA is unidirectional and an IPSec connection contains a pair of SAs. All SAs are stored in the SAD database and are available to the administrator for viewing and resetting.

IPSec provides two options for data encapsulation:
Policies and Policy Proposals
Politicians check passing packets against conditions and apply specified actions. If you return to the Packet flow, then the blocks with IPSec Policy are the reconciliation with policies. Actions set: IPSec security protocol (ESP or AH), proposals for SA negotiation, encapsulation mode.

The package goes through the policies one by one until it matches the conditions of one of them.
Policy setting

Setting up Proposals for SA negotiation


Groups
Used to link policy templates and peers.

In one of the old versions of RouterOS there was a bug with a non-working default group.
Sending and receiving IP parameters without using additional protocols. Allows you to create a self-contained Client-to-Server VPN using only IPSec tools.


Differences 6. X and 6
Depending on the version of RouterOS you are using, the IPSec configuration menu will be different.


The testing version already has new changes, so read the Release Notes before updating.

Cisco FTD (Firepower Management Center)
The firewall and NAT configuration logic from the FTD side is almost the same, but the tunnel itself is configured differently. Let’s start with him.
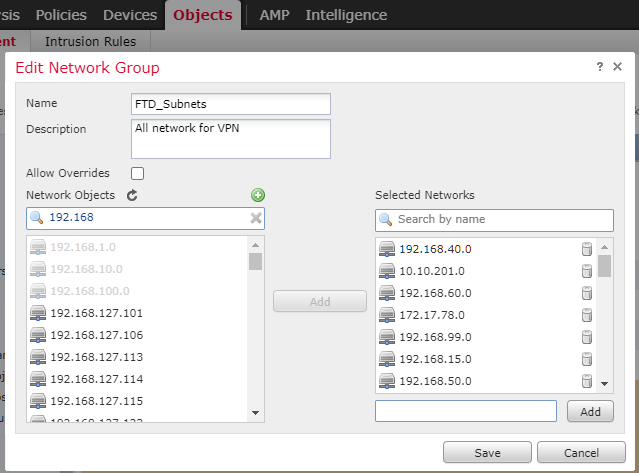
First, we need to create groups for the subnets that we send to the tunnel and which we receive.
Go to Objects — Object Management. Add Group
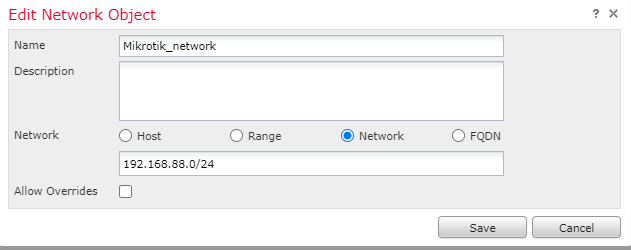
In my case, for the subnets we give it is FTD_Subnets. We add to Selected Networks all the subnets that we want to give to the tunnel. And we get one subnet, so we set it through Add network — Mikrotik_network.
Despite this, it is better to define a group even if there is only one subnet inside, since in the case of expansion it will be much easier to add a new subnet to the group than to add new rules for each object.
Let’s move on to creating a tunnel. Devices — VPN -Site to Site. Add VPN Firepower Threat Defense.
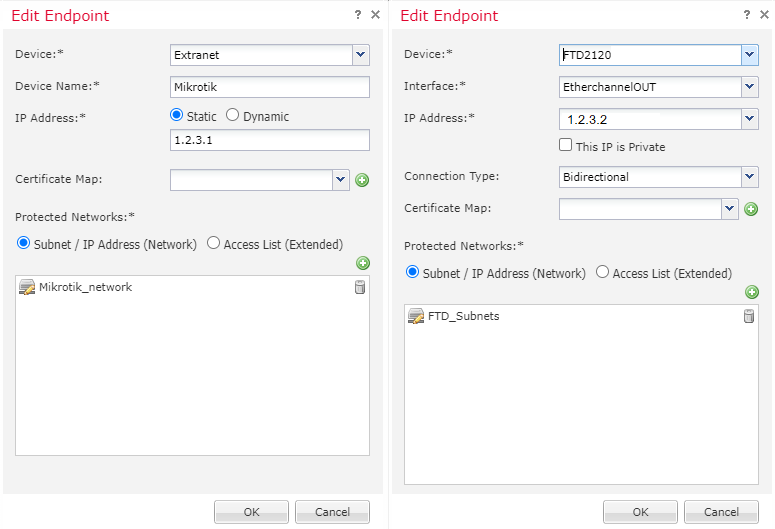
In the Endpoints tab, specify:
Node A is Mikrotik
Node B is our local FTD
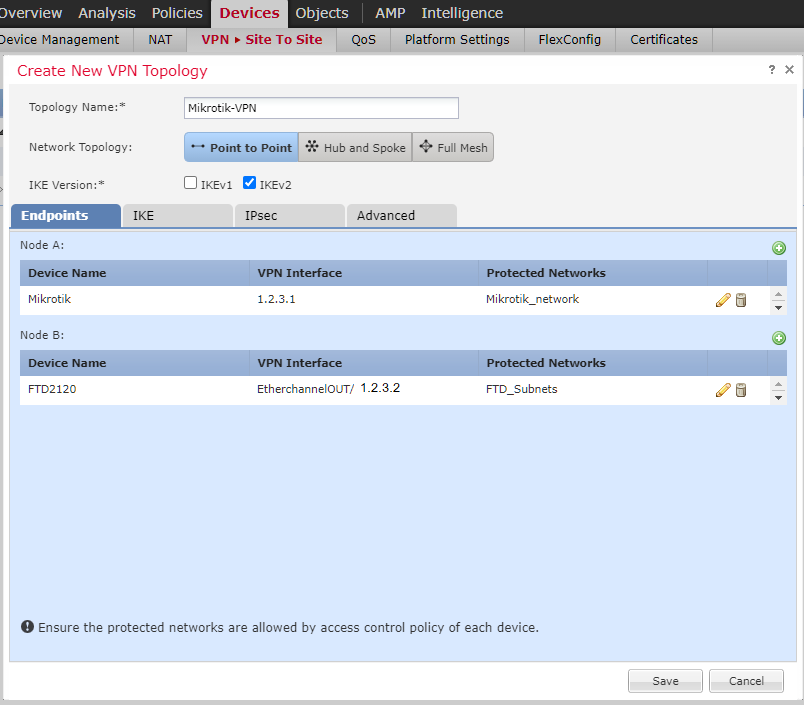
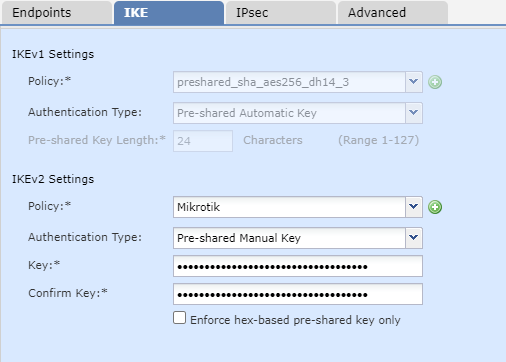
On the IKE tab, fill in IKEv2 Settings:
On the IPsec tab, fill in:
Without enabling this feature, only one Policy will be active on Mikrotik at a time. That is, only one subnet will work.
Leave all other parameters as default. Don’t forget to save the configuration.
Now we need (similarly to Mikrotik) to make NAT allow rules and exceptions.
Go to Policies — Access Control and create 2 rules
From the zone Inside to Outside, from Mikrotik_network to FTD_Subnets, Allow. Inspection and Logging can be added to taste. And the second rule, where everything is reversed.
In my case, the zone Inside_Zone is the zone behind which are all the subnets that need to be sent to the tunnel. Outside_Zone — Internet zone. If there are additional zones (DMZ, interconnects to other subnets), then you need to make rules for them.

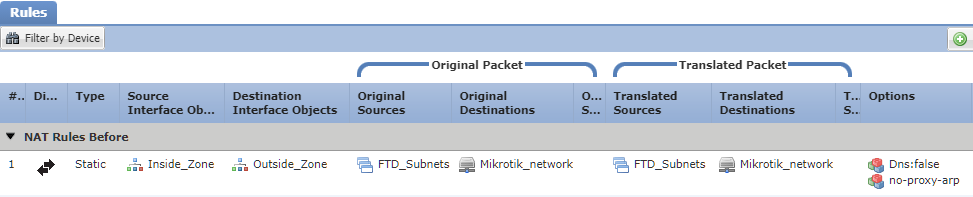
Go to Devices — NAT and create a Static, Manual NAT Rule:
Rule must be higher than NAT for local subnets.
Mikrotik (Winbox)
Starting IPsec configuration:
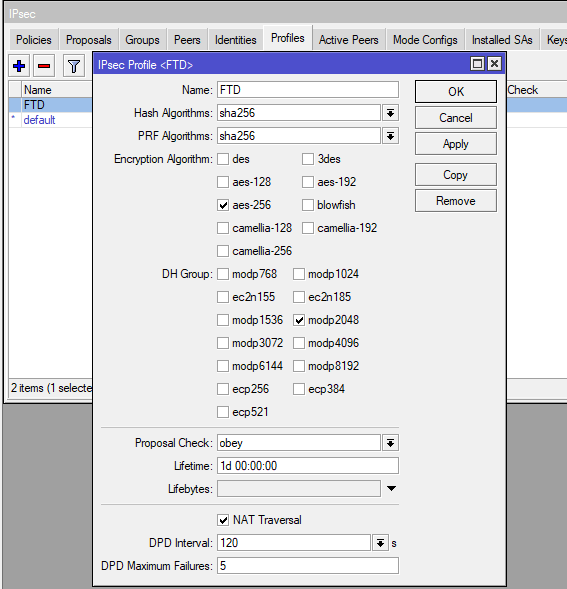
IP — IPsec — Profiles
Next, open the proposals tab
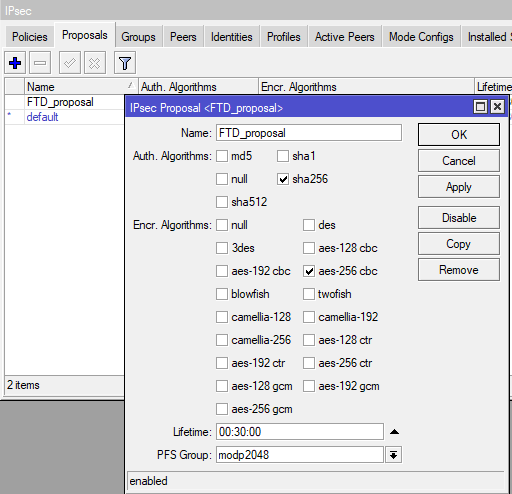
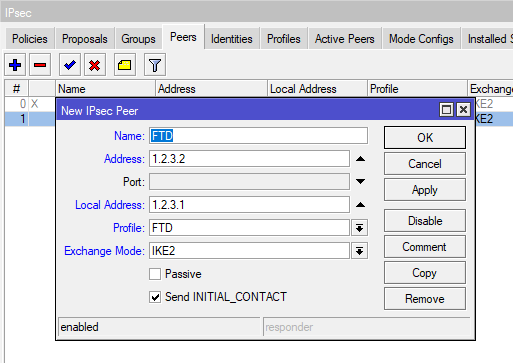
Go to the Identities tab
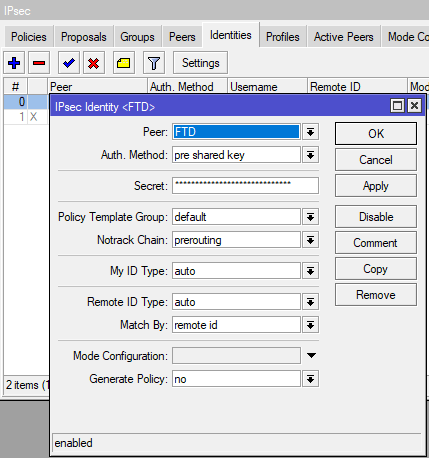
Now let’s move on to the main thing — setting Policies
The main snag in Mikrotik’s configuration is that it is possible to specify only one subnet for one policy. If we need to link 2 subnets, this is not a problem. In the case of multiple subnets from different ranges, the first difficulty arises. It is necessary to make a policy for each subnet.
On the second deposit (Actions) indicate
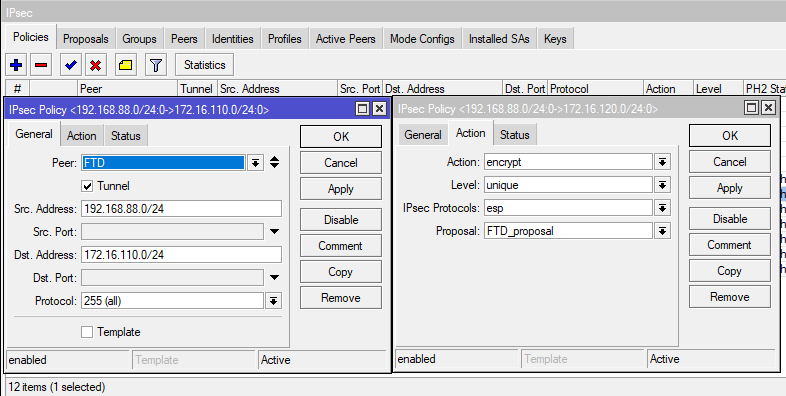
Repeat the settings for each subnet we want to add to the tunnel. From each local to each remote.
Now you need to configure the Firewall. Let’s start by creating address sheets.
IP — Firewall — Address Lists
Our task: to create 2 sheets. One — FTD_networks — with the networks that we will receive. And the second — Mikrotik_networks — with local networks on Mikrotik.
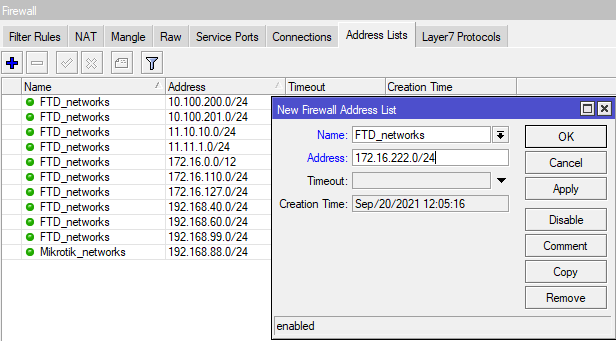
Go to the Filter Rules tab. Here we need to create allow rules for our subnets so that the router will let them through.
And the second rule, where Source and Destination Address List are swapped. Our permissive rules must be higher than those forbidding! Therefore, they need to be dragged up if they are not.
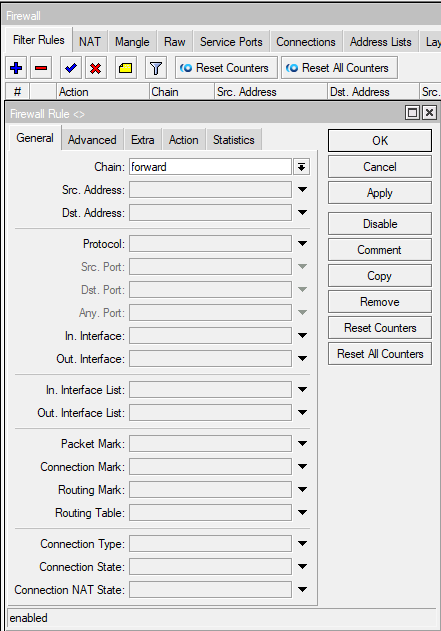
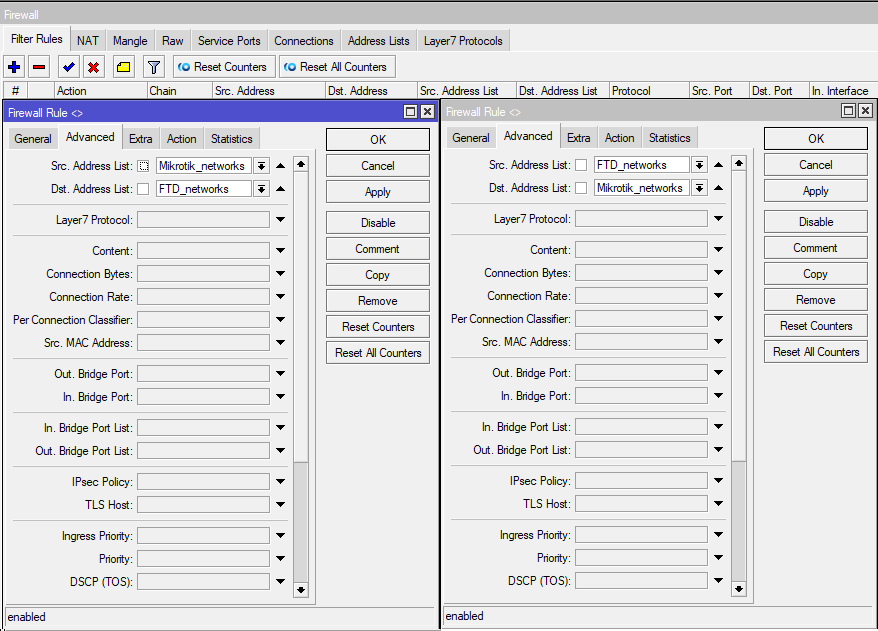
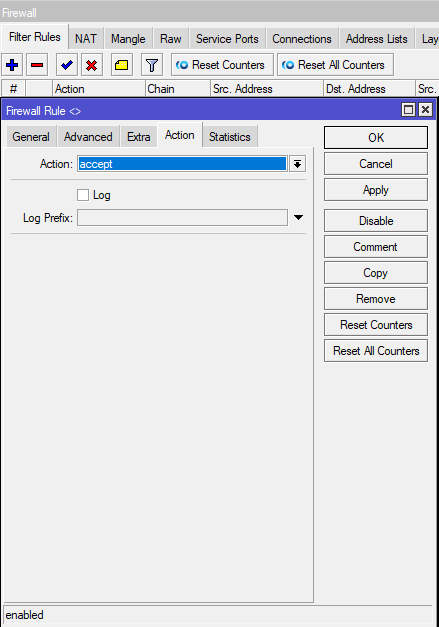
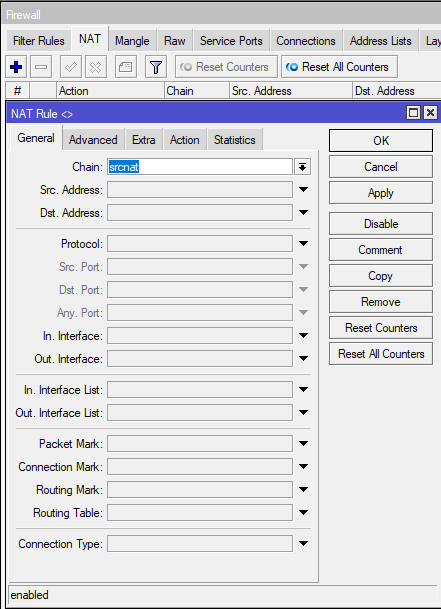
Go to the NAT tab.
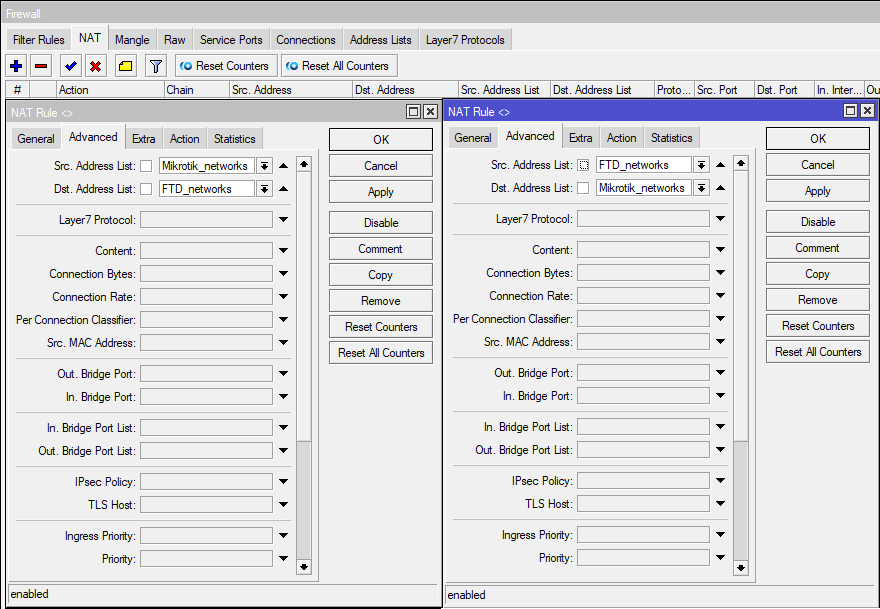
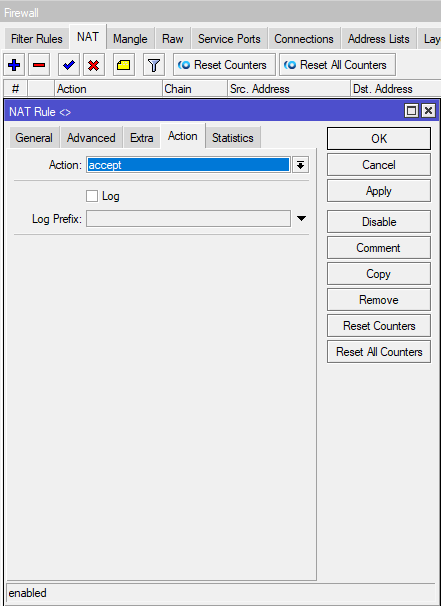
We need to make exceptions for our subnets so that they do not fly into normal NAT masquerading.
As in the filtering rules, you need to make 2 rules, swapping Source and Destination in the second one. And also, raise these rules above the masquerade rule.
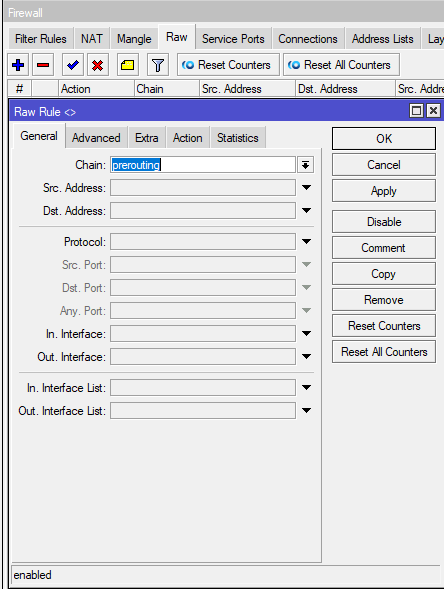
Go to the Raw tab.
Here, similarly, you need to make 2 rules for prerouting
As in the previous tabs, you need to make 2 rules, swapping Source and Destination in the second one.
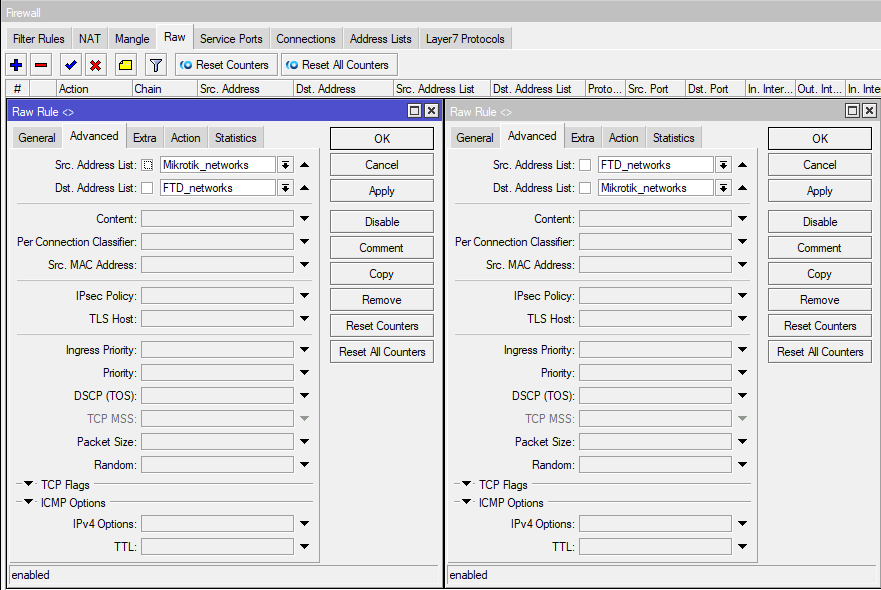
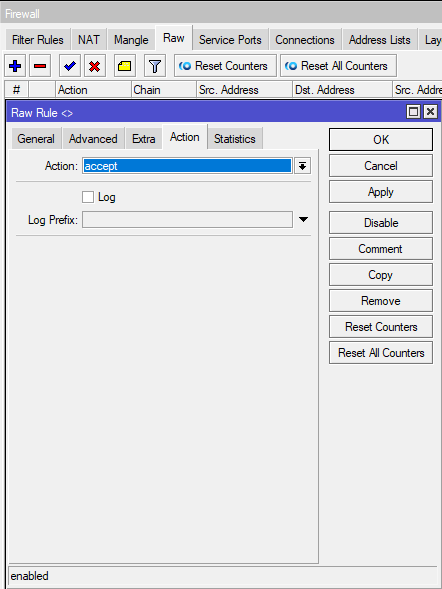
This completes the setup by Mikrotik. You can move on to the answer.
Security Policy Database (SPD)
Rule base that determines which traffic must be encrypted, data protection protocol, encapsulation type and a number of other parameters. The check position of the SPD packet can be displayed on the Packet Flow diagram.

Initially, we need to make sure that both of our parties have a «white» routable ip address. Theoretically, all this can be passed through NAT if the device is inside the network, but this complicates the configuration, and not all providers allow one-to-one NAT nowadays.
Let’s start from the side of Mikrotik. I assume that it has a fresh firmware (in my case it is 6.48.4), and it is already configured as a router with a «white» address outside.
Mikrotik local network in our case:
Cisco-side networks are a set of local subnets:
The routable address in the example for Mikrotik will be:
Routed address for Cisco:
Why all this
This note is written to make it easier for those who face the problem after me. The task seems trivial, but as usual, problems came up in the process, which had to be solved by the method of a long study of mana and endless reconfigurations. For some reason, there is very little information on the Internet on setting up Cisco Firepower Threat Defense (FTD), and even more so in conjunction with Mikrotik.
Setting up MikroTik RouterOS. Preparation
Prerequisites: The http (tcp:80) port must be open and accessible from the outside on the router. By default, the webfig service runs on this port. It is highly NOT recommended to leave access to it from the outside for everyone in a row, so you can open the port only at the time of generating / updating the certificate.
It is also desirable to have an FQDN associated with the external IP of your MikroTik. For example, gw1.mt‑courses.ru.
Certificate receipt script:
Flags: K — PRIVATE-KEY; A — AUTHORITY; I, R — REVOKED; T — TRUSTEDColumns: NAME, COMMON‑NAME
0 K T letsencrypt‑autogen_2023–xx–xxThh:mm:ssZ gw1.mt‑courses.ru
Obtaining and installing additional user-manager package on MikroTIk
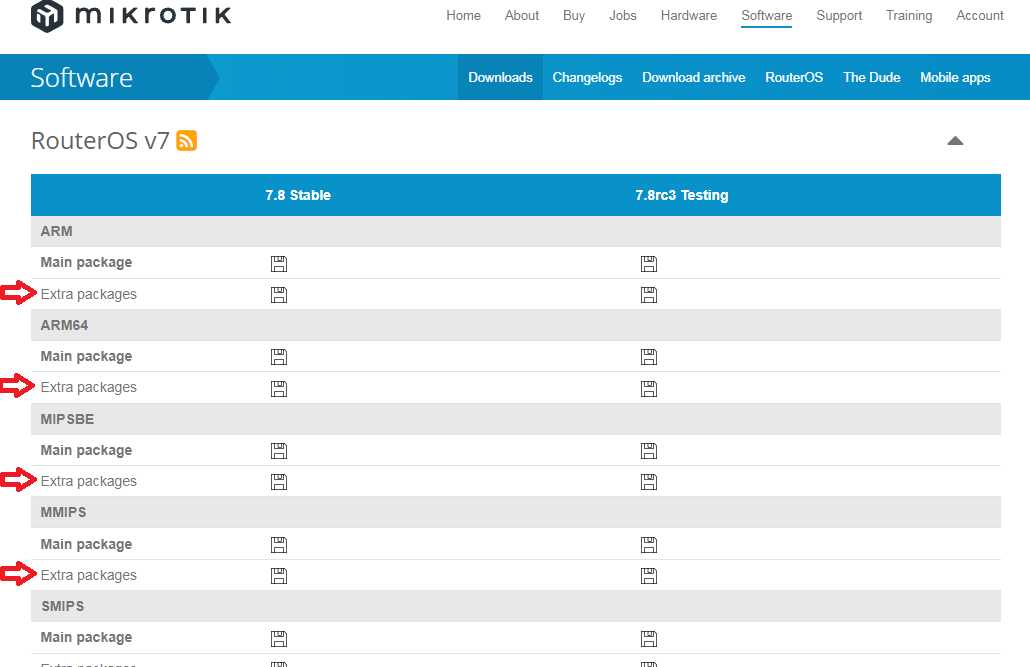
Appearance of the download page for RouterOS version 7 packages
Please note that the package version number exactly matches the installed version of RouterOS! It is not possible to install packages of a version that differs from the version of the operating system installed on the router.
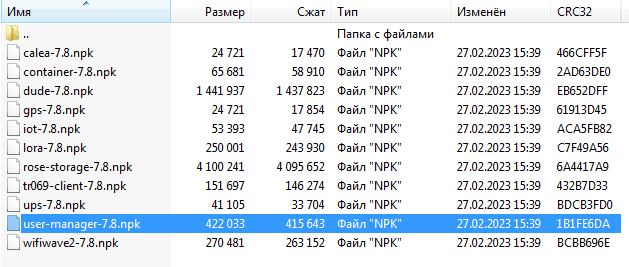
Extra-packages contents
This file must be extracted from the archive, copied to the root of the file system of the MikroTik router and rebooted (/system reboot ).
IKEv2 setup
Now let’s move on to the most basic, actually setting up the VPN access server via the IKEv2 protocol. Since when a client connects, it is allocated a certain virtual IP address, we first need to create an address pool for connected clients:
/ip/pool add name=vpn-pool ranges=192.0.2.1–192.0.2.254
Let’s go directly to the IPSec settings. Setting up IPSec requires creating multiple entities:
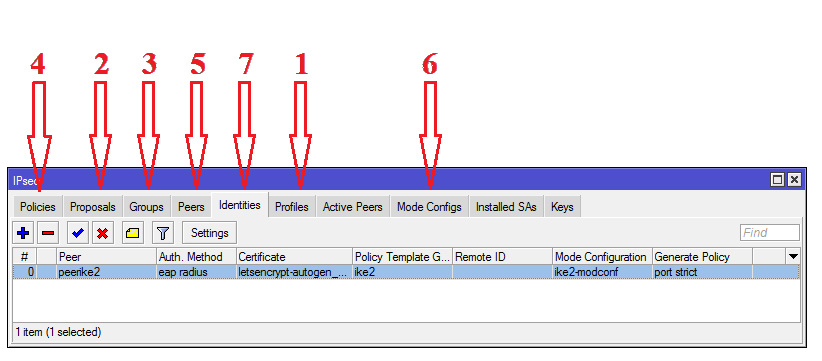
IPSec setup items in the Winbox menu
Group is used as a tag for linking Identity and Policy Template to generate individual Policies from a template when a client connects. In essence, Identity is what gathers all the settings together when the client connects to the server. Therefore, Identity is configured last, when the rest of the parameters are created.
Here I want to give you advice: Never. N-and-to-o-g-d-a, without urgent need, do not change profiles with the name “Default” in RouterOS, unless you know exactly how this will affect further work. Winbox always has the ability to create a copy of a profile and experiment with the copy. The console also has such an option — the «copy-from=» keyword.
1,2) For clarity, let’s create copies of the existing Proposal and Profile. At the same time, disable in Proposal PFS:
/ip/ipsec/proposal
print
add copy-from=0 name=proposal-ike2 pfs-group=none
/ip/ipsec/profile
print
add copy-from=0 name=profile-ike2

New parameter sets for IKEv2
3) Create a separate Group for Policy:
/ip ipsec policy group add name=ike2
Group for policy generation
4) Create a Policy Template for connected peers that received an address from the pool 192.0.2.0/24:
/ip/ipsec/policy add dst-address=192.0.2.0/24 group=ike2 proposal=proposal-ike2 src-address=0.0.0.0/0 template=yes
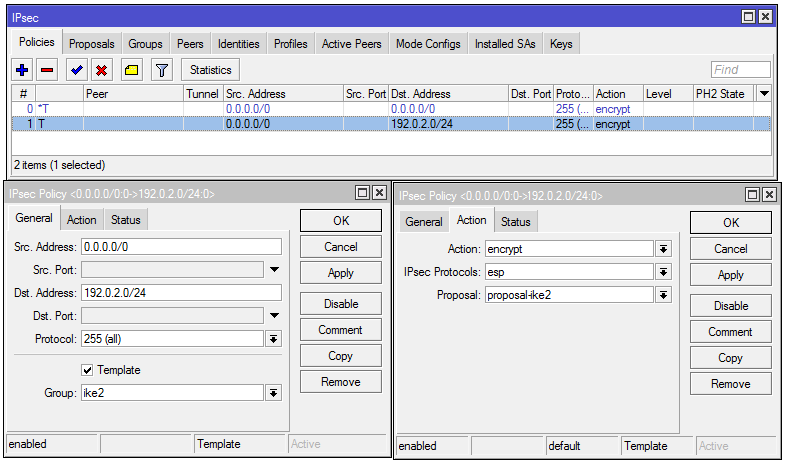
New Ploicy Template references Proposal from step 1 and Group from step 3
5) Create a peer (client) template:
/ip/ipsec/peer add exchange-mode=ike2 name=peerike2 passive=yes profile=profile-ike2
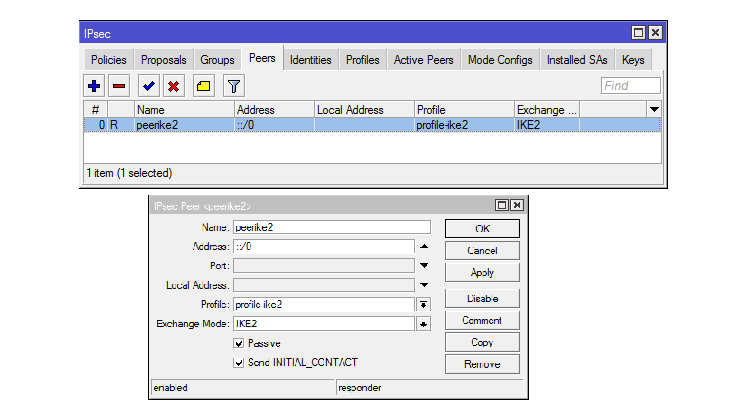
Template for peer refers to Profile from step 1
6) Create mode‑config. This is a set of parameters that will be passed to the client, including the DNS server address and routes to local networks. In the example, the route to the local network 10.10.4.0/24 is sent to the client:
/ip/ipsec/mode-config
add address-pool=vpn-pool name=ike2-modconf split-include=10.10.4.0/24 system-dns=yes
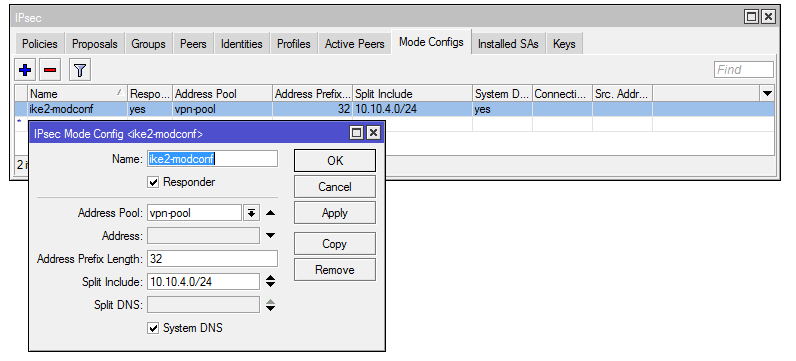
New modeconf with options to pass to the client. Refers to Pool
7) Create the final identity. In it, we will also use the link to the received certificate from Let’s Encrypt:
/ip/ipsec/identity
add auth-method=eap-radius certificate=letsencrypt-autogen_2023-xx-xxThh:mm:ssZ generate-policy=port-strict mode-config=ike2-modconf peer=peerike2 policy-template-group=ike2
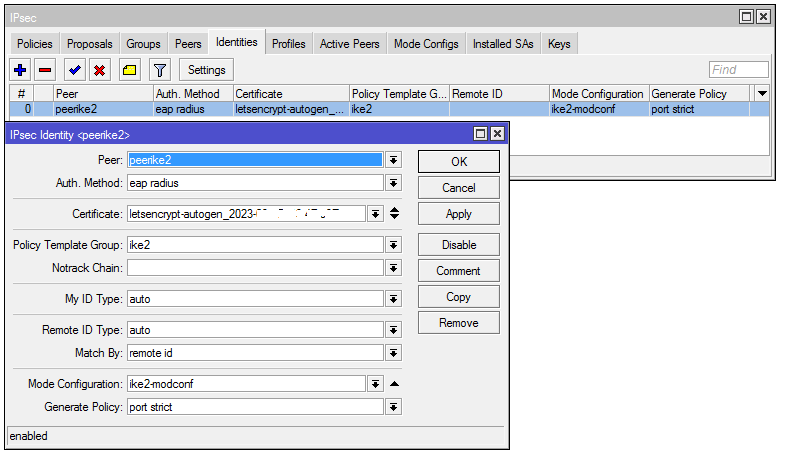
Identity refers to Radius, Group, Modeconf and Let’s Encrypt certificate

Let’s Encrypt intermediate certificate can be specified directly as part of IPSec Identity
/radius
add address=127.0.0.1 secret=MySuperPass1234 service=ppp,ipsec
/radius incoming
set accept=yes

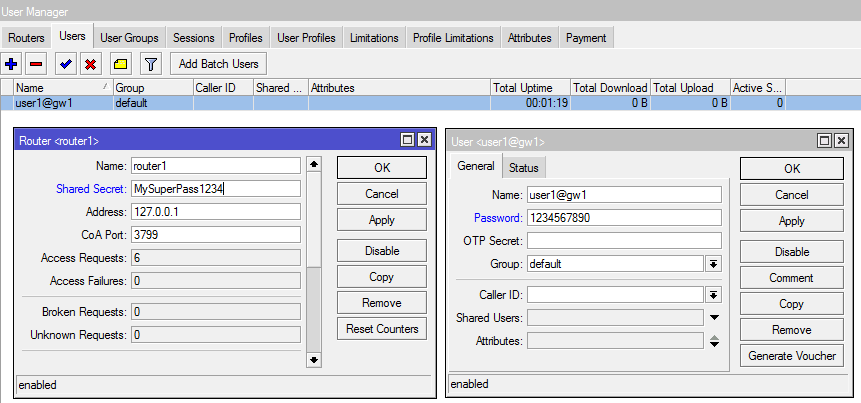
Access description for vpn server and one user
And a couple of examples of typical IPSec configuration problems
Proposals matching problem on Phase1

Problem negotiating proposals IKE_SA_INIT
In the logs you will see something like this:

In the request, you can see the proposals from the peer:

In the response, we see that no suitable proposals were found:

Proposals negotiation problem for SA

The router prompts about the proposals error on phase2 and shows what is configured locally and what is remote.
Proposals IKE_AUTH negotiation issue
We see that the connection and authentication of peers has occurred, but further error proposals. You won’t see details in debug, nor in wireshark (IKE_AUTH traffic is encrypted).
PSK authentication error
Wrong IKE mode

We see that Phase1 breaks by timeout, although packets between peers go. But the size of the incoming packet is much larger, if analyzed through wireshark, we will see that the remote peer is using aggressive mode.
We see that packets from us are sent to UDP:500, and they arrive on UDP:4500, and quite large ones. Here the remote peer has IKEv2 mode.
And finally, read the troubleshooting section of the wiki. And all the material about IPSec is desirable for review, I described only the basic set of tools and settings.
Advantages and disadvantages of IPSec
The main task is to protect user data.
How to establish an IPSec connection

Participants of an IPSec connection are usually called peers, which indicates their equivalence in the connection being established. A configuration close to client-server is possible, but when building permanent IPSec tunnels, any of the peers can be an initializer.
One of the key concepts in IPSec is SA (Security Association) — this is a set of encryption and hashing algorithms agreed by peers, as well as encryption keys.
Sometimes you can find a division into:
IPSec and Endpoints
I did not find any information about the client built into android vpn, but in general it works with proposals from windows. Android does not support IKEv2, you must use StrongSwan.
Scheme and basic configuration for examples with Site-to-Site tunnels:

add address=10.10.10.10/24 interface=ether1 network=10.10.10.0
add address=192.168.100.1/24 interface=ether2 network=192.168.100.0
/ip firewall nat
add action=masquerade chain=srcnat out-interface=ether1
add distance=1 gateway=10.10.10.1 dst-address=0.0.0.0/0
add address=10.20.20.20/24 interface=ether1 network=10.20.20.0
add address=192.168.200.1/24 interface=ether2 network=192.168.200.0
add distance=1 gateway=10.20.20.1 dst-address=0.0.0.0/0
IPSec in tunnel mode


#1
/ip ipsec peer profile
add dh-group=modp2048 enc-algorithm=aes-128 hash-algorithm=sha256 name=ipsec-tunnel-ike nat-traversal=no
#2
/ip ipsec peer
add address=10.20.20.20/32 exchange-mode=ike2 profile=ipsec-tunnel-ike secret=test-ipsec
#3
/ip ipsec proposal
add auth-algorithms=sha256 enc-algorithms=aes-256-cbc name=ipsec-tunnel-sa
#4-5
/ip ipsec policy
add dst-address=192.168.200.0/24 proposal=ipsec-tunnel-sa sa-dst-address=10.20.20.20 sa-src-address=10.10.10.10 src-address=192.168.100.0/24 tunnel=yes
#6
/ip firewall nat
set 0 ipsec-policy=out,none

/ip ipsec peer profile
add dh-group=modp2048 enc-algorithm=aes-128 hash-algorithm=sha256 name=ipsec-tunnel-ike nat-traversal=no
#2
/ip ipsec peer
add address=10.10.10.10/32 exchange-mode=ike2 profile=ipsec-tunnel-ike secret=test-ipsec
#3
/ip ipsec proposal
add auth-algorithms=sha256 enc-algorithms=aes-256-cbc name=tets-ipsec-sa
#4-5
/ip ipsec policy
add dst-address=192.168.100.0/24 proposal=tets-ipsec-sa sa-dst-address=10.10.10.10 sa-src-address=10.20.20.20 src-address=192.168.200.0/24 tunnel=yes
#6
/ip firewall nat
set 0 ipsec-policy=out,noneWhat does NAT have to do with it?
To work in tunnel mode, a fake route to the remote subnet is required, or a default route, otherwise the packets will not go beyond the Routing decision. There are usually no problems with the first option, but there will be problems with the default route and Source NAT (the first and second are present on the vast majority of home and office routers).
Remember Packet Flow. Packets traverse Source NAT before IPSec policies, the rule with masquerade knows nothing about what traffic is intended to be sent to the «ephemeral» tunnel and will translate the headers of packets to be sent to IPSec when a packet with a changed header gets checked in Policies for the source address in header will not match the rule and the packet will fly to the default route, which, having seen the destination address from the private network, will most likely discard it.
There are several solutions to the problem:


IPIP tunnel preset:
#Mikrotik1
#Configuring the ipip interface
/interfaceipip
add allow-fast-path=no clamp-tcp-mss=no name=ipip-vpn remote-address=10.20.20.20
#Set ip address on ipip interface
/ip address
add address=10.30.30.1/30 interface=ipip-vpn
#Static route to remote subnet
/ip route
add distance=1 dst-address=192.168.200.0/24 gateway=10.30.30.2
#Mikrotik2
#Everything is the same, only addresses and subnets change
/interfaceipip
add allow-fast-path=no clamp-tcp-mss=no name=ipip-vpn remote-address=10.10.10.10
/ip address
add address=10.30.30.2/30 interface=ipip-vpn
/ip route
add distance=1 dst-address=192.168.100.0/24 gateway=10.30.30.1
IPSec step-by-step configuration:

#1
/ip ipsec peer profile
add dh-group=modp2048 enc-algorithm=aes-128 hash-algorithm=sha256 name=ipsec-tunnel-ike nat-traversal=no
#2
/ip ipsec peer
add address=10.20.20.20/32 exchange-mode=ike2 profile=ipsec-tunnel-ike secret=test-ipsec
#3
/ip ipsec proposal
add auth-algorithms=sha256 enc-algorithms=aes-256-cbc name=ipsec-tunnel-sa
#4-5
/ip ipsec policy
add dst-address=10.20.20.20/32 proposal=ipsec-tunnel-sa protocol=ipencap src-address=10.10.10.10/32 sa-dst-address=10.20.20.20 sa-src-address=10.10.10.10

#1
/ip ipsec peer profile
add dh-group=modp2048 enc-algorithm=aes-128 hash-algorithm=sha256 name=ipsec-tunnel-ike nat-traversal=no
#2
/ip ipsec peer
add address=10.10.10.10/32 exchange-mode=ike2 profile=ipsec-tunnel-ike secret=test-ipsec
#3
/ip ipsec proposal
add auth-algorithms=sha256 enc-algorithms=aes-256-cbc name=tets-ipsec-sa
#4-5
/ip ipsec policy
add dst-address=10.10.10.10/32 proposal=tets-ipsec-sa protocol=ipencap src-address=10.20.20.20/32 sa-dst-address=10.10.10.10 sa-src-address=10.20.20.20
For the inattentive, the real difference between tunnel and transport mode configuration in IPSec Policies is:

Connection test is similar to tunnel mode.
L2TP/IPSec
The previous examples work well for creating a permanent VPN between two peers, with static external IP addresses.
If the address of one of the peers is dynamic (and usually located behind a NAT), you must use a different Client-to-Server VPN.
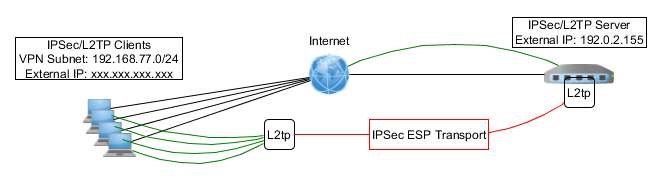
L2TP pre-configuration:
Why am I ignoring IPSec autoconfiguration
In the configuration of ipip,gre,eoip,l2tp, there is autoconfiguration of ipsec connections, in fact the system creates dynamic rules for Peers and Policies for you, but firstly, we are not looking for easy ways, and secondly, when upgrading from 6.42 to 6.43 automatically created tunnels broke and it is not a fact that this will not happen again.

There is an error in the screenshot — specify dst. port and src. port not needed
#1
/ip ipsec policy group
add name=l2tp-ipsec
#2
/ip ipsec peer profile
add dh-group=modp1024 enc-algorithm=aes-256 hash-algorithm=sha256 name=l2tp-ipsec-ike
#3-4
/ip ipsec peer
add address=0.0.0.0/0 generate-policy=port-strict passive=yes policy-template-group=l2tp-ipsec profile=l2tp-ipsec-ike secret=secret-ipsec-pass send-initial-contact=no
#5
/ip ipsec proposal
add auth-algorithms=sha256,sha1 enc-algorithms=aes-256-cbc,aes-128-cbc name=l2tp-ipsec-sa pfs-group=none
#6-7
/ip ipsec policy
add dst-address=0.0.0.0/0 group=l2tp-ipsec proposal=l2tp-ipsec-sa protocol=udp src-address=0.0.0.0/0 template=yes
Firewall configuration to create L2TP connections only after IPSec
/ip firewall filter
#Allow IKE, NAT-T and ipsec-esp
add chain=input protocol=17 dst-port=500,4500 action=accept
add chain=input protocol=50 action=accept
#Allow L2TP only if there is an ipsec policy for this traffic
add chain=input protocol=17 dst-port=1701 ipsec-policy=in,ipsec action=accept
add chain=input protocol=17 dst-port=1701 action-drop
IKEv2 VPN
The L2TP option is popular, but thanks to mode config, you can set up a VPN server using only IPSec. This is a promising type of VPN, but so far rarely used, so in addition to the server-side configuration, I will give an example of setting up a strongSwan client on android.

Of course, not everything is so rosy. Most «user» operating systems (in particular Windows and Android) agree to work with such a VPN only if they are authenticated by certificates or EAP.
Предварительная генерация сертификатов:
Пошаговая конфигурация IKEv2 VPN:

#1
/ip pool
add name=pool-ike ranges=192.168.77.10-192.168.77.20
#2
/ip ipsec mode-config
add address-pool=pool-ike address-prefix-length=32 name=ikev2-vpn static-dns=77.88.8.8 system-dns=no
#3
/ip ipsec policy group
add name=ikev2-vpn
#4
/ip ipsec peer profile
add enc-algorithm=aes-256,aes-128 hash-algorithm=sha256 name=ikev2-vpn
#5-6
/ip ipsec peer
add address=0.0.0.0/0 auth-method=rsa-signature certificate=vpn exchange-mode=ike2 generate-policy=port-strict mode-config=ikev2-vpn passive=yes policy-template-group=ikev2-vpn profile=ikev2-vpn send-initial-contact=no
#7
/ip ipsec proposal
add auth-algorithms=sha256,sha1 enc-algorithms=aes-256-cbc,aes-128-cbc name=ikev2-vpn
#8-9
/ip ipsec policy
add dst-address=0.0.0.0/0 group=ikev2-vpn proposal=ikev2-vpn src-address= 0.0.0.0/0 template=yes
Конфигурация strongSwan на android.
Если соединение прошло успешно появятся: динамическая политика, запись в remote Peers и пара SA.


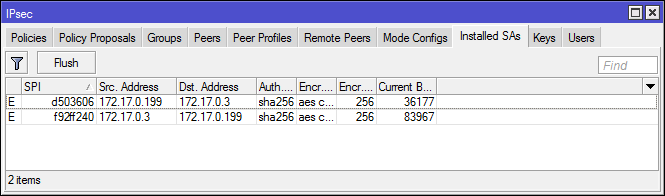
У RouterOS x86 demo лицензии нет ограничений на число IPSec туннелей, включая IKEv2 VPN. Можно развернуть RouterOS x86 demo (не путайте с RouterOS CHR free, там все грустно) на VPS и получить личный VPN сервер с минимальным напрягом по администрированию, без покупки лицензии на RouterOS или RouterOS CHR.
