

Trying to plant seeds in Valheim? Farming is a great way to stock up on food while you focus on other tasks. But this takes time, you will not be able to harvest immediately. Planting seeds and building a farm requires advanced equipment that you won’t be able to get until you’ve played at least a few hours. However, you can find seeds everywhere in the early stages of the game, so be sure to save them to plant when you get the tools you need.
In my recent article “How to encrypt Kubernetes secrets with Mozilla SOPS”, I demonstrated how to encrypt regular Kubernetes secret manifests (yaml) using SOPS CLI in conjunction with Azure Key Vault as the backend for the encryption-key.
This post will take it one step further; it guides you through the process of creating a custom Helm chart that will reference encrypted secrets. In the end, you will be able to add your encrypted secrets to source control without leaking sensitive information.
We will again deploy a simple Web API to expose all environment variables via HTTP for demonstration purposes.
Time to read
Helm is one of the most popular package managers for Kubernetes. To get acquainted with it is useful for any DevOps engineer and everyone who is faced with the tasks of deploying applications. This two-part mini-series can be seen as a short but fairly complete introduction to Helm. In the first part, let’s talk about the Helm architecture and some typical tasks that it allows you to solve. In particular, application customization and code reuse.
The code fragments in the article are specially given in the form of pictures — this allowed us to highlight the lines that are important to us. But for your convenience, I have collected all the examples in this repository just in case.
Based on your request, these examples may contain coarse language.
Based on your request, these examples may contain colloquial vocabulary.
- Offers
- Sentences that contain Helm
- Architecture and basic concepts of Helm
- Destination Helm
- Where to find flax seeds
- Where to find fir seeds
- Create a custom Helm chart
- Where to find beech seeds
- Deploy the application to Kubernetes
- Можно ли посадить древнее семя
- Где найти семена сосны
- Возможности Helm
- Где найти семена ячменя
- Install the helm-secrets plugin
- Test the deployment
- Helm alternatives
- Typical tasks of a YAML developer
- How to plant seeds
- Conclusion
- Reference encrypted secrets
Offers
The extraction of dissidents was rehearsed in Jade Helm 15 and 16.
Extraction of dissidents was rehearsed in the Jade Helmet exercises 15 and 16.
Without the Helm I’m helpless.
And without a helmet, you’re in vain.
As a result of this colossal failure, having to disband the Jade Helm structure, the US military reacted.
Due to this colossal failure, having to disband the Jade Helmet structure, the US military reacted.
Helm of the Veteran: Increases the health and armor of the character that equips it.
Veteran’s Helm: Increases the health and armor of the character wearing it.
Helm of the Distinguished Imperial Officer: Friendly units within the area are healed and have their energy restored when you kill an enemy.
Helmet of the Distinguished Officer of the Imperium: When you kill an enemy, allies in the area of effect are healed and restored energy.
Helm saves $252,000 yearly by working with digital inventory control.
Helm saves $252,000 a year with digital inventory management.
I thought you were Matt Helm.
But I think it was Matt Murray’s helmet.
Nothing found for this value.
Sentences that contain Helm
Results: . Exact matches: . Elapsed time: ms
Architecture and basic concepts of Helm
Helm 2 and Helm 3 versions are currently relevant, and the latter, unlike the previous one, does not have a server component (Tiller). It’s basically just a Go binary, with Helm 3 being much more lightweight and split-rights friendly.
Helm 3 architecture is shown in the diagram:

Helm 3 works like this:
This scheme is called 3-way merge. In this way, Helm will bring the application configuration to the state that is described in git, but will not touch other changes. That is, if you have some kind of entity in your cluster that transforms your primitives (for example, Service Mesh), then Helm will treat them carefully.
Now let’s go through the basic concepts of Helm.
1. Helm chart
Files have different structure and purpose. For example, Chart.yaml describes the main chart parameters. Here is the official Chart.yaml minio:
It contains many arbitrary descriptive fields, but the necessary and sufficient condition is to specify only name and version. If you want to dig deeper, you are here.
2. Chart Repository
A fairly simple entity, actually a web server, at the root of which is index.yaml with a description of the charts and the packed .tgz charts themselves.
In principle, you can manage the repository manually using Helm commands. Although there is software that provides a quick start and visual interfaces to facilitate work. For example:
You can dig deeper here.
3. Helm Release, Helm Values
Helm Release is generated from the Chart using the input values (Values):
Chart + Values = Release
Using the helm list command, we can view the releases installed in a particular Kubernetes Namespace.

Releases are associated with the concept of Release backend — the place where Helm stores and versions the releases submitted for deployment.
This could be configmap/secret/SQL. By default, this is secret — Helm creates an object of this type (which stores JSON wrapped in gzip + Base64) for each release in the Namespace where it installs it. Although he can do it, for example, in a SQL database.

Destination Helm
A modern application is a complex product with many internal components and external links.

At the same time, most often we have several working environments, which can differ quite a lot from each other both in the number of components and connections, and in their quality.
In addition, in today’s world of microservices and sawn monoliths, we can have much more than one project.

I want to manage this complex economy in the simplest, most versatile and least expensive way. Therefore, the attitude towards choosing the right deployment tool and building a technical discipline around it varies from good practice to a necessary condition for survival.
Helm Package Manager has become such a tool for many.

Where to find flax seeds
Creating a tiller is the most difficult part of the whole process. You will not be able to craft it until you have made significant progress in the game, so you will not be able to create a farm at the very beginning of the game. It takes 5 Bronze Ingots and 5 Solid Wood to craft a Tiller. These materials can be difficult to find.
First of all, you must build a smelter (details of construction can be found in a separate guide). This requires 5 units of surtling cores and 20 units of stone. The stone is quite easy to find, they are scattered throughout the game world.
Surtling Cores can be found in the Burial Chambers in the Black Forest biome, but only after you defeat the first boss of the game, Eikthyr.
After the Smelter is built, you need to gather materials to build the Forge. The forge requires 6 Copper Bars, 4 Stone, 4 Coal and 10 Wood.
Preparing resources for crafting a tiller
Now it’s time to get solid wood (Core Wood). It can be found while cutting Pine Trees in the Black Forest biome. Pine trees are incredibly tall, with most of their branches at the top, so they are very easy to spot.
Where to find fir seeds
This article assumes that you’ve installed Helm CLI and access to an instance of Azure Key Vault as described in the “How to encrypt Kubernetes secrets with Mozilla SOPS” article.
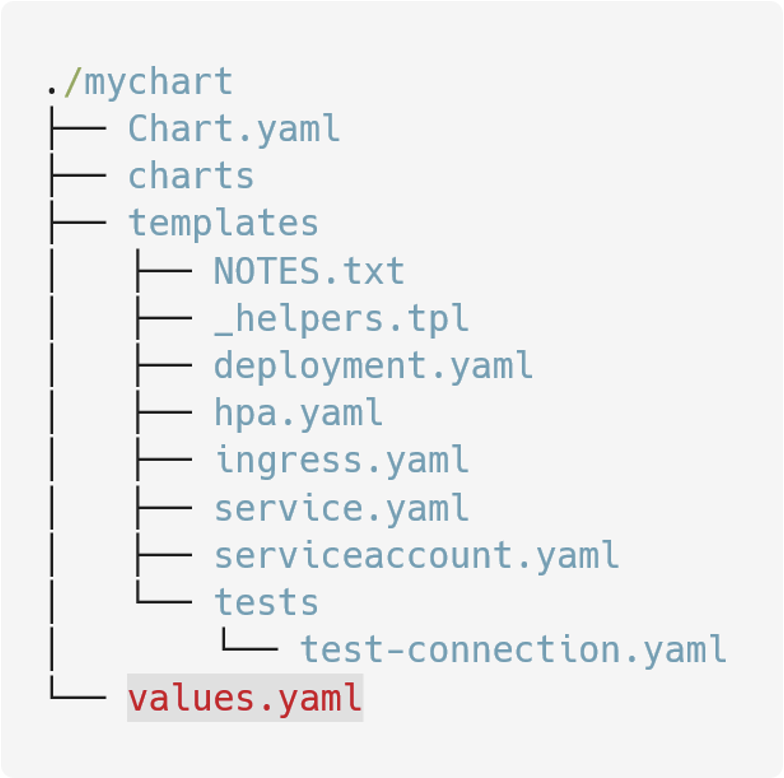
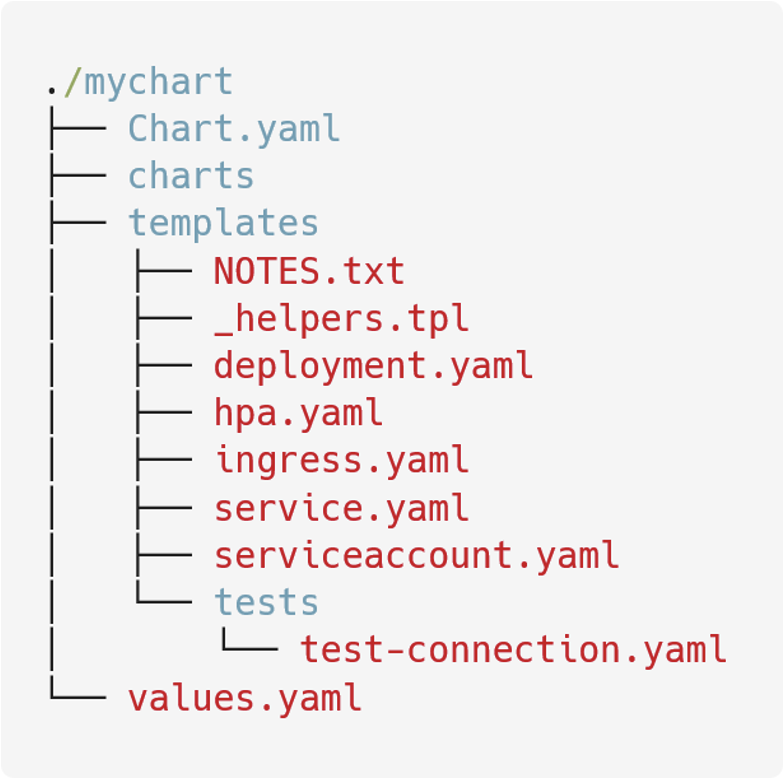
Create a custom Helm chart
# total 1
# -rw-r—r— 1 thorsten staff 1.3K Aug 11 11:24 secrets.yml
# create a new Helm chart called app
# helm CLI will place the chart in ./app
helm create app
At this point, Helm CLI will generate an example chart, which we will use as the starting point and apply some simple modifications before deploying it to Kubernetes.
Where to find beech seeds
You can create new encrypted secrets using sops CLI. At this point, we will use an encryption key stored in Azure Key Vault.
sops —azure-kv secrets.yml
This will open your default editor; for demonstration purposes, let’s create two sensitive values:
Save the file and close the editor again. Take a look at the new secrets.yml file (cat secrets.yml); it contains the encrypted representation of your configuration data.
If you want to get the decrypted secrets, you can use the helm secrets view command like this:
# decrypt & print all secrets
helm secrets view secrets.yml
# password: secret_value
The secrets plugin also allows editing previously created and already encrypted secrets using helm secrets edit secrets.yml. Use helm secerts to get a list of all available sub-commands.
Deploy the application to Kubernetes
To deploy the Helm chart to Kubernetes, I have provisioned an Azure Kubernetes Service (AKS) instance. To isolate this sample from other applications running in the cluster, create a new Kubernetes namespace using kubectl:
# create a new Kubernetes namespace
kubectl create ns encrypted-secrets
# namespace/encrypted-secrets created
The previously installed plugin helm-secrets provides required commands to install a Helm chart that relies on encrypted secrets. Use helm secrets install and provide the desired Kubernetes namespace and the encrypted secrets file besides the reference to the chart itself as shown below:
helm secrets install ./app -n encrypted-secrets -f secrets.yml
Можно ли посадить древнее семя
Возможно, вы также нашли древнее семя (Ancient seed), которое может выпасть с различных грейдворфов (Greydwarf). Их нельзя посадить в почву. Их вы можете использовать, чтобы вызвать босса Древнего.
Где найти семена сосны
Когда у вас в руках будет достаточно бронзы и цельной древесины, самое время создавать пропашник. Вы можете сделать его в своей кузнице. С ним вы сможете начать сажать семена. Он работает так же, как и многие другие инструменты, поэтому просто щёлкните правой кнопкой мыши, чтобы открыть меню. Затем выберите опцию «прополка». Это позволит превратить обычную почву в сельскохозяйственные угодья, на которых можно выращивать урожай. Затем просто щёлкните в выбранном месте, чтобы подготовить почву для семян.
После этого снова откройте меню и выберите семена, которые хотите посадить. Вы можете разместить их на любом участке, который вы обработали. Некоторым растениям для правильного роста требуется пространство, поэтому обязательно оставляйте небольшое расстояние между семенами. Растениям также требуется несколько дней, чтобы полностью вырасти, поэтому вам придётся немного подождать созревания урожая. Для посадки саженцев деревьев землю пропалывать не нужно.
Возможности Helm
Список основных возможностей включают в себя:
Для публикации последних создатели Helm даже запустили специальный сайт artifacthub.io. Там уже собрана и постоянно пополняется сообществом огромная коллекция чартов (в апреле 2021-го их было 3402, в сентябре — уже 5568).

Правда, как это бывает с опенсорс-наработками, их качество совершенно разное (я бы не рекомендовал использовать чарты с artifactshub без изменений). Более или менее сориентироваться в содержимом позволяют звезды, которые присваивают наработкам пользователи. Разумеется, вы также можете внести вклад в оценку.
В любом случае, даже если не найдете ничего подходящего, всегда можно взять готовый вариант за основу собственного проекта. Просто чтобы не начинать с нуля.
Где найти семена ячменя
В Valheim довольно большой выбор блюд, но для их изготовления вам понадобится котёл. Подробнее о приготовлении еды и напитков в Valheim мы рассказали в отдельном гайде.
Также вам может понадобиться мельница, которая позволит заготовить большой запас ячменной муки. Как построить мельницу в Valheim мы рассказали в отдельном гайде.
Если у вас возникли сложности с транспортировкой своего урожая, то вы можете использовать телегу, чтобы перевезти свои припасы.
Семена попадаются в различных локациях мира игры, но часто их можно найти только в определённых биомах. Посадить семена и вырастить урожай можно в тех же биомах, где они были найдены.
Выберете подходящий для строительства фермы участок и окружите его забором, чтобы защитить от различных противников. На Равнинах вы можете найти и посадить ячмень и лён. Морковь и пихта и сосна растут в Чёрном лесу. Репа на Болотах, а бук на Лугах.
Install the helm-secrets plugin
To use encrypted, sensitive data in Helm, we have to install the helm-secrets plugin locally.
helm plugin install https://github.com/jkroepke/helm-secrets
# alternatively you can install a specific version
# see releases at https://github.com/jkroepke/helm-secrets/releases
helm plugin install https://github.com/jkroepke/helm-secrets
Test the deployment
To test the deployment, create a port forwarding with kubectl and curl the root route as shown here:
Open an additional terminal session and curl the root URL. The sample below pipes the standard output to jq to increase readability:
Helm alternatives
Of course, Helm is not the only solution for deploying to Kubernetes. We have others:
When choosing a tool, of course, it is worth considering its weaknesses. For example, it was precisely the shortcomings of Helm that the guys from Grafana tried to overcome by creating their own Tanka product using jsonnet.

So, the main disadvantages of Helm:
But despite all the shortcomings of Helm, I don’t know people who changed it to something else. But I’ve come across counter examples many times. For example, my friends first deployed using Terraform and the Jsonnet provider, then switched to Ansible, but in the end they rewrote it to Helm. They explained this by the fact that they began to attract developers to describe the deployment in Kubernetes, and Helm, covering most of their needs, also provides a low entry level.
By the way, Tanka not so long ago officially and proudly announced support for Helm charts.

Typical tasks of a YAML developer
Let’s move on to the tasks that most often arise in the process of deploying applications in Kubernetes, and their implementation using Helm. I got this short list:
As you can see, the list includes both basic, I would even say existential, tasks like code reuse, and quite practical ones, like debugging
1. Application customization by environment
We can have quite a lot of environments that are similar in general, but at the same time have several important differences.
Among the latter, two types can be distinguished:
According to best practices, we should be able to pass operational parameters to the application as close as possible to the deployment. If you are still setting them when building an image or baking them into an image, don’t do this — this approach is fraught with many problems. A good way to control performance parameters is to pass them through environment variables or configmaps that are mounted in the pod.
Managing infrastructure changes is conceptually similar to managing application operating parameters: within Helm, it is changing text files depending on a set of input values.

To manage input values, Helm has a Values mechanism located in the values.yaml file:
We can use values in templates.
Values.yaml is a hierarchical key-value tree structure.
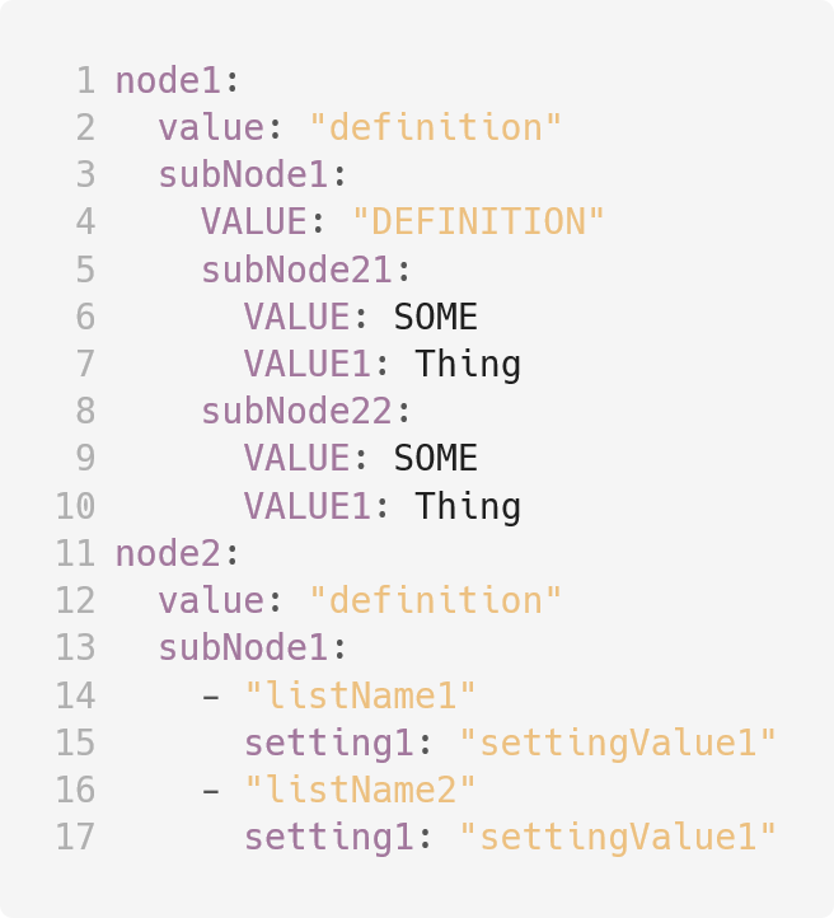
With its help, we can create the desired grouping and mnemonics for our input values.

We can use values in templates files using constructions of the form:
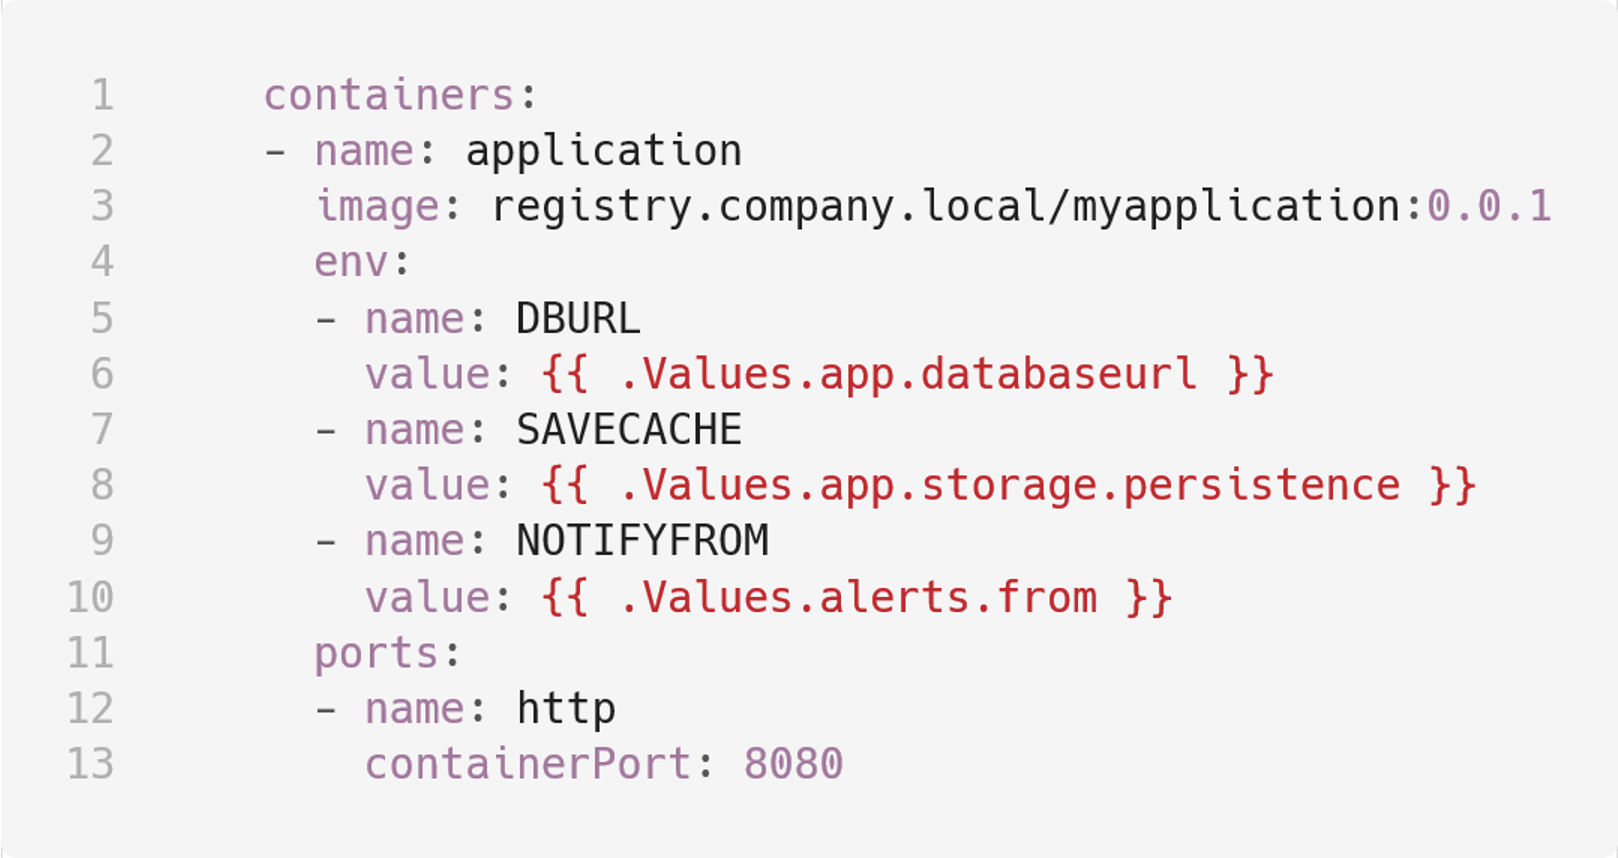
Here “.” means the current scope, followed by the reserved word Values and the path to the key. When the release is rendered, the value that was defined along this path will be substituted here.
But values.yaml is a static way to set values. Obviously, we need to change some values when deploying to a specific environment. Helm provides several ways to do this:
Passing through the —set directive. We can send one:
helm upgrade —install -n ci-namespace ci-release path/to/chart —set global.env=develop
or multiple set directives:
helm upgrade —install -n ci-namespace ci-release path/to/chart —set global.env=develop —set app.databaseurl=$POSTGRESQL_PASSWORD_DEV
Pass multiple values separated by commas in one set directive:
helm upgrade —install -n ci-namespace ci-release path/to/chart —set global.env=develop —set app.databaseurl=$POSTGRESQL_PASSWORD_DEV —set app.cloud=aws,app. storage.storageclass.aws=gp3
Pass values to lists:
But this is already, perhaps, too inconvenient. Therefore, we can pass filled values files through the -f or —values directives (also one or more).
In this case, the values passed via —set or —values will override those that are described in the values.yaml of the chart. You can also pass values by keys that are not described in values.yaml — they will also be available. But if the template uses a value that is not in the values.yaml chart, it must be passed during deployment (or a stub, for example, with the default go templates function), otherwise the release render will break.
1.1. Working with lists
In the values.yaml example above, the storageClass and persistentVolumeSize lists were described in the app.storage section. They describe the persistentVolume parameters depending on the cloud where we are deploying (aws or gcp). Such lists are very convenient and are quite common. There are several options for using such lists. When deploying, we first need to determine the value that characterizes a particular option. In the example above it is
A bad way to use a list is to describe all the options with an if statement:
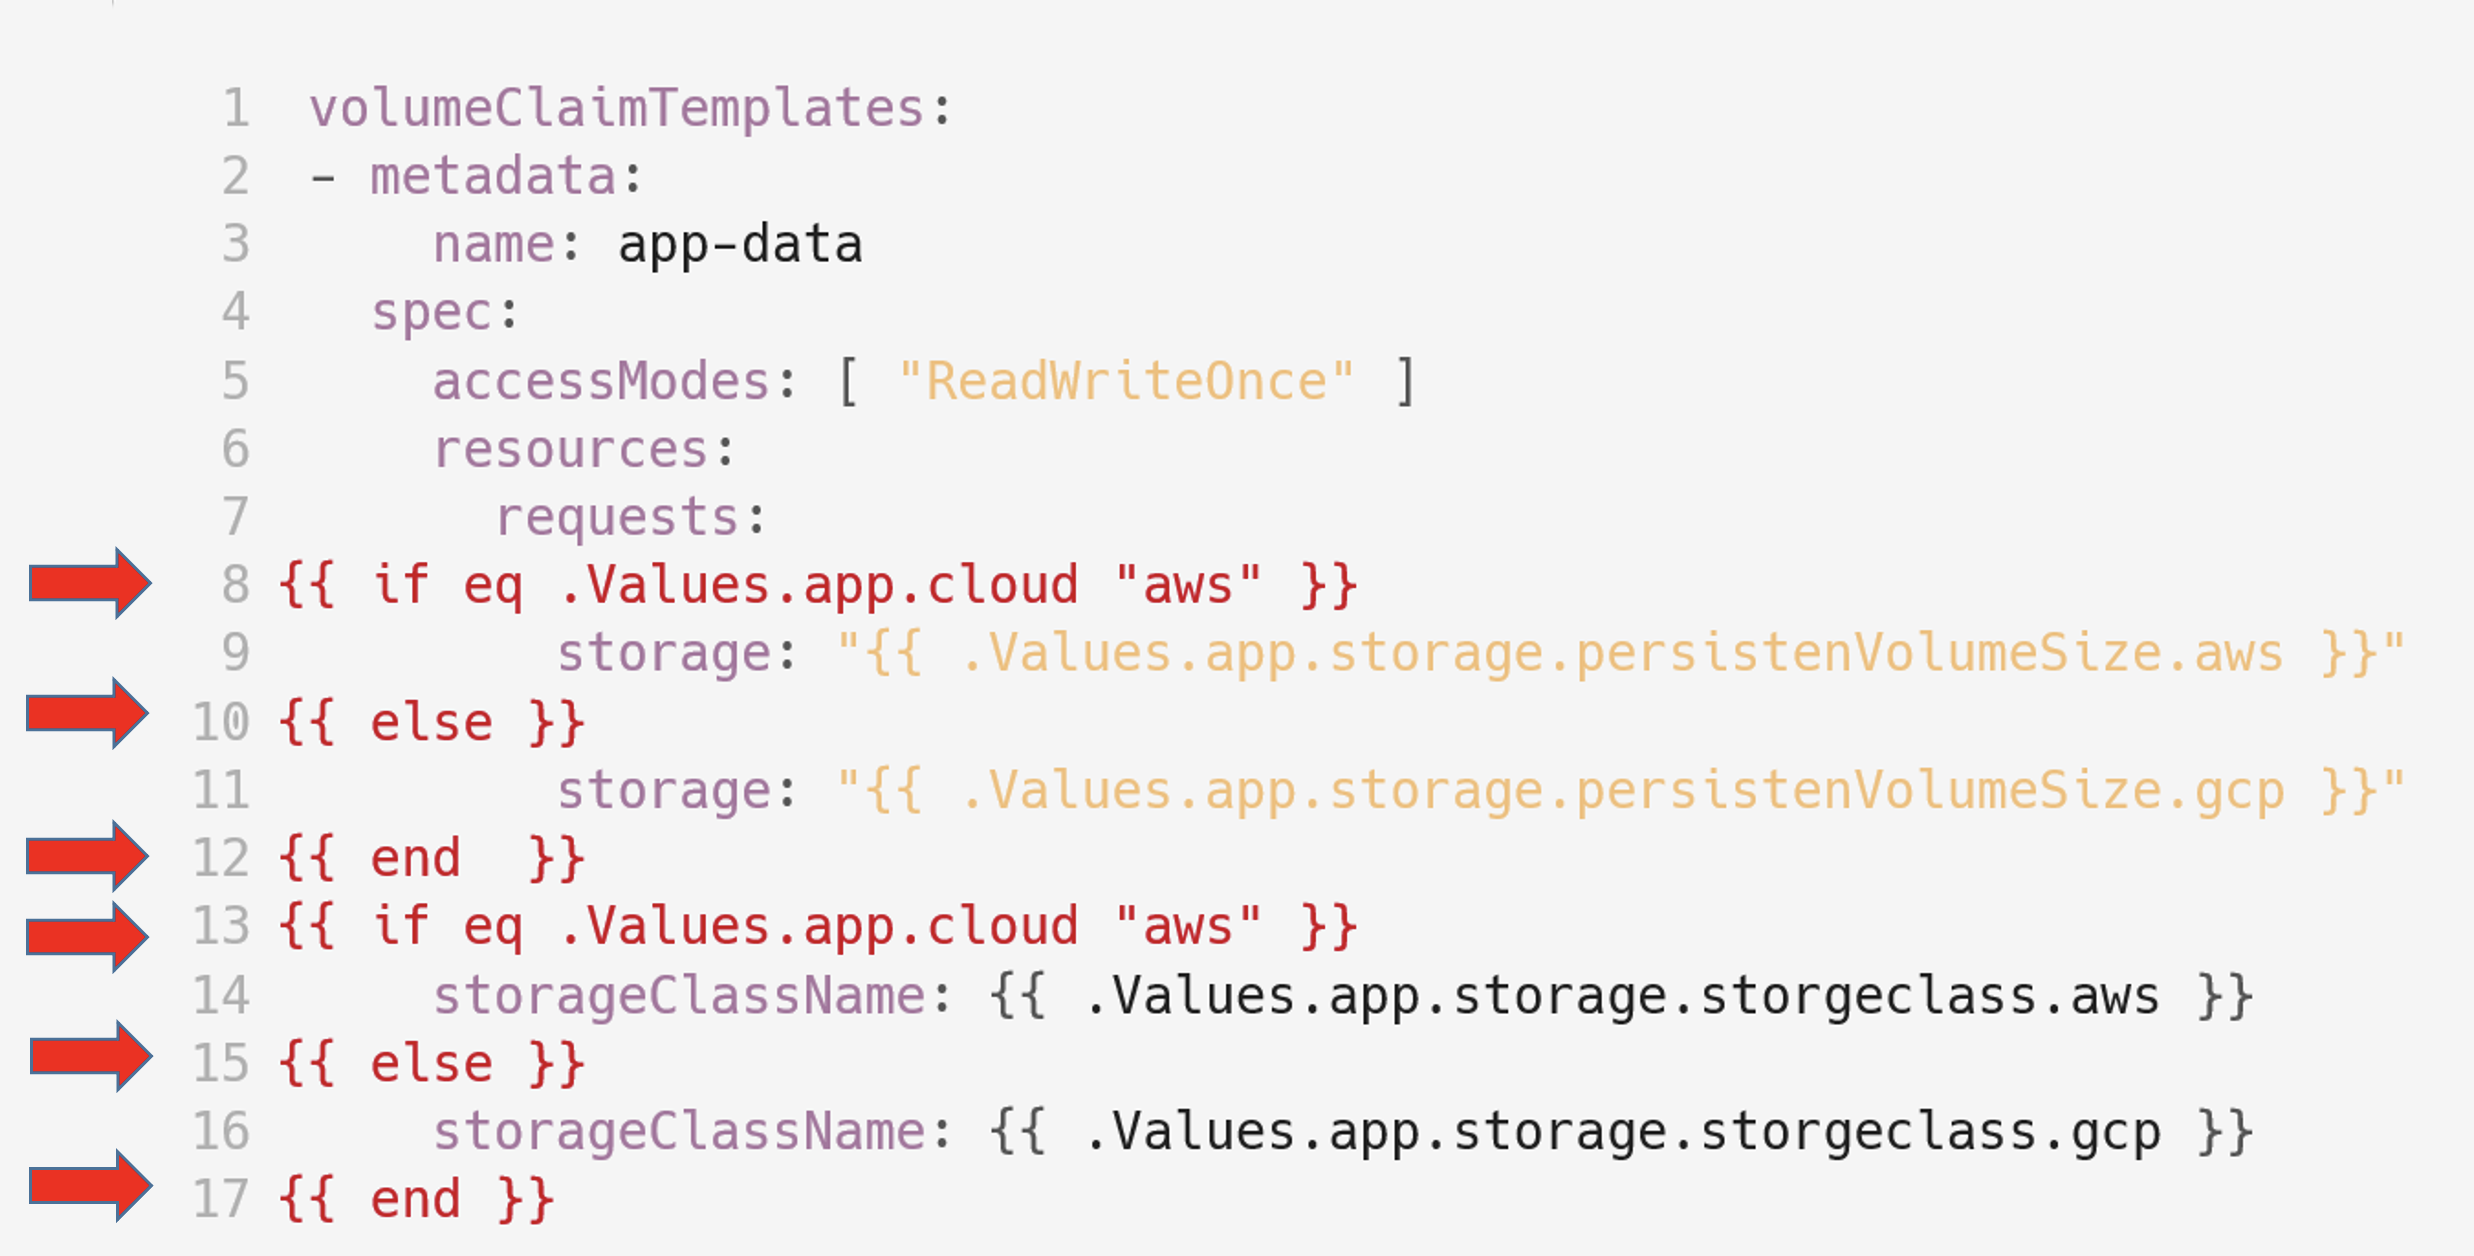
A better way is to use the Go templates functions:
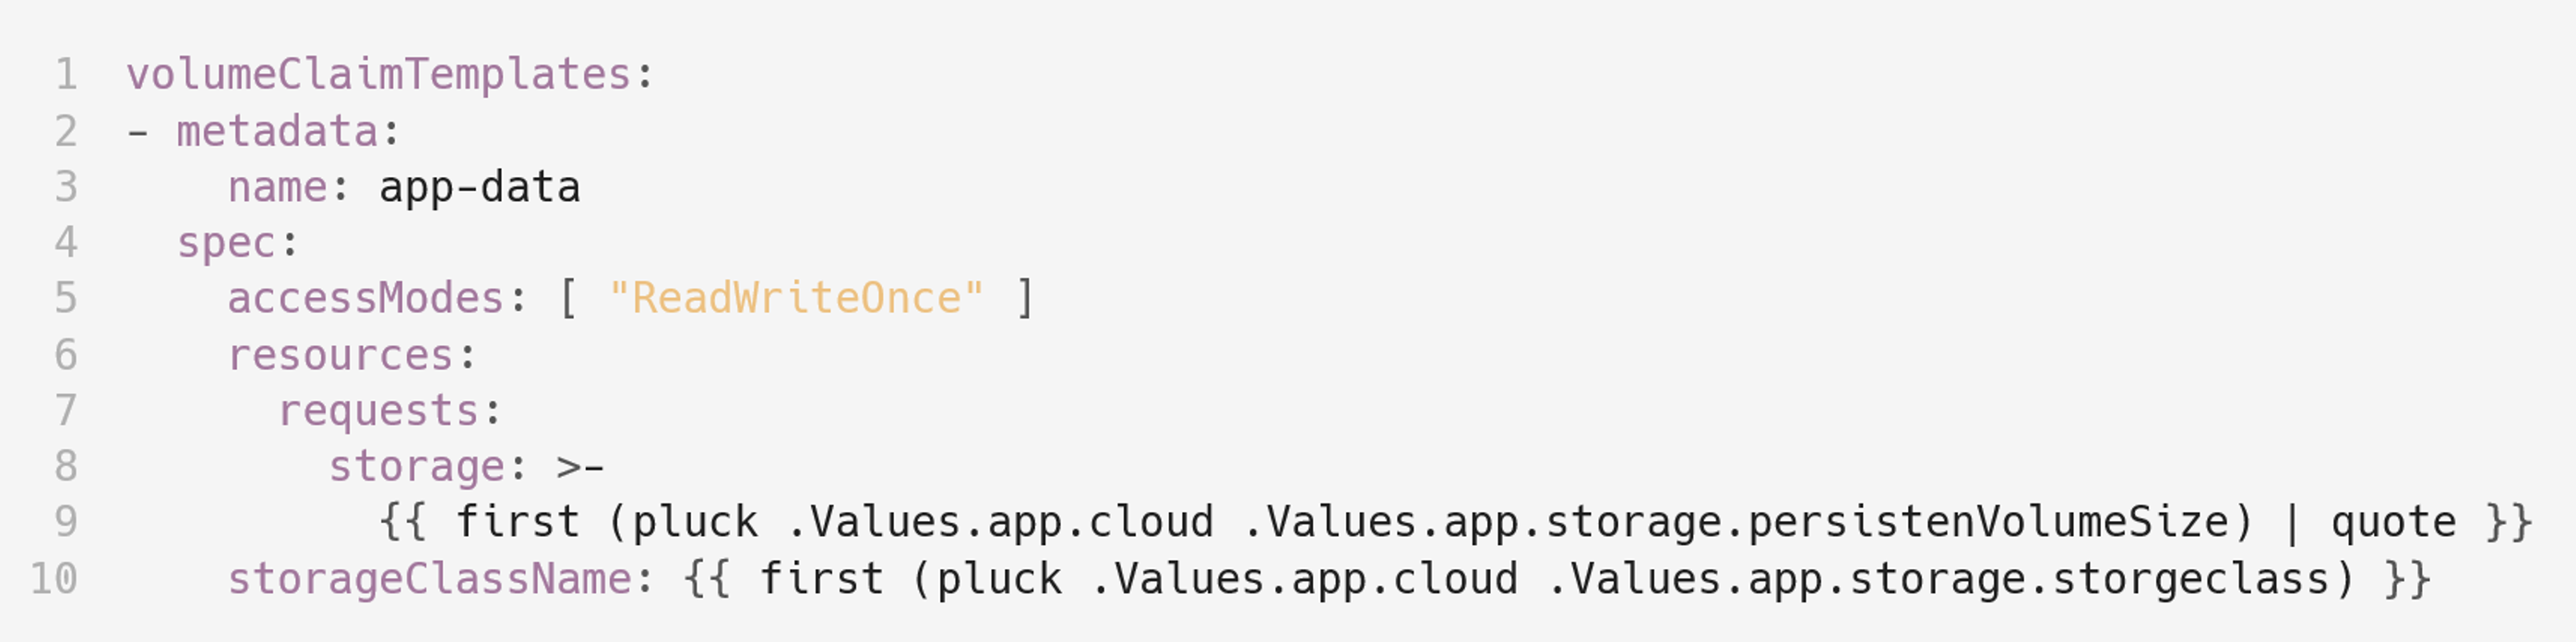
Here we are using the pluck function by value . Values.app.cloud we select a key from the required one from the list, cast it to a string using the first function and wrap the result in quotes, passing it to the quote function.
Go templates functions, extended by Sprig framework, allow you to make code much more beautiful, functional and compact. If you’re doing something and don’t feel like it’s going very well, consider using Go templates.
Here are a couple of useful links for this case:
Speaking of values, we need to mention the standard Helm values, which are generated automatically every time a release is rendered.
They are described in detail in the documentation at this link.
If you use these values in your code
then when transferring it between charts, the code will pick up the required values and seamlessly, without changes, be integrated into the new chart.
2. Code reuse
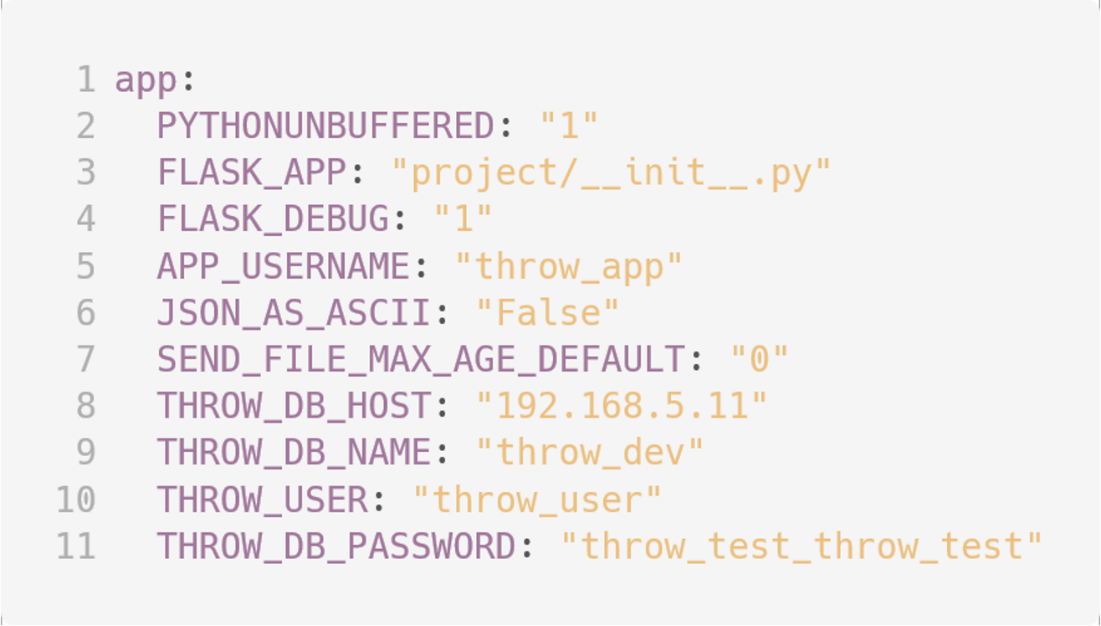
Let’s say we have a number of values:
And these values are needed by several applications in our chart:
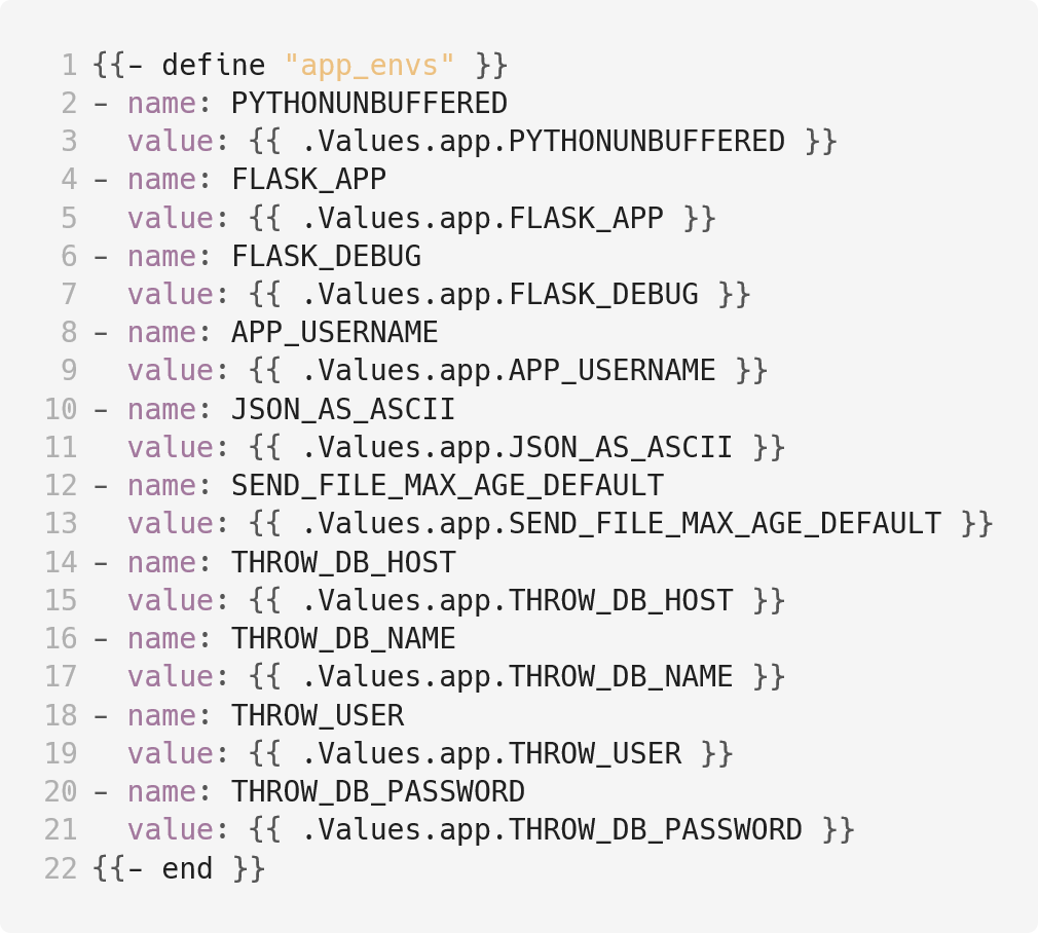
It’s quite obvious that duplicating the env: section in the description of each application is completely ugly.
To solve this problem, Helm has a “Named templates” mechanism.
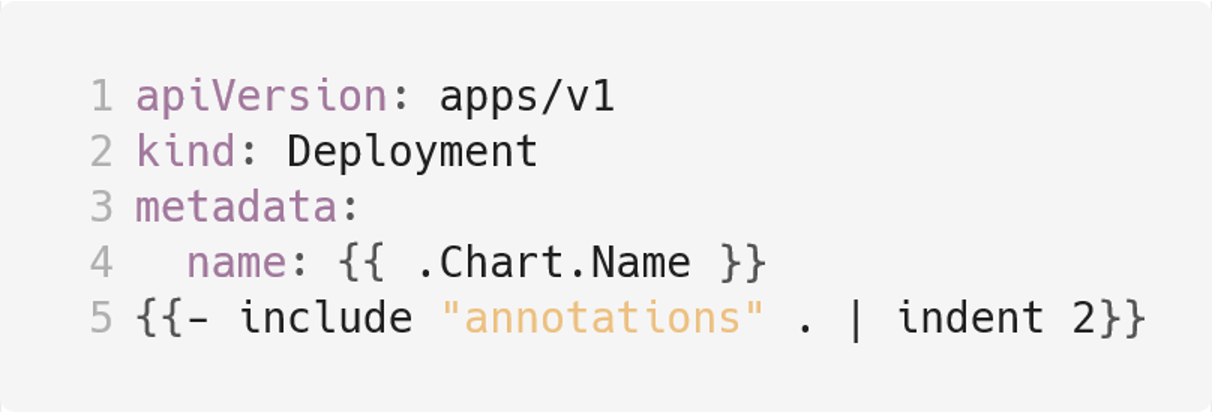
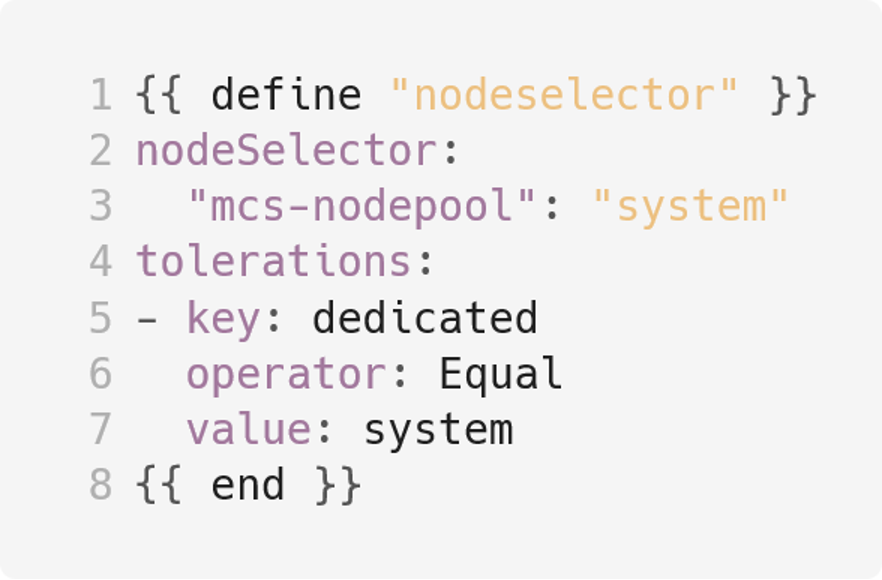
According to the conventions, named templates can be described in files with extensions .tpl or .yaml, whose name starts with an underscore:
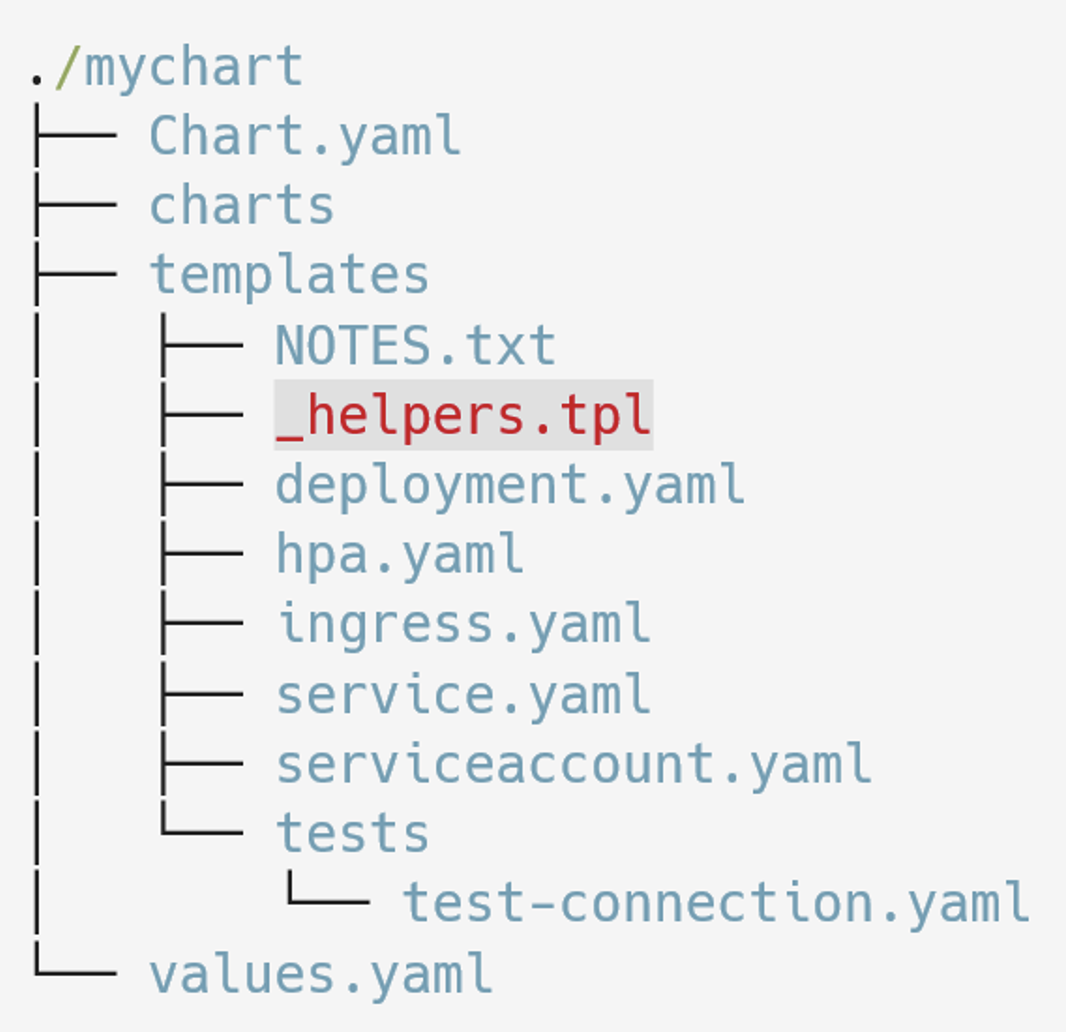

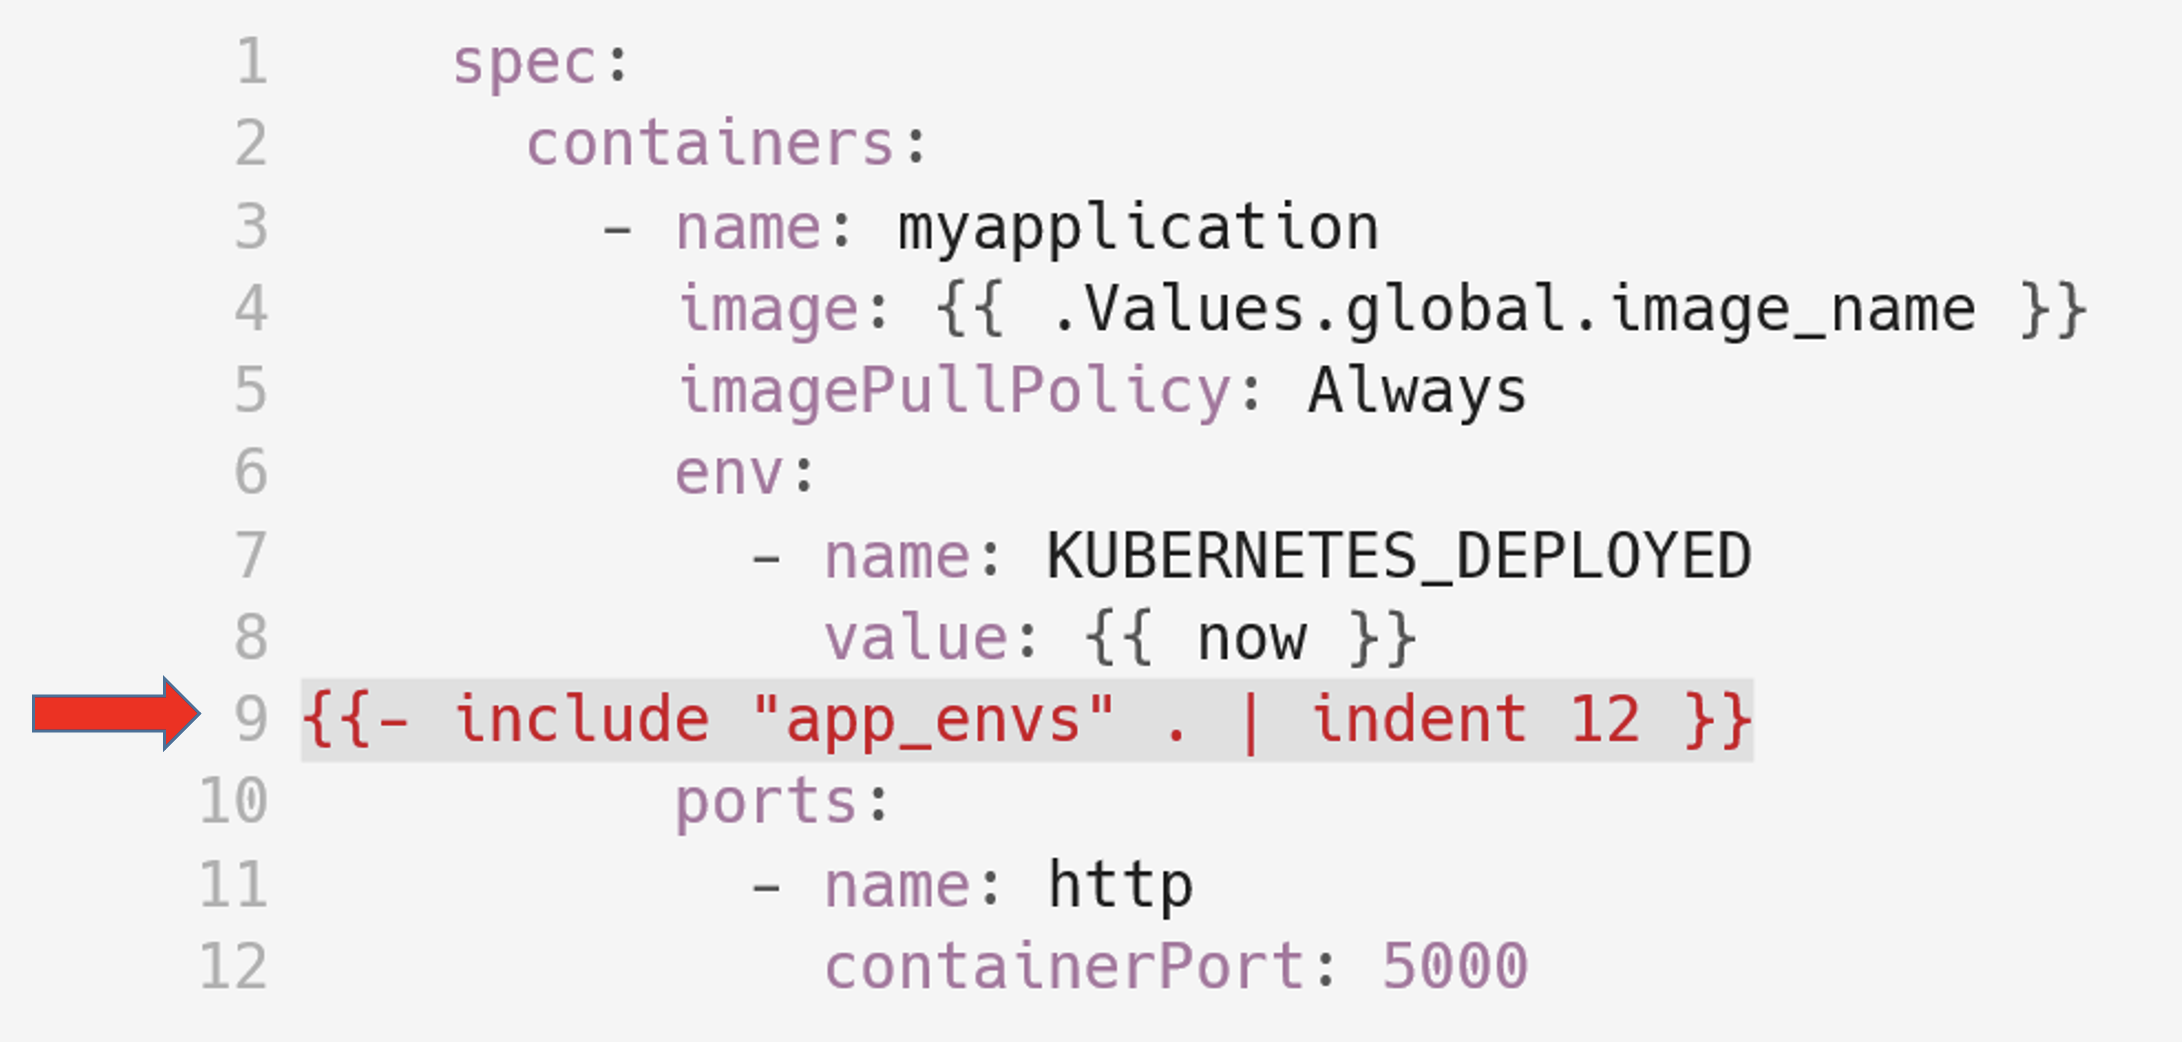
Here we see that the define name and the current context are passed to the include function, then the text described in define is piped to the indent function, which shifts it by 12 spaces.
What can it be used for? For any repeating sections of code.
Definition of common labels:


nodeSelector / tolerances:


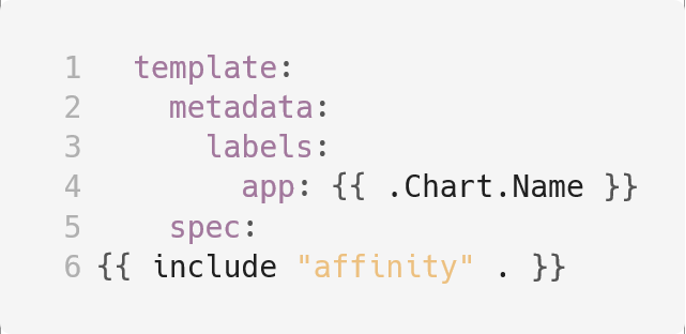
Use templates and follow the basic “DRY” programming rule: DON’T REPEAT YOURSELF!

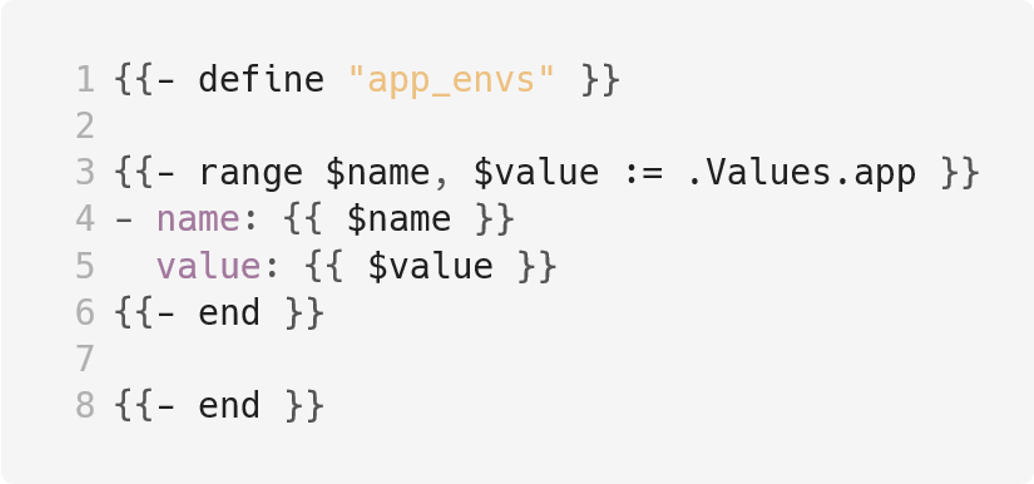
2.1. Using cycles (range)
The examples of values.yaml and define, which was made to include it in the yaml of the application, look quite ugly. You have to describe the value in values, then describe it in define. This is an obvious duplication.
You can get rid of him in Helm using range.
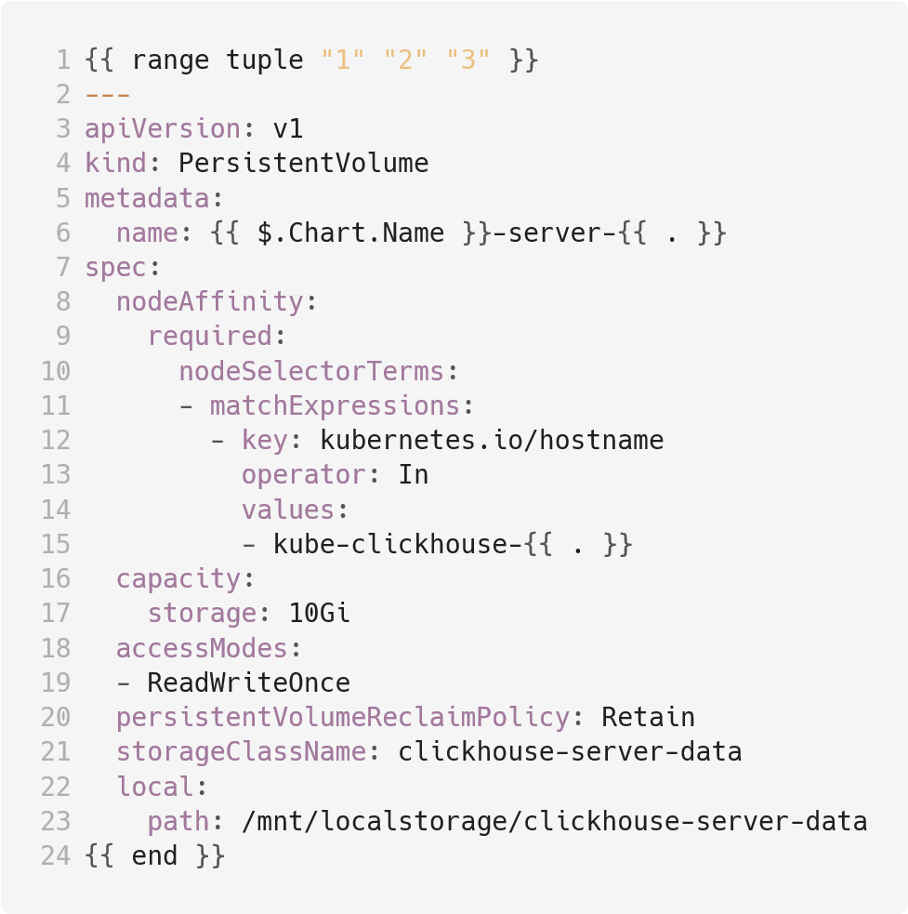
Example 1: range over a given list.
Example 2: range by values.yaml
Let’s say we have a number of cronJobs that actually differ only in schedule and run command. We describe them as a list in values.yaml:

And describe the range:
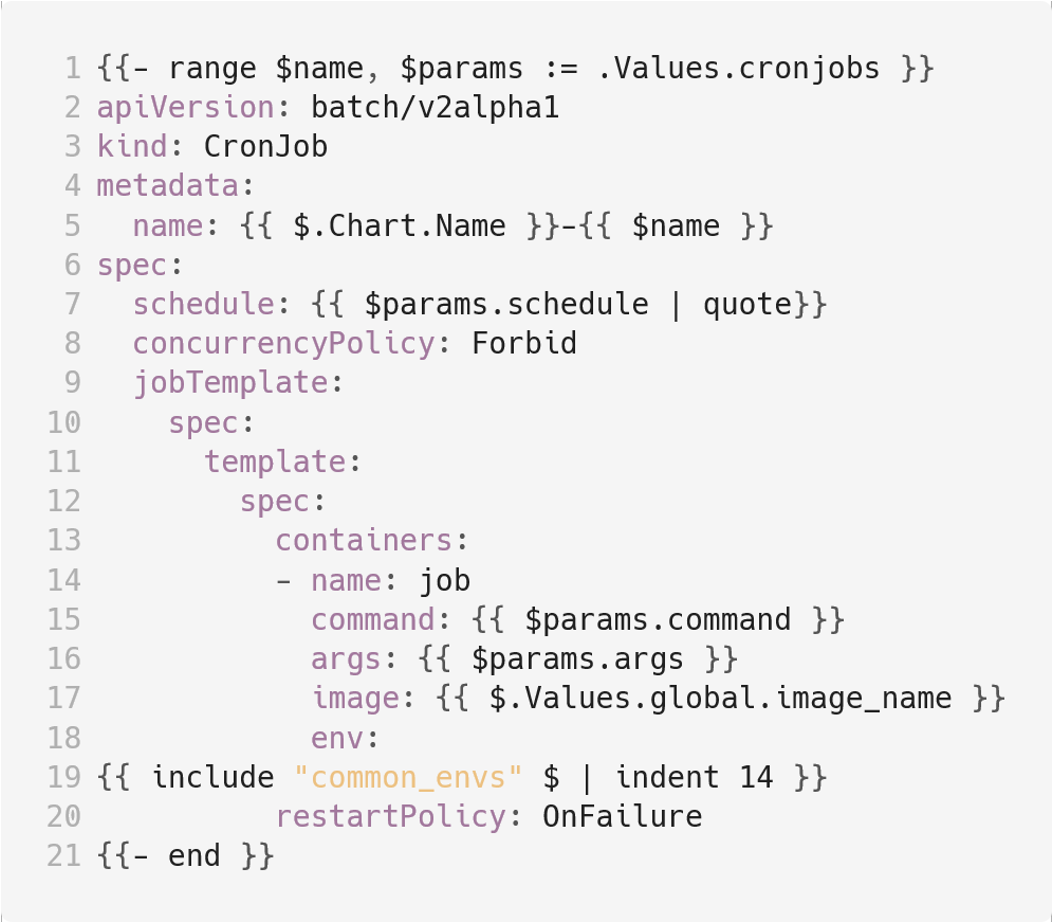
Here in Line 1 we read the cronjobs section into the $name and $range variables.
Then, based on $name, which contains the nodes of the first hierarchy from the section tree, we make the cronJob name (Line 5).
Based on $params, which contains the list of node values, we fill in the schedule (Line 7) and run command parameters (Lines 15 and 16) by referring to the keys specified in the list.
In doing so, we include environment variables from the upper range, similar to the previous example (Line 19).
Range is a very powerful templating tool, but it requires a lot of attention, without showing it, you can easily shoot yourself in the foot.
Let’s say Example 2 has a mistake that will cause only the last cronJob to be created from the entire list. The point is the absence of the yaml separator. The correct option looks like this (pay attention to Line 2):
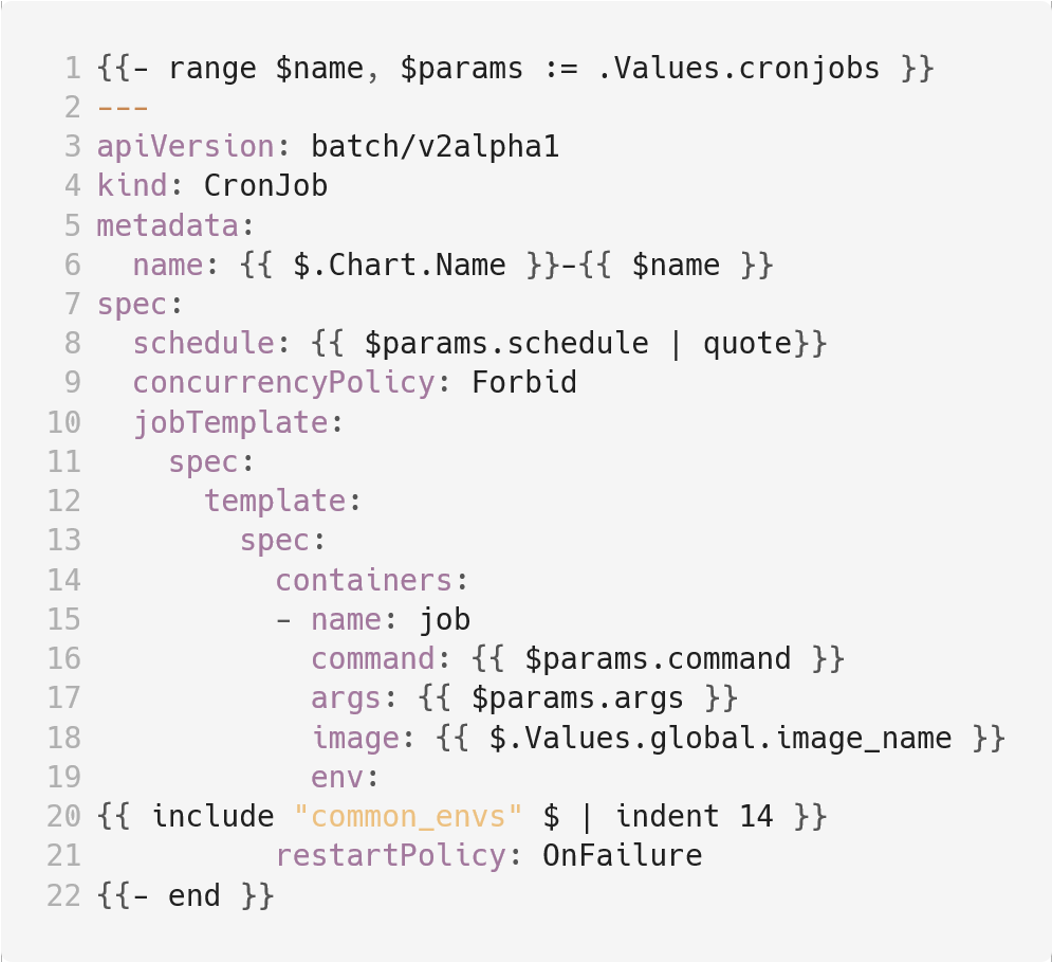
How can we improve this construction with range?
The final construction is much simpler and more concise:
2.3. Good practices values.yaml
Since the Helm chart often describes multiple environments, many people make different values files and pass them through the —values directive when deploying. In my opinion, this is a bad practice — this approach leads to a loss of visibility.

However, not all values need to be changed from environment to environment, some of them are initially described as _default.
The code for parsing such constructions will look like this:
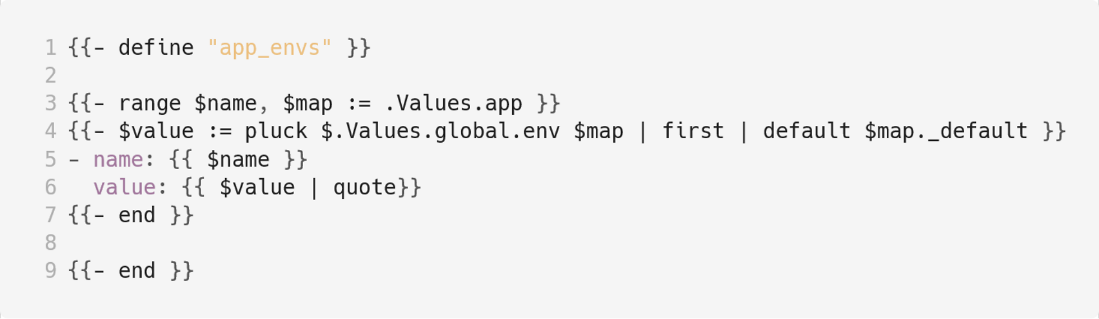
Here range is in the app section (Line 3). Name comes with the name of the environment variable, map is a list of values from which a value is selected based on the global.env variable passed through the —set directive when starting Helm, and which should contain the name of the target environment.
If no value corresponding to the environment is found, then using the default function, the value from the _default key is substituted.
This way of description is very popular with developers, because it is quite simple and visual.
2.4. Best practices
Speaking of best practices, the Helm documentation has a set of recommendations and hacks that can be useful when using it: Chart best practices, Chart tips and tricks.
For example, from a selection of best practices, you can find out what the creators of Helm drown for using camelCase. And in tips and tricks, I recently found this thing:
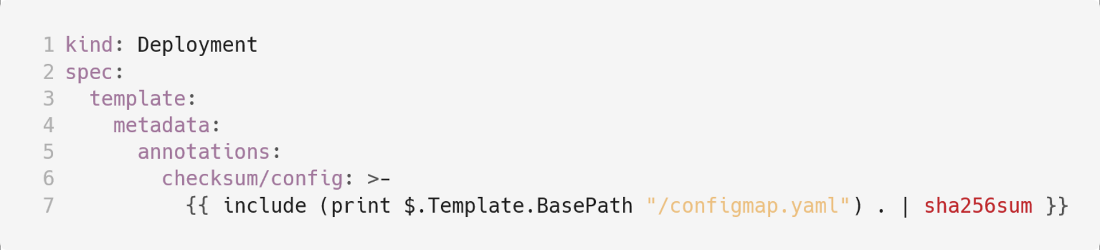
Here we also annotate the pods in the template, which is calculated based on the hash function from the contents of the configmap. The configmap has changed, the hash has been recalculated, the annotation has changed, the pods have been rolled over, the configuration has been applied. In my opinion, the decision is very witty.
At this point, I decided to take a break, because the material is getting very long. However, I promise not to delay the rollout of the continuation, which will focus on other typical tasks that arise during the deployment in Kubernetes: rollout tracking, debugging, release cycle management, etc.
UPD: second part of the article
How to plant seeds
Here are the basic steps for planting seeds in Valheim:
Conclusion
Distributing containerized applications with Helm has become the default since the release of Helm 3. Using the Helm secrets plugin, you can also use encrypted secrets in your custom Helm charts. Storing the encrypted representation of your secrets in source control is no longer an issue, and you are not in danger of leaking sensitive information. Again, Mozilla SOPS builds the flexible yet robust foundation for all of this.
Reference encrypted secrets
Also in app/templates/deployment.yaml update ports.containerPort from 80 to 5000
