

NGINX was initially designed as a reverse proxy server. However, with continuous development, NGINX also serves as one of the options to implement the forward proxy. The forward proxy itself is not complex, the key issue it addresses is how to encrypt HTTPS traffic. This article describes two methods for using NGINX as the forward proxy for HTTPS traffic, as well as their application scenarios and principal problems.
TLS encryption of traffic is a security must have. In this article, I show how to create and install a self-signed certificate, and how to configure Nginx for providing encryption to all ingress and egress traffic.
In the last article, I explained how to setup Nginx as a Reverse Proxy that uses Consul DNS entries to forward the requests. Now we need to encrypt all HTTP traffic. We will do this by generating TLS certificates with the openssl command line tool, and then configure Nginx to process HTTP requests.
- Application Security
- APPSEC01: Secure all client to service communication with TLS
- APPSEC02: Secure inter service communication with TLS
This article originally appeared at my blog.
- Historical Background
- Предпосылки
- Установка
- Ubuntu
- CentOS/RHEL
- Настройка
- Что такое обратный прокси?
- Преимущества обратного прокси
- Настройка Nginx в качестве обратного прокси
- Дополнительные настройки
- Резюме
- Кибербезопасность с Nginx
- Whether the Proxy Encrypts HTTPS
- Summary
- Testing the Connection
- Ngx_stream_ssl_preread_module
- Application Scenarios
- Certificate Generation process
- Whether the Proxy is Transparent to the Client
- Creating Certificates with OpenSSL
- NGINX Stream (L4 Solution)
- The Need For Special Processing When the Forward Proxy Processes HTTPS Traffic
- Critical Review
- Environment Building
- Common Problems
- Classification of HTTP/HTTPS Forward Proxy
- Configure DNSmasq
- Footnotes
- Conclusion
Historical Background
1) The client sends an HTTP CONNECT request to the proxy server.2) The proxy server uses the host and port information in the HTTP CONNECT request to establish a TCP connection with the target server.3) The proxy server returns an HTTP 200 response to the client.4) The client establishes an HTTP CONNECT tunnel with the proxy server. After HTTPS traffic arrives at the proxy server, the proxy server transparently transmits HTTPS traffic to the remote target server through the TCP connection. The proxy server only transparently transmits HTTPS traffic and does not decrypt HTTPS traffic.
Обратный прокси-сервер – это сервер, который принимает запросы (http / https), а затем передает или распространяет их на внутренний сервер.
Бэкэнд-сервер может быть сервером приложений, таким как Tomcat, Wildfly, Jenkins и т.д, или он может быть другим веб-сервером, таким как Apache.
Но зачем нам вообще нужен обратный прокси перед приложением или веб-сервером, какие причины?
1. Он скрывает исходную точку, что делает наш внутренний сервер более безопасным и менее подходящим для атак
2. Поскольку обратный прокси-сервер является первой точкой контакта для всех запросов, он может помочь зашифровать / расшифровать запрос. Это снимает нагрузку с внутреннего сервера
3. Он также может быть использован для кэширования контента, что снова снижает нагрузку на другие серверы
4 – он также может действовать как балансировщик нагрузки.
Мы уже обсуждали, как мы можем настроить веб-сервер Apache в качестве обратного прокси-сервера:
А теперь поговорим о том, как мы настраиваем обратный прокси-сервер Nginx.
Предпосылки
Нам понадобится внутренний сервер, это может быть любой сервер приложений или даже веб-сервер.
Но помните, что если вы используете веб-сервер, который также находится на том же сервере, что и обратный прокси-сервер nginx, убедитесь, что другой веб-сервер не использует тот же порт tcp, что и обратный прокси-сервер nginx, т. е. 80 и 443.
В этом руководстве я буду использовать сервер Tomcat, размещенный на другом сервере с IP 192.168.1.110, работающий на порте 8080.
Как уже упоминалось выше, вы можете выбрать другой сервер приложений или веб-сервер.
Установка
Теперь давайте кратко обсудим установку Nginx на
Ubuntu
$ sudo apt-get update && sudo apt-get install nginx
CentOS/RHEL
Нам нужно добавить несколько репозиториев для установки nginx на CentOS:
И сам Nginx:
$ yum install nginx
Теперь запустите службы и включите их для загрузки во время старта системы:
# systemctl start nginx
# systemctl enable nginx
Настройка
Теперь, когда nginx установлен и работает, мы продолжим работу с конфигурацией обратного прокси-сервера Nginx.
Но сначала мы удалим конфигурацию по умолчанию, это можно сделать с помощью следующей команды:
# rm /etc/nginx/conf.d/default.conf
В качестве альтернативы, мы также можем удалить содержимое внутри вышеупомянутого файла и настроить там обратный прокси-сервер Nginx, но я предпочитаю использовать отдельный файл для каждого настроенного сайта.
Итак, давайте создадим новый файл conf для нашего обратного прокси nginx,
# vi /etc/nginx/conf.d/test-proxy.conf
и сделйате следующие записи в файле:
Теперь сохраните файл и выйдите.
Здесь, в конфигурации, мы добивили server_name разделе «location», а именно мы предоставляем внутренний сервер, то есть наш сервер Apache tomcat.
Теперь, чтобы реализовать сделанные изменения, мы перезапустим службу nginx, но перед этим мы должны проверить правильность сделанной конфигурации,
# ngnix -t
или мы также можем предоставить полный путь к файлу конфигурации,
# nginx -t -c /etc/nginx/conf.d/test-proxy.conf
Как только проверка вернется с нулевым выводом, мы можем перезапустить сервис nginx,
Пожалуйста, не спамьте и никого не оскорбляйте.
Это поле для комментариев, а не спамбокс.
Рекламные ссылки не индексируются!
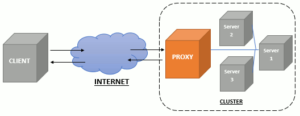
Что такое обратный прокси?
Прокси-сервер действует как посредник между клиентом и другим сервером.
Он получает ресурсы с сервера, к которому вы хотите подключиться, и отправляет его вам для просмотра. Обратный прокси-сервер работает так же, за исключением того, что роль меняется на противоположную.
Когда вы запрашиваете информацию с сервера, обратный прокси-сервер получает запрос и отправляет его на соответствующий внутренний сервер.
Это позволяет системному администратору использовать сервер для нескольких приложений, а также обеспечивать более плавный поток трафика между клиентом и сервером.
Теперь давайте сделаем более общий вариант настройки 🙂
Преимущества обратного прокси
В зависимости от вашего приложения у вас могут быть разные варианты использования обратного прокси.
- Обратный прокси-сервер позволяет запускать несколько приложений на одном сервере. Если на одном сервере запущено несколько приложений, все они не могут одновременно прослушивать порт 80 или 433. Обратный прокси-сервер позволяет настроить обратный прокси-сервер так, чтобы при необходимости перенаправлять трафик отдельным приложениям.
- Балансировка нагрузки – если у вас несколько серверов, на которых запущено одно приложение, вы можете использовать обратный прокси-сервер для равномерного распределения трафика на каждом сервере.
- Брандмауэр веб-приложений – вы можете использовать обратный прокси-сервер, чтобы скрыть свое приложение от общественности, а также отфильтровать спам-IP или защитить от DDOS-атаки.
- Простая регистрация и аудит – поскольку весь входящий трафик управляется обратным прокси-сервером, проще регистрировать и отслеживать поток трафика.
Настройка Nginx в качестве обратного прокси
Настройка Nginx в качестве обратного прокси
Для начала стоит сказать, что можно воспользоваться услугами прокси, не настраивая все самому.
Представлено очень большое количество решений, среди которых можно выделить https://youproxy.ru/russian-proxy, не зависимо от целей, которые вы преследуете, используя прокси-сервера.
Чтобы настроить Nginx в качестве обратного прокси-сервера, мы будем использовать параметр proxy_pass в файлах конфигурации Nginx.
Примечание. В этом руководстве предполагается, что вы немного знакомы с Nginx и уже установили и настроили Nginx на своем сервере.
В большинстве случаев Nginx будет внешним сервером, прослушивающим порт 80 (HTTP) или 443 (HTTPS) для входящих запросов.
Поскольку может быть только одна служба, прослушивающая порт 80 или 443, ваше приложение должно будет прослушивать другой порт, например порт 8081.
Самая простая конфигурация будет выглядеть примерно так:
Это означает, что все входящие запросы на myapp.com через порт 80 будут перенаправлены на порт 8081.
Дополнительные настройки
Помимо директивы proxy_pass, есть несколько других директив, которые вы можете использовать для более сложной настройки.
proxy_set_header – позволяет установить заголовок для отправки в фоновое приложение.
Например, посмотрите следующую конфигурацию:
proxy_set_header Host $host;
proxy_set_header X-Real-IP $remote_addr;
proxy_set_header X-Forwarded-For $proxy_add_x_forwarded_for;
proxy timeout – позволяет установить значение тайм-аута для отправки и получения прокси-запросов.
proxy_connect_timeout 90;
proxy_send_timeout 90;
proxy_read_timeout 90;
proxy_buffers – это позволяет Nginx временно хранить ответ прокси-сервера и отправлять его на сервер запросов только после того, как прокси-сервер завершит ответ.
Если ваше приложение отправляет большой кусок файла, то вы можете отключить proxy_buffers:
proxy_buffering off;
Резюме
Как видите, Nginx – это полноценный обратный прокси-сервер
Самое приятное в нем то, что его конфигурация проста, проста в использовании и все же позволяет масштабироваться для более сложных сценариев.
Для получения более подробной информации вы можете ознакомиться с документацией по прокси-модулю Nginx или примерами конфигурации.
Кибербезопасность с Nginx
Now, let’s take a quick look at the key problems concerning the L4 solution.
1) Access attempt failure due to the manual proxy settings on the client.
The result indicates that the client tries to establish an HTTP CONNECT tunnel before NGINX. However, as NGINX transparently transmits the traffic, the CONNECT request is directly forwarded to the target server. The target server does not accept the CONNECT method. Therefore, “Proxy CONNECT aborted” reflects in the above snippet, resulting in an access failure.
2) Access attempt failure as the client does not include SNI in the ClientHello packet.
As mentioned earlier, when NGINX stream is used as a forward proxy, it is crucial to use ngx_stream_ssl_preread_module to extract the SNI field from ClientHello. If the client does not include SNI in the ClientHello packet, the proxy server wouldn’t know the target domain name, resulting in an access failure.
In transparent proxy mode (simulated by manually binding hosts), use OpenSSL for simulation on the client.
OpenSSL s_client does not include SNI by default. As the snippet shows, the preceding request terminates in the TLS/SSL handshake phase after ClientHello is sent. This occurs because the proxy server does not know the target domain name where ClientHello should be forwarded.
Using OpenSSL with the “servername” parameter to specify SNI, results in successful access.
# openssl s_client -connect www.baidu.com:443 -servername www.baidu.com
Whether the Proxy Encrypts HTTPS
- Tunnel Proxy: This is a proxy that transparently transmits traffic. The proxy server specifically transmits the HTTPS traffic over TCP transparently. It does not decrypt or perceive the specific content of its proxy traffic. The client performs direct TLS/SSL interaction with the target server. This article describes the NGINX proxy mode pertaining to this type.
- Man-in-the-Middle (MITM) Proxy: The proxy server decrypts HTTPS traffic, uses a self-signed certificate to complete the TLS/SSL handshake with the client, and completes normal TLS interaction with the target server. Two TLS/SSL sessions are set up on the client-proxy-server link.
Note: In this case, the client actually obtains the self-signed certificate of the proxy server in the TLS handshake process, and verification of the certificate chain is unsuccessful by default. The Root CA certificate among the proxy self-signed certificates must be trusted on the client. Therefore, the client is aware of the proxy in this process. A transparent proxy is achieved if the self-signed Root CA certificate is pushed to the client, which is implemented in the internal environment of an enterprise.
Summary
This article explained how to provide TLS encryption to Nginx. We explored the OpenSSL command line utility to create a self-signed certificate. We showed how to configure Nginx to listen to TLS connection and provide the generated certificate. Finally, I showed how to configure DNSmasq to use Nginx for resolving all traffic inside the cluster.
Testing the Connection
Restart Nginx and browse to a page. Your browser will notify you that “the page is not secure” — a very misleading message! The message is about complaining that the certificate authority is not a well-known one — which is true, since we self-signed the certificates. But the connection is secured with TLS encryption. You need to accept the notification, and then browse normally.
Ngx_stream_ssl_preread_module
In order to obtain the target domain name of HTTPS traffic without decrypting HTTPS traffic, the only method is to use the SNI field contained in the first ClientHello packet during the TLS/SSL handshake. Starting from the version 1.11.5, NGINX supports ngx_stream_ssl_preread_module. This module helps to obtain SNI and ALPN from the ClientHello packet. For a L4 forward proxy, the ability to extract SNI from the ClientHello packet is crucial, otherwise the NGINX stream solution will not be implemented. This, however, also brings a restriction that all clients must include the SNI field in the ClientHello packets during the TLS/SSL handshake. Otherwise, the NGINX stream proxy wouldn’t know the target domain name that the client needs to access.
Application Scenarios
In the L7 solution, the HTTP CONNECT request must establish a tunnel, and therefore, the proxy server is a common proxy that the client must perceive. Manually configure the IP address and port of the HTTP(S) proxy server on the client. Access the client using the “-x” parameter of cURL as shown below.
The preceding details printed by the “-v” parameter indicate that the client first establishes an HTTP CONNECT tunnel with the proxy server 39.105.196.164. Once the proxy replies with “HTTP/1.1 200 Connection Established”, the client initiates a TLS/SSL handshake and sends traffic to the server.
Certificate Generation process
The normal way to generate certificates involves multiple steps:
- You create a certificate signing request on your severer
- You forwarded the request to a registration authority
- The registry authority checks the claim that you are the owner of the server, and sends an ok to a certificate authority
- The certificate authority generates the certificate and the private key
- The certificate is forwarded to a validation authority
- The certificate and the private key will be sent to you
- You install the certificate on your server
Self-signed certificate will be our choice.
Whether the Proxy is Transparent to the Client
- Common Proxy: Here, the proxy address and port are manually configured in the browser or system environment variables on the client. For example, when you specify the IP address and port 3128 of the Squid server on the client.
- Transparent Proxy: There is no need for the proxy settings on the client. The “proxy” role is transparent to the client. For example, a Web Gateway device on an enterprise network is a transparent proxy.
Creating Certificates with OpenSSL
openssl req -new -x509 -days 90 -newkey rsa:4096 -sha512 -nodes -out admantium.cert -keyout admantium.key
The flags look scary — lets understand them:
- req: Make a new certificate request
- x509: Create the certificate in X509 format
- days: Set the viability period of this certificate
- newkey: Generate a new key using 4096bit RSA
- sha512: Use SHA-512 as the message digest algorithm
- nodes: Do not require a password for the key file (ONLY ok for self-signed certificates)
- out: Path and filename where the certificates should be saved
- keyout: Path and filename where the certificate should be saved
The next step is to use the required directives in Nginx, as shown in the next snippet:
ssl_certificate /etc/nginx/certs/admantium.cert; ssl_certificate_key /etc/nginx/certs/admantium.key;}
- listen 443 ssl: Listen on port 443 for incoming TLS connection
- ssl_certificate: Path and filename of the certificate
- ssl_certificate_key: Path and filename of the certificate key
- ssl_protocols: The supported protocols — only use TLS1.2 and TLS1.3 since older versions have security weaknesses
- ssl_ciphers: With this list you control the available encryption methods that Nginx and the client can use for exchanging data, select only strong ciphers
- ssl_prefer_server_ciphers: A flag that specifies to use the offered ciphers, not those that the client offers.
As L4 forward proxy, NGINX basically transparently transmits traffic to the upper layer, and does not require HTTP CONNECT to establish a tunnel. Therefore, the L4 solution is suitable for the transparent proxy mode. For example, when the target domain name is directed to the proxy server by means of DNS resolution, it require simulating the transparent proxy mode by binding /etc/hosts to the client.
NGINX Stream (L4 Solution)
Since the upper-layer traffic is transparently transmitted, the critical question that arises here, is whether NGINX should serve as an “L4 proxy” to implement completely transparent transmission of protocols above TCP/UDP. The answer is yes. NGINX 1.9.0 or later supports ngx_stream_core_module. This module is not built by default. Add the — with-stream option under the configure command to enable this module.
The Need For Special Processing When the Forward Proxy Processes HTTPS Traffic
While serving as a reverse proxy, the proxy server usually terminates HTTPS encrypted traffic and forwards it to the backend instance. Encryption, decryption, and authentication of HTTPS traffic occur between the client and the reverse proxy server.
Critical Review
So, the goal is achieved, but it has two drawbacks:
- Static configuration: The configuration is determined when I configure Nginx by running an Ansible script. When a new service starts, I need to modify the Nginx configuration. If an existing service stops, Nginx will show an error. However, when the service comes back, which is the default behavior of the job scheduler Nomad, the Consul DNS resolution points to the new space.
- No dynamic ports: The open source version of Nginx cannot parse DNS SRV records to determine the dynamic ports of a service — this feature is available only on the paid version Nginx Plus. For now, I configure the all Services that are run with Nomad to use static ports. Then, in the Nginx configuration, I can refer to these static ports. This works for now. If the demand to oversee a high amount of services with dynamic ports arises, I could either use the Consul Template extension, a daemon with the task to watch variables and writes config files when they change, or I go back to a zero-conf router like Traeffik or Fabio.
Environment Building
1) Environment Installation
For the newly installed environment, refer to the common installation steps (content in Chinese), and directly add the —with-stream, —with-stream_ssl_preread_module, and —with-stream_ssl_module options under the «configure» command. Consider the example below for better understanding.
Add the preceding three stream-related modules for already installed and compiled environments as shown below.
2) Configure nginx.conf File
Common Problems
Using NGINX stream as a proxy of the HTTPS traffic at the TCP layer, leads to the same problem mentioned at the beginning of this article: the proxy server does not obtain the target domain name that the client wants to access. This happens because the information obtained at the TCP layer is limited to the IP address and port, without obtaining the domain name. To obtain the target domain name, the proxy must be able to extract the domain name from the upper-layer packets. Therefore, NGINX stream is not an L4 proxy in a strict sense, and it must seek help from the upper layer to extract the domain name.
Classification of HTTP/HTTPS Forward Proxy
To begin with, let’s take a closer look at the classification of the forward proxy.
Configure DNSmasq
Now you can resolve any https://*.infra addresses.
Footnotes
Considering CentOS 7 environment as an example, let’s take a look at the process in detail.
For new environment installation, refer to the common installation steps (content in Chinese) for installing the ngx_http_proxy_connect_module connect module.
Also, add ngx_http_proxy_connect_module for the existing environments as shown below.
Conclusion
This article describes two methods for using NGINX as the forward proxy for HTTPS traffic. It summarizes the principles, environment building requirements, application scenarios, and key problems of the solutions where NGINX acts as the HTTPS forward proxy using the HTTP CONNECT tunnel and NGINX stream. This article serves as a reference while you use NGINX as a forward proxy in various scenarios.
