

Path for Mobile
TechSpot means tech analysis and advice you can trust.
March 15, 2017
About Path Social Network
View Best Answer in replies below
5 Replies
Path is no fun if you don’t have any friends.
1. To invite your friends to join the social network, tap the Menu button at the top left of your screen.
2. Then tap Add Friends in the Notifications section.
4. If you choose to invite friends to Path, you can send a personalized invite or a generic one by tapping Invite next to their name then tapping Send.
MORE: 10 Best Social Apps
Send friends personalized invites
Path gives you the option to send friends a generic invite or a personalized one.
1. After you’ve selected which friend you want to invite, tap Invite next to their name.
2. Then tap the record button or Write A Note. Tapping the record button lets you record a message up to about 15 seconds. You can stop it at any time and retry if you don’t like the finished product. By tapping Write A Note, you can type in a personalized message for your friend.
3. When you’re done, tap Send.
MORE: 25 Best Android Apps
Privately message friends
A big perk of Path is its free private messaging service, which eliminates the need to even get a texting plan.
3. Confirm the in-app purchase, then your stickers will download.
4. Alternatively, tap the smiley face next to the text box within a message. At the bottom, you’ll see several stickers.
5. Tap on the pack you want, then tap the green button that has its price and confirm the in-app purchase.
MORE: Top 10 Smartphones
Once you’ve bought a sticker pack, you can send stickers to friends to your heart’s desire.
1. Within a message, tap the smiley icon next to the text box.
2. Along the bottom are all of your sticker packs. Tap the pack you’d like to use, then tap the specific sticker. The sticker will then automatically send.
MORE: The Biggest Smartphones in the World
Comment on someone’s moment
1. Tap the Friends button in the upper right, then tap a friend’s name.
2. Tap the Person button in the upper right, then tap Visit.
3. Tap the smiley icon next to a moment. You can then choose to leave an emoji-like reaction on that moment, or comment.
4. Tap within the Comment text box, then type your comment. Tap Send when you’re done.
5. You can also emote a friend’s moment by tapping the smile, laugh, gasp, frown or love emojis.
MORE: 10 Amazingly Dumb Things We Do With Smartphones
Add a photo moment
Path lets you upload photos and videos to your profile, and has a cool set of filters and effects, so you can edit photos or leave them as-is.
1. Tap the + icon in the bottom left of your home screen.
2. Tap the camera icon.
4. Tap the sun icon to enhance the image, the drop icon to blue the image’s edges and/or the scissor icon to crop the image.
5. Tap Lens, then choose a filter from one of the 15 option. Or tap Shop to purchase additional filters.
6. Tap Save, then type a caption for your photo.
7. You have the option here to tag friends and add a location by tapping I’m With and I’m At. When you’re done, tap Save.
MORE: 10 Weirdest Social Networks
Add a location moment
2. Tap the location icon.
3. Path will find places close to you. Select the spot where you are, or type in the name of the place, then tap the location.
4. Type a caption, then tap I’m Here With if you want to tag one of your Path friends that’s with you.
5. When you’re done, tap Save.
MORE: 8 Ways the Death of Cash Will Change Your Life
Add a song, book or movie moment
Want your Path friends to know what you’re listening to, reading or watching? By adding a song, book or movie moment and choosing content from Path’s database, they’ll be able to like or comment on how you’re currently spending your time.
2. Tap the musical note icon.
3. At the top of your screen, you can tap Music, Movies or Books. Tap the type of content you’re currently entertained by.
4. Type the song or artist, movie title or book or author in the text box.
5. Once you’ve selected your song, movie or book, type a caption if you want, then tap Watching With or I’m At to tag friends in the moment with you or add a location.
6. When you’re done, tap Save.
MORE: Top 10 iPhone Alternatives
Add a status
2. Tap the quotes button.
3. Type what’s on your mind, then tap I’m With or I’m At to tag Path friends or add a location.
4. When you’re done, tap Save.
MORE: Best Tech Gifts for College Graduation 2013
Add a sleep notification
2. Tap the moon icon.
3. Tap Go To Sleep or I’m Awake. The sleep/awake notification will then automatically be added to your profile.
MORE: How to Use Vine
1. Tap the + icon in the bottom left of your profile.
MORE: 10 Best Apps for the Samsung Galaxy S4
Turn on/off notifications
Although we’re sure you want to know when someone comments on one of your moments or tags you in a post, sometimes you don’t need to know the very instant it happens. It’s a battery-drainer, and you don’t need notifications popping up constantly when you’re trying to concentrate at work. Path lets you turn off notifications by type; for example, you can turn off friend request notifications but leave on comments notifications.
1. Tap the Menu button in the top left of your screen.
2. Tap the Settings wheel next to your name.
3. Scroll down to Notifications and tap the icons on or off.
Джеффри Хикс опубликовал очередную статью по PowerShell, посвященную на этот раз управлению файловыми серверами. Мы решили разбить ее на две части: построение отчетов по файловому серверу и непосредственно управление файловыми шарами. В первой части рассмотрим отчеты.
В посте будут рассмотрены следующие вопросы:
Итак, под катом вы найдете перевод статьи File Server Management with Windows PowerShell.
Получаем все сетевые папки
Вместо chi-fp01 укажем имя интересующего нас компьютера
Добавим фильтр в первоначальную команду:
Тем самым мы выводим только нужную информацию.

Но если вы ищите также и скрытые папки – те, которые заканчиваются знаком доллара ($) – фильтр придется слегка переписать:
В WMI знак процента (%) используется вместо знака подстановки (wildcard). Вывести все папки, кроме тех, которые скрыты чуть сложнее.
Получаем размер сетевой папки
Довольно часто необходима информация о том, сколько места занимают файловые шары. Используем Get-ChildItem, или его сокращение dir, и передадим результаты в Measure-Object:
В итоге вы получите информацию об общем числе объектов, размер в байтах, наименьшие и наибольшее размерах файлов. В предыдущей команде, применил фильтр. В PowerShell 3.0 то же самое можно сделать проще, однако та команда, которую я использовал, работает как v2.0, так и 3.0. Ее лучше всего запускать локально. Код в примере 1 комбинирует эту команду с нашей техникой WMI, чтобы получить отчет о размере высокоуровневых папок.
Пример 1: Отчет о размерах высокоуровневых сетевых папок
Вы можете форматировать или обрабатывать $results как вашей душе будет угодно. Нужна удобоваримая таблица? Просто используйте следующую команду:

Тем самым можно сделать полный отчет по использованию всех папок на файловом сервере не составляет труда. Сэкономьте время, воспользуетесь примером 2.
Пример 2: Отчет об использовании файловых шар
И снова я слегка отформатирую таблицу.

Получаем файлы по владельцу
Двигаемся дальше – найдем владельцев файлов. Если вы используете квоты, отчеты уже наверняка получаете. В противном случае, все, что вам нужно – это извлечь ACL файла, который включает в себя владельца, и агрегировать результаты. Лучше всего добавить владельца файла в качестве кастомного свойства
Мы можем группировать по свойству нового владельца и затем обрабатывать новый объект.
Пара усилий и вы можете применить тот же подход к файловой шаре, как указано в коде примера 3.
Пример 3: Группируем файловые шары по владельцу
Я также должен указать на то, что могут проблемы: с файлами, имя которых более 260 символов или содержит необычные символы, особенно если вы пытаетесь запустить Get-ACL. В PowerShell 3.0 этот командлет имеет параметр -LiteralPath, что помогает решить вышеуказанные проблемы.
Опять выведем читаемую таблицу.

Get files by creation date
The last reporting technique I want to demonstrate is creating a report with the latest generated files. In fact, we create a collection of objects that we can use in several ways. You might want to use objects, or delete or move files, or you might want to build a report that you can send to management. Always create PowerShell commands so that you can use them later.
Determining the age of a file is not easy. In PowerShell, a file object (an object of type file) has several properties that you might want to use. For example, command:
produces the output shown in the screenshot below.
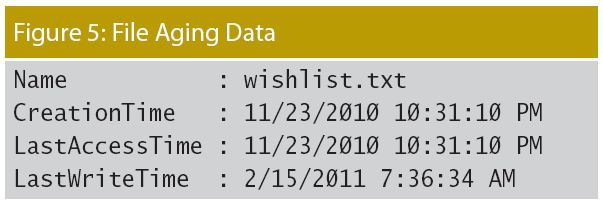
Personally, I think it’s better to use LastWriteTime, which indicates when the file was last accessed. I have seen situations where LastAccessTime was updated through third-party programs, such as antivirus, which in itself does not mean the truth. And LastAccessTime has been deactivated since Windows Vista, though you can turn it on. You also need to be careful because these values can change depending on whether you are copying or moving files between disks (between volumes). But you can decide for yourself. Using this file as an example, we can get PowerShell to tell us how old the file is. See example 4.
Example 4. Determine the age of files
The Age property is a TimeSpan object, and the Days property is simply the TotalDays property of that object. But since we can do this for one file, we can do it for others. Let’s take a look at my shared folder and find all the files that haven’t changed in the last 400 days.
I’ll go ahead and include the owner of the file as well. The screenshot below shows the results from running this code in a remote session on my file server.

I can store these results in a variable and use them at any time. Since I have the full name of the file, passing it to another command like Remove-Item is easy.
One of my favorite techniques is to determine how many files have changed in a year.
As you can see in the screenshot, everything looks neat. Need details? You can parse the Group property, which is a collection of files.

Example 5: Determine file modification period
The image below shows the result when I ran this code on my scripts folder, which I know has a dense age distribution. My code doesn’t include the actual files, but it would be too hard to change my example.
This post is based on the first part of the article File Server Management with Windows PowerShell.
By the way, Jeffrey Hicks writes about how to find files using PowerShell and WMI in his blog (parts 1 and 2).
Only registered users can participate in the survey. Come in, please.
The second part of the article discusses the issues of creating and deleting file shares and delegating access rights to them. Would it be interesting to translate it?
Voted by 143 users.
14 users abstained.
