
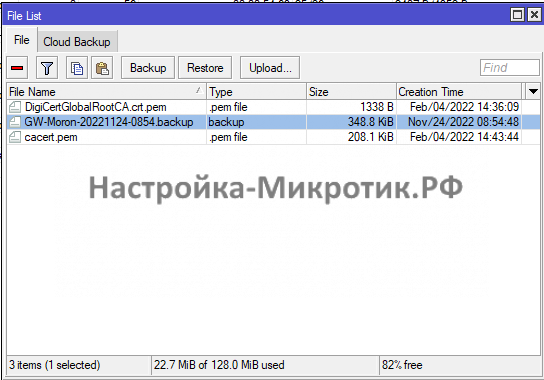
Перенос конфигурации RouterOS с устройства на устройство возможен только через export и import. Использование бинарного файла не рекомендуется, но бывает единственным возможным способом перенести сертификаты, либо когда другого бэкапа не делалось.
- Наличие бэкапов
- Сброс нового устройства
- Восстановление бинарного бэкапа
- Восстановление экспорта бэкапа
- Навигация по записям
- System Backup
- Exporting Configuration
- Importing Configuration
- Configuration Reset
- Import troubleshooting
- Configuration parts to watch out for in exported .rsc files
- Overview
- Configuration Undo and Redo
- Safe Mode
- System Backup and Restore
- Configuration Export and Import
- Configuration Export
- Configuration Import
- Auto Import
- Import troubleshooting
- Configuration parts to watch out for in exported .rsc files
- Configuration Reset
- Сохранение и восстановление настроек MikroTik
- Перенос настроек MikroTik на другое устройство
- Частичный перенос настроек
- Автоматическое создание резервных настроек MikroTik и отправка на email
- Создание скрипта
- Настройка планировщика
Наличие бэкапов
У вас должны быть настроены бэкапы через почту, либо SSH:
Сброс нового устройства
Новое устройство должно быть полностью без настроек:
Восстановление бинарного бэкапа
Files > File
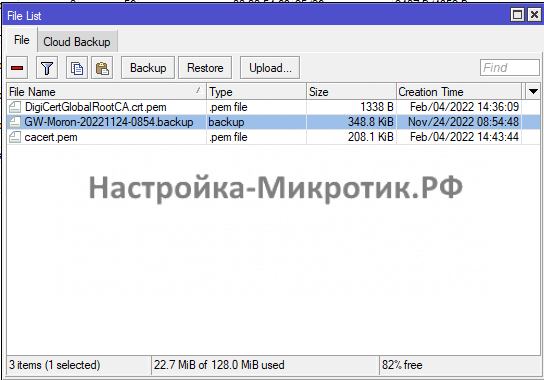
Данный способ идеально работает на той самой железке, где сделан бэкап. Перенос на другую, даже полностью идентичную может не дать ожидаемый результат, к тому могут возникнуть проблемы в виде перепутанных интерфейсов и фантомных глюков.
Восстановление экспорта бэкапа
Работает в 100%, за исключением восстановления сертификатов, об этом нужно заботиться отдельно и вести реестр установленных сертификатов.
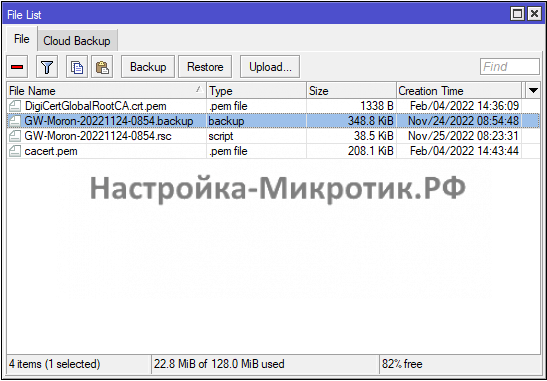
Берем бэкап, если вы не делали автоматический, то в консоли export file=backup и перетягиваем из files на рабочий стол.
Подключаем ПК в последний порт MikroTik и входим на него через WinBox по MAC-адресу:
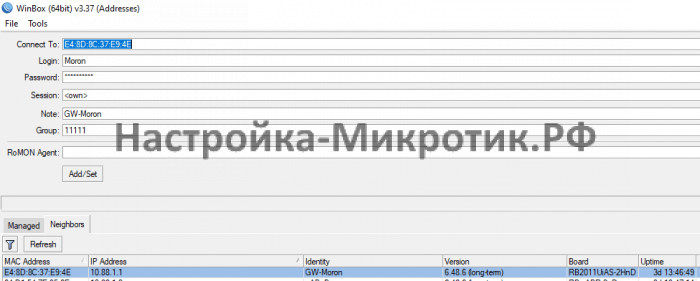
Подключение в последний порт даст настроить без поиска разрыва конфигурации после отвала маршрутизатора.
Открываем конфигурацию в Notepad++ и видим, что она разбита по блокам, где новый блок начинается с слеша /
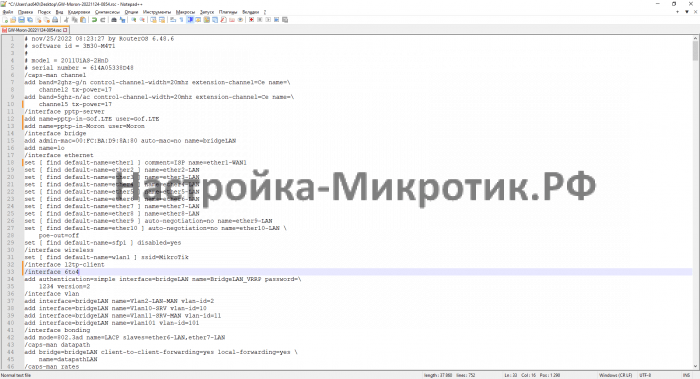
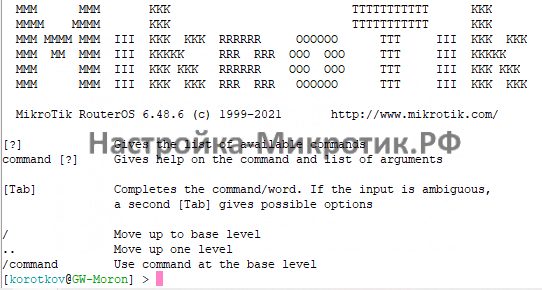
Задача для первого переноса конфигурации переносить каждый блок:

Вставляем до блока /interface bridge port
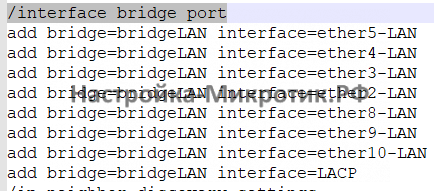
После переключения можно вставлять остальные блоки конфигурации.
После переноса конфигурации настройте пароль администратора и если есть привязка по мак адресу — смените MAC на WAN порту.

Applies to RouterOS: ALL
- system backup;
- system restore from a backup;
- configuration export;
- configuration import;
- system configuration reset.
The configuration backup can be used for backing up MikroTik RouterOS configuration to a binary file, which can be stored on the router or downloaded from it using FTP for future use. The configuration restore can be used for restoring the router’s configuration, exactly as it was at the backup creation moment, from a backup file. The restoration procedure assumes the configuration is restored on the same router, where the backup file was originally created, so it will create partially broken configuration if the hardware has been changed.
The configuration export can be used for dumping out complete or partial MikroTik RouterOS configuration to the console screen or to a text (script) file, which can be downloaded from the router using FTP protocol. The configuration dumped is actually a batch of commands that add (without removing the existing configuration) the selected configuration to a router. The configuration import facility executes a batch of console commands from a script file.
System reset command is used to erase all configuration on the router. Before doing that, it might be useful to backup the router’s configuration.
System Backup
The system backup feature allows you to effortlessly save and load device’s configuration. Read more about the backup feature in the System/Backup section.
Exporting Configuration
Command name: /export
The export command prints a script that can be used to restore configuration. The command can be invoked at any menu level, and it acts for that menu level and all menu levels below it. The output can be saved into a file, available for download using FTP.
- file=[filename] — saves the export to a file
[admin@MikroTik] > ip address print
Flags: X - disabled, I - invalid, D - dynamic # ADDRESS NETWORK BROADCAST INTERFACE 0 10.1.0.172/24 10.1.0.0 10.1.0.255 bridge1 1 10.5.1.1/24 10.5.1.0 10.5.1.255 ether1
[admin@MikroTik] >
To make an export file:
[admin@MikroTik] ip address> export file=address
[admin@MikroTik] ip address>
To see the files stored on the router:
[admin@MikroTik] > file print # NAME TYPE SIZE CREATION-TIME
0 address.rsc script 315 dec/23/2003 13:21:48
[admin@MikroTik] >
Starting from v5.12 compact export was added. It allows to export only part of configuration that is not default RouterOS config.

Note: Starting from v6rc1 «export compact» is default behavior. To do old style export use export verbose
For example compact OSPF export:
[admin@SXT-ST] /routing ospf> export compact
# jan/02/1970 20:16:32 by RouterOS 5.12
# software id = JRB7-9UGC
#
/routing ospf instance
set [ find default=yes ] redistribute-connected=as-type-1
/routing ospf interface
add disabled=yes interface=wlan1 network-type=point-to-point
/routing ospf network
add area=backbone network=10.255.255.36/32
add area=backbone disabled=yes network=10.5.101.0/24
add area=backbone network=10.10.10.0/24
[admin@SXT-ST] /routing ospf>
Compact export introduces another feature that indicates which part of config is default on RouterOS and cannot be deleted. As in example below ‘*’ indicates that this OSPF instance is part of default configuration.
[admin@SXT-ST] /routing ospf instance> print
Flags: X - disabled, * - default 0 * name="default" router-id=0.0.0.0 distribute-default=never redistribute-connected=as-type-1 redistribute-static=no redistribute-rip=no redistribute-bgp=no redistribute-other-ospf=no metric-default=1 metric-connected=20 metric-static=20 metric-rip=20 metric-bgp=auto metric-other-ospf=auto in-filter=ospf-in out-filter=ospf-out
List of default config by menus that cannot be removed:
Importing Configuration
Command name: /import
- file=[filename] — loads the exported configuration from a file to router
In RouterOS it is possible to automatically execute scripts — your script file has to be named anything.auto.rsc — once this file is uploaded using FTP to the router, it will automatically be executed, just like with the ‘/import’ command. This method only works with FTP.
Once the file is uploaded, it is automatically executed. Information about the success of the commands that were executed is written to anything.auto.log
[admin@MikroTik] > import address.rsc
Opening script file address.rsc
Script file loaded and executed successfully
[admin@MikroTik] >
Configuration Reset
Command name: /system reset-configuration
- keep-users: keeps router users, passwords and ssh host keys(since v6.45.1)
- no-defaults: doesn’t load any default cofigurations, just clears everything
- skip-backup: automatic backup is not created before reset, when yes is specified
- run-after-reset: specify export file name to run after reset
Note: If run-after-reset is set then no-defaults parameter will be ignored and only the specified script will be loaded!

Warning: Warning: If the device has a folder named «flash», then the confscript.rsc file must be stored in that folder to work with «run-after-reset» command. Everything outside this folder is stored on the RAM drive which contents are deleted on reboot or power cycle.
Warning: If the router has been installed using netinstall and had a script specified as the initial configuration, the reset command executes this script after purging the configuration. To stop it doing so, you will have to reinstall the router.
[admin@MikroTik] > system reset-configuration
Dangerous! Reset anyway? [y/N]: n
action cancelled
[admin@MikroTik] >
Import troubleshooting
Configuration parts to watch out for in exported .rsc files
Things that should be removed from export files that were created with: «/export», before attempting import on new device.
- Interface renaming that is in conflict with default ethernet naming scheme.
/interface ethernet
set [ find default-name=ether5 ] auto-negotiation=no name=ether1-gateway
set [ find default-name=ether6 ] name=ether2
set [ find default-name=ether7 ] name=ether3
set [ find default-name=ether8 ] name=ether4
set [ find default-name=ether1 ] name=ether5
set [ find default-name=ether2 ] name=ether6
set [ find default-name=ether3 ] name=ether7
set [ find default-name=ether4 ] name=ether8
- In older version exports default entries might show with «add» instead of «set» command. That should be edited before import to avoid errors.
- Check if interface/module: ether/wlan/modem/com/etc count match on new and old device. If there will some missing that will end up in error during .rsc import.
- Reset the configuration on that device.
- Run import command again with «verbose=yes» argument. It will stop also stop import process on problem which you already encountered, but will also show place where export failed. That way showing you place where things need to be edited in .rsc import file
If your configuration relies on interfaces that might not yet have started up upon command execution, it is suggested to introduce delays, or to monitor until all needed interfaces are available. This example script allows you to set how many interfaces you are expecting, and how long to wait until they become available:
{
:local i 0
#Number of interfaces. It is necessary to reconfigure this number for each device (/interface print count-only)
:local x 10
#Max time to wait
:local t 30
while ($i < $t && [:len [/interface find]] < $x) do={
:put $i
:set $i ($i + 1)
:delay 1
}
if ($i = $t) do={
:log warning message="Could not load all physical interfaces"
} else={
#Rest of your script
}
}
The above script will wait until there are 10 interfaces visible, or 30 seconds. If there are no 10 interfaces in this time, it will put a message in the log. Modify the variables according to your needs.
Overview
This article describes a set of commands used for configuration management.
Configuration Undo and Redo
Any action done in GUI or any command executed from the CLI is recorded in . You can undo or redo any action by running or commands from the CLI or by clicking on Undo, and Redo buttons from the GUI.
A simple example to demonstrate the addition of the firewall rule and how to undo and redo the action:
[admin@v7_ccr_bgp] /ip/firewall/filter> add chain=forward action=drop
[admin@v7_ccr_bgp] /ip/firewall/filter> print
Flags: X - disabled, I - invalid; D - dynamic
0 X chain=input action=drop protocol=icmp src-address=10.155.101.1 log=no
log-prefix=""
1 chain=forward action=drop
[admin@v7_ccr_bgp] /ip/firewall/filter> /system/history/print
Flags: U - undoable, R - redoable, F - floating-undo
Columns: ACTION, BY, POLICy
ACTION BY POLIC
F filter rule added admin write
U --- write
[admin@v7_ccr_bgp] /ip/firewall/filter>
We have added a firewall rule and in we can see all that is being done.
Let’s undo everything:
[admin@v7_ccr_bgp] /ip/firewall/filter> /undo
[admin@v7_ccr_bgp] /ip/firewall/filter> print
Flags: X - disabled, I - invalid; D - dynamic
0 X chain=input action=drop protocol=icmp src-address=10.155.101.1 log=no
log-prefix=""
[admin@v7_ccr_bgp] /ip/firewall/filter>
As you can see firewall rule disappeared.
Now redo the last change:
[admin@v7_ccr_bgp] /ip/firewall/filter> /redo
[admin@v7_ccr_bgp] /ip/firewall/filter> print
Flags: X - disabled, I - invalid; D - dynamic
0 X chain=input action=drop protocol=icmp src-address=10.155.101.1 log=no
log-prefix=""
1 chain=forward action=drop
[admin@v7_ccr_bgp] /ip/firewall/filter>
System history is capable of showing exact CLI commands that will be executed during Undo or Redo actions even if we perform the action from GUI, for example, detailed history output after adding TCP accept rule from WinBox:
[admin@v7_ccr_bgp] /system/history> print detail
Flags: U - undoable, R - redoable, F - floating-undo F redo= /ip firewall filter add action=accept chain=forward disabled=no log=no \ log-prefix="" protocol=tcp undo=/ip firewall filter remove *4 action="filter rule added" by="admin" policy=write time=oct/10/2019 18:51:05 F redo=/ip firewall filter add action=accept chain=forward undo=/ip firewall filter remove *3 action="filter rule added" by="admin" policy=write time=oct/10/2019 18:49:03
U redo="" undo="" action="---" by="" policy=write time=sep/27/2019 13:07:35
[admin@v7_ccr_bgp] /system/history>
Safe Mode
It is sometimes possible to change router configuration in a way that will make the router inaccessible (except from local console). Usually, this is done by accident, but there is no way to undo the last change when the connection to the router is already cut. Safe mode can be used to minimize such risk.
[admin@MikroTik] ip route>[CTRL]+[X]
[Safe Mode taken]
[admin@MikroTik] ip route<SAFE>
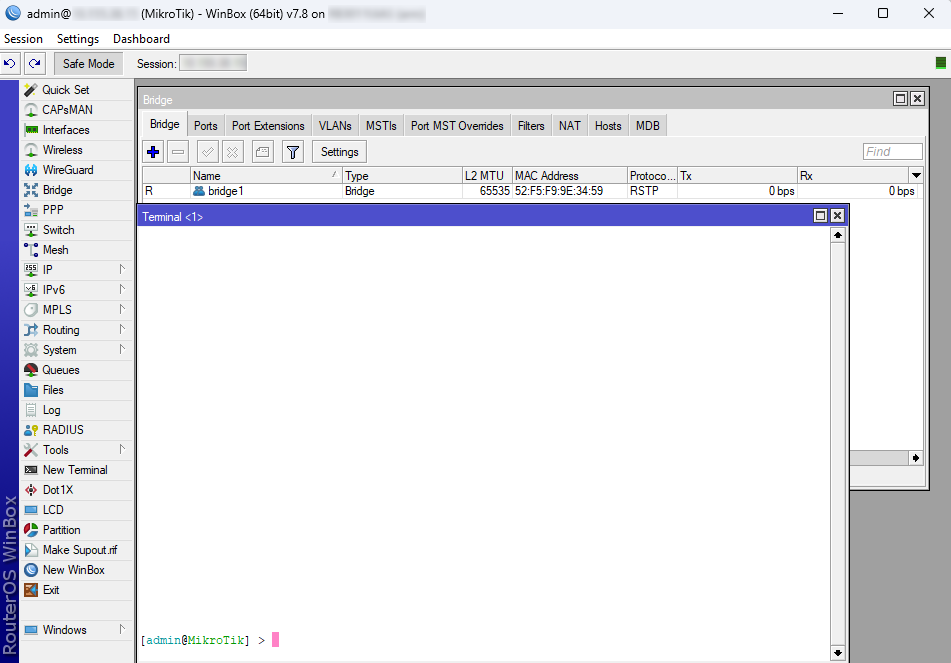
Message Safe Mode taken is displayed and prompt changes to reflect that session is now in safe mode. All configuration changes that are made (also from other login sessions), while the router is in safe mode, are automatically undone if the safe mode session terminates abnormally. You can see all such changes that will be automatically undone and tagged with an F flag in the system history:
[admin@MikroTik] /ip/route>
[Safe Mode taken]
[admin@MikroTik] /ip/route<SAFE> add
[admin@MikroTik] /ip/route<SAFE> /system/history/print
Flags: U, F - FLOATING-UNDO
Columns: ACTION, BY, POLICY ACTION BY POLICY
F route 0.0.0.0/0 added admin write
[admin@MikroTik] >
Hijacking Safe Mode from someone - unroll/release/don't take it [u/r/d]:
- [u] — undoes all safe mode changes, and puts the current session in safe mode.
- [r] — keeps all current safe mode changes, and puts the current session in a safe mode. The previous owner of safe mode is notified about this:
[admin@MikroTik] ip firewall rule input
[Safe mode released by another user]
- [d] — leaves everything as-is.
System Backup and Restore
System backup is the way to completely clone routers configuration in binary format. The backup file contains not just configuration, but also statistics data, logs, etc. The backup file is used to save and restore configuration on the same device, for moving configuration to other devices, use export files instead.
Backup files contain sensitive information (passwords). The file can be encrypted, but even then backups should be stored only in a secure location.
Restoring backup files should be done only on the same router. A backup must not be used to clone configuration on multiple network routers.
Example to save and load backup file:
[admin@MikroTik] > system backup save name=test password=123
Configuration backup saved
[admin@MikroTik] > file print
# NAME TYPE SIZE CREATION-TIME
0 test.backup backup 12567 sep/08/2004 21:07:50
[admin@MikroTik] >
[admin@MikroTik] > system backup load name=test password=123
Restore and reboot? [y/N]:
y
Restoring system configuration
System configuration restored, rebooting now
Configuration Export and Import
RouterOS allows to export and import of parts of the configuration in plain text format. This method can be used to copy bits of configuration between different devices, for example, clone the whole firewall from one router to another.
An export command can be executed from each individual menu (resulting in configuration export only from this specific menu and all its sub-menus) or from the root menu for complete config export and is available for CLI only.
Configuration Export
For example export configuration from the menu and save it to a file:
[admin@MikroTik] > /ip address print Flags: X - disabled, I - invalid, D - dynamic # ADDRESS NETWORK BROADCAST INTERFACE 0 10.1.0.172/24 10.1.0.0 10.1.0.255 bridge1 1 10.5.1.1/24 10.5.1.0 10.5.1.255 ether1 [admin@MikroTik] > /ip address export file=address [admin@MikroTik] > /file print # NAME TYPE SIZE CREATION-TIME 0 address.rsc script 315 dec/23/2003 13:21:48 [admin@MikroTik] >
For example, the IPSec default policy will not be exported, and if we change one property then only our change will be exported:
[admin@rack1_b4] /ip ipsec policy> print Flags: T - template, X - disabled, D - dynamic, I - inactive, * - default 0 T * group=default src-address=::/0 dst-address=::/0 protocol=all proposal=default template=yes [admin@rack1_b4] /ip ipsec policy> export # apr/02/1970 17:59:14 by RouterOS 6.22 # software id = DB0D-LK67 # [admin@rack1_b4] /ip ipsec policy> set 0 protocol=gre [admin@rack1_b4] /ip ipsec policy> export # apr/02/1970 17:59:30 by RouterOS 6.22 # software id = DB0D-LK67 # /ip ipsec policy set 0 protocol=gre
The * flag, it indicates that the entry is system default and cannot be removed manually.
Here is the list of all menus containing default system entries
Configuration Import
Root menu command import allows running configuration script from the specified file. Script file (with extension «.rsc») can contain any console command including complex scripts.
For example, load saved configuration file
[admin@MikroTik] > import address.rsc
Opening script file address.rsc
Script file loaded and executed successfully
[admin@MikroTik] >
In the event that the device has a default or existing configuration that requires replacement, it is necessary to initiate a configuration reset.
Auto Import
It is also possible to automatically execute scripts after uploading to the router with FTP or SFTP. The script file must be named with the extension *.auto.rsc. Once the commands in the file are executed, a new *.auto.log file is created which contains import success or failure information.
«.auto.rsc» in the filename is mandatory for a file to be automatically executed.
Import troubleshooting
Configuration parts to watch out for in exported .rsc files
Things that should be removed from export files that were created with «/export», before attempting import on a new device.
- Interface renaming is in conflict with the default ethernet naming scheme.
/interface ethernet
set [ find default-name=ether5 ] auto-negotiation=no name=ether1-gateway
set [ find default-name=ether6 ] name=ether2
set [ find default-name=ether7 ] name=ether3
set [ find default-name=ether8 ] name=ether4
set [ find default-name=ether1 ] name=ether5
set [ find default-name=ether2 ] name=ether6
set [ find default-name=ether3 ] name=ether7
set [ find default-name=ether4 ] name=ether8
- In older version exports default entries might show with «add» instead of the «set» command. That should be edited before import to avoid errors.
- Check if the total number of physical interfaces count matches the new and old devices. If there will some missing that will end up in error during .rsc import.
- Reset the configuration on that device.
- Run the import command again with the «verbose=yes» argument. It will stop also stop the import process on a problem that you already encountered, but will also show the place where the export failed. That way showing you the place where things need to be edited in the .rsc import file.
If your configuration relies on interfaces that might not yet have started up upon command execution, it is suggested to introduce delays or to monitor until all needed interfaces are available. This example script allows you to set how many interfaces you are expecting, and how long to wait until they become available:
{
:local i 0
#Number of interfaces. It is necessary to reconfigure this number for each device (/interface print count-only)
:local x 10
#Max time to wait
:local t 30
while ($i < $t && [:len [/interface find]] < $x) do={
:put $i
:set $i ($i + 1)
:delay 1
}
if ($i = $t) do={
:log warning message="Could not load all physical interfaces"
} else={
#Rest of your script
}
}
The above script will wait until there are 10 interfaces visible, or 30 seconds. If there are no 10 interfaces at this time, it will put a message in the log. Modify the variables according to your needs.
Configuration Reset
RouterOS allows resetting configuration with command
After the configuration reset command is executed router will reboot and load the default configuration.
The backup file of the existing configuration is stored before reset. That way you can easily restore any previous configuration if the reset is done by mistake.
If the router has been installed using Netinstall and had a script specified as the initial configuration, the reset command executes this script after purging the configuration. To stop it from doing so, you will have to reinstall the router.
It is possible to override the default reset behavior with the parameters below:
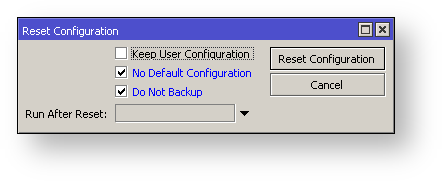
For example hard reset configuration without loading default config and skipping backup file:
[admin@MikroTik] > /system reset-configuration no-defaults=yes skip-backup=yes
Dangerous! Reset anyway? [y/N]: y
And the same using Winbox:
Имеется офис с постоянной круглосуточной работой. Клиент пожелал, что-бы у него в запасе был еще один точно такой-же Микротик, который в любой момент может заменить рабочий. Замена будет осуществляться вручную. Так как на Микротике постоянно происходят изменения, бекап и экспорт каждую неделю падают на мыло клиенту. Имеем два одинаковых роутера: 951G-2HnD с одинаковыми Firmware 3.18 и версией ОС: 6.19. Выкладываю инструкцию по переносу настроек на бекапный роутер для клиента, с пошаговыми действиями.
1) скачиваем экспорт с мыла

2) приводим файл экспорта к формату автоматического запуска на роутере путем добавления приставки .auto

3) берем бекапный роутер, сбрасываем настройки и не применяем начальную конфигурацию

При таком переносе корректно подменяются все MAC-адреса без разрыва соединения, настройки экспортируются идеально. Почему такие сложности? Об этом я писал в этой статье. Помните: бекап в микротике нужен для того, что-бы восстановить настройки на одном и том же устройстве. Для переноса нужно использовать экспорт (при бекапе не переносятся настройки радиоинтерфейсов + сложности переноса настроек в проводные интерфейсы из-за разных MAC).
Если кто то думает что, что бы, перенести настройки с точки в точку через пункт Files /backup/restore то данных подход не подойдет, через него можно выгрузить и загрузить только настройки одного устройства.
Как же сделать дубль настроек на другое устройство?
У меня под рукой 2 абсолютно одинаковых MikroTik (hAP) RB951Ui-2ND
Одно устройство я настраивал ручками каждый пункт и не хотелось проводить те же настройки повторно.
Приступим к Бекапу
для создания резервной копии настроек откройте консоль (ssh/terminal) неважно и выполните команду
Что ж. как поставить эти же настройки на другое устройство
для начала нужно сбросить его настройки

После данного сброса увы но подключиться легко не получиться.
откройте утилиту WinBox
и подключитесь к устройству по MAC адресу
в списке сканирования сети
нажмите на мак адрес устройства, при этом мак отобразиться в строке подключения

после этого назначьте первому интерфейсу статический адрес к примеру 192.168.0.1
это можно сделать через пункт IP-Addresses
 После этого на вашем ноутбуке (ПК) нужно назначить любой адрес этой же подсети и по ФТП (без пароля) загрузить наш бекап и через терминал выполнить его импорт
Переносить лучше руками, использую команду export на прошлом устройстве. На новом сбросить конфиг и построчно импортнуть через терминал.
По результатам нужно будет настроить только wi-fi.
Но я бы вам посоветовал перед покупкой нового поиграться со старым.
1) Проверить или просто заменить БП (если не знаете как проверять)
2) Перешить используя netinstall и воссоздать конфиг с нуля, руками без копирования старого.
Вряд ли сломался.
Перепрошить на свежий.
Сбросить настройки.
Настроить с нуля.
Подключиться терминалом или открыть новую терминальную сессию в winbox
export file config
Скопировать с микротика файл config.rsc (текстовый файл). Это и есть полный конфиг, заполненный командами, которые настроят устройство.
К вышеприведенным советам можно добавить, что если устройство работает в условиях производства, то не лишним будет его прочистить от пыли. При всей своей невесомости — пыль электропроводная штука!
Прошивка и версия ОС это одно и то же ?
WebFig v6.37.1 (stable)
Аналогичный роутер Mikrotik RB 2011 UiAS-rm. Отваливается периодически сеть. Роутер служит туннелем до сервера предприятия. Раньше проблема решалась сотрудниками с помощью перезагрузки розетки. Через какое-то время и это не помогло, только winbox мог помочь с перезагрузкой. Иногда доступ к удалёнке(1С) есть, а в инет нет, перезагрузка помогает. Иногда пишет что нет соединение с DNS, но при этом в телеграмме мог общаться. Залить настройки на другой микротик пробовал — пока не получается. Но особо много времени на это не тратил.
Прошивка 6.37.1
Операционная система RouterOS позволяет сохранить настройки MikroTik, и быстро восстановить резервную копию, чтобы возобновить работу устройства. Это очень удобно, если вы напортачили с настройками, или вам нужно выполнить одинаковую настройку нескольких устройств MikroTik. В этой статье мы расскажем, как создать резервную копию настроек MikroTik, восстановить ее или перенести на другое устройство.
Сохранение и восстановление настроек MikroTik
Чтобы сохранить настройки MikroTik, выполните следующее:
- Откройте в программе Winbox меню Files.
- Нажмите кнопку Backup.
- Во всплывающем окне нажмите кнопку Backup.
При желании можете указать в поле Name имя файла и пароль в поле Password.
По умолчанию файлы бэкапов шифруются, чтобы злоумышленники не смогли извлечь из них пароли, например, к Wi-Fi. Галочка Don’t encrypt позволяет отключить шифрование файла с резервными настройками.

После этого в списке появится файл с именем MikroTik-xxxxxxxx-xxxx.backup , где ххххххxx-хххх — это дата и время создания файла.

Внимание! Файл MikroTik-xxxxxxxx-xxxx.backup предназначен для восстановления настроек только на устройстве, на котором он создан. Его нельзя использовать для переноса настроек на другое устройство. Иначе у вас перенесутся MAC-адреса интерфейсов, в сети будут два одинаковых устройства и возникнет конфликт.
Для переноса настроек используются специальные файлы в текстовом формате, описанные ниже в разделе Перенос настроек MikroTik на другое устройство.
Далее резервную копию конфигурации MikroTik можно сохранить на компьютер, перетащив файл на рабочий стол или в проводник Windows.

Перед восстановлением настроек, нужно сбросить все настройки устройства, чтобы в нем не остались какие-то настройки из текущей конфигурации.
- Откройте меню System — Reset Configuration.
- Поставьте галочку No Default Configuration.
- Нажмите кнопку Reset Configuration.
- В всплывающем окне нажмите Yes для сброса настроек и перезагрузки устройства.

После перезагрузки подключайтесь к устройству по MAC адресу, поскольку IP адрес будет отсутствовать. В программе Winbox нужно нажать мышкой на MAC-адрес устройства и нажать кнопку Connect.

Чтобы восстановить конфигурацию MikroTik, выполните следующее:
- Откройте меню Files.
- Выберите файл с резервной копией.
- Нажмите кнопку Restore.
- В появившемся окне нажмите кнопку Restore.
Если вы делали бэкап с паролем, то введите пароль в поле Password. - В всплывающем окне нажмите Yes для восстановления конфигурации и перезагрузки устройства.

Перенос настроек MikroTik на другое устройство
Для переноса настроек на другое устройство MikroTik, нужно сохранить настройки в файл в текстовом виде. Этот файл можно будет редактировать, если возникнут проблемы при переносе настроек.
Переносить настройки можно только на устройства MikroTik со схожей аппаратной конфигурацией. Вы не сможете перенести настройки с роутера на 10 LAN портов, на роутер с 5-ю LAN портами. При этом будут выдаваться ошибки. Можно конечно вручную отредактировать файл с настройками, но это довольно сложный и долгий процесс.
Чтобы сохранить настройки MikroTik в текстовом формате, откройте меню New Terminal и выполните следующую команду:
Далее нужно скопировать созданный файл в другое устройство. Для этого сначала перетащите файл на рабочий стол Windows. После этого перетащите его в новое устройство в меню Files.
Перед импортированием настроек, нужно сбросить конфигурацию устройства, иначе будет конфликт с текущими настройками и при импорте будут выдаваться ошибки.
- Откройте меню System — Reset Configuration.
- Поставьте галочку No Default Configuration.
- Нажмите кнопку Reset Configuration.
- В всплывающем окне нажмите Yes для сброса настроек и перезагрузки устройства.

Чтобы импортировать настройки MikroTik, откройте меню New Terminal и выполните следующую команду:
При переносе настроек между похожими роутерами MikroTik с одинаковым количеством портов, но с разными процессорами или памятью, во время импорта могут возникать ошибки. Я как-то пытался перенести настройки между двумя очень схожими роутерами. При этом выдавало ошибку, что указанная частота памяти не поддерживается устройством. В этом случае откройте файл с настройками на компьютере, отредактируйте необходимую настройку или удалите ее.
Частичный перенос настроек
Бывают ситуации, когда нужно сохранить часть настроек, например, правила фаервола, скрипты, NAT, правила маркировки пакетов и т.п. Для этого помогут следующие команды:
ip address export file=ip.rsc
ip firewall mangle export file=mangle.rsc
ip firewall nat export file=nat.rsc
ip firewall filter export file=filter.rsc
queue simple export file=simple.rsc
ip dns export file=dns.rsc
files backup export file=backup.rsc
system script export file=script.rsc
system scheduler export file=scheduler.rsc
tool e-mail export file=email.rsc
ip firewall address-list export file=address-list.rsc
ip route export file=route.rsc
ip dhcp-server network export file=network.rsc
queue type export file=type.rsc
queue tree export file=tree.rsc
queue simple export file=simple.rsc
interface ethernet export file=ethernet.rsc
ip pool export file=pool.rsc
ppp profile export file=profile.rsc
log export file=log.rsc
Автоматическое создание резервных настроек MikroTik и отправка на email
Чтобы не забывать делать резервные копии конфигурации MikroTik, вы можете автоматизировать этот процесс и отправлять бэкапы себе на email.
Создание скрипта
Откройте меню System — Scripts и нажмите «красный плюсик», чтобы добавить новый скрипт. В поле Name укажите название скрипта, в поле Source вставьте скрипт и нажмите кнопку OK.

Чтобы протестировать работу скрипта, нажмите кнопку Run Script, и на ваш почтовый ящик будут высланы резервные копии. Процесс выполнения скрипта можно отслеживать в меню Log.
Скрипт для отправки резервной копии настроек MikroTik на email:
Для RouterOS v6.x

Настройка планировщика
Теперь нужно настроить с какой периодичностью будут создаваться резервные копии, и отправляться на email. Для этого настроим планировщик (Sheduler).
Откройте меню System — Sheduler и нажмите кнопку «плюсик», чтобы добавить новую задачу.

В открывшемся окне настраиваем параметры задачи:
- в поле Name указываем имя задачи, например send_backup_to_email;
- в поле Interval указываем с какой периодичностью будет выполняться скрипт. Мы указали интервал 24 часа. Для отладки работы планировщика укажите интервал 5 минут и текущее время Start Time. И не забудьте настроить время на MikroTik в меню System — Clock;
- в поле On Event указываем, какую команду необходимо выполнить при запуске задачи. Мы указали команду /system script run backup_to_email, которая запускает скрипт backup_to_email;
- нажимаем кнопку OK для сохранения задачи.

Теперь каждый день в 00:00:00 будет создаваться резервная конфигурация MikroTik и отправляться вам на email.
