
- Траблы с фаерволом микротика
- Router refused connection mikrotik перевод
- Re: MikroTik Mobile app “Connection Refused”
- Re: MikroTik Mobile app “Connection Refused”
- Сбой подключения к роутеру Mikrotik
- MikroTik
- RB3011UiAS перестал пускать по белому ip.
- RB3011UiAS перестал пускать по белому ip.
- WinBox не подключается к Mikrotik
- Ошибка при подключении к Mikrotik используя WinBox
- WinBox и Mikrotik
- Сбой подключения к роутеру Mikrotik
- MikroTik
- RB3011UiAS перестал пускать по белому ip.
- RB3011UiAS перестал пускать по белому ip.
- Mikrotik router refused connection что это
- RB3011UiAS перестал пускать удаленно
- Mikrotik router refused connection что это
- Утратил доступ к MikroTik из WAN и LAN через WinBox (Router OS 6. 1) — взломали?
- Ошибка при подключении к Mikrotik используя WinBox
- Connection refused
- Re: Connection refused
- Re: Connection refused
- Re: Connection refused
- Re: Connection refused
- Re: Connection refused
- Re: Connection refused
- Re: Connection refused
- Re: Connection refused
- Connecting to the Router
- Router without Default Configuration
- Configuring IP Access
- Configuring Internet Connection
- Dynamic Public IP
- Static Public IP
- PPPoE Connection
- Verify Connectivity
- Protecting the Router
- User Password Access
- MAC Connectivity Access
- Neighbor Discovery
- IP Connectivity Access
- Administrative Services
- Other Services
- Port Forwarding
- Setting up Wireless
- Protecting the Clients
- Blocking Unwanted Websites
- Troubleshooting
- Troubleshoot if ping fails
- Summary
- Starting Winbox
- Run Winbox on macOS
- Interface Overview
Траблы с фаерволом микротика
Сабж, подскажите дураку что и как нужно. Проблема в том, что я с телефона даже не могу подключится к тому-же ssh, коннект идет, а вот пакеты обратно в refuse уходят.
Делал по вот этому гайду
Знаю что микротики(фаервол конкретно iptables) кому-то простые, но я никогда с ними не работал и даже в душе не знаю что с ним делать

Покажи правила файрвола и как именно коннектишься(с какого ip на какой, через какой интерфейс и т.д.)

С ноутбуком и все что кабелем коннектится работает отлично
ether1 это WAN ether2 это мой ноутбук
4 + wifi = bridge1
натом маскарадинг настроенный
Конекчусь с телефона, вайфай, айпи выдан DHCP но присвоен как static, 10.7.0.23
В ответ connection refused
Пытаюсь с телефона зайти на 10.7.0.20(мой ноутбук) порт 19999 netdata, в ответ connection refused
И как мне кажется, в локалке именно через вайфай никто не получает доступа друг к другу
Временно убери DROP для invalid пакетов — не всё может проходить нормально через conntrack, прецеденты у меня были(и на чистом Linux и на микротиках)
Router refused connection mikrotik перевод
Thu Jul 23, 2020 7:18 pm
Re: MikroTik Mobile app “Connection Refused”
Fri Jul 24, 2020 9:51 am
Are your PC and your phone in the same network, when you connect? There might be firewall rules restricting access from different IP addresses.
When connected with Winbox, you can also see the «log» for any messages in the router.
Also make sure that both Winbox and the mobile app are upgraded, and your RouterOS is also upgraded. Older versions of RouterOS might not allow net mobile app to connect, as the security was improved lately. So upgrading RouterOS could also help.
Re: MikroTik Mobile app “Connection Refused”
Fri Jul 24, 2020 4:23 pm
As normis stated, (must be a slow day in Riga for the sultan to answer the minions questions!! ;-P )
(4) Lastly, look under tools MAC and MAC WINBOX SERVER specifically — see which interface list you have chosen to allow access to winbox via mac.
Ensure your smart phone is included in that interface listing.
Сбой подключения к роутеру Mikrotik
Что делать когда winbox не может подключиться к роутеру Mikrotik?
«Could not connect to 192.168.88.1:80 — no response!»
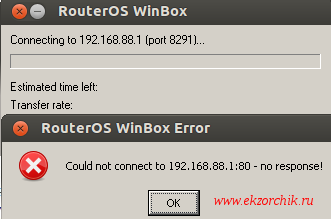
Вот что тогда делать, данный роутер Mikrotik RB951Ui-2Hnd не оборудован консольным портом, чтобы сбросить все настройки.
На заметку : все дальнейшие действия происходят на моей рабочей системе Ubuntu 12.04.5 Desktop amd64
Во многих статьях интернета все больше сводится к тому, что в процессе ранее когда подключали данный Mikrotik не корректно произвели обновление или просто напросто прервали сам процесс, но у меня исключительная ситуация — я не подключал ни куда данный роутер, а купил таким.
Как я уже знаю, что устройства Mikrotik поддерживают такие протоколы управления, как:
- HTTP/HTTPS — 80,443
- SSH — 22
- Telnet — 23
- Winbox — 8291
- API — 8728
Для того, чтобы поправить текущую ситуацию придется задействовать один из ниже указанных способов.
Первый способ: попробовать сделать reset всем настройкам
- Выключаем штекер питания
- Распрямляем скрепку и нажимаем ею в углубленную кнопку с надписью RES
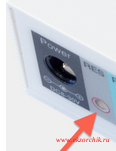
- и держим скрепку в нажатом состоянии на кнопку.
- Подключаем штекер питания
- Ждем когда надпись на индикаторе ACT начнет мигать
- Отпускаем скрепку которое все это время была нажата на углубленную кнопку RES
и через некоторое время (обычно минуту или две) уже можно будет попробовать подключиться к устройству Mikrotik через утилиту winbox — В одном случае у меня данный способ привел к положительному результату, я получил доступ к устройству.
Подключаю сетевой провод в первый порт на устройстве Mikrotik

Запускаю утилиту netinstall через wine, на появившееся окно с надписью «Bind bootp failed: (10013)» не обращаем внимание, т. е. Нажимать OK не следует иначе закроется сама утилита netinstall.
Через Browse указываем каталог местоположения прошивки, в моем случае это /home/aollo, а после нажимаем кнопку Net booting и активируем (Установка галочки Boot Server Enabled и указанием IP адреса текущей системы), что текущая система будет выступать PXE сервером с адресом Вашей системы где запущена утилита netinstall
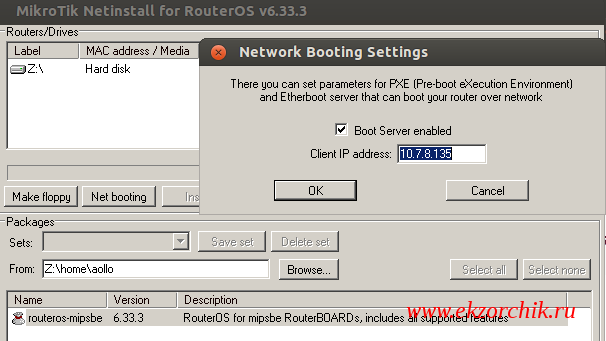
После чего проделываю действия над Mikrotik чтобы он перешел в режим загрузки по сети , данные действия аналогичны первому способу, но вот в чем загвоздка, сообщение которое появляется при загрузке netinstall говорит, что не может сделать текущую систему сервером PXE с которого грузить прошивку.
Раз так, то попробую задействовать резервный ноутбук: HP ProBook 4540s с операционной системой Windows 7 Профессиональная SP1.
Подключаю к ноутбуку (выставляю статику 192.168.88.100) сетевой кабель, а другим разъемом в второй порт на роутере Mikrotik.
Проделываю все операции по переводу роутера Mikrotik в режим загрузки по сети, но так ни на одном из портов ничего не удается сделать. Может я пока чего-то не понимаю.
MikroTik
For every complex problem, there is a solution that is simple, neat, and wrong.
RB3011UiAS перестал пускать по белому ip.
RB3011UiAS перестал пускать по белому ip.
Сообщение lends » 29 дек 2021, 21:59
RB3011UiAS
RouterOS 6.48.6
Было настроено удаленное подключение winbox c определенного ip:
/ip firewall filter
add action=accept chain=input comment=winbox dst-port=8291 in-interface=\
ether1 protocol=tcp src-address=xx.xxx.xxx.xxx (правило firwall)
set winbox address=192.168.1.0/24, xx.xxx.xxx.xxx (в сервисах разрешаю локалку и внешний ip)
Все работало какое то время.
Несколько дней назад что то сломалось, причем я ничего особенного в конфиге не менял.
Теперь c этого белого ip xx.xxx.xxx.xxx, не пускает winbox.
Причем если отключить все правила и фильтрацию по ip и разрешить всем подключения, с любого другого ip все работает и моего белого xx.xxx.xxx.xxx не пускает.
Уже сломал голову, в чем проблема — при любых правилах, с моего ip xx.xxx.xxx.xxx, не подключается с ошибкой в зависимости от версии winbox :
3.27 — router doest not support secure connection, please enable Legacy Mode if you want to connect anyway (Legacy Mode -пробовал, просто висит).
3.31 — router refused connection
ip xx.xxx.xxx.xxx — это обычная статика выданная провайдером, причем есть еще два таких же микрота в других местах — туда я этими же правилами с этого ip я спокойно подключаюсь.
Глюк конфигурации ? Не могу понять как может блокироваться мой ip? Причем в логах даже ничего нет о том, что микрот его блокирует (если пробовать фильтр включить и пробовать подключаться с других ip, в логах видно, что он блокирует его, а с моим xx.xxx.xxx.xxx везде тишина .
Может ли как то блокироваться именно winbox со стороны провайдера куда подключен RB3011UiAS ?
Там оптика через свитч в микрот с статикой выделяемой динамически по маку.
Какие у кого есть мысли, буду благодарен за идеи.
Пров микрота уже на каникулах, делать сброс на заводские не хочется, тем более может не микрот виноват.
WinBox не подключается к Mikrotik
Для настройки и управления оборудованием Mikrotik, лучше использовать специальную программу WinBox. С её помощью все это делать гораздо удобней. Можно конечно пользоваться и веб интерфейсом Mikrotik. При подключение к Mikrotik через ПО WinBox очень часто возникают различные ошибки, их достаточно много. Но есть самые распространенные которые встречаются в 90% случаях. Сегодня рассмотрим одну самую часто встречающуюся ошибку, которая не позволят подключиться к Mikrotik.
У меня достаточно много статей которые касаются оборудования Mikrotik, рекомендую с ними ознакомиться.
Ошибка при подключении к Mikrotik используя WinBox
И так вы установил WinBox ввели IP адрес Mikrotik, лоин и пароль нажали кнопку «Connect» и увидели вот такую ошибку.
ERROR: router does not support secure connection please enable Legacy Mode if you want to connect anyway
Если перевести то это означает следующие.
Маршрутизатор не поддерживает безопасное соединение пожалуйста, включите устаревший режим, если вы все равно хотите подключиться
Это говорит о том что WinBox пытается подключиться к вашему устройству используя безопасное соединение а ваш Mikrotik его не поддерживает. Т.е у него старая прошивка.
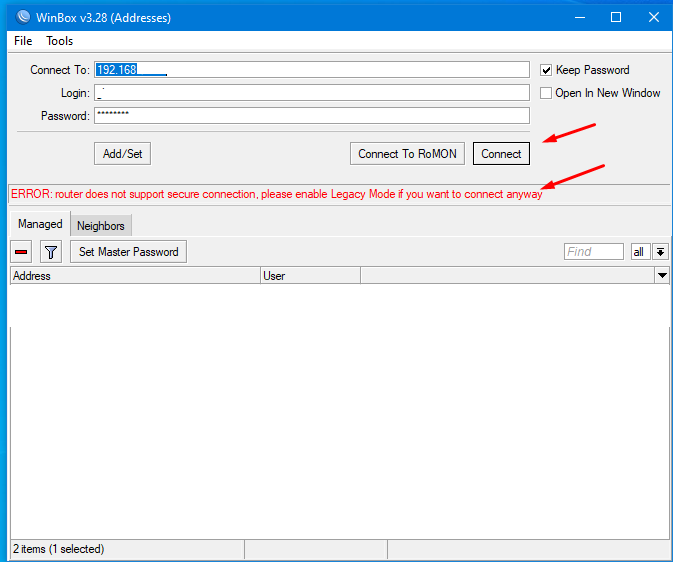
Самый простой способ это включить в WinBox функцию Legacy Mode, она позволяется подключаться к Микротик менее защищенным способ.
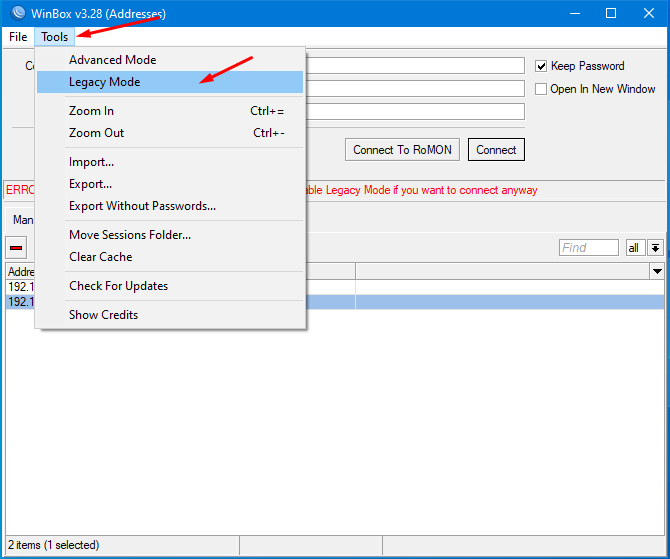
Защищенное подключение поддерживается в RouterOS выше версии 6.43. Но лучше обновить прошивку Mikrotik тем более что сделать это очень просто.
WinBox и Mikrotik
Блин Спасибо! Надо учить английский)))
Мне английский мало помог.))) Кто бы знал где эту галку ставить xD
Сбой подключения к роутеру Mikrotik
Что делать когда winbox не может подключиться к роутеру Mikrotik?
«Could not connect to 192.168.88.1:80 — no response!»
Вот что тогда делать, данный роутер Mikrotik RB951Ui-2Hnd не оборудован консольным портом, чтобы сбросить все настройки.
На заметку : все дальнейшие действия происходят на моей рабочей системе Ubuntu 12.04.5 Desktop amd64
Во многих статьях интернета все больше сводится к тому, что в процессе ранее когда подключали данный Mikrotik не корректно произвели обновление или просто напросто прервали сам процесс, но у меня исключительная ситуация — я не подключал ни куда данный роутер, а купил таким.
Как я уже знаю, что устройства Mikrotik поддерживают такие протоколы управления, как:
- HTTP/HTTPS — 80,443
- SSH — 22
- Telnet — 23
- Winbox — 8291
- API — 8728
Для того, чтобы поправить текущую ситуацию придется задействовать один из ниже указанных способов.
Первый способ: попробовать сделать reset всем настройкам
- Выключаем штекер питания
- Распрямляем скрепку и нажимаем ею в углубленную кнопку с надписью RES
- и держим скрепку в нажатом состоянии на кнопку.
- Подключаем штекер питания
- Ждем когда надпись на индикаторе ACT начнет мигать
- Отпускаем скрепку которое все это время была нажата на углубленную кнопку RES
и через некоторое время (обычно минуту или две) уже можно будет попробовать подключиться к устройству Mikrotik через утилиту winbox — В одном случае у меня данный способ привел к положительному результату, я получил доступ к устройству.
Подключаю сетевой провод в первый порт на устройстве Mikrotik
Запускаю утилиту netinstall через wine, на появившееся окно с надписью «Bind bootp failed: (10013)» не обращаем внимание, т. е. Нажимать OK не следует иначе закроется сама утилита netinstall.
Через Browse указываем каталог местоположения прошивки, в моем случае это /home/aollo, а после нажимаем кнопку Net booting и активируем (Установка галочки Boot Server Enabled и указанием IP адреса текущей системы), что текущая система будет выступать PXE сервером с адресом Вашей системы где запущена утилита netinstall
После чего проделываю действия над Mikrotik чтобы он перешел в режим загрузки по сети , данные действия аналогичны первому способу, но вот в чем загвоздка, сообщение которое появляется при загрузке netinstall говорит, что не может сделать текущую систему сервером PXE с которого грузить прошивку.
Раз так, то попробую задействовать резервный ноутбук: HP ProBook 4540s с операционной системой Windows 7 Профессиональная SP1.
Подключаю к ноутбуку (выставляю статику 192.168.88.100) сетевой кабель, а другим разъемом в второй порт на роутере Mikrotik.
Проделываю все операции по переводу роутера Mikrotik в режим загрузки по сети, но так ни на одном из портов ничего не удается сделать. Может я пока чего-то не понимаю.
MikroTik
For every complex problem, there is a solution that is simple, neat, and wrong.
RB3011UiAS перестал пускать по белому ip.
RB3011UiAS перестал пускать по белому ip.
Сообщение lends » 29 дек 2021, 21:59
RB3011UiAS
RouterOS 6.48.6
Было настроено удаленное подключение winbox c определенного ip:
/ip firewall filter
add action=accept chain=input comment=winbox dst-port=8291 in-interface=\
ether1 protocol=tcp src-address=xx.xxx.xxx.xxx (правило firwall)
set winbox address=192.168.1.0/24, xx.xxx.xxx.xxx (в сервисах разрешаю локалку и внешний ip)
Все работало какое то время.
Несколько дней назад что то сломалось, причем я ничего особенного в конфиге не менял.
Теперь c этого белого ip xx.xxx.xxx.xxx, не пускает winbox.
Причем если отключить все правила и фильтрацию по ip и разрешить всем подключения, с любого другого ip все работает и моего белого xx.xxx.xxx.xxx не пускает.
Уже сломал голову, в чем проблема — при любых правилах, с моего ip xx.xxx.xxx.xxx, не подключается с ошибкой в зависимости от версии winbox :
3.27 — router doest not support secure connection, please enable Legacy Mode if you want to connect anyway (Legacy Mode -пробовал, просто висит).
3.31 — router refused connection
ip xx.xxx.xxx.xxx — это обычная статика выданная провайдером, причем есть еще два таких же микрота в других местах — туда я этими же правилами с этого ip я спокойно подключаюсь.
Глюк конфигурации ? Не могу понять как может блокироваться мой ip? Причем в логах даже ничего нет о том, что микрот его блокирует (если пробовать фильтр включить и пробовать подключаться с других ip, в логах видно, что он блокирует его, а с моим xx.xxx.xxx.xxx везде тишина .
Может ли как то блокироваться именно winbox со стороны провайдера куда подключен RB3011UiAS ?
Там оптика через свитч в микрот с статикой выделяемой динамически по маку.
Какие у кого есть мысли, буду благодарен за идеи.
Пров микрота уже на каникулах, делать сброс на заводские не хочется, тем более может не микрот виноват.
Mikrotik router refused connection что это
Секреты настройки
файрвола через

RB3011UiAS перестал пускать удаленно
Есть аппарат RB3011UiAS.
На нем настроен доступ WInBox, ssh с конкретного «белого» ip.
В начале все работало, с сегодняшнего дня роутер просто не пускает c прописанного ip ни через winbox, ни через ssh.
WinBox в зависимости от версии выдает:
3.27 — router doest not support secure connection, please enable Legacy Mode if you want to connect anyway (Legacy Mode -пробовал, просто висит).
3.31 — router refused connection
Что предпринял:
1. Прошил на версию — 6.48.6
2. reboot
Не помогло.
Все настройки проверил 1000 раз . ничего не менял, что касается доступа winbox, ssh.
Что это может быть и как исправить.
Спасибо.
P/S — из локалки роутер нормально пускает и в остальном все работает, что настроено.

Да. замазывать локальные IP — это круто.
Есть предложение — вы просто тупо отключаете ВСЕ правила фаерволла.
Убираете ограничения в Winbox на входящие IP.
Пробуете.
Еще раз, чудес не бывает. Где-то ошибка в настройках, провайдер мутит с подключениями в этом направлении или что-то подобное.
Да. замазывать локальные IP — это круто.
Есть предложение — вы просто тупо отключаете ВСЕ правила фаерволла.
Убираете ограничения в Winbox на входящие IP.
Пробуете.
Еще раз, чудес не бывает. Где-то ошибка в настройках, провайдер мутит с подключениями в этом направлении или что-то подобное.
Ну давайте гадать дальше.
На 3011 один провайдер (uplink. )? Не может быть так, что входящий пакет приходит по одному uplink, а ответ уходит по другому.
Еще вариант проверки: а с мобильного телефона с мобильного интернета получается подключиться.
А не изменился ли IP адрес у 3011. А не оказался ли он, случайно, за nat. А если включить ssh на нем, получится достучаться?? А если включить ip-cloud, там все сработает? Не будет никаких ошибок?
А если поднять на 3011 vpn, к нему получается подключиться.
А если перевесить winbox на другой порт.
А если локально стать ноутом в порт wan, получится подключиться, хотя бы по MAC.
Я наконец то сдвинулся с мертвой точки, спасибо — gmx.
В правилах выключил привязку к белому ip и сменил стандартный порт winbox на другой.
С мобильного интернета подключаюсь !
С других внешних ip любых подключаюсь !
С своего белого ip — нет .
Теперь я так понимаю, проблема в моем белом ip ?
А что с ним может быть, если он даже без всяких фильтраций по ip не хочет с него подключаться ?
И что странно, как я писал выше у меня еще 2 таких же микрота в других местах к которым я спокойно подключаюсь с этого же белого ip причем с фильтрацией ! (то есть только с него разрешено).
Какие будут идеи .
P/S — с ssh такая же ситуация, с любого другого ip я подключаюсь, с своего белого — нет.
Мог мой белый ip попасть в какой ни будь черный список у провайдера проблемного микротика ?
Только такая мысль мне приходит, потому что как объяснить, что на другие микроты я подключаюсь (там естественно другое провы), значит проблема не в провайдере белого ip, а именно у прова с проблемным микротиком и именно с моим белым ip.
Вообще запутанная ситуация получается — я такое в первые наблюдаю.
Mikrotik router refused connection что это
Бесплатный чек-лист
по настройке RouterOS
на 28 пунктов
Утратил доступ к MikroTik из WAN и LAN через WinBox (Router OS 6. 1) — взломали?
Правила форума
Как правильно оформить вопрос.
Прежде чем начать настройку роутера, представьте, как это работает. Попробуйте почитать статьи об устройстве интернет-сетей. Убедитесь, что всё, что Вы задумали выполнимо вообще и на данном оборудовании в частности.
Не нужно изначально строить Наполеоновских планов. Попробуйте настроить простейшую конфигурацию, а усложнения добавлять в случае успеха постепенно.
Пожалуйста, не игнорируйте правила русского языка. Отсутствие знаков препинания и неграмотность автора топика для многих гуру достаточный повод проигнорировать топик вообще.
1. Назовите технологию подключения (динамический DHCP, L2TP, PPTP или что-то иное)
2. Изучите темку «Действия до настройки роутера».
viewtopic.php?f=15&t=2083
3. Настройте согласно выбранного Вами мануала
4. Дочитайте мануал до конца и без пропусков, в 70% случаев люди просто не до конца читают статью и пропускают важные моменты.
5. Если не получается, в Winbox открываем терминал и вбиваем там /export hide-sensitive. Результат в топик под кат, интимные подробности типа личных IP изменить на другие, пароль забить звездочками.
6. Нарисуйте Вашу сеть, рисунок (схему) сюда. На словах может быть одно, в действительности другое.
Все микротики с серыми IP не могут поднять соединения с Микротиком (который с белым IP). В логах други микротиков (подключился к ним по резервным каналам) вижу одинаковое время потери связи в 3:31 ночи. Возникает ощущение, что произошло что-то, сначала «грешил» на электропитание или интернет-провайдера. Техподдержка интернет-провайдера не отвечала — несколько раз звонил, возможно суббота «виновата». Микротик же RB1100AHx4 Dude Edition с двойным питанием: через UPS и напрямую к розетке (в нем 2 блока питания ввстроено).
Такое ощущение, что хакеры сначала заDDOSили микротик, завалили его, что-то изменили внутри в настройках.
За несколько часов до этих событий замечал падение sstp-туннеля и трафик с удаленного микротика на этот шел по pptp-туннелю через четвертый микротик ! И внес в белый список я как раз ту подсеть (мобильного оператора связи) на которой были эти странности. Может их заинтересовал трафик идущий по sstp-туннелю, в результате чего рубанули sstp.
Для настройки и управления оборудованием Mikrotik, лучше использовать специальную программу WinBox. С её помощью все это делать гораздо удобней. Можно конечно пользоваться и веб интерфейсом Mikrotik. При подключение к Mikrotik через ПО WinBox очень часто возникают различные ошибки, их достаточно много. Но есть самые распространенные которые встречаются в 90% случаях. Сегодня рассмотрим одну самую часто встречающуюся ошибку, которая не позволят подключиться к Mikrotik.
У меня достаточно много статей которые касаются оборудования Mikrotik, рекомендую с ними ознакомиться.
Mikrotik ограничение скорости
Mikrotik работа с провайдером Домру
Как узнать кто загружает канал
Делим трафик поровну Mikrotik
Mikrotik потери пакетов
Ошибка при подключении к Mikrotik используя WinBox
И так вы установил WinBox ввели IP адрес Mikrotik, лоин и пароль нажали кнопку «Connect» и увидели вот такую ошибку.
ERROR: router does not support secure connection please enable Legacy Mode if you want to connect anyway
Если перевести то это означает следующие.
Маршрутизатор не поддерживает безопасное соединение пожалуйста, включите устаревший режим, если вы все равно хотите подключиться
Это говорит о том что WinBox пытается подключиться к вашему устройству используя безопасное соединение а ваш Mikrotik его не поддерживает. Т.е у него старая прошивка.
Самый простой способ это включить в WinBox функцию Legacy Mode, она позволяется подключаться к Микротик менее защищенным способ.
Защищенное подключение поддерживается в RouterOS выше версии 6.43. Но лучше обновить прошивку Mikrotik тем более что сделать это очень просто.
Что делать когда winbox не может подключиться к роутеру Mikrotik?
«Could not connect to 192.168.88.1:80 — no response!»
Вот что тогда делать, данный роутер Mikrotik RB951Ui-2Hnd не оборудован консольным портом, чтобы сбросить все настройки.
: все дальнейшие действия происходят на моей рабочей системе Ubuntu 12.04.5 Desktop amd64
Во многих статьях интернета все больше сводится к тому, что в процессе ранее когда подключали данный Mikrotik не корректно произвели обновление или просто напросто прервали сам процесс, но у меня исключительная ситуация — я не подключал ни куда данный роутер, а купил таким.
Как я уже знаю, что Mikrotik поддерживают такие протоколы управления, как:
- HTTP/HTTPS — 80,443
- SSH — 22
- Telnet — 23
- Winbox — 8291
- API — 8728
Для того, чтобы поправить текущую ситуацию придется задействовать один из ниже указанных способов.
попробовать сделать reset всем настройкам
- Выключаем штекер питания
- Распрямляем скрепку и нажимаем ею в углубленную кнопку с надписью RES
- и держим скрепку в нажатом состоянии на кнопку.
- Подключаем штекер питания
- Ждем когда надпись на индикаторе ACT начнет мигать
- Отпускаем скрепку которое все это время была нажата на углубленную кнопку RES
и через некоторое время (обычно минуту или две) уже можно будет попробовать подключиться к устройству Mikrotik через утилиту winbox — В одном случае у меня данный способ привел к положительному результату, я получил доступ к устройству.
Подключаю сетевой провод в первый порт на устройстве Mikrotik
netinstall через wine, на появившееся окно с надписью «Bind bootp failed: (10013)» не обращаем внимание, т. е. Нажимать OK не следует иначе закроется сама утилита netinstall.
Через Browse указываем каталог местоположения прошивки, в моем случае это /home/aollo, а после нажимаем кнопку Net booting и активируем (Установка галочки Boot Server Enabled и указанием IP адреса текущей системы), что текущая система будет выступать PXE сервером с адресом Вашей системы где запущена утилита netinstall
После чего проделываю действия над Mikrotik чтобы он перешел в режим загрузки по сети, данные действия аналогичны первому способу, но вот в чем загвоздка, сообщение которое появляется при загрузке netinstall говорит, что не может сделать текущую систему сервером PXE с которого грузить прошивку.
Раз так, то попробую задействовать резервный ноутбук: HP ProBook 4540s с операционной системой Windows 7 Профессиональная SP1.
Подключаю к ноутбуку (выставляю статику 192.168.88.100) сетевой кабель, а другим разъемом в второй порт на роутере Mikrotik.
Проделываю все операции по переводу роутера Mikrotik в режим загрузки по сети, но так ни на одном из портов ничего не удается сделать. Может я пока чего-то не понимаю.
-

- dolanp
- Posts: 29
- Joined: Sat Jun 30, 2007 9:08 pm
Connection refused
Fri Oct 19, 2012 1:35 pm
I have a router on a public IP but pretty secured.
Once a day or so, when I try to log in using winbox, I get the message «connection refused». It only happens with winbox.
In order to solve the issue, I have to log in via webbox, disable and enable winbox in IP-Services and it works fine for a day or two and then back to the same issue again.
I have reloaded the software and disabled all L7 and firewall without success.
The router is running 5.20 but this issue started since 5.14.
Any advice would be appreciated
-
- CelticComms
- Posts: 1765
- Joined: Wed May 02, 2012 5:48 am
Re: Connection refused
Fri Oct 19, 2012 2:21 pm
Do you click on the MAC address or IP address when opening the router in Winbox?
Is this when accessing via the WAN or LAN side?
-
- dolanp
- Posts: 29
- Joined: Sat Jun 30, 2007 9:08 pm
Re: Connection refused
Fri Oct 19, 2012 2:25 pm
Do you click on the MAC address or IP address when opening the router in Winbox?
Is this when accessing via the WAN or LAN side?
It happens on both WAN and LAN.
it happens using both MAC and IP address
-
- dolanp
- Posts: 29
- Joined: Sat Jun 30, 2007 9:08 pm
Re: Connection refused
Fri Oct 19, 2012 8:24 pm
Yep, it sounds pretty familiar. I have a RB1200AH2
CPU usage does not go above 20-30%
-
- dolanp
- Posts: 29
- Joined: Sat Jun 30, 2007 9:08 pm
Re: Connection refused
Tue Oct 23, 2012 1:07 pm
Can someone from Mikrotik please address this issue.
-

- tomaskir
- Posts: 1161
- Joined: Sat Sep 24, 2011 2:32 pm
- Location: Slovakia
Re: Connection refused
Tue Oct 23, 2012 2:42 pm
Can someone from Mikrotik please address this issue.
-
- dolanp
- Posts: 29
- Joined: Sat Jun 30, 2007 9:08 pm
Re: Connection refused
Wed Oct 24, 2012 1:04 am
Can someone from Mikrotik please address this issue.
I have already sent an email on two occasions, once with the support out file but although I received a read notification, I have not yet received a response many weeks later
-

- dallas
Long time Member

- Posts: 548
- Joined: Wed Dec 13, 2006 4:13 am
- Location: Minnesota
- Contact:
Re: Connection refused
Tue Dec 11, 2012 7:18 pm
I have the same issue. I sent supout to mikrotik
I tried to:
I tried to winbox to the mikrotik
I saw this problem:
I cant winbox into the mikrotik.
I expected to see:
I want to get in. If I mac-telnet into the router and disable and reenable the winbox it is fixed. Then I wait a few days and it starts back up. I am on ros 5.22. It does it with 5.18 5.20 5.21 and 5.22. I made a supout while it was happening.
Steps to repeat this issue:
-
- dallas
Long time Member
- Posts: 548
- Joined: Wed Dec 13, 2006 4:13 am
- Location: Minnesota
- Contact:
Re: Connection refused
Tue Dec 11, 2012 7:20 pm
also additional to the current winbox issue. Also the dude cant connect via routeros. If you goto devices/routeros/devices. It cant connect until a reboot.
Connecting to the Router
There are two types of routers:
- With default configuration
- Without default configuration. When no specific configuration is found, IP address 192.168.88.1/24 is set on ether1 or combo1, or sfp1.
More information about the current default configuration can be found in the Quick Guide document that came with your device. The quick guide document will include information about which ports should be used to connect for the first time and how to plug in your devices.
This document describes how to set up the device from the ground up, so we will ask you to clear away all defaults.
Router without Default Configuration
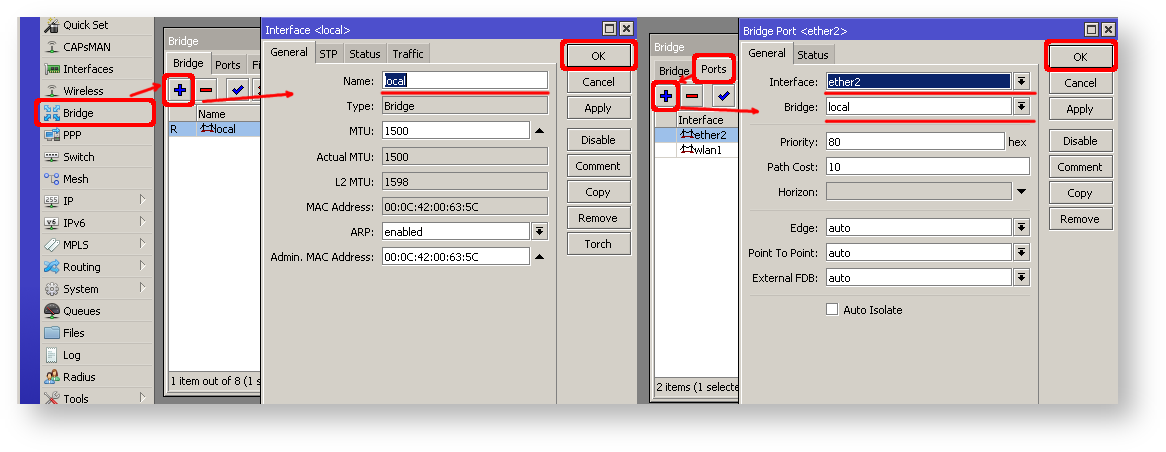
If there is no default configuration on the router you have several options, but here we will use one method that suits our needs.
Connect Routers ether1 port to the WAN cable and connect your PC to ether2. Now open WinBox and look for your router in neighbor discovery. See detailed example in Winbox article.
If you see the router in the list, click on MAC address and click Connect.
The simplest way to make sure you have absolutely clean router is to run
/system reset-configuration no-defaults=yes skip-backup=yes
Or from WinBox (Fig. 1-1):

Configuring IP Access
Since MAC connection is not very stable, the first thing we need to do is to set up a router so that IP connectivity is available:
- add bridge interface and bridge ports;
- add an IP address to LAN interface;
- set up a DHCP server.
Set bridge and IP address are quite easy:
/interface bridge add name=local
/interface bridge port add interface=ether2 bridge=local
/ip address add address=192.168.88.1/24 interface=local
If you prefer WinBox/WeBfig as configuration tools:
- Open Bridge window, Bridge tab should be selected;
- Click on the + button, a new dialog will open, enter bridge name local and click on OK;
- Select the Ports tab and click on the + button, a new dialog will open;
- select interface ether2 and bridge local form drop-down lists and click on the OK button to apply settings;
- You may close the bridge dialog.
- Open Ip -> Addresses dialog;
- Click on the + button, a new dialog will open;
- Enter IP address 192.168.88.1/24 select interface local from the drop-down list and click on OK button;

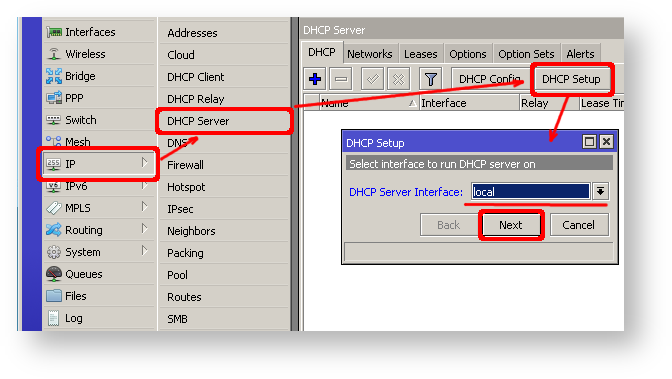
The next step is to set up a DHCP server. We will run the setup command for easy and fast configuration:
[admin@MikroTik] /ip dhcp-server setup [enter] Select interface to run DHCP server on dhcp server interface: local [enter] Select network for DHCP addresses dhcp address space: 192.168.88.0/24 [enter] Select gateway for given network gateway for dhcp network: 192.168.88.1 [enter] Select pool of ip addresses given out by DHCP server addresses to give out: 192.168.88.2-192.168.88.254 [enter] Select DNS servers dns servers: 192.168.88.1 [enter] Select lease time lease time: 10m [enter]
Notice that most of the configuration options are automatically determined and you just simply need to hit the enter key.
The same setup tool is also available in WinBox/WeBfig:
- Open Ip -> DHCP Server window, DHCP tab should be selected;
- Click on the DHCP Setup button, a new dialog will open, enter DHCP Server Interface local and click on Next button;
- Follow the wizard to complete the setup.
Now connected PC should be able to get a dynamic IP address. Close the Winbox and reconnect to the router using IP address (192.168.88.1)
Configuring Internet Connection
The next step is to get internet access to the router. There can be several types of internet connections, but the most common ones are:
- dynamic public IP address;
- static public IP address;
- PPPoE connection.
Dynamic Public IP
Dynamic address configuration is the simplest one. You just need to set up a DHCP client on the public interface. DHCP client will receive information from an internet service provider (ISP) and set up an IP address, DNS, NTP servers, and default route for you.
/ip dhcp-client add disabled=no interface=ether1
After adding the client you should see the assigned address and status should be bound
[admin@MikroTik] /ip dhcp-client> print
Flags: X - disabled, I - invalid # INTERFACE USE ADD-DEFAULT-ROUTE STATUS ADDRESS 0 ether1 yes yes bound 1.2.3.100/24
Static Public IP
In the case of static address configuration, your ISP gives you parameters, for example:
- IP: 1.2.3.100/24
- Gateway: 1.2.3.1
- DNS: 8.8.8.8
These are three basic parameters that you need to get the internet connection working
To set this in RouterOS we will manually add an IP address, add a default route with a provided gateway, and set up a DNS server
/ip address add address=1.2.3.100/24 interface=ether1
/ip route add gateway=1.2.3.1
/ip dns set servers=8.8.8.8
PPPoE Connection
/interface pppoe-client add disabled=no interface=ether1 user=me password=123 \ add-default-route=yes use-peer-dns=yes
- Open PPP window, Interfaces tab should be selected;
- Click on the + button, and choose PPPoE Client from the dropdown list, new dialog will open;
- Select interface ether1 from the dropdown list and click on the OK button to apply settings.
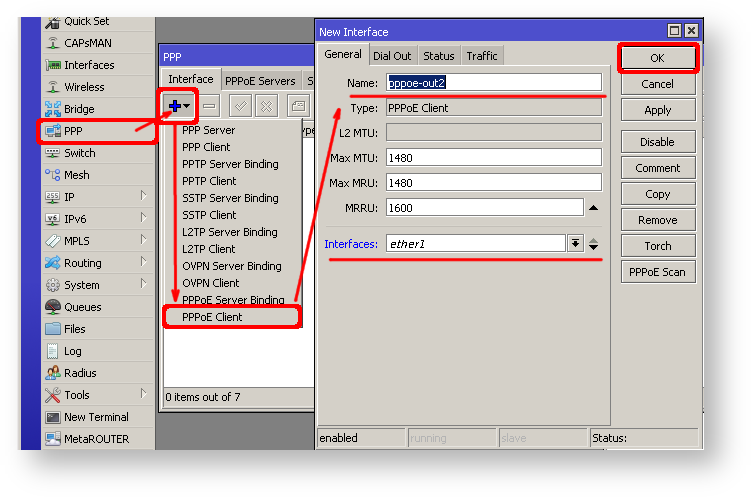
Further in configuration WAN interface is now pppoe-out interface, not ether1.
Verify Connectivity
After successful configuration, you should be able to access the internet from the router.
Verify IP connectivity by pinging known IP address (google DNS server for example)
[admin@MikroTik] > /ping 8.8.8.8
HOST SIZE TTL TIME STATUS
8.8.8.8 56 47 21ms
8.8.8.8 56 47 21ms
Verify DNS request
[admin@MikroTik] > /ping www.google.com
HOST SIZE TTL TIME STATUS
173.194.32.49 56 55 13ms
173.194.32.49 56 55 12ms
If everything is set up correctly, ping in both cases should not fail.
In case of failure refer to the troubleshooting section
Protecting the Router
Now anyone over the world can access our router so it is the best time to protect it from intruders and basic attacks
User Password Access
MikroTik routers require password configuration, we suggest using a password generator tool to create secure and non-repeating passwords. With secure password we mean:
- Minimum 12 characters;
- Include numbers, Symbols, Capital and lower case letters;
- Is not a Dictionary Word or Combination of Dictionary Words;
/user set 0 password="!={Ba3N!40TуX+GvKBzjTLIUcx/,"Another option to set a password,
We strongly suggest using a second method or Winbox interface to apply a new password for your router, just to keep it safe from other unauthorized access.
[admin@MikroTik] > / password
old password:
new password: ******
retype new password: ******
Make sure you remember the password! If you forget it, there is no recovery. You will need to reinstall the router!
/user add name=myname password=mypassword group=full
/user remove admin
MAC Connectivity Access
By default mac server runs on all interfaces, so we will disable default all entry and add a local interface to disallow MAC connectivity from the WAN port. MAC Telnet Server feature allows you to apply restrictions to the interface «list».
First, create an interface list:
[admin@MikroTik] > /interface list add name=listBridge
Then, add your previously created bridge named «local» to the interface list:
[admin@MikroTik] > /interface list member add list=listBridge interface=local
Apply newly created «list» (of interfaces) to the MAC server:
[admin@MikroTik] > tool mac-server set allowed-interface-list=listBridge
Do the same for Winbox MAC access
[admin@MikroTik] > tool mac-server mac-winbox set allowed-interface-list=listBridge
- Open Interfaces → Interface List → Lists window and add a new list by clicking «+»;
- Input the interface list name «listBridge» into the Name field and click OK;
- Go back to the Interfaces → Interface List section and click «+»;
- Select «listBridge» from the dropdown List options and select «local» from the dropdown Interface options and click OK;
- Open Tools -> Mac Server window;
- Click on the «MAC Telnet Server» button, a new dialog will open;
- Select the newly created list «listBridge» from the dropdown list and click on OK button to apply settings.
Neighbor Discovery
MikroTik Neighbor discovery protocol is used to show and recognize other MikroTik routers in the network. Disable neighbor discovery on public interfaces:
/ip neighbor discovery-settings set discover-interface-list=listBridge
IP Connectivity Access
/user set 0 allowed-address=x.x.x.x/yy
x.x.x.x/yy — your IP or network subnet that is allowed to access your router.
IP connectivity on the public interface must be limited in the firewall. We will accept only ICMP(ping/traceroute), IP Winbox, and ssh access.
/ip firewall filter add chain=input connection-state=established,related action=accept comment="accept established,related"; add chain=input connection-state=invalid action=drop; add chain=input in-interface=ether1 protocol=icmp action=accept comment="allow ICMP"; add chain=input in-interface=ether1 protocol=tcp port=8291 action=accept comment="allow Winbox"; add chain=input in-interface=ether1 protocol=tcp port=22 action=accept comment="allow SSH"; add chain=input in-interface=ether1 action=drop comment="block everything else";
In case if a public interface is a pppoe, then the in-interface should be set to «pppoe-out».
The first two rules accept packets from already established connections, so we assume those are OK to not overload the CPU. The third rule drops any packet which connection tracking thinks is invalid. After that, we set up typical accept rules for specific protocols.
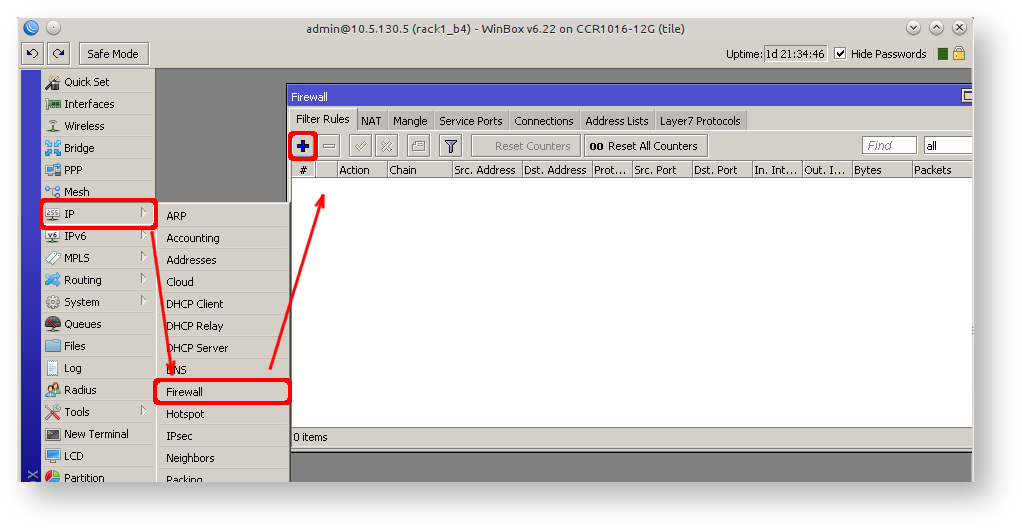
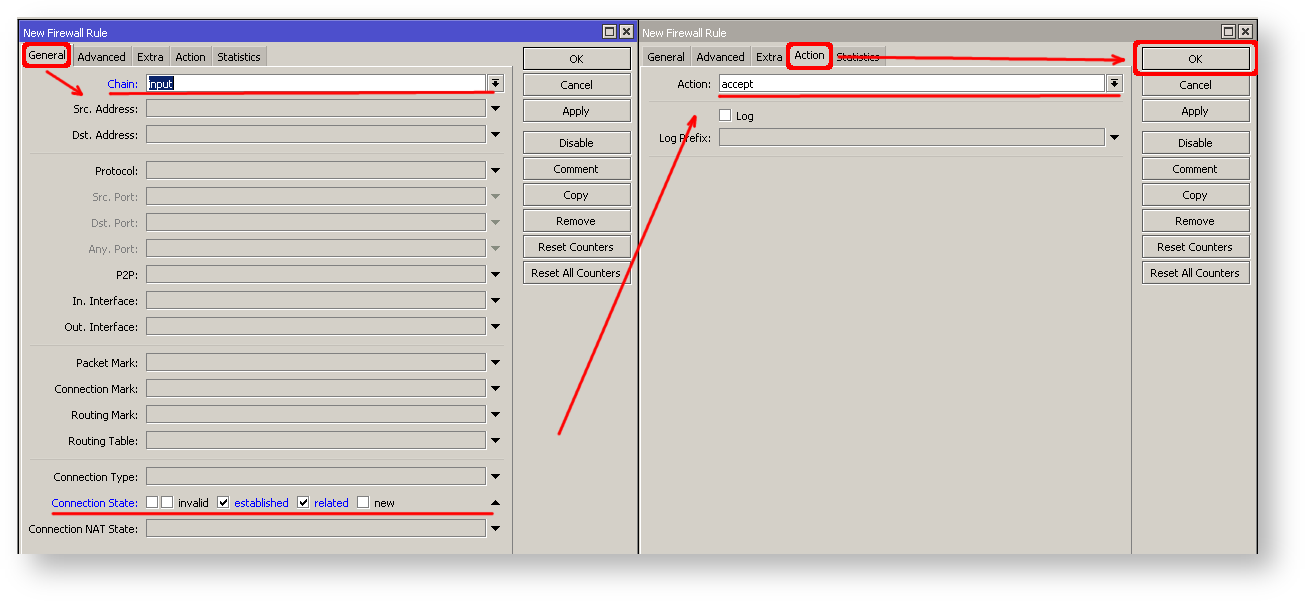
If you are using Winbox/Webfig for configuration, here is an example of how to add an established/related rule:
- Open Ip -> Firewall window, click on Filter rules tab;
- Click on the + button, a new dialog will open;
- Select chain input, click on Connection state, and select checkboxes for established and related;
- Click on the Action tab and make sure action accept is selected;
- Click on the Ok button to apply settings.
To add other rules click on + for each new rule and fill the same parameters as provided in the console example.
Administrative Services
Although the firewall protects the router from the public interface, you may still want to disable RouterOS services.
Keep only secure ones,
/ip service disable telnet,ftp,www,api
Change default service ports, this will immediately stop most of the random SSH brute force login attempts:
/ip service set ssh port=2200
/ip service set winbox address=192.168.88.0/24
Other Services
A bandwidth server is used to test throughput between two MikroTik routers. Disable it in the production environment.
/tool bandwidth-server set enabled=no
A router might have DNS cache enabled, which decreases resolving time for DNS requests from clients to remote servers. In case DNS cache is not required on your router or another router is used for such purposes, disable it.
/ip dns set allow-remote-requests=no
Some RouterBOARDs have an LCD module for informational purposes, set pin or disable it.
It is good practice to disable all unused interfaces on your router, in order to decrease unauthorized access to your router.
/interface print
/interface set x disabled=yes
Where «X» is a number of the unused interfaces.
RouterOS utilizes stronger crypto for SSH, most newer programs use it, to turn on SSH strong crypto:
/ip ssh set strong-crypto=yes
- MikroTik caching proxy,
- MikroTik socks proxy,
- MikroTik UPNP service,
- MikroTik dynamic name service or IP cloud,
/ip cloud set ddns-enabled=no update-time=no
At this point, PC is not yet able to access the Internet, because locally used addresses are not routable over the Internet. Remote hosts simply do not know how to correctly reply to your local address.
The solution for this problem is to change the source address for outgoing packets to routers public IP. This can be done with the NAT rule:
/ip firewall nat add chain=srcnat out-interface=ether1 action=masquerade
In case if a public interface is a pppoe, then the out-interface should be set to «pppoe-out».
Another benefit of such a setup is that NATed clients behind the router are not directly connected to the Internet, that way additional protection against attacks from outside mostly is not required.
Port Forwarding
Some client devices may need direct access to the internet over specific ports. For example, a client with an IP address 192.168.88.254 must be accessible by Remote desktop protocol (RDP).
After a quick search on Google, we find out that RDP runs on TCP port 3389. Now we can add a destination NAT rule to redirect RDP to the client’s PC.
/ip firewall nat add chain=dstnat protocol=tcp port=3389 in-interface=ether1 \ action=dst-nat to-address=192.168.88.254
If you have set up strict firewall rules then RDP protocol must be allowed in the firewall filter forward chain.
Setting up Wireless
For ease of use bridged wireless setup will be made so that your wired hosts are in the same Ethernet broadcast domain as wireless clients.
The important part is to make sure that our wireless is protected, so the first step is the security profile.
Security profiles are configured from /interface wireless security-profiles menu in a terminal.
/interface wireless security-profiles add name=myProfile authentication-types=wpa2-psk mode=dynamic-keys \ wpa2-pre-shared-key=1234567890
in Winbox/Webfig click on Wireless to open wireless windows and choose the Security Profile tab.
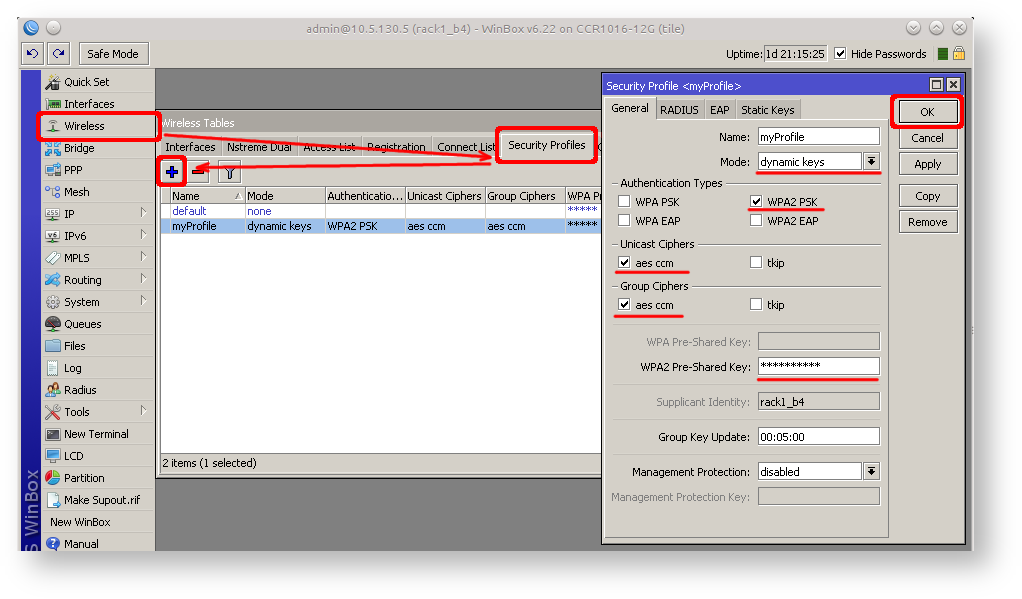
If there are legacy devices that do not support WPA2 (like Windows XP), you may also want to allow WPA protocol.
Now when the security profile is ready we can enable the wireless interface and set the desired parameters
/interface wireless enable wlan1; set wlan1 band=2ghz-b/g/n channel-width=20/40mhz-Ce distance=indoors \ mode=ap-bridge ssid=MikroTik-006360 wireless-protocol=802.11 \ security-profile=myProfile frequency-mode=regulatory-domain \ set country=latvia antenna-gain=3
To do the same from Winbox/Webfig:
- Open Wireless window, select wlan1 interface, and click on the enable button;
- Double click on the wireless interface to open the configuration dialog;
- In the configuration dialog click on the Wireless tab and click the Advanced mode button on the right side. When you click on the button additional configuration parameters will appear and the description of the button will change to Simple mode;
- Choose parameters as shown in the screenshot, except for the country settings and SSID. You may want to also choose a different frequency and antenna gain;
- Next, click on the HT tab and make sure both chains are selected;
- Click on the OK button to apply settings.
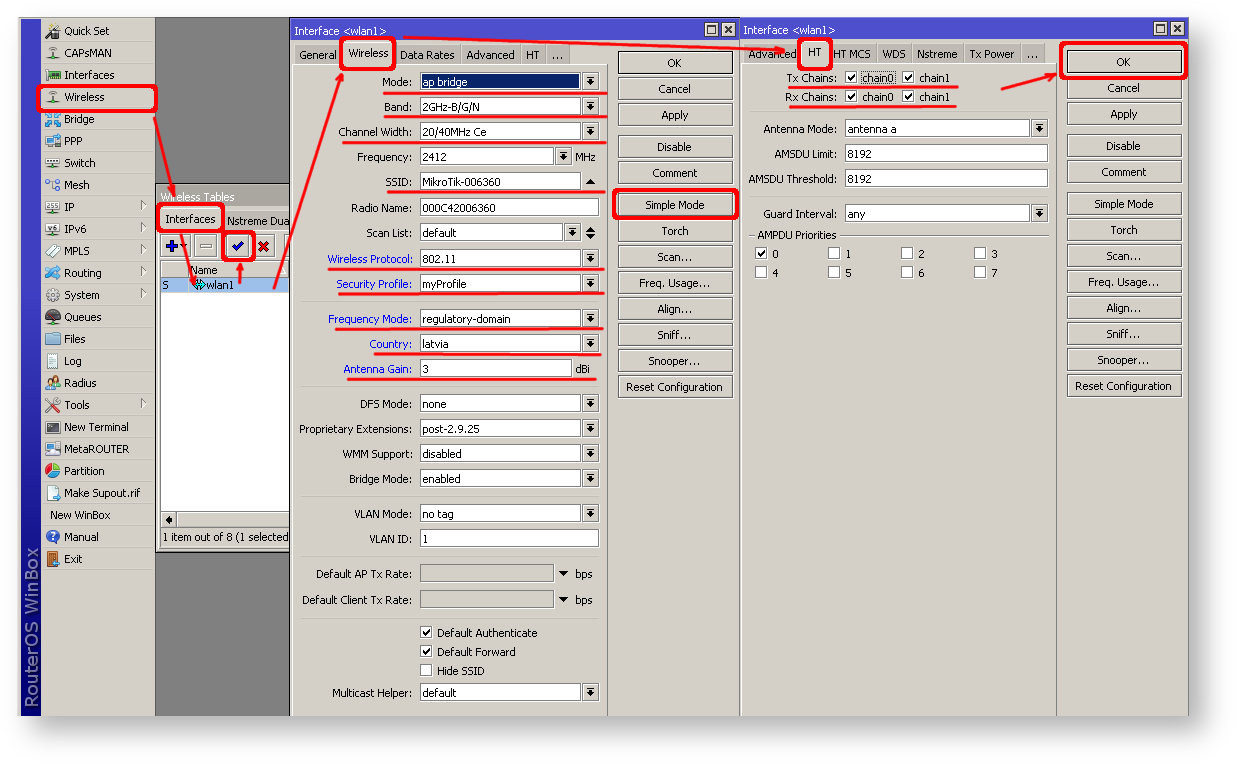
The last step is to add a wireless interface to a local bridge, otherwise connected clients will not get an IP address:
/interface bridge port add interface=wlan1 bridge=local
Now wireless should be able to connect to your access point, get an IP address, and access the internet.
Protecting the Clients
Now it is time to add some protection for clients on our LAN. We will start with a basic set of rules.
/ip firewall filter add chain=forward action=fasttrack-connection connection-state=established,related \ comment="fast-track for established,related"; add chain=forward action=accept connection-state=established,related \ comment="accept established,related"; add chain=forward action=drop connection-state=invalid add chain=forward action=drop connection-state=new connection-nat-state=!dstnat \ in-interface=ether1 comment="drop access to clients behind NAT from WAN"
A ruleset is similar to input chain rules (accept established/related and drop invalid), except the first rule with action=fasttrack-connection. This rule allows established and related connections to bypass the firewall and significantly reduce CPU usage.
Another difference is the last rule which drops all new connection attempts from the WAN port to our LAN network (unless DstNat is used). Without this rule, if an attacker knows or guesses your local subnet, he/she can establish connections directly to local hosts and cause a security threat.
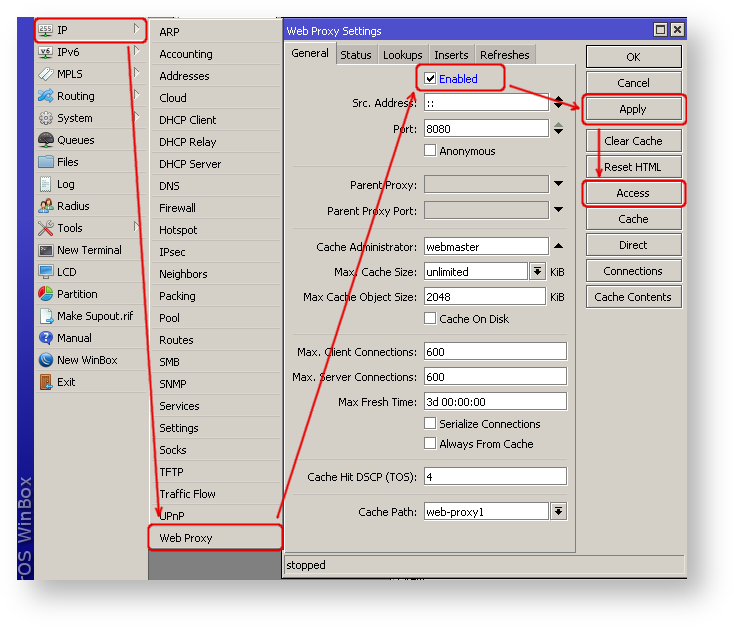
Blocking Unwanted Websites
First, we need to add a NAT rule to redirect HTTP to our proxy. We will use RouterOS built-in proxy server running on port 8080.
/ip firewall nat add chain=dst-nat protocol=tcp dst-port=80 src-address=192.168.88.0/24 \ action=redirect to-ports=8080
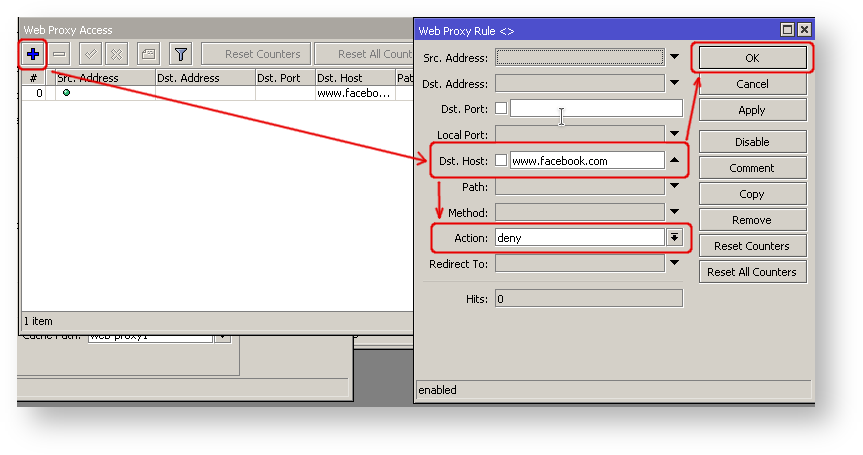
Enable web proxy and drop some websites:
/ip proxy set enabled=yes
/ip proxy access add dst-host=www.facebook.com action=deny
/ip proxy access add dst-host=*.youtube.* action=deny
/ip proxy access add dst-host=:vimeo action=deny
- On the left menu navigate to IP -> Web Proxy
- Web proxy settings dialog will appear.
- Check the «Enable» checkbox and click on the «Apply» button
- Then click on the «Access» button to open the «Web Proxy Access» dialog
- In the «Web Proxy Access» dialog click on «+» to add a new Web-proxy rule
- Enter Dst hostname that you want to block, in this case, «www.facebook.com«, choose the action «deny»
- Then click on the «Ok» button to apply changes.
- Repeat the same to add other rules.
Troubleshooting
RouterOS has built-in various troubleshooting tools, like ping, traceroute, torch, packet sniffer, bandwidth test, etc.
We already used the ping tool in this article to verify internet connectivity.
Troubleshoot if ping fails
The problem with the ping tool is that it says only that destination is unreachable, but no more detailed information is available. Let’s overview the basic mistakes.
You cannot reach www.google.com from your computer which is connected to a MikroTik device:
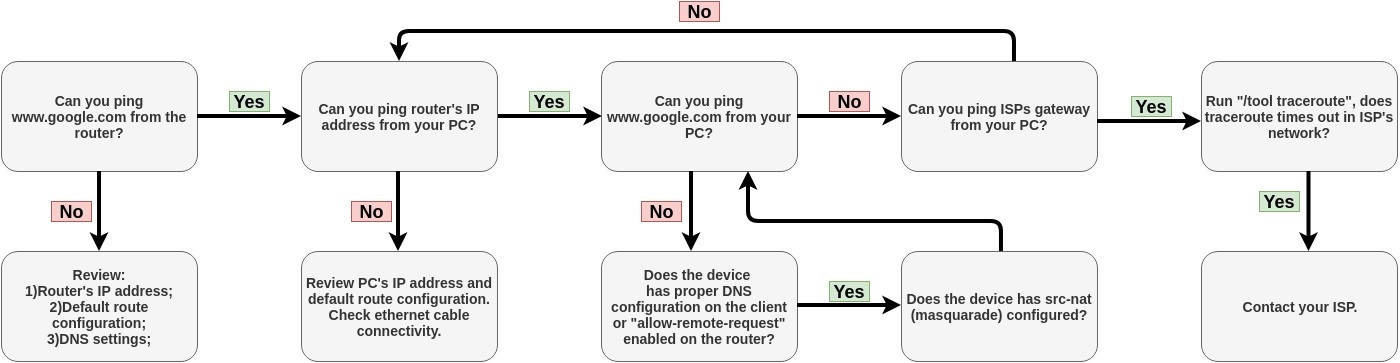
If you are not sure how exactly configure your gateway device, please reach MikroTik’s official consultants for configuration support.
Summary
- Winbox.exe is signed with an Extended Validation certificate, issued by SIA Mikrotīkls (MikroTik).
- WinBox uses ECSRP for key exchange and authentication (requires new winbox version).
- Both sides verify that other side knows password (no man in the middle attack is possible).
- Winbox in RoMON mode requires that agent is the latest version to be able to connect to latest version routers.
- Winbox uses AES128-CBC-SHA as encryption algorithm (requires winbox version 3.14 or above).
Starting Winbox
Winbox loader can be downloaded from the mikrotik download page. When winbox.exe is downloaded, double click on it and winbox loader window will pop up:
![]()
Note: It is recommended to use IP address whenever possible. MAC session uses network broadcasts and is not 100% reliable.
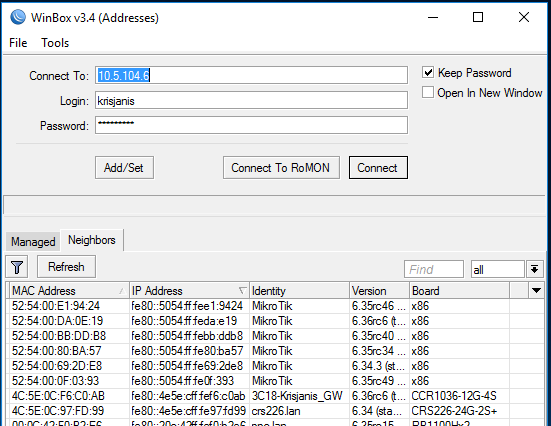
You can also use neighbor discovery, to list available routers use Neighbors tab:
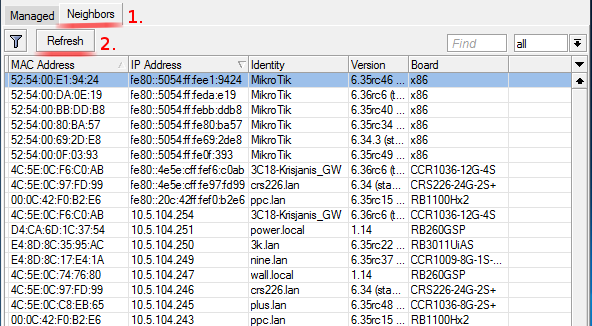
From list of discovered routers you can click on IP or MAC address column to connect to that router. If you click on IP address then IP will be used to connect, but if you click on MAC Address then MAC address will be used to connect to the router.
![]()
Note: Neighbor discovery will show also devices which are not compatible with Winbox, like Cisco routers or any other device that uses CDP (Cisco Discovery Protocol). If you will try to connect to SwOS device, then connection will be established through web browser
Description of buttons and fields of loader screen
- Simple mode:
- Connect — Connect to the router
- Connect To RoMON — Connect to RoMON Agent
- Add/set — Save/Edit any of saved router entries in Managed tab.
- Open In New Window — Leaves loader open in background and opens new windows for each device to which connection is made.
- Connect To: — destination IP or MAC address of the router
- Login — username used for authentication
- Password — password used for authentication
- Keep Password — if unchecked, password is not saved to the list
- Advanced mode:
- Browse — Browse file directory for some specific session
- Keep Password — if unchecked, password is not saved to the list
- Secure mode — if checked, winbox will use DH-1984 for key exchange and modified and hardened RC4-drop3072 encryption to secure session.
- Autosave session — Saves sessions automatically for devices to which connection are made.
- Session — Saved router session.
- Note — Note that is assigned to save router entry.
- Group — Group to which saved router entry is assigned.
- RoMON Agent — Select RoMON Agent from available device list
Description of menu items in loader screen
- New — Create new managed router list in specified location
- Open — Open managed router list file
- Save As — Save current managed router list to file
- Exit — Exit Winbox loader
- Advanced Mode — Enables/Disables advanced mode view
- Import — Imports saved session file
- Export — Exports saved session file
- Move Session Folder — Change path where session files are stored
- Clear cache — Clear winbox cache
- Check For Updates — Check for updates for Winbox loader
![]()
Warning: Managed routers list is not encrypted by default. To encrypt it, set the master password!
winbox.exe [<connect-to> [<login> [<password>]]]
For example (with no password):
winbox.exe 10.5.101.1 admin ""
winbox.exe --romon [<romon-agent> [<connect-to> [<login> [<password>]]]]
For example (with no password):
winbox.exe --romon 10.5.101.1 D4:CA:6D:E1:B5:7D admin ""
Winbox supports IPv6 connectivity. To connect to the routers IPv6 address, it must be placed in square braces the same as in web browsers when connecting to IPv6 server.
Example:
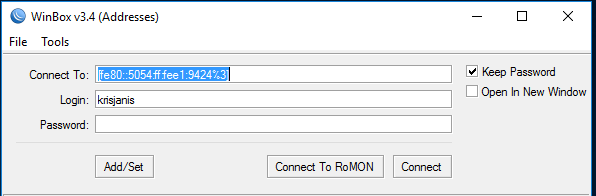
Winbox neighbor discovery is now capable of discovering IPv6 enabled routers. As you can see from the image below, there are two entries for each IPv6 enabled router, one entry is with IPv4 address and another one with IPv6 link-local address. You can easily choose to which one you want to connect:
Run Winbox on macOS
Wine is a software that allows you to run Windows executable files on macOS. Install latest Wine software from the official Wine HQ homepage, during installation you must check the «64 bit» checkbox, so that it can operate in macOS Catalina and newer. Then, you will have to launch Winbox 64bit version using this command line:
/Applications/Wine\ Staging.app/Contents/Resources/wine/bin/wine64 /Applications/winbox64.exe
Change the command according to where you installed Wine and where you have put the Winbox64 executable.
This is the easiest and most reliable way to run Winbox on new macOS versions.
For older macOS versions, It is possible to use Winbox in Apple macOS operating system by using Wine emulation software. For easier use it can be combined with WineBottler software to create a more convenient executable.
Also for older macOS versions, If the bottled version does not work, you can use Homebrew to install Wine and then launch the regular Winbox.exe file from our download page
brew cask install xquartz
brew install wine
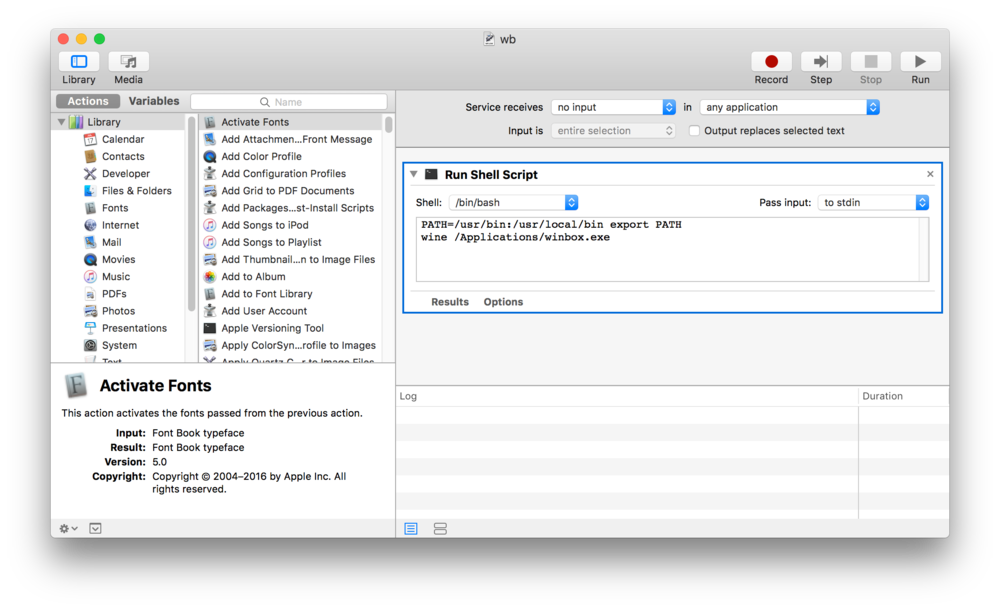
If you’d like to create a launcher in MacOS, to avoid launching Wine from the Terminal, you can do it with Automator and save the result as a service or as an app. This is an example setup:
Interface Overview
- Main toolbar at the top where users can add various info fields, like CPU and memory usage.
- Menu bar on the left — list of all available menus and sub-menus. This list changes depending on what packages are installed. For example if IPv6 package is disabled, then IPv6 menu and all it’s sub-menus will not be displayed.
- Work area — area where all menu windows are opened.
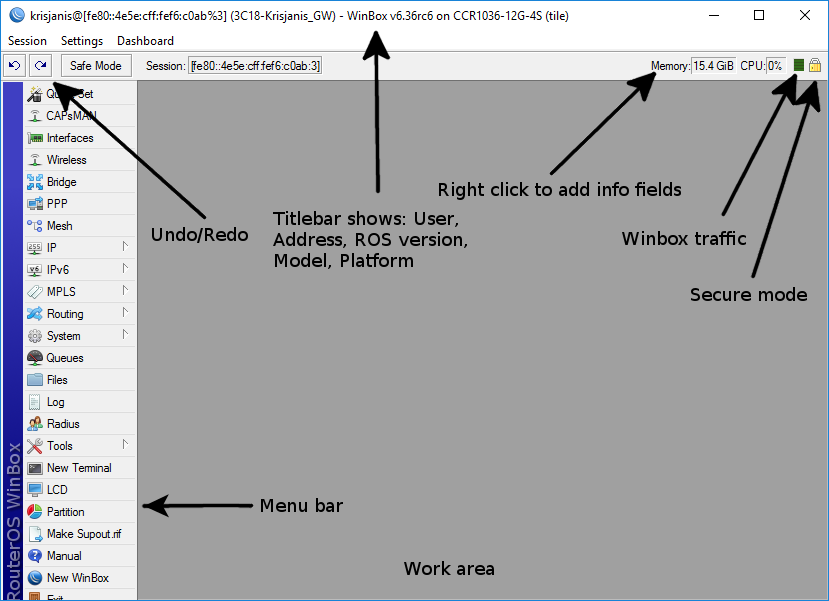
[username]@[Router's IP or MAC] ( [RouterID] ) - Winbox [ROS version] on [RB model] ([platform])
On the Main toolbar’s left side is located undo and redo buttons to quickly undo any changes made to configuration. On the right side is located:
- winbox traffic indicator displayed as a green bar,
- indicator that shows whether winbox session uses encryption
