

Хочу сегодня рассмотреть тему редиректов в Nginx. Я обычно настраиваю их в лоб. То есть нужен какой-то редирект, я его добавляю. На днях меня попросили СЕО специалисты переработать редиректы одного проекта и сделать так, чтобы для клиента был ровно один 301 редирект, который включает в себя сразу все необходимые преобразования url.
Если у вас есть желание научиться администрировать системы на базе Linux, рекомендую познакомиться с онлайн-курсом «Linux для начинающих» в OTUS. Курс для новичков, для тех, кто с Linux не знаком. Подробная информация.

- Пример двойного редиректа
- Пример с nginx rewrite
- Встроенные редиректы WordPress
- Все стандартные редиректы в nginx
- Корректный редирект с одного url на другой
- Заключение
- Помогла статья? Подписывайся на telegram канал автора
- Introduction
- General Proxying Information
- Deconstructing a Basic HTTP Proxy Pass
- Understanding How Nginx Processes Headers
- Setting or Resetting Headers
- Defining an Upstream Context for Load Balancing Proxied Connections
- Changing the Upstream Balancing Algorithm
- Setting Server Weight for Balancing
- Using Buffers to Free Up Backend Servers
- High Availability (Optional)
- Configuring Proxy Caching to Decrease Response Times
- Configuring a Proxy Cache
- Notes about Caching Results
- Conclusion
- Введение
- Настройка proxy_pass в nginx
- Передача реального ip (real ip) адреса клиента в nginx при proxy_pass
- Передача https через nginx с помощью proxy pass
- Проксирование определенной директории или файлов
- Часто задаваемые вопросы по теме статьи (FAQ)
- Заключение
- Помогла статья? Подписывайся на telegram канал автора
- Что такое обратный прокси?
- Преимущества обратного прокси
- Настройка Nginx в качестве обратного прокси
- Дополнительные настройки
- Резюме
- Кибербезопасность с Nginx
Пример двойного редиректа
Для того, чтобы было понятно, о чем идет речь, приведу пример. Допустим, у вас настроен редирект с http на https и добавление к урлу в конце слеш. То есть вы хотите такое преобразование:
http://site.ru/catalog -> https://site.ru/catalog/
Допустим, у вас сначала был настроен редирект на https подобным образом:
server { listen 80; root /var/www/site.ru/public; location / { return 301 https://site.ru$request_uri; }
}
А потом вас попросили добавить редирект всех урлов без слеша на тот же урл только со слешем на конце. Вы идете в секцию c listen 443 и добавляете редирект.
server { listen 443 http2;
................... location / { rewrite ^([^.]*[^/])$ $1/ permanent;
...................
}
В целом все нормально, редиректы работают. Но если перейти по ссылке http://site.ru/catalog, мы получим 2 301-х редиректа.
# curl -I -L http://site.ru/catalogHTTP/1.1 301 Moved PermanentlyServer: nginx
Content-Type: text/html
Content-Length: 162
Connection: keep-alive
Location: https://site.ru/catalogHTTP/2 301
server: nginx
content-type: text/html
content-length: 162
location: https://site.ru/catalog/HTTP/2 200
server: nginx
content-type: text/html; charset=UTF-8
vary: Accept-Encoding
На выходе у вас 2 редиректа вместо одного, что плохо для СЕО. Надо по возможности все реализовать в одном. В данном случае напрашивается простое и очевидное решение:
server { listen 80; server_name site.ru www.site.ru; root /var/www/site.ru/public; location / { return 301 https://site.ru$request_uri/; }
}
Вроде бы все нормально. Теперь редирект будет автоматически добавлять слеш в конец запроса. Но проблемы начнутся со ссылками на медиа файлы. Например, запрос http://site.ru/catalog/img.png будет превращаться в https://site.ru/catalog/img.png/, что нам совершенно не нужно. Чтобы это исправить, надо сделать так.
server { listen 80; server_name site.ru www.site.ru; location ~* ^.+.(js|css|png|jpg|jpeg|gif|webp|ico|woff|txt)$ { return 301 https://site.ru$request_uri; } location / { return 301 https://site.ru$request_uri/; }
}
Теперь все будет нормально, так как location со статикой указан в виде регулярного выражения. В случае попадания запроса в указанное правило, будет выполнен редирект без слеша. Все остальное попадет в следующий префиксный location /. То же самое можно сделать с помощью if и одного location, но c if работать будет медленнее. Там где можно обходиться без if, лучше его не использовать.
Пример с nginx rewrite
Теперь другая проблема. Возьмем такой url — http://site.ru/catalog/. В текущем конфиге он превращается в https://site.ru/catalog//. Исправляем это:
server { listen 80; server_name site.ru www.site.ru; location ~* ^.+.(js|css|png|jpg|jpeg|gif|webp|ico|woff)$ { return 301 https://site.ru$request_uri; } location / { rewrite ^/(.*)/$ /$1; return 301 https://site.ru$uri/; }
}
Обращаю внимание на то, что сделано. Я использую rewrite без какого-либо флага на конце, чтобы не прекращать обработку директив. В данном случае просто меняется uri и передается дальше. Если запрос приходит со слешом на конце, мы его обрезаем и отправляем в правило редиректа на https. Если слеша нет, то он сразу на редирект уходит. Теперь все в порядке.
Встроенные редиректы WordPress
Очевидно, что выше описана простая ситуация. На нее достаточно обратить внимание и исправить. Но не всегда бывает так просто. Например, вы сами не настраивали редирект урлов без слеша на урлы со слешом, он вам не нужен. Но, к примеру, WordPress реализует подобный редирект своими средствами. В итоге, при запросе http://site.ru/catalog вы получите такую картину с редиректами.
# curl -I -L http://site.ru/catalog
HTTP/1.1 301 Moved Permanently
Server: nginx
Content-Type: text/html
Content-Length: 162
Connection: keep-alive
Location: https://site.ru/catalogHTTP/2 301
server: nginx
content-type: text/html; charset=UTF-8
location: https://site.ru/catalog/x-powered-by: PHP/7.4.2x-redirect-by: WordPressHTTP/2 200
server: nginx
content-type: text/html; charset=UTF-8
vary: Accept-Encoding
Сначала nginx сделал редирект на https, так как вы это настроили у него в конфигурации, а потом wordpress на страницу со слешом на конце. В итоге у вас два редиректа, а надо один. Причем, два редиректа получились не по вашей воле. Если не обратите на это внимание, так и будете с ними жить. По факту, все типовые редиректы лучше сразу реализовывать в одном месте в веб сервере.
Все стандартные редиректы в nginx
Рассмотрю типовой пример, когда у нас одновременно присутствуют следующие редиректы:
- С http на https.
- С www на без www для обоих протоколов.
- Без слеша на конце на урл со слешем.
Наша цель будет реализовать все преобразования url в одном месте и выдать клиенту только один 301-й редирект.
server { listen 443 ssl http2; server_name site.ru; root /web/sites/site.ru/www/; index index.php index.html index.htm; access_log /web/sites/site.ru/log/access.log main; error_log /web/sites/site.ru/log/error.log; ssl_certificate	/etc/letsencrypt/live/site.ru/fullchain.pem; ssl_certificate_key	/etc/letsencrypt/live/site.ru/privkey.pem; location / {rewrite ^([^.]*[^/])$ $1/ permanent;try_files $uri/ /index.php?$args;	} location ~* ^.+.(js|css|png|jpg|jpeg|gif|webp|ico|woff|txt)$ {	access_log off;	expires max;	} location ~* ^/(\.ht|xmlrpc\.php)$ {	return 404;	} location ~ \.php$ {	try_files $uri =404;	fastcgi_pass unix:/var/run/php-fpm/php7-fpm.sock;	fastcgi_index index.php;	fastcgi_param DOCUMENT_ROOT /web/sites/site.ru/www/;	fastcgi_param SCRIPT_FILENAME /web/sites/site.ru/www$fastcgi_script_name;	fastcgi_param PATH_TRANSLATED /web/sites/site.ru/www$fastcgi_script_name;	include fastcgi_params;	fastcgi_param QUERY_STRING $query_string;	fastcgi_param REQUEST_METHOD $request_method;	fastcgi_param CONTENT_TYPE $content_type;	fastcgi_param CONTENT_LENGTH $content_length;	fastcgi_param HTTPS on;	fastcgi_intercept_errors on;	} location = /favicon.ico {	log_not_found off;	access_log off;	} location = /robots.txt {	allow all;	log_not_found off;	access_log off;	}
}
server { listen 443 ssl http2; server_name www.site.ru; location ~* ^.+.(js|css|png|jpg|jpeg|gif|webp|ico|woff|txt)$ {	return 301 https://site.ru$request_uri; } location / {	rewrite ^/(.*)/$ /$1;	return 301 https://site.ru$uri/; }
}
server { listen 80; server_name site.ru www.site.ru; location ~* ^.+.(js|css|png|jpg|jpeg|gif|webp|ico|woff|txt)$ {	return 301 https://site.ru$request_uri; } location / {	rewrite ^/(.*)/$ /$1;	return 301 https://site.ru$uri/; }
}
Получилось примерно так. Призываю не копировать бездумно конфиг, а проверить то, что я предлагаю. Хотя я сам внимательно проверил, как мог, но все равно не застрахован от ошибки. На мой взгляд здесь рассмотрены все основные моменты с редиректами. На выходе всегда один 301 редирект, какой бы запрос мы не сделали. При этом все реализовано средствами самого веб сервера, а значит, будет работать максимально быстро.
Корректный редирект с одного url на другой
Допустим вы корректно настроили стандартные редиректы в nginx. А потом в какой-то момент у вас поменялась структура сайта, или просто нужно было сделать редиректы для отдельных страниц. К примеру, запрос https://site.ru/main/hello/ перенаправить в https://site.ru/main/. По идее ничего сложного. Добавляем редирект:
server { listen 443;
........................ location /main/hello { return 301 /main/; }
........................
Если делать запросы по https, то все в порядке. Никаких проблем, сработает ровно один 301-й редирект на другой url. А что будет при запросе http://site.ru/main/hello ? Смотрим.
# curl -I -L --insecure http://site.ru/main/hello
HTTP/1.1 301 Moved Permanently
Server: nginx
Content-Type: text/html
Content-Length: 162
Connection: keep-alive
Location: https://site.ru/main/hello/
HTTP/2 301
server: nginx
content-type: text/html
content-length: 162
location: https://site.ru/main/
HTTP/2 200
server: nginx
content-type: text/html; charset=UTF-8
vary: Accept-Encoding
Опять два 301-х редиректа. Переделываем на один, не забывая все возможные варианты написания.
server { listen 443 ssl http2; server_name www.site.ru; location ~* ^.+.(js|css|png|jpg|jpeg|gif|webp|ico|woff|txt)$ {	return 301 https://site.ru$request_uri; } location / {	rewrite ^/(.*)/$ /$1;	return 301 https://site.ru$uri/; } location /main/hello {	rewrite ^/(.*)/$ /$1;	return 301 https://site.ru/main/; }
}
server { listen 80; server_name site.ru www.site.ru; location ~* ^.+.(js|css|png|jpg|jpeg|gif|webp|ico|woff|txt)$ {	return 301 https://site.ru$request_uri; } location / {	rewrite ^/(.*)/$ /$1;	return 301 https://site.ru$uri/; } location /main/hello {	rewrite ^/(.*)/$ /$1;	return 301 https://site.ru/main/; }
}
Ну и так далее. Думаю, идея ясна. Следует следить за всеми редиректами и стараться всегда оставлять только один.
Заключение
Я прилично заморочился с темой редиректов в nginx. Раньше никогда не обращал на них пристального внимания. Да и у других не видел акцента на этом. В интернете полно готовых вариантов перенаправлений на все случаи жизни, но рассмотрены они в отдельности. А вот так комплексно взглянуть на полный конфиг со всеми нюансами не приходилось.
Материал полностью написан и протестирован мной от начала до конца, поэтому призываю не копировать слепо к себе, а проверить. Я могу где-то ошибаться, что в такой важной теме может быть чревато проблемами с индексацией и работой сайта. Так что внимательно все проверяйте, прежде чем внедрять у себя. Ну а замечания все, как обычно, жду в комментариях.
В завершении рекомендую мою статью про настройку nginx. Я там частично рассматриваю и эту тему. А вообще там рассказаны все основные моменты, на которые стоит обращать внимание при работе с nginx.
Если у вас есть желание научиться строить и поддерживать высокодоступные и надежные системы, научиться непрерывной поставке ПО, мониторингу и логированию web приложений, рекомендую познакомиться с онлайн-курсом «DevOps практики и инструменты» в OTUS. Курс не для новичков, для поступления нужны базовые знания по сетям и установке Linux на виртуалку. Обучение длится 5 месяцев, после чего успешные выпускники курса смогут пройти собеседования у партнеров.
Проверьте себя на вступительном тесте и смотрите подробнее программу по ссылке.
Помогла статья? Подписывайся на telegram канал автора
Анонсы всех статей, плюс много другой полезной и интересной информации, которая не попадает на сайт.
Introduction
In this guide, we will discuss Nginx’s http proxying capabilities, which allow Nginx to pass requests off to backend http servers for further processing. Nginx is often set up as a reverse proxy solution to help scale out infrastructure or to pass requests to other servers that are not designed to handle large client loads.
Along the way, we will discuss how to scale out using Nginx’s built-in load balancing capabilities. We will also explore buffering and caching to improve the performance of proxying operations for clients.
General Proxying Information
If you have only used web servers in the past for simple, single server configurations, you may be wondering why you would need to proxy requests.
One reason to proxy to other servers from Nginx is the ability to scale out your infrastructure. Nginx is built to handle many concurrent connections at the same time. This makes it ideal for being the point-of-contact for clients. The server can pass requests to any number of backend servers to handle the bulk of the work, which spreads the load across your infrastructure. This design also provides you with flexibility in easily adding backend servers or taking them down as needed for maintenance.
Proxying in Nginx is accomplished by manipulating a request aimed at the Nginx server and passing it to other servers for the actual processing. The result of the request is passed back to Nginx, which then relays the information to the client. The other servers in this instance can be remote machines, local servers, or even other virtual servers defined within Nginx. The servers that Nginx proxies requests to are known as upstream servers.
Nginx can proxy requests to servers that communicate using the http(s), FastCGI, SCGI, and uwsgi, or memcached protocols through separate sets of directives for each type of proxy. In this guide, we will be focusing on the http protocol. The Nginx instance is responsible for passing on the request and massaging any message components into a format that the upstream server can understand.
Deconstructing a Basic HTTP Proxy Pass
The most straight-forward type of proxy involves handing off a request to a single server that can communicate using http. This type of proxy is known as a generic “proxy pass” and is handled by the aptly named proxy_pass directive.
Let’s take a look at an example:
# server context
. . .
In the above configuration snippet, no URI is given at the end of the server in the proxy_pass definition. For definitions that fit this pattern, the URI requested by the client will be passed to the upstream server as-is.
Let’s take a look at the alternative scenario:
# server context
. . .
In the above example, the proxy server is defined with a URI segment on the end (/new/prefix). When a URI is given in the proxy_pass definition, the portion of the request that matches the location definition is replaced by this URI during the pass.
For example, a request for /match/here/please on the Nginx server will be passed to the upstream server as http://example.com/new/prefix/please. The /match/here is replaced by /new/prefix. This is an important point to keep in mind.
Sometimes, this kind of replacement is impossible. In these cases, the URI at the end of the proxy_pass definition is ignored and either the original URI from the client or the URI as modified by other directives will be passed to the upstream server.
Understanding How Nginx Processes Headers
One thing that might not be immediately clear is that it is important to pass more than just the URI if you expect the upstream server handle the request properly. The request coming from Nginx on behalf of a client will look different than a request coming directly from a client. A big part of this is the headers that go along with the request.
When Nginx proxies a request, it automatically makes some adjustments to the request headers it receives from the client:
- Nginx gets rid of any empty headers. There is no point of passing along empty values to another server; it would only serve to bloat the request.
- Nginx, by default, will consider any header that contains underscores as invalid. It will remove these from the proxied request. If you wish to have Nginx interpret these as valid, you can set the
underscores_in_headersdirective to “on”, otherwise your headers will never make it to the backend server. - The “Host” header is re-written to the value defined by the
$proxy_hostvariable. This will be the IP address or name and port number of the upstream, directly as defined by theproxy_passdirective. - The “Connection” header is changed to “close”. This header is used to signal information about the particular connection established between two parties. In this instance, Nginx sets this to “close” to indicate to the upstream server that this connection will be closed once the original request is responded to. The upstream should not expect this connection to be persistent.
The first point that we can extrapolate from the above is that any header that you do not want passed should be set to an empty string. Headers with empty values are completely removed from the passed request.
The next point to glean from the above information is that if your backend application will be processing non-standard headers, you must make sure that they do not have underscores. If you need headers that use an underscore, you can set the underscores_in_headers directive to “on” further up in your configuration (valid either in the http context or in the context of the default server declaration for the IP address/port combination). If you do not do this, Nginx will flag these headers as invalid and silently drop them before passing to your upstream.
The “Host” header is of particular importance in most proxying scenarios. As stated above, by default, this will be set to the value of $proxy_host, a variable that will contain the domain name or IP address and port taken directly from the proxy_pass definition. This is selected by default as it is the only address Nginx can be sure the upstream server responds to (as it is pulled directly from the connection info).
The most common values for the “Host” header are below:
$proxy_host: This sets the “Host” header to the domain name or IP address and port combo taken from theproxy_passdefinition. This is the default and “safe” from Nginx’s perspective, but not usually what is needed by the proxied server to correctly handle the request.$http_host: Sets the “Host” header to the “Host” header from the client request. The headers sent by the client are always available in Nginx as variables. The variables will start with an$http_prefix, followed by the header name in lowercase, with any dashes replaced by underscores. Although the$http_hostvariable works most of the time, when the client request does not have a valid “Host” header, this can cause the pass to fail.$host: This variable is set, in order of preference to: the host name from the request line itself, the “Host” header from the client request, or the server name matching the request.
In most cases, you will want to set the “Host” header to the $host variable. It is the most flexible and will usually provide the proxied servers with a “Host” header filled in as accurately as possible.
Setting or Resetting Headers
To adjust or set headers for proxy connections, we can use the proxy_set_header directive. For instance, to change the “Host” header as we have discussed, and add some additional headers common with proxied requests, we could use something like this:
# server context  HOST   X-Forwarded-Proto   X-Real-IP   X-Forwarded-For
. . .
The above request sets the “Host” header to the $host variable, which should contain information about the original host being requested. The X-Forwarded-Proto header gives the proxied server information about the schema of the original client request (whether it was an http or an https request).
The X-Real-IP is set to the IP address of the client so that the proxy can correctly make decisions or log based on this information. The X-Forwarded-For header is a list containing the IP addresses of every server the client has been proxied through up to this point. In the example above, we set this to the $proxy_add_x_forwarded_for variable. This variable takes the value of the original X-Forwarded-For header retrieved from the client and adds the Nginx server’s IP address to the end.
Of course, we could move the proxy_set_header directives out to the server or http context, allowing it to be referenced in more than one location:
# server context HOST X-Forwarded-Proto X-Real-IP X-Forwarded-For Defining an Upstream Context for Load Balancing Proxied Connections
In the previous examples, we demonstrated how to do a simple http proxy to a single backend server. Nginx allows us to easily scale this configuration out by specifying entire pools of backend servers that we can pass requests to.
We can do this by using the upstream directive to define a pool of servers. This configuration assumes that any one of the listed servers is capable of handling a client’s request. This allows us to scale out our infrastructure with almost no effort. The upstream directive must be set in the http context of your Nginx configuration.
Let’s look at a simple example:
# http context Changing the Upstream Balancing Algorithm
You can modify the balancing algorithm used by the upstream pool by including directives or flags within the upstream context:
- (round robin): The default load balancing algorithm that is used if no other balancing directives are present. Each server defined in the upstream context is passed requests sequentially in turn.
least_conn: Specifies that new connections should always be given to the backend that has the least number of active connections. This can be especially useful in situations where connections to the backend may persist for some time.ip_hash: This balancing algorithm distributes requests to different servers based on the client’s IP address. The first three octets are used as a key to decide on the server to handle the request. The result is that clients tend to be served by the same server each time, which can assist in session consistency.hash: This balancing algorithm is mainly used with memcached proxying. The servers are divided based on the value of an arbitrarily provided hash key. This can be text, variables, or a combination. This is the only balancing method that requires the user to provide data, which is the key that should be used for the hash.
# http context
. . .
In the above example, the server will be selected based on which one has the least connections. The ip_hash directive could be set in the same way to get a certain amount of session “stickiness”.
As for the hash method, you must provide the key to hash against. This can be whatever you wish:
# http context  consistent
. . .
The above example will distribute requests based on the value of the client ip address and port. We also added the optional parameter consistent, which implements the ketama consistent hashing algorithm. Basically, this means that if your upstream servers change, there will be minimal impact on your cache.
Setting Server Weight for Balancing
In declarations of the backend servers, by default, each servers is equally “weighted”. This assumes that each server can and should handle the same amount of load (taking into account the effects of the balancing algorithms). However, you can also set an alternative weight to servers during the declaration:
# http context  host1.example.com weight=3
. . .
In the above example, host1.example.com will receive three times the traffic as the other two servers. By default, each server is assigned a weight of one.
Using Buffers to Free Up Backend Servers
When proxying to another server, the speed of two different connections will affect the client’s experience:
- The connection from the client to the Nginx proxy.
- The connection from the Nginx proxy to the backend server.
Nginx has the ability to adjust its behavior based on whichever one of these connections you wish to optimize.
Without buffers, data is sent from the proxied server and immediately begins to be transmitted to the client. If the clients are assumed to be fast, buffering can be turned off in order to get the data to the client as soon as possible. With buffers, the Nginx proxy will temporarily store the backend’s response and then feed this data to the client. If the client is slow, this allows the Nginx server to close the connection to the backend sooner. It can then handle distributing the data to the client at whatever pace is possible.
proxy_buffering: This directive controls whether buffering for this context and child contexts is enabled. By default, this is “on”.proxy_buffers: This directive controls the number (first argument) and size (second argument) of buffers for proxied responses. The default is to configure 8 buffers of a size equal to one memory page (either4kor8k). Increasing the number of buffers can allow you to buffer more information.proxy_buffer_size: The initial portion of the response from a backend server, which contains headers, is buffered separately from the rest of the response. This directive sets the size of the buffer for this portion of the response. By default, this will be the same size asproxy_buffers, but since this is used for header information, this can usually be set to a lower value.proxy_busy_buffers_size: This directive sets the maximum size of buffers that can be marked “client-ready” and thus busy. While a client can only read the data from one buffer at a time, buffers are placed in a queue to send to the client in bunches. This directive controls the size of the buffer space allowed to be in this state.proxy_max_temp_file_size: This is the maximum size, per request, for a temporary file on disk. These are created when the upstream response is too large to fit into a buffer.proxy_temp_file_write_size: This is the amount of data Nginx will write to the temporary file at one time when the proxied server’s response is too large for the configured buffers.proxy_temp_path: This is the path to the area on disk where Nginx should store any temporary files when the response from the upstream server cannot fit into the configured buffers.
As you can see, Nginx provides quite a few different directives to tweak the buffering behavior. Most of the time, you will not have to worry about the majority of these, but it can be useful to adjust some of these values. Probably the most useful to adjust are the proxy_buffers and proxy_buffer_size directives.
An example that increases the number of available proxy buffers for each upstream request, while trimming down the buffer that likely stores the headers would look like this:
# server context In contrast, if you have fast clients that you want to immediately serve data to, you can turn buffering off completely. Nginx will actually still use buffers if the upstream is faster than the client, but it will immediately try to flush data to the client instead of waiting for the buffer to pool. If the client is slow, this can cause the upstream connection to remain open until the client can catch up. When buffering is “off” only the buffer defined by the proxy_buffer_size directive will be used:
# server context High Availability (Optional)
Nginx proxying can be made more robust by adding in a redundant set of load balancers, creating a high availability infrastructure.
A high availability (HA) setup is an infrastructure without a single point of failure, and your load balancers are a part of this configuration. By having more than one load balancer, you prevent potential downtime if your load balancer is unavailable or if you need to take them down for maintenance.
Here is a diagram of a basic high availability setup:
Configuring Proxy Caching to Decrease Response Times
While buffering can help free up the backend server to handle more requests, Nginx also provides a way to cache content from backend servers, eliminating the need to connect to the upstream at all for many requests.
Configuring a Proxy Cache
To set up a cache to use for proxied content, we can use the proxy_cache_path directive. This will create an area where data returned from the proxied servers can be kept. The proxy_cache_path directive must be set in the http context.
In the example below, we will configure this and some related directives to set up our caching system.
# http context /var/lib/nginx/cache levels=1:2 keys_zone=backcache:8m max_size=50m With the proxy_cache_path directive, we have have defined a directory on the filesystem where we would like to store our cache. In this example, we’ve chosen the /var/lib/nginx/cache directory. If this directory does not exist, you can create it with the correct permission and ownership by typing:
sudo mkdir -p /var/lib/nginx/cache
sudo chown www-data /var/lib/nginx/cache
sudo chmod 700 /var/lib/nginx/cache
The levels= parameter specifies how the cache will be organized. Nginx will create a cache key by hashing the value of a key (configured below). The levels we selected above dictate that a single character directory (this will be the last character of the hashed value) with a two character subdirectory (taken from the next two characters from the end of the hashed value) will be created. You usually won’t have to be concerned with the specifics of this, but it helps Nginx quickly find the relevant values.
The keys_zone= parameter defines the name for this cache zone, which we have called backcache. This is also where we define how much metadata to store. In this case, we are storing 8 MB of keys. For each megabyte, Nginx can store around 8000 entries. The max_size parameter sets the maximum size of the actual cached data.
Another directive we use above is proxy_cache_key. This is used to set the key that will be used to store cached values. This same key is used to check whether a request can be served from the cache. We are setting this to a combination of the scheme (http or https), the HTTP request method, as well as the requested host and URI.
The proxy_cache_valid directive can be specified multiple times. It allows us to configure how long to store values depending on the status code. In our example, we store successes and redirects for 10 minutes, and expire the cache for 404 responses every minute.
Now, we have configured the cache zone, but we still need to tell Nginx when to use the cache.
In locations where we proxy to a backend, we can configure the use of this cache:
# server context  X-Proxy-Cache
. . .
Using the proxy_cache directive, we can specify that the backcache cache zone should be used for this context. Nginx will check here for a valid entry before passing to the backend.
The proxy_cache_bypass directive is set to the $http_cache_control variable. This will contain an indicator as to whether the client is explicitly requesting a fresh, non-cached version of the resource. Setting this directive allows Nginx to correctly handle these types of client requests. No further configuration is required.
We also added an extra header called X-Proxy-Cache. We set this header to the value of the $upstream_cache_status variable. Basically, this sets a header that allows us to see if the request resulted in a cache hit, a cache miss, or if the cache was explicitly bypassed. This is especially valuable for debugging, but is also useful information for the client.
Notes about Caching Results
Caching can improve the performance of your proxy enormously. However, there are definitely considerations to keep in mind when configuring cache.
If your site has some dynamic elements, you will have to account for this in the backend servers. How you handle this depends on what application or server is handling the backend processing. For private content, you should set the Cache-Control header to “no-cache”, “no-store”, or “private” depending on the nature of the data:
- no-cache: Indicates that the response shouldn’t be served again without first checking that the data hasn’t changed on the backend. This can be used if the data is dynamic and important. An ETag hashed metadata header is checked on each request and the previous value can be served if the backend returns the same hash value.
- no-store: Indicates that at no point should the data received ever be cached. This is the safest option for private data, as it means that the data must be retrieved from the server every time.
- private: This indicates that no shared cache space should cache this data. This can be useful for indicating that a user’s browser can cache the data, but the proxy server shouldn’t consider this data valid for subsequent requests.
- public: This indicates that the response is public data that can be cached at any point in the connection.
A related header that can control this behavior is the max-age header, which indicates the number of seconds that any resource should be cached.
Setting these headers correctly, depending on the sensitivity of the content, will help you take advantage of cache while keeping your private data safe and your dynamic data fresh.
If your backend also uses Nginx, you can set some of this using the expires directive, which will set the max-age for Cache-Control:
Cache-Control Conclusion
Nginx is first and foremost a reverse proxy, which also happens to have the ability to work as a web server. Because of this design decision, proxying requests to other servers is fairly straight forward. Nginx is very flexible though, allowing for more complex control over your proxying configuration if desired.
Хочу рассказать об одной полезной возможности nginx, которую регулярно использую в своих делах. Речь пойдет о настройке проксирования запросов на удаленный сервер с помощью nginx и директивы proxy_pass. Я приведу примеры различных настроек и расскажу, где сам использую данный модуль популярного веб сервера.
Если у вас есть желание научиться администрировать системы на базе Linux, рекомендую познакомиться с онлайн-курсом «Linux для начинающих» в OTUS. Курс для новичков, для тех, кто с Linux не знаком. Подробная информация.
Введение
Немного расскажу своими словами о том, как работает модуль ngx_http_proxy_module. Именно он реализует весь функционал, о котором пойдет речь. Допустим, у вас в локальной или виртуальной сети есть какие-то сервисы, не имеющие прямого доступа из интернета. А вы хотите таковой иметь. Можно пробрасывать нужные порты на шлюзе, можно что-то еще придумывать. А можно сделать проще всего — настроить единую точку входа на все свои сервисы в виде nginx сервера и с него проксировать различные запросы к нужным серверам.
Расскажу на конкретных примерах, где я это использую. Для наглядности и простоты буду прям по порядку перечислять эти варианты:
- Ранее я рассказывал о настройке чат серверов — matrix и mattermost. В этих статьях я как раз рассказывал о том, как проксировать запросы в чат с помощью nginx. Прошелся по теме вскользь, не останавливаясь подробно. Суть в том, что вы настраиваете на любом виртуальном сервере эти чаты, помещаете их в закрытые периметры сети без лишних доступов и просто проксируете запросы на эти сервера. Они идут через nginx, который у вас смотрит во внешний интернет и принимает все входящие соединения.
- Допустим, у вас есть большой сервер с множеством контейнеров, например докера. На нем работает множество различных сервисов. Вы устанавливаете еще один контейнер с чистым nginx, на нем настраиваете проксирование запросов на эти контейнеры. Сами контейнеры мапите только к локальному интерфейсу сервера. Таким образом, они будут полностью закрыты извне, и при этом вы можете гибко управлять доступом.
- Еще один популярный пример. Допустим, у вас есть сервер с гипервизором proxmox или любым другим. Вы настраиваете на одной из виртуальных машин шлюз, создаете локальную сеть только из виртуальных машин без доступа в нее извне. Делаете в этой локальной сети для всех виртуальных машин шлюз по-умолчанию в виде вашей виртуальной машины со шлюзом. На виртуальных серверах в локальной сети размещаете различные сервисы и не заморачиваетесь с настройками фаервола на них. Вся их сеть все равно не доступна из интернета. А доступ к сервисам проксируете с помощью nginx, установленным на шлюз или на отдельной виртуальной машине с проброшенными на нее портами.
- Мой личный пример. У меня дома есть сервер synology. Я хочу организовать к нему простой доступ по https из браузера по доменному имени. Нет ничего проще. Настраиваю на сервере nginx получение бесплатного сертификата Let’s encrypt, настраиваю проксирование запросов на мой домашний ip, там на шлюзе делаю проброс внутрь локалки на synology сервер. При этом я могу фаерволом ограничить доступ к серверу только одним ip, на котором работает nginx. В итоге на самом synology вообще ничего не надо делать. Он и знать не знает, что к нему заходят по https, по стандартному порту 443.
- Допустим, у вас большой проект, разбитый на составные части, которые живут на разных серверах. К примеру, на отдельном сервере живет форум, по пути /forum от основного домена. Вы просто берете и настраиваете проксирование всех запросов по адресу /forum на отдельный сервер. Точно так же можно без проблем все картинки перенести на другой сервер и проксировать к ним запросы. То есть вы можете создать любой location и переадресовывать запросы к нему на другие сервера.
Надеюсь в общем и целом понятно, о чем идет речь. Вариантов использования много. Я привел самые распространенные, которые пришли в голову и которые использую сам. Из плюсов, которые считаю наиболее полезными именно из своих кейсов, отмечу 2:
- Без проблем можете настроить https доступ к сервисам, при этом совершенно не трогая эти сервисы. Вы получаете и используете сертификаты на nginx сервере, используете https соединение с ним, а сам nginx уже передает информацию на сервера со службами, которые могут работать по обычному http и знать не знают о https.
- Вы очень легко можете менять адреса, куда проксируете запросы. Допустим у вас есть сайт, его запросы проксируются на отдельный сервер. Вы подготовили обновление или переезд сайта. Отладили все на новом сервере. Теперь вам достаточно на сервере nginx изменить адрес старого сервера на новый, куда будут перенаправляться запросы. И все. Если что-то пойдет не так, можете оперативно вернуть все обратно.
С теорией закончил. Перейдем теперь к примерам настройки. В своих примерах я буду использовать следующие обозначения:
Настройка proxy_pass в nginx
Рассмотрим самый простой пример. Буду использовать свой технический домен zeroxzed.ru в этом и последующих примерах. Допустим, у нас есть сайт blog.zeroxzed.ru. В DNS создана A запись, указывающая на ip адрес сервера, где установлен nginx — nginx_srv. Мы будем проксировать все запросы с этого сервера на другой сервер в локальной сети blog_srv, где реально размещается сайт. Рисуем конфиг для секции server.
server { listen 80; server_name blog.zeroxzed.ru; access_log /var/log/nginx/blog.zeroxzed.ru-access.log; error_log /var/log/nginx/blog.zeroxzed.ru-error.log;
location / { proxy_pass http://192.168.13.31; proxy_set_header Host $host; proxy_set_header X-Forwarded-For $proxy_add_x_forwarded_for; proxy_set_header X-Real-IP $remote_addr; }
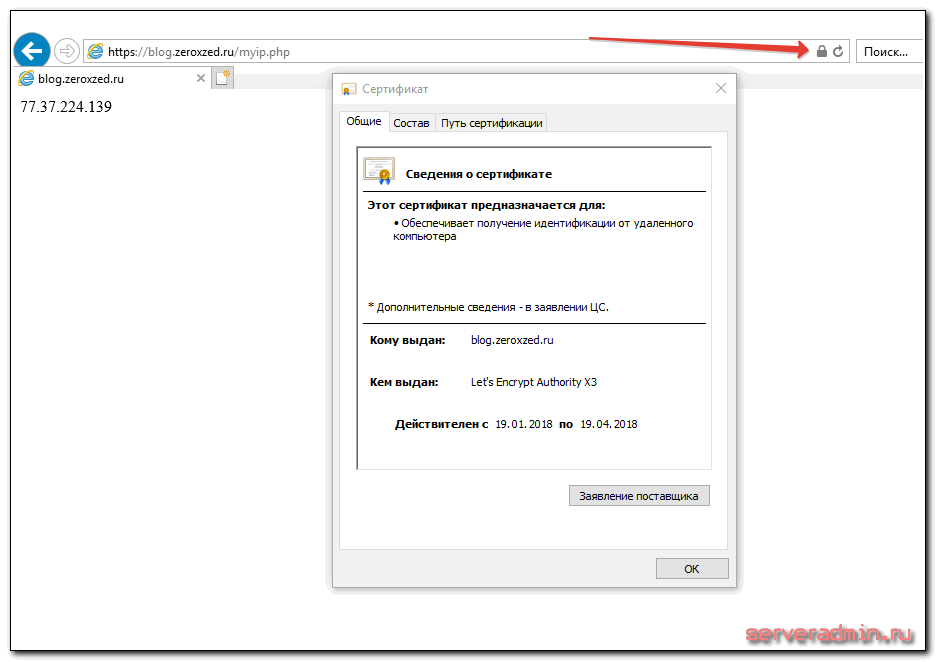
}Заходим по адресу http://blog.zeroxzed.ru. Мы должны попасть на blog_srv, где тоже должен работать какой-то веб сервер. В моем случае это будет тоже nginx. У вас должно открыться содержимое, аналогичное тому, что вы увидите, набрав http://192.168.13.31 в локальной сети. Если что-то не работает, то проверьте сначала, что по адресу директивы proxy_pass у вас все корректно работает.
Посмотрим логи на обоих сервера. На nginx_srv вижу свой запрос:
77.37.224.139 - - [19/Jan/2018:15:15:40 +0300] "GET / HTTP/1.1" 304 0 "-" "Mozilla/5.0 (Windows NT 10.0; WOW64; Trident/7.0; rv:11.0) like Gecko"
94.142.141.246 - - [19/Jan/2018:15:15:40 +0300] "GET / HTTP/1.0" 304 0 "-" "Mozilla/5.0 (Windows NT 10.0; WOW64; Trident/7.0; rv:11.0) like Gecko" "77.37.224.139"
Как мы видим, запрос сначала пришел на nginx_srv, был переправлен на blog_srv, куда он пришел уже с адресом отправителя 94.142.141.246. Это адрес nginx_srv. Реальный же ip адрес клиента мы видим только в самом конце лога. Это неудобно, так как директива php REMOTE_ADDR не будет возвращать настоящий ip адрес клиента. А он очень часто бывает нужен. Мы это дальше исправим, а пока создадим в корне сайта на chat_srv тестовую страничку для проверки ip адреса клиента следующего содержания:
<?php
echo $_SERVER['REMOTE_ADDR']
?>
Назовем ее myip.php. Перейдем по адресу http://blog.zeroxzed.ru/myip.php и проверим, как сервер определит наш адрес. Никак не определит 🙂 Он покажет адрес nginx_srv. Исправляем это и учим nginx передавать реальный ip адрес клиента на сервер.
Передача реального ip (real ip) адреса клиента в nginx при proxy_pass
В предыдущем примере мы на самом деле передаем реальный ip адрес клиента с помощью директивы proxy_set_header, которая добавляет в заголовок X-Real-IP настоящий ip адрес клиента. Теперь нам нужно на принимающей стороне, то есть blog_srv сделать обратную замену — заменить информацию об адресе отправителя на ту, что указана в заголовке X-Real-IP. Добавляем в секцию server следующие параметры:
set_real_ip_from 94.142.141.246;
real_ip_header X-Real-IP;
Полностью секция server на blog_srv в самом простом варианте получается следующей:
 server {	listen 80 default_server;	server_name blog.zeroxzed.ru;	root /usr/share/nginx/html;set_real_ip_from 94.142.141.246;	real_ip_header X-Real-IP; location / {	index index.php index.html index.htm;	try_files	$uri $uri/	=404;	} location ~ \.php$ {	fastcgi_pass 127.0.0.1:9000;	fastcgi_index index.php;	fastcgi_intercept_errors on;	include fastcgi_params;	fastcgi_param SCRIPT_FILENAME $document_root$fastcgi_script_name;	fastcgi_ignore_client_abort off;	} error_page 404 /404.html;	location = /40x.html { } error_page 500 502 503 504 /50x.html;	location = /50x.html { }
}
Сохраняем конфиг, перечитываем его и снова проверяем http://blog.zeroxzed.ru/myip.php. Вы должны увидеть свой реальный ip адрес. Его же вы увидите в логе web сервера на blog_srv.

Дальше рассмотрим более сложные конфигурации.
Передача https через nginx с помощью proxy pass
Если у вас сайт работает по https, то достаточно настроить ssl только на nginx_srv, если вы не беспокоитесь за передачу информации от nginx_srv к blog_srv. Она может осуществляться по незащищенному протоколу. Рассмотрю пример с бесплатным сертификатом let’s encrypt. Это как раз один из кейсов, когда я использую proxy_pass. Очень удобно настроить на одном сервере автоматическое получение всех необходимых сертификатов. Подробно настройку let’s encrypt я рассматривал отдельно. Сейчас будем считать, что у вас стоит certbot и все готово для нового сертификата, который потом будет автоматически обновляться.
Для этого нам надо на nginx_srv добавить еще один location — /.well-known/acme-challenge/. Полная секция server нашего тестового сайта на момент получения сертификата будет выглядеть вот так:
server { listen 80; server_name blog.zeroxzed.ru; access_log /var/log/nginx/blog.zeroxzed.ru-access.log; error_log /var/log/nginx/blog.zeroxzed.ru-error.log; location /.well-known/acme-challenge/ {	root /web/sites/blog.zeroxzed.ru/www/; } location / {	proxy_pass http://192.168.13.31;	proxy_set_header Host $host;	proxy_set_header X-Forwarded-For $proxy_add_x_forwarded_for;	proxy_set_header X-Real-IP $remote_addr; }
}
Перечитывайте конфиг nginx и получайте сертификат. После этого конфиг меняется на следующий:
server { listen 80; server_name blog.zeroxzed.ru; access_log /var/log/nginx/blog.zeroxzed.ru-access.log; error_log /var/log/nginx/blog.zeroxzed.ru-error.log; return 301 https://$server_name$request_uri; # редирект обычных запросов на https }
server { listen 443 ssl http2; server_name blog.zeroxzed.ru; access_log /var/log/nginx/blog.zeroxzed.ru-ssl-access.log; error_log /var/log/nginx/blog.zeroxzed.ru-ssl-error.log; ssl on; ssl_certificate /etc/letsencrypt/live/blog.zeroxzed.ru/fullchain.pem; ssl_certificate_key /etc/letsencrypt/live/blog.zeroxzed.ru/privkey.pem; ssl_session_timeout 5m; ssl_protocols TLSv1 TLSv1.1 TLSv1.2; ssl_dhparam /etc/ssl/certs/dhparam.pem; ssl_ciphers 'EECDH+AESGCM:EDH+AESGCM:AES256+EECDH:AES256+EDH'; ssl_prefer_server_ciphers on; ssl_session_cache shared:SSL:10m; location /.well-known/acme-challenge/ {	root /web/sites/blog.zeroxzed.ru/www/; } location / {	proxy_pass http://192.168.13.31;	proxy_set_header Host $host;	proxy_set_header X-Forwarded-For $proxy_add_x_forwarded_for;	proxy_set_header X-Real-IP $remote_addr; }
}
Проверяем, что получилось.
Наш сайт работает по https, при том, что мы вообще не трогали сервер, где этот сайт располагается. Конкретно с web сайтом это может быть не так актуально, но если вы проксируете запросы не на обычный сайт, а на какой-то нестандартный сервис, который трудно перевести на https, это может быть хорошим решением.
Проксирование определенной директории или файлов
Рассмотрим еще один пример. Допустим, у вас форум живет в директории http://blog.zeroxzed.ru/forum/, вы хотите вынести форум на отдельный web сервер для увеличения быстродействия. Для этого к предыдущему конфигу добавьте еще один location.
location /forum/ { proxy_pass http://192.168.13.31; proxy_set_header Host $host; proxy_set_header X-Forwarded-For $proxy_add_x_forwarded_for; proxy_set_header X-Real-IP $remote_addr; proxy_redirect default; }Еще одно популярное решение. Вы можете отдавать картинки с одного сервера, а все остальное с другого. В моем примере, картинки будут жить на том же сервере, где nginx, а остальной сайт на другом сервере. Тогда у нас должна быть примерно такая конфигурация локаций.
location / {	proxy_pass http://192.168.13.31;	proxy_set_header Host $host;	proxy_set_header X-Forwarded-For $proxy_add_x_forwarded_for;	proxy_set_header X-Real-IP $remote_addr;	}
location ~ \.(gif|jpg|png)$ {	root /web/sites/blog.zeroxzed.ru/www/images;	}
Чтобы все это работало корректно, необходимо, чтобы сам сайт умел правильно размещать свои изображения. Вариантов это организовать множество. Можно как на сервере монтировать сетевые паки различными способами, так и программистам изменять код для управления размещением изображений. В любом случае, это комплексный подход к работе с сайтом.
Существует очень много директив для управления прокси-соединениями. Все они описаны в соответствующей документации nginx. Я не большой специалист по настройке nginx. В основном использую свои готовые конфиги, зачастую даже не вникая в суть, если получается сразу решить задачу. Подсматриваю что-то у других, записываю к себе, стараюсь разобраться.
Особое внимание следует уделить директивам кэширования proxy_cache, если в этом есть потребность. Можно существенно увеличить отклик веб сайта, если подходящим образом настроить отдачу кэша. Но это тонкий момент и нужно настраивать в каждом конкретном случае отдельно. Готовых рецептов тут не бывает.
Более подробно о комплексной настройке nginx читайте в отдельной большой статье с моими личными примерами.
Часто задаваемые вопросы по теме статьи (FAQ)
При использовании https нужно ли в режиме proxy_pass настраивать https и на бэкенде?
В общем случае не обязательно. Но есть некоторый софт, который не может корректно работать в таком режиме. Он не понимает, как корректно обрабатывать такую ситуацию. Может создавать ссылки вида http://site.ru:443, которые будут являться ошибочными. В таком случае необходимо настроить обмен между nginx и бэк сервером тоже https соединение.
Как наиболее простым спосбом передавать сертификат let’s encrypt с nginx на backend? Ведь обновдление и генерация сертификата происходят только на nginx.
Я в таких случаях использую 2 способа, в зависимости от ситуации. Самый простой — на сервере с nginx настроить nfs сервер, а на бэкенде подмонтировать по nfs к себе директорию /etc/letsencrypt и спокойно использовать сертификаты, как-будто они лежат локально. Второй вариант — использовать простой bash скрипт для копирования сертификатов к себе на сервер по scp. В обоих случаях надо не забыть на бэкенде перезапускать службы, которые использую сертификат, после его обновления.
При обращении с бэкенда по адресу сайта, запрос уходит на nginx proxy, так как в dns прописан его ip адрес. Из-за этого иногда не работают встроенные скрипты или проверки некоторых движков, так как они ожидают, что запрос вернется с того же сервера, с которого он был сделан. Но на практике он уходит на proxy и приходит оттуда.
В такой ситуации может помочь правка файла /etc/hosts на самом бэкенде. Сделайте там статическую запись с именем сайта и локальным ip адресом. Тогда запросы с самого сервера будут приходить на него же локально, а не на nginx proxy.
Что лучше использовать для проксирования http запросов nginx или haproxy?
Однозначного ответа на этот вопрос не может быть. В чем-то это схожий софт, но есть и существенные отличия. В общем случае, описанном в статье, принципиальной разницы нет. У haproxy в бесплатной версии есть функционал, который присутсвует только в nginx plus. Так что нужно смотреть по конкретным задачам и решать, какой продукт подойдет лучше.
Добавляет ли nginx в режиме proxy_pass дополнительные сетевые задержки?
Конечно да. Но на практике они очень малы, если nginx и целевой сервер находятся в общей локальной сети. С учетом задержек при передачи пакетов по сети интернет, этими локальными задержками можно пренебречь. Они будут ничтожно малы. Если же вы проксируете запросы через интернет, то нужно внимательно смотреть величину задержек между nginx и бэкендом. Желательно их делать минимальными, располагая сервера поближе друг к другу.
Заключение
На этом у меня все. Не рассмотрел еще один возможный вариант, когда вы проксируете https сайт и передаете инфу на бэкенд тоже по https. Нет под рукой готового примера, чтобы проверить, а заочно не стал рисовать конфиг. По идее, ничего сложного в этом нет, настраиваете nginx на обоих серверах с одним и тем же сертификатом. Но наверняка не скажу, что все заработает при этом. Возможно, есть какие-то нюансы с таким проксированием. Мне обычно не приходится так делать.
Как я уже писал в начале, в основном проксирую запросы с одного внешнего веб сервера на закрытый периметр сети, куда нет никому доступа. В этом случае у меня нет необходимости использовать https при передаче запросов на бэкенд. В качестве бэкенда не обязательно будет отдельный сервер. Это запросто может быть контейнер на этом же сервере.
Если у вас есть желание научиться администрировать системы на базе Linux, но вы с ними никогда не работали и не знакомы, то рекомендую начать с онлайн-курса «Linux для начинающих» в OTUS. Курс для новичков, для тех, кто с Linux не знаком. Цена за курс минимальная (символическая). Информация о курсе и цене.
Помогла статья? Подписывайся на telegram канал автора
Анонсы всех статей, плюс много другой полезной и интересной информации, которая не попадает на сайт.
Что такое обратный прокси?
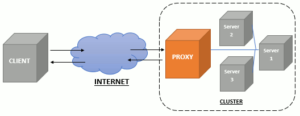
Прокси-сервер действует как посредник между клиентом и другим сервером.
Он получает ресурсы с сервера, к которому вы хотите подключиться, и отправляет его вам для просмотра. Обратный прокси-сервер работает так же, за исключением того, что роль меняется на противоположную.
Когда вы запрашиваете информацию с сервера, обратный прокси-сервер получает запрос и отправляет его на соответствующий внутренний сервер.
Это позволяет системному администратору использовать сервер для нескольких приложений, а также обеспечивать более плавный поток трафика между клиентом и сервером.
Теперь давайте сделаем более общий вариант настройки 🙂
Преимущества обратного прокси
В зависимости от вашего приложения у вас могут быть разные варианты использования обратного прокси.
- Обратный прокси-сервер позволяет запускать несколько приложений на одном сервере. Если на одном сервере запущено несколько приложений, все они не могут одновременно прослушивать порт 80 или 433. Обратный прокси-сервер позволяет настроить обратный прокси-сервер так, чтобы при необходимости перенаправлять трафик отдельным приложениям.
- Балансировка нагрузки – если у вас несколько серверов, на которых запущено одно приложение, вы можете использовать обратный прокси-сервер для равномерного распределения трафика на каждом сервере.
- Брандмауэр веб-приложений – вы можете использовать обратный прокси-сервер, чтобы скрыть свое приложение от общественности, а также отфильтровать спам-IP или защитить от DDOS-атаки.
- Простая регистрация и аудит – поскольку весь входящий трафик управляется обратным прокси-сервером, проще регистрировать и отслеживать поток трафика.
Настройка Nginx в качестве обратного прокси
Настройка Nginx в качестве обратного прокси
Для начала стоит сказать, что можно воспользоваться услугами прокси, не настраивая все самому.
Представлено очень большое количество решений, среди которых можно выделить https://youproxy.ru/russian-proxy, не зависимо от целей, которые вы преследуете, используя прокси-сервера.
Чтобы настроить Nginx в качестве обратного прокси-сервера, мы будем использовать параметр proxy_pass в файлах конфигурации Nginx.
Примечание. В этом руководстве предполагается, что вы немного знакомы с Nginx и уже установили и настроили Nginx на своем сервере.
В большинстве случаев Nginx будет внешним сервером, прослушивающим порт 80 (HTTP) или 443 (HTTPS) для входящих запросов.
Поскольку может быть только одна служба, прослушивающая порт 80 или 443, ваше приложение должно будет прослушивать другой порт, например порт 8081.
Самая простая конфигурация будет выглядеть примерно так:
server { listen 80; listen [::]:80;
  server_name myapp.com;
  location / { proxy_pass http://localhost:8081/; }
}
Это означает, что все входящие запросы на myapp.com через порт 80 будут перенаправлены на порт 8081.
Дополнительные настройки
Помимо директивы proxy_pass, есть несколько других директив, которые вы можете использовать для более сложной настройки.
proxy_set_header – позволяет установить заголовок для отправки в фоновое приложение.
Например, посмотрите следующую конфигурацию:
proxy_set_header Host $host;
proxy_set_header X-Real-IP $remote_addr;
proxy_set_header X-Forwarded-For $proxy_add_x_forwarded_for;
proxy timeout – позволяет установить значение тайм-аута для отправки и получения прокси-запросов.
proxy_connect_timeout 90;
proxy_send_timeout 90;
proxy_read_timeout 90;
proxy_buffers – это позволяет Nginx временно хранить ответ прокси-сервера и отправлять его на сервер запросов только после того, как прокси-сервер завершит ответ.
Если ваше приложение отправляет большой кусок файла, то вы можете отключить proxy_buffers:
proxy_buffering off;
Резюме
Как видите, Nginx – это полноценный обратный прокси-сервер
Самое приятное в нем то, что его конфигурация проста, проста в использовании и все же позволяет масштабироваться для более сложных сценариев.
Для получения более подробной информации вы можете ознакомиться с документацией по прокси-модулю Nginx или примерами конфигурации.
