

- Lab Environment
- Why DNS Server is needed for SMTP Mail Server
- Sample DNS Forward and Reverse Zone File on DNS Server
- Verify DNS Server configuration
- Configure Postfix Mail Server (CentOS/RHEL 7/8)
- Install Postfix rpm
- Configure master.cf file
- Configure main.cf
- Modify inet_interfaces
- Modify mydomain
- Modify myorigin
- Define myhostname
- Modify mydestination
- Modify mynetworks
- Modify relayhost
- Modify home_mailbox and mail_spool_directory
- Configure Postfix SMTP Relay (Client)
- Install postfix and sendmail
- Configure client DNS (update /etc/resolv.conf)
- Verify the DNS server configuration
- Configure /etc/postfix/main.cf
- Modify inet_interfaces
- Modify relayhost
- Modify mynetworks
- Modify mydestination
- How to check SMTP server configuration in Linux
- Log Files for troubleshooting Postfix Mail Server related issues
- How Postfix (MTA) Mail Server Works?
- Installation
- Basic Configuration
- SMTP Authentication
- Configuring SASL
- Testing
- Troubleshooting
- Escaping chroot
- SMTPS
- Log Viewing
- Increasing Logging Detail
- Logging mail delivery
- Increasing daemon verbosity
- Logging SASL debug info
- References
- Подготовительные действия
- Установка и настройка MySQL для Postfix и Roundcube
- Установка и настройка PostfixAdmin
- Настройка брандмауэра для postfix
- Настройка почтового сервера Dovecot
- Настройка брандмауэра для Dovecot
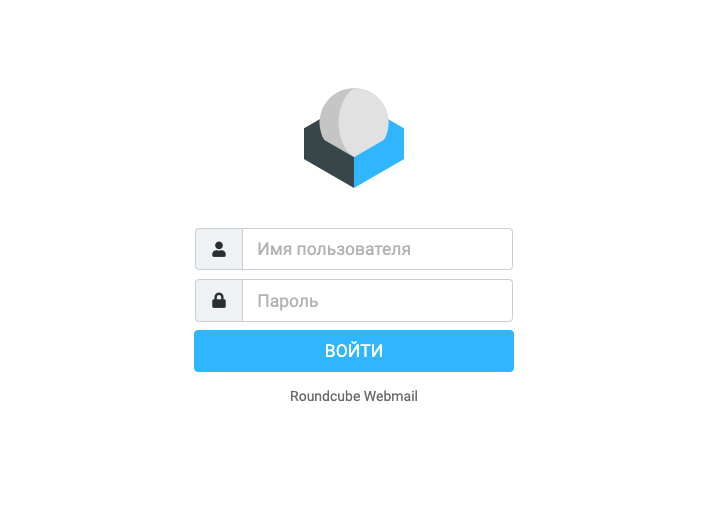
- Установка веб-интерфейса Roundcube
Lab Environment
Below is my Postfix Mail Server (also my DNS Server)
Below is my Client Server
Why DNS Server is needed for SMTP Mail Server
- If you wish to configure postfix mail server for a single node where user’s can send mail locally to each other and you can receive email alerts for system activities on localhost then you do not need DNS Server for your SMTP Mail Server.
- A user deepak on a workstation
server1.example.comwill not be aware of useramitavailable onserver2.example.comwhich is where DNS server comes in. - We use MX records in DNS servers as they provide mail-routing information. They specify mail exchangers for domains that is, the names of the mail hubs that handle all the mail for a domain name.
- So we configure postfix mail server which acts as MTA, this will act as SMTP relay host and can receive message from user
deepakfromserver1.example.comand transfer it to useramitonserver2.example.comand vice versa. - MTAs such as Postfix need a way to determine which host or hosts are the mail hubs for a domain. DNS MX records provide this information.
I have already written another article with detailed explanation and steps to configure BIND DNS Server in chroot environment in CentOS/RHEL 7 and 8 Linux. Additionally here we need to add some MX and CNAME records to our existing DNS forward and reverse zone files to configure postfix mail server.
Sample DNS Forward and Reverse Zone File on DNS Server
Below is my sample forward zone file. Here I am using a single mail server which is my localhost i.e. centos-8.example.com. I have also defined a CNAME record so I can use a more familiar FQDN to mail server instead of centos-8.example.com
[root@centos-8 ~]# cat /var/named/example.com.zone
$TTL 1D
@ IN SOA example.com root ( 4 ; serial 1D ; refresh 1H ; retry 1W ; expire 3H ) ; minimum
@ IN NS localhost
localhost IN A 127.0.0.1
; Host Address
example.com. IN A 192.168.0.10
centos-8 IN A 192.168.0.10
rhel-8 IN A 192.168.0.11
; Mail Serverexample.com. IN MX 10 192.168.0.10; CNAMEmail IN CNAME centos-8.example.com.
And my sample reverse zone file. Similar to my forward zone file I have defined my CNAME and MX record address.
[root@centos-8 ~]# cat /var/named/example.com.rzone
$TTL 1D
@ IN SOA example.com. root.example.com. ( 20191116 ; serial 1D ; refresh 1H ; retry 1W ; expire 3H ) ; minimum IN NS localhost.10 IN PTR centos-8.example.com.
10 IN PTR mail.example.com.11 IN PTR rhel-8.example.com.
Make sure you verify your zone configuration files before you restart the named-chroot service
[root@centos-8 ~]# systemctl restart named-chroot.service
Step-by-Step Tutorial: Configure Master Slave DNS Server (RHEL/CentOS 7)
Verify DNS Server configuration
Make sure your DNS server is working properly to configure postfix mail server, which you can do by performing host lookup. You need bind-utils rpm to be able to use nslookup which you can install using yum.
[root@centos-8 ~]# nslookup mail.example.com
Server: 192.168.0.10
Address: 192.168.0.10#53mail.example.com canonical name = centos-8.example.com.
Name: centos-8.example.com
Address: 192.168.0.10
Using host command we can query the mail server (MX record)
[root@centos-8 ~]# host -t mx example.comexample.com mail is handled by 10 192.168.0.10.example.com.Configure Postfix Mail Server (CentOS/RHEL 7/8)
Now we are done with all the pre-requisites. It is time we configure postfix mail server. Several steps are necessary to configure the Postfix server.The basic steps involved in this process are
- Edit the
master.cf file - Determine local mail delivery method.
- Edit the
main.cffile. - Create an aliases table.
- Start and test Postfix.
- Create a boot script to start Postfix.
- Create any user-defined files.
We will distribute these tasks in different articles or else this will become a long boring article. let us try to have and configure postfix mail server (basic).
Install Postfix rpm
First thing first, to configure postfix mail server we need the main ingredient which is postfix rpm. By default postfix is installed with most of the CentOS/RHEL 7/8 software group but if not you can install it using yum
[root@centos-8 ~]# yum -y install postfix
Linux disable IPv6 properly (with or without reboot)
- Create a new system user named
postfix - Create a new system group named
postfix - Create the
/etc/postfixand/var/spool/postfixdirectories - Create all Postfix message queue directories
- Create a default Postfix configuration file
- Create a default Postfix aliases database
Configure master.cf file
The Postfix master daemon launches all of the other Postfix services as they are needed. The various services, and how they are run, are specified in the master.cf file.
To configure postfix mail server (a basic SMTP Server) we do not need to do any modification in this file at this moment.
Configure main.cf
Similar to sendmail, Postfix uses a configuration file to define its operational behaviour. What’s different about the Postfix configuration file is that instead of using cryptic codes, or needing to be compiled, it uses plain text and common-sense descriptions for parameter names and values.
The global Postfix configuration file is called main.cf. It is located in the Postfix configuration directory, which by default is /etc/postfix.
It is important that you take a backup of your existing main.cf file
[root@centos-8 ~]# cp /etc/postfix/main.cf /etc/postfix/main.cf.BAK
Now this file contains multiple parameters but we need to work only on limited directives to configure postfix mail server in this article, so I will only concentrate on these directives:
Modify inet_interfaces
Step-by-Step Tutorial: Configure DNS Server using bind chroot (CentOS/RHEL 7/8)
We will use all, to use all the addresses that are available on our SMTP mail server machine
inet_interfaces = all
Now in my case I only have one interface so this is fine but if you have multiple interface on you SMTP mail server node then you can use $myhostname. Make sure you also define this variable in the file when you configure postfix mail server.
myhostname = centos-8.example.com
Modify mydomain
Next we need to set the local domain-name of the mail server. For example, if our mailserver’s FQDN is mailserver.example.com and this mailserver is responsible for delivering mail for the whole private example.com domain, the domain name will be example.com
mydomain = example.com
This address will get appended to any mail message that you are sending out of the server. If you have not defined this then the system will use myhostname instead of domain name.
Modify myorigin
The myorigin parameter defines the format of the origin address for all messages sent by the Postfix system. By default, the myorigin parameter will assume the value of the myhostname parameter.
So we will use myorigin as domain name
myorigin = $mydomain
Define myhostname
myhostname = centos-8.example.com
Making Sure There Is Enough Free Space on Your Mac’s Drive
Modify mydestination
The mydestination parameter defines what hostnames the Postfix server accepts messages for as the final destination. This parameter applies only to the main hostname and aliases for the local system and should not include virtual domains for other hosts.
The mydestination parameter often supports hosts that may have DNS names other than the normal hostname assigned to it. For example, we have added a CNAME record for mail.example.com. The mydestination parameter can be configured as:
mydestination = $myhostname, localhost.$mydomain, localhost, $mydomain, mail.$mydomain
webmaster
webmaster@centos-8.example.com
webmaster@example.com
webmaster@mail.example.com
Modify mynetworks
The mynetworks parameter is used to control which SMTP clients Postfix will relay mail for. By default, Postfix will relay mail from any client whose IP address matches the settings in the mynetworks parameter.
The mynetworks parameter contains a list of IP network addresses, along with subnet values, to specify alternative network restrictions on SMTP clients. The format of the mynetworks parameter is
mynetworks = ipaddress1, ipaddress2, ...
where ipaddress1 and ipaddress2 represent IP address network values
Here, I have provided the value of my subnet
mynetworks = 192.168.0.0/24, 127.0.0.0/8
This restricts clients that can use the Postfix server as an SMTP relay host.
Modify relayhost
The relayhost parameter defines Postfix SMTP relay host. There are two formats of the relayhost parameter:
relay_host = gateway.my.domain
relay_host = [an.ip.add.ress]
The first format identifies a SMTP relay host mail server by its DNS name. Postfix forwards all outbound mail messages to this host. The second format identifies the relay host by its numeric IP address. You should use the second format for Postfix servers that use dial-up connections to the relay host. Since the Postfix server is not connected to the Internet full time to resolve the relay host DNS name, it is best to refer to it using the IP address. This prevents problems in mail delivery due to DNS errors. In our case we use Postfix MTA as SMTP relay host.
relayhost = [centos-8.example.com]
How to cleanup Failed Actions from pcs status of cluster
Modify home_mailbox and mail_spool_directory
- sendmail-style:
/var/spool/mailmailboxes - Individual:
$HOME/Mailboxfiles - qmail-style:
$HOME/Maildirdirectories
By default, Postfix delivers messages to the standard system mailbox directory. On most Linux systems this is the /var/spool/mail directory.
home_mailbox = Maildir/
mail_spool_directory = /var/spool/mail
Now these configuration modifications are enough to configure postfix mail server (basic). Here I have not implemented any security related directives, I will cover them in upcoming articles.
Configure Postfix SMTP Relay (Client)
I will configure rhel-8.example.com as my client which will use our Postfix SMTP relay server centos-8.example.com to send emails.
Install postfix and sendmail
We will use postfix as the main configuration file although we plan to use come client tools to send the mail which requires sendmail rpm to be installed.
[root@rhel-8 ~]# yum -y install postfix
Install some more tools which we will need in this article
[root@rhel-8 ~]# yum -y install bind-utils telnet mailx sendmail
We need nslookup tool to verify our client DNS configuration which is provided by bind-utils
telnet will be used to make sure our SMTP port 25 is reachable
mailx and sendmail will be used as client software to send mails to remote server
Configure client DNS (update /etc/resolv.conf)
Now on our primary DNS server we had already defined an A and PTR record for rhel-8.example.com so on the client node we just need to update /etc/resolv.conf
[root@rhel-8 ~]# cat /etc/resolv.conf
# Generated by NetworkManager
search example.com
nameserver 192.168.0.10
Here 192.168.0.10 is the IP Address of our DNS Server
Verify the DNS server configuration
We will perform few DNS lookup to make sure the DNS server is reachable
[root@rhel-8 ~]# nslookup rhel-8
Server: 192.168.0.10
Address: 192.168.0.10#53Name: rhel-8.example.com
Address: 192.168.0.11
[root@rhel-8 ~]# host -t mx mail.example.commail.example.com is an alias for centos-8.example.com.So our A and MX record are working properly.
Configure /etc/postfix/main.cf
Now we must configure and modify certain values in our postfix main.cf to be able to send mails using SMTP relay server
Modify inet_interfaces
Similar to our SMTP Mail Server we will modify inet_interfaces value to all
inet_interfaces = all
Modify relayhost
We will use our Postfix mail server as SMTP relay host, so we will give our postfix mail server FQDN in the relayhost
relayhost = [centos-8.example.com]
Modify mynetworks
On the client node we can add the loopback address for mynetworks directive
mynetworks = 127.0.0.0/8
Modify mydestination
Again this directive can be null for the client side postfix main.cf
mydestination =
These are the directives we will modify for our client side postfix configuration to configure postfix mail server.
For this article I have disabled firewalld and selinux config. You can add SMTP rule to your firewalld once your configuration is working properly
# firewall-cmd --permanent --add-service=smtp && firewall-cmd --reload
Next start your postfix service on client node
[root@rhel-8 ~]# systemctl start postfix
You can use telnet to make sure port 25 is reachable
[root@rhel-8 ~]# telnet localhost 25
Trying ::1...Connected to localhost.Escape character is '^]'.
220 rhel-8.example.com ESMTP Postfix
QUIT
221 2.0.0 Bye
Connection closed by foreign host.
How to check SMTP server configuration in Linux
There are different mail clients available such as mutt, mail etc. You can use SWAKS (Swiss Army Knife SMTP) to check SMTP server configuration in Linux. Once we configure postfix mail server, the next step would be to check SMTP server configuration and make sure the mails are sent and delivered successfully.
We install SWAKS on our RHEL 8 host which was our client. Now SWAKS is not available on the so you must install EPEL repo. Next install SWAKS using yum
[root@rhel-8 ~]# yum install swaks
So on our node we have below version of swaks installed to check SMTP server configuration
[root@rhel-8 ~]# rpm -q swaks
swaks-20181104.0-5.el8.noarch
[root@rhel-8 ~]#
=== Trying 192.168.0.10:25...
=== Connected to 192.168.0.10.
<- 220 centos-8.example.com ESMTP Postfix -> EHLO rhel-8.example.com
<- 250-centos-8.example.com
<- 250-PIPELINING
<- 250-SIZE 10240000
<- 250-VRFY
<- 250-ETRN
<- 250-STARTTLS
<- 250-ENHANCEDSTATUSCODES
<- 250-8BITMIME
<- 250-DSN
<- 250 SMTPUTF8 -> MAIL FROM:<root@rhel-8.example.com>
<- 250 2.1.0 Ok -> RCPT TO:<deepak@centos-8.example.com>
<- 250 2.1.5 Ok -> DATA
<- 354 End data with . -> Date: Mon, 18 Nov 2019 12:34:01 +0530 -> To: deepak@centos-8.example.com -> From: root@rhel-8.example.com -> Subject: test Mon, 18 Nov 2019 12:34:01 +0530 -> Message-Id: <20191118123401.008780@rhel-8.example.com> -> X-Mailer: swaks v20181104.0 jetmore.org/john/code/swaks/ -> -> This is a test mailing -> -> -> .
<- 250 2.0.0 Ok: queued as 9DF4E6027A -> QUIT
<- 221 2.0.0 Bye
=== Connection closed with remote host.
Swaks creates output which should give us a hint if the mail transport has been successful.
Step-by-Step Tutorial: Configure DNS caching server — dnsmasq (CentOS/RHEL 7)
[deepak@centos-8 ~]$
Return-Path: <root@rhel-8.example.com>
X-Original-To: deepak@centos-8.example.com
Delivered-To: deepak@centos-8.example.com
Received: from rhel-8.example.com (rhel-8.example.com [192.168.0.11]) by centos-8.example.com (Postfix) with ESMTP id 524DD602C2 for <deepak@centos-8.example.com>; Mon, 18 Nov 2019 12:41:38 +0530 (IST)
Date: Mon, 18 Nov 2019 12:41:38 +0530
To: deepak@centos-8.example.com
From: root@rhel-8.example.com
Subject: test Mon, 18 Nov 2019 12:41:38 +0530
Message-Id: <20191118124138.008795@rhel-8.example.com>
X-Mailer: swaks v20181104.0 jetmore.org/john/code/swaks/
This is a test mailing
Log Files for troubleshooting Postfix Mail Server related issues
For every mail you send using sendmail, you should be able to see some new lines appearing in the /var/log/maillog file, which contains status information and other important logging text for the mail.
Understanding High Availability Cluster and Architecture
[root@rhel-8 ~]# mail -s test message deepak@centos-8.example.com <.
Null message body; hope that's ok
For this we had below log entry in /var/log/maillog on rhel-8.example.com
Nov 18 12:53:13 rhel-8 sendmail[8849]: xAI7NDhe008849: from=root, size=240, class=0, nrcpts=2, msgid=<201911180723.xAI7NDhe008849@rhel-8.example.com>, relay=root@localhost
Nov 18 12:53:13 rhel-8 postfix/smtpd[8831]: connect from localhost[127.0.0.1]
Nov 18 12:53:13 rhel-8 sendmail[8849]: STARTTLS=client, relay=[127.0.0.1], version=TLSv1.3, verify=FAIL, cipher=TLS_AES_256_GCM_SHA384, bits=256/256
Nov 18 12:53:13 rhel-8 postfix/smtpd[8831]: 684EE20B88: client=localhost[127.0.0.1]
Nov 18 12:53:13 rhel-8 postfix/cleanup[8834]: 684EE20B88: message-id=<201911180723.xAI7NDhe008849@rhel-8.example.com>
Nov 18 12:53:13 rhel-8 postfix/qmgr[6230]: 684EE20B88: , size=661, nrcpt=2 (queue active)
Nov 18 12:53:13 rhel-8 sendmail[8849]: xAI7NDhe008849: to=message,deepak@centos-8.example.com, ctladdr=root (0/0), delay=00:00:00, xdelay=00:00:00, mailer=relay, pri=60240, relay=[127.0.0.1] [127.0.0.1], dsn=2.0.0, stat=Sent (Ok: queued as 684EE20B88)
Nov 18 12:53:13 rhel-8 postfix/smtpd[8831]: disconnect from localhost[127.0.0.1] ehlo=2 starttls=1 mail=1 rcpt=2 data=1 quit=1 commands=8
Nov 18 12:53:13 rhel-8 postfix/smtp[8835]: 684EE20B88:
Nov 18 12:53:13 rhel-8 postfix/smtp[8835]: 684EE20B88: to=<message@rhel-8.example.com>, relay=centos-8.example.com[192.168.0.10]:25, delay=0.21, delays=0.06/0/0.11/0.03, dsn=2.0.0, status=sent (250 2.0.0 Ok: queued as 94D62602FF)
Nov 18 12:53:13 rhel-8 postfix/smtpd[8831]: connect from centos-8.example.com[192.168.0.10]
Nov 18 12:53:13 rhel-8 postfix/qmgr[6230]: 684EE20B88: removed
You can check the same log file (/var/log/maillog) on server side i.e. centos-8.example.com
Nov 18 12:53:13 centos-8 postfix/smtpd[17583]: connect from rhel-8.example.com[192.168.0.11]
Nov 18 12:53:13 centos-8 postfix/smtpd[17583]: 94D62602FF: client=rhel-8.example.com[192.168.0.11]
Nov 18 12:53:13 centos-8 postfix/cleanup[17586]: 94D62602FF: message-id=<201911180723.xAI7NDhe008849@rhel-8.example.com>
Nov 18 12:53:13 centos-8 postfix/qmgr[17460]: 94D62602FF:
Nov 18 12:53:13 centos-8 postfix/local[17587]: 94D62602FF:
Journalctl cheat sheet with 10+ commands to filter systemd logs
How Postfix (MTA) Mail Server Works?
- The Postfix MTA service can receive incoming e-mails from mail clients or other remote MTA servers using the SMTP protocol.
- If an incoming e-mail is destinated for the MTA server’s configured final destination domain (for example, a mail sent with the recipient address
deepak@example.comis incoming to the example.com configured Postfix MTA server), it will deliver the mail to a local mailbox installed on the server (either in the filesystem or in a database system such as MariaDB). - If the incoming mail is not destinated for this server, it will be relayed (forwarded) to another MTA.
- Remember that this is all a Postfix server is capable of doing and nothing more: receiving incoming SMTP connections from mail clients or other MTAs, delivering mail to local mailboxes on the server, and forwarding mail to other MTAs using SMTP
- Contrary to common belief, Postfix cannot transfer the mails from its local mailboxes to the end users.
- Here we need another type of MTA called delivery agent, which uses different mail protocols, such as IMAP or POP3.
- If an incoming e-mail, sent from another computer in our network, has the same domain name in the recipient’s e-mail address as our Postfix server has its FQDN in, then it gets delivered to the appropriate local mailbox defined by the recipient’s part of the e-mail; all external e-mail addresses get relayed to an external MTA.
Lastly I hope the steps from the article to configure postfix mail server with SMTP relay server on RHEL/CentOS 7/8 was helpful. So, let me know your suggestions and feedback using the comment section.
This guide does not cover setting up Postfix Virtual Domains, for information on Virtual Domains and other advanced configurations see References.
Installation
sudo apt install postfixFor now, it is ok to simply accept defaults by pressing return for each question. Some of the configuration options will be investigated in greater detail in the next stage.
Deprecation warning: please note that the
mail-stack-deliverymetapackage has been deprecated in Focal. The package still exists for compatibility reasons, but won’t setup a working email system.
Basic Configuration
There are four things you should decide before starting configuration:
- The <Domain> for which you’ll accept email (we’ll use
mail.example.comin our example) - The network and class range of your mail server (we’ll use 192.168.0.0/24)
- The username (we’re using steve)
- Type of mailbox format (mbox is default, we’ll use the alternative, Maildir)
sudo dpkg-reconfigure postfix- Internet Site
mail.example.com- steve
-
mail.example.com, localhost.localdomain, localhost - 127.0.0.0/8 [::ffff:127.0.0.0]/104 [::1]/128 192.168.0.0/24
- +
- all
To set the mailbox format, you can either edit the configuration file directly, or use the postconf command. In either case, the configuration parameters will be stored in /etc/postfix/main.cf file. Later if you wish to re-configure a particular parameter, you can either run the command or change it manually in the file.
To configure the mailbox format for Maildir:
sudo postconf -e 'home_mailbox = Maildir/'SMTP Authentication
SMTP-AUTH allows a client to identify itself through the SASL authentication mechanism, using Transport Layer Security (TLS) to encrypt the authentication process. Once authenticated the SMTP server will allow the client to relay mail.
To configure Postfix for SMTP-AUTH using SASL (Dovecot SASL), run these commands at a terminal prompt:
sudo postconf -e 'smtpd_sasl_type = dovecot'
sudo postconf -e 'smtpd_sasl_path = private/auth'
sudo postconf -e 'smtpd_sasl_local_domain ='
sudo postconf -e 'smtpd_sasl_security_options = noanonymous,noplaintext'
sudo postconf -e 'smtpd_sasl_tls_security_options = noanonymous'
sudo postconf -e 'broken_sasl_auth_clients = yes'
sudo postconf -e 'smtpd_sasl_auth_enable = yes'
sudo postconf -e 'smtpd_recipient_restrictions = \
permit_sasl_authenticated,permit_mynetworks,reject_unauth_destination'
The smtpd_sasl_path config parameter is a path relative to the Postfix queue directory.
There are several SASL mechanism properties worth evaluating to improve the security of your deployment. The options “noanonymous,noplaintext” prevent use of mechanisms that permit anonymous authentication or that transmit credentials unencrypted.
Next, generate or obtain a digital certificate for TLS. See security — certificates in this guide for details about generating digital certificates and setting up your own Certificate Authority (CA).
Once you have a certificate, configure Postfix to provide TLS encryption for both incoming and outgoing mail:
sudo postconf -e 'smtp_tls_security_level = may'
sudo postconf -e 'smtpd_tls_security_level = may'
sudo postconf -e 'smtp_tls_note_starttls_offer = yes'
sudo postconf -e 'smtpd_tls_key_file = /etc/ssl/private/server.key'
sudo postconf -e 'smtpd_tls_cert_file = /etc/ssl/certs/server.crt'
sudo postconf -e 'smtpd_tls_loglevel = 1'
sudo postconf -e 'smtpd_tls_received_header = yes'
sudo postconf -e 'myhostname = mail.example.com'
If you are using your own Certificate Authority to sign the certificate enter:
sudo postconf -e 'smtpd_tls_CAfile = /etc/ssl/certs/cacert.pem'After running all the commands, Postfix is configured for SMTP-AUTH and a self-signed certificate has been created for TLS encryption.
Now, the file /etc/postfix/main.cf should look like this:
# See /usr/share/postfix/main.cf.dist for a commented, more complete
# version
smtpd_banner = $myhostname ESMTP $mail_name (Ubuntu)
biff = no
# appending .domain is the MUA's job.
append_dot_mydomain = no
# Uncomment the next line to generate "delayed mail" warnings
#delay_warning_time = 4h
myhostname = server1.example.com
alias_maps = hash:/etc/aliases
alias_database = hash:/etc/aliases
myorigin = /etc/mailname
mydestination = server1.example.com, localhost.example.com, localhost
relayhost =
mynetworks = 127.0.0.0/8
mailbox_command = procmail -a "$EXTENSION"
mailbox_size_limit = 0
recipient_delimiter = +
inet_interfaces = all
smtpd_sasl_local_domain =
smtpd_sasl_auth_enable = yes
smtpd_sasl_security_options = noanonymous
broken_sasl_auth_clients = yes
smtpd_recipient_restrictions =
permit_sasl_authenticated,permit_mynetworks,reject _unauth_destination
smtpd_tls_auth_only = no
smtp_tls_security_level = may
smtpd_tls_security_level = may
smtp_tls_note_starttls_offer = yes
smtpd_tls_key_file = /etc/ssl/private/smtpd.key
smtpd_tls_cert_file = /etc/ssl/certs/smtpd.crt
smtpd_tls_CAfile = /etc/ssl/certs/cacert.pem
smtpd_tls_loglevel = 1
smtpd_tls_received_header = yes
smtpd_tls_session_cache_timeout = 3600s
tls_random_source = dev:/dev/urandom
sudo systemctl restart postfix.servicePostfix supports SMTP-AUTH as defined in RFC2554. It is based on SASL. However it is still necessary to set up SASL authentication before you can use SMTP-AUTH.
When using ipv6, the mynetworks parameter may need to be modified to allow ipv6 addresses, for example:
mynetworks = 127.0.0.0/8, [::1]/128Configuring SASL
Postfix supports two SASL implementations: Cyrus SASL and Dovecot SASL. To enable Dovecot SASL the dovecot-core package will need to be installed:
sudo apt install dovecot-coreservice auth { # auth_socket_path points to this userdb socket by default. It's typically # used by dovecot-lda, doveadm, possibly imap process, etc. Its default # permissions make it readable only by root, but you may need to relax these # permissions. Users that have access to this socket are able to get a list # of all usernames and get results of everyone's userdb lookups. unix_listener auth-userdb { #mode = 0600 #user = #group = } # Postfix smtp-auth unix_listener /var/spool/postfix/private/auth { mode = 0660 user = postfix group = postfix } }auth_mechanisms = plainauth_mechanisms = plain loginOnce you have Dovecot configured, restart it with:
sudo systemctl restart dovecot.serviceTesting
SMTP-AUTH configuration is complete. Now it is time to test the setup.
telnet mail.example.com 25After you have established the connection to the Postfix mail server, type:
ehlo mail.example.com250-STARTTLS
250-AUTH LOGIN PLAIN
250-AUTH=LOGIN PLAIN
250 8BITMIMETroubleshooting
When problems arise, there are a few common ways to diagnose the cause.
Escaping chroot
The Ubuntu Postfix package will by default install into a chroot environment for security reasons. This can add greater complexity when troubleshooting problems.
smtp inet n - - - - smtpdsmtp inet n - n - - smtpdYou will then need to restart Postfix to use the new configuration. From a terminal prompt enter:
sudo service postfix restartSMTPS
smtps inet n - - - - smtpd -o smtpd_tls_wrappermode=yes -o smtpd_sasl_auth_enable=yes -o smtpd_client_restrictions=permit_sasl_authenticated,reject -o milter_macro_daemon_name=ORIGINATING Log Viewing
Postfix sends all log messages to /var/log/mail.log. However, error and warning messages can sometimes get lost in the normal log output so they are also logged to /var/log/mail.err and /var/log/mail.warn respectively.
To see messages entered into the logs in real time you can use the tail -f command:
tail -f /var/log/mail.errIncreasing Logging Detail
The amount of detail that is recorded in the logs can be increased via the configuration options. For example, to increase TLS activity logging set the smtpd_tls_loglevel option to a value from 1 to 4.
sudo postconf -e 'smtpd_tls_loglevel = 4'Reload the service after any configuration change, to make the new config active:
sudo systemctl reload postfix.serviceLogging mail delivery
If you are having trouble sending or receiving mail from a specific domain you can add the domain to the debug_peer_list parameter.
sudo postconf -e 'debug_peer_list = problem.domain' sudo systemctl reload postfix.serviceIncreasing daemon verbosity
You can increase the verbosity of any Postfix daemon process by editing the /etc/postfix/master.cf and adding a -v after the entry. For example, edit the smtp entry:
smtp unix - - - - - smtp -vThen, reload the service as usual:
sudo systemctl reload postfix.serviceLogging SASL debug info
auth_debug=yes auth_debug_passwords=yesJust like Postfix if you change a Dovecot configuration the process will need to be reloaded:
sudo systemctl reload dovecot.serviceSome of the options above can drastically increase the amount of information sent to the log files. Remember to return the log level back to normal after you have corrected the problem. Then reload the appropriate daemon for the new configuration to take affect.
References
- The Postfix website documents all available configuration options.
- O’Reilly’s Postfix: The Definitive Guide is rather dated but provides deep background information about configuration options.
- The Ubuntu Wiki Postfix page has more information from a Ubuntu context. There is also a Debian Wiki Postfix page that’s a bit more up to date; they also have a set of Postfix Tutorials for different Debian versions.
- Info on how to set up mailman3 with postfix
Postfix — почтовый сервер с открытым исходным кодом, который чаще всего используется как почтовый сервер для веб-сайтов. После установки Postfix уже готов к выполнению своей основной задачи — работе с почтовыми сообщения, однако, в нем нет подсистемы авторизации.
То есть любой человек может подключиться к почтовому серверу и отправить или получить сообщения для любого почтового ящика. Dovecot — специальный плагин, которые добавляет возможность подключения функционала авторизации к Postfix. Именно эти два инструмента мы и рассмотрим в этой статье. Заварите чаю и садитесь поудобнее.
Перед началом установки всех необходимых компонентов, подготовим сервер. Это будет выделенный сервер с готовой конфигурацией.
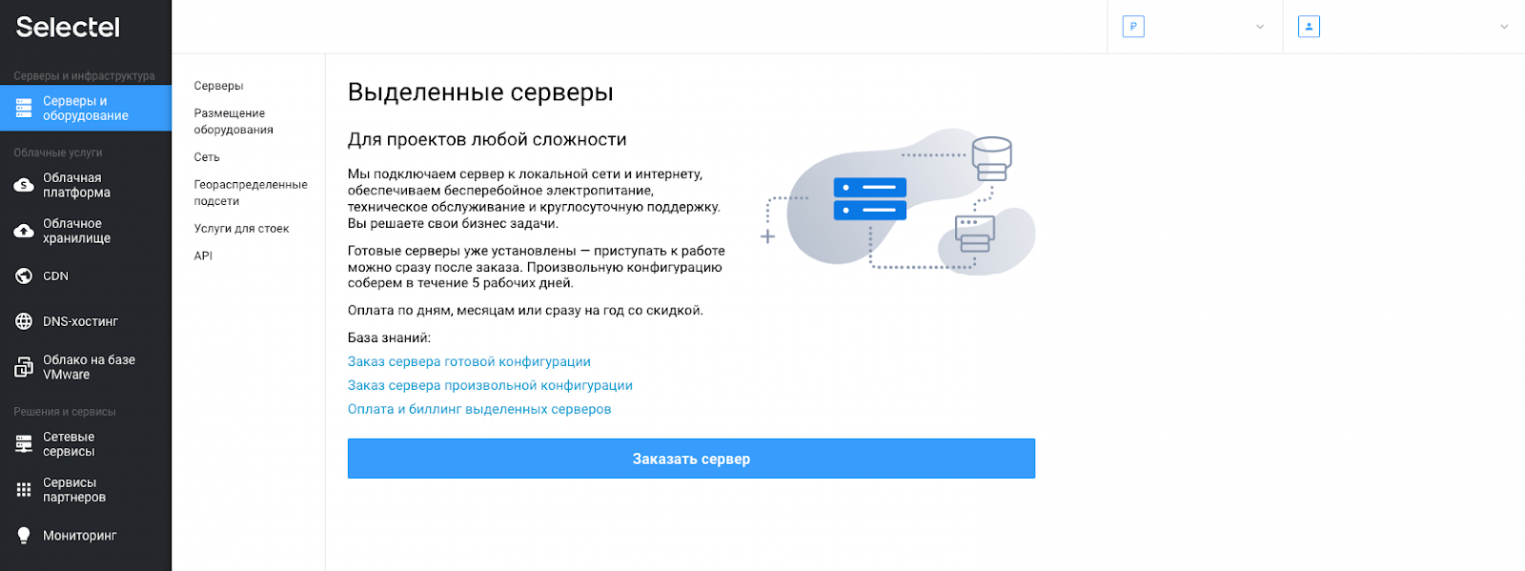
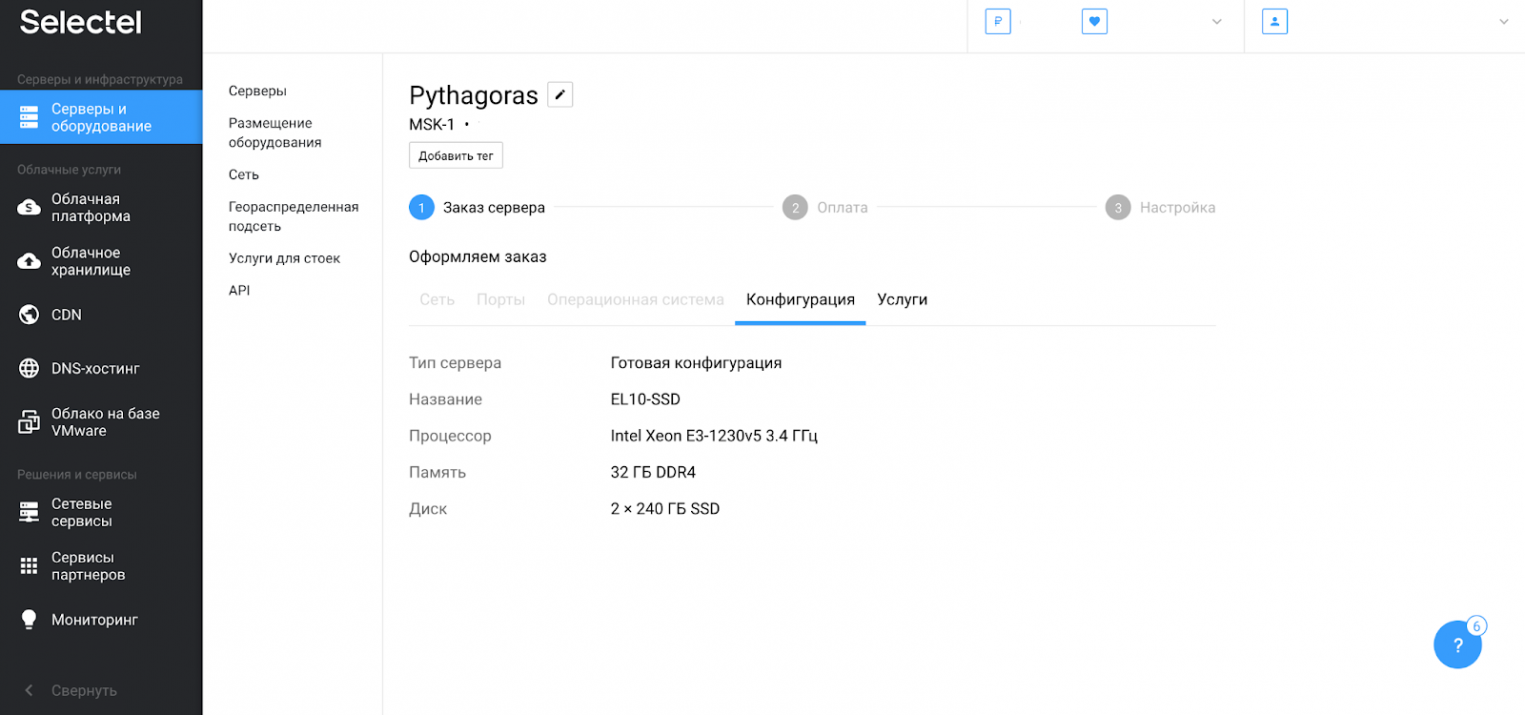
В панели управления Selectel перейдем в представление Серверы и оборудование и нажмем на кнопку Заказать сервер.
На следующем представлении на вкладке Готовые серверы выберем сервер.
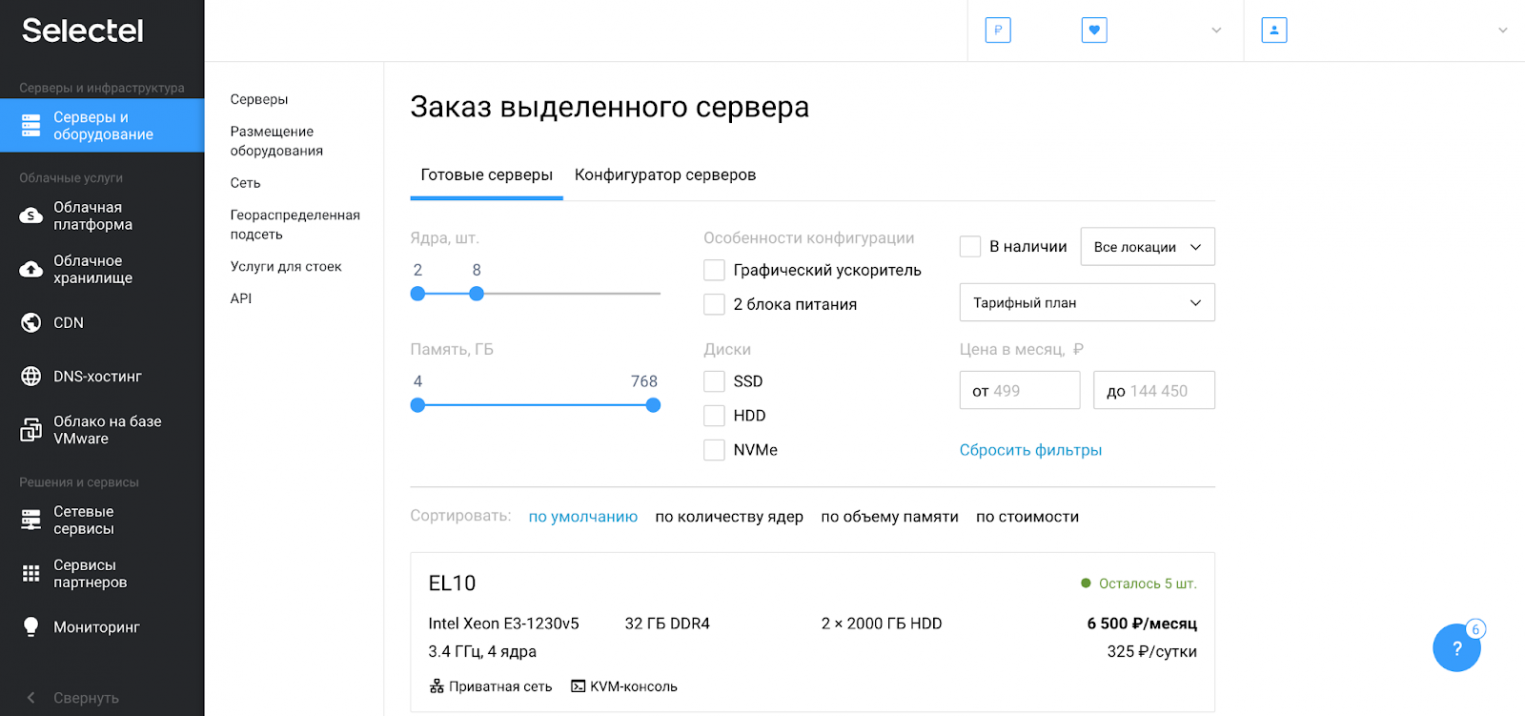
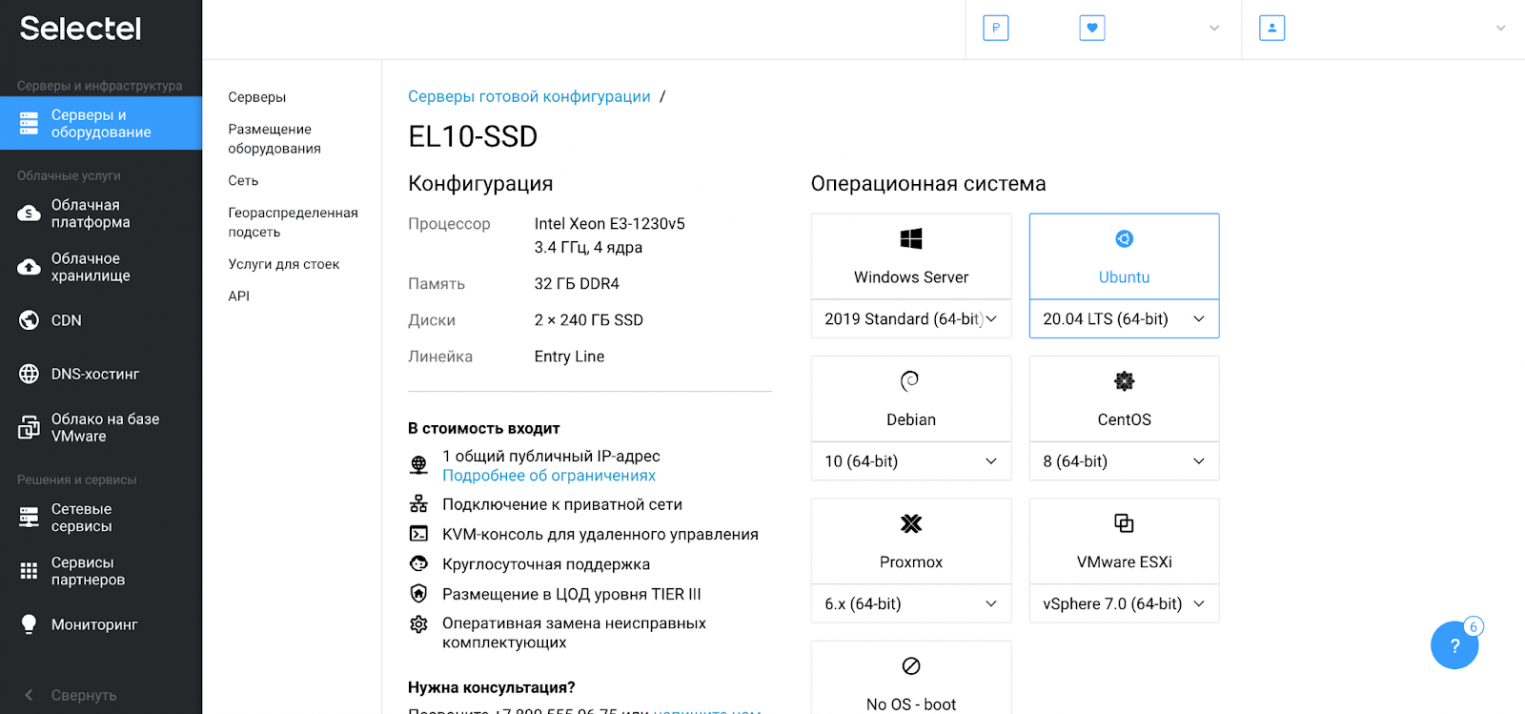
Выбираем сервер EL 10-SSD с процессором Intel Xeon E3-1230v5 3.4 ГГц, 4 ядра, памятью 32 ГБ DDR4 и двумя SSD-дисками по 240 ГБ. На сервер установим Ubuntu 20.04 LTS (64-bit).
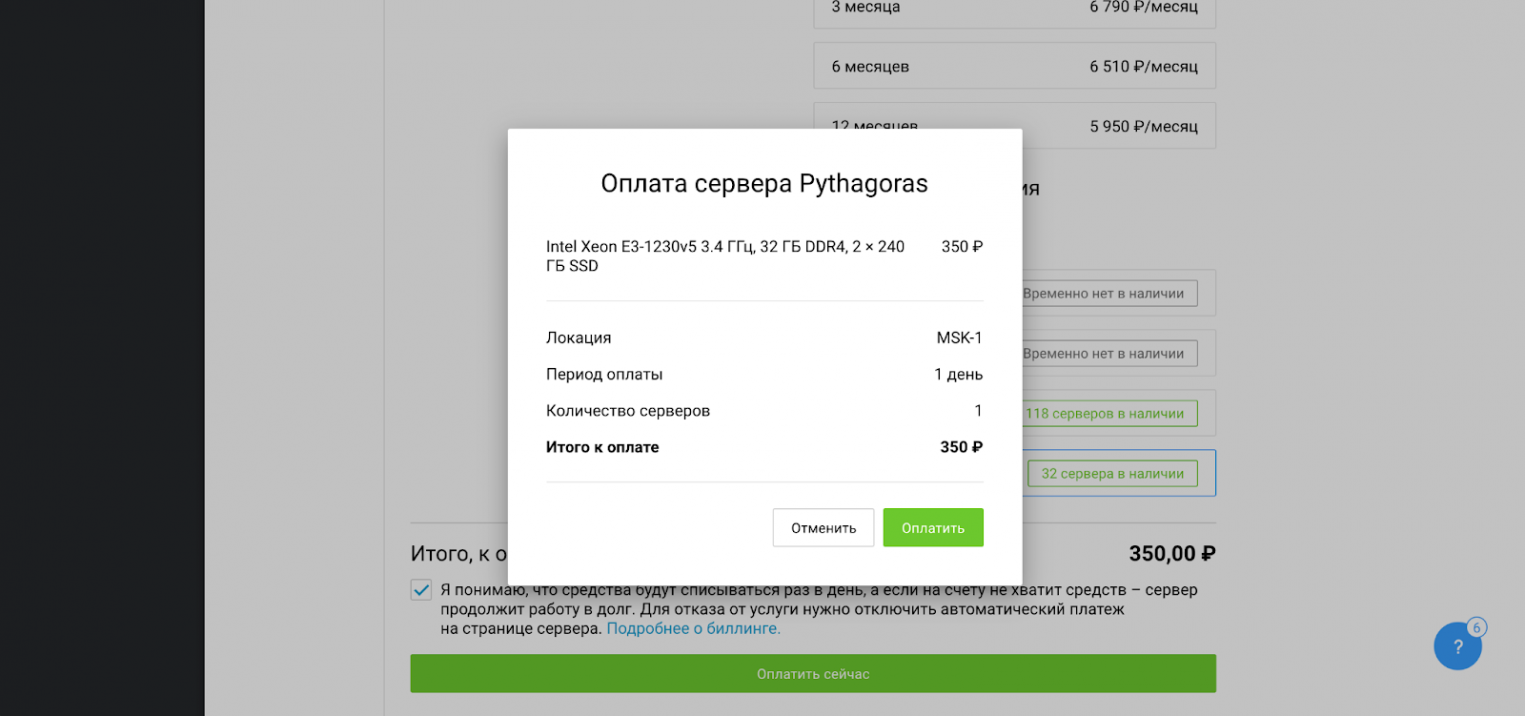
Выбираем доступную площадку с возможностью ежедневной оплаты и нажимаем кнопку Оплатить сейчас.

В появившемся pop-up окне также нажимаем кнопку Оплатить.
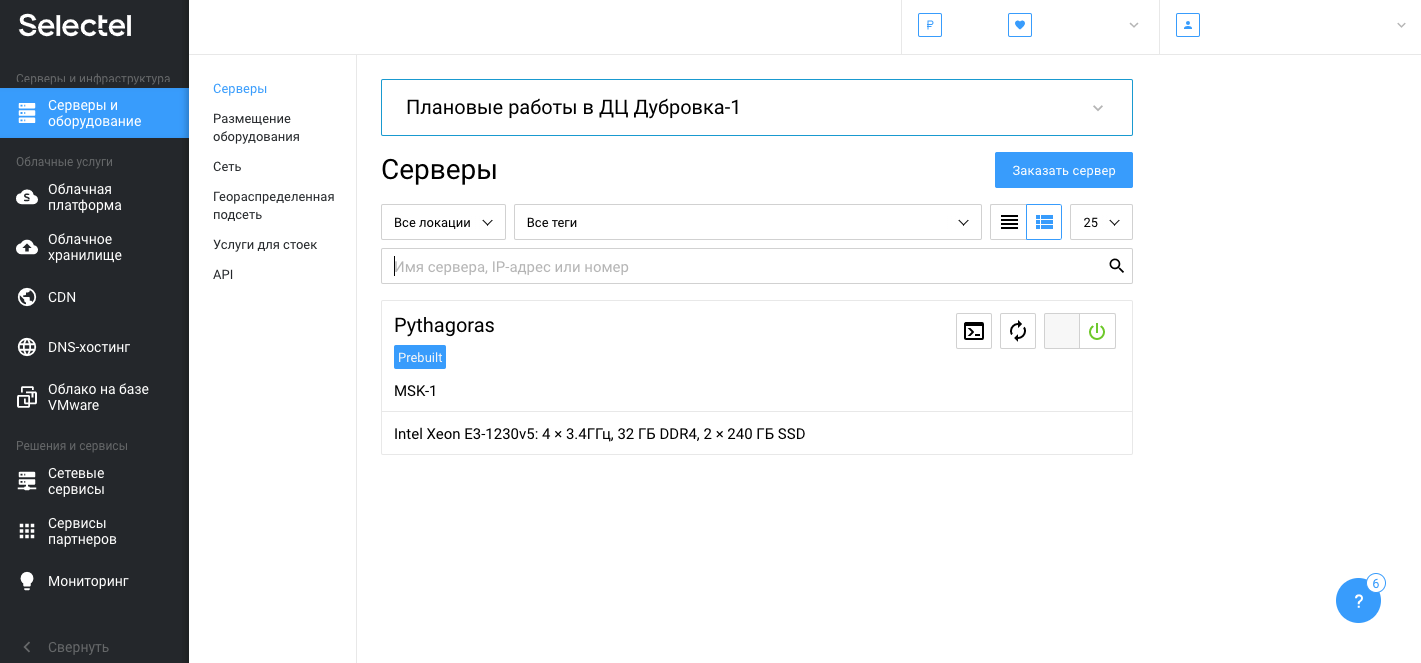
После заказа сервера мы увидим таймлайн с шагами подготовки сервера: заказ сервера, оплата и настройка. Еще раз проверим конфигурацию и дождемся готовности сервера.
Через несколько минут сервер будет готов к работе.
Подготовительные действия
Перед началом установки пакетов, подготовим учетную запись postfix, от имени которой будем в дальнейшем выполнять все действия. Дополнительно выдадим учетной записи права sudo:
adduser postfixusermod -aG sudo postfixУстановка и настройка MySQL для Postfix и Roundcube
Базу данных MySQL мы будем использовать сразу для двух целей: хранение учетных данных пользователей Postfix и хранение конфигурации и данных Roundcube.
Установим базу данных MySQL, PHP и веб-сервер Apache:
sudo apt install mysql-server mysql-client apache2 libapache2-mod-php php php-imap php-mysql php-mbstringЗапускаем MySQL, веб-сервер и добавим их в автозагрузку:
sudo systemctl start apache2sudo systemctl enable apache2sudo systemctl start mysqlsudo systemctl enable mysqlПосле установки базы данных, зададим пароль для учетной записи root и создадим базы данных для Postfix и Roundcube:
sudo mysql -u root -pВ консоли mysql> выполняем следующие команды, подтверждая каждую нажатием Enter:
alter user root@localhost identified by ‘password’;create database postfix;use postfix;create user postfix@localhost identified by 'password';grant all privileges on *.* to postfix@localhost;create database roundcube;use roundcube;create user roundcube@localhost identified by 'password';grant all privileges on *.* to roundcube@localhost;flush privileges;exit;Установка и настройка PostfixAdmin
wget https://sourceforge.net/projects/postfixadmin/files/latest/download -O postfixadmin.tar.gztar -zxf postfixadmin.tar.gzsudo mv postfixadmin-* /usr/share/postfixadminmkdir /usr/share/postfixadmin/templates_crm postfixadmin.tar.gzsudo chown -R www-data:www-data /usr/share/postfixadmin/Далее добавим символическую ссылку из директории веб-сервера:
sudo ln -s /usr/share/postfixadmin/public/ /var/www/html/postfixadminsudo nano /usr/share/postfixadmin/config.local.php<?php
$CONF['configured'] = true;
$CONF['setup_password'] = 'нужно изменить после запуска';
$CONF['default_language'] = 'ru';
$CONF['database_type'] = 'mysqli';
$CONF['database_host'] = 'localhost';
$CONF['database_user'] = 'postfix';
$CONF['database_password'] = 'password';
$CONF['database_name'] = 'postfix';
$CONF['admin_email'] = 'root@domain.ru';
$CONF['encrypt'] = 'md5crypt';
$CONF['default_aliases'] = array ( 'abuse' => 'root', 'hostmaster' => 'root', 'postmaster' => 'root', 'webmaster' => 'root'
);
$CONF['domain_path'] = 'YES';
$CONF['domain_in_mailbox'] = 'YES';
?>- mysql для MySQL 3.23 и 4.0, 4.1 или 5;
- mysqli для MySQL 4.1+ или MariaDB;
- pgsql для PostgreSQL;
- sqlite для SQLite 3.
- md5crypt;
- md5;
- system — учетная запись по умолчанию, от которой работает PHP;
- cleartext — это простой открытый текст (не рекомендуется, т.к. пропадает смысл использования базы данных для повышения безопасности);
- mysql_encrypt используется для интеграции с PAM;
- authlib использует пароли типа courier-authlib и требует установки значения параметра $CONF[‘authlib_default_flavor’];
- dovecot:CRYPT-METHOD использует зашифрованный пароль из dovecot, например, dovecot:CRAM-MD5;
- php_crypt:CRYPT-METHOD:DIFFICULTY:PREFIX использует встроенную в PHP функцию шифрования. Пример: php_crypt:SHA512:50000
- php_crypt CRYPT-METHOD: Поддерживаемые значения DES, MD5, BLOWFISH, SHA256, SHA512;
- php_crypt DIFFICULTY поддерживает значения BLOWFISH:4-31, SHA256:1000-999999999, SHA512:1000-999999999;
- не используйте методы dovecot:*, которые включают имя пользователя в хэш;
- минимально допустимая версия dovecot 2.1 (‘doveadm pw’ версии 2.0.x не поддерживают опцию ‘-t’);
- dovecot 2.0.0 — 2.0.7 не поддерживается.
- ‘abuse’ => ‘abuse@your.domain.com’;
- ‘hostmaster’ => ‘hostmaster@your.domain.com’;
- ‘postmaster’ => ‘postmaster@your.domain.com’;
- ‘webmaster’ => ‘webmaster@your.domain.com’.
Альтернативный способ создать привилегированного пользователя — выполнить специальную команду в консоли:
sudo bash /usr/share/postfixadmin/scripts/postfixadmin-cli admin add postfix@domain.com --superadmin 1 --active 1 --password password --password2 password
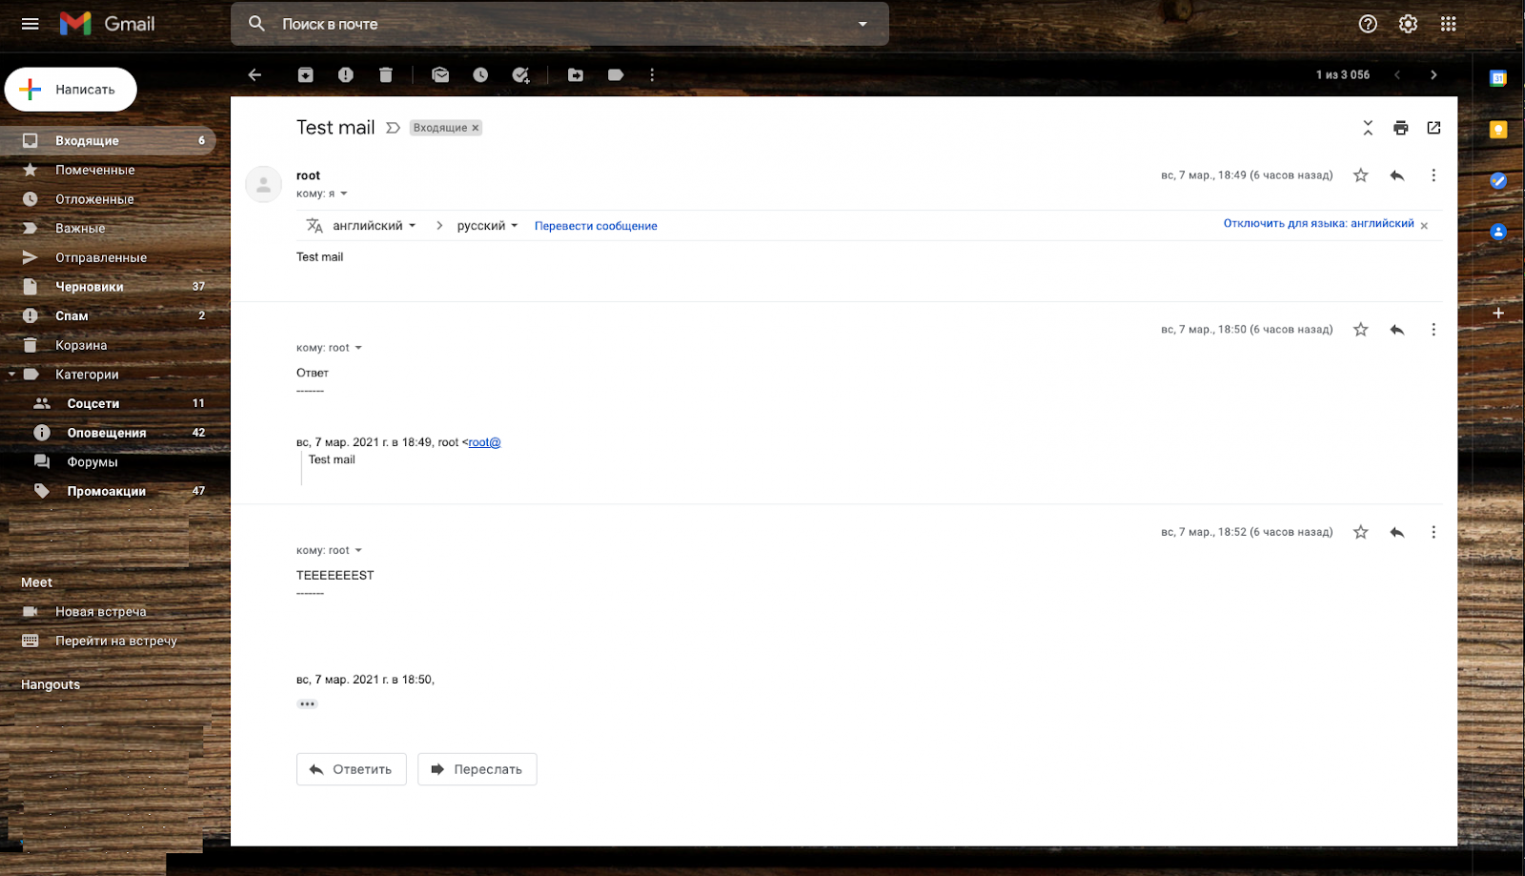
При тестировании отправки в почтовый ящик на mail.ru приходил ответ, что письмо подозрительное и оно даже не появлялось в почтовом ящике. Gmail отнесся более лояльно и помещал письма в папку Спам. Ниже скриншот из Gmail.
Установим из пакетов сам Postfix и коннектор к базе данных MySQL:
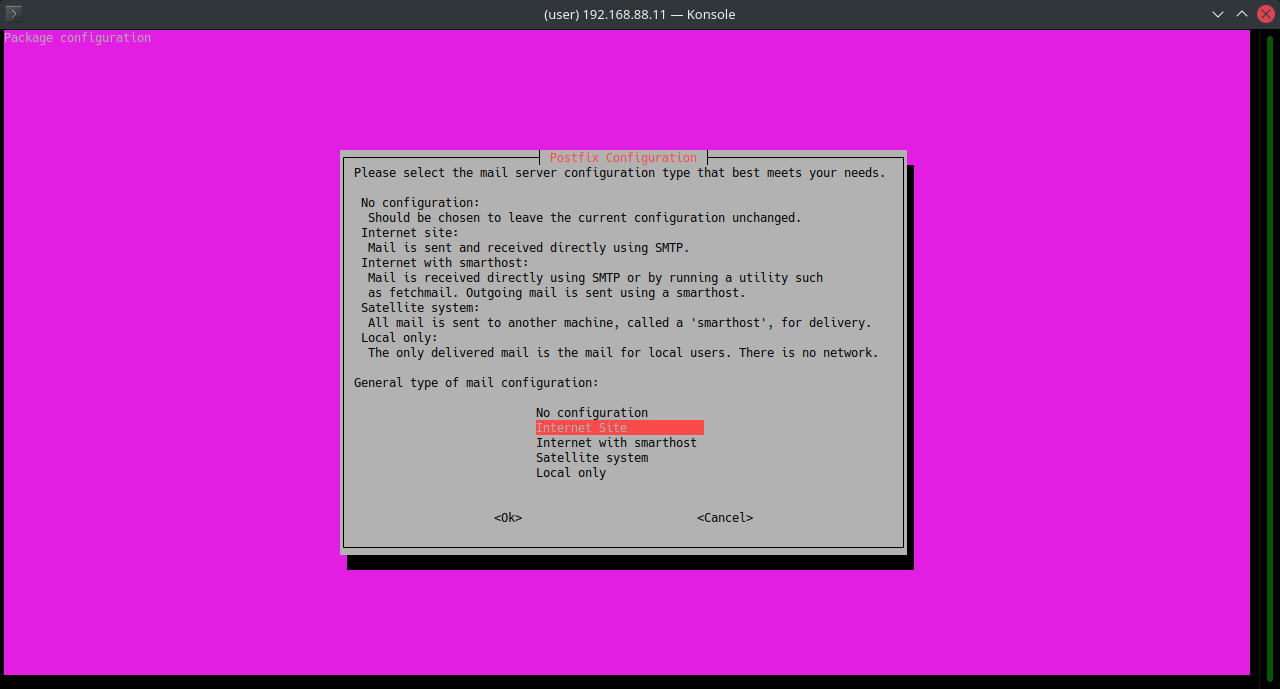
sudo apt install postfix postfix-mysql -yПосле окончания установки в консоли откроется графический интерфейс первоначальной настройки.
На первом экране настройки выбираем Internet Site:
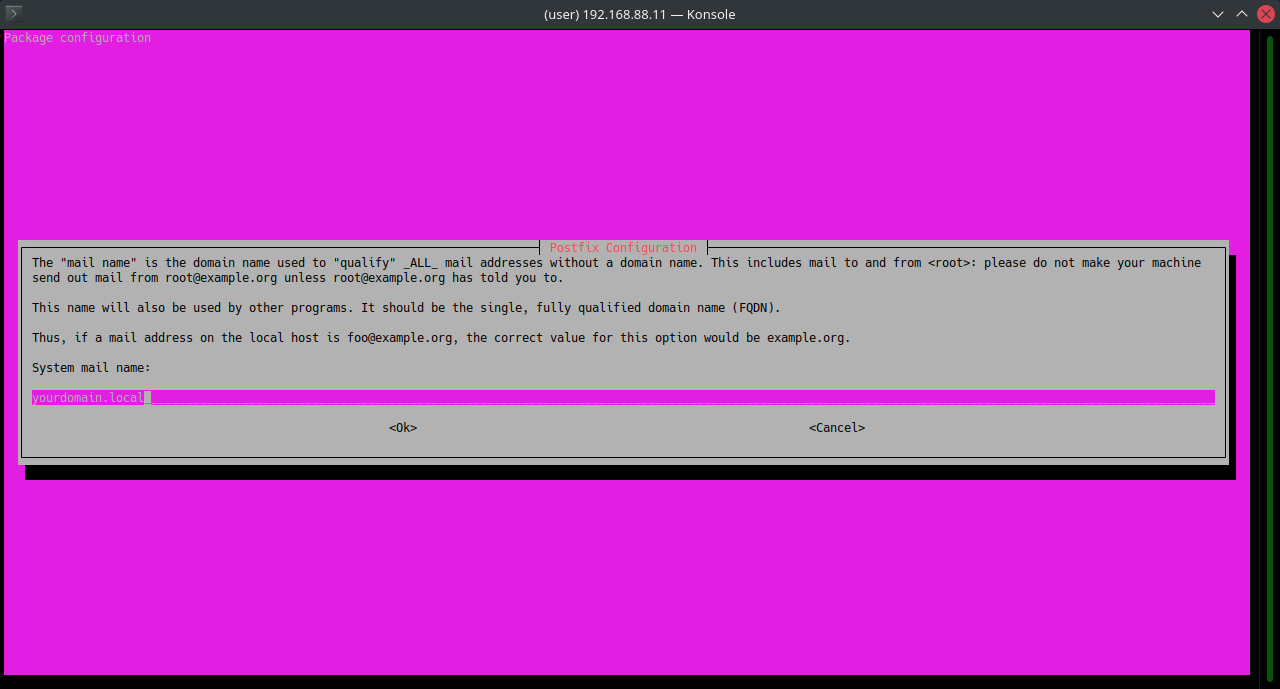
На следующем экране нужно указать FQDN сервера, на котором работает почтовый сервис:
На этом настройка почтового сервера окончена и можно переходить к работе с остальными инструментами для почтового обмена. Если позже появится необходимость внести изменения в выполненные настройки, можно воспользоваться утилитой dpkg-reconfigure:
sudo dpkg-reconfigure postfixДля настройки Postfix, закомментируем в файле /etc/postfix/main.cf следующие строки символом #:
sudo nano /etc/postfix/main.cf#smtpd_tls_cert_file=/etc/ssl/certs/ssl-cert-snakeoil.pem
#smtpd_tls_key_file=/etc/ssl/private/ssl-cert-snakeoil.key
#smtpd_tls_security_level=may
#smtpd_banner = $myhostname ESMTP $mail_name (Ubuntu)Затем добавляем следующее:
virtual_transport=lmtp:unix:private/dovecot-lmtp
relay_domains = mysql:/etc/postfix/mysql/relay_domains.cf
virtual_alias_maps = mysql:/etc/postfix/mysql/virtual_alias_maps.cf,mysql:/etc/postfix/mysql/virtual_alias_domain_maps.cf
virtual_mailbox_domains = mysql:/etc/postfix/mysql/virtual_mailbox_domains.cf
virtual_mailbox_maps = mysql:/etc/postfix/mysql/virtual_mailbox_maps.cf
virtual_mailbox_base=/var/mail/vmail/
local_recipient_maps=$virtual_mailbox_maps
smtpd_sasl_auth_enable=yes
smtpd_sasl_type=dovecot
smtpd_sasl_path=private/auth
broken_sasl_auth_clients=yes
smtpd_sasl_security_options=noanonymous
smtpd_use_tls=yes
smtpd_tls_cert_file=/etc/postfix/certs/cert.pem
smtpd_tls_key_file=/etc/postfix/certs/key.pem
smtpd_sasl_tls_security_options=noanonymous
smtpd_tls_auth_only=yes
smtpd_recipient_restrictions=permit_mynetworks,permit_sasl_authenticated,reject_non_fqdn_helo_hostname,reject_non_fqdn_sender,reject_unknown_sender_domain,reject_non_fqdn_recipient,reject_unknown_recipient_domain
smtpd_banner=$myhostname ESMTP
strict_rfc821_envelopes=yes
disable_vrfy_command=yes
smtpd_helo_required=yes
Открываем файл конфигурации /etc/postfix/master.cf на редактирование:
sudo nano /etc/postfix/master.cfДобавляем в конец файла следующие строки:
submission inet n - n - - smtpd -o smtpd_tls_security_level=encrypt -o smtpd_sasl_auth_enable=yes -o smtpd_sasl_type=dovecot -o smtpd_sasl_path=private/auth -o syslog_name=postfix/submission -o smtpd_tls_wrappermode=no -o smtpd_recipient_restrictions=permit_mynetworks,permit_sasl_authenticated,reject -o smtpd_relay_restrictions=permit_mynetworks,permit_sasl_authenticated,defer_unauth_destination -o milter_macro_daemon_name=ORIGINATING
smtps inet n - n - - smtpd -o smtpd_sasl_auth_enable=yes -o smtpd_sasl_type=dovecot -o smtpd_sasl_path=private/auth -o syslog_name=postfix/smtps -o smtpd_tls_wrappermode=yes -o smtpd_recipient_restrictions=permit_mynetworks,permit_sasl_authenticated,reject -o smtpd_relay_restrictions=permit_mynetworks,permit_sasl_authenticated,defer_unauth_destination -o milter_macro_daemon_name=ORIGINATING
dovecot unix - n n - - pipe flags=DRhu user=vmail:vmail argv=/usr/lib/dovecot/deliver -f ${sender} -d ${recipient}
На следующих шагах создадим конфигурационные файлы, при помощи которых Postfix сможет обращаться к базе данных MySQL.
sudo mkdir /etc/postfix/mysqlsudo nano /etc/postfix/mysql/relay_domains.cfhosts = localhost
user = postfix
password = password
dbname = postfix
query = SELECT domain FROM domain WHERE domain='%s' and backupmx = '1'sudo nano /etc/postfix/mysql/virtual_alias_domain_maps.cfhosts = localhost
user = postfix
password = password
dbname = postfix
query = SELECT goto FROM alias,alias_domain WHERE alias_domain.alias_domain = '%d' and alias.address = CONCAT('%u', '@', alias_domain.target_domain) AND alias.active = 1sudo nano /etc/postfix/mysql/virtual_alias_maps.cfhosts = localhost
user = postfix
password = password
dbname = postfix
query = SELECT goto FROM alias WHERE address='%s' AND active = '1'sudo nano /etc/postfix/mysql/virtual_mailbox_domains.cfhosts = localhost
user = postfix
password = password
dbname = postfix
query = SELECT domain FROM domain WHERE domain='%s' AND backupmx = '0' AND active = '1'sudo nano /etc/postfix/mysql/virtual_mailbox_maps.cfhosts = localhost
user = postfix
password = password
dbname = postfix
query = SELECT maildir FROM mailbox WHERE username='%s' AND active = '1'Осталось сгенерировать самоподписанный сертификат. При выполнении команды openssl будут задаваться вопросы. Ответы на них могут быть любыми, на работу сервиса это никак не повлияет.
sudo mkdir /etc/postfix/certssudo openssl req -new -x509 -days 3650 -nodes -out /etc/postfix/certs/cert.pem -keyout /etc/postfix/certs/key.pemНа этом настройка Postfix завершена и можно проверить ее корректность и запускать сервис:
sudo postfix checksudo systemctl restart postfixНастройка брандмауэра для postfix
Для внесения изменений изменений в правила брандмауэра воспользуемся специальной утилитой ufw (расшифровывается как uncomplicated firewall). По сравнению с известным iptables, у ufw проще синтаксис. Установим и запустим ufw:
sudo apt install ufwsudo ufw enableПроверим текущее правило для Postfix:
cat /etc/ufw/applications.d/postfix[Postfix]
title=Mail server (SMTP)
description=Postfix is a high-performance mail transport agent
ports=25/tcp
[Postfix SMTPS]
title=Mail server (SMTPS)
description=Postfix is a high-performance mail transport agent
ports=465/tcp
[Postfix Submission]
title=Mail server (Submission)
description=Postfix is a high-performance mail transport agent
ports=587/tcpРазрешаем сетевое взаимодействие с Postfix при помощи следующей команды:
sudo ufw allow PostfixНастройка почтового сервера Dovecot
Перед началом работы с Dovecot, установим пакеты самого приложения и коннектор для работы с базой данных MySQL. Сразу же активируем службу и добавим в автозапуск.
sudo apt install dovecot-imapd dovecot-pop3d dovecot-lmtpd dovecot-mysql -ysudo systemctl start dovecotsudo systemctl enable dovecotСоздадим специализированную учетную запись для работы с Dovecot и добавим права sudo:
sudo adduser vmailsudo usermod -aG sudo vmailДалее создадим конфигурационный файл /etc/dovecot/local.conf, в который впишем настройки сервиса. Обратите внимание, что сертификат из переменных ssl_key и ssl_cert будет использоваться тот же самый, который был сгенерирован для Postfix.
sudo nano /etc/dovecot/local.confprotocols = pop3 imap lmtp
auth_mechanisms = plain login
mail_gid = vmail
mail_uid = vmail
first_valid_uid = 5000
last_valid_uid = 5000
mail_location = maildir:/var/mail/vmail/%d/%n/
mbox_write_locks = fcntl
disable_plaintext_auth = yes
passdb { args = scheme=ssha512 username_format=%u /etc/dovecot/users driver = passwd-file
}
userdb { args = username_format=%u /etc/dovecot/users driver = passwd-file
}
service auth { unix_listener /var/spool/postfix/private/auth { group = postfix mode = 0660 user = postfix } unix_listener auth-userdb { mode = 0600 user = vmail }
}
service lmtp { unix_listener /var/spool/postfix/private/dovecot-lmtp { group = postfix mode = 0600 user = postfix } user = vmail
}
protocol lmtp { postmaster_address = postmaster@mailtest.fvds.ru
}
ssl = required
ssl_cert = </etc/postfix/certs/cert.pem
ssl_key = </etc/postfix/certs/key.pem
ssl_cipher_list = ECDHE-RSA-AES128-GCM-SHA256:ECDHE-ECDSA-AES128-GCM-SHA256:ECDHE-RSA-AES256-GCM-SHA384:ECDHE-ECDSA-AES256-GCM-SHA384:DHE-RSA-AES128-GCM-SHA256:DHE-DSS-AES128-GCM-SHA256:kEDH+AESGCM:ECDHE-RSA-AES128-SHA256:ECDHE-ECDSA-AES128-SHA256:ECDHE-RSA-AES128-SHA:ECDHE-ECDSA-AES128-SHA:ECDHE-RSA-AES256-SHA384:ECDHE-ECDSA-AES256-SHA384:ECDHE-RSA-AES256-SHA:ECDHE-ECDSA-AES256-SHA:DHE-RSA-AES128-SHA256:DHE-RSA-AES128-SHA:DHE-DSS-AES128-SHA256:DHE-RSA-AES256-SHA256:DHE-DSS-AES256-SHA:DHE-RSA-AES256-SHA:ECDHE-RSA-DES-CBC3-SHA:ECDHE-ECDSA-DES-CBC3-SHA:AES128-GCM-SHA256:AES256-GCM-SHA384:AES128-SHA256:AES256-SHA256:AES128-SHA:AES256-SHA:AES:CAMELLIA:DES-CBC3-SHA:!aNULL:!eNULL:!EXPORT:!DES:!RC4:!MD5:!PSK:!aECDH:!EDH-DSS-DES-CBC3-SHA:!EDH-RSA-DES-CBC3-SHA:!KRB5-DES-CBC3-SHA
ssl_prefer_server_ciphers = yesТеперь создадим конфигурацию для подключения к базе данных MySQL:
sudo nano /etc/dovecot/dovecot-mysql.confdriver = mysql
default_pass_scheme = CRYPT
connect = host = localhost
dbname=postfix
user=postfix
password=password
user_query = SELECT '/var/mail/vmail/%d/%u' as home, 'maildir:/var/mail/vmail/%d/%u' as mail, 5000 AS uid, 5000 AS gid, concat('*:bytes=', quota) AS quota_rule FROM mailbox WHERE username = '%u' AND active = '1'
password_query = SELECT username as user, password, '/var/mail/vmail/%d/%u' as userdb_home, 'maildir:/var/mail/vmail/%d/%u' as userdb_mail, 5000 as userdb_uid, 5000 as userdb_gid, concat('*:bytes=', quota) AS userdb_quota_rule FROM mailbox WHERE username = '%u' AND active = '1'Настройки выполнены, остается перезапустить сервис:
sudo systemctl restart dovecotНастройка брандмауэра для Dovecot
Аналогично Postfix, для настроек будем использовать утилиту ufw. Проверим текущее правило для сервисов Dovecot (их два):
sudo cat /etc/ufw/applications.d/dovecot-imapd[Dovecot IMAP]
title=Secure mail server (IMAP)
description=Dovecot is a mail server whose major goals are security and extreme reliability.
ports=143/tcp
[Dovecot Secure IMAP]
title=Secure mail server (IMAPS)
description=Dovecot is a mail server whose major goals are security and extreme reliability.
ports=993/tcp
# sudo cat /etc/ufw/applications.d/dovecot-pop3d
[Dovecot POP3]
title=Secure mail server (POP3)
description=Dovecot is a mail server whose major goals are security and extreme reliability.
ports=110/tcp
[Dovecot Secure POP3]
title=Secure mail server (POP3S)
description=Dovecot is a mail server whose major goals are security and extreme reliability.
ports=995/tcpРазрешаем сетевое взаимодействие с Dovecot при помощи следующей команды:
sudo ufw allow 'Dovecot IMAP'sudo ufw allow 'Dovecot POP3'Установка веб-интерфейса Roundcube
Веб-сервис Roundcube представляет из себя почтовый клиент, который предназначен для получения и отправки электронной почты. Работает на основе сервера приложений Apache и базы данных MySQL, которые мы уже подготовили к работе.
Начнем с создания конфигурации для Apache:
sudo mkdir /var/www/html/sitessudo mkdir /var/www/html/sites/roundcubesudo nano /etc/apache2/sites-available/roundcube.conf<VirtualHost *:80>
ServerName <ваш домен>
ServerPath /roundcube
ServerAdmin admin@<ваш домен>
DocumentRoot /var/www/html/sites/roundcube
ErrorLog ${APACHE_LOG_DIR}/error.log
CustomLog ${APACHE_LOG_DIR}/access.log combined
</VirtualHost>После этого перезагрузим Apache:
sudo systemctl restart apache2Загрузим пакет Roundcube из репозитория на Github, распакуем его и копируем в созданную папку сервера Apache:
sudo wget https://github.com/roundcube/roundcubemail/releases/download/1.5-beta/roundcubemail-1.5-beta-complete.tar.gz -O roundcube.tar.gzsudo tar xvzf roundcube.tar.gzcd roundcubemail-1.5-betasudo cp -R * /var/www/html/sites/roundcubeТеперь нужно дать веб-серверу права на доступ к директории с файлами Roundcube:
sudo chown -R www-data:www-data /var/www/html/sites/roundcube/sudo chmod -R 775 /var/www/html/sites/roundcubeТеперь откроем интерфейс Roundcube по адресу http://ip_address/installer и убедимся, что отсутствуют критические ошибки.
Если таковые ошибки присутствуют, то их необходимо исправить. К примеру, мы получили следующие ошибки:
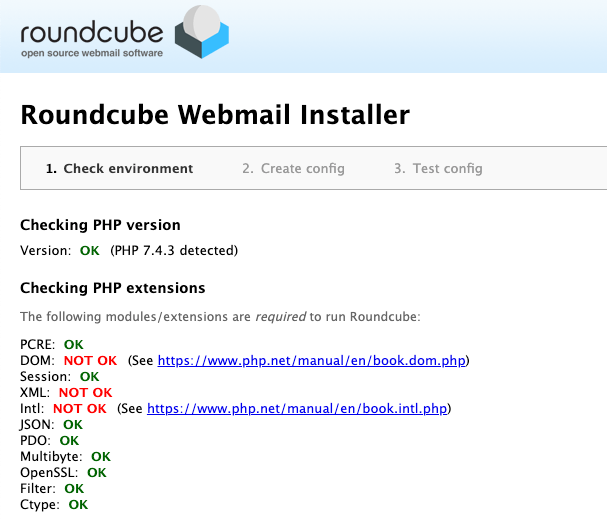
Видим для начала, что в PHP-интерпретаторе не хватает расширения php-xml, отвечающий за поддержку формата XML и программного интерфейса DOM. Также у нас отсутствует расширение функций интернационализации php-intl. Устанавливаем оба недостающих пакета:
sudo apt install php-xml php-intlПерезагружаем веб-сервер для активации расширений:
sudo systemctl restart apache2Перезагружаем страничку инсталлятора Roundcube и видим, что ошибки ушли, а требуемые расширения работают корректно.
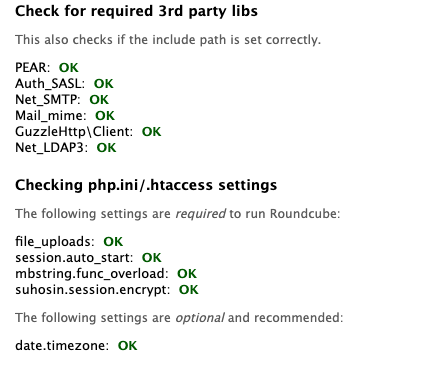
Желательно также установить и опциональные расширения по той же схеме, например:
sudo apt install php-curl php-ldap php-gd php-imagick php-zip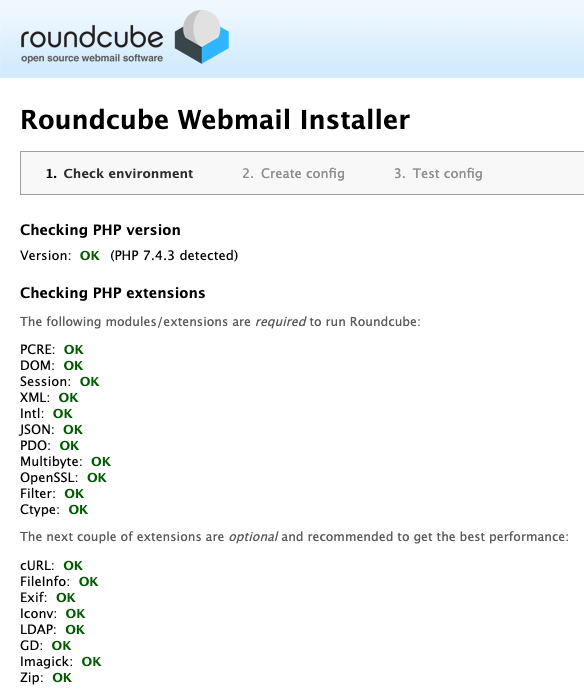
Следующим этапом надо проверить, что у нас есть необходимый коннектор к базе данных. Поскольку в инструкции мы рассматриваем классический вариант с MySQL, то будет достаточно только его. Еще нужно установить правильную временную зону.
Открываем на редактирование конфигурационный файл PHP:
sudo nano /etc/php/7.4/apache2/php.iniНажимаем Ctrl + W и вводим слово timezone. Подтверждаем выполнение поиска нажатием Enter. Раскомментируем строку (убрав символ ;) date.timezone и приводим ее к виду:
date.timezone = Europe/MoscowВыходим из режима редактирования Ctrl + X, подтверждаем сохранение изменений и еще раз перезагружаем веб-сервер:
sudo systemctl restart apache2Еще раз обновляем страничку инсталлятора и видим, что переменная date.timezone успешно определена:
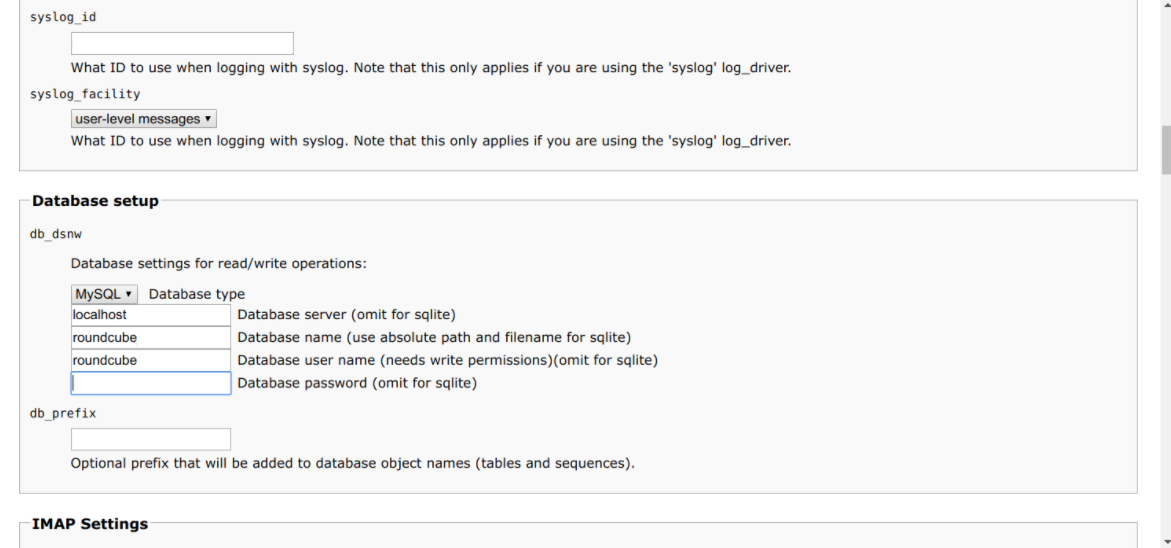
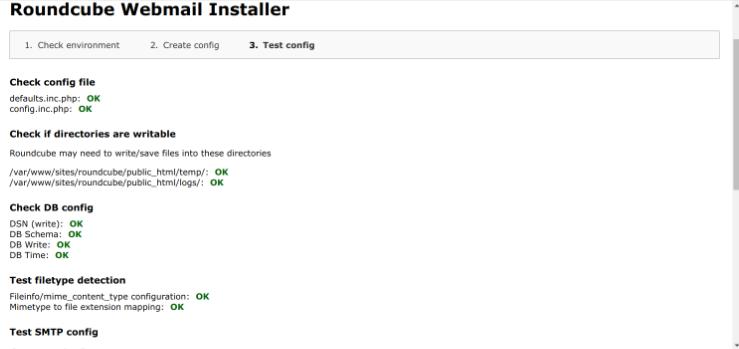
Далее убедимся, что схема данных корректно создана и отсутствуют критические ошибки.
На этом настройка Roundcube завершена. Для безопасности не забудьте удалить директорию installer из корня сайта по адресу /var/www/html/sites/roundcube или выставьте переменную enable_installer в config.inc.php в disabled.
