RDP
(Remote Desktop Protocol — Remote Desktop Protocol) is an application-level protocol developed by Microsoft, used to provide remote user work with a server running the terminal connection service. Clients exist for almost all versions of Windows (including Windows CE and Mobile), Linux, FreeBSD, Mac OS
X. The default port is TCP 3389
. Microsoft’s official name for the client software is Remote Desktop Connection or Terminal Services Client (TSC), in particular, the client in Windows 2k/XP/2003/Vista/2008/7 is called mstsc.exe.
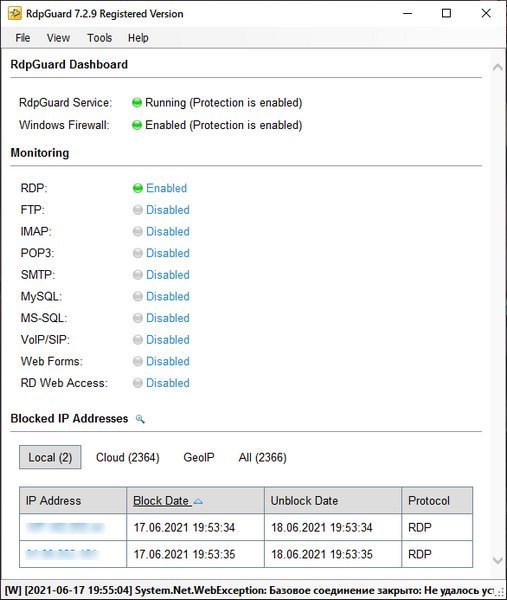
Program RdpGuard
protects against brute-force attacks
. Protected protocols and services: RDP, FTP
, IMAP
, POP3, SMTP
, MySQL
, MS-SQL, IIS Web Login, ASP. NET Web Forms, MS Exchange, RD Web Access, VoIP/SIP
, etc.
Supported OS: Windows Vista/7/8/10/11 and Windows Server 2008/2012/2016/2019/2022
What is RDP Wrapper?
RDP Wrapper is a program that is an alternative to Remote Desktop Services. It may be needed due to the fact that you are not satisfied with the restrictions in terms of the remote desktop experience introduced by Microsoft on various editions of Windows
Thanks to this program, on any version of Windows you can implement:
So proceed with the installation, read the English documentation at the link https://github.com/asmtron/rdpwrap/blob/master/binary-download.md
.
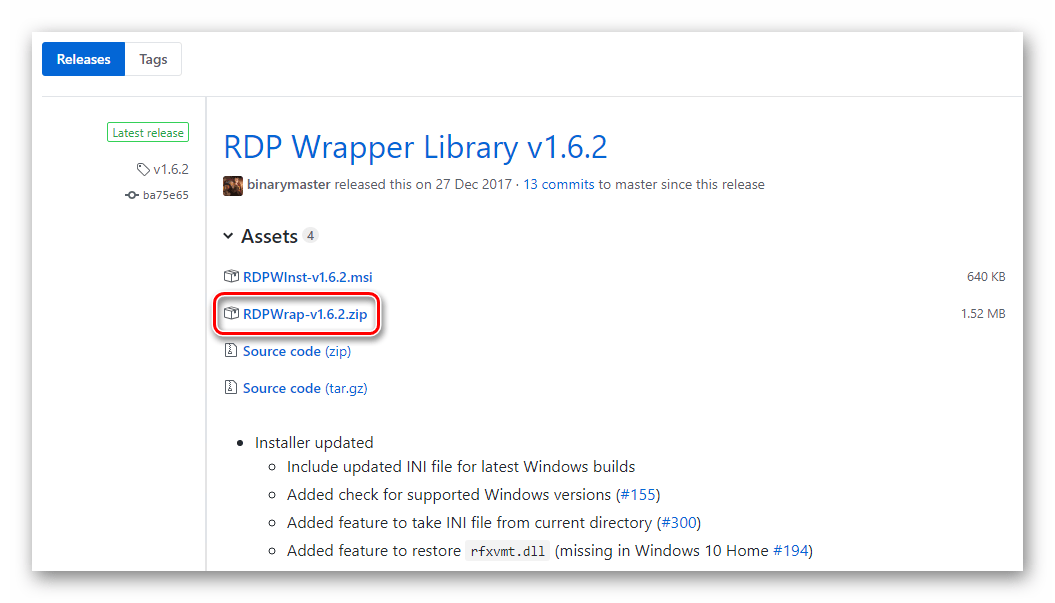
Download RDPWrap-v1.6.2.zip from the link https://github.com/stascorp/rdpwrap/releases
and unzip to «%ProgramFiles%\RDP Wrapper» directory. To install RDPWrap, you must use only this «%ProgramFiles%\RDP Wrapper» directory (usually C:\Program Files\RDP Wrapper), otherwise auto-update will not work.Download autoupdate.zip
and unzip to «%ProgramFiles%\RDP Wrapper» directory.To include the autoupdate.bat file in Windows 10 autostart at system startup, run the following helper batch file as administrator: «%ProgramFiles%\RDP Wrapper\helper\autoupdate__enable_autorun_on_startup.bat»
Set an exception in your antivirus or Windows Defender for the «%ProgramFiles%\RDP Wrapper» folder to prevent RDP Wrapper files from being deleted.
To manually update the RDP Wrapper (rdpwrap.ini file), run the autoupdate batch file autoupdate.bat as administrator: «%ProgramFiles%\RDP Wrapper\autoupdate.bat»
In order to check if the RDP Wrapper utility settings are correct, run the RDPConf file and you should see

XRDP is an open source implementation of the Microsoft Remote Desktop Protocol (RDP) that allows you to graphically control a remote system. Unlike a commercial product, XRDP on Linux allows an unlimited number of users to work simultaneously with one computer or virtual machine, which allows you to actively use XRDP to deploy terminal servers based on Ubuntu 20.04.
 apt update
apt xrdp
During installation, a certificate is generated that is necessary for the operation of the RDP protocol, the line below indicates that the certificate was successfully created:
ssl_gen_key_xrdp1 ok
You must enter the xrdp user, on behalf of which XRDP runs on the system, into the ssl-cert group. Run the command:
adduser xrdp ssl-cert
Then add the xrdp service to autostart and restart it to apply the changes:
 systemctl xrdp
systemctl restart xrdp
At the end, configure the firewall, for UFW
, it will look like this:
ufw allow from 192.168.2.0 to any port
To change the keyboard layout in Ubuntu 20.04, use the Super + Space key combination. If the layout does not change in the window, and the password is entered in the wrong language, then you need to disable the RDP client, close it, change the language in Windows to the desired one, and reconnect to the remote machine.
These commands are used for Windows and Windows Server.
 reg add v fDenyTSConnections t REG_DWORD d f
netsh firewall service remotedesktop
  # Activate user  = = Get-WmiObject Win32_UserAccount Where-Object . Name net user Administrator active:yes net user Administrator expires:never net user admin active:yes net user admin expires:never  # Change the port in regedit =Get-ItemProperty HKLM:\System\CurrentControlSet\Control\Terminal Server\WinStations\RDP-Tcp PortNumber  # add rule for new port netsh advfirewall firewall add rule=”RDP” = =allow =TCP =  # Disable existing rules for RDP that we have by default  =  'Remote Desktop - Shadow (TCP-In)' ,,
foreach = =
Disable-NetFirewallRule Params  #Collecting the bruteforce log to file C:\bruteforce.txt  =  # Delay time in seconds  = Get-WinEvent logname= id=
foreach = . properties. value = . properties. value C:bruteforce.txt = system. diagnostics. Stopwatch::StartNew . Elapsed. TotalSeconds  # Waiting for delay execution  Start sleep
. stop  # Reboot server to apply changes shutdown r t
Write-Output  "Port already 1239"
netsh advfirewall firewall add rule=”RDP” = =allow =TCP =
The RDP connection in Windows 10 is actively used by both some ordinary users and professionals. To bypass the system limitation, the latter uses the RDP Wrap program. Alas, after system updates, this software stops working, and today we will help you solve this problem.
- Method 1: Replacing the configuration file
- Method 2: Setting in the Group Policy Editor
- More articles on this topic:
- Did the article help you?
- Step 1: Installing specialized software
- Step 2: Change profile settings and OS settings
- Step 3: Connecting to a remote computer
- More articles on this topic:
- Did the article help you?
- Critical considerations
- Enable multiple custom RDP connections with RDPWrap
- Enable multiple custom RDP connections by modifying the fileTermsrv.dll
- Conclusion
- Can You Activate Multiple Remote Desktop Connections in Windows 11?
- 4 Ways to Enable RDP Multiple Sessions
- 1. Use RDP Wrapper Library
- 2. Modify termsrv.dll Using HEX Editor
- 3. Patch termsrv.dll With PowerShell Script
- 4. Modify the Local Group Policies
- Conclusion
Method 1: Replacing the configuration file
Problems with the operation of the program in question arise due to updates to the termsrv.dll system library. For each of its versions, RDP Wrap needs to be reconfigured. Fortunately, the application developers take care of this themselves and release a new configuration file after each major update. The algorithm for replacing it is as follows:
- Follow the link to the app’s GitHub repository.
GitHub repository
- Open the res directory by double-clicking the left mouse button. Find inside the link named rdpwrap.ini
and right click on it. Select “Save Link As…”
(in other browsers — «Save Target As…»
or similar in meaning).
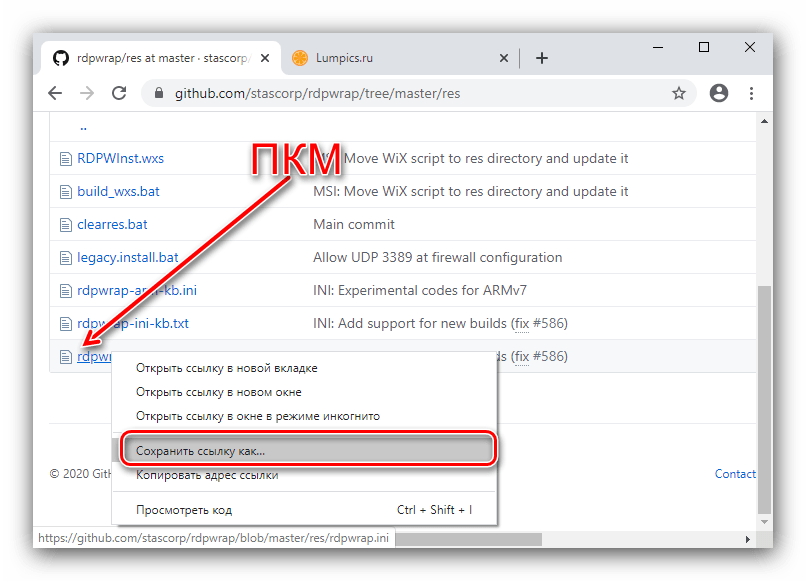
Save the file rdpwrap.ini
to any suitable location on the computer. - Now open the utility Run
combination Win+R
, enter a request into itservices.msc
and press OK
.

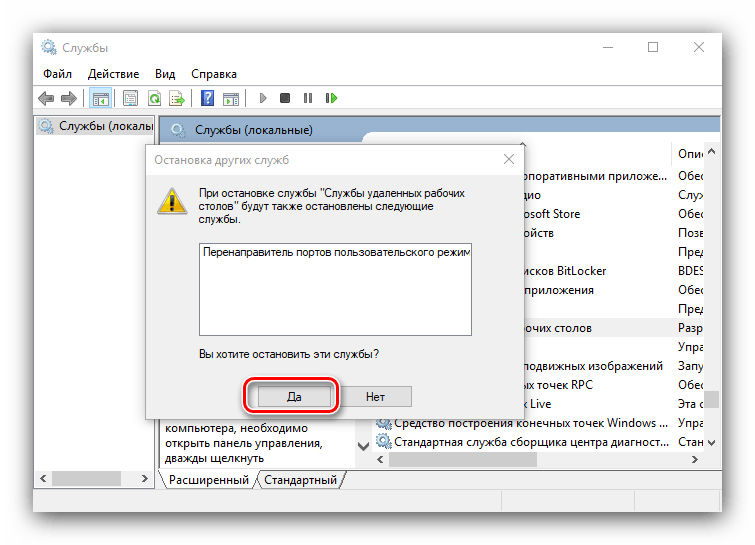
After launching the list of services, find the entry “Remote Desktop Services”
, select it and press Stop Service
.
- Next, open “Explorer”
and go to the following address:C:\Program Files\RDP WrapperCopy the previously obtained rdpwrap.ini
and paste in this folder.
Confirm file replacement.
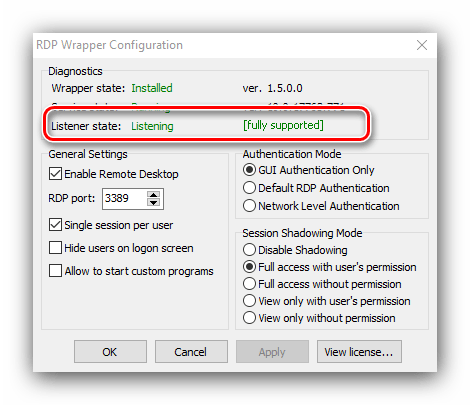
- Restart your computer, then open the wrapper monitor named RDConfig.

Check the line «Listener»
– if the inscription in it reads “Fully supported”
, the problem is resolved.

This method is the preferred one and the next one should only be used if it does not work.
Method 2: Setting in the Group Policy Editor
Users of Windows 10 Professional and Enterprise editions can solve the problem in question by configuring a certain parameter in the «Group Policy Editor»
.
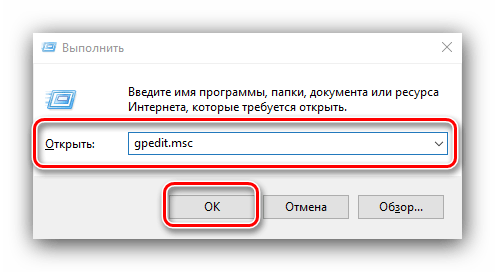
- Call tool Run
(step 3 of Method 1), in which enter the request gpedit.msc
. - Go to the following path:
Конфигурация компьютера/Административные шаблоны/Компоненты Windows/Службы удаленных рабочих столов/Узел сеансов удаленных рабочих столов/Подключения - Double click on the policy «Limit the number of connections»
.

Set position “On”
, then change the value of the maximum number of connections to999999
. Save the changes by successively pressing the buttons «Apply»
and «OK»
. - Close «Group Policy Editor»
and restart your computer.


The manipulation described above will solve the problem, but is potentially unsafe, so use it as a last resort.
Sometimes the above actions do not lead to the desired result. In this case, we note that most likely the matter is no longer in the wrapper and the library. Act like this:
- First, check the firewall settings, both system and third-party, and allow RDP connection in it.
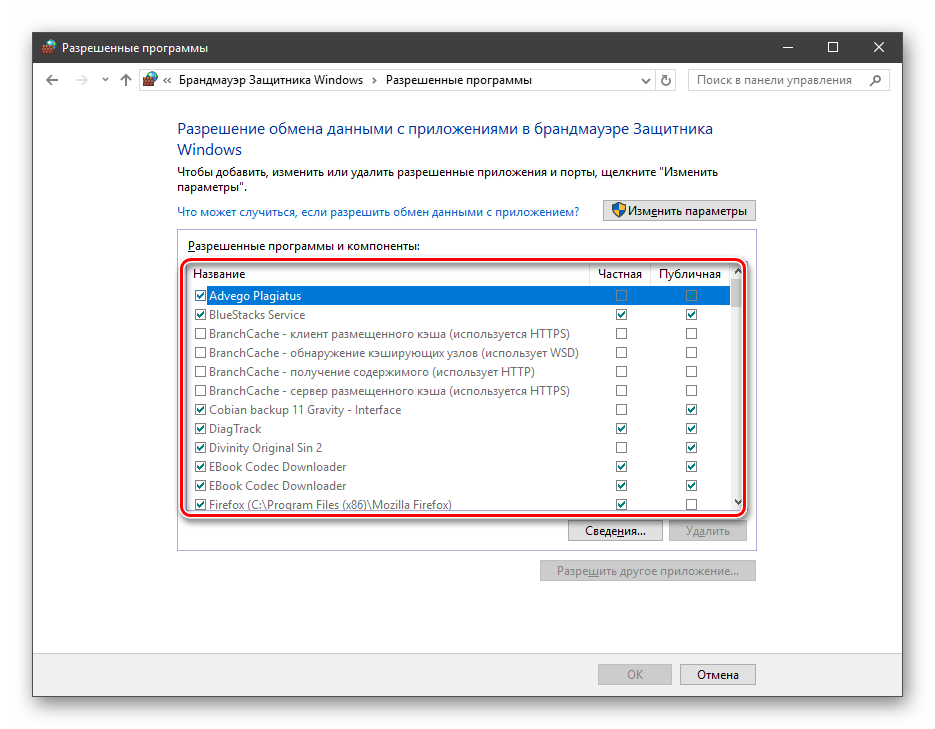
Lesson: Setting up a firewall on Windows 10
- It is also worth checking the status of the ports — it is possible that the one required for the required protocol to work is simply closed.

Read more: How to open ports on Windows 10
- Check the edition of the target ten again — RDP connection is not supported in Windows 10 Home.
- The type of connection in question may not work due to damage to the corresponding system files. First, check if your system has a virus.

Read more: Fight against computer viruses
After that, check the integrity of the OS components and restore them in one of the possible ways, if necessary.
Lesson: Check
integrity and restoration
system files in Windows 10
Now you know how to deal with the situation when RDP Wrapper stopped working after a Windows 10 update, and what to do if the connection via this protocol does not work in general.
More articles on this topic:
Did the article help you?
- Windows 10 Terminal Server Setup Guide
- Questions and Answers

Default operating system Windows 10
does not allow several users to simultaneously connect to one computer, but in the modern world, such a need arises more and more often. Moreover, this function is used not only for remote work, but also for personal purposes. In this article, you will learn how to set up and use a terminal server in Windows 10.
No matter how difficult the task stated in the topic of the article may seem at first glance, in fact, everything is obscenely simple. All that is required of you is to strictly follow the instructions. Please note that the connection method is similar to that in earlier versions of the OS.
Read more: Creating a terminal server on Windows 7
Step 1: Installing specialized software
As we said earlier, the standard settings of Windows 10 do not allow multiple users to use the system at the same time. When you try to connect like this, you will see the following picture:
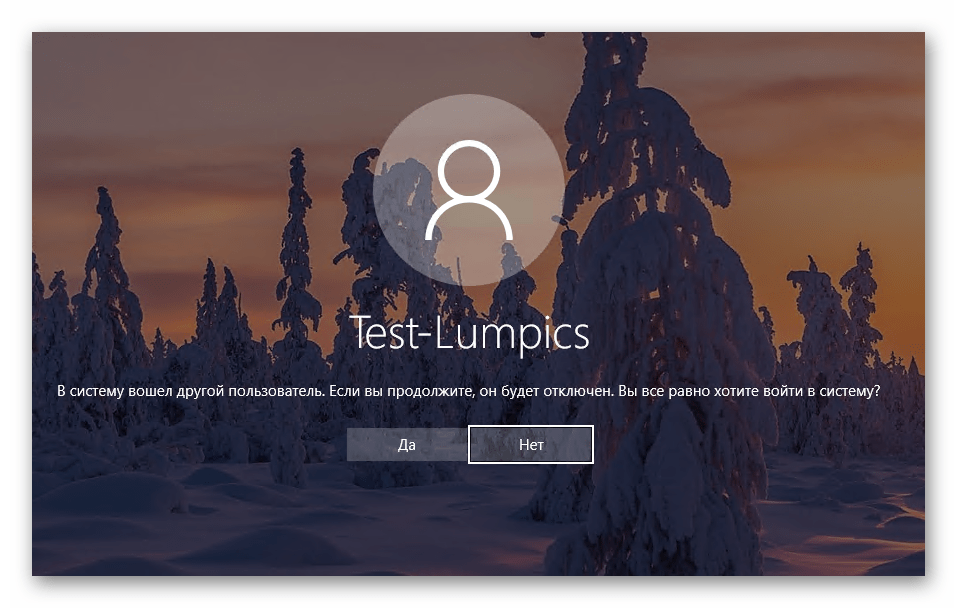
To fix this, you need to make changes to the OS settings. Fortunately, there is a special software for this that will do everything for you. We will immediately warn you that the files discussed below modify system data. In this regard, in some cases they are recognized as dangerous for Windows itself, so it is up to you to use them or not. All the described actions have been tested in practice by us personally. So, let’s get started, first of all, do the following:
- Follow this link
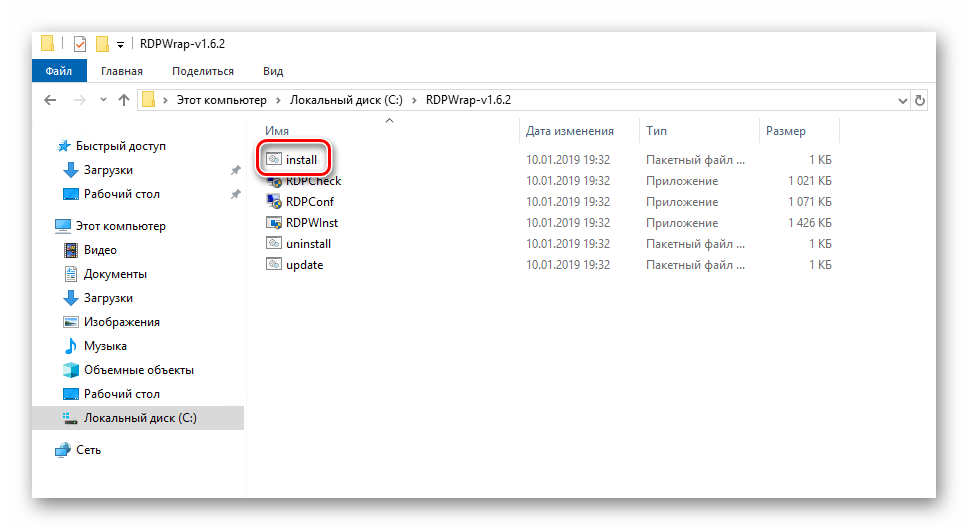
, then click on the line shown in the image below. - As a result, the archive with the required software will be downloaded to the computer. When the download is complete, extract all its contents to any convenient place and find among the received files the one called “install”
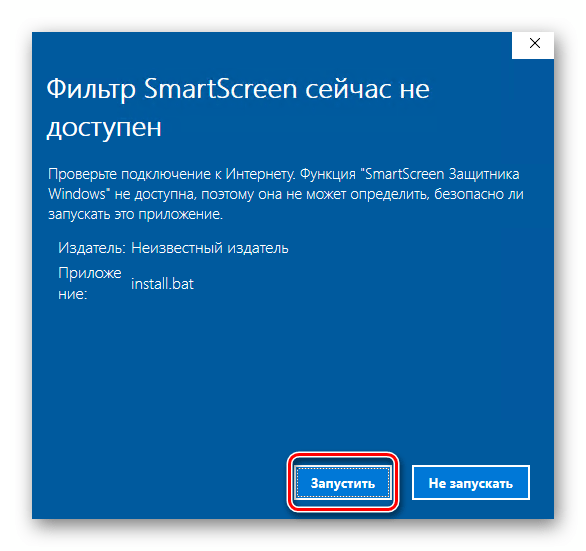
. Run it as administrator. To do this, right-click on it and select the line with the same name from the context menu. - As we mentioned earlier, the system will not detect the publisher of the executable file, so the built-in Windows Defender may work
. He will simply warn you about it. To continue, press the button «Start»
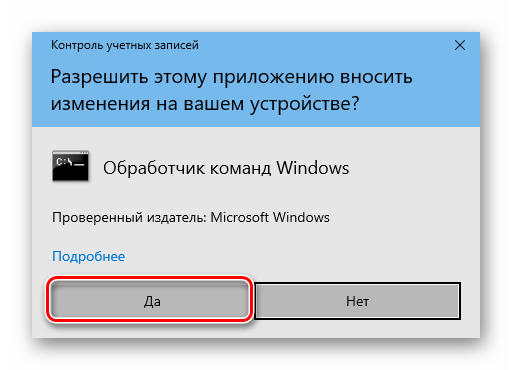
. - If you have profile control enabled, you may be prompted to launch the application “Command Prompt”
. This is where the software will be installed. Click in the appeared window «Yes»
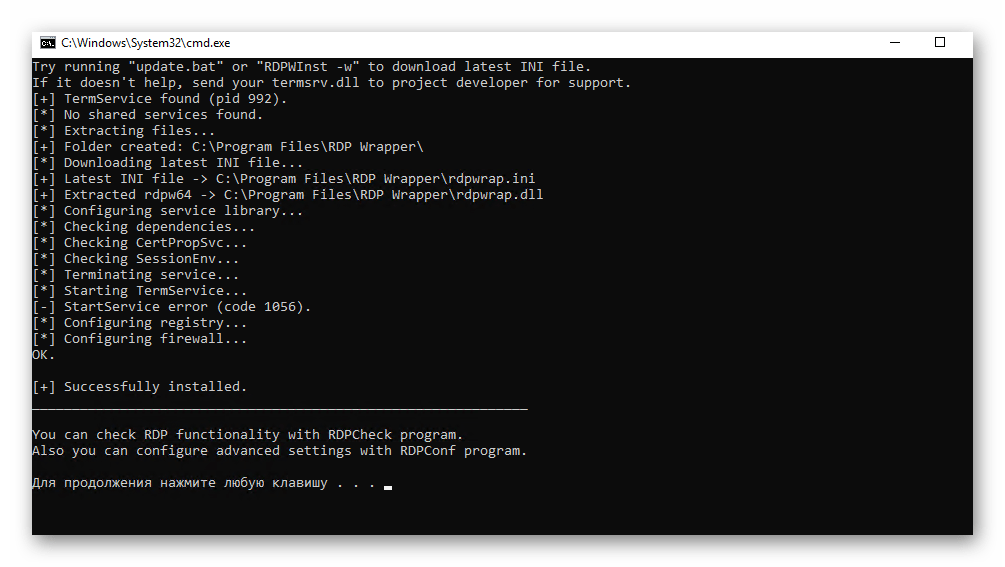
. - Next window will appear “Command line”
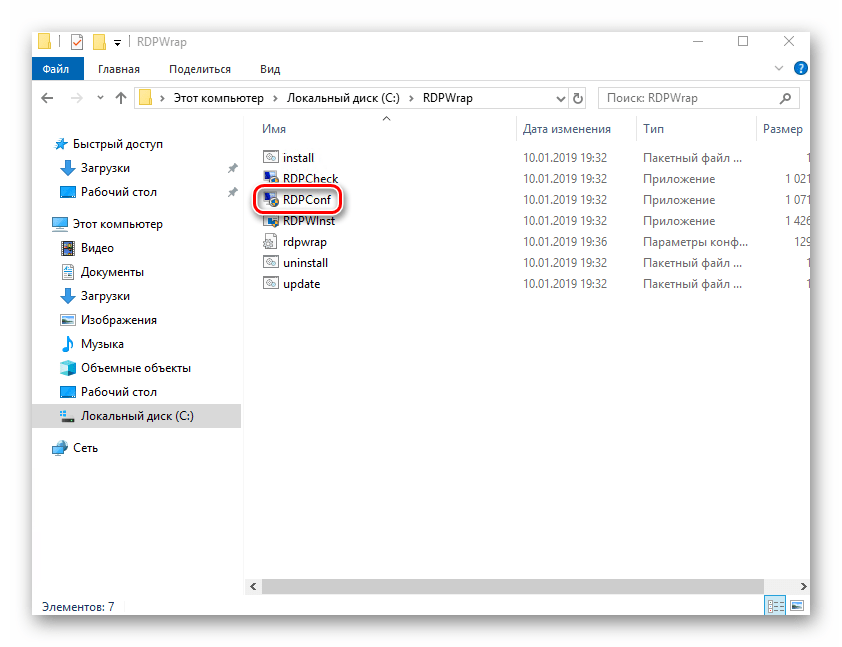
and the modules will automatically install. You just need to wait a bit until you are asked to press any key, which is what you need to do. This will automatically close the installation window. - It remains only to check all the changes made. To do this, in the list of extracted files, find «RDPConf»
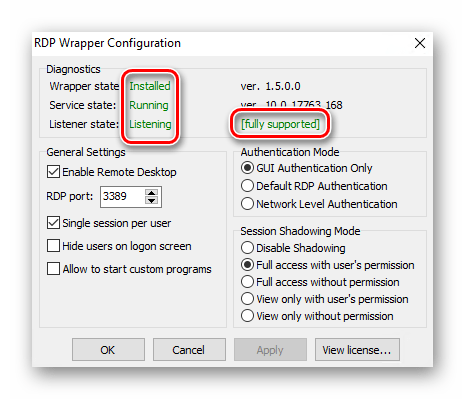
and run it. - Ideally, all the items that we have marked in the next screenshot should be green. This means that all changes have been made correctly and the system is ready for multiple users to connect.
This completes the first step of setting up the terminal server. We hope you don’t have any difficulties. We move on.
Step 2: Change profile settings and OS settings
Now you need to add profiles under which other users can connect to the desired computer. In addition, we will make some adjustments to the system. The list of actions will be as follows:
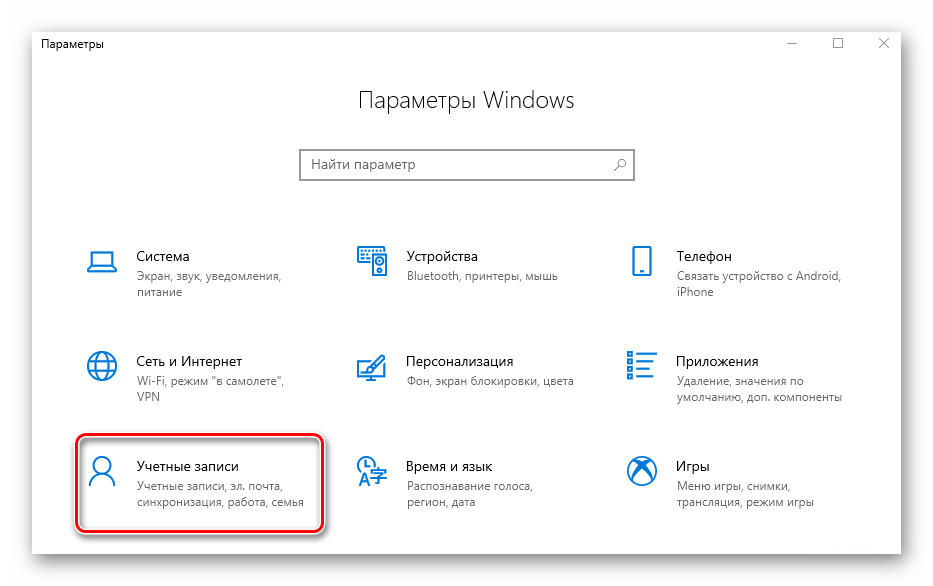
- Press the keys together on the desktop «Windows»
and «I»
. This action will activate the Windows 10 Basic Settings window. - Go to the group Accounts
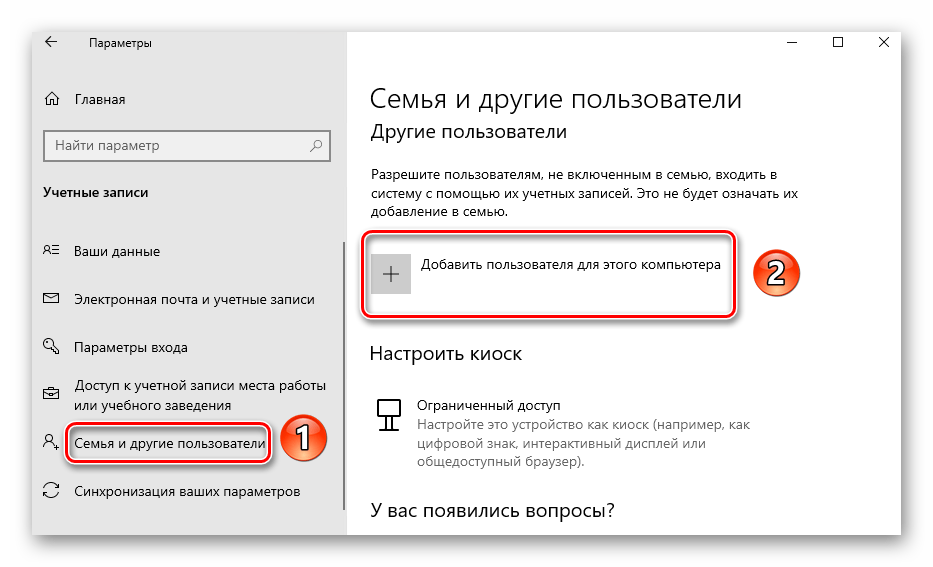
. - In the side (left) panel, go to the subsection “Family and other users”
. Click on the button «Add a user to this computer»
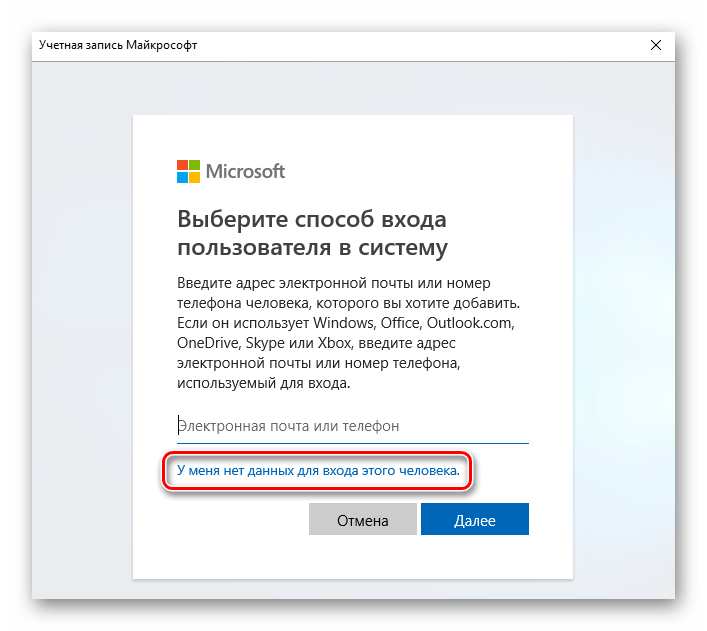
somewhat to the right. - A window with Windows login options will appear. You don’t need to enter anything on a single line. You just need to click on the inscription “I do not have login details for this person”
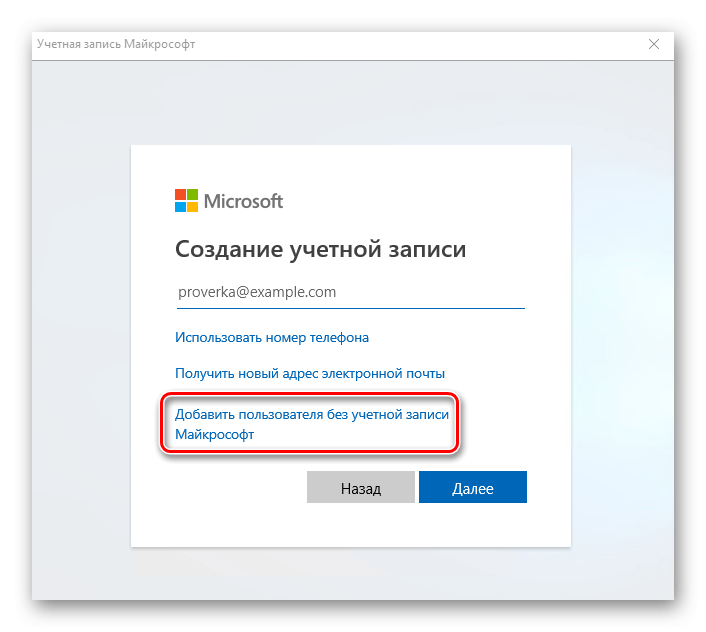
. - Next, you need to click on the line «Add a user without a Microsoft account»
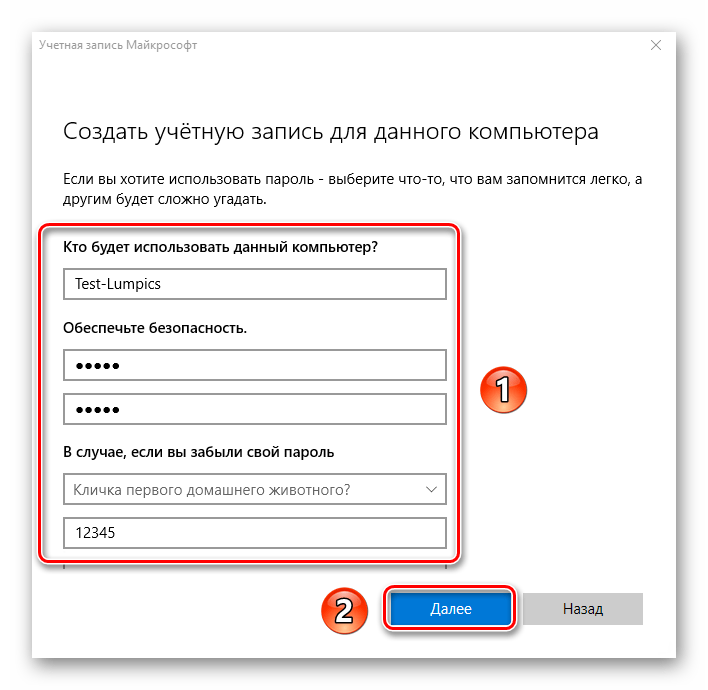
. - Now enter the name of the new profile and the key to it. Remember that the password must be entered without fail. Otherwise, you may experience problems with remote connection to the computer in the future. All other fields must also be filled in. But this is already a requirement of the system itself. When finished, press the button “Next”
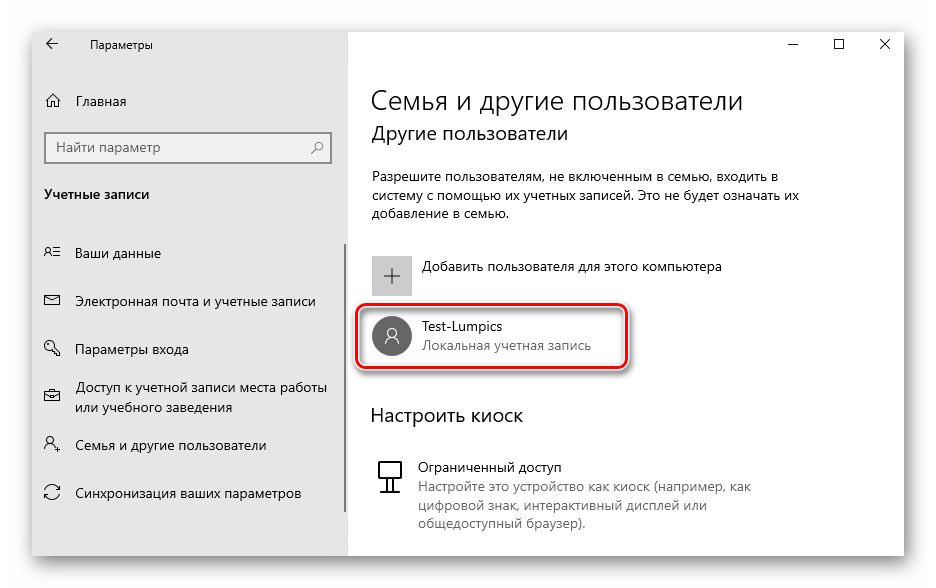
. - After a few seconds, a new profile will be created. If everything goes well, you will see it in the list.
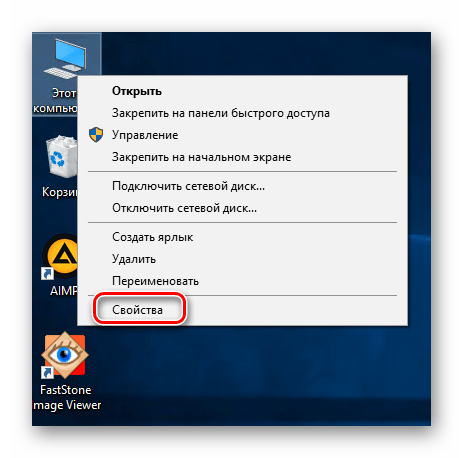
- Now let’s move on to changing the parameters of the operating system. To do this, on the desktop on the icon «This computer»
click with the right mouse button. Select from the context menu the parameter «Properties»
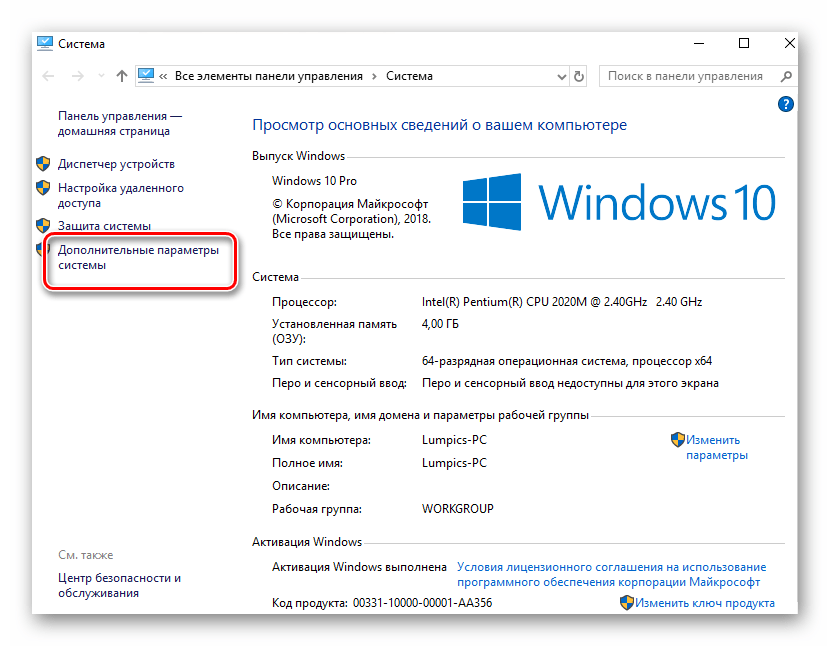
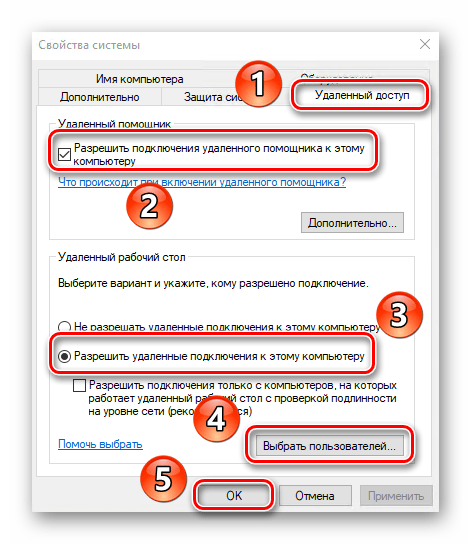
. - In the next window that opens, click on the line marked below.
- Go to subsection “Remote Access”
. Below you will see the parameters that should be changed. Check the box «Allow remote assistance connections to this computer»
, and also activate the option «Allow remote connections to this computer»
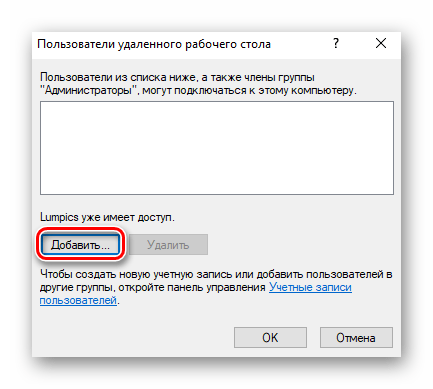
. When finished, press the button «Select Users»
. - In the new small window, select the function «Add»
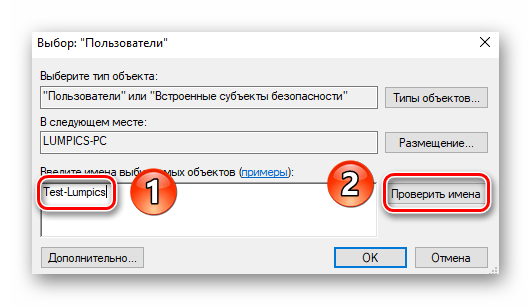
. - Then you need to enter the username, which will be given remote access to the system. You need to do this in the bottom field. After entering the name of the profile, click on the button «Check Names»
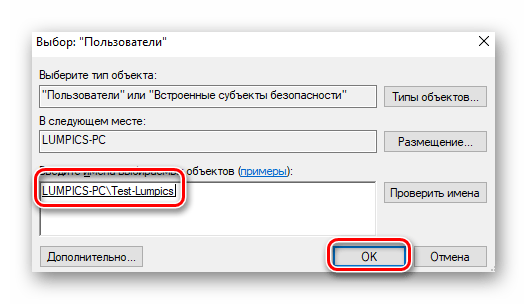
, which is to the right. - As a result, you will see that the username will be transformed. This means that it passed the test and was found in the list of profiles. To complete the operation, press «OK»
. - Apply your changes to all open windows. To do this, click on them on «OK»
or «Apply»
. There is very little left.
Step 3: Connecting to a remote computer
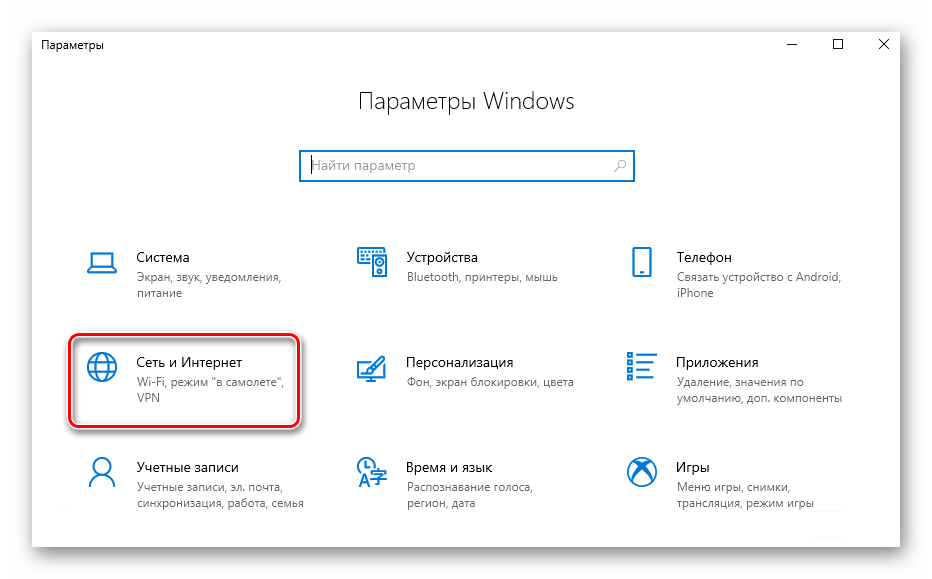
The terminal will be connected via the Internet. This means that we first need to find out the address of the system to which users will connect. It is not difficult to do this:
- Reopen Settings
Windows 10 using keys «Windows+I»
or menu «Start»
. In the system settings, go to the section «Network and Internet»
. - On the right side of the window that opens, you will see the line «Change connection properties»
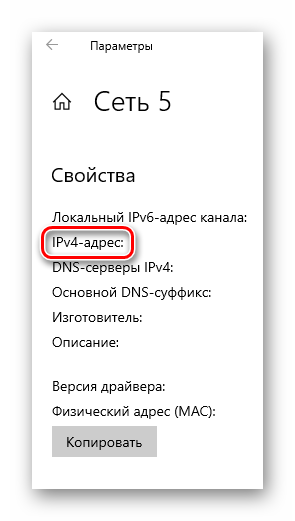
. Click on it. - The next page will display all available network connection information. Scroll down until you see the network properties. Remember the numbers that are located opposite the line marked on the screenshot:
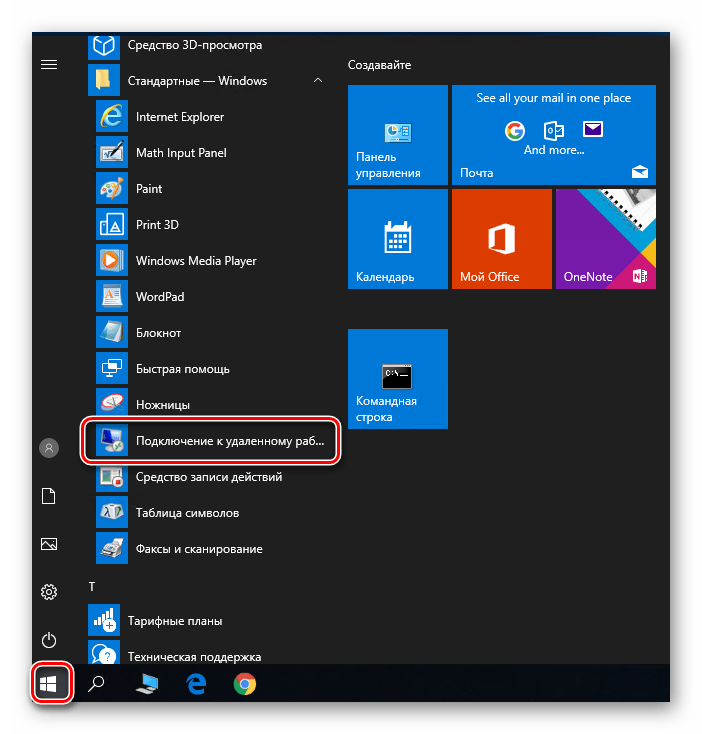
- We have received all the necessary data. It remains only to connect to the created terminal. Further actions must be performed on the computer from which the connection will be made. To do this, press the button «Start»
. In the list of applications, find the folder Windows Accessories
and open it. In the list of items will be «Remote Desktop Connection»
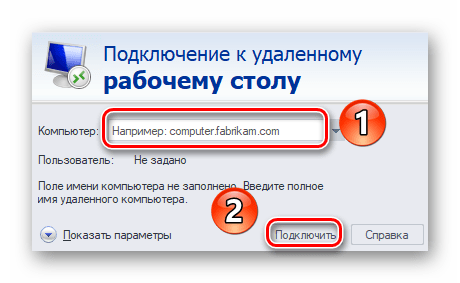
, and you need to run it. - Then, in the next window, enter the IP address you learned earlier. At the end, press the button «Connect»
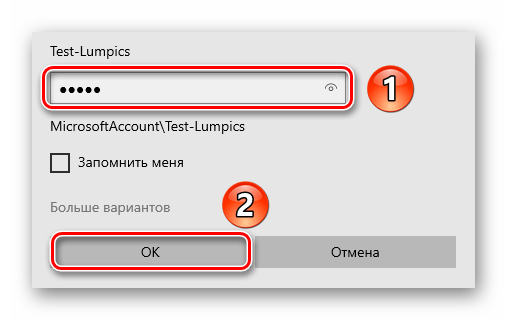
. - As with the standard Windows 10 login, you will need to enter your username and account password. Please note that at this stage you need to enter the name of the profile that you gave permission to connect to remotely earlier.
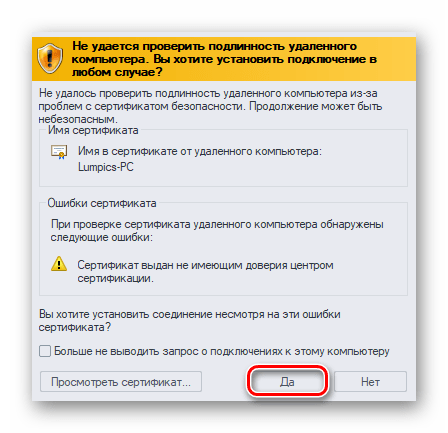
- In some cases, you may see a notification that the system was unable to authenticate the certificate of the remote computer. If this happens, press the button «Yes»
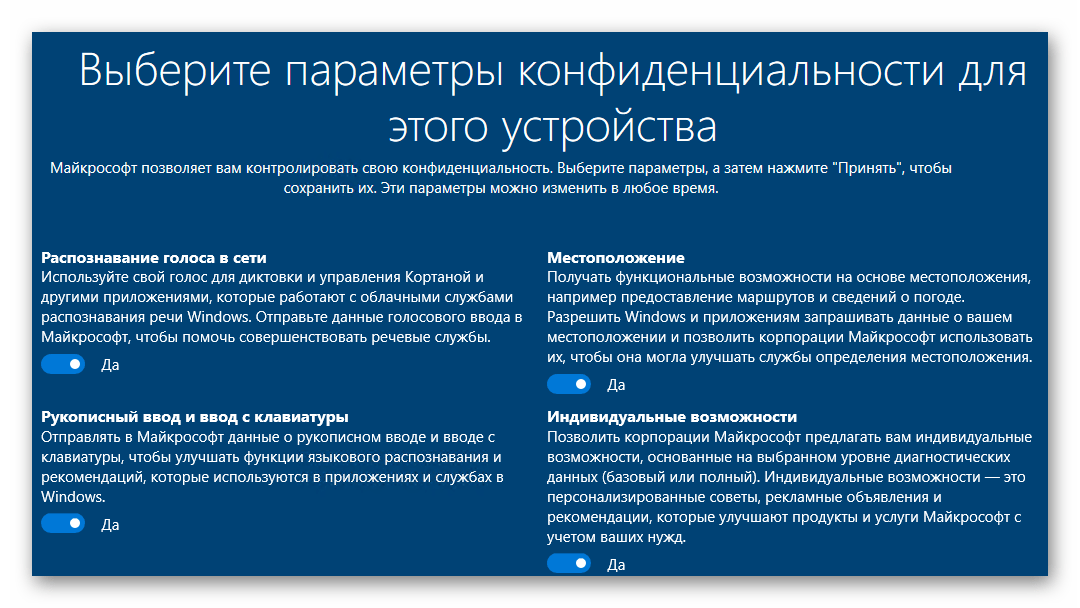
. True, you only need to do this if you are sure of the computer to which you are connecting. - It remains only to wait a little while the remote connection system boots up. When you connect to a terminal server for the first time, you will see a standard set of options that you can change if you wish.
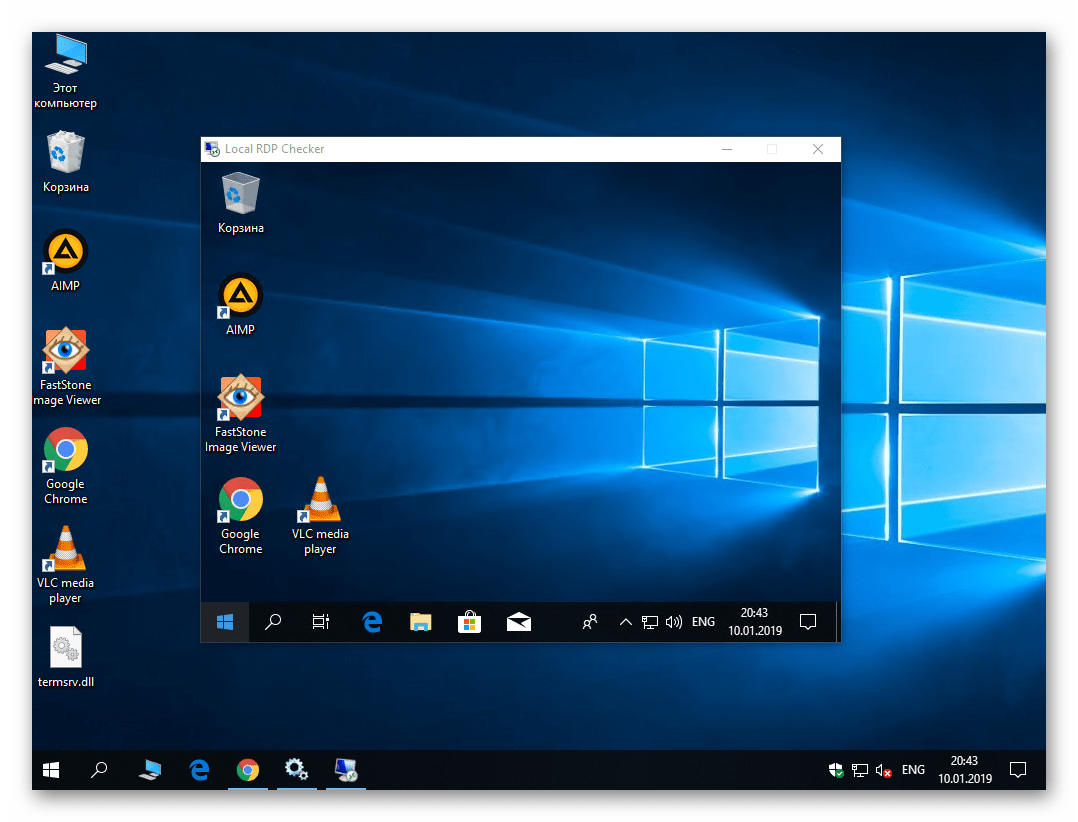
- In the end, the connection should succeed, and you will see a desktop image on the screen. In our example, it looks like this:

That’s all we wanted to tell you about this topic. By following the steps above, you can easily connect to your or work computer remotely from almost any device. If you subsequently have difficulties or questions, we recommend that you read a separate article on our website:
More: Solving the problem with the inability to connect to a remote PC
More articles on this topic:
Did the article help you?
If you frequently access a remote Windows computer and log out because your colleague logged in and didn’t know you were also logged in, then this article is for you.
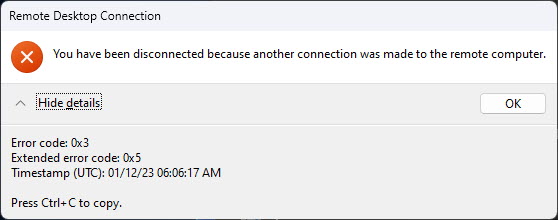
By default, the Windows operating system allows only one RDP connection at a time. If another connection was made from a different computer on the network, regardless of whether they use a different user account to log in, you will automatically be logged out and receive one of the following prompts:
“You were disconnected because another connection was established to the remote computer”
Dialog box asking you to disable using the same user account. Do you want to allow to connect to this computer? Click OK to disconnect immediately, or Cancel to stay connected. Nothing will disconnect your session for 30 seconds.
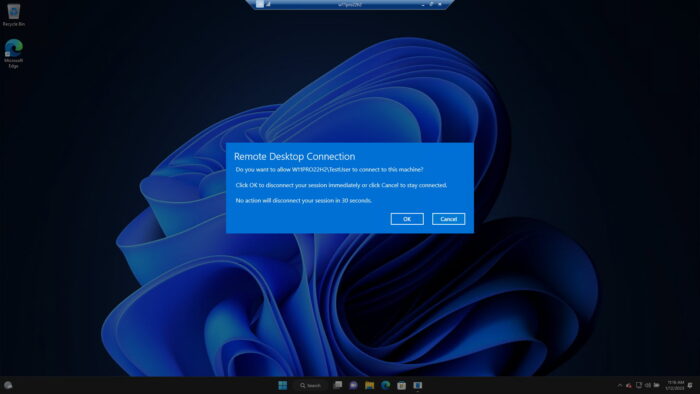
Logout dialog when using a different user account
In this article, we will look at the problem of simultaneous RDP connections and how to allow a Windows client PC (Windows 10 or 11) to have 2 or more RDP connections at the same time. This will increase your team’s productivity and save valuable time.
Before we start, we would like to point out a few things.
Critical considerations
First, Microsoft wants you to use a Windows Server license instead of a Windows CAL if you want to allow multiple RDP connections. This leads us to believe that Windows is technically capable of handling multiple RDP connections. Technically, it all comes down to available system resources.
A typical RDP connection only requires 150-200MB of RAM per RDP session. If your system has available RAM, you can allow multiple remote sessions using one of the following methods given below.
Second, we came across several websites that offer a way to allow multiple RDP connections using the Group Policy Editor by reconfiguring « Restrict Remote Desktop Services user to a single Remote Desktop Services session
» policy. Note that this method only works on Windows servers.
Therefore, don’t waste time editing the group policy as we have already checked it for you.
Third, only the Professional and Enterprise editions of Windows support RDP connections. If you have a home version of Windows, learn how to enable RDP or use the first method (RDPWrapper) to allow multi-user remote connection.
However, there is no native simple method to allow multiple RDP connections on a Windows client PC. You need to either use a third party utility or manipulate critical Windows files to enable multi-user RDP connection. Therefore, it is recommended that you create a system restore point before using either of the two methods.
Enable multiple custom RDP connections with RDPWrap
RDPWrap
is an open source project available on GitHub. RDPWrap provides support for multiple simultaneous RDP sessions as well as RDP hosts on previously unavailable versions of Windows such as Home.
Follow the instructions below exactly like this
as specified to allow multiple RDP connections on the computer.
Note:
All steps below must be performed on the remote (target) computer.
Download «RDPWInst.zip» from Github
.Note:
If you use Google Chrome to download a file, it will be marked as malicious and blocked from downloading. Learn how to stop Chrome from blocking downloads.Extract the contents of the zipped file.
Right-click the zipped file and select » Extract All
» from the context menu. Then press » Extract
” in the extraction wizard to complete the extraction.Run «install.exe» with administrator rights.
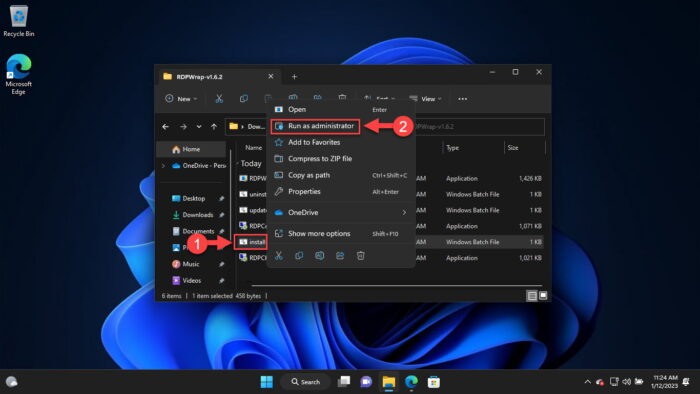
Run «install.exe» as administratorRight click » install.exe
» and then click » Run as administrator
» from the context menu.Now RDPWrap will start the installation in the command window.
Press any key to continue installation.
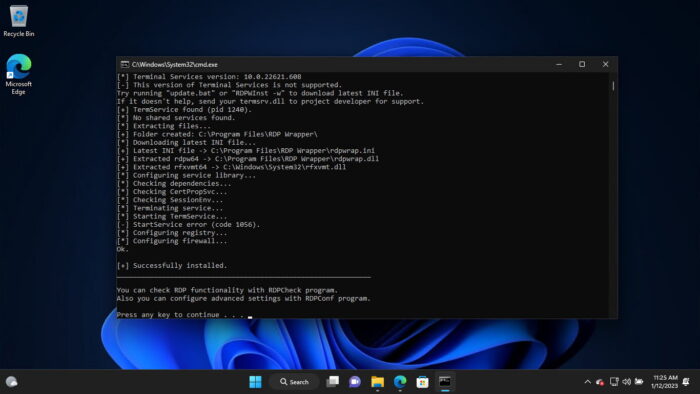
Press any key to complete the installationNow run the “RDPConf.exe” file.
The RDP Wrapper configuration window will open.
Make sure all items in Diagnostics
section green.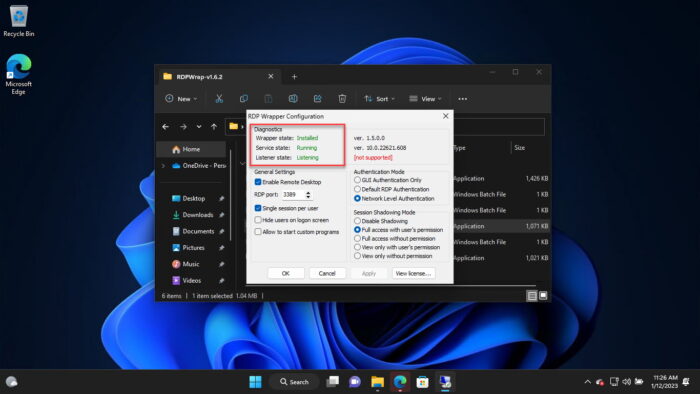
Make sure all items are greenNote that it says (Not Supported)
in front of «Listener State» on the right. This is because the Windows version will not be supported. In order for RDPWrap to support your OS version, you must replace the «rdpwrap.ini» file by following a few steps below, which are located at » C:\Program Files\RDP-wrapper
«.Launch an elevated instance of PowerShell.
Run the following cmdlet:
Service Life Stop-Service -Force
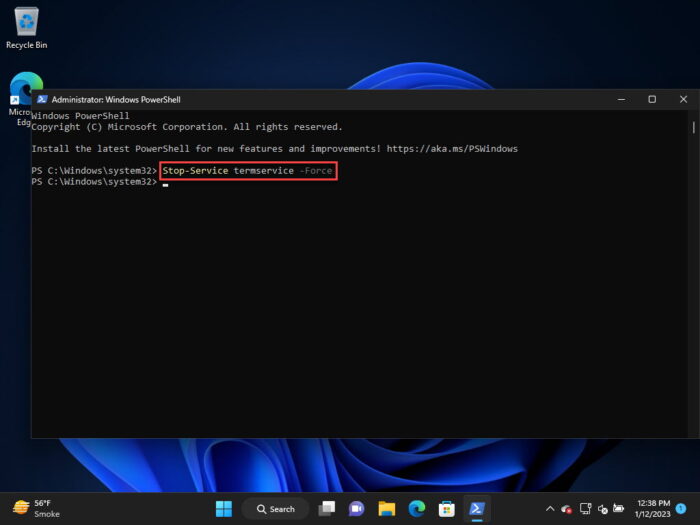
Stop the RDP service from PowerShellThis will temporarily stop the Remote Desktop Service.
Now run the following cmdlet to replace the rdpwrap.ini file:
Invoke-WebRequest -outfile “C:\Program Files\RDP Wrapper\rdpwrap.ini”
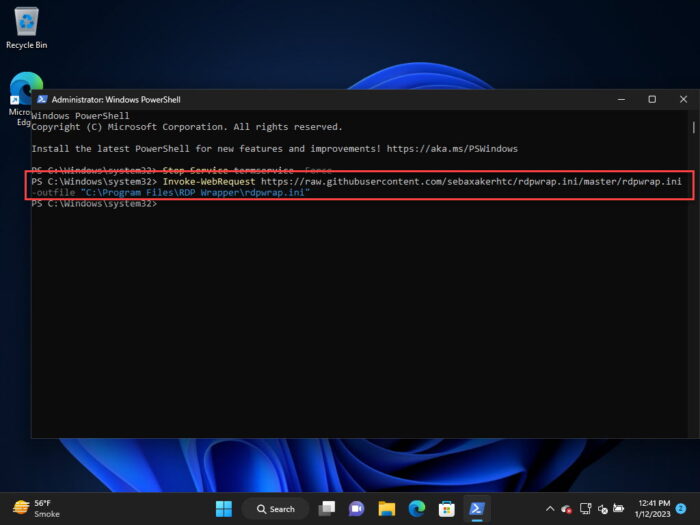
Replace the rdpwrap.ini fileRun the “RDPConf.exe” file again to verify that the status has changed from (Not Supported) to (Fully Supported).
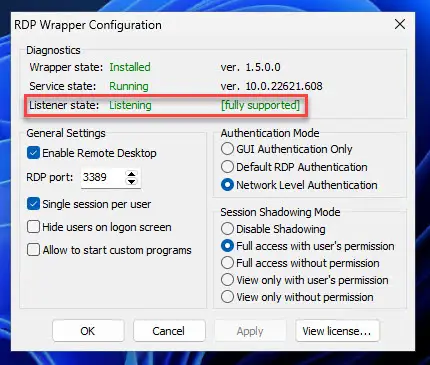
RDPWrap is fully supported
If you log in with the same user account, the RDC connection using the previous account will be terminated automatically.
Enable multiple custom RDP connections by modifying the fileTermsrv.dll
If you don’t want to use RDPWrap, you can modify the Terminalsrv.dll file to allow multiple RDP connections at the same time. This is the library that the remote connection protocol uses to establish a connection. C:\Windows\System32
«.
We remind you that before proceeding, you need to create a system restore point so that you can return your settings if something does not go as planned.
Alternatively, we have also listed the steps to back up only Terminalsrv.dll in the steps below so that it can be replaced if needed.
Perform the following steps to modify the Terminalsrv.dll library to allow multiple RDP connections:
Note:
All steps below must be performed on the remote (target) computer.
Run an elevated command prompt.
Make a copy of the Terminalsrv.dll file by running this cmdlet:
copy c:\Windows\System32\termsrv.dll termsrv.dll_backup
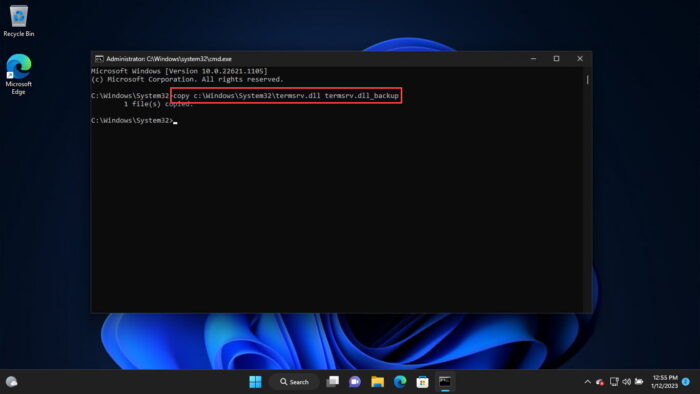
Backup msrv.dllTake ownership of the source file by running the following command:
take /F c:\Windows\System32\termsrv.dll /A
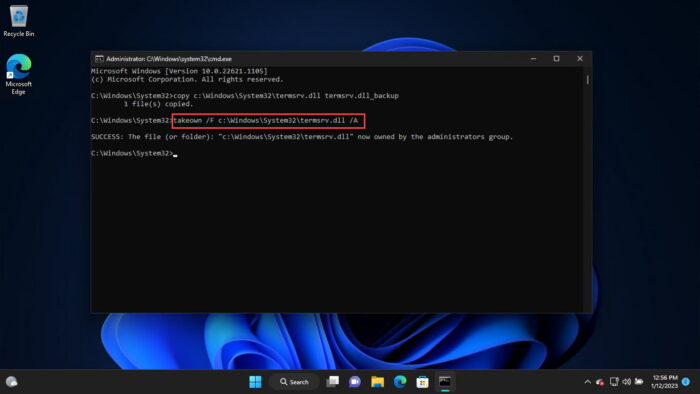
Take ownership of Terminalsrv.dllGive the local Administrators group full access to the library by running this cmdlet:
icacls c:\Windows\System32\termsrv.dll /grant Administrators: F
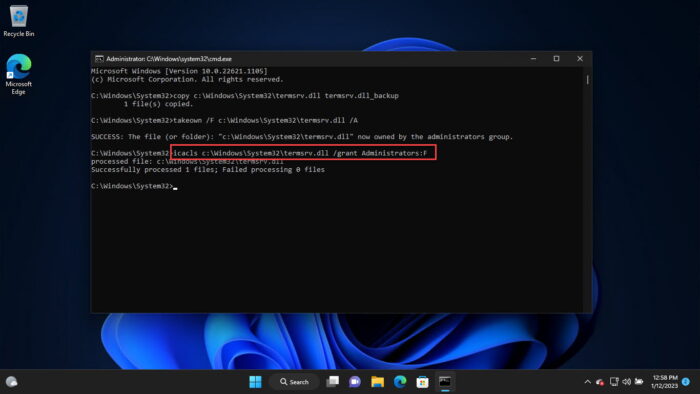
Give the Administrators group full access to Terminalsrv.dll.Now stop the Remote Desktop Service by running this cmdlet:
Clean stop TermService
Also enter » D
” when prompted for confirmation.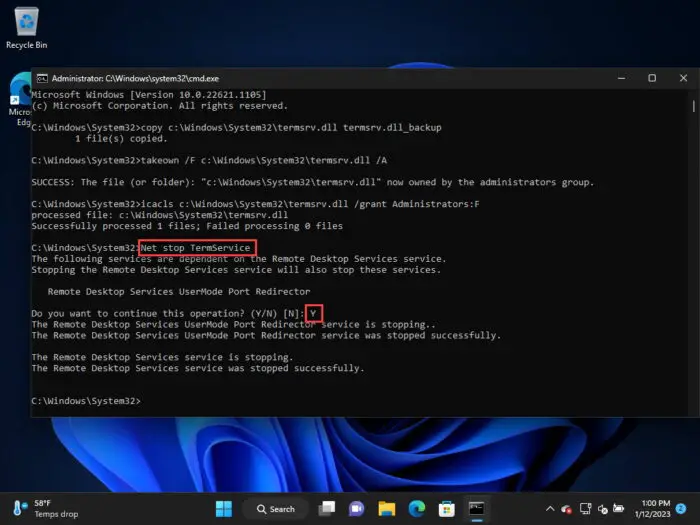
Stop RDP serviceDetermine and record your OS version by typing «winver» in the «Run Command» field.
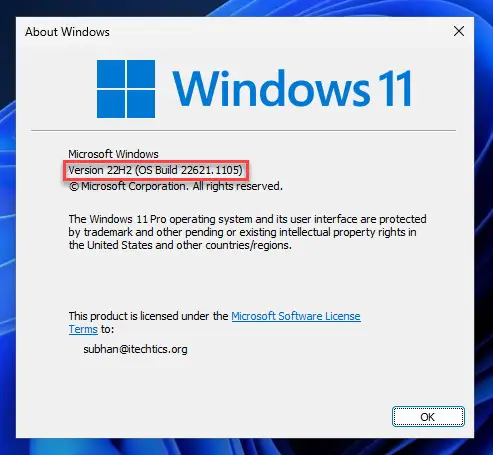
Find your OS versionThis will be needed later.
Now open the termsrv.dll file (C:\Windows\System32\termsrv.dll) with a hex editor.
Find the following line according to your OS version (identified in step 6 above) listed in the table below and replace it with the following:
B8 00 01 00 00 89 81 38 06 00 00 90
Building Windows
Replacement string
Windows 11 22H239 81 3C 06 00 00 0F 84 75 7A 01 00 3C 06 00 00 0F 84 OBD 61 01 00Windows 10 x64 21H139 81 3C 06 00 00 0F 84 2B 5F 01 00Windows 10 x64 20H239 81 3C 06 00 00 0F 84 21 68 01 00Windows 10 x64 200439 81 3C 06 00 00 0F 84 D9 51 0 1 00Windows 10 x64 190939 81 3C 06 00 00 0F 84 5D 61 01 00Windows 10 x64 190339 81 3C 06 00 00 0F 84 5D 61 01 00Windows 10 x64 180939 81 3C 06 00 00 0F 84 3B 2B 01 00 Windows 10 x64 18038B 99 3 C 06 00 00 8B B9 38 06 00 00 Windows 10 x64 170939 81 3C 06 00 00 0F 84 B1 7D 02 00 Windows versions and corresponding replacement hex string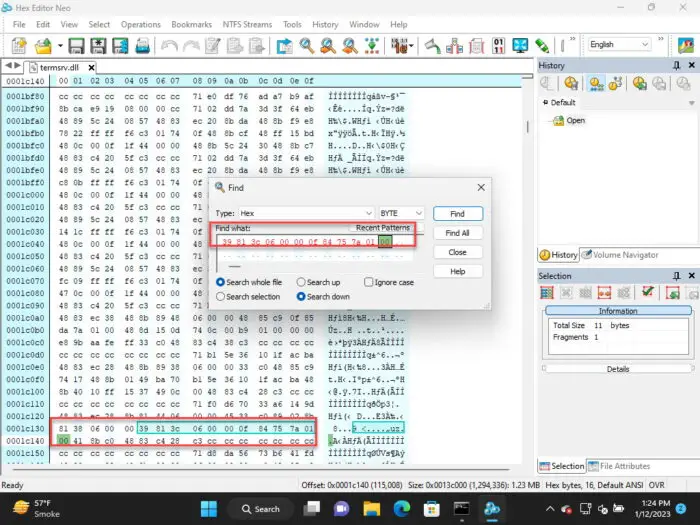
Find and replace hex values in «Termsrv.ini» fileModify and save the Terminalsrv.dll file.
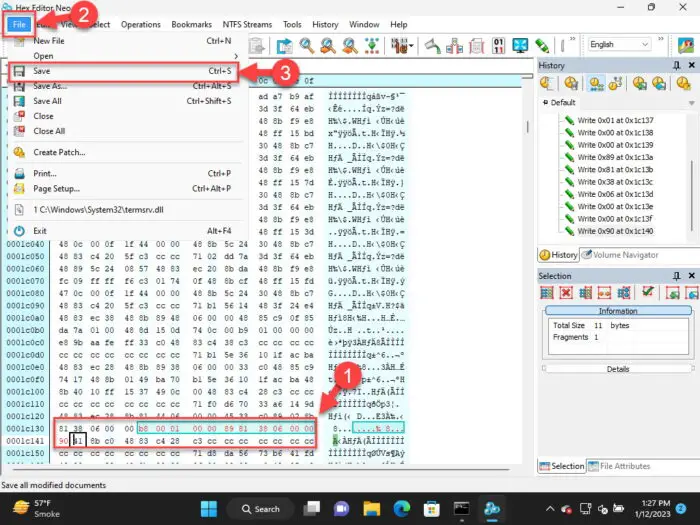
Save the modified Termrv.dll file.If prompted for confirmation or UAC, press Yes.
Close the hex editor.
Now you can connect multiple RDP sessions to a remote PC after modifying the Terminalsrv.dll file.
If something didn’t go as planned, you can restore the original Terminalsrv.dll file by running the following cmdlet on the command line using the backup we created in step 2 above:
copy termsrv.dll_backup c:\Windows\System32\termsrv.dll
Conclusion
Being able to have multiple RDP connections at the same time on a Windows PC can result in a significant performance boost. Now you and your team members can work on a client Windows PC at the same time without waiting for each other.
However, the methods given in this post are tried and tested and you can follow them verbatim on your Windows PC to allow simultaneous RDP sessions. Однако, несмотря на то, что методы работают, мы советуем вам создавать резервные копии системы на всякий случай.
The number of simultaneous RDP connections that can be operated on Windows is restricted by the license, which won’t let you create a terminal RDP server based on the workstation usable by multiple individuals. For those in need of a terminal server, buying a Windows Server license, RDS CALs, and installing and configuring the Remote Desktop Session Host (RDSH) role is their best bet.
Note:
The article is meant solely for educational purposes, and we take no liability for the risks involved or damages caused as a result of the below-mentioned steps.
Can You Activate Multiple Remote Desktop Connections in Windows 11?
In normal conditions, Windows 10 and Windows 11 will allow you to establish only 1 Remote Desktop Connection (RDP sessions) on a computer by default. As for multiple RDP sessions simultaneously, it can only be done on a Windows Server OS. Windows 10 and 11 have a few restrictions on the Remote Desktop Service usage, like:
- Remotely connect only to higher Windows editions such as Professional and Enterprise via RDP. Windows Home or Single Language editions are not equipped to receive incoming remote desktop connections.
- Only 1 simultaneous RDP connection is supported at a time, and if you try opening a second RDP session, you will be prompted to close the connection.
- If you work on the local computer console, the current session must be disconnected before creating a new remote RDP connection.
- The remote RDP session will be forcibly disconnected if you try to log in locally.
4 Ways to Enable RDP Multiple Sessions
Below we have laid out the 4 different ways to enable multiple remote desktop connections on Windows 11. Admittedly, the steps might look a little daunting at first, but you will get acclimatized to them before you know it. Here’s how to enable RDP multiple sessions:
1. Use RDP Wrapper Library
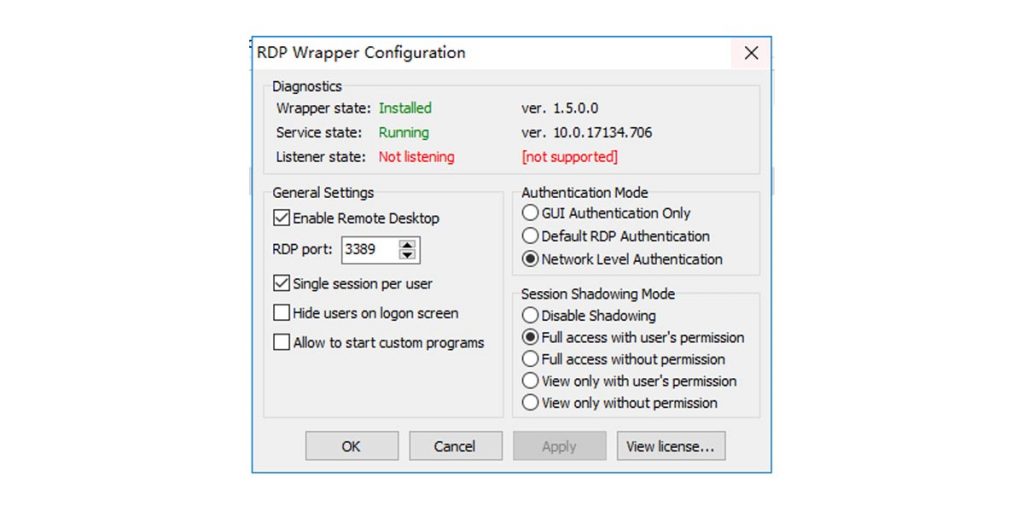
‘RDP Wrapper Library’ loads the termsrv library with only the modified parameters required for simultaneous connection. Even if the termsrv.dll file gets updated by Windows or during monthly cumulative update installations, it will work. Make sure you use the original unpatched termsrv.dll file before installing ‘RDP Wrapper Library.’
Here’s how to do it:
- Download RDP Wrapper Library
. - Extract the contents of the zip file.
- Right-click on “install.bat” and select ‘Run as administrator’ from the menu to install RDPWrap.
- Double-click on ‘RDPConfig.exe’ to open RDP Wrapper Configuration and verify the installation is done properly. Ensure all green flags are in the Diagnostics section.
After installing, you will most likely see that the RDP wrapper is running (Installed, Running, Listening) but not working. You might see the red warning stating “not supported” due to Windows 10 (ver. 10.0.19041.1320).
- Download the rdpwrap.ini
file’s current version. - Copy and paste this page’s contents to the C:\Program Files\RDP Wrapper\rdpwrap.ini file.
- Restart Windows.
- Double-click on ‘RDPConfig.exe’ to open ‘RDP Wrapper Configuration.’ Verify if all items are green in the Diagnostics section.
- Double-click on ‘RDPCheck.exe’ to prompt a secondary RDP session or connect multiple RDP sessions from your remote computers.
2. Modify termsrv.dll Using HEX Editor
Here’s how to go about it:
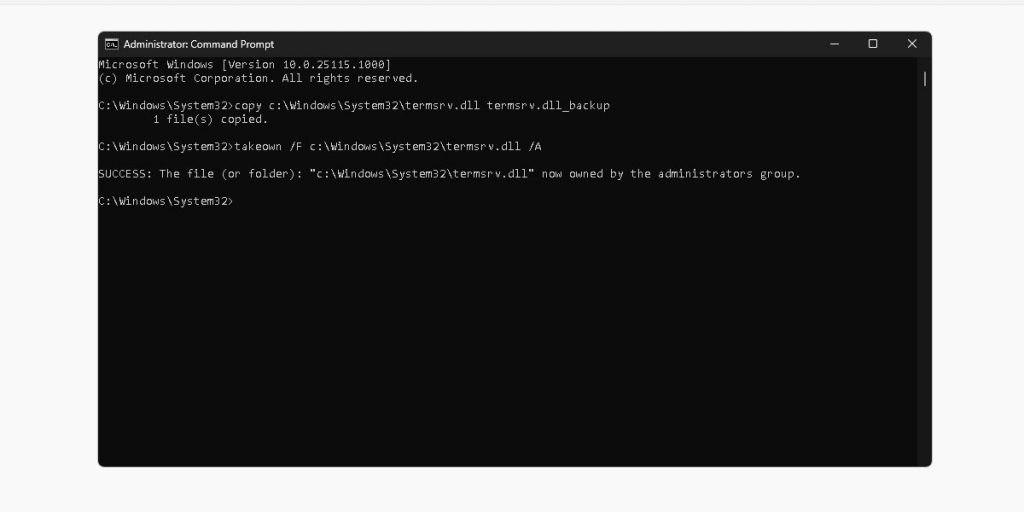
- Open Command Prompt to create a backup copy of the termsrv.dll file before editing or replacing it. Enter the following prompt: copy c:\Windows\System32\termsrv.dll termsrv.dll_backup
- To change the owner of a file from ‘TrustedInstaller’ to the local administrators group, execute the following: takeown /F c:\Windows\System32\termsrv.dll /A
- Upon successful completion, you will see this message: SUCCESS: The file (or folder): c:\Windows\System32\termsrv.dll now owned by the administrators group
- To grant the local administrators group with Full Control permissions for the termsrv.dll file using the icacls.exe
, execute this: icacls c:\Windows\System32\termsrv.dll /grant Administrators:F - Once the operation is completed successfully, you will see the following message: processed file: c:\Windows\System32\termsrv.dll Successfully processed 1 files; Failed processing 0 files.
- Stop Remote Desktop Services (TermService) with the services.msc console. Alternatively, execute the following command: Net stop TermService
- To find out the Windows version and build number, open PowerShell and execute the following command: Get-ComputerInfo | select WindowsProductName, WindowsVersion
- Download and install any of the following HEX editor software: HxD – Freeware Hex Editor and Disk Editor
/ Tiny Hexer installer
/ Tiny Hexer Small Portable Edition v1.8.1.6
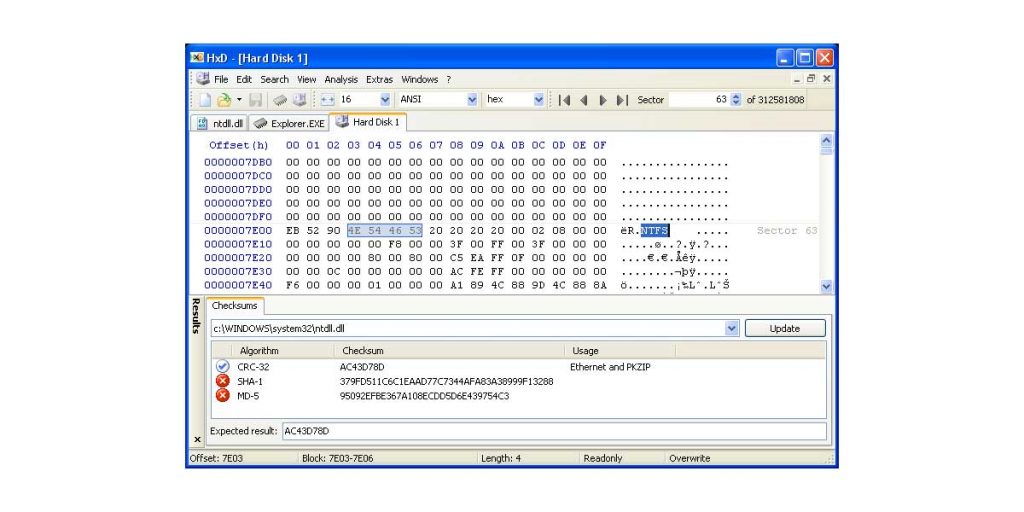
- Open the ‘termsrv.dll’ file with HEX editor. Tiny Hexer editor cannot directly edit ‘termsvr.dll’ files from the system32 folder, so you must copy it to your desktop and, following modification, replace the original file.
- Depending on your Windows version and build, locate this string to modify:
Windows 11 RTM (21H2 – 22000.258): 39 81 3C 06 00 00 0F 84 4F 68 01 00/ Windows 10 x64 21H2: 39 81 3C 06 00 00 0F 84 DB 61 01 00/ Windows 10 x64 21H1: 39 81 3C 06 00 00 0F 84 2B 5F 01 00/ Windows 10 x64 20H2: 39 81 3C 06 00 00 0F 84 21 68 01 00/ Windows 10 x64 2004: 39 81 3C 06 00 00 0F 84 D9 51 01 00/ Windows 10 x64 1909: 39 81 3C 06 00 00 0F 84 5D 61 01 00/ Windows 10 x64 1903: 39 81 3C 06 00 00 0F 84 5D 61 01 00/ Windows 10 x64 1809: 39 81 3C 06 00 00 0F 84 3B 2B 01 00/ Windows 10 x64 1803: 8B 99 3C 06 00 00 8B B9 38 06 00 00/ Windows 10 x64 1709: 39 81 3C 06 00 00 0F 84 B1 7D 02 00
- Replace it with the following string:
39 81 3C 06 00 00 0F 84 7F 2C 01 00
- Save the file, and execute TermService.
3. Patch termsrv.dll With PowerShell Script
- Copy the following and paste it into a Notepad file:
 # Stop RDP service, make a backup of the termsrv.dllfile and change the permissions
Stop-Service UmRdpService -Force
Stop-Service TermService -Force
$termsrv_dll_acl = Get-Acl c:\windows\system32\termsrv.dll
Copy-Item c:\windows\system32\termsrv.dll c:\windows\system32\termsrv.dll.copy
takeown /f c:\windows\system32\termsrv.dll
$new_termsrv_dll_owner = (Get-Acl c:\windows\system32\termsrv.dll).owner
cmd /c "icacls c:\windows\system32\termsrv.dll /Grant $($new_termsrv_dll_owner):F /C"
# search for a pattern in termsrv.dll file
$dll_as_bytes = Get-Content c:\windows\system32\termsrv.dll -Raw -Encoding byte
$dll_as_text = $dll_as_bytes.forEach('ToString', 'X2') -join '
$patternregex = ([regex]'39 81 3C 06 00 00(\s\S\S){6}')
$patch = 'B8 00 01 00 00 89 81 38 06 00 00 90'
$checkPattern=Select-String -Pattern $patternregex -InputObject $dll_as_text
If ($checkPattern -ne $null) {
$dll_as_text_replaced = $dll_as_text -replace $patternregex, $patch
}
Elseif (Select-String -Pattern $patch -InputObject $dll_as_text) {
Write-Output 'The termsrv.dll file is already patch, exitting'
Exit
}
else {
Write-Output “Pattern not found”
}
# patching termsrv.dll
[byte[]] $dll_as_bytes_replaced = -split $dll_as_text_replaced -replace '^', '0x'
Set-Content c:\windows\system32\termsrv.dll.patched -Encoding Byte -Value $dll_as_bytes_replaced
# comparing two files
fc.exe /b c:\windows\system32\termsrv.dll.patched c:\windows\system32\termsrv.dll
# replacing the original termsrv.dll file
Copy-Item c:\windows\system32\termsrv.dll.patched c:\windows\system32\termsrv.dll -Force
Set-Acl c:\windows\system32\termsrv.dll $termsrv_dll_acl
Start-Service UmRdpService
Start-Service TermService - Save the file with the extension .ps1 like termsrv_rdp_patch.ps1
- To change the PowerShell execution policy settings for the present session, execute the following PowerShell command: Set-ExecutionPolicy Bypass -Scope Process -Force
- Double-click on ‘termsrv_rdp_patch.ps1’ to execute the script. You will need to edit the termsrv.dll file manually every time you upgrade to Windows or during monthly cumulative updates.
4. Modify the Local Group Policies
Here’s how to do it:
- Press the Windows key.
- Type gpedit.msc and press Enter to open the Local Group Policy Editor panel.
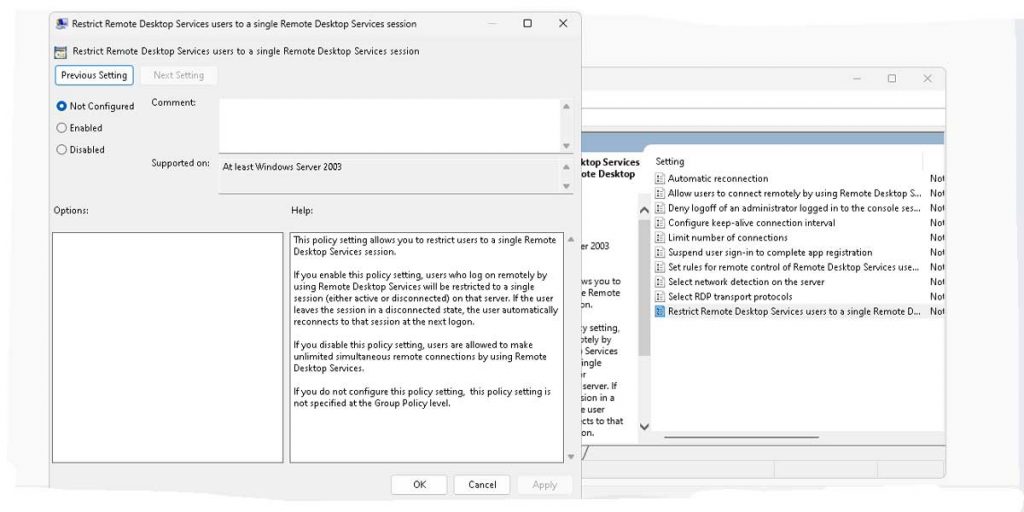
- Navigate to Computer Configuration > Administrative Templates > Windows Components > Remote Desktop Services > Remote Desktop Session Host > Connections.
- Double-click on the ‘Restrict Remote Desktop Services’ user and alter it to a single ‘Remote Desktop Services’ session policy and set it to Disabled.
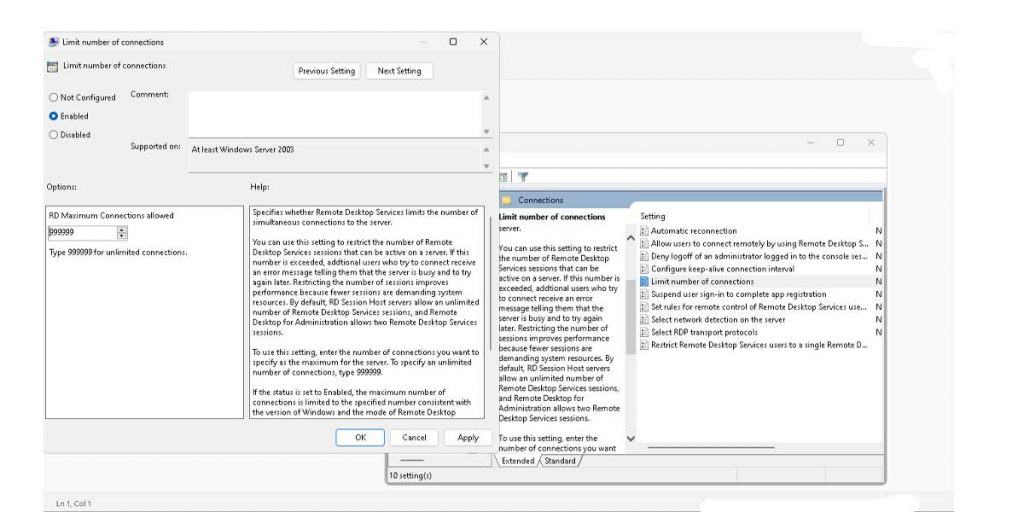
- Double click on the ‘Limit number of connections’ policy. The default state should be ‘Not Configured.’ Select ‘Enabled radio’ to enable the counter menu of ‘RD Maximum Connections’ permitted in the ‘Options’ section.
- Set the ‘RD Maximum Connections’ permitted to 999999.
- Click on OK to apply the changes.
- Restart Windows.
Conclusion
That’s all there is to know about enabling multiple remote desktop connections on your Windows 11. These are the most commonly tried and tested set of methods to achieve RDP multiple sessions access, so make sure you go by trial and error to see which one pans out well in your case. Good luck!