
")
- Configure Visual Studio for Linux cross compilation
- Copy the server executable
- Dedicated Server from a brand new project
- Download the Unreal engine from source
- Im too lazy for all this just give me the files
- Create the server shortcut and setup log options
- Dedicated Server from a blueprint only project
- Hosting on a virtual server
- Package your project to a distinct location
- Setup source unreal engine
- Target file instructions for engine version 4.15
- A Setup source unreal engine To use Visual studio 2022
- Build a dedicated server binary for Linux
- Target file instructions for engine version 4.16
- Enabling Physics
- Switch Unreal engine versions & generate project files
- Target file instructions for engine version 4.17
- Building the server
- Connect to your server and run the dedicated server binary
- Fixing the lighting swarm error
- Play your game on your server
- Prepare the project for packaging
- Dedicated Server on Steam
- Issues
- Setup packaging settings
- Section 1 building a dedicated server in unreal engine 4
- Steam community :: guide :: unreal tournament 3 hosting guide
- Unreal tournament servers : buy ut 99 server hosting (rental)
Configure Visual Studio for Linux cross compilation
Epic have provided a prebuilt cross compilation toolchain for building Linux binaries from Windows. Follow the installation guide on the wiki:
Compiling For Linux
.
Once you have the toolchain installed, verify that you have a LINUX_ROOT env var pointing to it. You can check this in git bash with the following command:
`env | grep LINUX_ROOT `
Copy the server executable
go to your project folder, then binaries, win 64, and find the file called «yourProjectNameServer.exe»
and right click it and copy it.
next go to your packaged game location. then WindowsNoEditor, then the name of your project, binaries, win64,
and paste in the server.exe like so.
Dedicated Server from a brand new project
Open up source unreal engine, select c and third person template, give it a suitable name and save location
Download the Unreal engine from source
You’ll need a source-built version of the engine in order to build using the server solution configurations in Visual Studio.
Im too lazy for all this just give me the files
i will provide the test project files soon i ran out of time
Create the server shortcut and setup log options
now take the server file and create a shortcut to it. then rename it to match whatever you called your map inside the project . in my case i called it test level so my shortcut will look like this
now right click this shortcut and go to properties
at the end of the target path simply add -log like so
and click ok
Dedicated Server from a blueprint only project
if your project was made with a none source or different engine version or was simply only BLUEPRINTS to begin with
you will not be able to make a dedicated server until you add some c code.
So simply go to add new, c class, an empty class will suffice, and you can delete it later.
Once you have a source directory, right click on the .uproject file and generate visual studio project files. This should create an .sln in the project directory that you can open in visual studio.
Hosting on a virtual server
log into your virtual server, open up the internet and download the game package. unzip it and then launch the server shortcut as normal.
Package your project to a distinct location
Thanks to Osman for pointing this out to me. In order to compress everything you’ll need to deploy and run a standalone binary, you should package your project somewhere outside of your project’s working directory. The resulting file structure will contain the essentials.
Open the editor and package your project for Linux. Choose a distinct destination for the build (eg, ~/Desktop/MyGameLinux/). Once this completes, you should see a client build for Linux in the destination you chose.
Setup source unreal engine
open up the previously extracted folder
and find a file called Setup.bat
double click this file and it will open up a console window and begin installing unreal dependencies
Target file instructions for engine version 4.15
// Copyright 1998-2022 Epic Games, Inc. All Rights Reserved.

using UnrealBuildTool;
using System.Collections.Generic;

[SupportedPlatforms(UnrealPlatformClass.Server)]
public class ShooterGameServerTarget : TargetRules      // Change this line of code as shown in the previous steps
{

    public ShooterGameServerTarget(TargetInfo Target)  // Change this line of code as shown in the previous steps

       {

     Type = TargetType.Server;

      bUsesSteam = false;

       }

        //
        // TargetRules interface.
        //
            public override void SetupBinaries
            (
             TargetInfo Target,
             ref List<UEBuildBinaryConfiguration> OutBuildBinaryConfigurations,
             ref List<string> OutExtraModuleNames
             )
               {
                OutExtraModuleNames.Add("ShooterGame");     // Change this line of code as shown in the previous steps
               }
  }
A Setup source unreal engine To use Visual studio 2022
If you are using visual studio 2022. Instead of clicking on the GenerateProjectFiles.bat as shown above. Open up a CMD prompt window.
Navigate to the folder where source built unreal files are by using the cd (change directory) command.
Once inside the correct directory you need to run the following command.
«GenerateProjectFiles.bat -2022»
Build a dedicated server binary for Linux
Open your project solution in Visual Studio, select the Development Server configuration (or whichever server configuration you’d like to use) and build for Linux. Make sure you’ve followed the previous guide and that your Server target is correctly setup.
Copy the Linux Server binary to the packaged project directory we created in step 2. You should put it next to the client binary. So when you look in:
~/Desktop/MyGameLinux/LinuxNoEditor/MyGame/Binaries/Linux
You should see:
MyGame
MyGameServer
Target file instructions for engine version 4.16
// Copyright 1998-2022 Epic Games, Inc. All Rights Reserved.

using UnrealBuildTool;
using System.Collections.Generic;

[SupportedPlatforms(UnrealPlatformClass.Server)]
public class ShooterGameServerTarget : TargetRules    // Change this line of code as shown previously
{
	public ShooterGameServerTarget(TargetInfo Target) : base(Target) // Change this line of code as shown previously
       {
              Type = TargetType.Server;
              ExtraModuleNames.Add("ShooterGame");   // Change this line of code as shown previously
       }
}
Enabling Physics
Not sure if this is still relevant in engine 4.14 but ive left it here just in case. from original wiki authors.
Switch Unreal engine versions & generate project files
next inside the project folder right click the uproject file and when the menu pops up select «switch unreal engine versions»
if when you right click on a uproject file you dont get a menu that looks like this
then follow this step below from the read me file.
One last thing. You’ll want to setup your Windows shell so that you can interact with .uproject files. Find the file named UnrealVersionSelector-Win64-Shippping.exe in the UnrealEngine/Engine/Binaries/Win64/ folder and run it. Now, you’ll be able to double-click .uproject files to load the project, or right click them to quickly update Visual Studio files.
This should now allow you to right click on the uproject file to bring up the menu.
when you click switch engine versions make sure that your source build version of the engine is selected in the drop down box and click ok.
this should automatically regenerate the visual studio solution project files . if it does not then it means your files are already up to date but just to be safe you can right click the uproject file again and click «generate visual studio project files»
Target file instructions for engine version 4.17
// Copyright 1998-2022 Epic Games, Inc. All Rights Reserved.

using UnrealBuildTool;
using System.Collections.Generic;

[SupportedPlatforms(UnrealPlatformClass.Server)]
public class ShooterGameServerTarget : TargetRules   // Change this line as shown previously
{
       public ShooterGameServerTarget(TargetInfo Target) : base(Target)  // Change this line as shown previously
       {
        Type = TargetType.Server;
        ExtraModuleNames.Add("ShooterGame");    // Change this line as shown previously
       }
}
Building the server
next open up the visual studio project solution and allow it to fully load until it says ready.
go up to the drop down box and in the menu this time select DEVELOPMENT EDITOR
then same as before go to the solution explorer and right click and click build
again depending on youre computer this can take a long time to complete.
once this is done go back to the menu and in the drop down box this time select DEVELOPMENT SERVER
then same as before go to the solution explorer and right click and click build
again depending on your computer this can take a long time to complete.
once the server is built if you go into your project folder again then click binaries, win64
and you should have the server files in there like this
Connect to your server and run the dedicated server binary
SSH into your machine:
ssh piinecone@123.456.78.91
You may need to append `-i ~/.ssh/<your private key>` again here.
Once connected, you’ll be in your home directory. `ls` and you should see your gzipped tarball. Unpack it:
tar -xzf mygame-linux-server.tar.gz
`cd` to your binary location:
cd MyGameLinux/LinuxNoEditor/MyGame/Binaries/Linux
Make your server binary executable:
chmod x MyGameServer
Run it!
./MyGameServer -log
Okay, now kill it with Ctrl C because we have to open up allow connections on UDP:7777.
Also, if you see this error:
Could not adjust number of file handles
Add this line to /etc/security/limits.conf:
Fixing the lighting swarm error
With source built unreal when you go to build the lighting it is common for the following error to occur and it took me forever to find the solution so i am including it here to save you guys the headache.
so what you do is in your solution explorer in visual studio scroll down until you see «unreal lightmass»
and again like before right click it and click build.
when it has finished close visual studio and now the swarm bug error should be fixed.
Play your game on your server
This is, after all, the whole point. Build a client executable (or just use the one you built in step 2). Run it, open the console (with “~”), and type:
open my.server.ip.address:7777
You should see a join in your server log, and your client pawn should spawn into whichever map the server is currently running.
Prepare the project for packaging
now open up your project again by clicking on the uproject file.
ok so the first thing we need to do is under the content folder is add two new folders .
one called maps, the other blueprints.
then we need to go down to where the third person example map is stored and move it into your newly created map folder like so.
rename this to test level or whatever you like. this will be the level that the player loads into the server on and plays the game .
as of engine versions 4.14 whenever you make a new map you must open the map and then click on build so that it generates the correct mapBuildDataRegistry Files for it. once this is done then click save all.
now we need to create 2 more additional maps. so go up to file, then new level and select the empty map level.
name this first level entry map, and the second level transition map. like so
again dont forget to build each time on the new map to make sure the data is saved correctly.
open up the entry level map and go up to blueprints and open the level blueprint
in this blueprint drag off from begin play and find the open level node. in the level name set the parameter to
127.0.0.1 this is your local ip address.
compile and save and close the blueprint.
finally open up the test level map and just click on the default character that is in the map and just delete him otherwise when you join the server you will end up with duplicated characters.
now we need to set the project settings up
so open up the project settings and then go to maps and modes.
set the editor startup map to entry
set the game default map to entry
set the transition map to transition
set the server default map to test level
like so
Dedicated Server on Steam
Now on it’s own page:
Issues
At some point of time (around Unreal Engine 4.4.x), Linux servers required glibc 2.14 , which made it unable to run on Debian-stable (back then Debian 7 ‘wheezy’). This was a temporary issue not experienced in previous versions, and it was fixed in later ones.
Setup packaging settings
go to file, packaging, packaging settings
in the packaging settings scroll down till you find the section list of maps to include in a packaged build . click on the sign to add 3 elements to the array. one for each map you have in the project.
then browse to your map folder and add each of your 3 maps to the array like so
now close the settings and package the project.
Section 1 building a dedicated server in unreal engine 4
Building a standalone dedicated server wasn’t an easy thing to do and i know a lot of people struggle with it so i decided to make this wiki guide to try and help people. I’m going to cover the steps I took to build a Windows executable of a dedicated server.
Steam community :: guide :: unreal tournament 3 hosting guide
You will need to change your router’s configuration,
and forwarding ports,
All are UDP ports.
6500
7777
7778
7787
9989
8767
13000
27900
———————————————————————-
HOSTING ERROR MESSAGE
«Your network configuration may not be compatible with
hosting matches. Please check your router’s manual for
instructions on setting up «Port forwarding» or a «DMZ
server».
Go into
My DocumentsMy GamesUnreal Tournament 3UTGameConfig
Open UnrealEngine.ini or
UTEngine.ini in notepad,
Search for the line
StunServerAddress=www.stunserver.org
change this to
StunServerAddress=stun.faktortel.com.au:3478
If you do not have the «StunServerAddress=www.stunserver.org»
in that notepad, just copy and paste «StunServerAddress=stun.faktortel.com.au:3478»
it inside.
Note: Seems like somewhere between the writing of this Guide
and 2022, i noticed that «UnrealEngine.ini» have changed to «UTEngine.ini»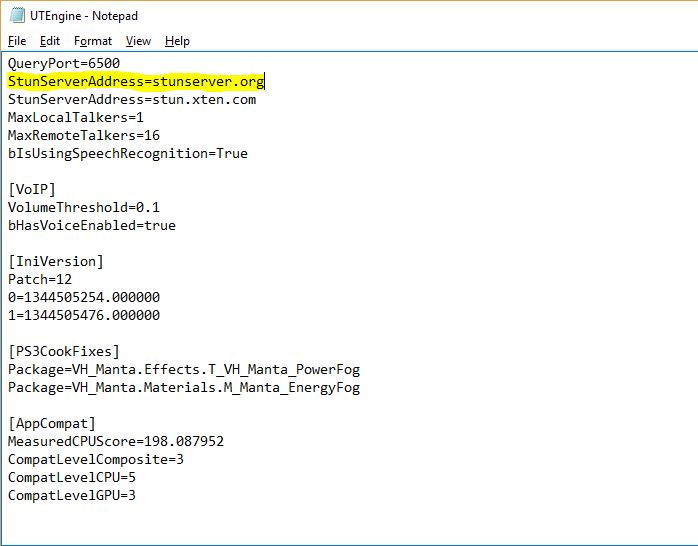
JOINING ERROR MESSAGE
«Sorry you do not appear to be authorized to play this game on steam at this time».
Hosting a multiplayer game, via a steam version, and you change the gametype. Changing the
gametype will give an error and the host has to restart steam before anyone can connect.
———————————————————————-
JOINING a FRIEND/PLAYER
You can do that by adding the Player’s IN-GAME Name onto your Friend list in UT3,
or by pressing F10 and type in
«open xxx.xxx.xxx.xxx»
Without Quotation Marks
Where X is the IP, e.g. 41.151.XXX.XXX
———————————————————————-
§
Unreal tournament servers : buy ut 99 server hosting (rental)
10 Players, $9.95 / mo11 Players, $10.95 / mo12 Players, $11.95 / mo13 Players, $12.95 / mo14 Players, $13.95 / mo15 Players, $14.95 / mo16 Players, $15.95 / mo17 Players, $16.95 / mo18 Players, $17.95 / mo19 Players, $18.95 / mo20 Players, $19.95 / mo21 Players, $20.95 / mo22 Players, $21.95 / mo23 Players, $22.95 / mo24 Players, $23.95 / mo25 Players, $24.95 / mo26 Players, $25.95 / mo27 Players, $26.95 / mo28 Players, $27.95 / mo29 Players, $28.95 / mo30 Players, $29.95 / mo31 Players, $30.95 / mo32 Players, $31.95 / mo
