

- Change major version of PHP CentOS
- Installing the Vesta panel on Centos
- Basic panel setting
- Inclusion of the Russian language
- Adding an IP address
- Disable Auto Update
- Ban time increase
- Adding a site
- SSL Certificates
- Additional settings
- Installing PHP 7
- Setting backup
- What does backup include
- File Manager
- Changing service configuration files
- Web server configuration files for the site
- Configuring open_basedir for Nginx+PHP-FPM
- Blocking IP addresses from which more than 100 requests to the site per second
- Let’s Encrypt certificate installation
- In Console
- Changing iptables rules
- Using multiple PHP versions on a server with VestaCP
- Basic operations in the web interface
- Creating an FTP account
- Working with Cron Jobs
- Working with backups
- Creating a database
- Changing PHP settings
- Working with PhpMyAdmin
- Install custom SSL certificate
- Panel installation
- System requirements and supported OS
- Minimum system requirements
- Possible selection of software components
- Starting the installation
- Entrance to the panel
- Conclusion
Change major version of PHP CentOS
To change the major PHP version of the operating system:
$ service httpd stop
$ yum remove php -y
$ wget http://dl.fedoraproject.org/pub/epel/6/x86_64/epel-release-6-8.noarch.rpm
$ wget http://rpms.famillecollet.com/enterprise/remi-release-6.rpm
$ rpm -Uvh remi-release-6*.rpm epel-release-6*.rpm
$ service httpd start
February 27, 2020
Reading time ≈ 13 minutes

When looking for a good free hosting control panel, often there are problems with insufficient functionality and or lack of updates. Because of this, it is quite difficult to find free software that meets modern requirements.
One of the best open source control panels is VestaCP. The free VestaCP control panel allows you to easily manage multiple websites or databases, create and configure e-mail and FTP accounts. Vesta is quite easy to use. It is easy to install, and the basic settings will not cause problems even for novice users.
Below is a detailed instruction on how to install VestaCP and change its settings. The article is useful for beginners and professional site administrators, programmers and resource owners.
We are faced with the task of deploying a VPS server on the Centos 6.* operating system with the installation of the Vesta panel. The selected OS is stable, time-tested and fully supported by the VPS control panel. The panel itself is quite ascetic, fast and free. Vesta will help us effortlessly launch and configure nginx + apache + php in cgi + mysql + ftp mode to run and support one or more sites.
At the moment, my sites are also working in the same assembly. At the same time, there were no problems with devouring resources, falling through the fault of the software. Previously, I used the ISPmanager panel but refused because of its charge and bulkiness, and its advantages over Vesta are small.
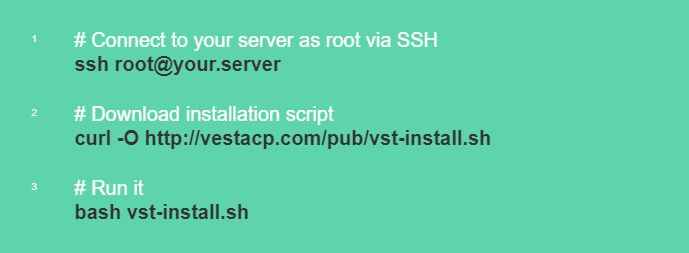
Using the functionality of the hosting used, we have already installed the Centos 6.* (64-bit) operating system and received a root password. Now we connect to the server via the SSH protocol through the Putty client or another console, usually provided by VPS hosting, how to do this was described here.
Installing the Vesta panel on Centos
Copy and paste (Shift+Insert) in the console the following two commands in turn, confirming them with the Enter key
curl -O http://vestacp.com/pub/vst-install.sh
If an error occurs on the second command, instead of continuing the installation, enter the command
bash vst-install-rhel.sh —force
We will be greeted by the Vesta panel installer window, confirm the installation by entering
Next, you need to confirm the installation and wait for the result.
This completes the installation of the panel, it remains to go to the admin panel to launch sites and configure them. These actions are quite enough for the stable operation of most sites.
Basic panel setting
Post-installation setup involves changing some basic settings.
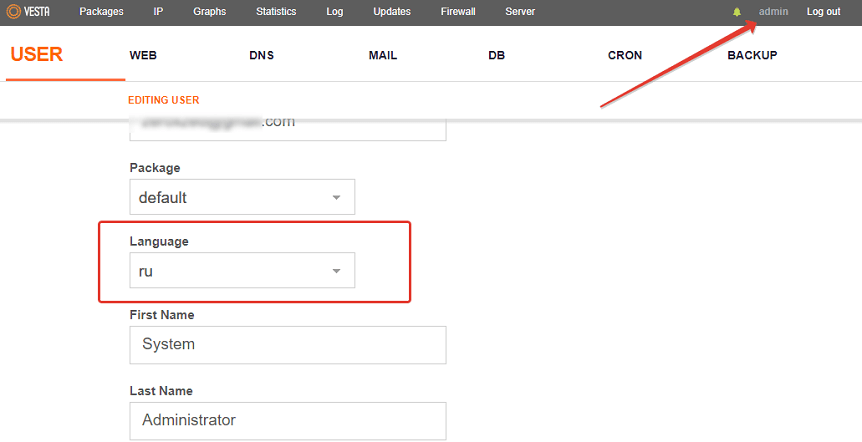
Inclusion of the Russian language
The panel is well enough translated into Russian. If the English interface is completely incomprehensible, you can switch the installation in the user section. Provided that the language pack «ru» is in the operating system used.
Adding an IP address
You can add external addresses through the section of the same name.
The administrator can choose which IP the site is running on.
Disable Auto Update
When using the control panel, it is recommended to disable auto-updates. Unverified packages can cause VestaCP to crash. Disabling the option will allow you to choose the time for the update yourself. Go to «Updates» and click «Turn off auto-update».

Ban time increase
To change the parameter, go to the “Server” section and select the “Configure” option for the fail2ban tool.
Adding a site
All fields must be completed during the process. It is important to specify the parameter «bash» or «sh» in «Access via SSH». To do this, select the created user and click «Edit»
Next, enter the PU and go to the «WEB» section. Now we need to add a domain. Here, later, subdomains are created.
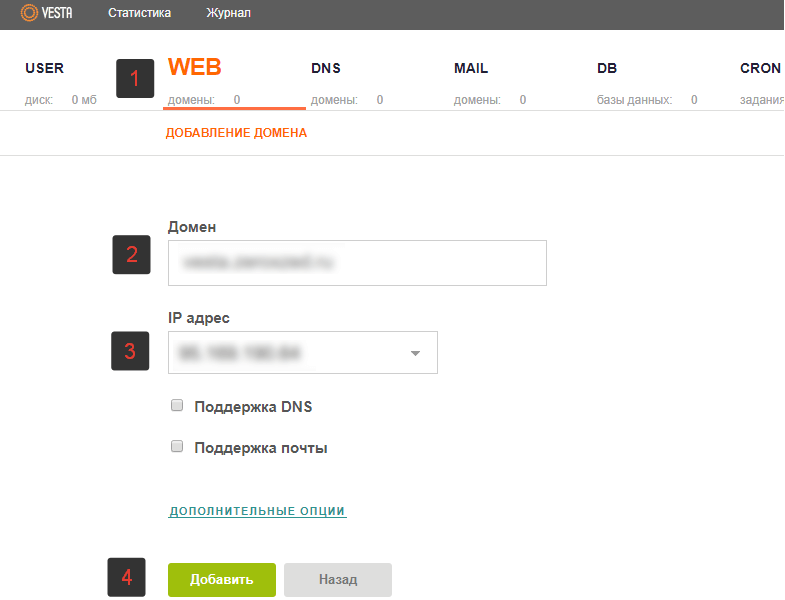
Any website will require a database. It can be created in the «DB» section.
Next, download the site sources via FTP or SFTP. All actions are performed under the account created for him. To speed up the operation, it is better to download the archive. Downloading unpacked files will take longer.
After that, you need to connect via FTP using any convenient client. Enter the server name and account information. The archive is uploaded directly to the FTP root. Next, we connect to the server. You can use Putty or its equivalent WinSCP.
Execute command via console:
Go to the site address so that the installer starts automatically. In it we denote the data of the database.
This is a standard process. The control panel has its own default templates that apply to any CMS. You can change the selected template in «WEB».
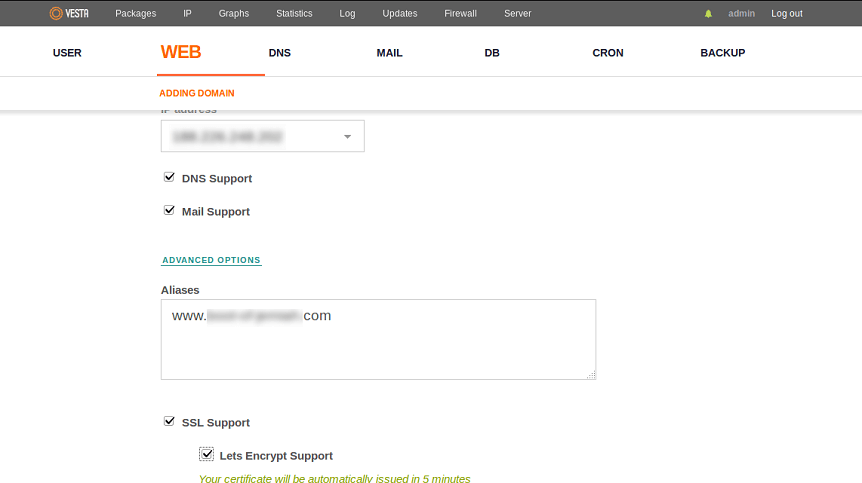
SSL Certificates
Through the VestaCP panel, you can automatically create free SSL certificates from Let’s Encrypt. It is possible to add directly when creating a new site or after that in the settings. The required parameter is located in the «WEB» section.
To check its correct operation, just go to the address of the resource with https.
Important. When updating a Let’s Encrypt SSL certificate issued for a Cyrillic domain, an error “Error: domain www.mydomain.rf doesn’t exist.” may occur.
This may be due to the difficulty of converting Cyrillic characters to punycode. To solve the problem, you need to comment out (add the «#» symbol before the line) the following lines in the file: . The result should be:
Setting up http2 in nginx at first glance is not a big deal, you just need to add five characters to a certain place, but given that our server is controlled by the Vesta panel, I ran into some difficulties, which we will deal with today.
I will not talk about the updated http2 protocol, there is Wikipedia and habrahabr for this, so I think that you have set yourself the goal of transferring sites to the new protocol and you know what it is for.
The server works with the following software: centos 6.X, Vesta control panel, php-fpm and nginx, an ssl certificate is already installed and configured for the domain.
Most nginx http2 configuration instructions contain little information, which boils down to adding http2 alphanumerics to the server section of the nginx configuration file. In our case, you already have a configured snginx.conf file for the domain to work over the secure https protocol, where after ssl you just need to add the familiar http2 to us, as shown in the screenshot below.
Then it would be enough to exit editing the file with saving and restart nginx (but not in our case)
service nginx restart
This method may be good for other server control panels or for servers where everything is manually configured, but do not even try to see the blue lightning with the HTTP/2 and SPDY indicator plugin installed. It’s all the fault of OpenSSL 1.0.1e-fips 11 Feb 2013 — a library that is installed with nginx/1.10.1 when installing the Vesta panel. You can check this with the command
To fix the problem, we need OpenSSL at least 1.0.2, and for this we need to rebuild nginx. Let’s use the above command
Copy and save in a text editor part of the code after configure arguments: until the very end, we will need it later.
yum install gc gcc gcc-c++ pcre-devel zlib-devel make wget openssl-devel libxml2-devel libxslt-devel gd-devel perl-ExtUtils-Embed GeoIP-devel gperftools gperftools-devel libatomic_ops-devel perl-ExtUtils- Embed -y
Go to the src directory
Download the latest version of openssl and nginx, for this, enter and execute the following commands in sequence:
wget —no-check-certificate https://www.openssl.org/source/openssl-1.1.0c.tar.gz
tar -xzvf openssl-1.1.0c.tar.gz
Let’s go to the directory with our version of nginx
service nginx stop
Let’s configure nginx, to do this, take the part of the code that we saved at the beginning and add three fragments to it (highlighted in bold):
Then execute the following commands one by one
service nginx start
Now check the result with the command
After these steps, even Google Chrome will determine that your site serves content using the new http2 protocol
Finally, disable nginx update with yum update command, as this may break server operation. Now it is recommended to update nginx in the same way that we went through in this article. To do this, disable the nginx.repo repository by setting enabled=0 in the section, as shown in the screenshot. Learn more about working with repositories here.
Exit file editing with saving. Not sure, but you may need to restart nginx.
This article covers a server installation based on Centos 7, which is suitable for both SEoDOR and other engines.
We will install the VestaCP panel in the Nginx + PHP-FPM bundle, and then update PHP to version 7.3. We will also install ionCube and PDO, activate the file manager in VestaCP, speed up open_basedir and disable dangerous functions in php.ini.
Temporarily it is not recommended to configure the server according to this manual due to the release of PHP 7.4, which automatically installs VestaCP and on which many things do not work yet! At the moment, the manual is being finalized — please check back later or try installing BrainyCP.
.htaccess won’t work in this build! Instead, all rules are written in the Web NGINX template!
Install CURL, ZIP
VestaCP + Nginx + PHP-FPM
Installing PHP 7.3
Installing ionCube
Installing PDO to run SQLite3
SQLite3 update
Adding nginx templates to the Vesta panel
Activating SFTP Chroot and File Manager in VestaCP
speed up open_basedir
PHP-FPM optimization
Disabling dangerous functions in /etc/php.ini
0. Install CURL, ZIP
1. VestaCP + Nginx + PHP-FPM
Download the installation script:
Next, go here. In the configurator, select nginx + php-fpm and other settings. We write in the empty fields the hostname, the mail of the panel administrator and the password for the panel. Click Generate Install Command:
Copy the received command to the console and confirm the setting «y».
After installation, the panel will be available at https://ip_server:8083/
Update all system software to the latest version using the yum package manager:
2. Installing PHP 7.3
Check which version of PHP is installed:
After the release of PHP 7.4 (10/28/2019), VestaCP started installing this version automatically, but some things are not yet compatible with it, such as IonCube, etc. Therefore, you will not have to downgrade PHP to 7.3.
Install yum-utils if it is not already installed. yum-utils will be used to include PHP versions:
Enable the Remi PHP 7.3 repository and disable the others. Let’s also remove the installed PHP 7.4:
yum-config-manager —disable remi-php5*
yum-config-manager —disable remi-php74
yum-config-manager —disable remi-test
yum-config-manager —enable remi-php73
yum -y remove php php-*
After the repository is enabled, install PHP 7.3:
Restart nginx and php-fpm:
systemctl restart nginx
systemctl restart php-fpm
Make sure PHP 7.3 is installed:
3. Installation of ionCube
wget http://downloads2.ioncube.com/loader_downloads/ioncube_loaders_lin_x86-.tar.gz
tar zxf ioncube_loaders_lin_x86-.tar.gz
rm -rf ioncube_loaders_lin_x86-.tar.gz
mv ioncube /usr/local
Add IonCube Loader to /etc/php.ini config:
Make sure ionCube is installed:
4. Installing PDO for SQLite3
After the release of PHP 7.4 (10/28/2019), VestaCP started automatic installation of version 7.4 with PDO and SQLite installed. Therefore, paragraphs 4 and 4.1 can be skipped and go straight to the 5th.
4.1. Update SQLite3 to 3.28.0
Check the current version:
and if it is older than 3.24 (for example, 3.7), then update SQLite3:
yum -y install sqlite-devel php-devel
wget https://www.php.net/distributions/php-7.3.11.tar.gz && tar zxvf php-7.3.11.tar.gz
cd /root/php-7.3.11/ext/sqlite3/
cp config0.m4 config.m4
phpsize
./configure
make
make install
cd ~
rm -r -f php-7.3.11
rm -r -f php-7.3.11.tar.gz
5. Adding nginx templates to the Vesta panel
Download the seodor5 nginx template and copy the files to the folder
/usr/local/vesta/data/templates/web/nginx/php-fpm/ :
cd /usr/local/vesta/data/templates/web/nginx/php-fpm
curl -O https://seodor.biz/public/vestacp_nginx_phpfpm.zip
unzip vestacp_nginx_phpfpm.zip
rm -r -f vestacp_nginx_phpfpm.zip
cd ~
Next, when creating a new domain in the panel or editing existing ones, select the nginx template corresponding to the CMS you are using and save the changes. That’s all it takes to get your sites working in conjunction with nginx and php-fpm.
6. Activating SFTP Chroot and File Manager in VestaCP
7. speedup open_basedir
As you know, using open_basedir significantly slows down the site loading speed, but if you do not want to refuse this option, then I recommend installing realpath_turbo — this extension will enable path caching and your sites will work at the same speed as if you did not used the open_basedir option.
Also in /etc/php.ini don’t forget to turn off the open_basedir option if it is enabled:
;open_basedir=
The realpath_turbo.open_basedir option will be used instead.
Now one of two options (the 1st is suitable for Seodor):
1) in the nginx seodor5 template, uncomment the line (in 2 files — tpl and stpl):
sed -i -e /usr/local/vesta/data/templates/web/nginx/php-fpm/seodor5.tpl
sed -i -e /usr/local/vesta/data/templates/web/nginx/php-fpm/seodor5.stpl
2) PHP-FPM Template:
8. PHP-FPM Optimization
We fix the number of child processes. Specify 30 in pm.max_children — this number depends on the amount of free memory on the server:
sed -i -e «s~.*ondemand.*~pm = static~g» /usr/local/vesta/data/templates/web/php-fpm/default.tpl
sed -i -e «s~.*max_children.*~pm.max_children = 30~g» /usr/local/vesta/data/templates/web/php-fpm/default.tpl
9. Disabling dangerous functions in /etc/php.ini
sed -i ‘s/disable_functions=/disable_functions = get_defined_constants, apache_get_modules, virtual, getmyinode, apache_get_version, apache_getenv, ini_restore, openlog, syslog, highlight_file, show_source, symlink, ini_get_all, phpinfo, pcntl_alarm, pcntl_fork, pcntl_waitpid, pcntl_wait . igwaitinfo, pcntl_sigtimedwait, pcntl_exec, pcntl_getpriority, pcntl_setpriority, exec, shell_exec, system, passthru, popen, proc_close, proc_get_status, proc_nice, proc_terminate , leak, listen, chown, chgrp, apache_note, apache_setenv, closelog, debugger_off, debugger_on, define_sys, getmyuid, getmypid, diskfreespace, dl, posix_ctermid, posix_getcwd, posix_getegid, posix_geteuid, posix_getgid, posix_getgrgid, posix_getgr nam, posix_getgroups, posix_getlogin, posix_getpgid, posix_getpgrp . _setsid, posix_setuid, posix_times, posix_ttyname, posix_uname/g’ /etc/php.ini
After setting up the server in VestaCP, add a new domain and apply Web NGINX (seodor5) and Backend PHP-FPM (default) templates for it:
Additional settings
It is possible to set up automatic redirection from a regular site to its version with a secure https connection. To do this, you need to enter the following passage into the .htaccess file.
Installing PHP 7
Updating several PHP versions at once when using Apache will be helped by ready-made solutions for Debian/Ubuntu and CentOS. The script for CentOS can be found on the official VestaCP developer forum. There, among the settings, there is a choice of PHP version.
Since there are no ready-made solutions for Nginx + PHP-FMP, you will need to update PHP manually. You should first check which version is already installed. In the console, enter the command:
Further changes must be checked on the test server beforehand so that the change of PHP versions goes without problems with performance.
To update PHP, you will have to remove its old version. Let’s take a look at this process using the upgrade to PHP 7.1 as an example. For newer versions, such as PHP 7.4, the procedure is similar.
1. Stop the services:
# service nginx stop
# service php-fpm stop
2. Add repositories:
# wget https://dl.fedoraproject.org/pub/epel/epel-release-latest-7.noarch.rpm
# wget http://rpms.remirepo.net/enterprise/remi-release-7.rpm
# rpm -Uvh remi-release-7.rpm epel-release-latest-7.noarch.rpm
# yum —enablerepo=remi update remi-release
3. Remove the installed version of PHP:
# yum remove php php-fpm
4. Install PHP 7.1:
yum —enablerepo=remi-php71 install php71-php php71-php-pear php71-php-bcmath php71-php-pecl-jsond-devel php71-php-mysqlnd php71-php-gd php71-php-common php71-php-fpm php71-php-intl php71-php-cli php71-php php71-php-xml php71-php-opcache php71-php-pecl-apcu php71-php-pecl-jsond php71-php-pdo php71-php -gmp php71-php-process php71-php-pecl-imagick php71-php-devel php71-php-mbstring
5. Create a symbolic link:
# rm -f /usr/bin/php
# ln -s /usr/bin/php71 /usr/bin/php
6. Create a link for the PHP configuration folder:
# ln -s /etc/php-fpm.d /etc/opt/remi/php71/php-fpm.d
7. Next, you need to make the following changes in the configuration file:
8. Rename folders in Vesta:
# cd /usr/local/vesta/data/templates/web
# mv php-fpm php71-php-fpm
# cd /usr/local/vesta/data/templates/web/nginx
# mv php-fpm php71-php-fpm
9. Start the services and include the new version of PHP in startup:
# systemctl start nginx
# systemctl start php71-php-fpm
# systemctl enable php71-php-fpm
Such changes may affect the performance of the panel, including blocking automatic updates of Vesta. You can avoid this by renaming it to . But in this case, auto-update would be impossible for PHP. The user should decide for himself which parameter is more important for him.
The presented instruction is also suitable for PHP 7.2 and 7.4.
Setting backup
Panel backup is located in the corresponding section — “Backup”. Creating backups there is quite simple and does not take much time.
What does backup include
File Manager
Using the free file manager for VestaCP is not officially possible. The panel can use a paid additional plug-in from the developers — Web File Manager.
Changing service configuration files
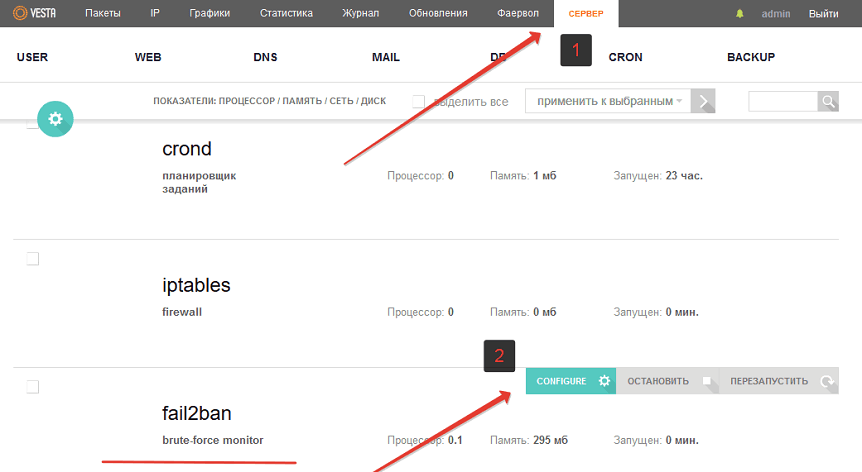
In the web interface, go to the «SERVER» section: https://IP-BOX:8083/list/server/ .
Here we select the service whose configuration needs to be changed. We click on the “CONFIGURE” button next to the name of the service, a file with its settings opens in front of us.
After making changes, so that they are applied immediately, check the «RESTART» checkbox before clicking on the «SAVE» button.
If something was entered incorrectly, the panel will report that it is impossible to restart the service and return the config to its previous form.
Therefore, this method of making changes for advanced users is more optimal than editing files on the server directly.
Web server configuration files for the site
The Vesta panel allows you to use different web server settings for each site.
Configuring open_basedir for Nginx+PHP-FPM
By default, the Nginx+PHP-FPM bundle in VestaCP does not allow enabling the open_basedir directive.
You can do this with the help of templates, which for php-fpm are stored in the /usr/local/vesta/data/templates/web/ directory.
To enable open_basedir you need:
Blocking IP addresses from which more than 100 requests to the site per second
Implementation of the configuration is done on the main nginx+fail2ban.
Procedure for lock setting:
limit_req_zone $binary_remote_addr zone=one:10m rate=100r/s;
limit_req zone=one burst=1 nodelay;
service fail2ban restart
Let’s Encrypt certificate installation
In the current version of the panel, this is enough to automatically install an SSL certificate.
If the panel is not up to date, or if the automatic installation fails, or if specific certificate parameters need to be set, the SSL certificate must be installed manually from the console.
In Console
Let’s Encrypt SSL certificate can be installed on a combination of any OS and web server using certbot . After selecting the options in the drop-down list, you will be redirected to a page with specific installation recommendations.
To simplify the interaction between Vesta and Let’s Encrypt, there is a letsencrypt-vesta utility.
You can automate the installation process by running the following script ssl.sh on your account (attached to the article), its code is:
The -a switch reports the need to renew the certificate every N days (60 in the example).
Successful completion of the installation will give:
IMPORTANT NOTES:
— Congratulations! Your certificate and chain have been saved at:
/etc/letsencrypt/live/test.moodle.pzdk.ru/fullchain.pem
Your key file has been saved at:
/etc/letsencrypt/live/test.moodle.pzdk.ru/privkey.pem
Your cert will expire on 2018-04-10. To obtain a new or tweaked
version of this certificate in the future, simply run certbot-auto
again. To non-interactively renew *all* of your certificates, run
«certbot auto renew»
— Your account credentials have been saved in your Certbot
configuration directory at /etc/letsencrypt. You should make a
secure backup of this folder now. This configuration directory will
also contain certificates and private keys obtained by Certbot so
making regular backups of this folder is ideal.
— If you like Certbot, please consider supporting our work by:
Donating to ISRG / Let’s Encrypt: https://letsencrypt.org/donate
Donating to EFF: https://eff.org/donate-le
Error: SSL=no doesn’t exist
warning: commands will be executed using /bin/sh
job 1 at Sun Mar 11 16:47:00 2018
Renewal scheduled for 60 days.
Error and warning can be ignored in this case. The entry «Renewal scheduled for 60 days.» means the certificate renewal is scheduled in 60 days.
When letsencrypt-vesta is already installed and configured, to add a certificate to the new domain newdomain.ru, just execute in the console
Changing iptables rules
In the web interface of the panel, go to the «FIREWALL» section: https://IP-BOX:8083/list/firewall/ .
Here you can edit and delete existing rules, as well as add new ones.
The form for adding new rules has 2 drop-down lists: the first one allows you to select an action (DROP or ACCEPT), the second one — protocol (TCP,ICMP,UDP).
This way you can only add rules for incoming connections. Besides, it can only be simple rules.
For example, you can allow access to port 25 for everyone. Select the ACCEPT action, TCP protocol, enter 25 in the port field, and 0.0.0.0/0 in the IP field. As a result, the entry in iptables will look like:
-A INPUT -p tcp -m tcp —dport 25 -j ACCEPT
In order for the new rules to be saved after a reboot, execute the following in the console:
Using multiple PHP versions on a server with VestaCP
PHP 7.0 is installed by default with the Vesta control panel. If you want to use an older version of PHP, you can do so as follows.
Let’s install PHP 5.4 as an example.
Create directory for sources:
Download and unpack the source archive:
wget -O /etc/php/src/php-5.4.45.tar.bz2 http://de1.php.net/get/php-5.4.45.tar.bz2/from/this/mirror
cd /etc/php/src/
tar -xjf php-5.4.45.tar.bz2
cd php-5.4.45
Create a directory where our PHP 5.4 version will be located:
Configuration before compiling (pay attention to the —prefix= variable, it points to the directory where PHP will be compiled):
Enable CGI for Apache:
Version switching will be done using apache templates. Copy the existing phpcgi template:
cp /usr/local/vesta/data/templates/web/apache2/phpcgi.sh /usr/local/vesta/data/templates/web/apache2/php54.sh
cp /usr/local/vesta/data/templates/web/apache2/phpcgi.stpl /usr/local/vesta/data/templates/web/apache2/php54.stpl
cp /usr/local/vesta/data/templates/web/apache2/phpcgi.tpl /usr/local/vesta/data/templates/web/apache2/php54.tpl
Then open the file /usr/local/vesta/data/templates/web/apache2/php54.sh and replace:
The last step is to restart Vesta:
service vesta restart
Basic operations in the web interface
To create a mailbox, go to the «MAIL» section, click on the «ADD ACCOUNT» button next to the mail domain name, then specify the mailbox name and password in the form fields. If necessary, authorization data can be sent to the desired postal address.
After that, press the «ADD» button.
Creating an FTP account
To create an FTP account, go to the «WEB» section, click on the «EDIT» button next to the domain name for which you want to create an account, scroll down the page that opens, check the «Additional FTP» checkbox and enter the data for the new account .
After that, click on the «SAVE» button.
Working with Cron Jobs
Jobs are edited in the CRON section.
You can add a job using the “+” (ADD CRON JOB) button. The fields for the task execution time can be filled in automatically if you select the frequency in the form on the right at the bottom of the section.
To change an already added task, press the “EDIT” button next to it.
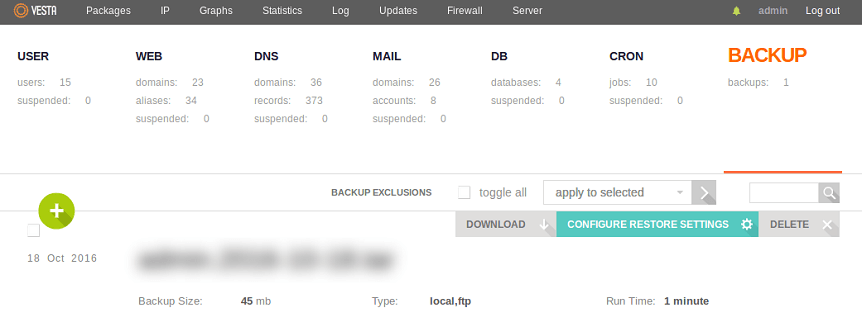
Working with backups
To create a backup, go to the «BACKUP» section, click on the «+» (CREATE BACKUP). When the operation is completed, a notification will be sent to the administrator’s address.
You can change the number of maximum possible backups in the «PACKAGES» section by clicking on «EDIT» next to the template (DEFAULT by default) and changing the value of the «Backups» field. Typically, this value is 3 by default.
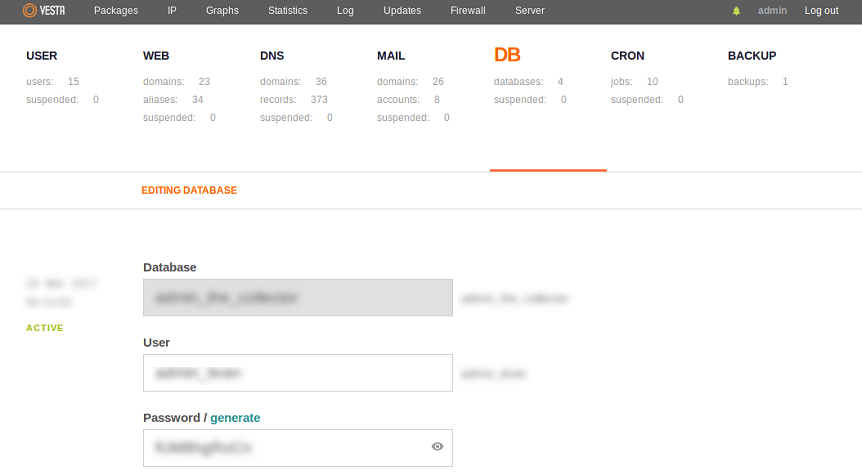
Creating a database
To create a database, go to the «DB» section, click on the «+» (ADD DATABASE), fill in the required fields. Authorization data can be sent to the desired postal address.
Changing PHP settings
To change the PHP settings in the «SERVER» section, click on «CONFIGURE» next to any web server, and then click on «CONFIGURE PHP. INI». Can be opened via a direct link: https://IP-BOX:8083/edit/server/php/
First, a form is displayed with fields for changing the following parameters:
To edit the php.ini file directly, click on the «ADVANCED OPTIONS» link below the form fields.
You can go back using the «BASIC OPTIONS» button.
To save the changes, press the «SAVE» button.
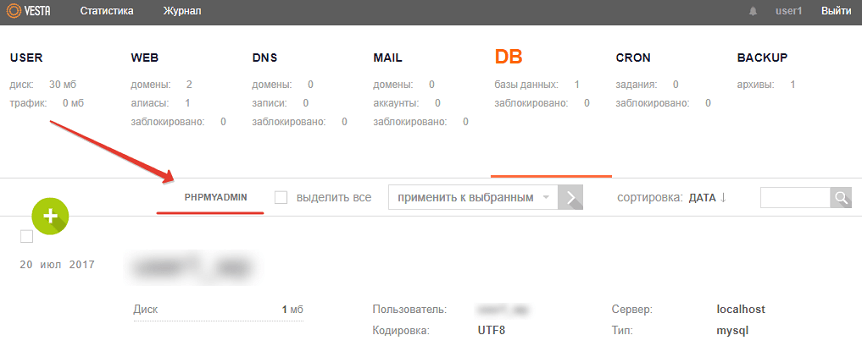
Working with PhpMyAdmin
By default, the size of the uploaded database dump cannot exceed 2MB, which is not enough for most dumps.
To fix this, you need to change the post_max_size and upload_max_filesize parameters in the panel settings according to the instructions from the previous paragraph.
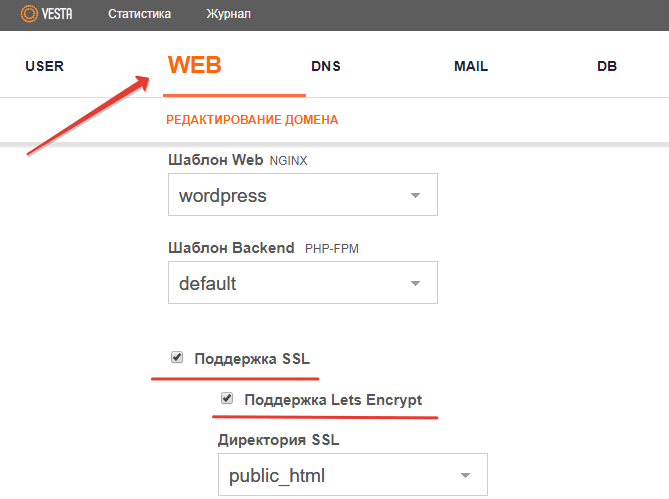
Install custom SSL certificate
In the Vesta web interface, go to the «WEB» section, click on the «EDIT» button next to the domain name, scroll down, check «SSL support» and enter the necessary data about the certificate:
SSL Certificate — domain certificate field.
SSL Key — field for the private key of the certificate.
SSL Certificate Authority/Intermediate — the field for the bundle (root certificate and intermediate chain), is optional.
Panel installation
Vesta is a popular free server control panel. The standard configuration of its software is quite demanding on resources: we recommend choosing a box with at least 2 GB of RAM.
Vesta is installed by two commands — downloading the Vesta panel script and executing it on the VDS. And we also have a ready-made image with another build of this panel — Hestia. It has more features, and its developers release updates more often than Vesta developers.
The package manager may differ depending on the OS. The example shows installation on Ubuntu, so apt-get is used.
apt-get install curl
If the installation is successfully completed, the console will display
System requirements and supported OS
VestaCP is widely popular due to its minimal system requirements and wide range of supported platforms. It can be installed on almost any operating system of the Unix/Linux family. For example, on Linux Ubuntu from 12.04 to 18.04, CentOS from 5 to 8 and Debian from 6 to 10.
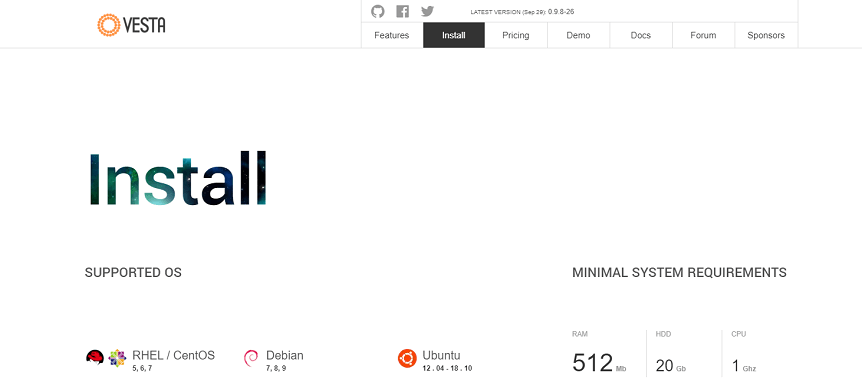
The developer resource lists specific system versions for which the panel is supported. But installing the VestaCP panel on Ubuntu 18.04, Debian 10, CentOS 7 and other new versions is possible according to the same principles.
Minimum system requirements
Before starting the process, it is necessary to update the system components to the latest ones. We do it with the help of commands:
After that, you need to enter the command to install the GNU Privacy Guard password encryption utility:
apt-get install gnupg
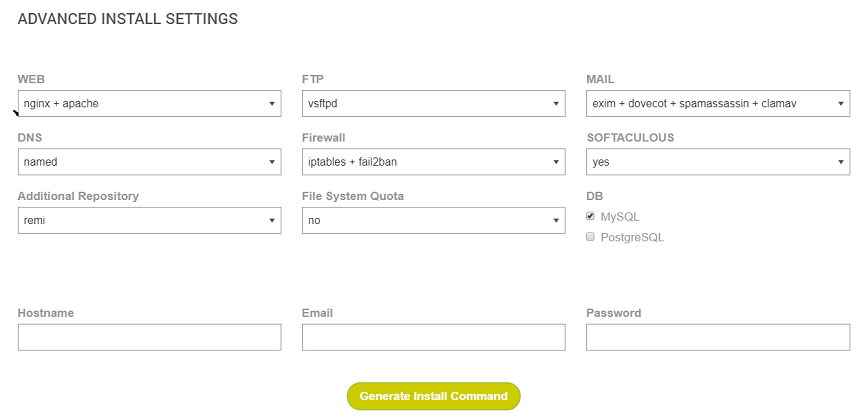
The main difficulty lies in the choice of components on the basis of which this control panel will function. Users have several options for installing a web server, including servers based on Nginx+Apache+PHP, Apache+PHP, and Nginx+PHP-FPM.
At the same time, on the installation page on the official website of the developers, you can find a form for generating a suitable installation command.
For any version of Linux operating systems, the installation procedure using a script is the same. Installing VestaCP on Debian 9 follows the same algorithm.
Possible selection of software components
The download command is executed in two ways to choose from:
Starting the installation
Next, you need to run the script, after which the installation will start automatically. During the operation, it will download the required components and web server software. To initiate their installation, use the command:
After that, a list of components that will be installed with the panel will appear:

Next, enter a valid email address and hostname. Installing all of the listed panel components will take approximately 15 minutes.
After the process is completed, the login information will be displayed on the screen. She will come to the specified address.
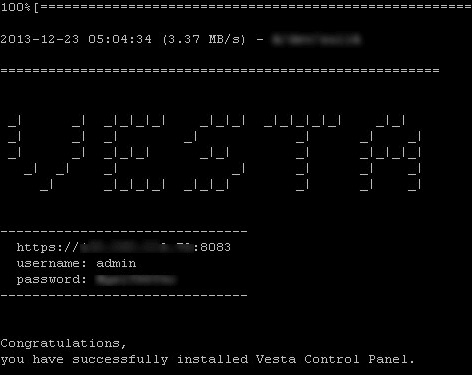
Entrance to the panel
Below is the default location of some VestaCP files and logs that you may need when working with it.
Conclusion
VestaCP is considered one of the most convenient free options, which are especially suitable for beginners in the field of IT due to its intuitive web interface and the presence of standard templates. Free distribution, open source and wide possibilities are the main advantages of the control panel.
Need a powerful and reliable virtual server for VestaCP? Choose VPS from Eternalhost — fast SSD, 2.8 GHz CPU, DDoS protection and 24/7 technical support!
