

Статья может быть особенно полезна владельцам VDS, которые создают новые сайты на VDS или переносят их с другой площадки. Для работы сайта мы создадим отдельного пользователя. Это будет более безопасно, чем позволять сайту работать с MySQL от имени пользователя root.
- Как создать пользователя и базу данных
- Как загрузить дамп базы
- Как скачать дамп базы
- Creating a New MySQL User Using phpMyAdmin
- Adding a MySQL User Account via phpMyAdmin
- Тех, кому доверяем!
- Добавление учеток через phpMyAdmin
- Добавляем нового пользователя БД
- Контроль возможностей созданных юзеров
- Создание юзера через консоль
- # Установка phpMyAdmin
- # Настройка аутентификации и прав пользователей
- # Создание нового пользователя
- # Дополнительная защита phpMyAdmin
- 13.7.1.3 CREATE USER Statement
- Создание пользователя и выдача прав
- 1. С помощью команды CREATE USER.
- 2. С помощью команды GRANT.
- Посмотреть существующих пользователей и их привилегии
- Смена пароля
- MySQL
- MariaDB
- Смена пароля пользователю root после установки
- MySQL < 8 или MariaDB
- MySQL 8 и выше
Как создать пользователя и базу данных
Способ входа зависит от хостинга. На хостинге NetAngels достаточно добавить в любому сайту в адресной строке /mysql. Например mywebsite.ru/mysql.
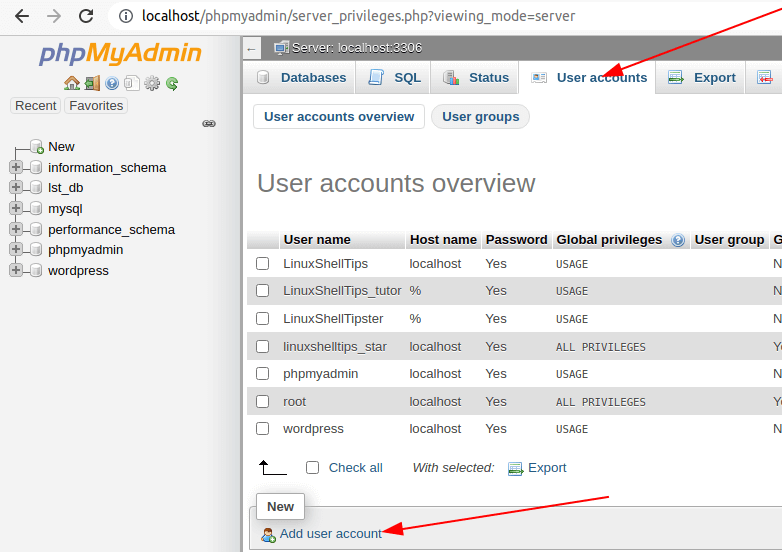
После входа в верхней части страницы нажмите “Учетные записи пользователей”

Кликните “Добавить нового пользователя”.
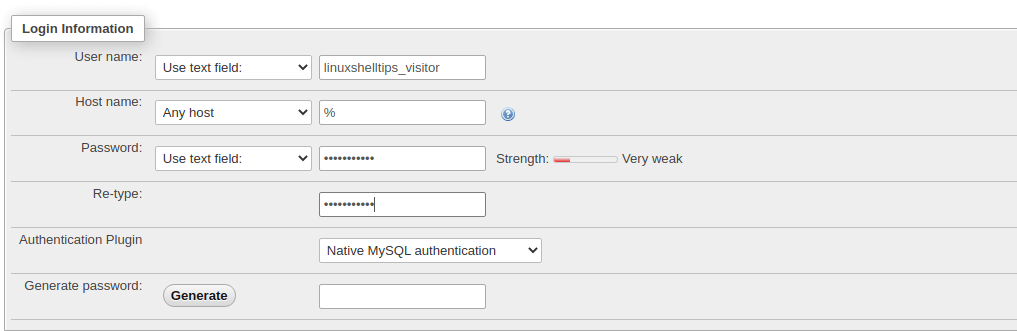
Введите имя пользователя и пароль. В качестве имени хоста выберите “Локальный”.

Промотайте страницу вниз и нажмите кнопку “Вперед”.
Как загрузить дамп базы

После этого кликните на кнопку “Выберите файл”:

После выбора файла промотайте страницу вниз и нажмите кнопку “Вперед”. Готово!
Как скачать дамп базы

В нижней части страницы нажмите кнопку “Вперед”.

Creating a New MySQL User Using phpMyAdmin
Adding a MySQL User Account via phpMyAdmin
The link should lead to an interface with four interesting sections:
Section 1: Login Information
Section 2: Database for User Account

Section 3: Global Privileges
Section 4: SSL


От автора: я бы вам советовал быть внимательнее с привилегиями. Один мой знакомый, который обладает в своей квартире правами администратора, наделил жену «привилегией» ограничения доступа к холодильнику. В итоге уже второй месяц сидит на диете и питается только овощами. Поэтому даже перед тем, как добавить пользователя в MySQL, хорошо подумайте!
Тех, кому доверяем!
Но все-таки есть на свете люди, которым можно доверять. И конечно, это не жена и не теща :). Давайте научимся сегодня добавлять учетные записи в MySQL и наделять их определенными привилегиями.
Выше всех в иерархии стоит пользователь с учетной записью root. Изначально эта учетка поставляется с пустым значением пароля. Администратор (root) может в MySQL добавить пользователя, наделить его определенными правами, а также лишить привилегий.
Система привилегий реализована не только на сервере СУБД, но и на уровне баз. Можно наделить пользователя доступом к определенной БД, а также разрешить ему выполнять только определенные операции с «хранилищем». Например, запретить вставлять, удалять и обновлять данные, но разрешить делать выборки из таблиц. Но все это легче познается в деле, поэтому приступим.
Добавление учеток через phpMyAdmin
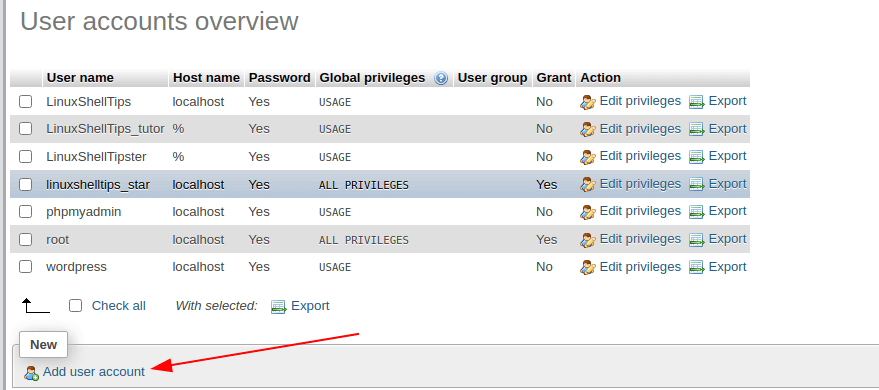
Откройте приложение, вверху перейдите по вкладке «Пользователи». После этого отобразится таблица «Обзор учетных записей». В ней указаны все учетные записи, которые существуют на экземпляре сервера, а также краткая информация об их привилегиях.

Чтобы добавить новую учетную запись, нужно нажать на ссылку «Добавить пользователя», которая расположена ниже таблицы. После чего система приложения выведет специальное диалоговое окно «Добавить пользователя».
В самом верхнем разделе («Информация учетной записи») следует задать имя нового пользователя, установить и подтвердить пароль. Также можно получить случайное значение пароля, которое будет автоматически подставлено в поля. Для этого нужно нажать кнопку «Генерировать».

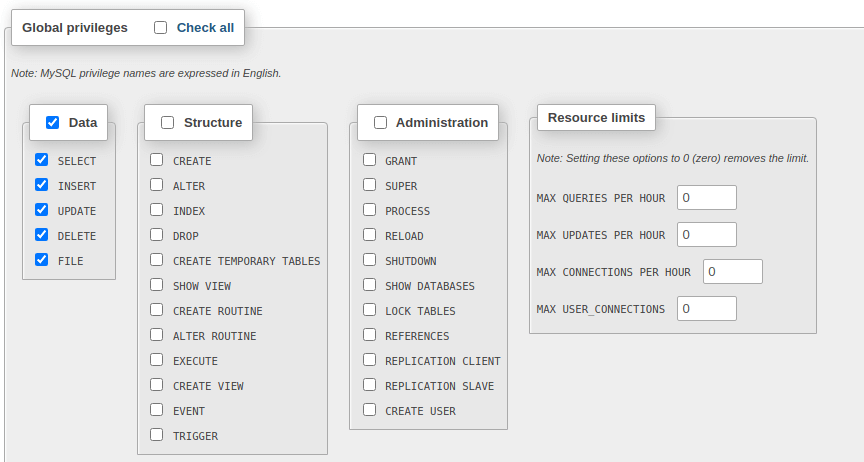
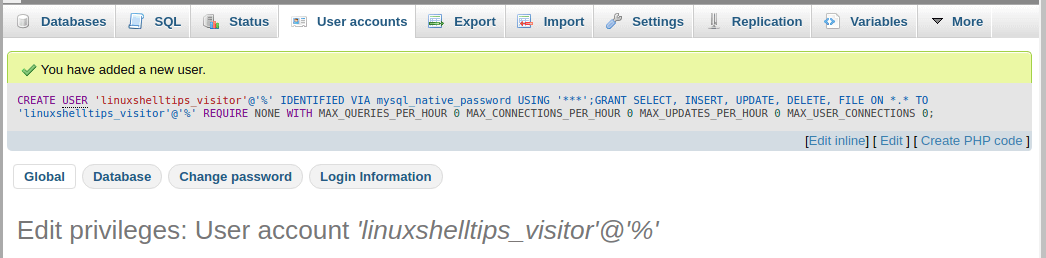
Если прокрутить немного вниз, то станут доступными для редактирования глобальные привилегии, которыми можно наделить создаваемого пользователя. На снимке видно, что все привилегии разделены на несколько категорий: «Данные», «Структура» и «Администрирование». Перед тем, как добавить пользователя в MySQL ,ознакомьтесь с ними и отметьте нужные.

Для создания учетки нажмите внизу диалогового окна кнопку «Добавить пользователя». Теперь посмотрим на результат наших действий. Снова вернитесь к таблице «Обзор учетных записей» и ознакомьтесь с ее содержанием. Как видите, на сервере была создана новая учетка с заданным нами именем.

Добавляем нового пользователя БД

После чего появится знакомый нам уже диалог «Добавить пользователя». Заполняем все поля, как и в предыдущем примере. Наделим leha2 глобальными привилегиями на базу world – пусть что хочет, то и делает с этим миром :). И нажимаем внизу «Добавить пользователя».

Контроль возможностей созданных юзеров
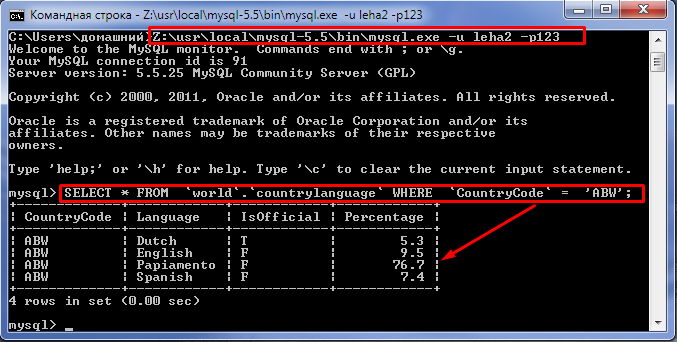
Разберемся, что может созданным нами последний «Леха». Переходим в командную строку. Входим на сервер и выполним выборку из базы, для которой в MySQL добавили пользователя: Z:\usr\local\mysql-5.5\bin\mysql.exe -u leha2 -p123

Теперь попробуем под этой учеткой (leha2) попасть в другую базу, и тоже сделать из нее выборку. Например, вот из этой БД:
Но в ответ получаем от MySQL «в тык», поскольку используемая учетка обладает правами только на базу world.
Но это еще не все возможности администрирования привилегий. Можно в MySQL добавить пользователя с правами только на просмотр. Для этого редактируется таблица прав существующей учетной записи или создается новая.
Снова заходим на вкладку «Привилегии». В таблице пользователей возле нужной учетки жмем «Редактирование привилегий». Затем в появившемся окне диалога выключаем все привилегии кроме select. Таким образом пользователь сможет лишь просматривать таблицы или делать из них выборки с помощью SQL-команды SELECT.
Создание юзера через консоль
Давайте научимся, как добавить пользователя в MySQL через консоль. Для этого нам нужно зайти на сервер БД с правами администратора. Затем с помощью команды CREATE создать нового юзера и задать ему пароль:

Теперь снова зайдем в программную оболочку и глянем, появился ли созданный нами «робот» в таблице «Обзор учетных записей».

Как видите, verter стал пользователем нашего сервера MySQL. Но он вообще не имеет никаких прав (как и любой робот). Так неэтично по отношению к братьям нашим «железным», поэтому снабдим его всеми привилегиями на любую из баз. Например, world:

Чтобы проверить привилегии «робота из советского будущего», проведем испытание его возможностей. Зайдем под его учетной записью на сервер и сделаем выборку из базы:

Администрирование сайтов и веб-приложений неразрывно связано с управлением базами данных. И хотя функционал MySQL полностью перекрывает запросы пользователей на работу с базами данных, его интерфейс — чёрно-белая консоль — подходит не всем.
Установку мы будем производить на сервер, настроенный по инструкции о первичной настройке с предустановленным программным стеком LAMP.
На Джино вы можете подключить бесплатный SSL-сертификат к своему домену — он обеспечит базовую защиту данных от перехвата и последующей расшифровки.
# Установка phpMyAdmin
После установки всех необходимых обновлений можно переходить к установке приложения:
Вместе с самим приложением установим два расширения для php — mbstring и gettext. Первое отвечает за работу с многобайтными строками, а второе — за перевод приложения на другие языки.
После окончания установки вручную запустим расширение mbstring:
Теперь осталось перезапустить Apache:
# Настройка аутентификации и прав пользователей
Проверим методы аутентификации, установленные для всех имеющихся пользователей MySQL:
В результате на экране должна появиться таблица со всеми пользователями и методами их аутентификации. Нас интересует строчка root — auth_socket:
Изменим метод аутентификации root-пользователя:
Значение password будет новым паролем для root-пользователя, поэтому сделайте его надёжным. Теперь перезагрузим таблицы привилегий, чтобы наши изменения вступили в силу:
Теперь мы видим, что в строке напротив root появилось значение mysql_native_password.
# Создание нового пользователя
В дальнейшем при работе с базами данных нам понадобятся новые пользователи, в идеале — новый пользователь для каждой новой базы данных. Создать нового пользователя можно командой:
Нового пользователя нужно будет наделить правами на управление базой данных. Для примера наделим нового пользователя всеми правами на выбранную базу:
Теперь можно выйти из mysql.
# Дополнительная защита phpMyAdmin
Чтобы использовать .htaccess, нужно сначала исправить конфигурационный файл самого Apache.
Теперь, когда мы подключили возможность использования .htaccess, создадим сам файл в директории приложения, которое он будет защищать:
В этом файле укажем следующее:
- AuthType указывает на то, какой тип защиты мы будем использовать — Базовый;
- AuthName отвечает за сообщение, которое будет показываться при неправильном подключении;
- AuthUserFile — путь, по которому будет размещаться верный пароль, с ним Apache будет сравнивать вводимое значение;
- Require valid-use сообщает, что только зарегистрированные пользователи базы данных смогут пройти авторизацию.
Теперь создадим пароль, хэшируем и разместим его сразу же в нужной директории:
Если нам нужно будет добавить ещё одного пользователя, это можно будет сделать той же командой, но уже без использования флага -c:
13.7.1.3 CREATE USER Statement
CREATE USER [IF NOT EXISTS]user[auth_option] [,user[auth_option]] ... DEFAULT ROLErole[,role] ... [REQUIRE {NONE |tls_option[[AND]tls_option] ...}] [WITHresource_option[resource_option] ...] [password_option|lock_option] ... [COMMENT 'comment_string' | ATTRIBUTE 'json_object']user: (see Section 6.2.4, “Specifying Account Names”)auth_option: { IDENTIFIED BY 'auth_string' [AND2fa_auth_option] | IDENTIFIED BY RANDOM PASSWORD [AND2fa_auth_option] | IDENTIFIED WITHauth_plugin[AND2fa_auth_option] | IDENTIFIED WITHauth_pluginBY 'auth_string' [AND2fa_auth_option] | IDENTIFIED WITHauth_pluginBY RANDOM PASSWORD [AND2fa_auth_option] | IDENTIFIED WITHauth_pluginAS 'auth_string' [AND2fa_auth_option] | IDENTIFIED WITHauth_plugin[initial_auth_option] }2fa_auth_option: { IDENTIFIED BY 'auth_string' [AND3fa_auth_option] | IDENTIFIED BY RANDOM PASSWORD [AND3fa_auth_option] | IDENTIFIED WITHauth_plugin[AND3fa_auth_option] | IDENTIFIED WITHauth_pluginBY 'auth_string' [AND3fa_auth_option] | IDENTIFIED WITHauth_pluginBY RANDOM PASSWORD [AND3fa_auth_option] | IDENTIFIED WITHauth_pluginAS 'auth_string' [AND3fa_auth_option] }3fa_auth_option: { IDENTIFIED BY 'auth_string' | IDENTIFIED BY RANDOM PASSWORD | IDENTIFIED WITHauth_plugin| IDENTIFIED WITHauth_pluginBY 'auth_string' | IDENTIFIED WITHauth_pluginBY RANDOM PASSWORD | IDENTIFIED WITHauth_pluginAS 'auth_string' }initial_auth_option: { INITIAL AUTHENTICATION IDENTIFIED BY {RANDOM PASSWORD | 'auth_string'} | INITIAL AUTHENTICATION IDENTIFIED WITHauth_pluginAS 'auth_string' }tls_option: { SSL | X509 | CIPHER 'cipher' | ISSUER 'issuer' | SUBJECT 'subject' }resource_option: { MAX_QUERIES_PER_HOURcount| MAX_UPDATES_PER_HOURcount| MAX_CONNECTIONS_PER_HOURcount| MAX_USER_CONNECTIONScount}password_option: { PASSWORD EXPIRE [DEFAULT | NEVER | INTERVALNDAY] | PASSWORD HISTORY {DEFAULT |N} | PASSWORD REUSE INTERVAL {DEFAULT |NDAY} | PASSWORD REQUIRE CURRENT [DEFAULT | OPTIONAL] | FAILED_LOGIN_ATTEMPTSN| PASSWORD_LOCK_TIME {N| UNBOUNDED} }lock_option: { ACCOUNT LOCK | ACCOUNT UNLOCK }
The CREATE USER statement creates
new MySQL accounts. It enables authentication, role, SSL/TLS,
resource-limit, password-management, comment, and attribute
properties to be established for new accounts. It also controls
whether accounts are initially locked or unlocked.
To use CREATE USER, you must have
the global CREATE USER privilege,
or the INSERT privilege for the
mysql system schema. When the
read_only system variable is
enabled, CREATE USER additionally
requires the CONNECTION_ADMIN
privilege (or the deprecated
SUPER privilege).
As of MySQL 8.0.27, these additional privilege considerations
apply:
The
authentication_policy
system variable places certain constraints on how the
authentication-related clauses of
CREATE USERstatements may be
used; for details, see the description of that variable.
These constraints do not apply if you have the
AUTHENTICATION_POLICY_ADMIN
privilege.To create an account that uses passwordless authentication,
you must have the
PASSWORDLESS_USER_ADMIN
privilege.
As of MySQL 8.0.22, CREATE USER
fails with an error if any account to be created is named as the
DEFINER attribute for any stored object.
(That is, the statement fails if creating an account would cause
the account to adopt a currently orphaned stored object.) To
perform the operation anyway, you must have the
SET_USER_ID privilege; in this
case, the statement succeeds with a warning rather than failing
with an error. Without
SET_USER_ID, to perform the
user-creation operation, drop the orphan objects, create the
account and grant its privileges, and then re-create the dropped
objects. For additional information, including how to identify
which objects name a given account as the
DEFINER attribute, see
Orphan Stored Objects.
CREATE USER either succeeds for
all named users or rolls back and has no effect if any error
occurs. By default, an error occurs if you try to create a user
that already exists. If the IF NOT EXISTS
clause is given, the statement produces a warning for each named
user that already exists, rather than an error.
Important
Under some circumstances, CREATE may be recorded in server logs or on the client
USER
side in a history file such as
~/.mysql_history, which means that
cleartext passwords may be read by anyone having read access
to that information. For information about the conditions
under which this occurs for the server logs and how to control
it, see Section 6.1.2.3, “Passwords and Logging”. For similar
information about client-side logging, see
Section 4.5.1.3, “mysql Client Logging”.
There are several aspects to the CREATE statement, described under the following topics:
USER
CREATE USER Overview
CREATE USER Authentication Options
CREATE USER Multifactor Authentication Options
CREATE USER Role Options
CREATE USER SSL/TLS Options
CREATE USER Resource-Limit Options
CREATE USER Password-Management Options
CREATE USER Comment and Attribute Options
CREATE USER Account-Locking Options
CREATE USER Binary Logging
CREATE USER Overview
For each account, CREATE USER
creates a new row in the mysql.user system
table. The account row reflects the properties specified in
the statement. Unspecified properties are set to their default
values:
Authentication: The default authentication plugin
(determined as described in
The Default Authentication Plugin),
and empty credentialsDefault role:
NONESSL/TLS:
NONEResource limits: Unlimited
Password management:
PASSWORD EXPIRE DEFAULT; failed-login
PASSWORD HISTORY DEFAULT PASSWORD REUSE INTERVAL DEFAULT
PASSWORD REQUIRE CURRENT DEFAULT
tracking and temporary account locking are disabledAccount locking:
ACCOUNT UNLOCK
An account when first created has no privileges and a default
role of NONE. To assign privileges or
roles, use the GRANT statement.
Each account name uses the format described in
Section 6.2.4, “Specifying Account Names”. For example:
CREATE USER 'jeffrey'@'localhost' IDENTIFIED BY 'password'; The host name part of the account name, if omitted, defaults
to '%'.
Each user value naming an account
may be followed by an optional
auth_option value that indicates
how the account authenticates. These values enable account
authentication plugins and credentials (for example, a
password) to be specified. Each
auth_option value applies
only to the account named immediately
preceding it.
Following the user specifications,
the statement may include options for SSL/TLS, resource-limit,
password-management, and locking properties. All such options
are global to the statement and apply to
all accounts named in the statement.
Example: Create an account that uses the default
authentication plugin and the given password. Mark the
password expired so that the user must choose a new one at the
first connection to the server:
CREATE USER 'jeffrey'@'localhost' IDENTIFIED BY 'new_password' PASSWORD EXPIRE; Example: Create an account that uses the
caching_sha2_password authentication plugin
and the given password. Require that a new password be chosen
every 180 days, and enable failed-login tracking, such that
three consecutive incorrect passwords cause temporary account
locking for two days:
CREATE USER 'jeffrey'@'localhost' IDENTIFIED WITH caching_sha2_password BY 'new_password' PASSWORD EXPIRE INTERVAL 180 DAY FAILED_LOGIN_ATTEMPTS 3 PASSWORD_LOCK_TIME 2; Example: Create multiple accounts, specifying some per-account
properties and some global properties:
CREATE USER 'jeffrey'@'localhost' IDENTIFIED WITH mysql_native_password BY 'new_password1', 'jeanne'@'localhost' IDENTIFIED WITH caching_sha2_password BY 'new_password2' REQUIRE X509 WITH MAX_QUERIES_PER_HOUR 60 PASSWORD HISTORY 5 ACCOUNT LOCK;
Each auth_option value
(IDENTIFIED WITH ... BY in this case)
applies only to the account named immediately preceding it, so
each account uses the immediately following authentication
plugin and password.
The remaining properties apply globally to all accounts named
in the statement, so for both accounts:
Connections must be made using a valid X.509 certificate.
Up to 60 queries per hour are permitted.
Password changes cannot reuse any of the five most recent
passwords.The account is locked initially, so effectively it is a
placeholder and cannot be used until an administrator
unlocks it.
CREATE USER Authentication Options
An account name may be followed by an
auth_option authentication option
that specifies the account authentication plugin, credentials,
or both.
Note
Prior to MySQL 8.0.27,
auth_option defines the sole
method by which an account authenticates. That is, all
accounts use one-factor/single-factor authentication
(1FA/SFA). MySQL 8.0.27 and higher supports multifactor
authentication (MFA), such that accounts can have up to
three authentication methods. That is, accounts can use
two-factor authentication (2FA) or three-factor
authentication (3FA). The syntax and semantics of
auth_option remain unchanged, but
auth_option may be followed by
specifications for additional authentication methods. This
section describes auth_option.
For details about the optional MFA-related following
clauses, see
CREATE USER Multifactor Authentication Options.
Note
Clauses for random password generation apply only to
accounts that use an authentication plugin that stores
credentials internally to MySQL. For accounts that use a
plugin that performs authentication against a credentials
system that is external to MySQL, password management must
be handled externally against that system as well. For more
information about internal credentials storage, see
Section 6.2.15, “Password Management”.
auth_pluginnames an
authentication plugin. The plugin name can be a quoted
string literal or an unquoted name. Plugin names are
stored in theplugincolumn of the
mysql.usersystem table.For
auth_optionsyntax that
does not specify an authentication plugin, the server
assigns the default plugin, determined as described in
The Default Authentication Plugin.
For descriptions of each plugin, see
Section 6.4.1, “Authentication Plugins”.Credentials that are stored internally are stored in the
mysql.usersystem table. An
'auth_string'
value orRANDOM PASSWORDspecifies
account credentials, either as a cleartext (unencrypted)
string or hashed in the format expected by the
authentication plugin associated with the account,
respectively:For syntax that uses
BY,
'auth_string'
the string is cleartext and is passed to the
authentication plugin for possible hashing. The result
returned by the plugin is stored in the
mysql.usertable. A plugin may use
the value as specified, in which case no hashing
occurs.For syntax that uses
BY RANDOM, MySQL generates a random password
PASSWORD
and as cleartext and passes it to the authentication
plugin for possible hashing. The result returned by
the plugin is stored in the
mysql.usertable. A plugin may use
the value as specified, in which case no hashing
occurs.Randomly generated passwords are available as of MySQL
8.0.18 and have the characteristics described in
Random Password Generation.For syntax that uses
AS,
'auth_string'
the string is assumed to be already in the format the
authentication plugin requires, and is stored as is in
themysql.usertable. If a plugin
requires a hashed value, the value must be already
hashed in a format appropriate for the plugin;
otherwise, the value cannot be used by the plugin and
correct authentication of client connections does not
occur.As of MySQL 8.0.17, a hashed string can be either a
string literal or a hexadecimal value. The latter
corresponds to the type of value displayed by
SHOW CREATE USERfor
password hashes containing unprintable characters when
the
print_identified_with_as_hex
system variable is enabled.If an authentication plugin performs no hashing of the
authentication string, theBYand
'auth_string'
AS
 'auth_string'
clauses have the same effect: The authentication
string is stored as is in the
mysql.usersystem table.
CREATE USER permits these
auth_option syntaxes:
IDENTIFIED BY
 'auth_string'
Sets the account authentication plugin to the default
plugin, passes the cleartext
'auth_string'
value to the plugin for possible hashing, and stores the
result in the account row in the
mysql.usersystem table.IDENTIFIED BY RANDOM PASSWORDSets the account authentication plugin to the default
plugin, generates a random password, passes the cleartext
password value to the plugin for possible hashing, and
stores the result in the account row in the
mysql.usersystem table. The statement
also returns the cleartext password in a result set to
make it available to the user or application executing the
statement. For details about the result set and
characteristics of randomly generated passwords, see
Random Password Generation.IDENTIFIED WITH
auth_pluginSets the account authentication plugin to
auth_plugin, clears the
credentials to the empty string, and stores the result in
the account row in themysql.user
system table.IDENTIFIED WITH
auth_pluginBY
'auth_string'Sets the account authentication plugin to
auth_plugin, passes the
cleartext
'auth_string'
value to the plugin for possible hashing, and stores the
result in the account row in the
mysql.usersystem table.IDENTIFIED WITH
auth_pluginBY RANDOM
PASSWORDSets the account authentication plugin to
auth_plugin, generates a random
password, passes the cleartext password value to the
plugin for possible hashing, and stores the result in the
account row in themysql.usersystem
table. The statement also returns the cleartext password
in a result set to make it available to the user or
application executing the statement. For details about the
result set and characteristics of randomly generated
passwords, see
Random Password Generation.IDENTIFIED WITH
auth_pluginAS
'auth_string'Sets the account authentication plugin to
auth_pluginand stores the
'auth_string'
value as is in themysql.useraccount
row. If the plugin requires a hashed string, the string is
assumed to be already hashed in the format the plugin
requires.
Example: Specify the password as cleartext; the default plugin
is used:
CREATE USER 'jeffrey'@'localhost' IDENTIFIED BY 'password'; Example: Specify the authentication plugin, along with a
cleartext password value:
CREATE USER 'jeffrey'@'localhost' IDENTIFIED WITH mysql_native_password BY 'password'; In each case, the password value stored in the account row is
the cleartext value
' afterpassword'
it has been hashed by the authentication plugin associated
with the account.
For additional information about setting passwords and
authentication plugins, see
Section 6.2.14, “Assigning Account Passwords”, and
Section 6.2.17, “Pluggable Authentication”.
CREATE USER Multifactor Authentication Options
The auth_option part of
CREATE USER defines an
authentication method for one-factor/single-factor
authentication (1FA/SFA). As of MySQL 8.0.27,
CREATE USER has clauses that
support multifactor authentication (MFA), such that accounts
can have up to three authentication methods. That is, accounts
can use two-factor authentication (2FA) or three-factor
authentication (3FA).
The authentication_policy
system variable defines constraints for
CREATE USER statements with
multifactor authentication (MFA) clauses. For example, the
authentication_policy setting
controls the number of authentication factors that accounts
may have, and for each factor, which authentication methods
are permitted. See
Configuring the Multifactor Authentication Policy.
For information about factor-specific rules that determine the
default authentication plugin for authentication clauses that
name no plugin, see
The Default Authentication Plugin.
Following auth_option, there may
appear different optional MFA clauses:
2fa_auth_option: Specifies a
factor 2 authentication method. The following example
definescaching_sha2_passwordas the
factor 1 authentication method, and
authentication_ldap_saslas the factor
2 authentication method.CREATE USER 'u1'@'localhost' IDENTIFIED WITH caching_sha2_password BY '
sha2_password' AND IDENTIFIED WITH authentication_ldap_sasl AS 'uid=u1_ldap,ou=People,dc=example,dc=com';3fa_auth_option: Following
2fa_auth_option, there may
appear a3fa_auth_optionclause
to specify a factor 3 authentication method. The following
example definescaching_sha2_password
as the factor 1 authentication method,
authentication_ldap_saslas the factor
2 authentication method, and
authentication_fidoas the factor 3
authentication methodCREATE USER 'u1'@'localhost' IDENTIFIED WITH caching_sha2_password BY '
sha2_password' AND IDENTIFIED WITH authentication_ldap_sasl AS 'uid=u1_ldap,ou=People,dc=example,dc=com' AND IDENTIFIED WITH authentication_fido;initial_auth_option: Specifies
an initial authentication method for configuring FIDO
passwordless authentication. As shown in the following,
temporary authentication using either a generated random
password or a user-specified
auth-stringis required to
enable FIDO passwordless authentication.CREATE USER
userIDENTIFIED WITH authentication_fido INITIAL AUTHENTICATION IDENTIFIED BY {RANDOM PASSWORD | 'auth_string'};For information about configuring passwordless
authentication using FIDO pluggable authentication, See
FIDO Passwordless Authentication.
CREATE USER Role Options
The DEFAULT ROLE clause defines which roles
become active when the user connects to the server and
authenticates, or when the user executes the
SET ROLE statement during a session.
DEFAULT
Each role name uses the format described in
Section 6.2.5, “Specifying Role Names”. For example:
CREATE USER 'joe'@'10.0.0.1' DEFAULT ROLE administrator, developer;
The host name part of the role name, if omitted, defaults to
'%'.
The DEFAULT ROLE clause permits a list of
one or more comma-separated role names. These roles must exist
at the time CREATE USER is
executed; otherwise the statement raises an error
(ER_USER_DOES_NOT_EXIST), and
the user is not created.
CREATE USER SSL/TLS Options
MySQL can check X.509 certificate attributes in addition to
the usual authentication that is based on the user name and
credentials. For background information on the use of SSL/TLS
with MySQL, see Section 6.3, “Using Encrypted Connections”.
To specify SSL/TLS-related options for a MySQL account, use a
REQUIRE clause that specifies one or more
tls_option values.
Order of REQUIRE options does not matter,
but no option can be specified twice. The
AND keyword is optional between
REQUIRE options.
CREATE USER permits these
tls_option values:
NONEIndicates that all accounts named by the statement have no
SSL or X.509 requirements. Unencrypted connections are
permitted if the user name and password are valid.
Encrypted connections can be used, at the client’s option,
if the client has the proper certificate and key files.CREATE USER 'jeffrey'@'localhost' REQUIRE NONE;
Clients attempt to establish a secure connection by
default. For clients that haveREQUIRE, the connection attempt falls back to an
NONE
unencrypted connection if a secure connection cannot be
established. To require an encrypted connection, a client
need specify only the
--ssl-mode=REQUIRED
option; the connection attempt fails if a secure
connection cannot be established.NONEis the default if no SSL-related
REQUIREoptions are specified.SSLTells the server to permit only encrypted connections for
all accounts named by the statement.CREATE USER 'jeffrey'@'localhost' REQUIRE SSL;
Clients attempt to establish a secure connection by
default. For accounts that haveREQUIRE, the connection attempt fails if a secure
SSL
connection cannot be established.X509For all accounts named by the statement, requires that
clients present a valid certificate, but the exact
certificate, issuer, and subject do not matter. The only
requirement is that it should be possible to verify its
signature with one of the CA certificates. Use of X.509
certificates always implies encryption, so the
SSLoption is unnecessary in this case.CREATE USER 'jeffrey'@'localhost' REQUIRE X509;
For accounts with
REQUIRE X509, clients
must specify the--ssl-key
and--ssl-certoptions to
connect. (It is recommended but not required that
--ssl-caalso be specified
so that the public certificate provided by the server can
be verified.) This is true forISSUER
andSUBJECTas well because those
REQUIREoptions imply the requirements
ofX509.ISSUER
'issuer'For all accounts named by the statement, requires that
clients present a valid X.509 certificate issued by CA
'. Ifissuer'
a client presents a certificate that is valid but has a
different issuer, the server rejects the connection. Use
of X.509 certificates always implies encryption, so the
SSLoption is unnecessary in this case.CREATE USER 'jeffrey'@'localhost' REQUIRE ISSUER '/C=SE/ST=Stockholm/L=Stockholm/ O=MySQL/CN=CA/emailAddress=ca@example.com';
Because
ISSUERimplies the requirements
ofX509, clients must specify the
--ssl-keyand
--ssl-certoptions to
connect. (It is recommended but not required that
--ssl-caalso be specified
so that the public certificate provided by the server can
be verified.)SUBJECT
'subject'For all accounts named by the statement, requires that
clients present a valid X.509 certificate containing the
subjectsubject. If a client
presents a certificate that is valid but has a different
subject, the server rejects the connection. Use of X.509
certificates always implies encryption, so the
SSLoption is unnecessary in this case.CREATE USER 'jeffrey'@'localhost' REQUIRE SUBJECT '/C=SE/ST=Stockholm/L=Stockholm/ O=MySQL demo client certificate/ CN=client/emailAddress=client@example.com';
MySQL does a simple string comparison of the
'subject'
value to the value in the certificate, so lettercase and
component ordering must be given exactly as present in the
certificate.Because
SUBJECTimplies the
requirements ofX509, clients must
specify the--ssl-keyand
--ssl-certoptions to
connect. (It is recommended but not required that
--ssl-caalso be specified
so that the public certificate provided by the server can
be verified.)CIPHER
'cipher'For all accounts named by the statement, requires a
specific cipher method for encrypting connections. This
option is needed to ensure that ciphers and key lengths of
sufficient strength are used. Encryption can be weak if
old algorithms using short encryption keys are used.CREATE USER 'jeffrey'@'localhost' REQUIRE CIPHER 'EDH-RSA-DES-CBC3-SHA';
The SUBJECT, ISSUER, and
CIPHER options can be combined in the
REQUIRE clause:
CREATE USER 'jeffrey'@'localhost' REQUIRE SUBJECT '/C=SE/ST=Stockholm/L=Stockholm/ O=MySQL demo client certificate/ CN=client/emailAddress=client@example.com' AND ISSUER '/C=SE/ST=Stockholm/L=Stockholm/ O=MySQL/CN=CA/emailAddress=ca@example.com' AND CIPHER 'EDH-RSA-DES-CBC3-SHA';
CREATE USER Resource-Limit Options
It is possible to place limits on use of server resources by
an account, as discussed in Section 6.2.21, “Setting Account Resource Limits”.
To do so, use a WITH clause that specifies
one or more resource_option values.
Order of WITH options does not matter,
except that if a given resource limit is specified multiple
times, the last instance takes precedence.
CREATE USER permits these
resource_option values:
MAX_QUERIES_PER_HOUR,
count
MAX_UPDATES_PER_HOUR,
count
MAX_CONNECTIONS_PER_HOUR
 count
For all accounts named by the statement, these options
restrict how many queries, updates, and connections to the
server are permitted to each account during any given
one-hour period. Ifcountis
0(the default), this means that there
is no limitation for the account.MAX_USER_CONNECTIONS
countFor all accounts named by the statement, restricts the
maximum number of simultaneous connections to the server
by each account. A nonzero
countspecifies the limit for
the account explicitly. If
countis0
(the default), the server determines the number of
simultaneous connections for the account from the global
value of the
max_user_connections
system variable. If
max_user_connectionsis
also zero, there is no limit for the account.
Example:
CREATE USER 'jeffrey'@'localhost' WITH MAX_QUERIES_PER_HOUR 500 MAX_UPDATES_PER_HOUR 100;
CREATE USER Password-Management Options
CREATE USER supports several
password_option values for password
management:
Password expiration options: You can expire an account
password manually and establish its password expiration
policy. Policy options do not expire the password.
Instead, they determine how the server applies automatic
expiration to the account based on password age, which is
assessed from the date and time of the most recent account
password change.Password reuse options: You can restrict password reuse
based on number of password changes, time elapsed, or
both.Password verification-required options: You can indicate
whether attempts to change an account password must
specify the current password, as verification that the
user attempting to make the change actually knows the
current password.Incorrect-password failed-login tracking options: You can
cause the server to track failed login attempts and
temporarily lock accounts for which too many consecutive
incorrect passwords are given. The required number of
failures and the lock time are configurable.
This section describes the syntax for password-management
options. For information about establishing policy for
password management, see
Section 6.2.15, “Password Management”.
If multiple password-management options of a given type are
specified, the last one takes precedence. For example,
PASSWORD EXPIRE DEFAULT PASSWORD EXPIRE is the same as
NEVERPASSWORD EXPIRE.
NEVER
Note
Except for the options that pertain to failed-login
tracking, password-management options apply only to accounts
that use an authentication plugin that stores credentials
internally to MySQL. For accounts that use a plugin that
performs authentication against a credentials system that is
external to MySQL, password management must be handled
externally against that system as well. For more information
about internal credentials storage, see
Section 6.2.15, “Password Management”.
A client has an expired password if the account password was
expired manually or the password age is considered greater
than its permitted lifetime per the automatic expiration
policy. In this case, the server either disconnects the client
or restricts the operations permitted to it (see
Section 6.2.16, “Server Handling of Expired Passwords”). Operations
performed by a restricted client result in an error until the
user establishes a new account password.
CREATE USER permits these
password_option values for
controlling password expiration:
PASSWORD EXPIREImmediately marks the password expired for all accounts
named by the statement.CREATE USER 'jeffrey'@'localhost' PASSWORD EXPIRE;
PASSWORD EXPIRE DEFAULTSets all accounts named by the statement so that the
global expiration policy applies, as specified by the
default_password_lifetime
system variable.CREATE USER 'jeffrey'@'localhost' PASSWORD EXPIRE DEFAULT;
PASSWORD EXPIRE NEVERThis expiration option overrides the global policy for all
accounts named by the statement. For each, it disables
password expiration so that the password never expires.CREATE USER 'jeffrey'@'localhost' PASSWORD EXPIRE NEVER;
PASSWORD EXPIRE INTERVAL
NDAYThis expiration option overrides the global policy for all
accounts named by the statement. For each, it sets the
password lifetime toNdays.
The following statement requires the password to be
changed every 180 days:CREATE USER 'jeffrey'@'localhost' PASSWORD EXPIRE INTERVAL 180 DAY;
CREATE USER permits these
password_option values for
controlling reuse of previous passwords based on required
minimum number of password changes:
PASSWORD HISTORY DEFAULTSets all accounts named by the statement so that the
global policy about password history length applies, to
prohibit reuse of passwords before the number of changes
specified by the
password_historysystem
variable.CREATE USER 'jeffrey'@'localhost' PASSWORD HISTORY DEFAULT;
PASSWORD HISTORY
 N
This history-length option overrides the global policy for
all accounts named by the statement. For each, it sets the
password history length toN
passwords, to prohibit reusing any of the
Nmost recently chosen
passwords. The following statement prohibits reuse of any
of the previous 6 passwords:CREATE USER 'jeffrey'@'localhost' PASSWORD HISTORY 6;
CREATE USER permits these
password_option values for
controlling reuse of previous passwords based on time elapsed:
PASSWORD REUSE INTERVAL DEFAULTSets all statements named by the account so that the
global policy about time elapsed applies, to prohibit
reuse of passwords newer than the number of days specified
by the
password_reuse_interval
system variable.CREATE USER 'jeffrey'@'localhost' PASSWORD REUSE INTERVAL DEFAULT;
PASSWORD REUSE INTERVAL
NDAYThis time-elapsed option overrides the global policy for
all accounts named by the statement. For each, it sets the
password reuse interval toN
days, to prohibit reuse of passwords newer than that many
days. The following statement prohibits password reuse for
360 days:CREATE USER 'jeffrey'@'localhost' PASSWORD REUSE INTERVAL 360 DAY;
CREATE USER permits these
password_option values for
controlling whether attempts to change an account password
must specify the current password, as verification that the
user attempting to make the change actually knows the current
password:
PASSWORD REQUIRE CURRENTThis verification option overrides the global policy for
all accounts named by the statement. For each, it requires
that password changes specify the current password.CREATE USER 'jeffrey'@'localhost' PASSWORD REQUIRE CURRENT;
PASSWORD REQUIRE CURRENT OPTIONALThis verification option overrides the global policy for
all accounts named by the statement. For each, it does not
require that password changes specify the current
password. (The current password may but need not be
given.)CREATE USER 'jeffrey'@'localhost' PASSWORD REQUIRE CURRENT OPTIONAL;
PASSWORD REQUIRE CURRENT DEFAULTSets all statements named by the account so that the
global policy about password verification applies, as
specified by the
password_require_current
system variable.CREATE USER 'jeffrey'@'localhost' PASSWORD REQUIRE CURRENT DEFAULT;
As of MySQL 8.0.19, CREATE USER
permits these password_option
values for controlling failed-login tracking:
FAILED_LOGIN_ATTEMPTS
 N
Whether to track account login attempts that specify an
incorrect password.Nmust be a
number from 0 to 32767. A value of 0 disables failed-login
tracking. Values greater than 0 indicate how many
consecutive password failures cause temporary account
locking (ifPASSWORD_LOCK_TIMEis also
nonzero).PASSWORD_LOCK_TIME {N
| UNBOUNDED}How long to lock the account after too many consecutive
login attempts provide an incorrect password.
Nmust be a number from 0 to
32767, orUNBOUNDED. A value of 0
disables temporary account locking. Values greater than 0
indicate how long to lock the account in days. A value of
UNBOUNDEDcauses the account locking
duration to be unbounded; once locked, the account remains
in a locked state until unlocked. For information about
the conditions under which unlocking occurs, see
Failed-Login Tracking and Temporary Account Locking.
For failed-login tracking and temporary locking to occur, an
account’s FAILED_LOGIN_ATTEMPTS and
PASSWORD_LOCK_TIME options both must be
nonzero. The following statement creates an account that
remains locked for two days after four consecutive password
failures:
CREATE USER 'jeffrey'@'localhost' FAILED_LOGIN_ATTEMPTS 4 PASSWORD_LOCK_TIME 2;
CREATE USER Comment and Attribute Options
As of MySQL 8.0.21, you can create an account with an optional
comment or attribute, as described here:
User comment
To set a user comment, add
COMMENTto the
'user_comment'
CREATE USERstatement, where
user_commentis the text of the
user comment.Example (omitting any other options):
CREATE USER 'jon'@'localhost' COMMENT 'Some information about Jon';
User attribute
A user attribute is a JSON object made up of one or more
key-value pairs, and is set by including
ATTRIBUTEas part
'json_object'
ofCREATE USER.
json_objectmust be a valid
JSON object.Example (omitting any other options):
CREATE USER 'jim'@'localhost' ATTRIBUTE '{"fname": "James", "lname": "Scott", "phone": "123-456-7890"}';
User comments and user attributes are stored together in the
ATTRIBUTE column of the Information Schema
USER_ATTRIBUTES table. This query
displays the row in this table inserted by the statement just
shown for creating the user jim@localhost:
mysql>SELECT * FROM INFORMATION_SCHEMA.USER_ATTRIBUTES->WHERE USER = 'jim' AND HOST = 'localhost'\G*************************** 1. row *************************** USER: jim HOST: localhost ATTRIBUTE: {"fname": "James", "lname": "Scott", "phone": "123-456-7890"} 1 row in set (0.00 sec)
The COMMENT option in actuality provides a
shortcut for setting a user attribute whose only element has
comment as its key and whose value is the
argument supplied for the option. You can see this by
executing the statement CREATE USER 'jon'@'localhost', and observing
COMMENT 'Some information about Jon'
the row which it inserts into the
USER_ATTRIBUTES table:
mysql>CREATE USER 'jon'@'localhost' COMMENT 'Some information about Jon';Query OK, 0 rows affected (0.06 sec) mysql>SELECT * FROM INFORMATION_SCHEMA.USER_ATTRIBUTES->WHERE USER = 'jon' AND HOST = 'localhost';+------+-----------+-------------------------------------------+ | USER | HOST | ATTRIBUTE | +------+-----------+-------------------------------------------+ | jon | localhost | {"comment": "Some information about Jon"} | +------+-----------+-------------------------------------------+ 1 row in set (0.00 sec)
You cannot use COMMENT and
ATTRIBUTE together in the same
CREATE USER statement; attempting to do so
causes a syntax error. To set a user comment concurrently with
setting a user attribute, use ATTRIBUTE and
include in its argument a value with a
comment key, like this:
mysql> CREATE USER 'bill'@'localhost' -> ATTRIBUTE '{"fname":"William", "lname":"Schmidt", -> "comment":"Website developer"}';
Query OK, 0 rows affected (0.16 sec)
Since the content of the ATTRIBUTE row is a
JSON object, you can employ any appropriate MySQL JSON
functions or operators to manipulate it, as shown here:
mysql>SELECT->USER AS User,->HOST AS Host,->CONCAT(ATTRIBUTE->>"$.fname"," ",ATTRIBUTE->>"$.lname") AS 'Full Name',->ATTRIBUTE->>"$.comment" AS Comment->FROM INFORMATION_SCHEMA.USER_ATTRIBUTES->WHERE USER='bill' AND HOST='localhost';+------+-----------+-----------------+-------------------+ | User | Host | Full Name | Comment | +------+-----------+-----------------+-------------------+ | bill | localhost | William Schmidt | Website developer | +------+-----------+-----------------+-------------------+ 1 row in set (0.00 sec)
To set or to make changes in the user comment or user
attribute for an existing user, you can use a
COMMENT or ATTRIBUTE
option with an ALTER USER
statement.
Because the user comment and user attribute are stored
together internally in a single
JSON column, this sets an upper
limit on their maximum combined size; see
JSON Storage Requirements, for more
information.
See also the description of the Information Schema
USER_ATTRIBUTES table for more
information and examples.
CREATE USER Account-Locking Options
MySQL supports account locking and unlocking using the
ACCOUNT LOCK and ACCOUNT options, which specify the locking state for
UNLOCK
an account. For additional discussion, see
Section 6.2.20, “Account Locking”.
If multiple account-locking options are specified, the last
one takes precedence.
CREATE USER Binary Logging
CREATE USER is written to the
binary log if it succeeds, but not if it fails; in that case,
rollback occurs and no changes are made. A statement written
to the binary log includes all named users. If the IF clause is given, this includes even users
NOT EXISTS
that already exist and were not created.
The statement written to the binary log specifies an
authentication plugin for each user, determined as follows:
The plugin named in the original statement, if one was
specified.Otherwise, the default authentication plugin. In
particular, if a useru1already exists
and uses a nondefault authentication plugin, the statement
written to the binary log forCREATE USER IF NOTnames the default authentication
EXISTS u1
plugin. (If the statement written to the binary log must
specify a nondefault authentication plugin for a user,
include it in the original statement.)
If the server adds the default authentication plugin for any
nonexisting users in the statement written to the binary log,
it writes a warning to the error log naming those users.
If the original statement specifies the
FAILED_LOGIN_ATTEMPTS or
PASSWORD_LOCK_TIME option, the statement
written to the binary log includes the option.
CREATE USER statements with
clauses that support multifactor authentication (MFA) are
written to the binary log.
CREATE USER ... IDENTIFIED WITH .. INITIALstatements
AUTHENTICATION IDENTIFIED WITH ...
are written to the binary log asCREATE USER ..,
IDENTIFIED WITH .. INITIAL AUTHENTICATION IDENTIFIED WITH
.. AS
'password-hash'
where thepassword-hashis the
user-specifiedauth-stringor
the random password generated by server when the
RANDOM PASSWORDclause is specified.
Тематические термины: MySQL, MariaDB.
В инструкции мы рассмотрим базовые аспекты работы с пользователями и рассмотрим некоторые примеры.
Создание пользователя и выдача прав
Рассмотрим два варианта создания учетных записей в СУБД MySQL/MariaDB.
1. С помощью команды CREATE USER.
Данный метод является универсальным. Он позволяет создать пользователя в системе без каких либо прав. После права назначаются командой GRANT.
Пример создания учетной записи:
После можно задать права командой:
> GRANT <тип привилегий> ON <объект> TO <пользователь> <дополнительные опции>;
- ALL PRIVILEGES — предоставляет полные права на использование данных.
- *.* — права предоставляются на все базы и все таблицы.
- dbuser — имя учетной записи.
- localhost — доступ для учетной записи будет предоставлен только с локального компьютера.
2. С помощью команды GRANT.
Например, эта команда предоставляет права доступа пользователю и, если его не существует, создает его:
- ALL PRIVILEGES — предоставляет полные права на использование данных.
- *.* — права предоставляются на все базы и все таблицы.
- dbuser — имя учетной записи.
- localhost — доступ для учетной записи будет предоставлен только с локального компьютера.
- password — пароль, который будет задан пользователю.
- WITH GRANT OPTION — будут предоставлены дополнительные права на изменение структуры баз и таблиц.
Посмотреть существующих пользователей и их привилегии
Список привилегий (для кажого пользователя смотряться отдельно):
Смена пароля
Команды отличаются в зависимости от версии СУБД.
MySQL
Версия 5.7.6 и более современная:
Версия 5.7.5 и древнее:
* посмотреть версию СУБД можно командой mysql -V.
MariaDB
В MariaDB команда для смены пароля одна, независимо от версии:
* в данном примере будет задан пароль New_Password для пользователя root.
Смена пароля пользователю root после установки
Для старых версий СУБД и новых процедуры различаются.
MySQL < 8 или MariaDB
Первый раз пароль задается из командной строки операционной системы (для MySQL/MariaDB):
Для смены пароля root необходимо выполнить команду в оболочке mysql по инструкции, описанной выше.
MySQL 8 и выше
Пароль создается автоматически при установке системы. Его можно посмотреть командой:
grep ‘password’ /var/log/mysqld.log
Мы увидим что-то на подобие:
* где oi25?wznro%W — пароль для пользователя root.
Заходим в оболочку sql с помощью данного пароля:
и меняем его.
