

- Introduction
- Background
- Привязать SSL сертификат к сайту IIS
- Getting IIS Express
- Transferring Settings Full IIS
- Configuration Flexibility
- Reviewing Your Sites
- Changing Your Directory
- Changing Your Binding
- Adding a Binding
- Creating a New Site
- Modifying the Defaults
- Webserver Changes
- SSL Configuration
- Per User Configuration Files
- Configuring Visual Studio
- Running Your Site without the Debugger
- Contents
- Configuring SSL on Sockets
- Configuring HTTPS (through SSL) on Web Applications
- Configuring https on IIS Hosted Websites
- Configuring https on Self-hosted (OWIN/Katana) Websites
- The Benefits of IIS Express
- Using the Code
- History
- Command Line Configuration
- Virtual Directories and Custom Pathing
- Running Multiple Sites
- Showing Off Your Work
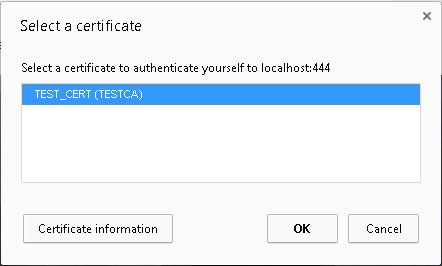
- Client Authentication Using Client Certificates
- Certificate Revocation List (CRL)
- Certificate Trust List (CTL)
- Configuring IIS for Client Certificate Validation
- Validating Client Certificates in Code
- Validating Client Certificates in WCF Service
- WCF Client Certificate Configuration
- Looking Forward
- Генерация CSR запроса в IIS
- Points of Interest
- Watching Your Site Work
- Установка SSL сертификата в ISS
- Conclusion
Introduction
Through this tip, we are going to enable SSL with IIS Express in Visual Studio.
Background
This article, if read in continuance with my previous article (here), will give you enough background to start with. However, if you already have basic understanding of SSL, you may safely skip reading it.
Данная инструкция описывает процедуру выпуска и установки SSL сертификатов на веб сервере IIS (Internet Information Services) в Windows Server.
In this article, we will look at implementing SSL and Client Certificates in Windows environment. However, even if you do not belong to the Microsoft world, this article will give you a good insight into few of the core concepts in certificate based security.
I would really love your feedback and corrections (if any).
IIS Express is a lightweight and tiny version of IIS for developers to run and test the web sites directly from Visual Studio. I hope by this time you must be using it as your default development
web server as well. Just to quickly recall, IIS Express was introduced
with VS 2010 SP 1, where we used to have both Visual Studio Development Server (WebDev.WebServer) and IIS Express. However with Visual Studio 2013,
IIS Express has been set as a default web server.
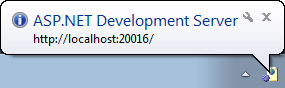
That indicated that a small webserver had been launched on a random port and it was hosting your application. That way, when the browser was launched, you could see your site in action. OK, that’s cool but there were a lot of limitations. For one thing, it only worked on your local computer. You couldn’t open up your firewall and have your buddy test out your site. It also didn’t play nice with SSL or other instances of Cassini. Speaking of which, if you weren’t careful, you would end up with multiple instances of Cassini running on your computer at once. Basically, a nice idea but the implementation was lacking. Enter IIS Express.
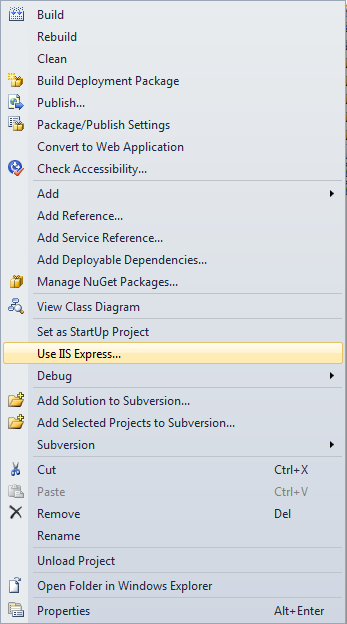
Привязать SSL сертификат к сайту IIS
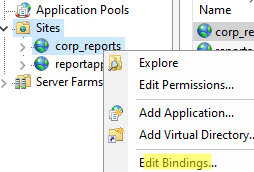
Теперь нужно привязать ваш сертификат к сайту IIS, порту и/или IP адресу. Найдите ваш сайт в консоли IIS и выберите Edit Bindings.
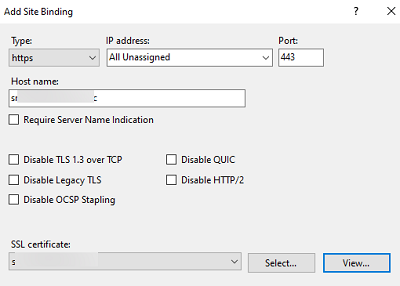
Нажмите Add и заполните следующую информацию:
- Type:
https - IP Address: выберите
All Unassigned
, или выберите конкретный IP адрес, которому нужно привязать SSL сертификат (на одном порту и IP адресе веб сервера IIS можно запустить несколько сайтов) - Hostname: укажите имя узла, для которого выпущен сертификат
- SSL Certificate: выберите из списка SSL сертификат, который вы установили
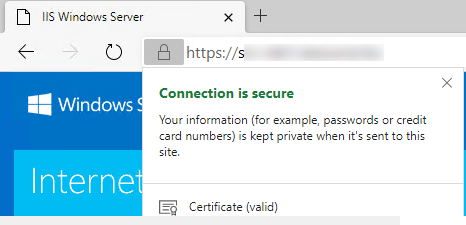
Откройте ваш веб сайт IIS в браузере используя префикс
https://
. Если сертификат установлен правильно в адресной строке браузера появится зеленый замок. Это значит что подключение защищено. Нажмите на замок чтобы просмотреть информацию о вашем SSL сертификате.
Далее нужно настроить правила, которое будет перенаправлять все HTTP запросы к сайту IIS на HTTPS.
Getting IIS Express
To get IIS Express, you can either install WebMatrix or you can install the stand-alone version of IIS Express. The direct download can be found here: http://www.microsoft.com/en-us/download/details.aspx?id=1038 This raises an interesting point of interest: IIS Express is not tied to Visual Studio. This is an awesome feature because it means we can use it for other website development projects. In fact, IIS Express supports PHP as well as the standard HTML files. That alone puts this web server a step ahead of Cassini and we are just getting started.
Transferring Settings Full IIS
Let’s face it – you aren’t going to publish the live version of your site using IIS Express. There is going to come a day where the baby bird needs to leave the nest. At that time, you probably want to replicate the settings in your dev environment over to your live environment, since you set your dev environment up to mimic how it would work in the real world. The good news is that IIS Express thought about that and made it simple. To set this up, go into the Properties sheet under your web project and select the Package/Publish Web tab. Under the section Items to deploy (applies to Web Deploy only), check the box that says Include IIS settings as configured in IIS Express like so:
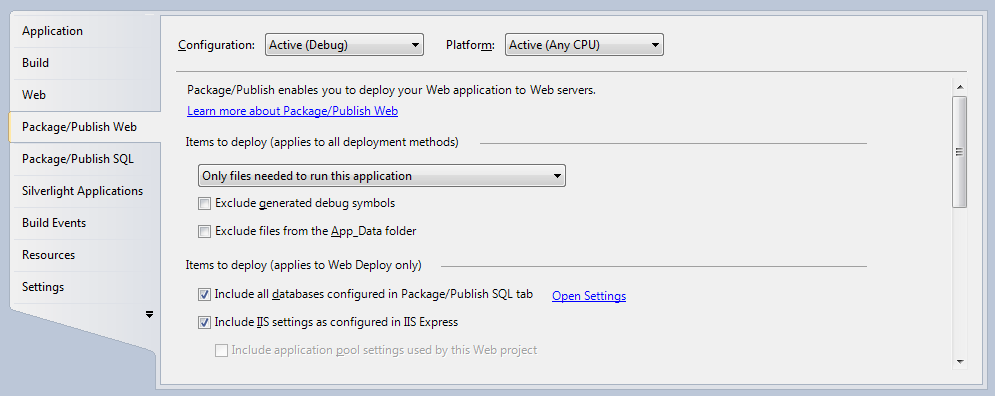
Done. Remember, this isn’t total magic, so if you don’t use the Web Deploy, it won’t work automatically.
Configuration Flexibility
I’m going to go over a few sections that you can play with. Modifying the config file in any serious manner would require an entire article (which wouldn’t be a bad thing). I will focus on just a few key areas that might benefit you the most.
Reviewing Your Sites
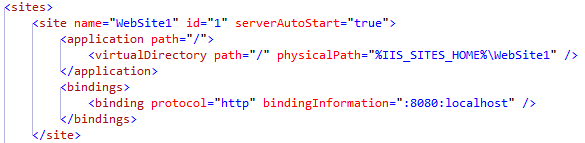
There is a section titled “sites” that contains a set of sites underneath it. Each site corresponds to a saved site in IIS Express (makes sense, right?). When you run IIS Express from the command prompt, you are given the option of launching the website via site name or ID number. This information is listed in the site tag.
Changing Your Directory
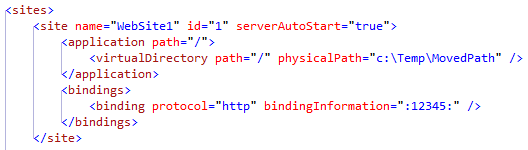
There may come a time when you want to move the location where a site points. To do this, simply edit the physicalPath attribute of the virtualDirectory element to reflect the new location. As an example, my example site (Website1) points to C:Program FilesIIS ExpressWebSite1. I am going to change that to point to a directory that contains my test site like so:

Now when I boot up my site, it pulls from this new location. Just make sure you refresh your browser in order to clear out any cache.
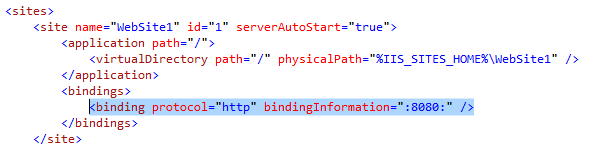
Changing Your Binding
This is a more common task for me, primarily because it is how we allow outside people use our site. However, you can also change the port number. This can be useful when you have another application that comes along and wants to use a port you are already using (rare but it happens). IIS Express is good about handling port issues internally but sometimes there are issues outside of your application that will interfere. For my example, I will change my port to be 12345 so it is easy to remember and I am going to take off the localhost designation so it can be accessed by my coworkers:
Adding a Binding
Here is an easy way to add SSL to your site. Simply add a https binding and point the bindingInformation to a port number between 44300 and 44399. In my example, I added a HTTPS site that listens to port 44332:

Creating a New Site
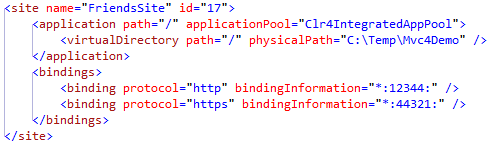
Note that I changed the site id to be 17. That is because 17 is the next free ID number in my config file currently. If I were to put a duplicate ID number in the config, even if I tried to just load the one site, it would throw an error.
Modifying the Defaults
Right below the last specified site still inside the sites element is a set of defaults. Here is where you can change where the log files are written or even what the default applicationPool is. This is what it looks like:

I won’t be changing anything here, but this is where you would make a change in certain rare circumstances.
Webserver Changes
You can modify how IIS Express works in the same way you can modify IIS. For the most part, you should never go into these sections. However, there are a couple places that might need a change once in a while. These include:
This is the section that will be looked through to find the first file that matches to be used as the homepage:

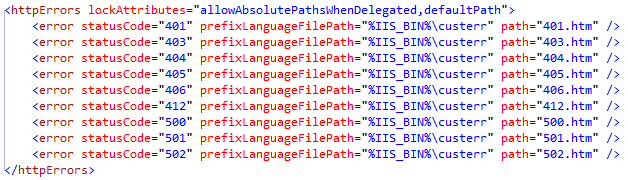
Custom Error Pages
Here is where you would change your error pages for each type of HTTP error:
SSL Configuration
It used to be that in order to test SSL, you needed to create a self-signed certificate and host it on a full web server on your machine. The steps were numerous and a bit complicated, especially if you weren’t very confident of what you were doing. Here is a good article on how to create a self-signed certificate in IIS 7 (which, as the article points out, is much easier to do than in previous versions): Create a Self Signed Certificate. Compare that to the steps we need to do: Select your project and view the properties. In the properties, set SSL Enabled to True. I think we all owe the developers of IIS Express a coffee or something for that little gem. It doesn’t get much easier than that.
Just to be clear, you do not modify the project properties but instead change the setting in the properties when you select the project. For whatever reason, Microsoft decided to name the property sheet of a project “Properties” when there was already the “Properties” window. Here is a screenshot to make it clearer:
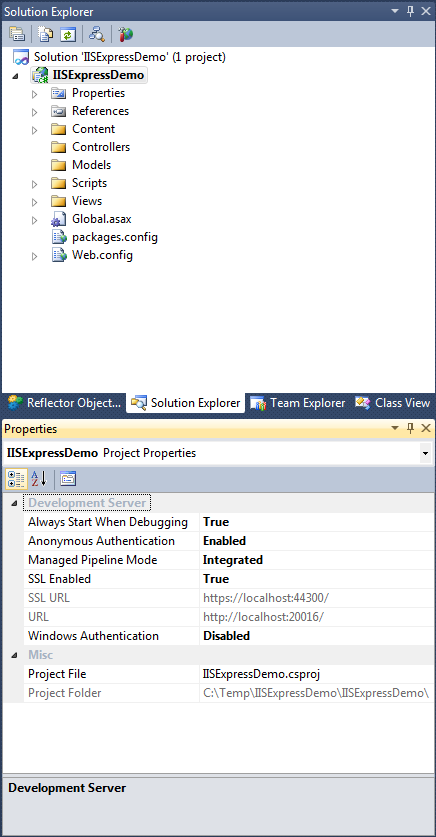
Notice also that there are other options on this property sheet that you can play with. For instance, you could disable anonymous authentication or enable Windows authentication. Not bad for a couple of simple properties. One important thing to note here is that the certificate won’t be trusted. You will still be told “This certificate is untrusted” when you browse to the site. This is fine. You aren’t testing the certificate itself, but how the site responds on SSL.
Per User Configuration Files
If you say Yes, Visual Studio will take care of adding the appropriate settings to the config file. Piece of cake, right?
Configuring Visual Studio
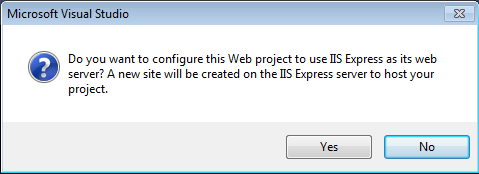
When you hit yes, the changes will be made and you will be informed what the new URL for your site will be, like so:


You have now performed the arduous task of setting up IIS Express to be the default development web server for Visual Studio. This includes ASP.NET sites, WCF sites, and other web projects.
Running Your Site without the Debugger
IIS Express isn’t a part of Visual Studio; it just plays nicely with it. That means it can serve up your site without the debugger running. In fact, it is a misconception to think that the way you start IIS Express is by starting the debugger. That definitely does it, but that is just a convenience. IIS Express can run your site independently of Visual Studio. The benefit here is that you can make changes to your project, hit the save button, and then refresh your browser to see the results instantly. If you change back-end code, you will need to do a project build before you refresh the page. Either way, this is a great option. Now you can keep your site running all day while you tweak it. As you will see, there are other benefits to this feature as well.
Contents
- Configuring SSL
Configuring IIS for SSLConfiguring SSL in a self-hosted application - Configuring IIS for SSL
- Configuring SSL in a self-hosted application
- Client authentication using Client Certificates
CRL, CTL and Cert StoresConfiguring IIS for Client Certificate ValidationAccessing and validating Client Certificates in code (.NET)Client Certificate validation in WCF - CRL, CTL and Cert Stores
- Configuring IIS for Client Certificate Validation
- Accessing and validating Client Certificates in code (.NET)
- Client Certificate validation in WCF
Configuring SSL on Sockets
.NET Framework provides the SslStream class that provides a stream used for client-server communication that uses SSL to authenticate the server and also the client. More details and code can be found here. You will notice that in this case, since we are playing with the Transport layer in socket programming, we will have to do some of the SSL plumbing manually in code. Please note how we are not talking about HTTPS here but SSL over sockets.
Configuring HTTPS (through SSL) on Web Applications
As mentioned in my previous article, HTTPS uses Digital Certificates and the PKI at its core. It can be used over any network traffic utilizing reliable stream transport protocol (TCP). HTTPS is one of the most popular implementation of SSL. A server is «identified» and the traffic is encrypted using SSL. How is the server «identified» by HTTPS? It is through the «Issued To» property of the certificate used by the server.
However a certificate’s «issued to» property can now have a wildcard character to reflect its association with a domain. For e.g., *.blah.com could be used to apply https on www.one.blah.com and www.two.blah.com. This again is not optimal as there may be requirement (as in case of web hosting companies) of using a single certificate for multiple sites with different domain names.
Then came the multi-domain, Subject Alternative Name (SAN) certificates. These have a list of DNS names in «Subject Alternative Name» field of such certificate. Hence, the OS can now decrypt the https traffic using such certificate and find out the host header address for further processing. On the other end, the client can also positively verify that the server is on the Subject Alternative Name list. However, this was again not the best solution, since every time a change was required (e.g., remove/change one of the entries in the SAN list), the certificate had to be revoked and a new certificate is required to be issued by the CA with the changes in it.
With TLS came an extension called «Server Name Indication» (SNI). SNI is an added visible part of the https traffic, and contains the host header information that the server can use to pick the correct certificate for decryption. However, please remember that since SSL/TLS relies on both: server and client, both parties should be complaint when it comes to any advancement in the protocol stack. IE on Windows XP doesn’t support TLS, hence SNI is not supported on it.
Configuring https on IIS Hosted Websites
On IIS, the steps for configuring SSL (for a Website/ Web Api/ Web Service) are relatively simple. Let us assume that you have a valid digital certificate for use in SSL. Either such certificate is minted by your local CA or is given to you by a well-known external CA. Let us assume that the certificate is installed correctly in the Computer’s Personal certificate store.
We will discuss three scenarios here (there can be plenty others):
Hosting a website with address «test. dummyblah. com» and we have a server certificate installed on the server with «issued to» property set to «*. dummyblah. com».
This is a common scenario where an organisation is hosting multiple websites (with same domain name).
The first step in setting up SSL is to create «Site Bindings» for https. Please refer to the image below; you will see how a new https binding is created with a Wildcard SSL certificate. Please remember that the «Host name» field in «Edit Site Bindings» window will only make sense if the certificate used is a Wildcard certificate. Hence, this field is enabled only if such certificate is selected in the «SSL Certificate» dropdown.
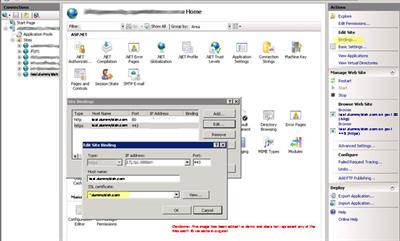
However, this site is still open to http request (there is a binding present for it). If we want to restrict the site to only cater to https requests, we will have to do that setting from «SSL Settings» for that site.
Hosting an HTTPS website on a Shared Hosting provider (GoDaddy, Winhost etc) server
This will depend on whether the hosting provider has SNI capability. If yes, you won’t need your website hosted with dedicated IP (remember the chicken and egg problem?) which is generally more expensive. The hosting providers generally provide a self-service website (CPANEL for e.g.) that you can use to buy and link a certificate to your website.
Hosting an HTTPS website on local IIS on a development machine
You (as a developer) may like to host your website/webapi on your computer (running IIS 7 for e.g.) and play with HTTPS during development phase. To do this, you will need a certificate valid on only your own machine. The easiest way to get such certificate is to get IIS to generate it for you. If you click on the server name (top level) in IIS Management Console, you will see a «Server Certificate» action button. Opening this will let you create Self-Signed certificate. This will generate a self-signed server certificate and install it to your local computer’s Personal certificate store.
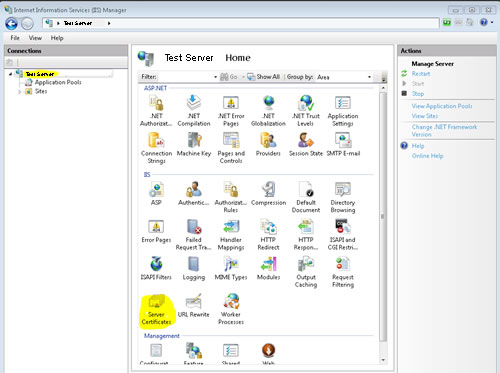
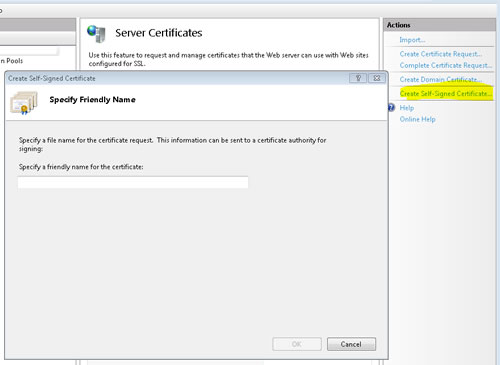
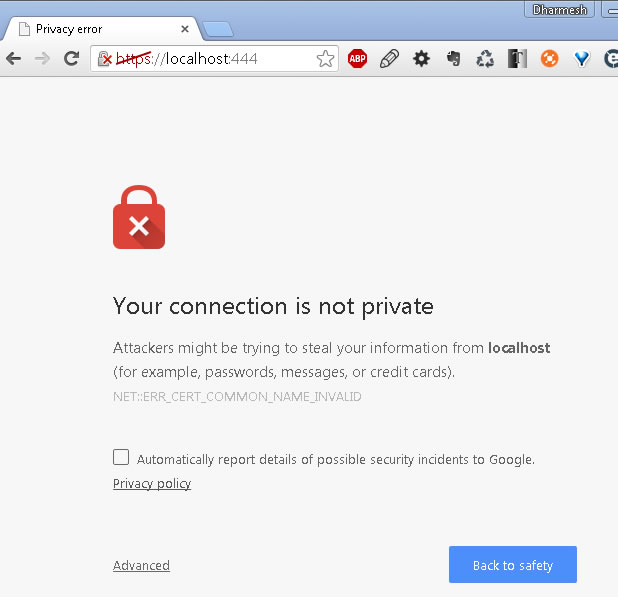
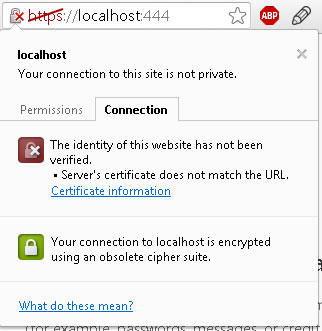
You can then use this certificate to create https binding for your website. The only glitch is that you will see error messages in browser that you will have to ignore since the self-signed certificate’s «issue to» property is set to the machine name and not the website name (localhost).

On your development machine, you can generate and use test certificates using makecert.exe as mentioned in this link.
Development computer running Visual Studio
This scenario is the simplest. The zest of using Visual Studio is it does take care of lots of developer tasks itself. For example, when you install Visual Studio, it will generate and install a server certificate called «IIS Express Development Certificate» that has the «issued to» field set to «localhost». (Alternatively, if you want to do the same manually -without using VS- you may have to use some certificate generation utility like Makecert, etc. to generate such certificate.)
Now, whenever you want to enable SSL on a website, just enable it from the Properties window for the website/webapi project.
Configuring https on Self-hosted (OWIN/Katana) Websites
When a website is self-hosted using services provided by Katana (Microsoft implementation of OWIN), you obviously don’t get the nice features offered by IIS. Remember that Katana in essence uses the «HttpListener» class, which in turn utilizes the kernel mode «http.sys» driver provided by the Windows OS. Hence, if we have to configure HTTPS over self-hosted sites, we will have to configure it at the OS level.
A common way of configuring SSL at OS level is to use the powerful «netsh» command.
netsh http show sslcert
Here, all 0s means all IP addresses on this machine. It can be a specific IP as well.
Note: Don’t forget to restart your server/ computer after such changes have been made through netsh (as these apply to Kernel mode processes).
There is a nice utility available here that provides UI to view and manage http.sys bindings. The article also explains about url acls which is more relevant in case of self-hosted application / web services.
The Benefits of IIS Express
For such a simple application, there are a lot of really great benefits that you will experience as a result of using IIS Express. Here is a list of what I see as the important benefits (each links to the section below that explains how to configure it and what it does):
Each of these items has a section below dedicated to showing you how they work. However, you only need to use what your project requires. You have already done all of the configuration you will need for most projects. Look at the information below as a “what else can it do” rather than a “what do I need to do yet”.
Using the Code
There are several
features of IIS express which you can find very useful and be used in a
similar way that we do with IIS. One of the great features of IIS
express is to run your application in both default and SSL mode. You can
achieve this very easily.
To enable the SSL with in IIS Express, you have to just set “SSL Enabled = true” in the project properties window.

By default SSL enabled is set to false with IIS Express; so if
you run your web application first time, you will only be able to find the
default URL and you can access the site over http.
Once the SSL is enabled (SSL Enabled = true); you can find both the URLs available in application browser window.

History
This member has not yet provided a Biography. Assume it’s interesting and varied, and probably something to do with programming.
Command Line Configuration
We have already touched upon a few of the command-line goodies, including launching IIS Express to watch the traffic and also loading all of the sites for a particular AppPool. However, there are other hidden gems in the form of command line options that can be very useful, including:
I have intentionally omitted a few switches from the above list. The reason for this is because they operate differently than the rest. There are some times when you want to run a site without adding an entry in the configuration. These switches are for just this case. They will not work with most of the other commands, which is another reason why they are separate. Here are the extra options:
The commands here are simple, but there are a lot of nice features that come in handy every once in a while. As always, you can use the /? command to give you these commands and basic explanations of each.
Virtual Directories and Custom Pathing
First, I open the property sheet to the right location. My current config looks like this:
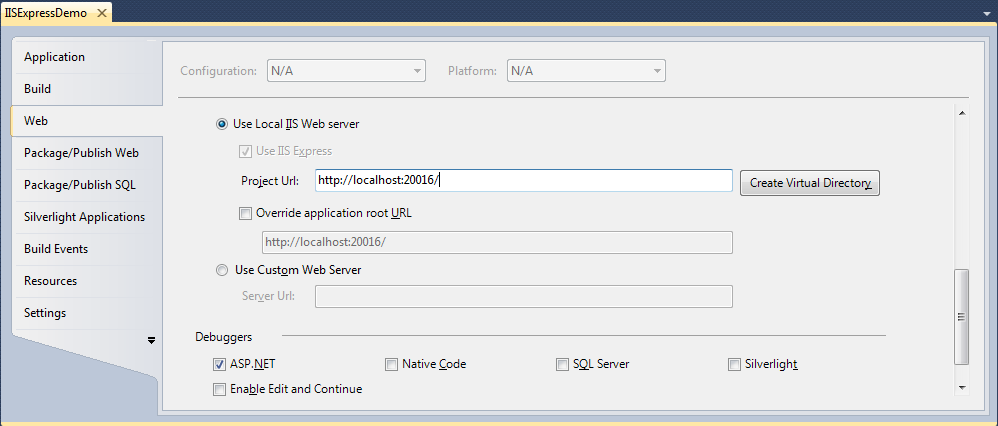
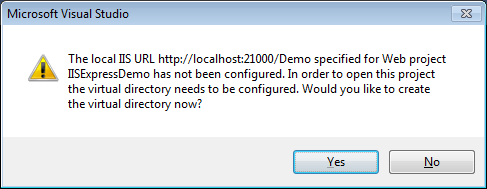
I modify the Project URL to point to the new port and a virtual directory called Demo. I click the Create Virtual Directory button and get this message:
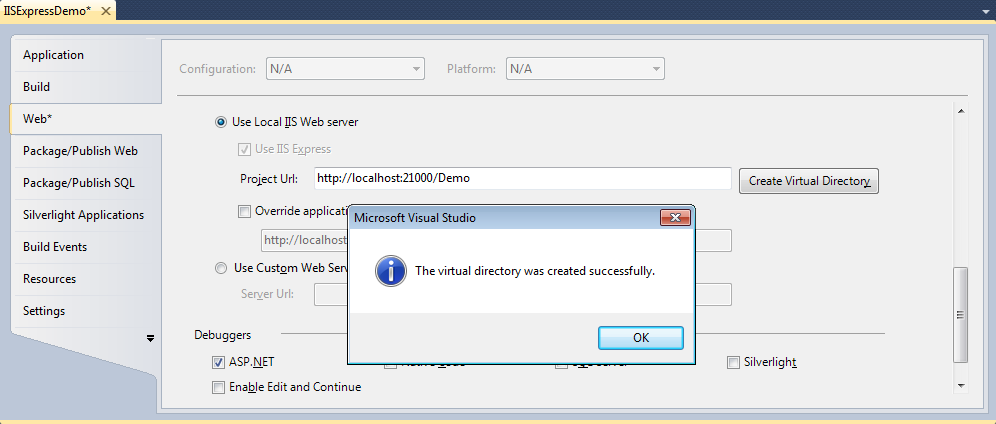
Now when I launch this website, it will operate on the same port as my other site. The way it does this without conflict is because it is using the Virtual Directory. Now my first site can access this site using the relative path of /Demo.
Running Multiple Sites
Why is it that best practice encourages us to break apart monolithic applications and yet our tools expect us to only have one website running at a time? Here in the real world, I often find myself developing applications that interact with other websites and services. Fortunately, IIS Express again comes to our rescue. If you have multiple projects open in Visual Studio, running each in the debugger once will start that application in IIS Express. After you have started and stopped your last application, you will have all of the sites running in IIS Express still. Now they can all interact.
That launches the sites that use the specified application pool (which, on my machine, is the default application pool). Unless you have changed the default configuration (which we will see how to do below), that will launch every site you have ever configured in IIS Express. That might not be what you were looking for (on my testing machine, I loaded over thirty sites at once). A far better way, in my mind, to launch multiple sites from the command prompt is to launch multiple command prompts. This may sound like a mess, but think about it: each window will display only the messages it is sending and receiving. That will more easily show you if you are having a communication issue. The nice thing about this method is that IIS Express will only open up one system tray icon. You can see all of your sites together in one place. It does, however, open up one instance of the IIS Express web server per command window. In this way, it truly is like two different web servers talking to each other.
The benefit of this really comes into play when you are developing both web sites and web services at the same time. You can start up the web service in IIS Express and then interact with it like it was in the live environment. The same is true for sites that reference each other (as we saw above with a site that was in a Virtual Directory underneath another site).
Showing Off Your Work
Now here is the same line after I have modified it:
Client Authentication Using Client Certificates
SSL can be configured so as to allow server to authenticate client using client certificates. However, in this case, there are few additional configuration steps required on the server and the client.
s_client -connect dummyblah.com:443 -prexit
GET /
Before we begin, let’s discuss a few important concepts:
Certificate Revocation List (CRL)
CRL is a list of serial numbers of the certificates that a CA has revoked (cancelled). It is the responsibility of a CA (that has issued a certificate) to provide a facility for clients to know if a particular certificate has been revoked. And it is the responsibility of the client to check with the CA has revoked a certificate it has issued. This last statement is important, because even if a CA has revoked a certificate, if the client (browser for e.g.) is not checking the revocation list, the certificate will still appear valid to the client. Different browsers have different behaviour when it comes to CRL check. Some important issues have been pointed here.
The CA maintains and hosts such CRL files on a location clients can access. The URL to this location can be found under the «CRL Distribution Points» extended property of the certificate.
Whenever IIS receives a client certificate in http request (and is configured to accept and validate it), it does a CRL check too. Please remember that this is an essential step, and if connectivity between the host (IIS) and CRL link is broken, the client certificate validation will fail with error code 403.13. However, in case of self-signed certificates, CRL check doesn’t make sense, hence the «Authority Information Access» and «CRL Distribution Point» fields of the certificate would not be required in the certificate and CRL check won’t happen.
Certificate Trust List (CTL)
Certificate Trust List is a list of trusted CAs. The server may be configured to trust a number of global- root CAs and a number of internal/external CAs. IIS can be configured to authenticate a client certificates against these trusted certificates authorities. However, this will mean that any client certificate issued by any such well known root (/intermediate) CAs will be considered valid. To avoid this, a ‘CTL’ could be created and configured (at system level or website level) which acts as a ‘filter’ for validation. If so, the client certificate must be issued by one of the CAs in the configured CTL. Remember that the CRL check is still done.
This behaviour of sending a hint to the client (during client certificate validation) can be controlled by changing the value of «SendTrustedIssuerList» (DWord) key in Windows registry located at:
HKEY_LOCAL_MACHINE/SYSTEM/CurrentControlSet/Control/SecurityProviders/SCHANNEL
If you want to create a CTL for authentication of client certificates (even if not to hint the client), it can be created using a tool called MakeCTL.exe as pointed in this post. Surprisingly, Microsoft didn’t provide good UI based tools to create CTL files since Windows 2003 Server, I guess due to popular and easier alternative provided by .NET framework (and WIF) to authenticate client certificates in code on the server (I will explain this later in this article).
With Windows Server 2012 and Windows 8, Microsoft has changed this client certificate validation model. CTL based validation is unsupported. Instead, certificate stores are used for this purpose. There is now a new dedicated store named «Client Authentication Issuers (ClientAuthIssuer)» that acts as a placeholder for listing CAs for Client Certificate based authentication at machine level. Besides, custom credential stores can be defined and used to authenticate individual websites. So firstly, the website’s custom credential store is checked (if configured), if it does not exist, then the ClientAuthIssuer store is checked (if configured). At last, the «Trusted Root Certification Authorities» store is checked by default. Also, as mentioned previously, no hint is sent to the browser by default and the default value of «SendTrustedIssuerList» registry key is 0.
- Since this will effect Kernel mode processes (in http.sys), you will have to reboot your computer to apply the changes.
- Even though ClientAuthIssuer store is configured to client cert validation, the CA must also be in the «Trusted Root Certificate Authorities» store.
On a side note, observe the presence of a store named “Web Hosting” which is added as an addition to “Personal” store and features scalability for accommodating higher number of certificates.
Configuring IIS for Client Certificate Validation
IIS needs to be configured to «Accept» or «Require» the client certificate as shown in the image below:
- If «Accept» is selected, and if client certificate is provided, IIS will accept the certificate, validate it, and forward the HTTP request to the application with the certificate.
If client certificate is not provided, IIS will still forward that HTTP request (without certificate) to the application. - If «Require» is selected, and if client certificate is provided, IIS will accept the certificate, validate it, and forward the HTTP request to the application with the certificate (just like «Accept» option). However, if client certificate is not provided, IIS will throw Http Error 403.7 – Forbidden to the client.
You can set these values in configuration files (web.config) by using:
The biggest issue (or call it lack of facility) with using IIS for client certificate authentication is that you won’t have finer control over exception handling, logging (apart from IIS logs) and alerts. This is one of the most common reasons why most developers prefer to validate client certificates in server side code (within application).
Validating Client Certificates in Code
I have attached three projects with this article for some samples on how to validate and process client certificates in code. These may not necessarily the best samples, however, they will get you started.
Validating Client Certificates in WCF Service
In IIS 7+, the most important changes as compared to the previous versions of IIS are the inclusion of WAS and ability to independently host and process HTTP, MSMQ, TCP and NamedPipe based services (look at the possible vertical slices in the image). So you can host a net.tcp WCF service with no dependency on HTTP.SYS and W3SVC and can even switch off or uninstall these driver and service without affecting the WCF service.
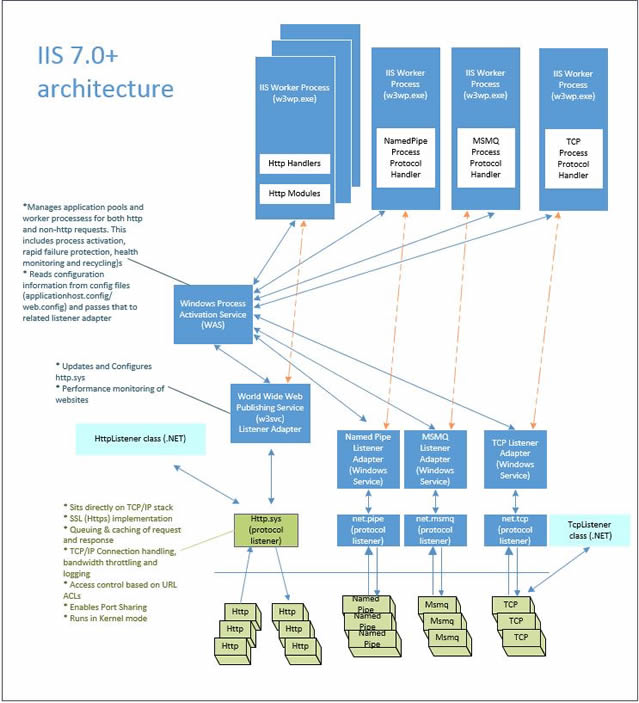
Few things to note:
WCF Client Certificate Configuration
WCF is versatile, powerful and huge. I would just touch its security features superficially and that too certificates specific.
Below are samples of configuration at Server and Client sides when using Transport security. In this case, I am using WSHttpBinding, but BasicHttpBinding can be used as well. I am omitting mex binding imagining I won’t need to auto generate proxies in Visual Studio.
Server Side (WCF service being called)
- PeerTrust (Forces a public key of the client certificate to be present in the ‘Trusted People’ certificate store on the service side)
- ChainTrust (Certificate must validate according to the complete certificate chain)
On Client side (which calls the service)
This article provides details on how to implement client certificate authentication with Message security.
Looking Forward
This article focused primarily on IIS Express 7.5. In the new release of Visual Studio, there will also be IIS Express 8.0. While Cassini will still be available, IIS Express will be the default development web server for Visual Studio 2012. I will be updating this article to include a section on the changes in IIS Express 8.0 and how they work. However, the primary focus of this article will remain on how to use IIS Express 7.5 with Visual Studio 2010, since that is the primary development system as of the time of the publication of this article.
Генерация CSR запроса в IIS
Для генерации SSL/TLS сертификата у внешнего Certificate Authority (CA) вам нужно сгенерировать запрос для выпуска сертификата (CSR, Certificate Signing Request). Вы можете сформировать CSR в ISS:
- Откройте консоль Internet Information Services Manager (
InetMgr.exe
); - Выберите ваш хост Windows Server и откройте раздел Server Certificates;
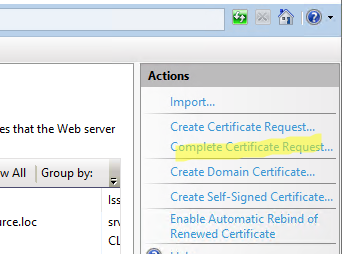
- В правом меню Actions выберите Создать запрос сертификата (Create Certificate Request);
- Заполните следующие поля в информацию о сертификате:Common Name – укажите имя сайта (веб-сервера), по которому будут обращаться ваши клиенты. Укажите FQDN имя, например:
reports.winitpro.ru
. Вы можете использоватьWildcard-сертфикат, в этом случае укажите здесь
*.winitpro.ru
Organization – укажите название организации. Для сертификатов с валидацией организации (OV-Organization Validation) и сертификатов с расширенной проверкой (EV-Extended Validation) нужно указать официальное название организации. Для физических лиц можно использовать SSL-сертификатов c домена (DV-Domain Validation). В этом случае указывается полное имя владельца сертификата;Organizational unit – yкажите внутреннее название подразделения вашей организации, которое является ответственным за сертификат;City/locality State/province Country/region – двухбуквенный код страны. - Common Name – укажите имя сайта (веб-сервера), по которому будут обращаться ваши клиенты. Укажите FQDN имя, например:
reports.winitpro.ru
. Вы можете использоватьWildcard-сертфикат, в этом случае укажите здесь
*.winitpro.ru - Organization – укажите название организации. Для сертификатов с валидацией организации (OV-Organization Validation) и сертификатов с расширенной проверкой (EV-Extended Validation) нужно указать официальное название организации. Для физических лиц можно использовать SSL-сертификатов c домена (DV-Domain Validation). В этом случае указывается полное имя владельца сертификата;
- Organizational unit – yкажите внутреннее название подразделения вашей организации, которое является ответственным за сертификат;
- City/locality
- State/province
- Country/region – двухбуквенный код страны.
- Выберите крипто провайдер и длину ключу. Рекомендуется использовать Microsoft RSA SChannel Cryptographic Provider с длиной ключа 2048 бит и более;
- Укажите имя файла, в который нужно сохранить CSR запрос.
- Должен сгенерироваться текстовый файл, который начинается с
BEGIN NEW CERTIFICATE REQUEST
и заканчивается
END NEW CERTIFICATE REQUEST
.
Points of Interest
With this, you can access any of the URLs from your browser and run the application in both modes.
Hope this helps.
Please let me know if you have any questions or comments.
Watching Your Site Work
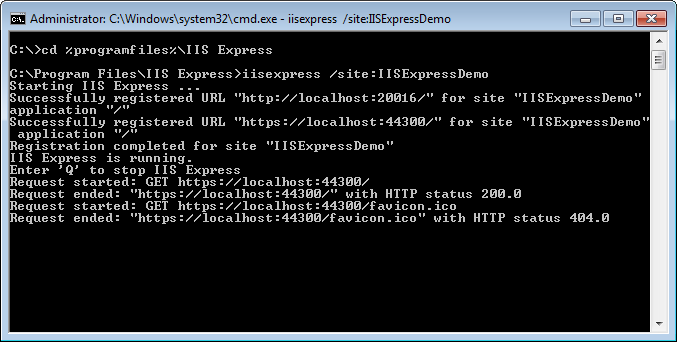
Like I mentioned before, starting IIS Express through the debugger is just a convenience. In fact, it probably isn’t the best way to launch IIS Express. A better way to launch the web server is through the command line. Doing so gives you a few features that you would otherwise not have. One of the best benefits is that you will be able to see each request and the result of the request with HTTP status codes. This can be especially useful when you are debugging a site. Identifying that you are sending a GET instead of a POST is easy and it will save you a lot of time.
cd %programfiles%IIS Express
for 32-bit operating systems or
cd c:Program Files (x86)IIS Express
The site name is usually the name of your project. However, if you have made changes to your site or if you have created a couple different configurations for your project, that may not work. One easy way to determine your site name is to run the debugger and then check the system tray icon. It will tell you the names of the sites that are running. Once the site is running, your command window should look like this:
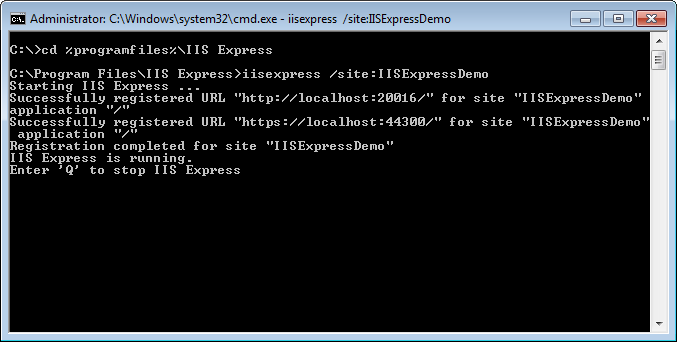
IIS Express is now running and waiting for activity on your site. In the text that is already displayed, you can see what protocols are enabled and on what ports. In this case, I’m actually running the same site on both HTTP and HTTPS. Let’s browse to the root of our HTTPS site to see what the command window shows us:
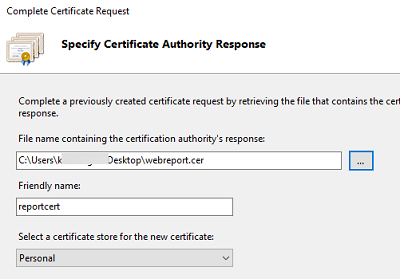
Установка SSL сертификата в ISS
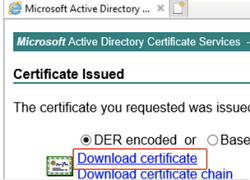
После того, как вы получили ваш файл (*.CER) с сертификатом SST/TLS от вашего CA, вы можете установить его в IIS.
Для этого запустите консоль IIS Manager, перейдите в раздел Certificates и выберите Complete Certificate Request.
В статье описывается установка *.CER сертификатов в формате DER/base64 сертификаты X.509 от Microsoft. Если вы получили от своего CA сертификат в формате *.CRT, его не получится импортировать и установить в IIS. Вам нужно сконвертировать CRT сертификат в формат PFX. Проще всего это сделать с помощью утилиты openssl в любом дистрибутиве Linux. Вам понадобится файл сертификата (*.crt) и закрытый ключ (*.key). Для их конвертации, выполните команду:
$ openssl pkcs12 -export -out target.pfx -inkey source.key -in source.crt
Такой PFX сертификат можно импортировать через меню Import.
Также вы можете конвертировать CRT сертификат прямо из Windows:
- Дважды щелкните по вашем CRT файлу;
- Перелижите на вкладку Details и нажмите Copy to File;
- Выберите формат Base-64 encoded X.509(.CER);
- Укажите путь, куда нужно поместить CER файл сертификата.
Выберите *,crt файл с SSL сертификатом, полученным от центра сертификации. Укажите имя SSL сертификата и хранилище, в которое поместить сертификат (Personal или Web Hosting).
Новый SSL сертификат должен появится в списке доступных сертификатов в IIS.
Conclusion
IIS Express is an amazing product that blows Cassini out of the water. We have seen how easy it is to use and configure. We have also looked at how you can get a lot more information about what is going on in the webserver by running it from the command line. Finally, we walked through configuring the system to make the most of IIS Express. I hope you found this article useful. I would appreciate constructive comments on how I can make this article even better.
