

В этом руководстве мы покажем, как составить список дисков и разделов в системах Linux.
Мы рассмотрим как инструменты командной строки, так и утилиты графического интерфейса.
К концу этого руководства вы узнаете, как просматривать или создавать отчеты о дисках и разделах на вашем сервере Linux, настольном компьютере или рабочей станции.
- 1. Список дисков Linux с помощью команды fdisk
- 2. Просмотр разделов диска Linux с помощью команды lsblk
- 3. Просмотр дисков Linux с помощью команды hwinfo
- 4. Поиск информации о разделах Linux с помощью GUI
- Как узнать информацию о жестких дисках (серийный номер, модель, интерфейс).
- Hdparm
- Установите hdparm на Linux
- Как найти информацию о жестком диске на Linux с помощью Hdparm
- Lshw
- Установка lshw на Linux
- Как найти информацию о жестком диске на Linux с помощью lshw
- Inxi
- Установка inxi на Linux
- Как найти информацию о жестком диске на Linux с помощью
- Smartctl
- Как найти информацию о жестком диске на Linux с помощью
- Как найти информацию о жестком диске на Linux с помощью
- 1. lsblk
- 2. df -h
- 3. fdisk -l
- 4. parted -l
- 5. cfdisk
- 6. sfdisk -l
- 7. ls -l /dev/disk/by-id
- 8. lshw -class disk
- Заключение
- Мониторинг состояния жёсткого диска
- Установка
- Разовый просмотр состояния диска
- Подготовка почтовой подсистемы
- Настройка мониторинга
- Freeing Disc Space
- See partitions and discs usage
- Full partitions
- See which directories are using the most disc space
- Command line
- Remove some cruft
- Graphical Interface
- Categorically Expendable Directories
- Temporary
- Logs
- Cache
- Spool
- /usr/bin/find
- Duplicate Handling
- Finders
- Files you do not want
- Packages you do not want
- Convert spaces to tabs
- Reduce data creation
- Application Level / User Space
- In Linux
- No high confidence of high reliability
- Turn Off Reserved Blocks on ExtFS
- Off Line Storage
- File Compression
- Wish list
- See Also
- NAME
- SYNOPSIS
- DESCRIPTION
- OPTIONS
- EXIT STATUS
- ENVIRONMENT
- NOTES
- SEE ALSO
- REPORTING BUGS
- AVAILABILITY
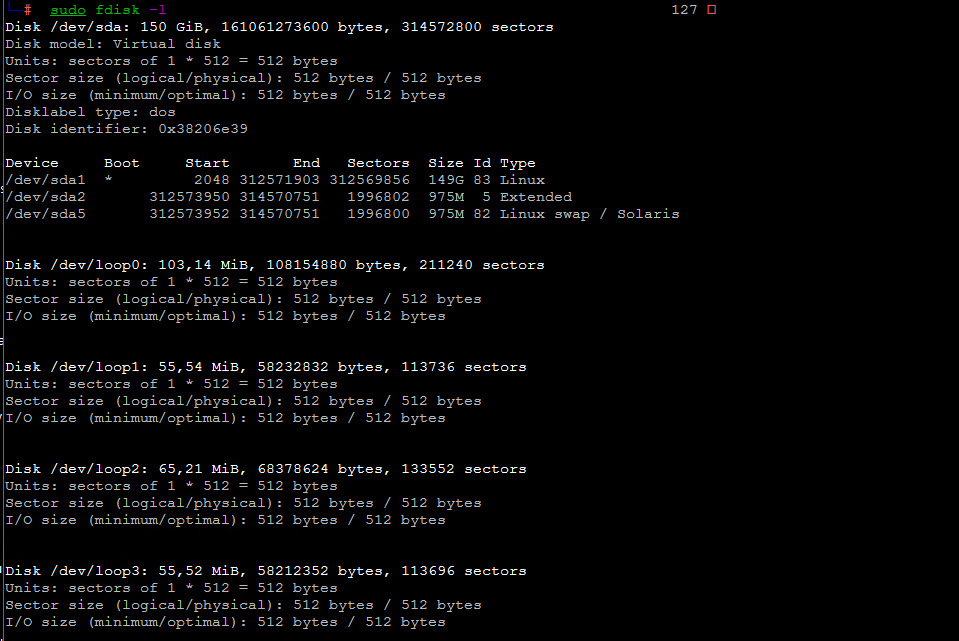
1. Список дисков Linux с помощью команды fdisk
fdisk – это широко используемый инструмент командной строки для работы с таблицами разделов дисков.
Вы можете использовать его для просмотра дисков и разделов на вашем Linux-сервере следующим образом.
Флаг -l означает список разделов, если устройство не указано, fdisk отобразит разделы со всех дисков.
Для его вызова требуются права root, поэтому при необходимости используйте команду sudo:
$ sudo fdisk -l
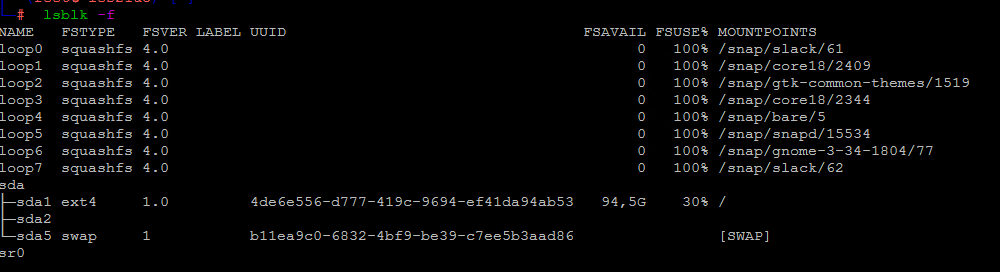
2. Просмотр разделов диска Linux с помощью команды lsblk
lsblk – это утилита для составления списка блочных устройств.
Вы можете использовать ее для просмотра дисков и разделов на вашем компьютере Linux следующим образом.
Она работает без команды sudo:
$ lsblk
Чтобы просмотреть дополнительную информацию о дисках, используйте параметр командной строки -f, как показано далее:
$ lsblk -f
3. Просмотр дисков Linux с помощью команды hwinfo
hwinfo – еще одна полезная утилита для просмотра информации о вашем оборудовании, в частности о дисках. Если вы не можете найти команду hwinfo в своей системе, выполните следующую команду для ее установки:
$ sudo apt install hwinfo [На Debian, Ubuntu and Mint]
$ sudo yum install hwinfo [На RHEL/CentOS/Fedora на Rocky Linux/AlmaLinux]
$ sudo emerge -a sys-apps/hwinfo [На Gentoo Linux]
$ sudo pacman -S hwinfo [На Arch Linux]
$ sudo zypper install hwinfo [На OpenSUSE]
После установки пакета hwinfo выполните команду с параметром командной строки –disk, как показано на рисунке:
$ sudo hwinfo --disk
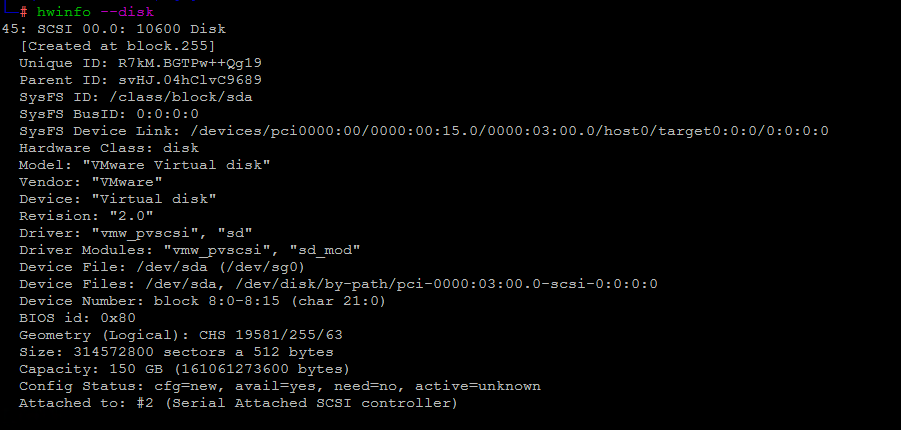
Из вывода предыдущей команды видно, что hwinfo отображает много информации о диске или его разделах.
Если вы хотите просмотреть обзор блочных устройств, выполните эту команду:
$ sudo hwinfo --short --block
Чтобы показать сводку по всем дискам, выполните команду:
$ sudo hwinfo --disk --short
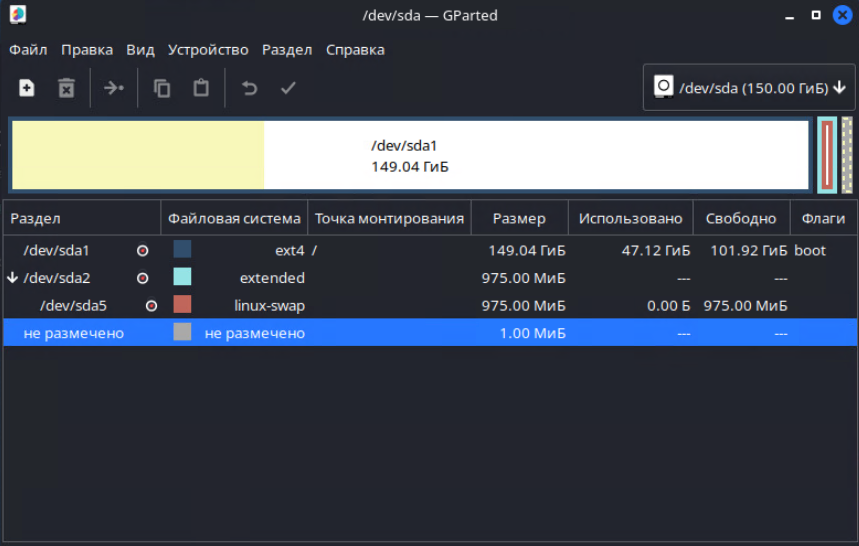
4. Поиск информации о разделах Linux с помощью GUI
На настольном компьютере Linux для просмотра списка дисков, подключенных к компьютеру, можно также использовать приложение с графическим интерфейсом пользователя (GUI).
Сначала найдите приложение “Диски” в системном меню.
Затем откройте его, чтобы просмотреть диски и их разделы.
Например можно вызвать утилиту Gparted:
$ sudo gparted
Как узнать информацию о жестких дисках (серийный номер, модель, интерфейс).
В теме «Как узнать информацию о жестких дисках (серийный номер, модель, интерфейс)» я расскажу как можно узнать серийный номер, модель или интерфейс вашего устройства на жестком диске. Существует довольно много решений, приведу несколько.
Первое что я сделаю, так это посмотрю какие у меня разделы имеются:
# lsblk
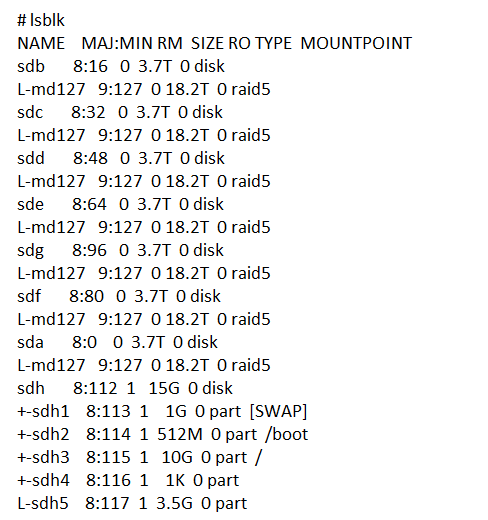
вывод имеющихся разделов программой lsblk
1. Первую утилиту что я могу порекомендовать Вам — это утилита hdparm.
Если вы используете RedHat/Centos/Fedora:
# yum install hdparm -y
Если вы используете Debian/Ubuntu/Linux Mint для установки программы:
# apt-get install hdparm
Чтобы использовать эту утилиту нужно запустить ее с опцией «-i» и добавить нужный нам раздел:
# hdparm -i /dev/sdf
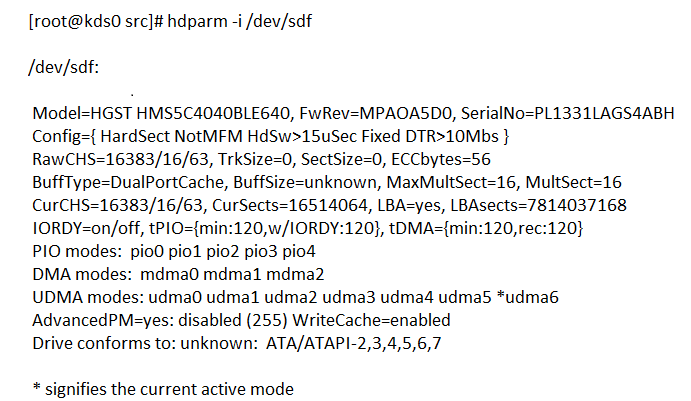
пример использования hdparm с ключем -i для раздела sdf
2. Советую так же утилиту lshw.
Эта программа показывает информацию не только о HDD, так же она выводит в удобно для вас формате (TXT-формате, HTML или XML).
Чтобы установить ее на CentOS/RedHat/Fedora, но если не стоит у вас эта программа, нужно выполнить:
# yum install lshw
Чтобы установить ее на Ubuntu/Linux Mint или Debian:
# sudo apt-get install lshw lshw-gtk
Чтобы получить нужную информацию с помощью утилиты lshw, выполните:
# lshw -class disk -class storage
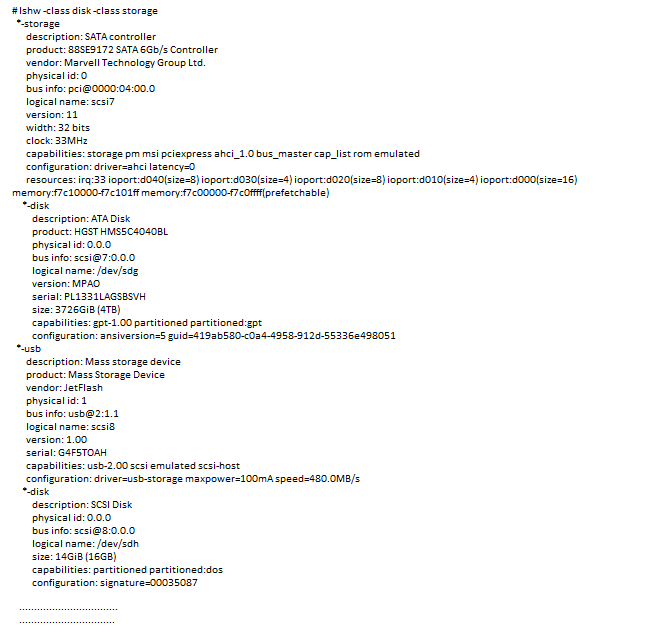
пример использования lshw -class disk -class storage
Если вам нужно вывести информацию только об установленных дисках на вашей ОС, вы можете использовать:
# lshw -short -C disk
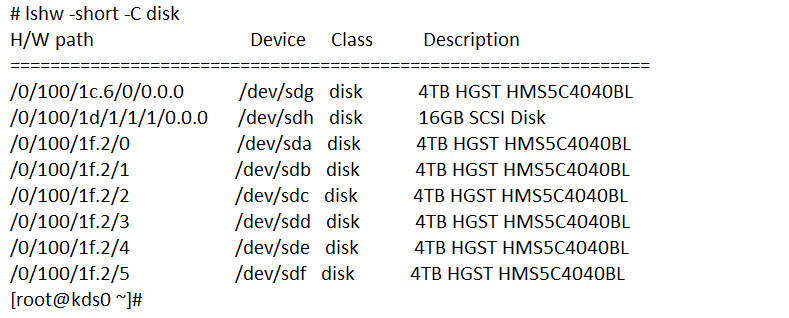
пример использования команды lshw -short -C disk
3. Что еще за утилиту могу посоветовать для использования — так это smartctl.
При помощи программы smartctl можно выводить информацию о состоянии ваших устройств, которые поддерживают SMART. Вот пример использования команды для SATA-устройства:
# smartctl -d ata -a -i /dev/sda
Я использую просто вот так:
# smartctl -x /dev/sda
4. Напоследок, приведу я графическую утилиту — GNOME Disk Utility.
Чтобы установить ее для использования в Debian/Ubuntu/ Linux Mint, выполните:
# sudo apt-get install gnome-disk-utility
Если используете Fedora/CentOS или RedHat, то выполните:
# yum install gnome-disk-utility
Утилита эта удобна тем, что у нее есть графический интерфейс (GUI), после установки вы можете ее запустить через командную строку ( а можно и найти ее в меню):
# palimpsest
Очень проста в использовании и очень простая.
Вот и все! Надеюсь моя тема «Как узнать информацию о жестких дисках (серийный номер, модель, интерфейс)» поможет Вам. Спасибо что читаете мой сайт http://linux-notes.org
В этом руководстве перечислены различные методы поиска сведений о жестких дисках в операционных системах Linux.
Используя приведенные ниже методы, вы можете найти марку жесткого диска, тип жесткого диска, размер, версию прошивки, таблицы разделов и другие параметры оборудования.
Сначала мы увидим, как отображать данные жесткого диска с помощью утилиты командной строки hdparm.
Hdparm
Hdparm – это программа командной строки для получения или установки аппаратных параметров для устройств PATA, SATA, SAS и SSD.
Она принимает любое устройство в качестве запоминающего устройства, подключенного к интерфейсам IDE, SATA, SAS, и мы даже можем получать информацию о дисках CD / DVD.
Используя утилиту hdparm, мы можем настроить жесткий диск или DVD-привод, проверить скорость жесткого диска или твердотельного накопителя, снизить уровень шума путем активации акустического режима, включить или выключить энергосберегающий режим, включить или отключить спящий режим, включить / отключить кэш диска и даже стереть диски надежно.
Hdparm написан Марком Лордом, ведущим разработчиком и разработчиком драйвера (E) IDE для Linux и текущим участником подсистемы «libata».
Хотя инструмент hdparm предлагает значительные преимущества для увеличения производительности диска, он также ОЧЕНЬ ОПАСЕН. Скорее всего, он приведет к массовой потере данных при неправильном использовании некоторых параметров. Документация hdparm предполагает, что ВЫ НЕ ДОЛЖНЫ ИСПОЛЬЗОВАТЬ НЕКОТОРЫЕ КОМАНДЫ ПРИ ЛЮБЫХ ОБСТОЯТЕЛЬСТВАХ. Поэтому я исключил такие опасные команды из этого руководства. Что еще более важно, всегда рекомендуется сделать резервную копию вашего жесткого диска перед тестированием hdparm в вашей системе Linux.
Установите hdparm на Linux
Hdparm предустановлен в большинстве дистрибутивов Linux.
Если он не включен по какой-либо причине, установите hdparm в вашей системе Linux, используя менеджер пакетов по умолчанию.
На Arch Linux, Manjaro Linux:
$ sudo pacman -S hdparm
На Debian, Ubuntu, Linux Mint:
$ sudo apt install hdparm
На Fedora, CentOS, RHEL:
$ sudo dnf install hdparm
$ sudo zypper install hdparm
Как найти информацию о жестком диске на Linux с помощью Hdparm
Чтобы отобразить подробную информацию о жестком диске, просто запустите hdparm с привилегиями sudo или root, как показано ниже:
$ sudo hdparm -I /dev/sda | less
Здесь sda – мой жесткий диск.
Замените его на свое устройство.
Здесь я использовал команду less для интерактивного чтения.
Нажмите клавишу ENTER или нажимайте стрелки ВВЕРХ / ВНИЗ, чтобы просмотреть остальные выходные данные.
Нажмите q, чтобы выйти, когда закончите.
Пример вывода моей системы Ubuntu:
/dev/sda:
ATA device, with non-removable media Model Number: ST9500325AS Serial Number: 5VEQTRV0 Firmware Revision: D005DEM1 Transport: Serial
Standards: Used: unknown (minor revision code 0x0029) Supported: 8 7 6 5 Likely used: 8
Configuration: Logical max current cylinders 16383 16383 heads 16 16 sectors/track 63 63 -- CHS current addressable sectors: 16514064 LBA user addressable sectors: 268435455 LBA48 user addressable sectors: 976773168 Logical/Physical Sector size: 512 bytes device size with M = 1024*1024: 476940 MBytes device size with M = 1000*1000: 500107 MBytes (500 GB) cache/buffer size = 8192 KBytes Nominal Media Rotation Rate: 5400
Capabilities: LBA, IORDY(can be disabled) Queue depth: 32 Standby timer values: spec'd by Standard, no device specific minimum R/W multiple sector transfer: Max = 16 Current = 16 Advanced power management level: 254 Recommended acoustic management value: 208, current value: 208 DMA: mdma0 mdma1 mdma2 udma0 udma1 udma2 udma3 udma4 udma5 *udma6 Cycle time: min=120ns recommended=120ns PIO: pio0 pio1 pio2 pio3 pio4 Cycle time: no flow control=120ns IORDY flow control=120ns
[...]
Как вы можете видеть, hdparm отображает номер модели жесткого диска, серийный номер, версию прошивки, за которой следует конфигурация жесткого диска, настройки DMA, список включенных функций, параметры безопасности и т. д.
Все функции, найденные в разделе Раздел «Commands/features», отмеченный звездочкой, в настоящее время активен.
Точно так же вы можете проверить информацию о других устройствах.
$ sudo hdparm -I /dev/sdb | less
$ sudo hdparm -I /dev/sdc | less
При запуске hdparm без параметров предполагается -acdgkmur.
Обратитесь к страницам руководства, чтобы узнать, для чего предназначен каждый параметр.
$ sudo hdparm /dev/sda
/dev/sda: multcount = 16 (on) IO_support = 1 (32-bit) readonly = 0 (off) readahead = 256 (on) geometry = 60801/255/63, sectors = 976773168, start = 0
Для более подробной информации обратитесь к справочным страницам.
$ man hdparm
Lshw
Lshw (Hardware Lister) – это простая, но полнофункциональная утилита, которая предоставляет подробную информацию о конфигурации оборудования системы Linux.
Она может сообщать точную конфигурацию памяти, версию прошивки, конфигурацию материнской платы, версию и скорость процессора, информацию о жестком диске, конфигурацию кэша, скорость шины и многое другое.
Установка lshw на Linux
По умолчанию lshw поставляется в некоторых дистрибутивах Linux, таких как Ubuntu.
Если онне установлен, установите lshw в вашу Linux-систему, используя менеджер пакетов по умолчанию, как показано ниже.
На Arch Linux и его подобных типа Manjaro Linux, выполните:
$ sudo pacman -S lshw
На Debian, Ubuntu, Linux Mint:
$ sudo apt install lshw
На Fedora, CentOS, RHEL:
$ sudo dnf install lshw
$ sudo zypper install lshw
Как найти информацию о жестком диске на Linux с помощью lshw
После установки lshw просто запустите следующую команду, чтобы получить информацию о вашем жестком диске в Linux:
$ sudo lshw -class disk
[...]
-disk description: ATA Disk product: ST9500325AS physical id: 0 bus info: scsi@0:0.0.0 logical name: /dev/sda version: DEM1 serial: 5VEQTRV0 size: 465GiB (500GB) capabilities: partitioned partitioned:dos configuration: ansiversion=5 logicalsectorsize=512 sectorsize=512 signature=8dd04bfd
[...]
Чтобы отобразить только название дисков, запустите:
$ sudo lshw -short -C disk
H/W path Device Class Description
====================================================================
/0/100/1d/1/1/6/0.0.0 /dev/sdb disk Multi-Card
/0/100/1d/1/1/6/0.0.0/0 /dev/sdb disk
/0/100/1f.2/0 /dev/sda disk 500GB ST9500325AS
/0/100/1f.2/1 /dev/cdrom disk DVD+-RW DS-8A8SH
Для более подробной информации, обратитесь к справочным страницам.
$ man lshw
Inxi
Inxi – еще один полнофункциональный инструмент для системной информации из командной строки.
Он показывает системное оборудование, процессор, драйверы, Xorg, рабочий стол, ядро, версии GCC, процессы, использование оперативной памяти и множество других полезных сведений.
Будь то жесткий диск или процессор, материнская плата или все детали всей системы, inxi предоставит их вам за считанные секунды.
Установка inxi на Linux
Inxi также доступен в репозиториях по умолчанию большинства дистрибутивов Linux.
В Arch Linux он доступен в AUR.
Вы можете установить его с помощью любых вспомогательных программ AUR, например Yay.
$ yay -S inxi
На Debian, Uubntu:
$ sudo apt install inxi
$ sudo dnf install inxi
На CentOS и RHEL:
$ sudo dnf install epel-release
$ sudo dnf install inxi
$ sudo zypper install inxi
Как найти информацию о жестком диске на Linux с помощью
Чтобы получить подробную информацию об установленных жестких дисках в вашей системе Linux, запустите:
$ inxi -D
Drives: Local Storage: total: 465.76 GiB used: 376.31 GiB (80.8%) ID-1: /dev/sda vendor: Seagate model: ST9500325AS size: 465.76 GiB
Вы также можете отобразить дополнительные сведения о диске, такие как скорость контроллера диска, серийный номер и температура, с помощью следующей команды:
$ inxi -Dxx
Drives: Local Storage: total: 465.76 GiB used: 332.10 GiB (71.3%) ID-1: /dev/sda vendor: Seagate model: ST9500325AS size: 465.76 GiB speed: 3.0 Gb/s serial: 5VEQTRV0 temp: 46 C
В отличие от программ Hdparm и lshw, он будет отображать только данные жесткого диска.
Утилиты hdparm и lshw отобразят всю информацию о приводе, включая CD / DVD ROM.
Для более подробной информации обратитесь к справочным страницам.
$ man inxi
Smartctl
Smartclt – это утилита командной строки, управления и мониторинга для SMART-дисков.
Она управляет системой технологии самоконтроля, анализа и отчетности (вкратце SMART), встроенной в большинство жестких дисков ATA / SATA и SCSI / SAS и твердотельных накопителей.
Команда Smartclt является частью пакета smartmontools, который предустановлен в большинстве версий Linux.
Как найти информацию о жестком диске на Linux с помощью
Чтобы получить полную информацию о жестком диске в вашей Linux-системе, запустите:
$ sudo smartctl -d ata -a -i /dev/sda
smartctl 7.1 2019-12-30 r5022 [x86_64-linux-5.4.0-29-generic] (local build)
Copyright (C) 2002-19, Bruce Allen, Christian Franke, www.smartmontools.org
=== START OF INFORMATION SECTION ===
Model Family: Seagate Momentus 5400.6
Device Model: ST9500325AS
Serial Number: 5VEQTRV0
LU WWN Device Id: 5 000c50 048fe5ff9
Firmware Version: D005DEM1
User Capacity: 500,107,862,016 bytes [500 GB]
Sector Size: 512 bytes logical/physical
Rotation Rate: 5400 rpm
Device is: In smartctl database [for details use: -P show]
ATA Version is: ATA8-ACS T13/1699-D revision 4
SATA Version is: SATA 2.6, 3.0 Gb/s
Local Time is: Mon May 11 16:35:54 2020 IST
SMART support is: Available - device has SMART capability.
SMART support is: Enabled
[...]
Для более подробной информации обратитесь к справочным страницам.
$ man smartctl
Как найти информацию о жестком диске на Linux с помощью
Lsblk – это утилита командной строки для отображения всех доступных или указанных блочных устройств в Unix-подобных операционных системах.
Она читает файловую систему «sysfs» и «udev db» для сбора информации.
Команда lsblk является частью пакета «util-linux», который предустановлен в большинстве дистрибутивов Linux.
Чтобы отобразить все блочные устройства с помощью команды lsblk, выполните:
$ lsblk -io KNAME,TYPE,SIZE,MODEL
loop0 loop 154.3M
loop1 loop 154.3M
loop2 loop 93.8M
loop3 loop 93.9M
loop4 loop 55M
loop5 loop 55M
loop6 loop 149M
loop7 loop 140.7M
loop8 loop 156.7M
loop9 loop 255.6M
loop10 loop 160.2M
loop11 loop 2.4M
loop12 loop 2.4M
loop13 loop 140.7M
loop14 loop 242.4M
loop15 loop 14.8M
loop16 loop 276K
loop17 loop 956K
loop18 loop 956K
loop19 loop 3.7M
loop20 loop 2.2M
loop21 loop 54.8M
loop22 loop 62.1M
loop23 loop 199.4M
loop24 loop 203M sda disk 465.8G ST9500325ASsda1 part 465.8G
sr0 rom 1024M PLDS_DVD+_-RW_DS-8A8SH
Если вы хотите отобразить только физические устройства, используйте флаг «-d».
$ lsblk -ido KNAME,TYPE,SIZE,MODEL
Системные администраторы Linux обычно составляют перечисляют диски для проверки всего дискового пространства.
Списки дисков также помогают увидеть подключенные к системе диски, разделы и файловую систему диска.
В системе Linux существует несколько способов составления списка всех жестких дисков. В этом руководстве мы узнаем, как составить список дисков в Linux с помощью командной строки.
1. lsblk
Просто набрав команду lsblk, вы получите список всех блочных устройств в виде дерева.
Это удобный и простой способ составления списка дисков.
lsblksda 8:0 0 238.5G 0 disk ├─sda1 8:1 0 529M 0 part ├─sda2 8:2 0 100M 0 part /boot/efi ├─sda3 8:3 0 16M 0 part ├─sda4 8:4 0 165.8G 0 part ├─sda5 8:5 0 70G 0 part / └─sda6 8:6 0 2G 0 part [SWAP] zram0 252:0 0 8G 0 disk [SWAP]
2. df -h
Команда df используется для вывода списка доступного дискового пространства в целом.
Команда df по умолчанию выводит имя устройства, общее количество блоков, используемое дисковое пространство, доступное дисковое пространство, процент используемого пространства, точку монтирования файловой системы, а также выводит удаленно смонтированные файловые системы, такие как NFS.
Команда df -h выводит список доступного пространства на всех дисках в удобочитаемой форме.
$ sudo df -hFilesystem Size Used Avail Use% Mounted on devtmpfs 5.8G 0 5.8G 0% /dev tmpfs 5.8G 90M 5.7G 2% /dev/shm tmpfs 2.4G 11M 2.4G 1% /run tmpfs 4.0M 0 4.0M 0% /sys/fs/cgroup /dev/sda5 69G 62G 3.1G 96% / tmpfs 5.8G 4.7M 5.8G 1% /tmp
/dev/sda2 96M 41M 56M 43% /boot/efi tmpfs 1.2G 200K 1.2G 1% /run/user/10003. fdisk -l
Команда fdisk – это текстовая утилита, используемая для управления разделами диска.
С помощью fdisk можно вывести список разделов диска, создать новый раздел, удалить существующий раздел жесткого диска и просмотреть размер раздела.
Использование команды fdisk -l для просмотра всех доступных разделов диска
$ sudo fdisk -lDisk /dev/sda: 238.47 GiB, 256060514304 bytes, 500118192 sectors Disk model: SK hynix SC300B Units: sectors of 1 * 512 = 512 bytes Sector size (logical/physical): 512 bytes / 4096 bytes I/O size (minimum/optimal): 4096 bytes / 4096 bytes Disklabel type: gpt Disk identifier: FF57C955-D98A-49C4-B1ED-835A44F2A0A4 Device Start End Sectors Size Type /dev/sda1 2048 1085439 1083392 529M Windows recovery environment /dev/sda2 1085440 1290239 204800 100M EFI System /dev/sda3 1290240 1323007 32768 16M Microsoft reserved /dev/sda4 1323008 349122559 347799552 165.8G Microsoft basic data /dev/sda5 349122560 495923199 146800640 70G Linux filesystem /dev/sda6 495923200 500117503 4194304 2G Linux swap Disk /dev/zram0: 8 GiB, 8589934592 bytes, 2097152 sectors Units: sectors of 1 * 4096 = 4096 bytes Sector size (logical/physical): 4096 bytes / 4096 bytes I/O size (minimum/optimal): 4096 bytes / 4096 bytesDisk /dev/loop0: 207.15 MiB, 217214976 bytes, 424248 sectors Units: sectors of 1 * 512 = 512 bytes Sector size (logical/physical): 512 bytes / 512 bytes I/O size (minimum/optimal): 512 bytes / 512 bytes Disk /dev/loop1: 99.18 MiB, 103993344 bytes, 203112 sectors Units: sectors of 1 * 512 = 512 bytes Sector size (logical/physical): 512 bytes / 512 bytes I/O size (minimum/optimal): 512 bytes / 512 bytes
4. parted -l
Parted – это полезный и мощный инструмент, используемый для управления разделами жесткого диска из командной строки: список, создание, уменьшение, удаление, поиск и восстановление разделов диска.
С помощью команды parted вы можете легко управлять всеми разделами жесткого диска.
Команда parted -l выводит список разделов диска на всех блочных устройствах.
$ sudo parted -lModel: ATA SK hynix SC300B (scsi) Disk /dev/sda: 256GB Sector size (logical/physical): 512B/4096B Partition Table: gpt Disk Flags: Number Start End Size File system Name Flags 1 1049kB 556MB 555MB ntfs Basic data partition hidden, diag 2 556MB 661MB 105MB fat32 EFI System Partition boot, esp 3 661MB 677MB 16.8MB Microsoft reserved partition msftres 4 677MB 179GB 178GB ntfs Basic data partition msftdata 5 179GB 254GB 75.2GB ext4 6 254GB 256GB 2147MB linux-swap(v1) swap Model: Unknown (unknown) Disk /dev/zram0: 8590MB Sector size (logical/physical): 4096B/4096B Partition Table: loop Disk Flags: Number Start End Size File system Flags 1 0.00B 8590MB 8590MB linux-swap(v1)5. cfdisk
Команда cfdisk немного отличается от вышеперечисленных команд, она предоставляет графическое представление в текстовом интерфейсе терминала для управления дисками.
С помощью cfdisk вы можете перечислять, создавать, удалять и изменять разделы на дисковом устройстве.
$ sudo cfdisk Disk: /dev/sda Size: 238.47 GiB, 256060514304 bytes, 500118192 sectors Label: gpt, identifier: FF57C955-D98A-49C4-B1ED-835A44F2A0A4 Device Start End Sectors Size Type /dev/sda1 2048 1085439 1083392 529M Windows recovery environment /dev/sda2 1085440 1290239 204800 100M EFI System /dev/sda3 1290240 1323007 32768 16M Microsoft reserved /dev/sda4 1323008 349122559 347799552 165.8G Microsoft basic data /dev/sda5 349122560 495923199 146800640 70G Linux filesystem /dev/sda6 495923200 500117503 4194304 2G Linux swap ┌──────────────────────────────────────────────────────────────────────────────────────────────────────────┐ │ Partition name: Basic data partition │ │ Partition UUID: E73F9719-F144-42A8-87BC-862FB470828B │ │ Partition type: Windows recovery environment (DE94BBA4-06D1-4D40-A16A-BFD50179D6AC) │ │ Attributes: RequiredPartition │ │ Filesystem UUID: 8C0A62C30A62A9C2 │ │Filesystem LABEL: Recovery │ │ Filesystem: ntfs │ └──────────────────────────────────────────────────────────────────────────────────────────────────────────┘ [ Delete ] [ Resize ] [ Quit ] [ Type ] [ Help ] [ Write ] [ Dump ]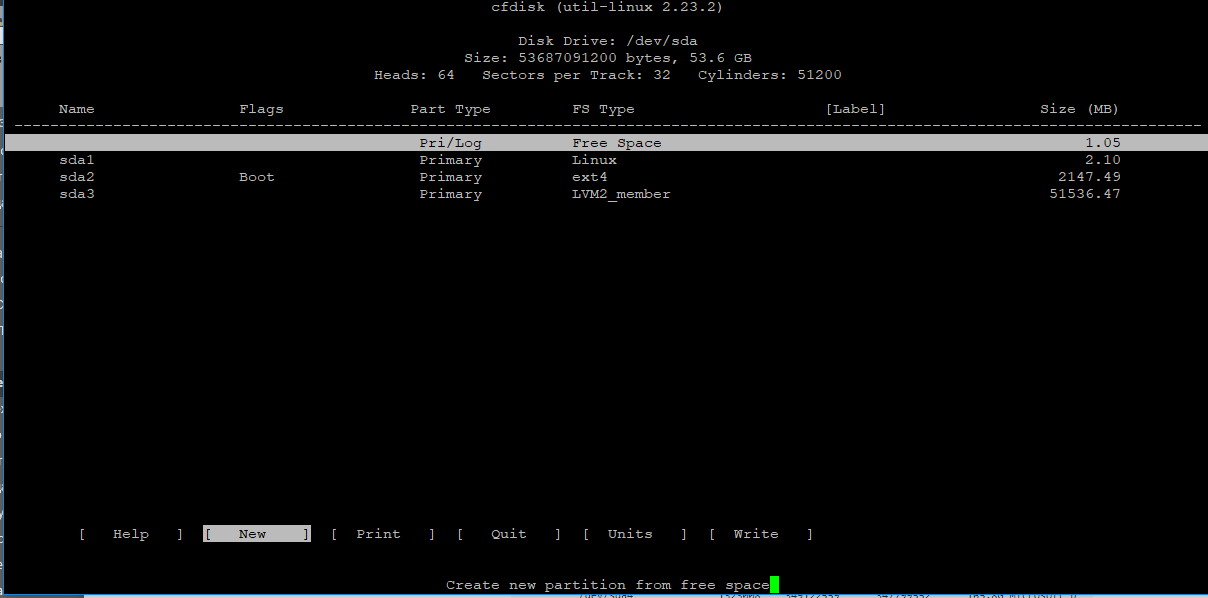
6. sfdisk -l
sfdisk – это редактор таблицы разделов.
Он может перечислить разделы на устройстве, указать размер раздела, проверить разделы на устройстве и подготовить устройство.
Он не предназначен для работы с большими разделами.
sfdisk -l выводит список разделов диска.
sudo sfdisk -lDisk /dev/sda: 238.47 GiB, 256060514304 bytes, 500118192 sectors Disk model: SK hynix SC300B Units: sectors of 1 * 512 = 512 bytes Sector size (logical/physical): 512 bytes / 4096 bytes I/O size (minimum/optimal): 4096 bytes / 4096 bytes Disklabel type: gpt Disk identifier: FF57C955-D98A-49C4-B1ED-835A44F2A0A4 Device Start End Sectors Size Type /dev/sda1 2048 1085439 1083392 529M Windows recovery environment /dev/sda2 1085440 1290239 204800 100M EFI System /dev/sda3 1290240 1323007 32768 16M Microsoft reserved /dev/sda4 1323008 349122559 347799552 165.8G Microsoft basic data /dev/sda5 349122560 495923199 146800640 70G Linux filesystem /dev/sda6 495923200 500117503 4194304 2G Linux swap Disk /dev/zram0: 8 GiB, 8589934592 bytes, 2097152 sectors Units: sectors of 1 * 4096 = 4096 bytes Sector size (logical/physical): 4096 bytes / 4096 bytes I/O size (minimum/optimal): 4096 bytes / 4096 bytes Disk /dev/loop0: 207.15 MiB, 217214976 bytes, 424248 sectors Units: sectors of 1 * 512 = 512 bytes Sector size (logical/physical): 512 bytes / 512 bytes I/O size (minimum/optimal): 512 bytes / 512 bytes Disk /dev/loop1: 99.18 MiB, 103993344 bytes, 203112 sectors Units: sectors of 1 * 512 = 512 bytes Sector size (logical/physical): 512 bytes / 512 bytes I/O size (minimum/optimal): 512 bytes / 512 bytes7. ls -l /dev/disk/by-id
Команда ls – это очень простая, но мощная команда, используемая для перечисления файлов и каталогов.
Мы можем перечислить диски, перечислив каталог /dev/disk/by-id.
$ ls -l /dev/disk/by-id total 0 lrwxrwxrwx 1 root root 9 Jun 20 23:26 ata-SK_hynix_SC300B_HFS256G39MND-3510B_FI68N023911308NC9 -> ../../sda lrwxrwxrwx 1 root root 10 Jun 20 23:26 ata-SK_hynix_SC300B_HFS256G39MND-3510B_FI68N023911308NC9-part1 -> ../../sda1 lrwxrwxrwx 1 root root 10 Jun 20 23:26 ata-SK_hynix_SC300B_HFS256G39MND-3510B_FI68N023911308NC9-part2 -> ../../sda2 lrwxrwxrwx 1 root root 10 Jun 20 23:26 ata-SK_hynix_SC300B_HFS256G39MND-3510B_FI68N023911308NC9-part3 -> ../../sda3 lrwxrwxrwx 1 root root 10 Jun 20 23:26 ata-SK_hynix_SC300B_HFS256G39MND-3510B_FI68N023911308NC9-part4 -> ../../sda4 lrwxrwxrwx 1 root root 10 Jun 20 23:26 ata-SK_hynix_SC300B_HFS256G39MND-3510B_FI68N023911308NC9-part5 -> ../../sda5 lrwxrwxrwx 1 root root 10 Jun 20 23:26 ata-SK_hynix_SC300B_HFS256G39MND-3510B_FI68N023911308NC9-part6 -> ../../sda6 lrwxrwxrwx 1 root root 9 Jun 20 23:26 wwn-0x5ace42e0900dd482 -> ../../sda lrwxrwxrwx 1 root root 10 Jun 20 23:26 wwn-0x5ace42e0900dd482-part1 -> ../../sda1 lrwxrwxrwx 1 root root 10 Jun 20 23:26 wwn-0x5ace42e0900dd482-part2 -> ../../sda2 lrwxrwxrwx 1 root root 10 Jun 20 23:26 wwn-0x5ace42e0900dd482-part3 -> ../../sda3 lrwxrwxrwx 1 root root 10 Jun 20 23:26 wwn-0x5ace42e0900dd482-part4 -> ../../sda4 lrwxrwxrwx 1 root root 10 Jun 20 23:26 wwn-0x5ace42e0900dd482-part5 -> ../../sda5 lrwxrwxrwx 1 root root 10 Jun 20 23:26 wwn-0x5ace42e0900dd482-part6 -> ../../sda6Вы также можете составить список по:
- by-label
- by-partlabel
- by-partuuid
- by-path
- by-uuid
8. lshw -class disk
lshw – это инструмент Linux, который используется для получения подробной информации об аппаратной конфигурации системы.
Используйте -class disk, чтобы перечислить информацию о диске.
$ sudo lshw -class disk *-disk description: ATA Disk product: SK hynix SC300B physical id: 0.0.0 bus info: scsi@1:0.0.0 logical name: /dev/sda version: 0P00 serial: FI68N023911308NC9 size: 238GiB (256GB) capabilities: gpt-1.00 partitioned partitioned:gpt configuration: ansiversion=5 guid=ff57c955-d98a-49c4-b1ed-835a44f2a0a4 logicalsectorsize=512 sectorsize=4096Также можно выводить -class disk как -json или -html или -xml.
$ sudo lshw -class disk -json { "id" : "disk", "class" : "disk", "claimed" : true, "handle" : "GUID:ff57c955-d98a-49c4-b1ed-835a44f2a0a4", "description" : "ATA Disk", "product" : "SK hynix SC300B", "physid" : "0.0.0", "businfo" : "scsi@1:0.0.0", "logicalname" : "/dev/sda", "dev" : "8:0", "version" : "0P00", "serial" : "FI68N023911308NC9", "units" : "bytes", "size" : 256060514304, "configuration" : { "ansiversion" : "5", "guid" : "ff57c955-d98a-49c4-b1ed-835a44f2a0a4", "logicalsectorsize" : "512", "sectorsize" : "4096" }, "capabilities" : { "gpt-1.00" : "GUID Partition Table version 1.00", "partitioned" : "Partitioned disk", "partitioned:gpt" : "GUID partition table" }, "children" : [ ] }Заключение
Для выполнения всех команд, кроме lsblk и ls -l dev/disk, требуется доступ root или права суперпользователя.
В этом руководстве мы узнали, как составить список дисков в Linux с помощью командной строки.
I need to know what hard disks are available, including ones that aren’t mounted and possibly aren’t formatted. I can’t find them in dmesg or /var/log/messages (too much to scroll through). I’m hoping there’s a way to use /dev or /proc to find out this information, but I don’t know how. I am using Linux.

4 gold badges70 silver badges103 bronze badges
asked Dec 6, 2010 at 7:58

72 gold badges182 silver badges249 bronze badges
On modern udev installations, there are symbolic links to storage media in subdirectories of /dev/disk, that let you look up a disk or a partition by serial number (/dev/disk/by-id/), by UUID (/dev/disk/by-uuid), by filesystem label (/dev/disk/by-label/) or by hardware connectivity (/dev/disk/by-path/).
Linux also provides the lsblk utility which displays a nice tree view of the storage volumes (since util-linux 2.19, not present on embedded devices with BusyBox).
If you have an fdisk or disklabel utility, it might be able to tell you what devices it’s able to work on.
You will find utility names for many unix variants on the Rosetta Stone for Unix, in particular the “list hardware configuration” and “read a disk label” lines.
answered Dec 6, 2010 at 8:25

$ lsblk -io KNAME,TYPE,SIZE,MODEL
KNAME TYPE SIZE MODEL
sda disk 149.1G TOSHIBA MK1637GS
sda1 part 23.3G
sda2 part 28G
sda3 part 93.6G
sda4 part 4.3G
sr0 rom 1024M CD/DVDW TS-L632M
lsblk is present in util-linux package and is thus far more universal than proposed alternatives.
answered Oct 9, 2013 at 4:37

lshw -class diskanswered Dec 6, 2010 at 8:13

7 silver badges5 bronze badges
> hwinfo --disk
21: IDE 00.0: 10600 Disk
[Created at block.245]
Unique ID: 3OOL.8MZXfAWnuH8
Parent ID: w7Y8.1T_0outZkp6
SysFS ID: /class/block/sda
SysFS BusID: 0:0:0:0
SysFS Device Link: /devices/pci0000:00/0000:00:1f.2/host0/target0:0:0/0:0:0:0
Hardware Class: disk
Model: "Hitachi HTS54322"
Vendor: "Hitachi"
Device: "HTS54322"
Revision: "ESBO"
Driver: "ahci", "sd"
Driver Modules: "ahci"
Device File: /dev/sda
Device Files: /dev/sda, /dev/disk/by-id/ata-Hitachi_HTS543225A7A384_E2021342GEPG4J, /dev/disk/by-id/scsi-SATA_Hitachi_HTS5432_E2021342GEPG4J, /dev/disk/by-path/pci-0000:00:1f.2-scsi-0:0:0:0, /dev/disk/by-id/wwn-0x5000cca614c6395e
Device Number: block 8:0-8:15
BIOS id: 0x80
Geometry (BIOS EDD): CHS 484521/16/63
Size (BIOS EDD): 488397168 sectors
Geometry (BIOS Legacy): CHS 1023/255/63
Drive status: no medium
Config Status: cfg=new, avail=yes, need=no, active=unknown
Attached to: #17 (SATA controller)
> hwinfo --block --short
disk: /dev/sda Hitachi HTS54322
partition: /dev/sda1 Partition /dev/sda2 Partition /dev/sda3 Partition /dev/sda4 Partition /dev/sda5 Partition
answered Oct 11, 2012 at 9:53

Martin Schröder
1 gold badge10 silver badges35 bronze badges
I’m running a CentOS 5.5 system. This system has 4 disks and a 3ware RAID controller.
In my case, lshw -class disk, cat /proc/scsi/scsi and parted --list shows the RAID controller (3ware 9650SE-4LP). This doesn’t show the actual disks:
only shows the 3ware RAID controller which provides the /dev/sda volume:
# lshw -class disk *-disk description: SCSI Disk product: 9650SE-4LP DISK vendor: AMCC physical id: 0.0.0 bus info: scsi@0:0.0.0 logical name: /dev/sda
# cat /proc/scsi/scsi
Attached devices:
Host: scsi0 Channel: 00 Id: 00 Lun: 00 Vendor: AMCC Model: 9650SE-4LP DISK Rev: 4.06 Type: Direct-Access ANSI SCSI revision: 05
# parted --list
Model: AMCC 9650SE-4LP DISK (scsi)
Disk /dev/sda: 2000GB
In order to see the disks which lie underneath, I had to install the tw_cli utility from 3ware, and ask the controller itself.
# tw_cli info c0
...
VPort Status Unit Size Type Phy Encl-Slot Model
------------------------------------------------------------------------------
p0 OK u0 931.51 GB SATA 0 - WDC WD1002FBYS-02A6
p1 OK u0 931.51 GB SATA 1 - WDC WD1002FBYS-02A6
answered Mar 2, 2011 at 21:51

Stefan Lasiewski
23 gold badges69 silver badges84 bronze badges
Since both «Can I see what HDD I have installed?» and «How do I determine the make & model of my storage devices?» are marked as duplicates of this question, I’m surprised no-one mentioned hdparm and smartctl. Having a look at a few machines, seems that either of them (when it’s not both) is often found already installed in standard (even old) linux distributions.
# smartctl -i /dev/sda
smartctl 6.1 2013-03-16 r3800 [i686-linux-3.9.9-301.fc19.i686.PAE] (local build)
Copyright (C) 2002-13, Bruce Allen, Christian Franke, www.smartmontools.org
=== START OF INFORMATION SECTION ===
Model Family: Toshiba 2.5" HDD MK..56GSY
Device Model: TOSHIBA MK1656GSY
Serial Number: 60PKT43CT
LU WWN Device Id: 5 000039 2919874b6
Firmware Version: LH013D
User Capacity: 160 041 885 696 bytes [160 GB]
Sector Size: 512 bytes logical/physical
Device is: In smartctl database [for details use: -P show]
ATA Version is: ATA8-ACS (minor revision not indicated)
SATA Version is: SATA 2.6, 3.0 Gb/s
Local Time is: Mon Jul 22 11:13:37 2013 CEST
SMART support is: Available - device has SMART capability.
SMART support is: Enabled
# hdparm -i /dev/sda
/dev/sda: Model=TOSHIBA MK1656GSY, FwRev=LH013D, SerialNo=60PKT43CT Config={ Fixed } RawCHS=16383/16/63, TrkSize=0, SectSize=0, ECCbytes=0 BuffType=unknown, BuffSize=16384kB, MaxMultSect=16, MultSect=16 CurCHS=16383/16/63, CurSects=16514064, LBA=yes, LBAsects=312581808 IORDY=on/off, tPIO={min:120,w/IORDY:120}, tDMA={min:120,rec:120} PIO modes: pio0 pio1 pio2 pio3 pio4 DMA modes: sdma0 sdma1 sdma2 mdma0 mdma1 mdma2 UDMA modes: udma0 udma1 udma2 udma3 udma4 *udma5 AdvancedPM=yes: unknown setting WriteCache=enabled Drive conforms to: Unspecified: ATA/ATAPI-3,4,5,6,7 * signifies the current active mode
answered Jul 22, 2013 at 9:21

Disk /dev/sda: 8589 MB, 8589934592 bytes
255 heads, 63 sectors/track, 1044 cylinders, total 16777216 sectors
Units = sectors of 1 * 512 = 512 bytes
Sector size (logical/physical): 512 bytes / 512 bytes
I/O size (minimum/optimal): 512 bytes / 512 bytes
Disk identifier: 0x0006a697
Device Boot Start End Blocks Id System
/dev/sda1 * 2048 1026047 512000 83 Linux
/dev/sda2 1026048 16777215 7875584 8e Linux LVM
Disk /dev/sdb: 8589 MB, 8589934592 bytes
255 heads, 63 sectors/track, 1044 cylinders, total 16777216 sectors
Units = sectors of 1 * 512 = 512 bytes
Sector size (logical/physical): 512 bytes / 512 bytes
I/O size (minimum/optimal): 512 bytes / 512 bytes
Disk identifier: 0x00000000
Disk /dev/sdb doesn't contain a valid partition table
Disk /dev/dm-0: 6509 MB, 6509559808 bytes
255 heads, 63 sectors/track, 791 cylinders, total 12713984 sectors
Units = sectors of 1 * 512 = 512 bytes
Sector size (logical/physical): 512 bytes / 512 bytes
I/O size (minimum/optimal): 512 bytes / 512 bytes
Disk identifier: 0x00000000
Disk /dev/dm-0 doesn't contain a valid partition table
Disk /dev/dm-1: 1543 MB, 1543503872 bytes
255 heads, 63 sectors/track, 187 cylinders, total 3014656 sectors
Units = sectors of 1 * 512 = 512 bytes
Sector size (logical/physical): 512 bytes / 512 bytes
I/O size (minimum/optimal): 512 bytes / 512 bytes
Disk identifier: 0x00000000
Disk /dev/dm-1 doesn't contain a valid partition table
10 gold badges156 silver badges139 bronze badges
answered Feb 11, 2012 at 12:00

Eugene S
8 gold badges29 silver badges35 bronze badges
I found in other SE answer, inxi tool as very convenient:
inxi -Dxx
Drives: HDD Total Size: 810.2GB (42.9% used) ID-1: /dev/sdc model: ST3160827AS size: 160.0GB serial: 5MT2HMH6 ID-2: /dev/sdb model: WDC_WD3200JD size: 320.1GB serial: WD-WCAMR1302926 ID-3: /dev/sda model: ST380817AS size: 80.0GB serial: 4MR2EWBE ID-4: /dev/sdd model: ST3250824AS size: 250.1GB serial: 9ND08GKX
answered Jan 2, 2017 at 21:15

sfdisk -l will give you detailed info about hardware/physical disks even if they are not mounted.
the program is pre-installed on all Linux variants that I have used, but you have to be root to use it.

63 gold badges436 silver badges649 bronze badges
answered Apr 10, 2014 at 10:42

Many of the commands listed will help you look for disks that have already been recognized by the system at boot. With modern drives, you may find yourself looking for something that you inserted while the machine was up and running (I did). I like the advice from http://fredericiana.com/2010/06/15/hot-plugging-a-sata-drive-under-linux/:
Try this to rescan the SCSI hosts (each SATA port appears as a SCSI
bus):
answered Jun 11, 2013 at 2:01

This worked for me:
fdisk -l 2>/dev/null | grep "Disk \/" | grep -v "\/dev\/md" | awk '{print $2}' | sed -e 's/://g'
answered Dec 17, 2012 at 18:51

sudo gparted will show all this in a GUI.
(You didn’t specify you need to do it within a terminal so I wonder why this solution was missing.)
answered May 13, 2017 at 3:28

Ondra Žižka
9 silver badges15 bronze badges
lsblk | grep diskOutput in my case:
sda 8:0 0 1,8T 0 disk
sdb 8:16 0 931,5G 0 disk
As you can see, I have two physical disks.
And contrary to fdisk or sfdisk, you don’t need root permissions to run it.
answered Aug 23, 2020 at 8:37

On embedded Linux systems where lsblk nor lsscsi nor lsblk is not installed :
$ grep . /sys/class/block/sd*/device/model
/sys/class/block/sda/device/model:Samsung SSD 860
/sys/class/block/sdb/device/model:WDC WD4003FFBX-6
/sys/class/block/sdc/device/model:WDC WD4003FFBX-6
/sys/class/block/sdd/device/model:WDC WD4003FFBX-6
or if lsscsi is installed :
$ lsscsi
[0:0:0:0] disk ATA Samsung SSD 860 2B6Q /dev/sda
[1:0:0:0] disk ATA WDC WD4003FFBX-6 0A83 /dev/sdb
[2:0:0:0] disk ATA WDC WD4003FFBX-6 0A83 /dev/sdc
[3:0:0:0] disk ATA WDC WD4003FFBX-6 0A83 /dev/sdd
or if lsblk is installed :
$ lsblk -do NAME,TYPE,SIZE,MODEL
NAME TYPE SIZE MODEL
sda disk 477G Samsung_SSD_860_PRO_512GB
sdb disk 3.7T WDC_WD4003FFBX-68MU3N0
sdc disk 3.7T WDC_WD4003FFBX-68MU3N0
sdd disk 3.7T WDC_WD4003FFBX-68MU3N0
answered Aug 24, 2022 at 13:12

4 gold badges22 silver badges32 bronze badges
alias lsblk2='lsblk -o size,fstype,model,name,serial,uuid'answered Aug 24, 2022 at 14:30

7 gold badges43 silver badges77 bronze badges
ls /sys/block/* | grep block | grep sd | wc -lIn my local test cases, 47 on my biggest war-machine and 1 on my laptop.
answered Apr 7, 2014 at 11:40


Translation(s): — Русский
Мониторинг состояния жёсткого диска
Этот раздел поможет установить и настроить мониторинг состояния жёсткого диска с оповещениями на электронную почту.
Активная разработка страницы завершена
- Мониторинг состояния жёсткого диска
Установка
Устанавливаем набор утилит для мониторинга жёстких дисков — smartmontools
# apt-get update# apt-get install smartmontools
На данный момент, для Debian Jessie, в репозитории Backports, доступна более новая версия. Если данный репозиторий подключен, то утилиту можно поставить так:
# apt-get update# apt-get install -t jessie-backports smartmontools
Разовый просмотр состояния диска
Смотрим какие диски есть в системе:
# smartctl --scan/dev/sda -d scsi # /dev/sda, SCSI device/dev/sdb -d scsi # /dev/sdb, SCSI device
# smartctl -i /dev/sda
Далее смотрим информацию о его здоровье. Если у Вас не PASSED, то диск следует заменить.
# smartctl -H /dev/sda
Теперь о здоровье подробно:
# smartctl -A /dev/sda
У многих производителей своё индивидуальное понимание атрибутов диска, поэтому не стоит ориентироваться на RAW_VALUE (кроме значения температуры). Например у Seagate, Raw Read Error Rate очень большое и это нормально. У WD равно 0 и это тоже нормально.
Для более детально понимания вопроса, обратитесь на профильные форумы или к официальной документации производителя диска.
Ключевое значение имеет содержимое 3-х столбцов:
- VALUE — текущее значение параметра
- WORST — наихудшее значение, которого когда-либо достигало значение Value
- THRESH — значение, которого должен достигнуть Value этого же атрибута, чтобы состояние атрибута было признано критическим.
Например, с ростом температуры RAW значение будет расти, а VALUE будет уменьшаться и упав до THRES, диск скорее всего скоро «умрёт» от жары.
Подготовка почтовой подсистемы
Один из вариантов оповещения — электронная почта.
По умолчанию, в ОС Debian устанавливается exim. Его и настроим. Тут описан самый простой способ, когда со стороны SMTP-сервера нету специфических настроек. Пример настройки exim и gmail описан тут — GmailAndExim4.
Редактируем файл /etc/exim4/update-exim4.conf.conf и меняем значения опций dc_eximconfig_configtype='' на smarthost, и в dc_smarthost='' указываем SMTP-сервер.
nano /etc/exim4/update-exim4.conf.confdc_eximconfig_configtype='smarthost'dc_other_hostnames='hostname.local'dc_local_interfaces='127.0.0.1 ; ::1'dc_readhost=''dc_relay_domains=''dc_minimaldns='false'dc_relay_nets=''dc_smarthost='smtp.example.org:25'CFILEMODE='644'dc_use_split_config='false'dc_hide_mailname=''dc_mailname_in_oh='true'dc_localdelivery='mail_spool'
В файле /etc/exim4/passwd.client указываем имя и пароль от почты.
smtp.example.org:login:password
Далее обновляем конфигурацию exim4:
# update-exim4.conf
$ echo "Test mess" | mail -s Test user@example.ru
На почту должно придти письмо.
Настройка мониторинга
Включаем мониторинг, раскомментируем строчку
nano /etc/default/smartmontoolsstart_smartd=yes
Настраиваем мониторинг. Комментируем строку с DEVICESCAN
nano /etc/smartd.conf#DEVICESCAN -d removable -n standby -m root -M exec /usr/share/smartmontools/smartd-runner/dev/sda -a -s (S/../../(2|4)/01|L/../../6/01) -m user@example.ru -M test# diminishing
- -a — включение большинства возможностей мониторинга: проверка «здоровья» диска, отслеживание изменений всех атрибутов, отслеживание неудачных тестов диагностики;
- -s — По вторникам и четвергам в час ночи проводить краткий тест, а по субботам тоже в час ночи — долгий тест
- -m — почтовый адрес получателя
- -М test — отправить сразу тестовое письмо.
- -M diminishing — постоянно напоминать об ошибке
Перезапускаем службу, если она была запущена:
systemctl status smartd.service
Если всё нормально, то на почту должно прийти тестовое письмо от smartd. Если тестовое письмо пришло, то меняем в опции -M test на diminishing.
Translation(s): Deutsch — English — Italiano
Freeing Disc Space
This page talks about ways to find out how much of the system storage space is used and to free up some of it.
For a description on how to reduce the footprint of a Debian installation see ReduceDebian.
See partitions and discs usage
First of all, to see the existing partitions, use:
sfdisk -l
Then to check which partitions are getting full use:
$ df -lhT
$ df --local --human-readable -TFilesystem Type Size Used Avail Use% Mounted on/dev/sda1 ext4 100M 77M 33M 77% /...
Full partitions
If a partition becomes full the system might not work properly.
When your Home directory becomes full, you will not be able to save any file, and some applications might refuse to start correctly.
When your temporary directory (/tmp) becomes full, many applications will fail with error messages such as:
cannot create temp file for document: No space left on device
See which directories are using the most disc space
There are several tools to see which directories are using the most disc space on a Debian system, like baobab (GUI) or the command line program du in the package coreutils that can be used like this:
/usr/bin/du --total --summarize --human-readable --one-file-system
See also ncdu.
Ncdu is a ncurses-based du viewer. It provides a fast and easy to use interface and allows to browse through directories, to show percentages of disk usage and to delete unwanted files.
Command line
- kernel packages are large; older versions are not removed automatically for your safety.
In lenny, aptitude has «why» and «why-not».
aptitude why package1
shows why package1 may have been installed.
aptitude why package1 package2
tries to work out why installing package1 would drag in package2.
«why-not» looks at conflicts.
These commands only provide one possible explanation. Check /var/log/aptitude for definitive information.
Using aptitude to list uninstalled recommended or suggested packages:
aptitude search '~RBsuggests:~i!~i'
To list upgradeable packages:
aptitude search '~U'
To list manually installed packages:
aptitude search '~i!~M'
To install without recommends but not uninstalling other recommends:
aptitude install -R -o Aptitude::Keep-Recommends=true
To list packages in increasing order of size:
aptitude -F '%I %p' search '~i'|egrep '^[0-9]+[\.,]?[0-9]* [MG]B'|sort -n
Remove some cruft
Purge obsolete configuration files:
aptitude purge ~c
Take a look at the Debian Cleanup Tips at http://raphaelhertzog.com/mastering-debian/.
Using dpigs (debian-goodies):
dpigs -n50
Using wajig :
wajig size
Sort installed packages by size:
dpkg-query -W --showformat='${Installed-Size} ${Package}\n' | sort -nGraphical Interface
synaptic, go to installed packages and click on the size column.
Categorically Expendable Directories
Temporary
/tmp/var/tmp
Contents of these directories are only intended to be used in the short term or while a program is running and are generally expendable.
Logs
/var/log
Cache
packages in /var/cache/apt/archives usually eats some space. As root or using sudo, you can get rid of them with:
apt-get clean
aptitude clean
Use apt-get autoclean if you want to remove old packages for which you also have the last package.
Spool
/var/spool
are intended to be processed but may be expendable.
These function only if file systems are usually mounted with option strictatime.
/usr/bin/find
-atime (if your system has atime enabled, which is not default in Linux)
Duplicate Handling
When you find duplicates, you can hard link them, if they are on the same file system, or remove duplicates to make them unique.
Finders
Files you do not want
bleachbit (Squeeze and later)
localepurge
Packages you do not want
Do not compress bash or your scripts will crash. Compressed executables may require more memory when run.
Convert spaces to tabs
Can reduce the file size of text files, though the difference is usually slight. For this example you need the commands find of findutils; unexpand of coreutils; and rewrite, which is at http://oss.ezic.com but not packaged.
find -type f -writable -name '*.txt' -exec rewrite '{}' 'unexpand --all' \;Reduce data creation
*.* -/dev/tty12
Output to what would be files can be caused to go to /dev/null in some cases where a symlink does not work as in this example redirecting output from .xsession-errors: mknod .xsession-errors c 1 3
On systems that have been running for some time you might consider removing or compressing old log files. logrotate can assist
Application Level / User Space
- GVFS Zip format archives can be mounted by GVFS.
fuse-utils There are many file systems which offer compression and operate through FUSE.
In Linux
- squashfs read-only
No high confidence of high reliability
These file systems might not be reliable enough to store critical data.
- Reiser4FS
- BTrFS
Turn Off Reserved Blocks on ExtFS
tune2fs -r 0 /dev/sda2
This can be done on a mounted filesystem.
Off Line Storage
You may move data to off line storage, such as removable optical discs or discs on an external data bus (such as Firewire or USB).
File Compression
- BZip2 format
- GZip format
External article on parallel compressors
Wish list
using Quota as usrquota groupquota waringquota in quota
See Also
NAME
SYNOPSIS
DESCRIPTION
The default output, as well as the default output from options
like —fs and —topology, is subject to change. So whenever
possible, you should avoid using default outputs in your scripts. Always
explicitly define expected columns by using —output
columns-list and —list in environments where a stable output
is required.
Note that lsblk might be executed in time when udev
does not have all information about recently added or modified devices yet.
In this case it is recommended to use udevadm settle before
lsblk to synchronize with udev.
OPTIONS
Don’t print empty devices.
Disable all built-in filters and list all empty devices
and RAM disk devices too.
Print the sizes in bytes rather than in a human-readable
format.
By default, the unit, sizes are expressed in, is byte, and unit
prefixes are in power of 2^10 (1024). Abbreviations of symbols are exhibited
truncated in order to reach a better readability, by exhibiting alone the
first letter of them; examples: «1 KiB» and «1 MiB» are
respectively exhibited as «1 K» and «1 M», then omitting
on purpose the mention «iB», which is part of these
abbreviations.
Print information about the discarding capabilities
(TRIM, UNMAP) for each device.
Do not print holder devices or slaves. For example,
lsblk —nodeps /dev/sda prints information about the sda device
only.
-E, —dedup column
Use column as a de-duplication key to de-duplicate
output tree. If the key is not available for the device, or the device is a
partition and parental whole-disk device provides the same key than the device
is always printed.
The usual use case is to de-duplicate output on system multi-path
devices, for example by -E WWN.
-e, —exclude list
Exclude the devices specified by the comma-separated
list of major device numbers. Note that RAM disks (major=1) are
excluded by default if —all is not specified. The filter is applied to
the top-level devices only. This may be confusing for —list output
format where hierarchy of the devices is not obvious.
Output info about filesystems. This option is equivalent
to -o NAME,FSTYPE,FSVER,LABEL,UUID,FSAVAIL,FSUSE%,MOUNTPOINTS. The
authoritative information about filesystems and raids is provided by the
blkid(8) command.
-I, —include list
Include devices specified by the comma-separated
list of major device numbers. The filter is applied to the top-level
devices only. This may be confusing for —list output format where
hierarchy of the devices is not obvious.
Use ASCII characters for tree formatting.
Use JSON output format. It’s strongly recommended
to use —output and also —tree if necessary.
Produce output in the form of a list. The output does not
provide information about relationships between devices and since version 2.34
every device is printed only once if —pairs or —raw not
specified (the parsable outputs are maintained in backwardly compatible
way).
Group parents of sub-trees to provide more readable
output for RAIDs and Multi-path devices. The tree-like output is
required.
Output info about device owner, group and mode. This
option is equivalent to -o NAME,SIZE,OWNER,GROUP,MODE.
Do not print a header line.
-o, —output list
Specify which output columns to print. Use —help
to get a list of all supported columns. The columns may affect tree-like
output. The default is to use tree for the column ‘NAME’ (see also
—tree).
The default list of columns may be extended if list is
specified in the format +list (e.g., lsblk -o +UUID).
Output all available columns.
Produce output in the form of key=»value»
pairs. The output lines are still ordered by dependencies. All potentially
unsafe value characters are hex-escaped (\x<code>). See also option
—shell.
Print full device paths.
Produce output in raw format. The output lines are still
ordered by dependencies. All potentially unsafe characters are hex-escaped
(\x<code>) in the NAME, KNAME, LABEL, PARTLABEL and MOUNTPOINT
columns.
Output info about SCSI devices only. All partitions,
slaves and holder devices are ignored.
Print dependencies in inverse order. If the —list
output is requested then the lines are still ordered by dependencies.
Force tree-like output format. If column is
specified, then a tree is printed in the column. The default is NAME
column.
-o
NAME,ALIGNMENT,MIN-IO,OPT-IO,PHY-SEC,LOG-SEC,ROTA,SCHED,RQ-SIZE,RA,WSAME.
Display help text and exit.
Print version and exit.
-w, —width number
Specifies output width as a number of characters. The
default is the number of the terminal columns, and if not executed on a
terminal, then output width is not restricted at all by default. This option
also forces lsblk to assume that terminal control characters and unsafe
characters are not allowed. The expected use-case is for example when
lsblk is used by the watch(1) command.
-x, —sort column
Sort output lines by column. This option enables
—list output format by default. It is possible to use the option
—tree to force tree-like output and than the tree branches are sorted
by the column.
The column name will be modified to contain only
characters allowed for shell variable identifiers, for example, MIN_IO and
FSUSE_PCT instead of MIN-IO and FSUSE%. This is usable, for example, with
—pairs. Note that this feature has been automatically enabled for
—pairs in version 2.37, but due to compatibility issues, now
it’s necessary to request this behavior by —shell.
Print the zone related information for each device.
Gather data for a Linux instance other than the instance
from which the lsblk command is issued. The specified directory is the
system root of the Linux instance to be inspected. The real device nodes in
the target directory can be replaced by text files with udev attributes.
EXIT STATUS
none of specified devices found
some specified devices found, some not found
ENVIRONMENT
enables lsblk debug output.
enables libblkid debug output.
enables libmount debug output.
enables libsmartcols debug output.
use visible padding characters.
NOTES
For partitions, some information (e.g., queue attributes) is
inherited from the parent device.
SEE ALSO
ls(1), blkid(8), findmnt(8)
REPORTING BUGS
For bug reports, use the issue tracker at
<https://github.com/util-linux/util-linux/issues>.
AVAILABILITY
The lsblk command is part of the util-linux package which
can be downloaded from Linux Kernel Archive
<https://www.kernel.org/pub/linux/utils/util-linux/>.
