

- Enable plugin
- Configure Zabbix data source
- HTTP settings
- Zabbix API details
- Direct DB Connection
- Supported databases
- Other
- Note about Browser Cache
- Community Resources, Feedback, and Support
- Support Project
- License
- Simple Graph
- Multiple Items On One Graph
- Bar Chart
- Singlestat and Gauges
- Introduction
- Step 1 — Installing Grafana
- Step 2 — Installing the Zabbix Plugin for Grafana
- Step 3 — Configuring the Zabbix Plugin
- Step 4 — Creating a Custom Zabbix Dashboard
- Conclusion
- Table of Contents
- Network Diagram
- Installing Grafana Zabbix Plugin
- Enabling Grafana-Zabbix Plugin
- Adding Zabbix Data Source on Grafana
- Monitoring Zabbix with Grafana
- Creating a Basic Zabbix Grafana Dashboard
- Where to Go Next?
- References
- Установка и запуск на CentOS / Red Hat
- Настройка брандмауэра
- Запуск сервиса
- Установка и запуск на Ubuntu / Debian
- Открываем и настраиваем портал
- Добавляем плагин для работы с Zabbix
- Добавляем источник данных
- Создаем график на основе метрики в Zabbix
- Настройка https
- Получаем сертификат
- Настройка сервера Grafana
- Анонимный доступ
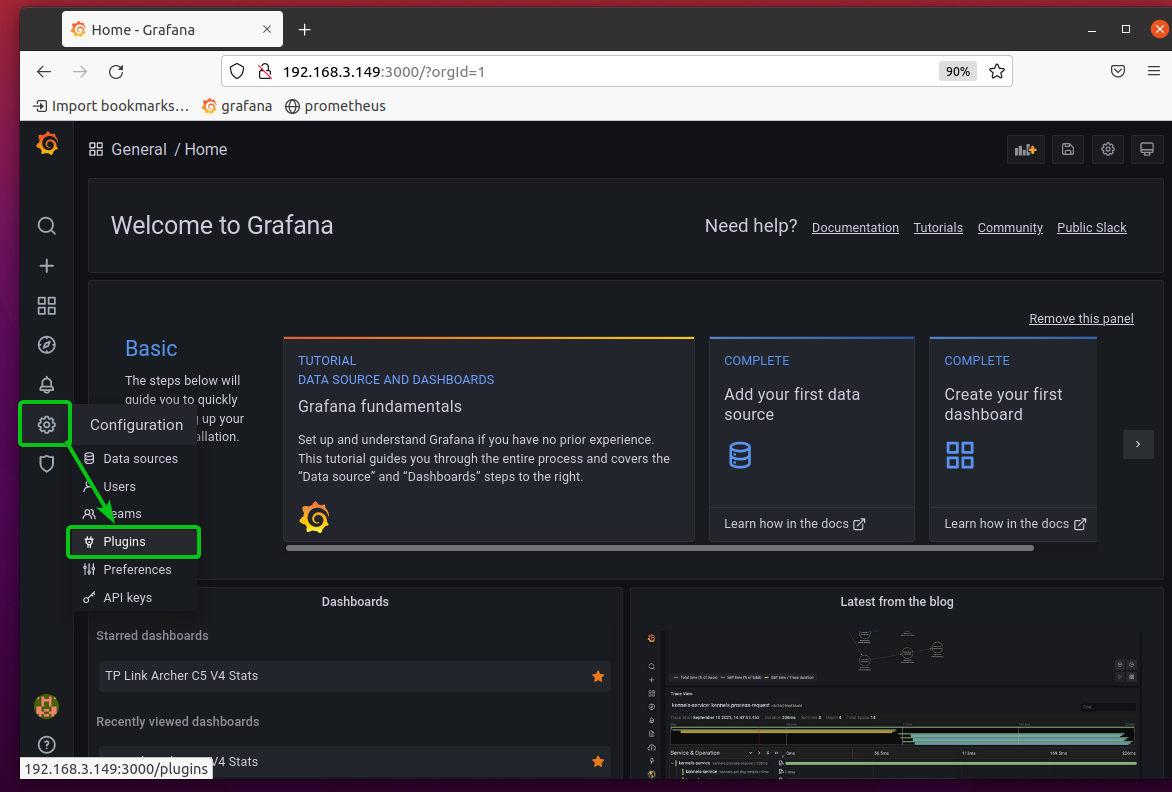
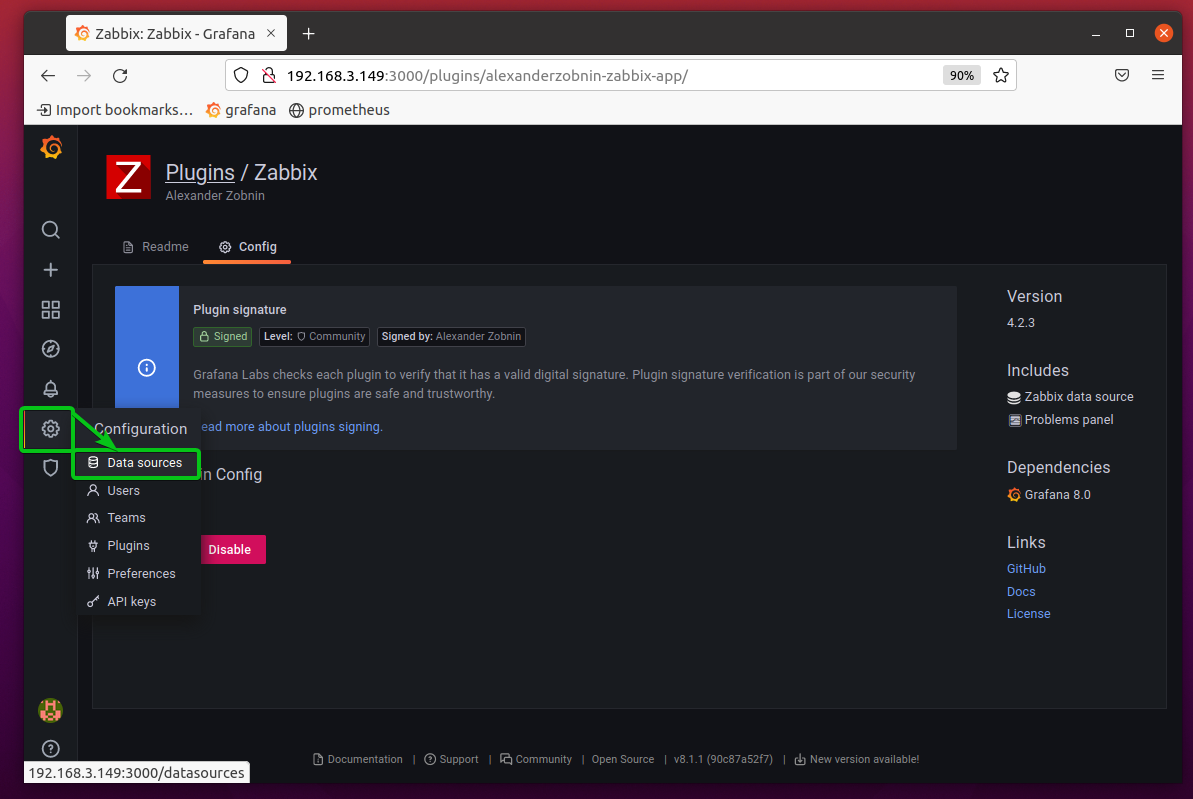
Enable plugin
Go to the plugins in Grafana side panel, select Apps tab, then select Zabbix, open Config
tab and enable plugin.

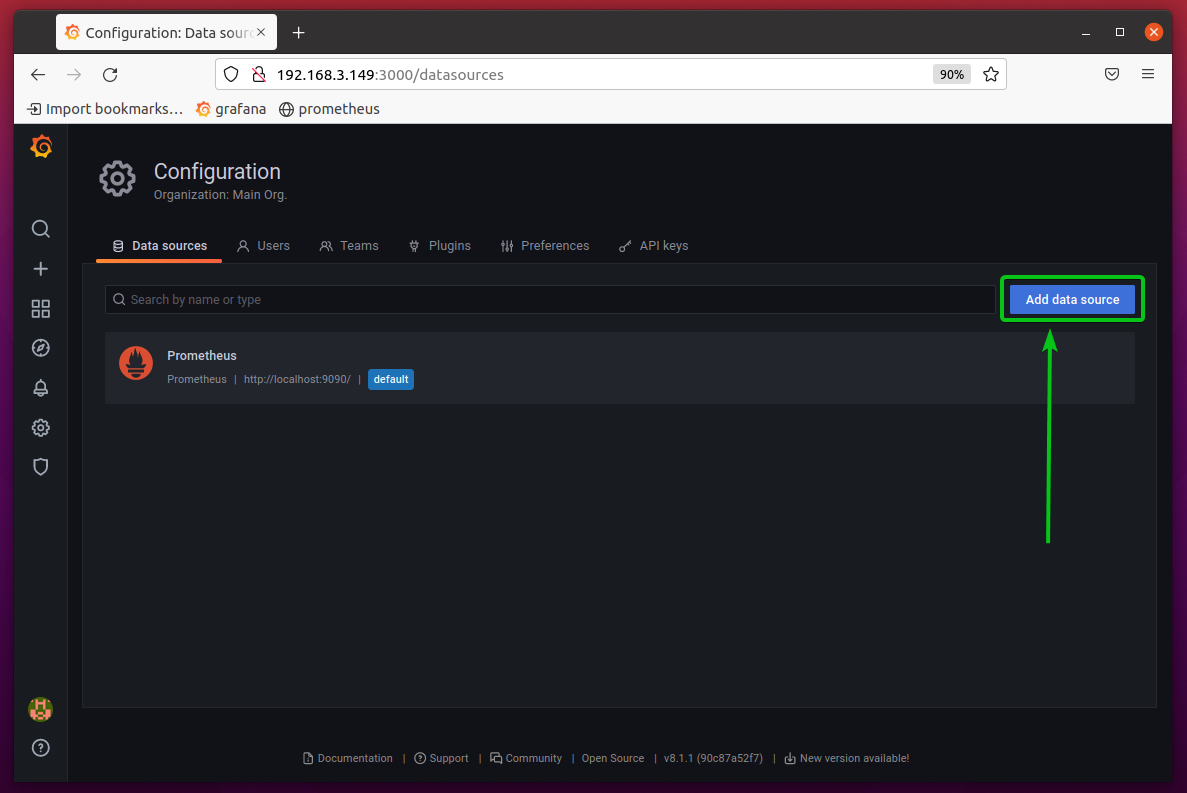
Configure Zabbix data source
After enabling plugin you can add Zabbix data source.
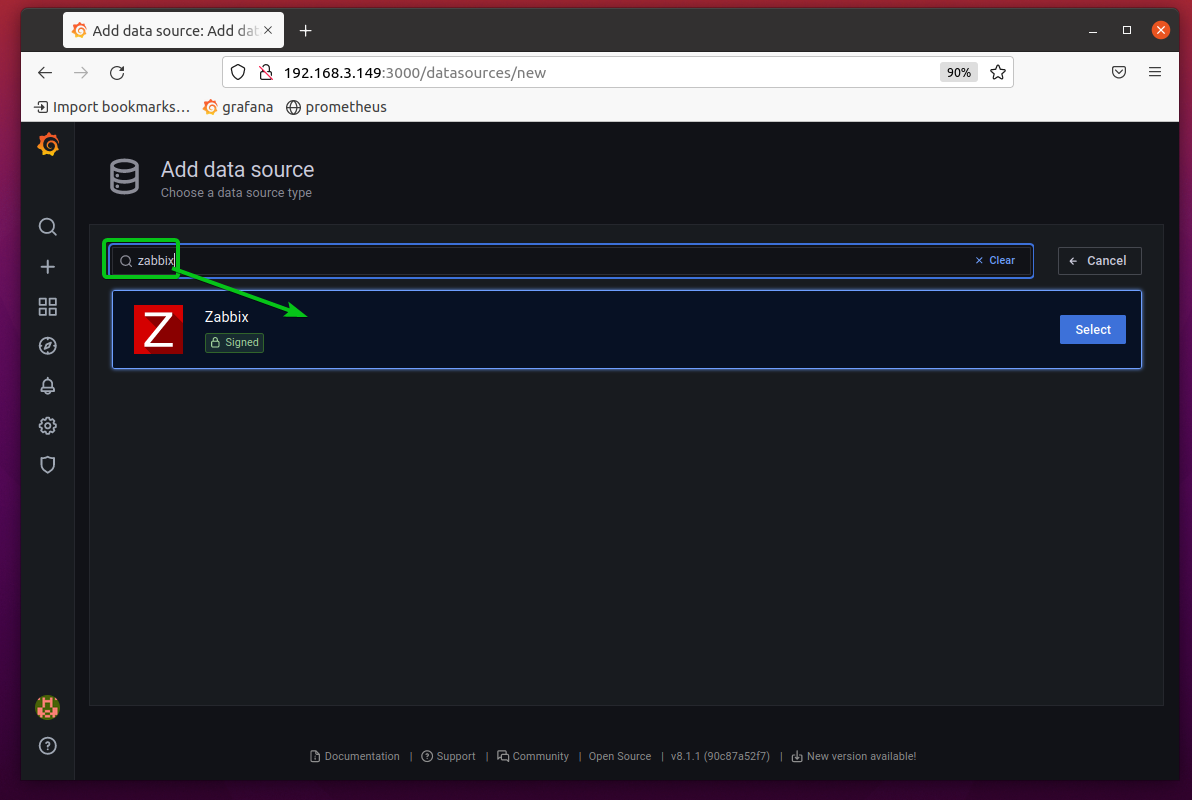
To add new Zabbix data source open Data Sources in side panel, click Add data source and select Zabbix from dropdown list.

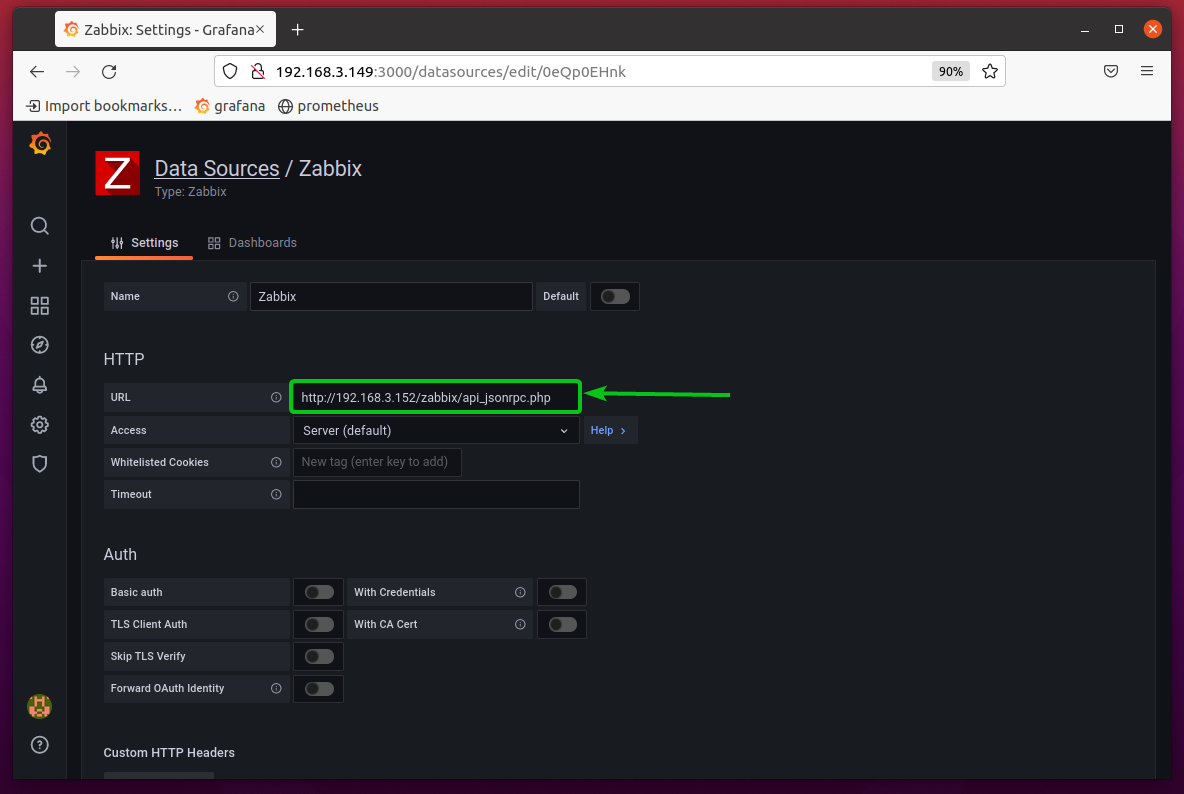
HTTP settings
- URL: set Zabbix API url (full path with api_jsonrpc.php).
- Access: Set to Server (default).
- Http Auth: configure if you use proxy authentication.
- Basic Auth:
- With Credentials:
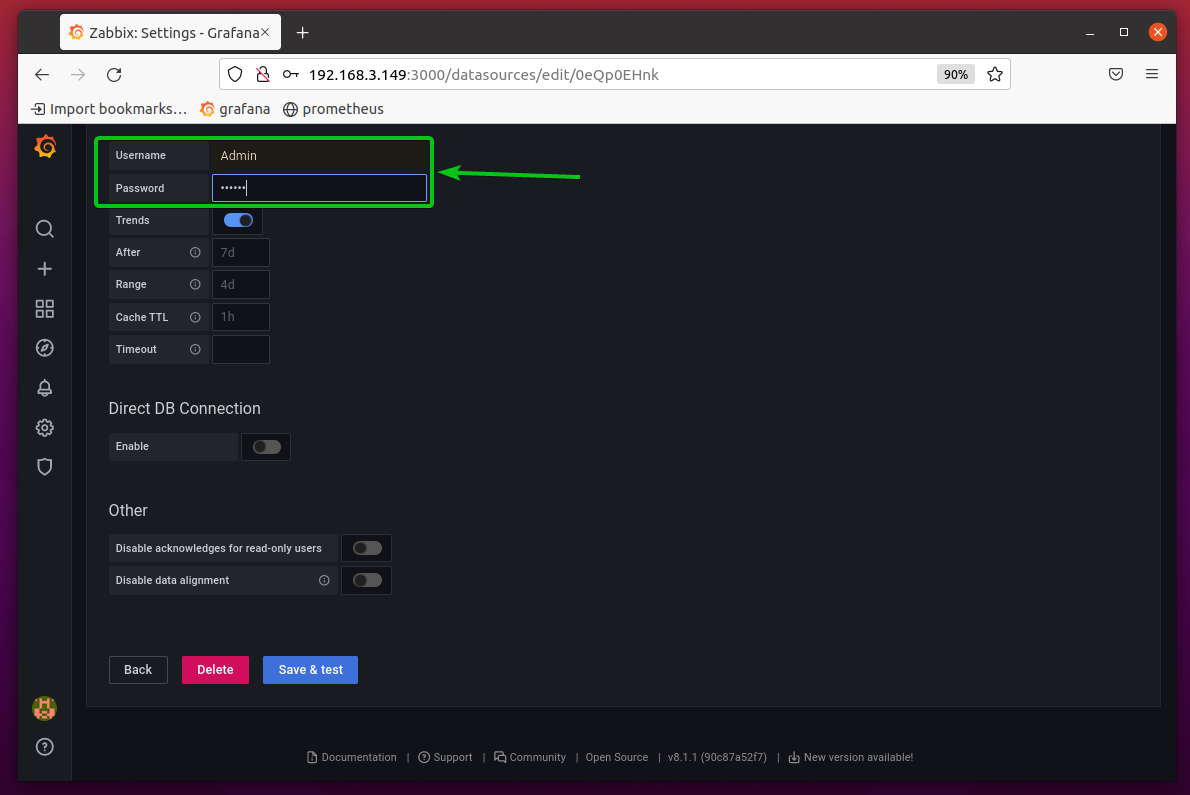
Zabbix API details
- Trends: enable if you use Zabbix 3.x or newer. This option is
strictly recommended for displaying long time periods (more than few days, depending of your item’s
updating interval in Zabbix), because few days of item history contains tons of points. Using trends
will increase Grafana performance. - After: time after which trends will be used.
Best practice is to set this value to your history storage period (7d, 30d, etc). Default is 7d (7 days).
You can set the time in Grafana format. Valid time specificators are:h — hoursd — daysM — months - h — hours
- d — days
- M — months
- Range: Time range width after which trends will be used instead of history.
It’s better to set this value in range of 4 to 7 days to prevent loading large amount of history data.
Default is 4 days. - Cache TTL: plugin caches some api requests for increasing performance. Set this
value to desired cache lifetime (this option affect data like items list). - Timeout: Zabbix connection timeout in seconds. Default is 30.
Direct DB Connection
Direct DB Connection allows plugin to use existing SQL data source for querying history data directly from Zabbix
database. This way usually faster than pulling data from Zabbix API, especially on the wide time ranges, and reduces
amount of data transferred.
Read how to configure SQL data source in Grafana.
- Enable: enable Direct DB Connection.
- Data Source: Select Data Source for Zabbix history database.
- Retention Policy (InfluxDB only): Specify retention policy name for fetching long-term stored data. Grafana will fetch data from this retention policy if query time range suitable for trends query. Leave it blank if only default retention policy used.
Supported databases
MySQL, PostgreSQL, InfluxDB are supported as sources of historical data for the plugin.
Other
You can import dashboard examples from Dashboards tab in the data source config.

Note about Browser Cache
After updating plugin, clear browser cache and reload application page. See details
for Chrome,
Firefox. You need to clear cache
only, not cookies, history and other data.
Grafana-Zabbix is a plugin for Grafana allowing to visualize monitoring data from Zabbix
and create dashboards for analyzing metrics and realtime monitoring. Main goals of this project
are extend Zabbix capabilities for monitoring data visualization and provide quick and powerful way
to create dashboards. It is possible due both Grafana and Grafana-Zabbix plugin features.
Community Resources, Feedback, and Support
This project is being started as a simple plugin for Grafana. But many powerful features and
improvements come from community. So don’t hesitate to give any feedback and together we will make
this tool better.
If you have any troubles with Grafana or you just want clarification on a feature, there are
a number of ways to get help:
Or you can send me email.
Support Project
I develop this project in my free time, but if you really find it helpful and promising, you can
support me. There are some ways to do this. You can donate
any reasonable amount, or you can request a feature development, interesting for you (for example,
Triggers panel was sponsored by Core IT Project).
License
By utilizing this software, you agree to the terms of the included license. Grafana-Zabbix plugin is
licensed under the Apache 2.0 agreement. See
LICENSE for the full
license terms.
After you installed and configured Grafana-Zabbix data source let’s
create a simple dashboard.
Simple Graph
Add new Graph panel to dashboard.
Select metrics from dropdown or start to type to filter results

Let’s create 15 min avg processor load graph. Select Host Group, Host, Application (optional — you can leave it blank) and Item.

Multiple Items On One Graph
/CPU (?!idle).* time/

Another case to use regex is comparing the same metrics for different hosts. Use /.*/ regex for showing all metrics or write your own filter. For example, I want to show CPU system time for all hosts which name started with backend from all host groups. I use /.*/ for Group, /^backend/ for Host and CPU system time for Item.

Bar Chart
Let’s create a graph which show queries stats for MySQL database. Select Group, Host, Application (MySQL in my case) and Items. I use /MySQL .* operations/ regex for filtering different types of operations.

To show graph as Bar Chart, go to the Display tab, uncheck Lines and set Bars. Also, enable Stack checkbox for showing stacked bars.

But this graph doesn’t look good because it contains too many bars. We can fix it by using Max data points parameter. Go to the Metrics tab and set Max data points to 50 for example.

Ok, looks pretty!
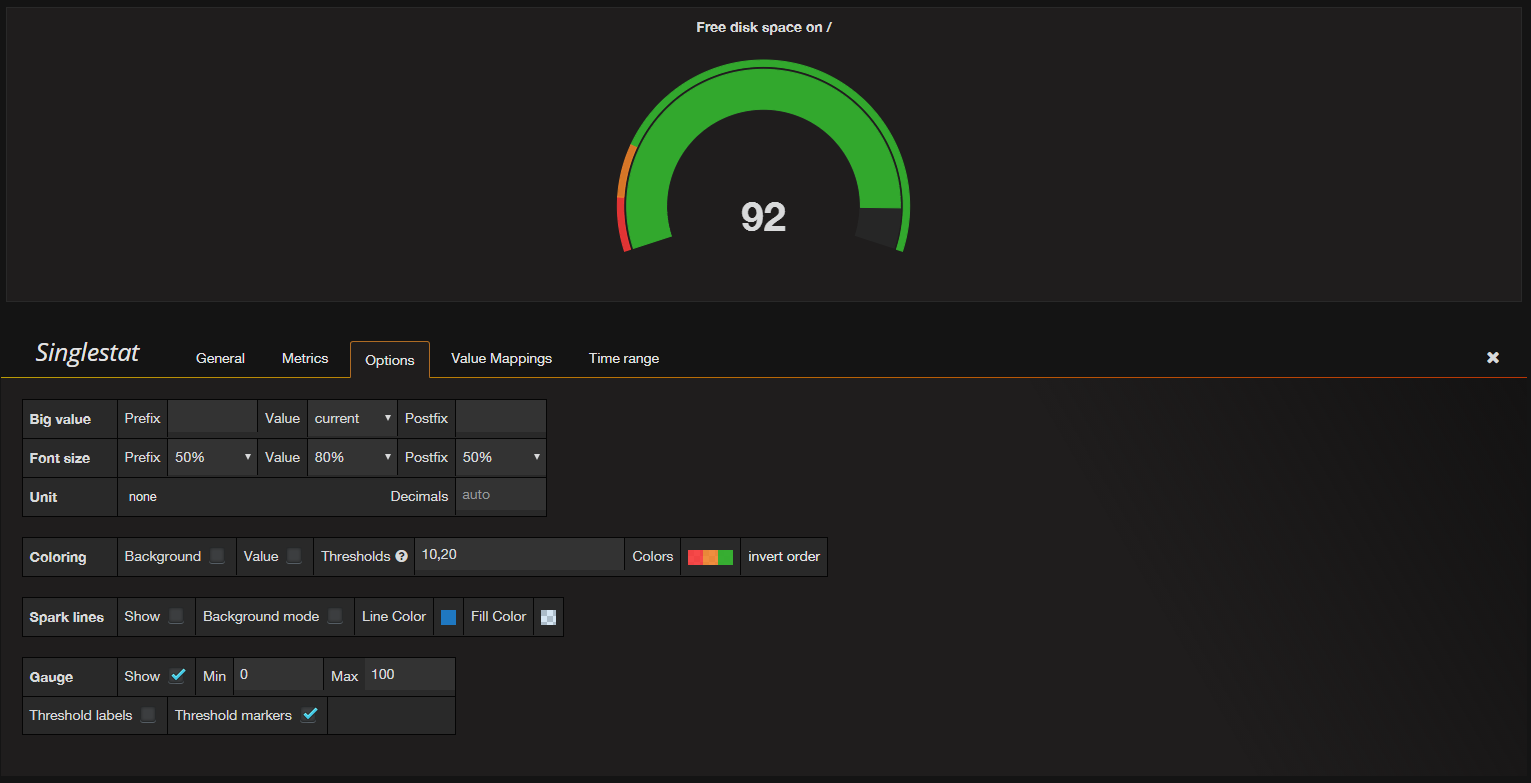
Singlestat and Gauges

Suppose that you want to set units as percents and show Gauge for this value. Go to the Options tab and set units to percent (0-100). Then enable Show option for Gauge and set Min and Max values for your metric (0-100 in our case). Set thresholds if you want to see it on Gauge (50,80 for example).

And all together:

Introduction
Zabbix is a great monitoring tool that collects data from servers, virtual machines, and other kinds of network devices so you can analyze it for trends or problems. It has feature-rich notifications on emerging issues, but the built-in tools for data analysis and visualization are not easy to use. You can combine graphs into dashboards, but first you need to create them, and there is practically no easy way to create graphs that display real-time data. Also,to there is no way to collect data from different hosts onto a single graph. While the situation is getting better with each new release, it is far from ideal.
Grafana is a good alternative to Zabbix’s dashboards. It lets you create graphs and dashboards based on data from various monitoring systems, and it specializes in the display and analysis of this data. It is lightweight, easy to install, and it looks beautiful.
In this tutorial, you’ll install Grafana and configure it to display data from Zabbix, and you’ll learn how to compose your own custom dashboard that monitors CPU and file usage.
Step 1 — Installing Grafana
Grafana isn’t available through the package manager by default, so we will set up the repository configuration file. First, create a new repository file for Grafana:
yum grafana
During the installation process you will be asked to import a GPG key. Confirm that you wish to import this key so the installation can continue.
Once the installation completes, start the Grafana service:
systemctl daemon-reload
systemctl start grafana-server
Then check whether the Grafana service is running properly:
systemctl status grafana-server
Finally, enable the service to start at boot time:
systemctl grafana-server
Grafana is running, so let’s install the component that lets Grafana pull data from Zabbix.
Step 2 — Installing the Zabbix Plugin for Grafana
You can extend Grafana’s functionality by installing plugins. You can explore the available plugins here. There are three types of plugins:
- Data sources: new storage backends for your time series data, so you can pull data from other sources.
- Apps: complex plugins that bundle data sources and panels within a single package.
We will use the Zabbix app plugin, which includes a Zabbix data source, a triggers panel, a Zabbix server dashboard, and a template to view data.
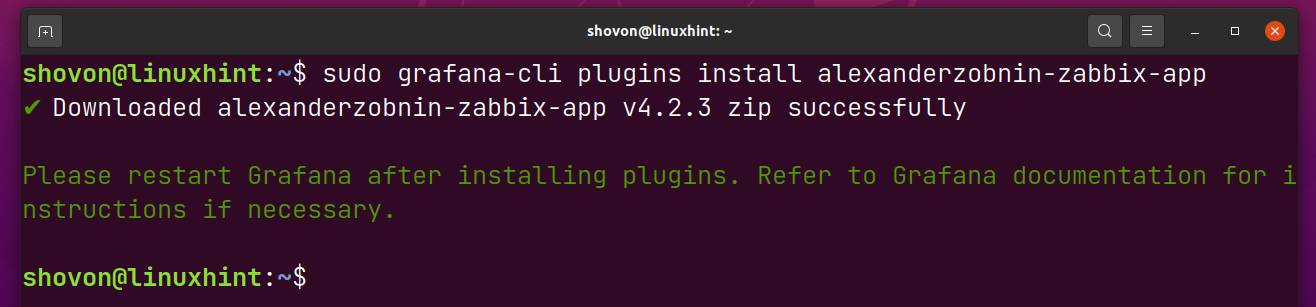
grafana-cli plugins alexanderzobnin-zabbix-app
✔ Installed alexanderzobnin-zabbix-app successfully
Whenever you add or modify plugins, you must restart grafana-server for the changes to take effect.
systemctl restart grafana-server
With the plugin installed, you can log in to Grafana and configure it to talk to Zabbix.
Step 3 — Configuring the Zabbix Plugin
Note: Grafana listens for incoming connections on port 3000. If you have a firewall configured, you’ll need to open this port. Review this tutorial to learn about the firewall in CentOS if you run into issues.

Now you can add a new data source. Select the Grafana logo again and navigate to Data sources. Then click the Add data source button. You will see the configuration page for the data source:
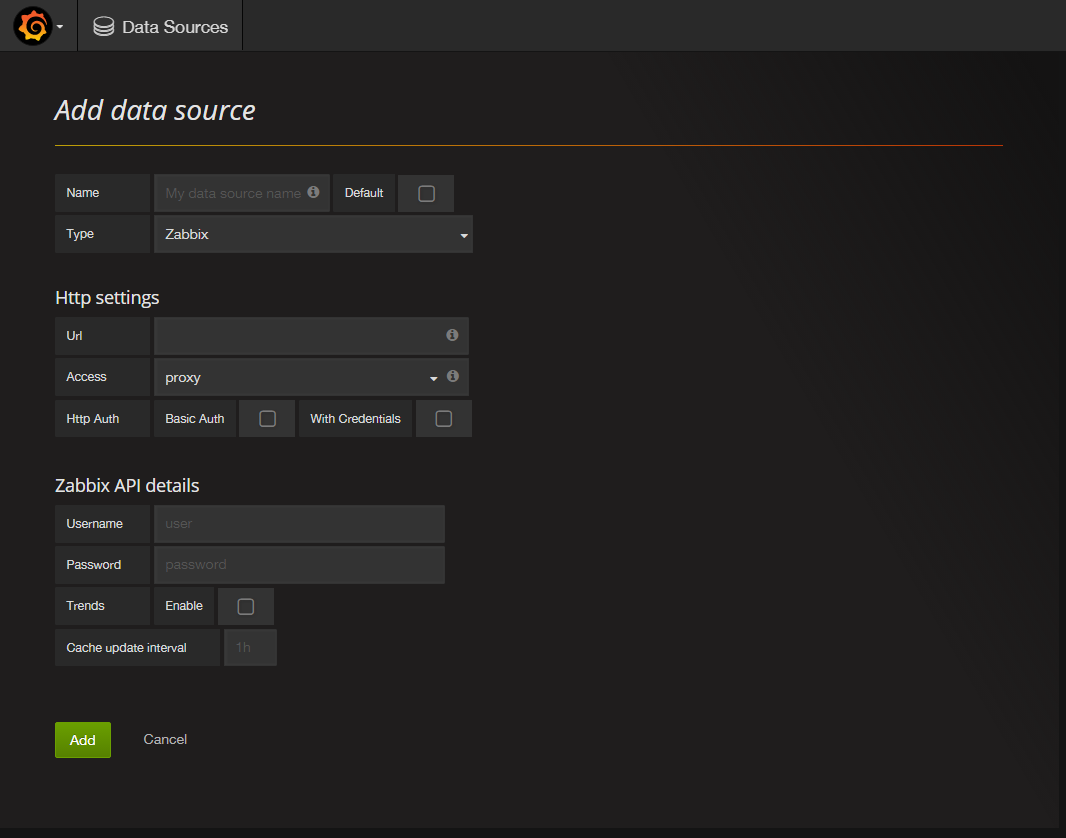
- Enter a name for this new data source in the Name field.
- Check the Default option so this data source will be preselected in new panels you create.
- Select Zabbix from the Type drop down list.
- Fill in the Url field with the full path to the Zabbix API, which will be http://your_zabbix_server_ip_address/zabbix/api_jsonrpc.php.
- Enable the Trends option; it will increase Grafana’s performance when displaying long time periods.
You can leave the other options at their default values.

If you do not see this message, check your credentials and test again.
Now let’s look at the Zabbix dashboard that came with the plugin. Select Zabbix server Dashboard from the dropdown list at the top of the screen. When you select it, the dashboard displays information about your Zabbix server:
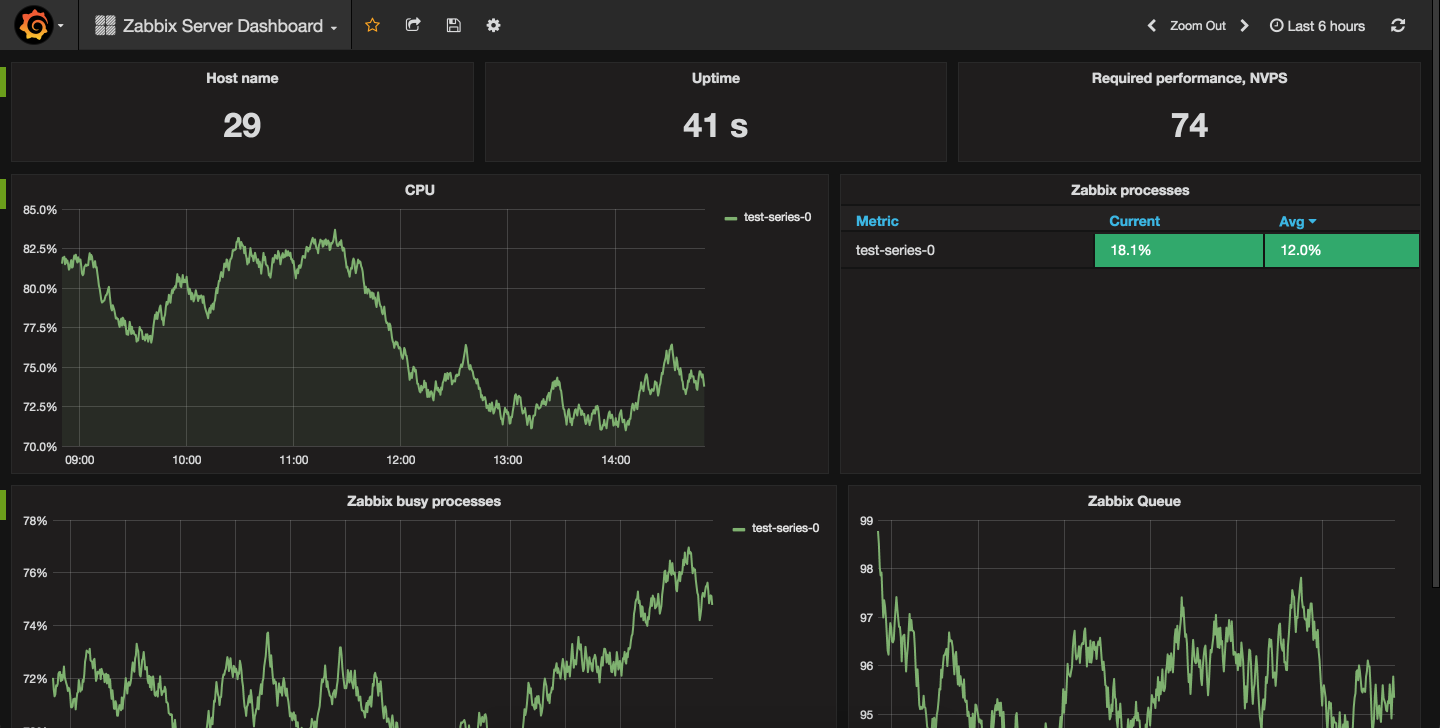
This dashboard is pretty informative, but you can create your own custom dashboard from scratch.
Step 4 — Creating a Custom Zabbix Dashboard
Let’s create a dashboard for Zabbix that shows us CPU usage and file system information in real-time.
Open the drop-down list on the top of the screen and click the Create New button. A new empty dashboard will be created.
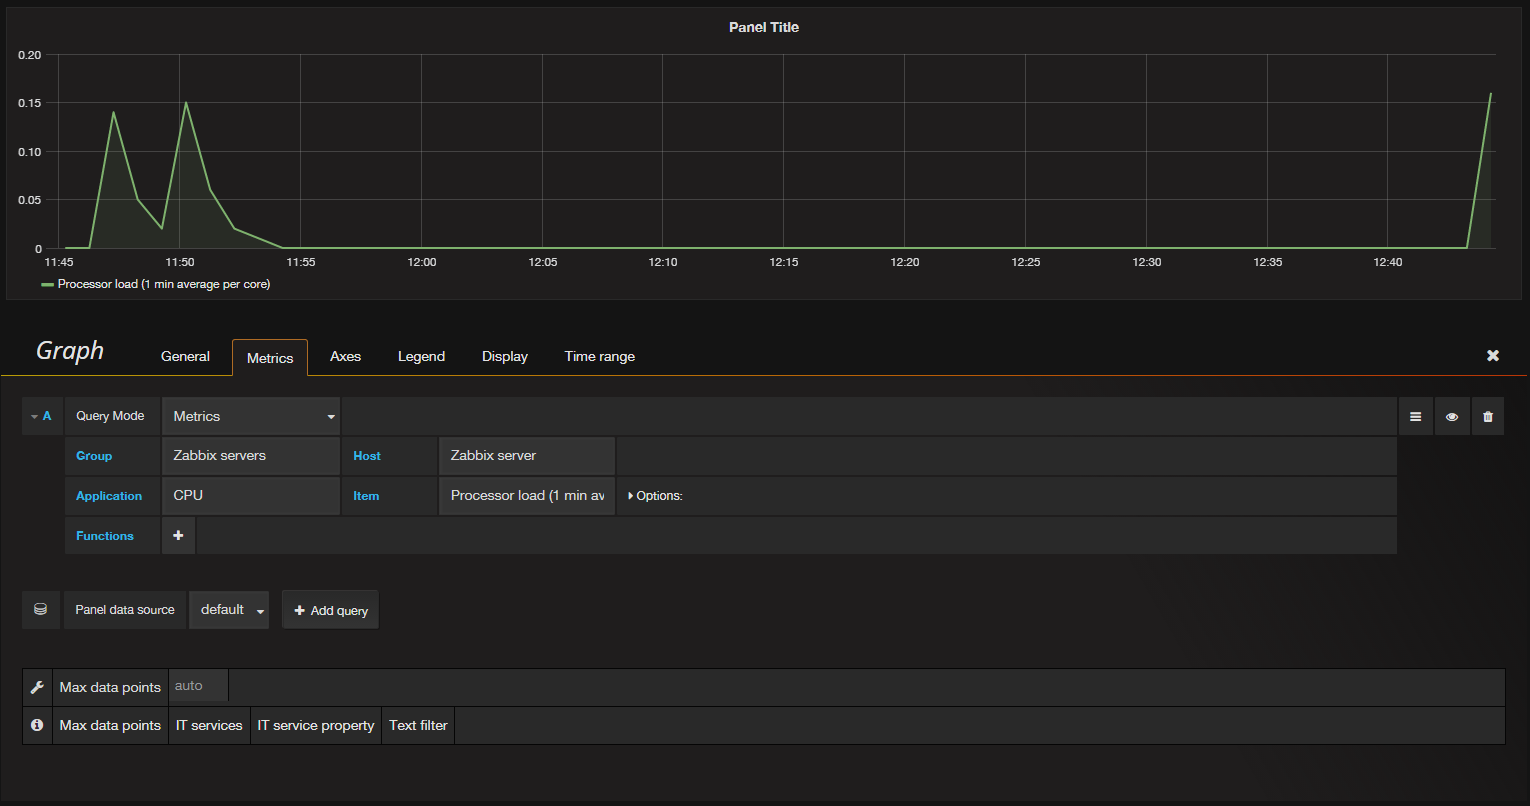
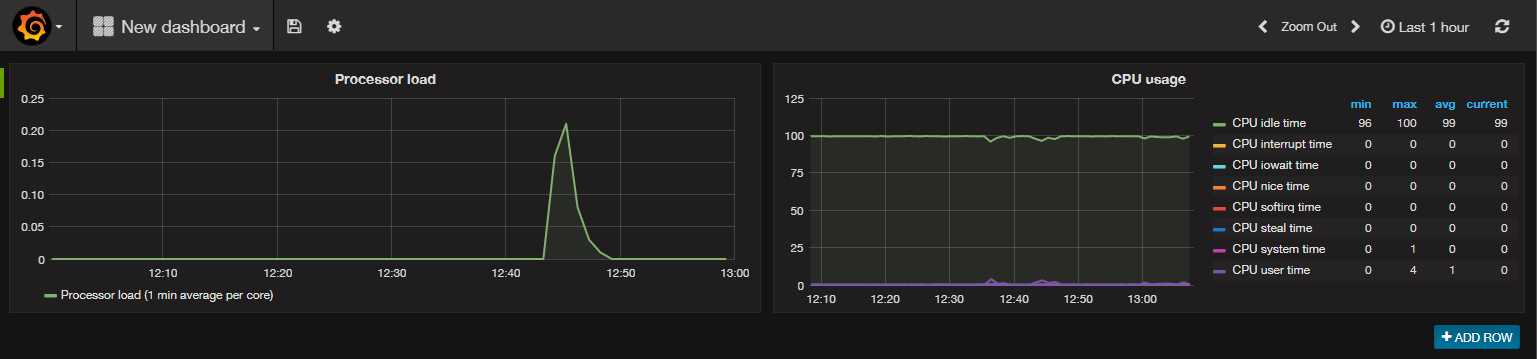
First we will create a graph that displays the CPU usage of our Zabbix server. Select the Add Panel item and then click Graph to insert a new graph into the row.
- Set Host Group to Zabbix servers.
- Set Host to Zabbix server.
- Set Application to CPU.
- Set Item to Processor load (1 min average per core).
You will see you current processor load on the graph.

Now you can click on Back to dashboard to see the result:
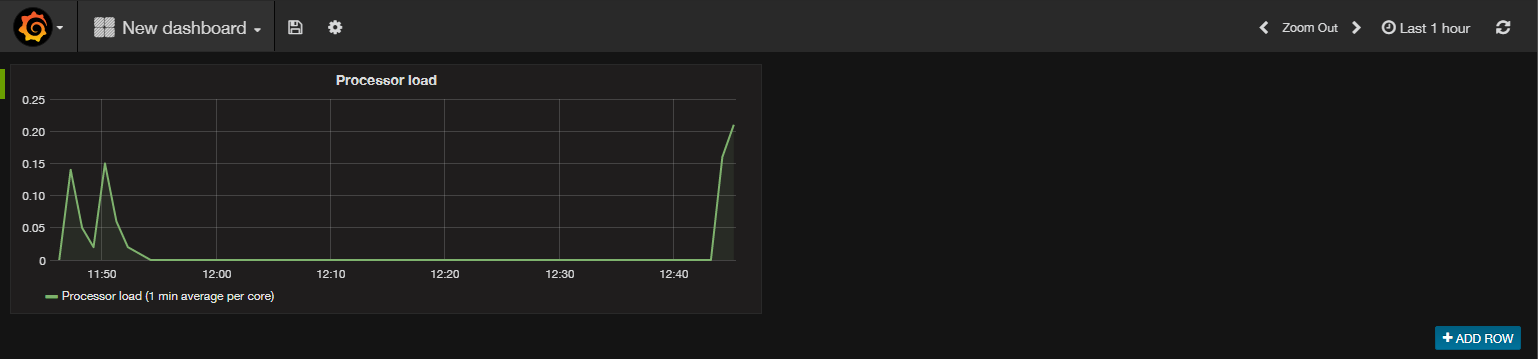
Note: If you don’t see any data, you may be zoomed out too far. Click the clock icon in the upper right of the interface and choose *Last 1 hour from the list of options.
- Change Title to CPU usage.
- Select the Metrics tab and change the Item field to /CPU.*/.
You can use Regular Expression patterns for host or metric names. Just be sure to wrap the pattern in forward slashes (/).
You can also show summary statistics. Select the Legend tab and you’ll see some options and values you can select.
- Under Options, check As table and To The right.
- Under Values, select Min, Max, Avg, and Current.
Now click Back to dashboard to see the result, which will look like this:
Next, add a Singlestat panel to show a single value for a particular metric. Create a new row by clicking Add row button and then select the row’s menu, choose Add panel, and select the Singlestat item.
- Set Host Group to Zabbix servers.
- Set Host to Zabbix server.
- Set Application to Filesystems.
- Set Item to Free disk space on / (percentage).
Next, switch to the General tab and set the Title field to Free disk space on /.
Then switch to the Options tab and configure these options:
- Enable the Show option for Gauge.
- Set Thresholds to 10,20. This will display these thresholds on the gauge.
- Select the current option from the Value drop-down list.
The gauge now looks like this:
Return to the dashboard and press CTRL+S to save it.
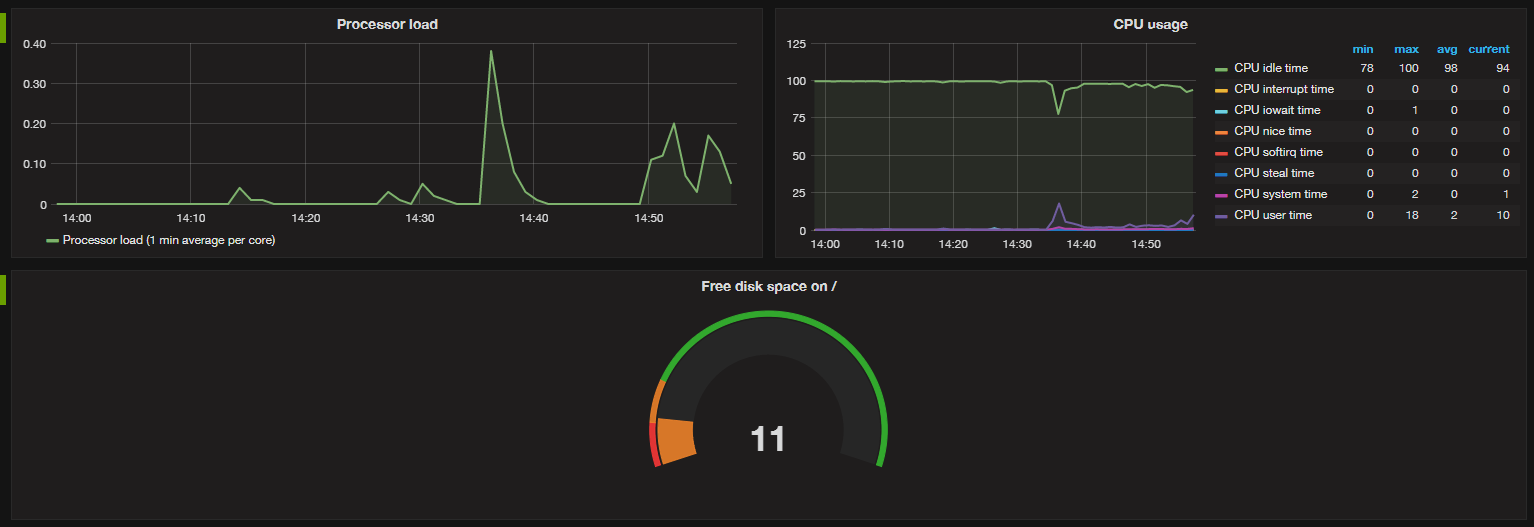
Now let’s test how this gauge responds to real-time events. To do so we will manually reduce free space on the disk and see what the dashboard displays.
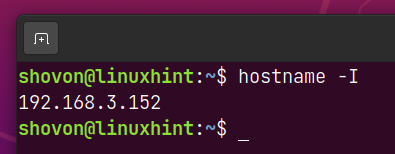
Log in to your Zabbix server if you’re not logged in currently:
Once logged in, determine how much free space is available on the file system. You can do this with the df command:
In this case, there’s 18 GB of free space. The amount of free space on your server will vary. Reduce the free space on the root partition below the 20% threshold by using the fallocate command to create one big temporary file:
fallocate 15G /tmp/test.img
Set the file size depending on the amount of free space on your server.
Then give Zabbix a couple of minutes to update its data. Refresh the dashboard and you’ll see that the gauge changed its color to reflect the free space issue:
Finally, let’s show active Zabbix triggers on the dashboard. Create a new row and then select the row’s menu, select Add panel, and choose the Zabbix Triggers item.
You will see the active trigger notifying you about the lack of free space on the server.
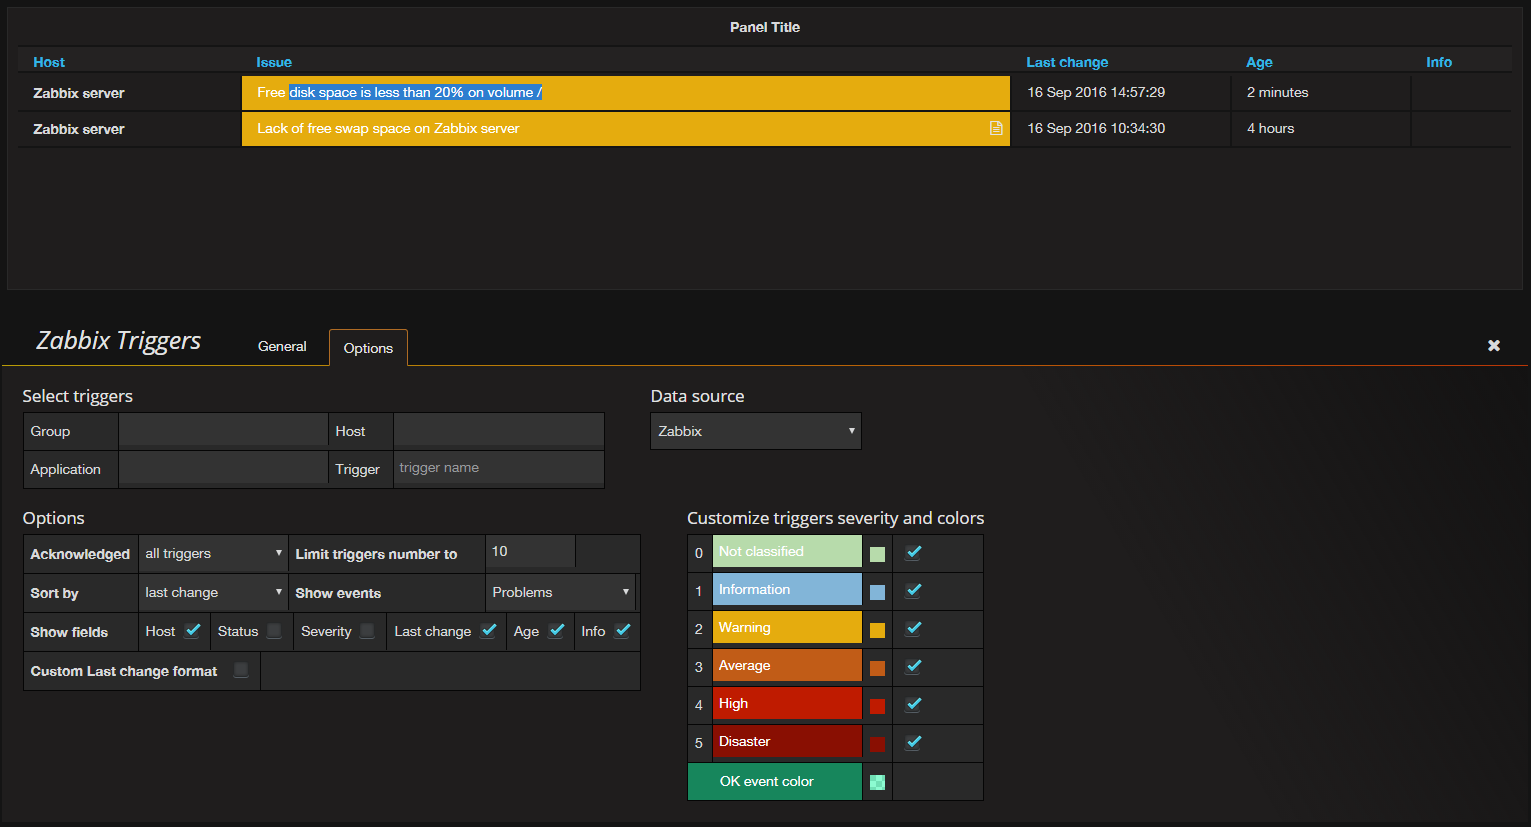
Select Back to dashboard and save the dashboard with CTRL+S. Your dashboard will now look like this:
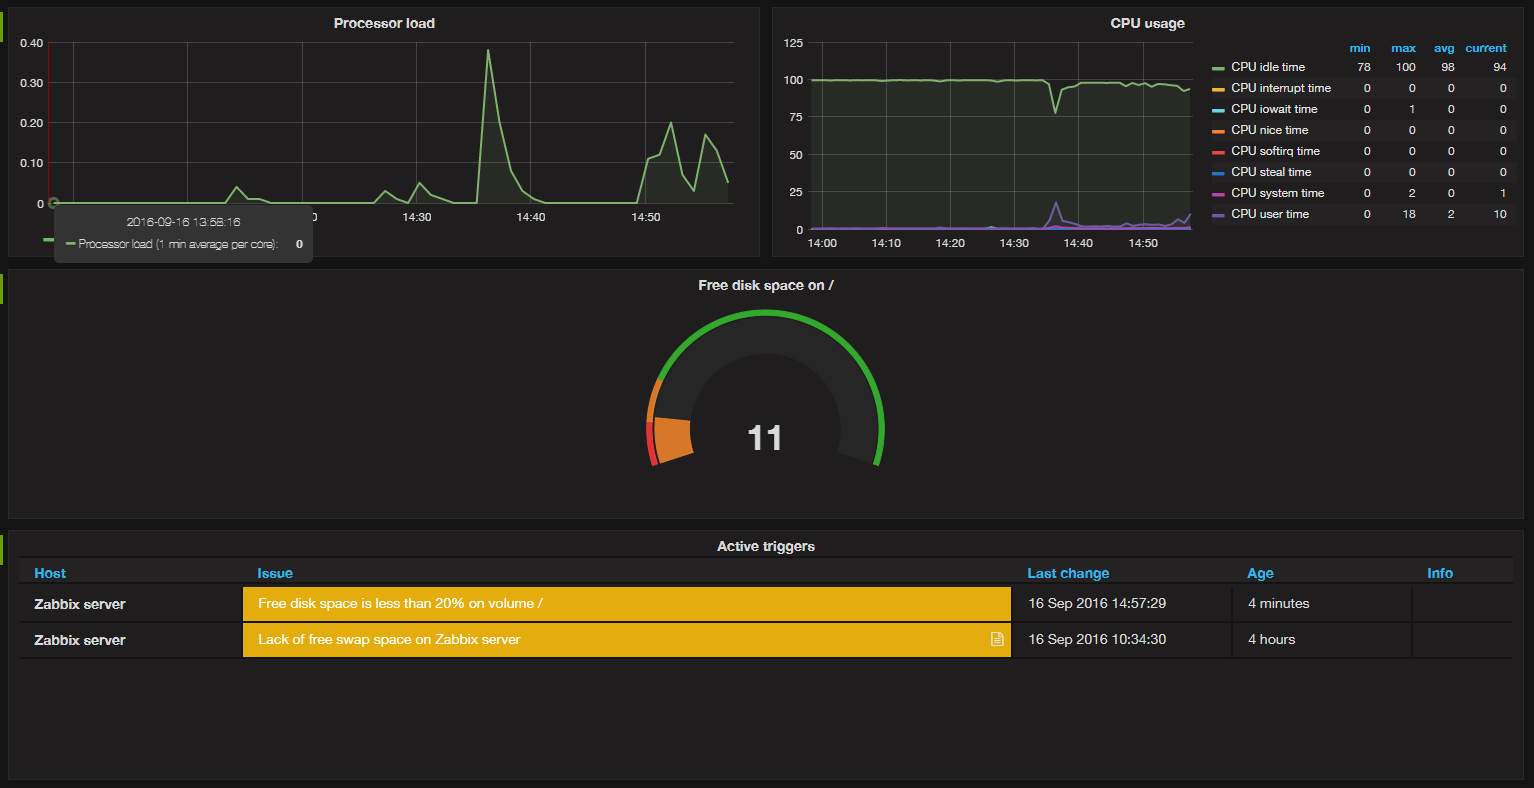
You can now use this simple dashboard to get a quick look at the current state of your server.
Don’t forget to remove the temporary file you created to free up space on your disk. On your Zabbix server, issue the command:
This will remove the test.img file. In a few minutes, the dashboard will update again to reflect the changes on the file system.
Conclusion
The Grafana-Zabbix plugin can be installed on Grafana to visualize data from Zabbix with Grafana. You can also use it to create amazing Grafana dashboards using the data from Zabbix.
In this article, I am going to show you how to install the Grafana-Zabbix plugin on Grafana. I will also show you how to add a Zabbix server as a data source on Grafana. I will show you how to get started with Grafana data visualization with Zabbix data source as well. So, let’s get started.
Table of Contents
Ubuntu 20.04 LTS: How Do I Connect Grafana with Prometheus?
CentOS 7: Install Zabbix 4.0 on CentOS 7
Network Diagram
For the demonstration, I have installed Zabbix on a Ubuntu 20.04 LTS host with the IP address 192.168.3.152 and Grafana on another Ubuntu 20.04 LTS host with the IP address 192.168.3.149.
The network diagram of my setup is given below:
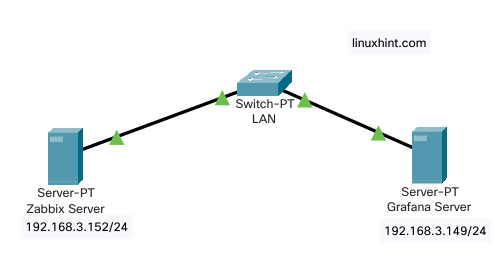
Fig 1: Network Diagram
Installing Grafana Zabbix Plugin
To add Zabbix as a Grafana data source, you must have the Grafana-Zabbix plugin installed on the computer where you have Grafana installed.

The Grafana-Zabbix plugin should be installed.
systemctl restart grafana-server.service

Enabling Grafana-Zabbix Plugin
Once you have the Grafana Zabbix plugin installed, you have to enable it from the Grafana Dashboard web interface.
To access the Grafana web interface, you have to know the IP address of the computer where you have Grafana installed. In my case, the IP address of the computer where I have Grafana installed is 192.168.3.149. It will be different for you. So, make sure to replace it with yours from now on.
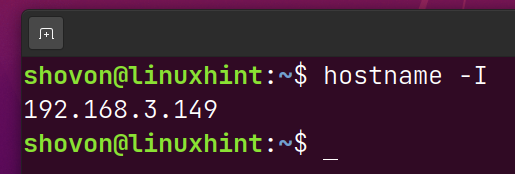
To access the Grafana web interface, visit http://192.168.3.149:3000 from your favorite web browser.
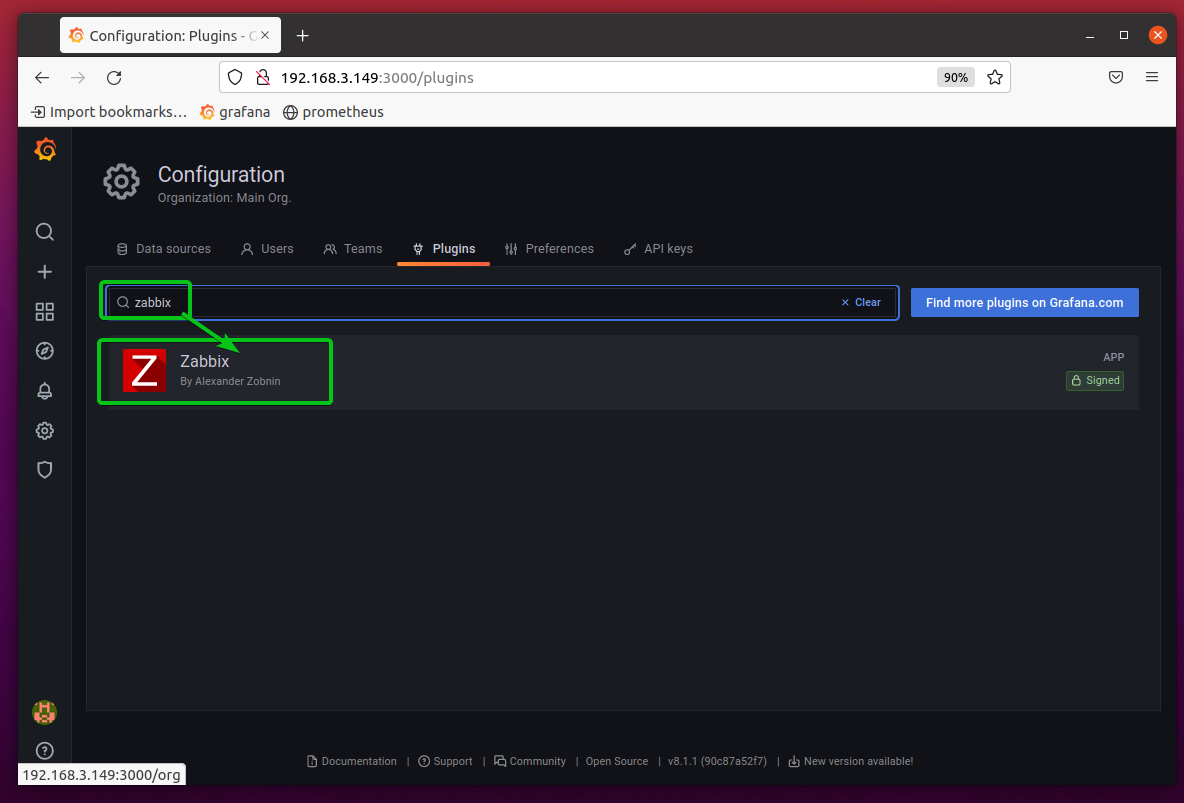
Search for the Zabbix plugin and click on the Zabbix plugin from the search result as marked in the screenshot below.
Click on Enable.
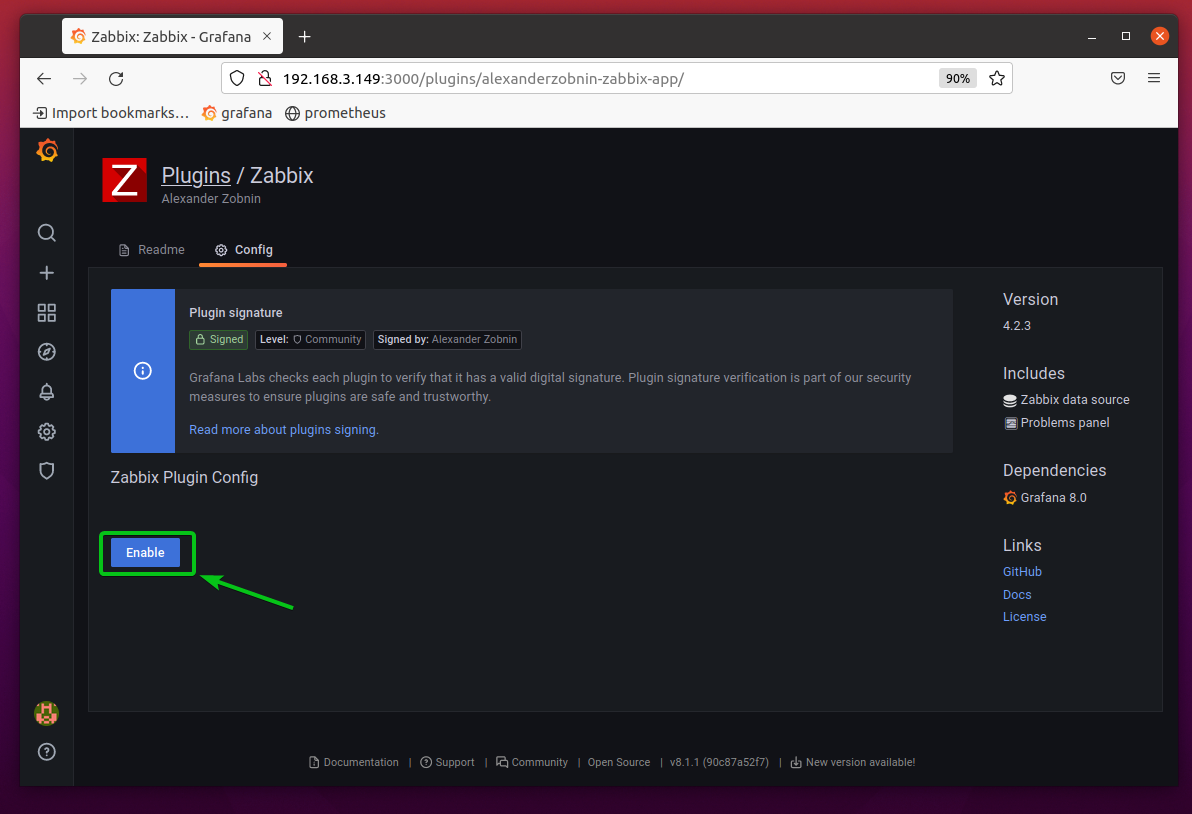
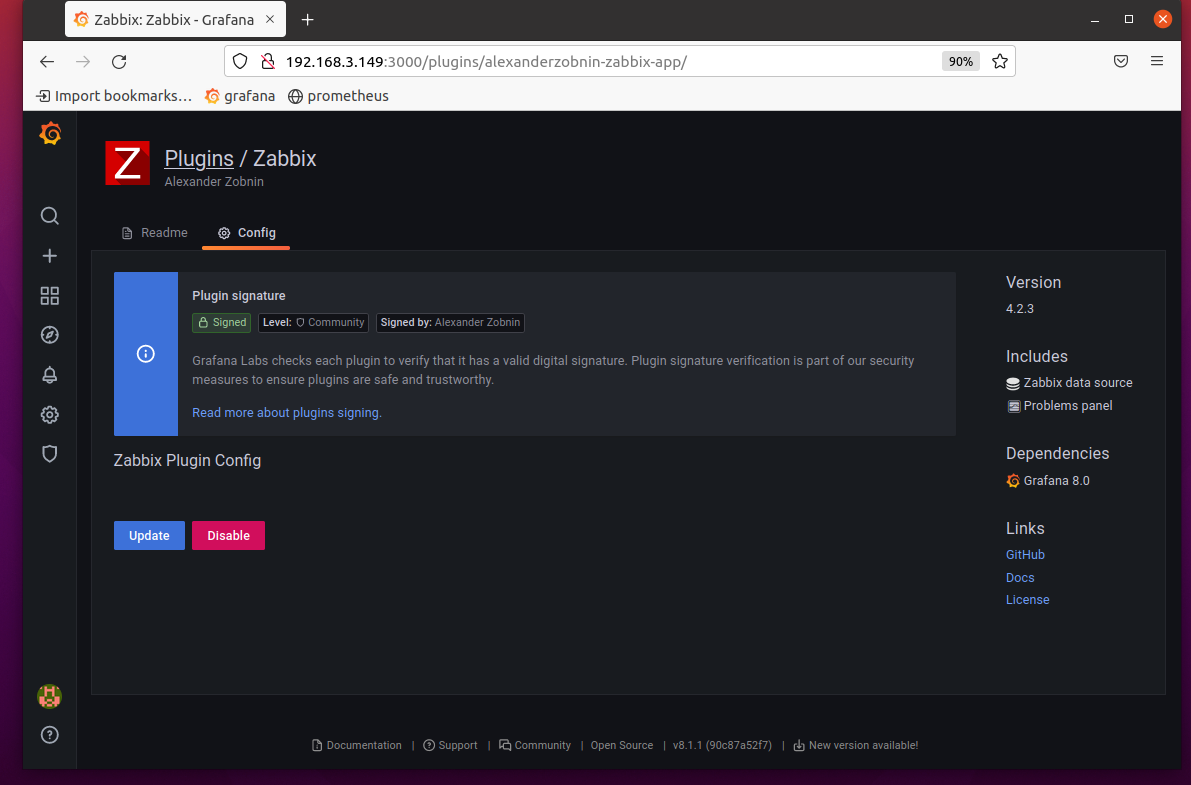
The Grafana Zabbix plugin should be enabled.
Adding Zabbix Data Source on Grafana
Once the Grafana Zabbix plugin is enabled, you can add your Zabbix server as a data source on Grafana.
Click on Add data source.
Search for the Zabbix data source and click on it as marked in the screenshot below.
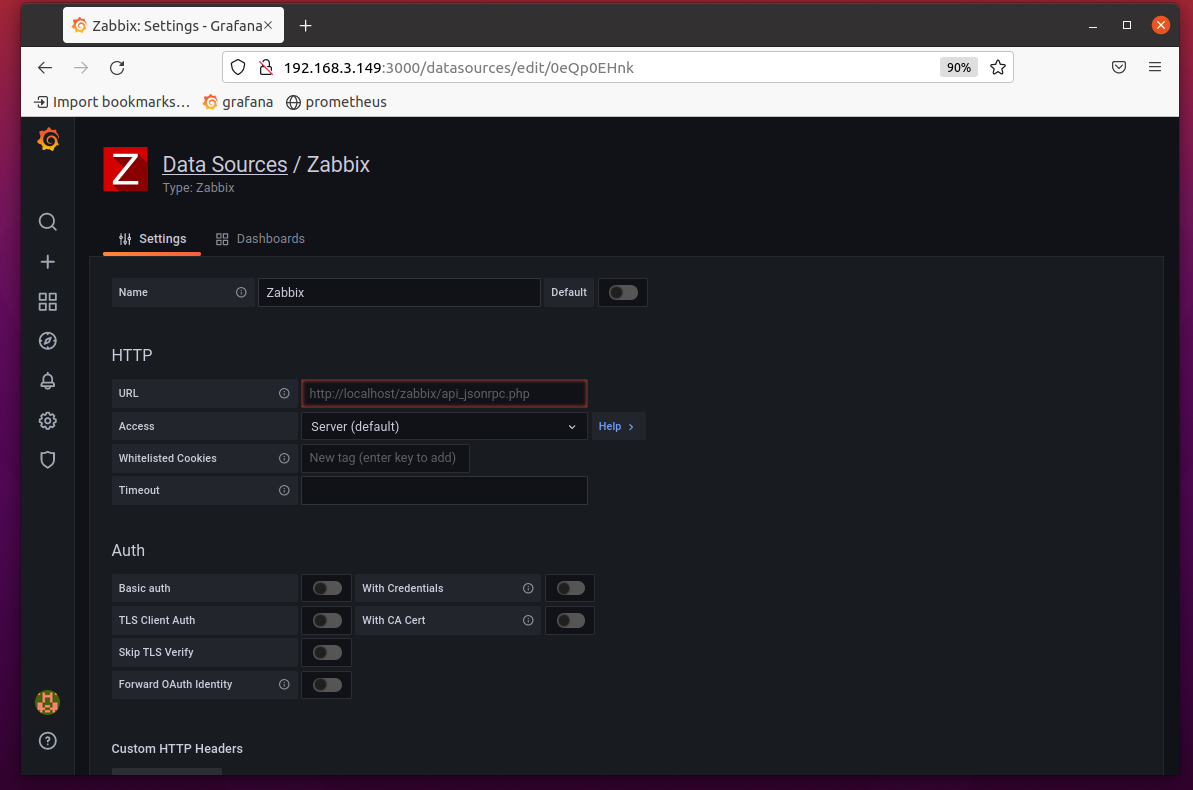
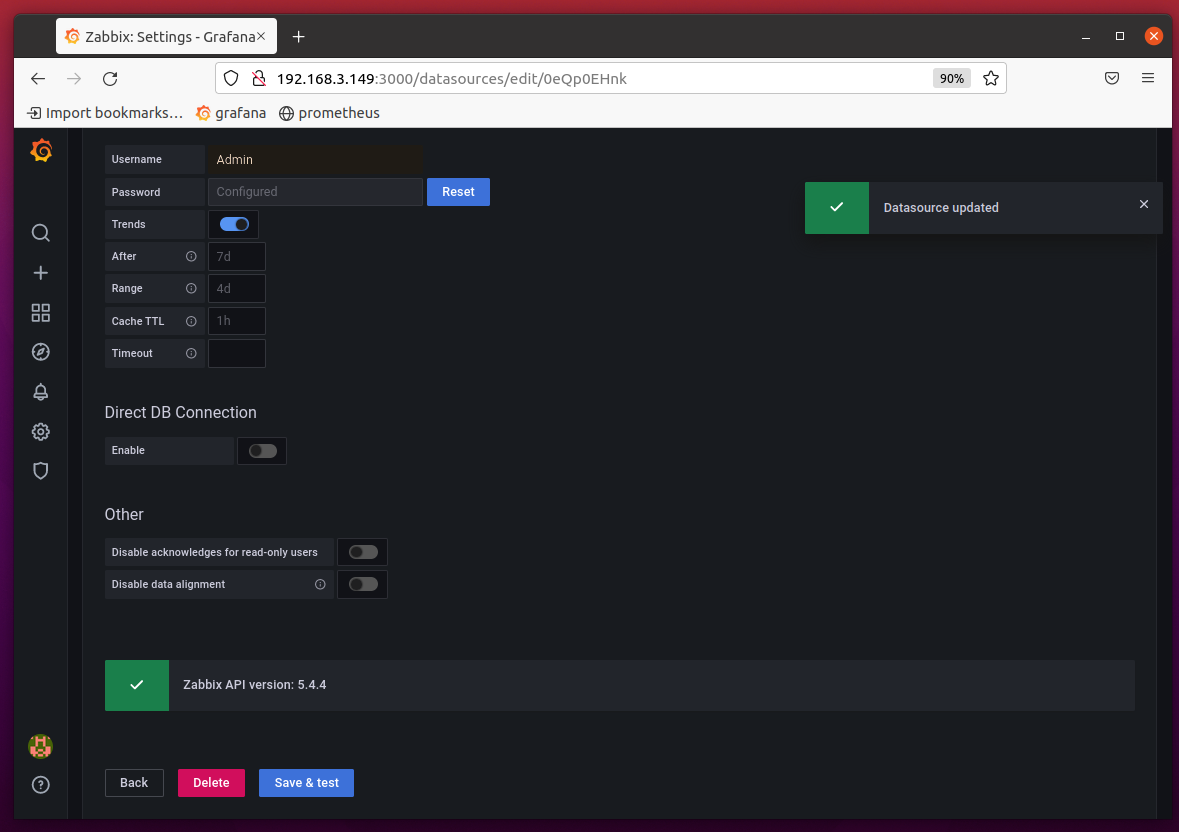
To add your Zabbix server as a data source on Grafana, you need to know the IP address of your Zabbix server. In my case, the IP address of my Zabbix server is 192.168.3.152. It will be different for you. So, make sure to replace it with yours from now on.
Once you’re done, click on Save & Test as marked in the screenshot below.
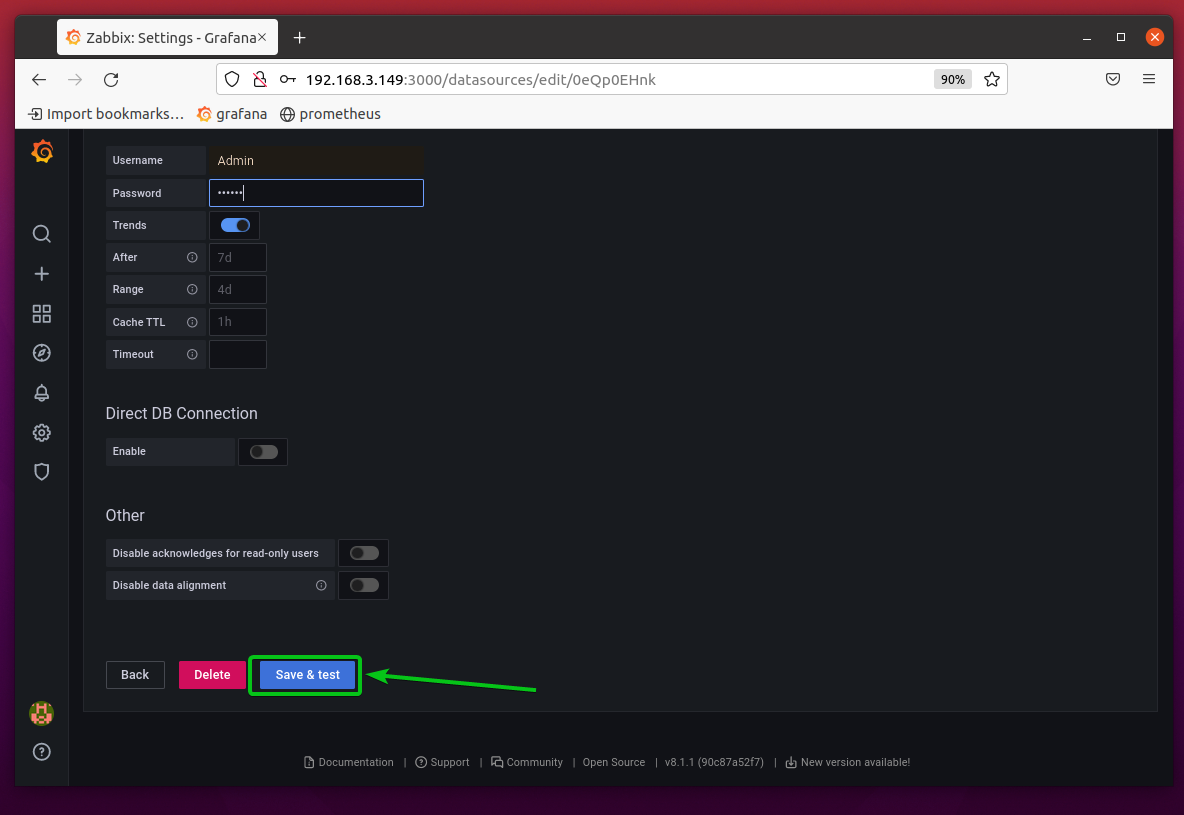
Your Zabbix server should be added to Grafana as a data source.
Monitoring Zabbix with Grafana
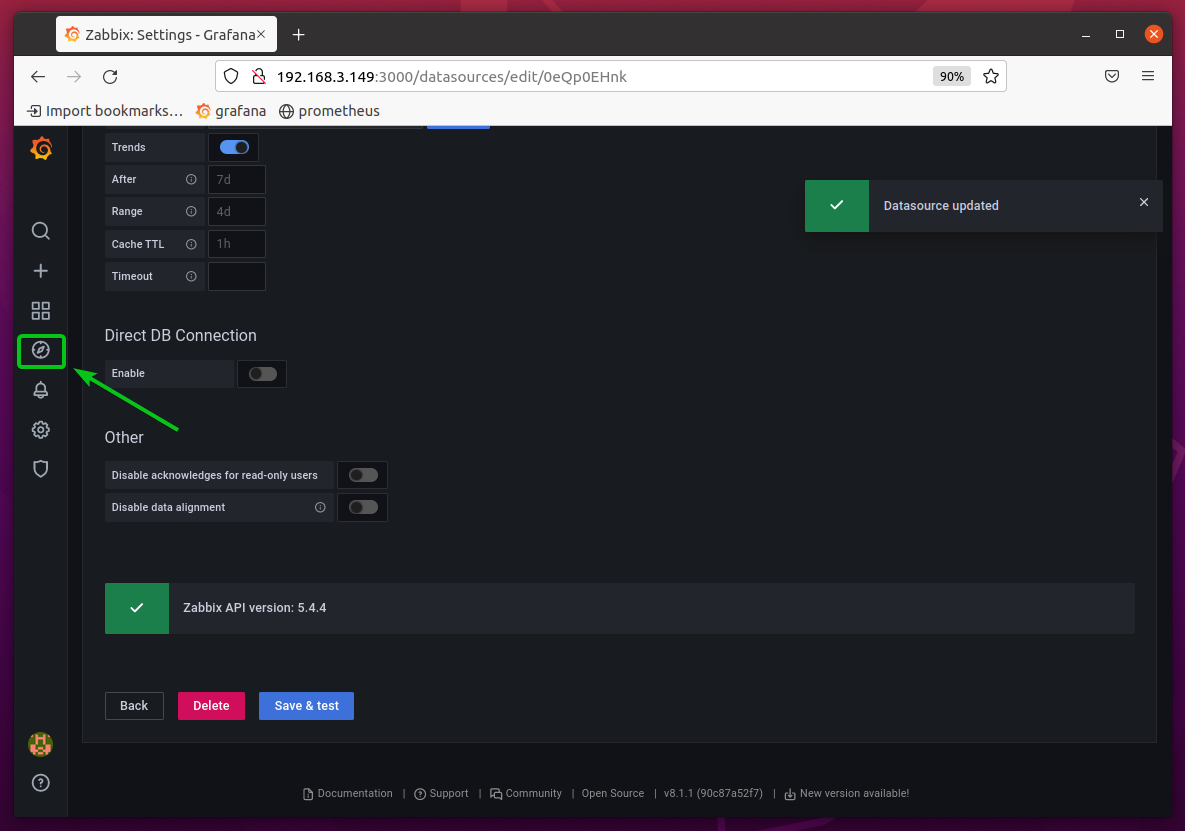
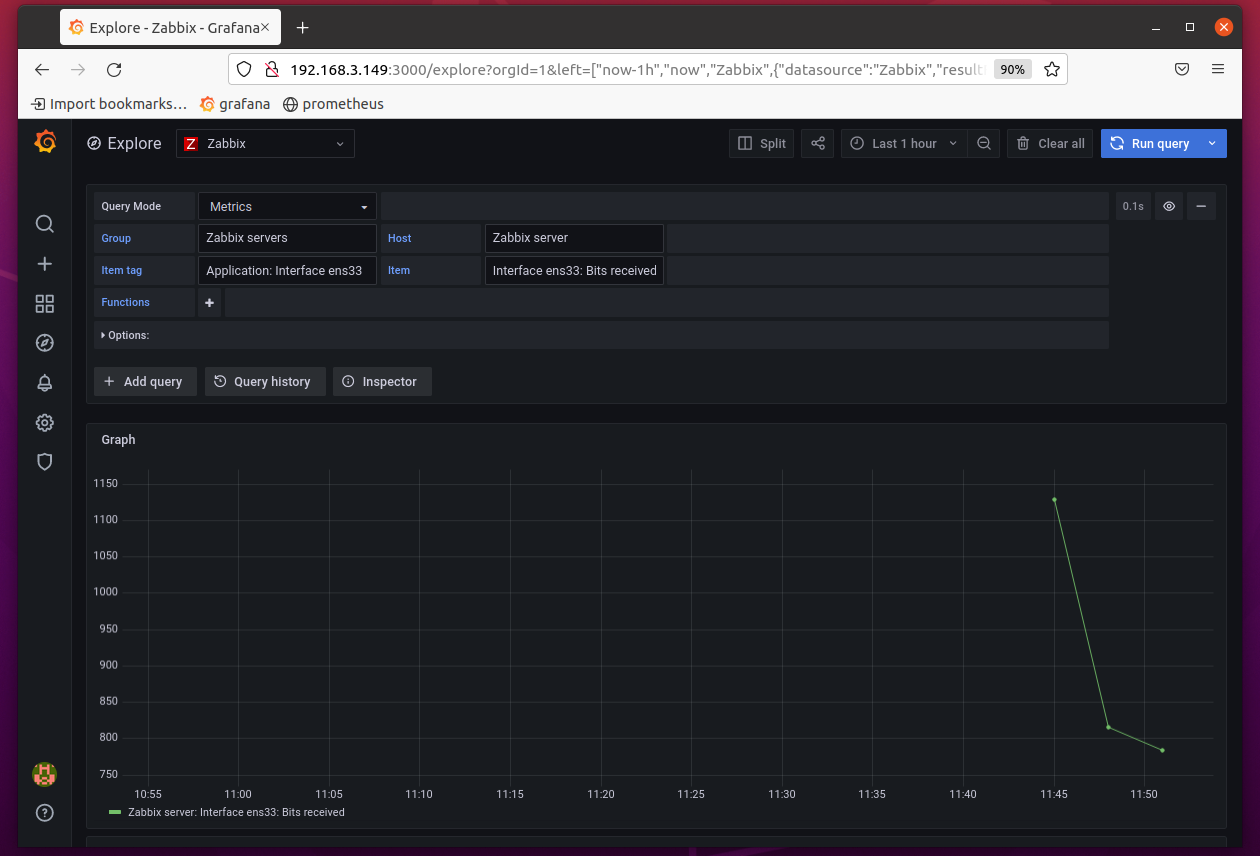
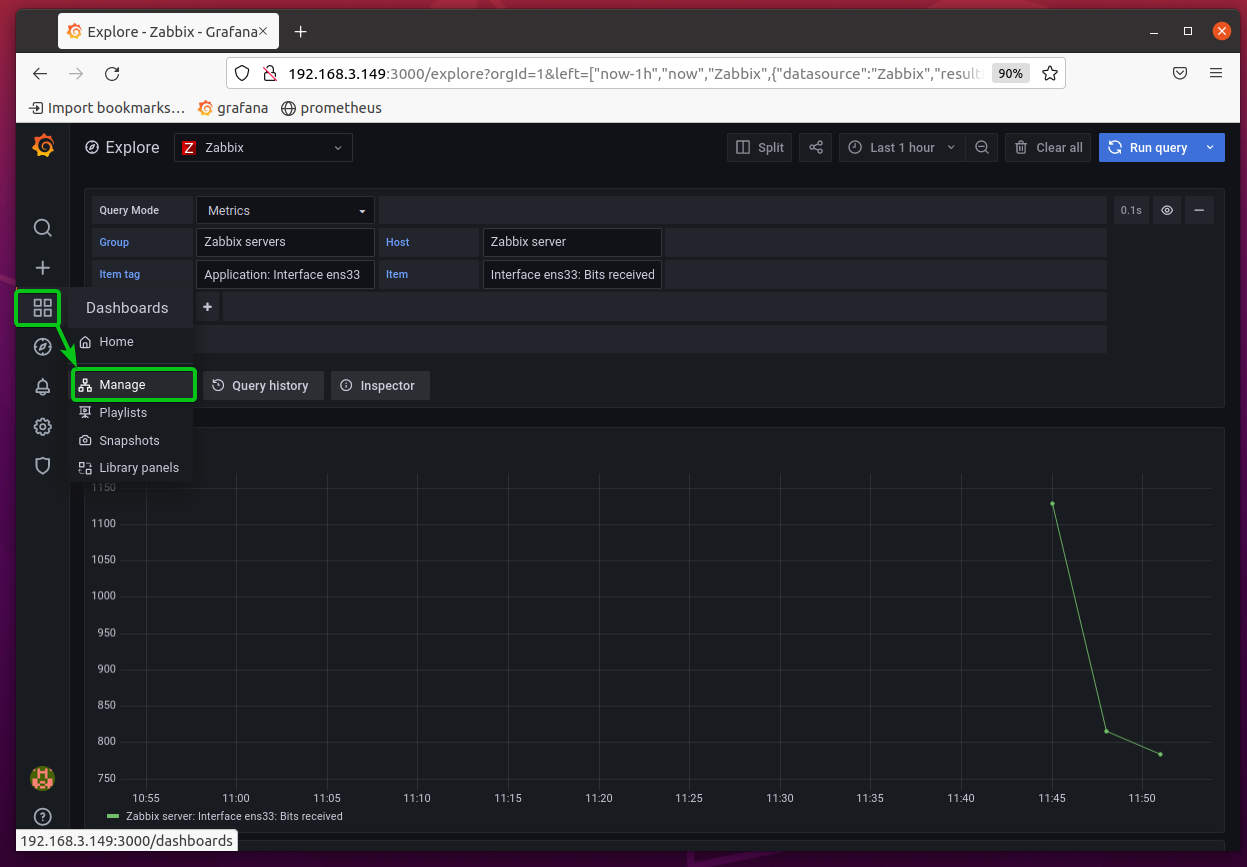
To test whether you can monitor Zabbix with Grafana, click on the Explorer icon ( ) of Grafana as marked in the screenshot below.
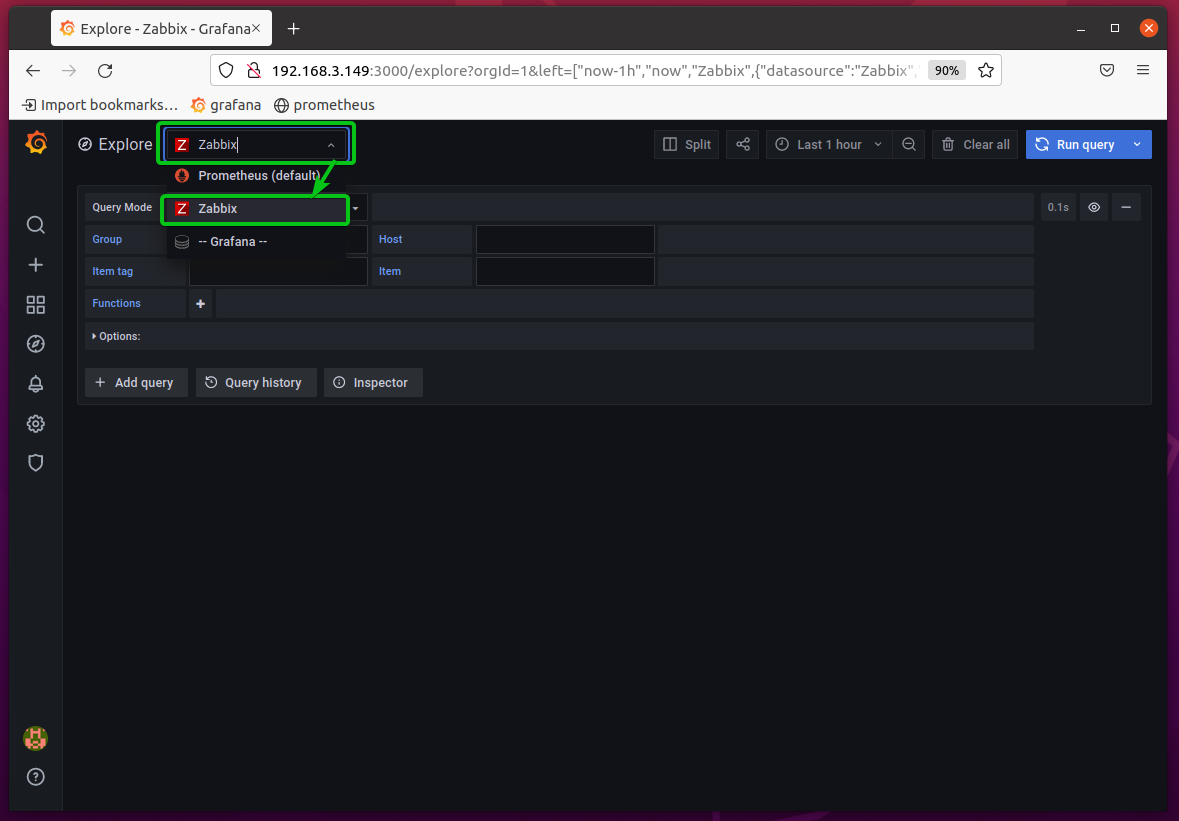
Select Zabbix from the Explore dropdown menu as marked in the screenshot below.
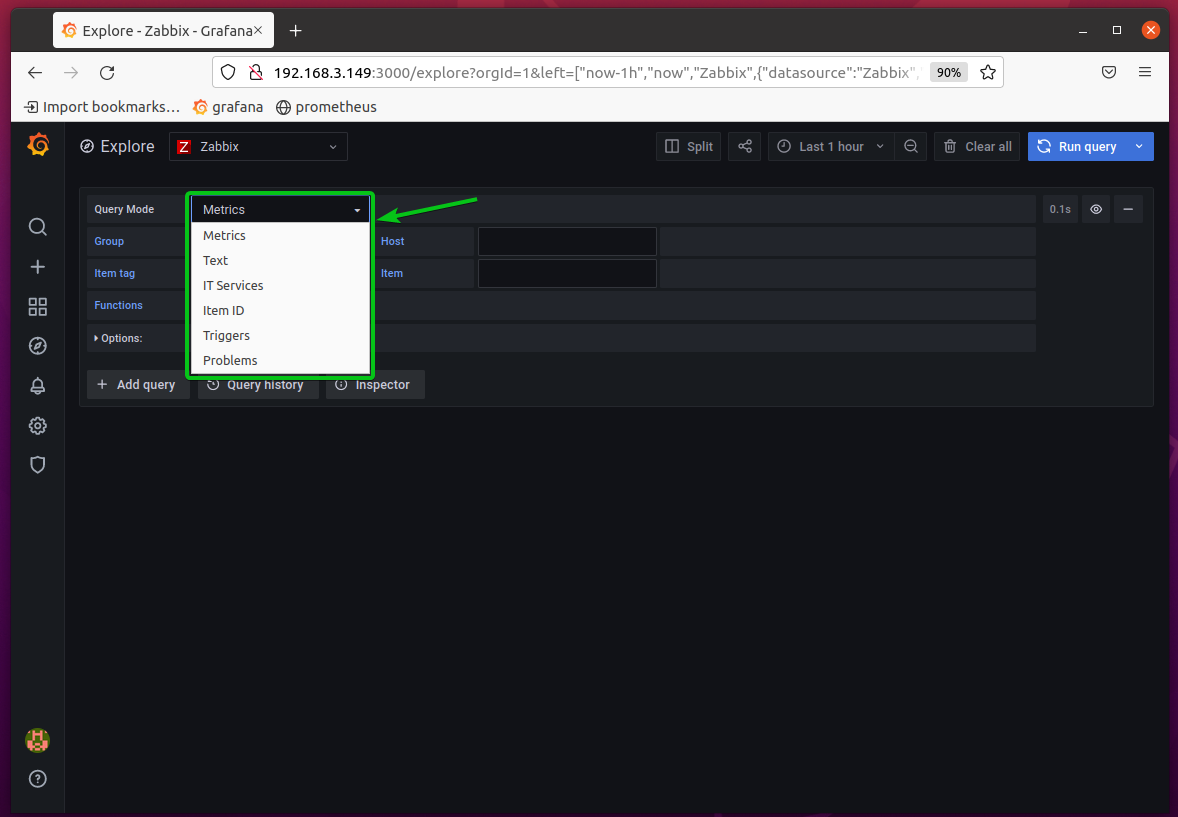
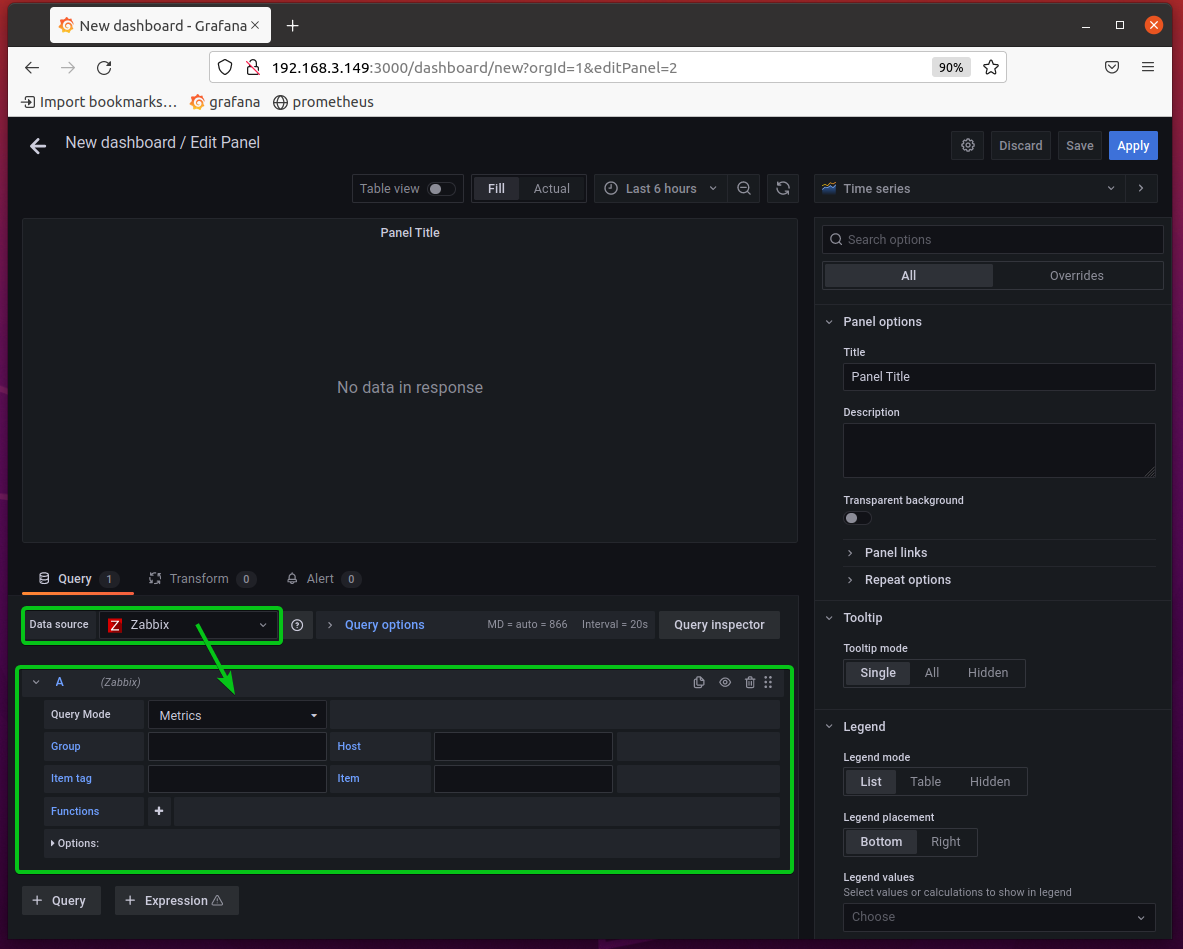
Now, select the type of data you want to query from Zabbix from the Query Mode dropdown menu as marked in the screenshot below.
I will select the Metrics type.
Select your desired Zabbix group from the Group section. I will select the default Zabbix servers group.
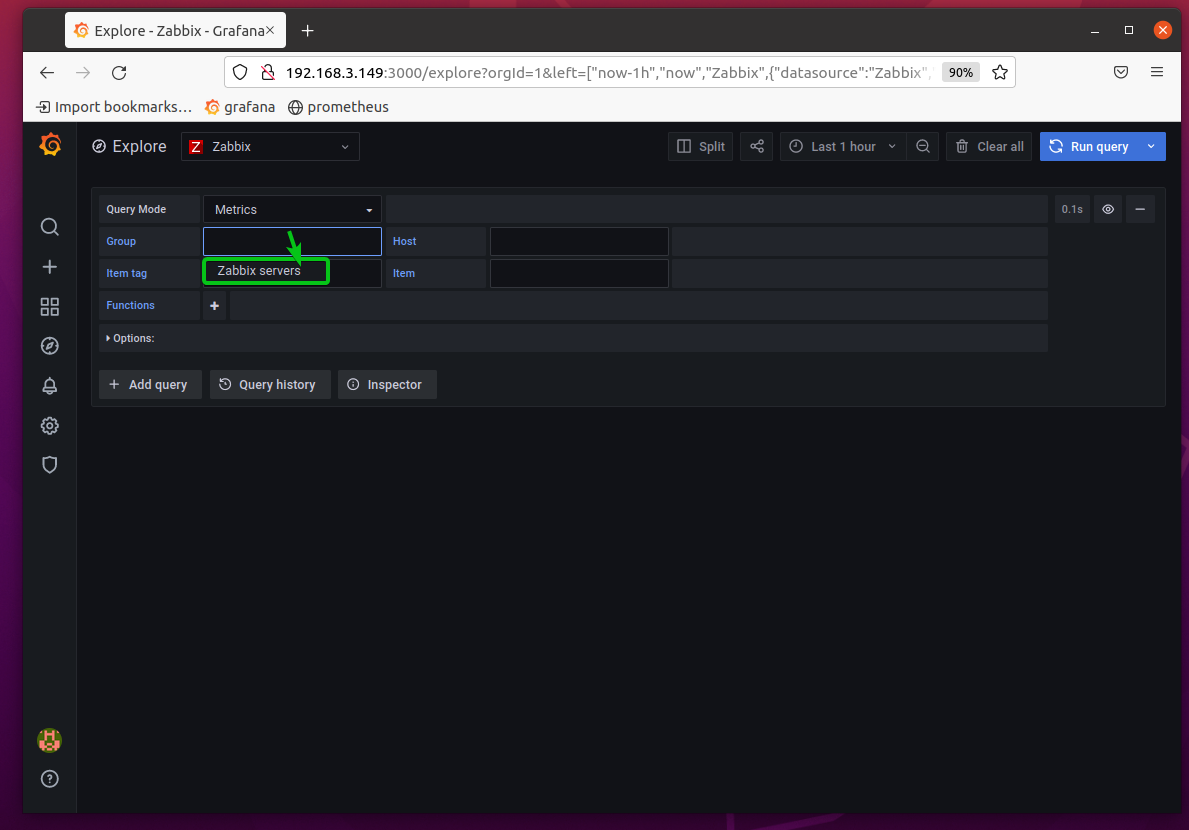
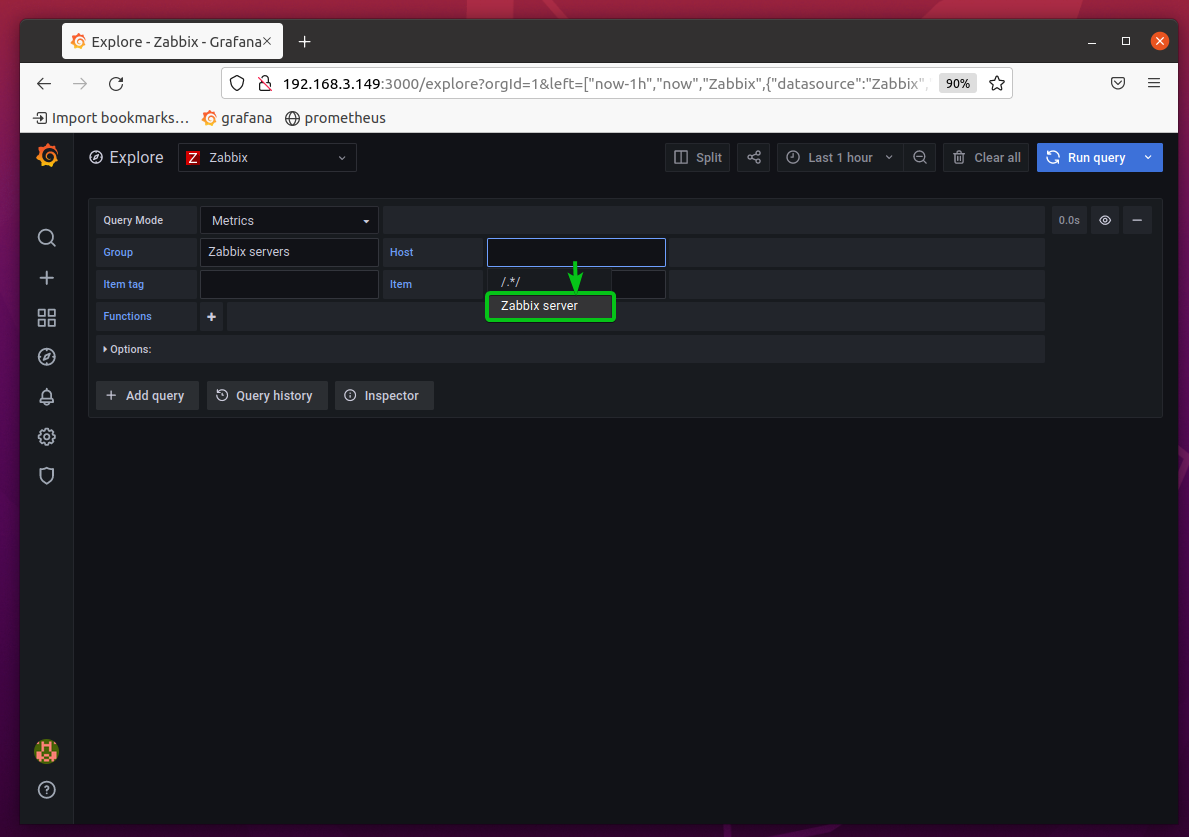
Select your Zabbix host from the Host section. I will select the Zabbix server host.
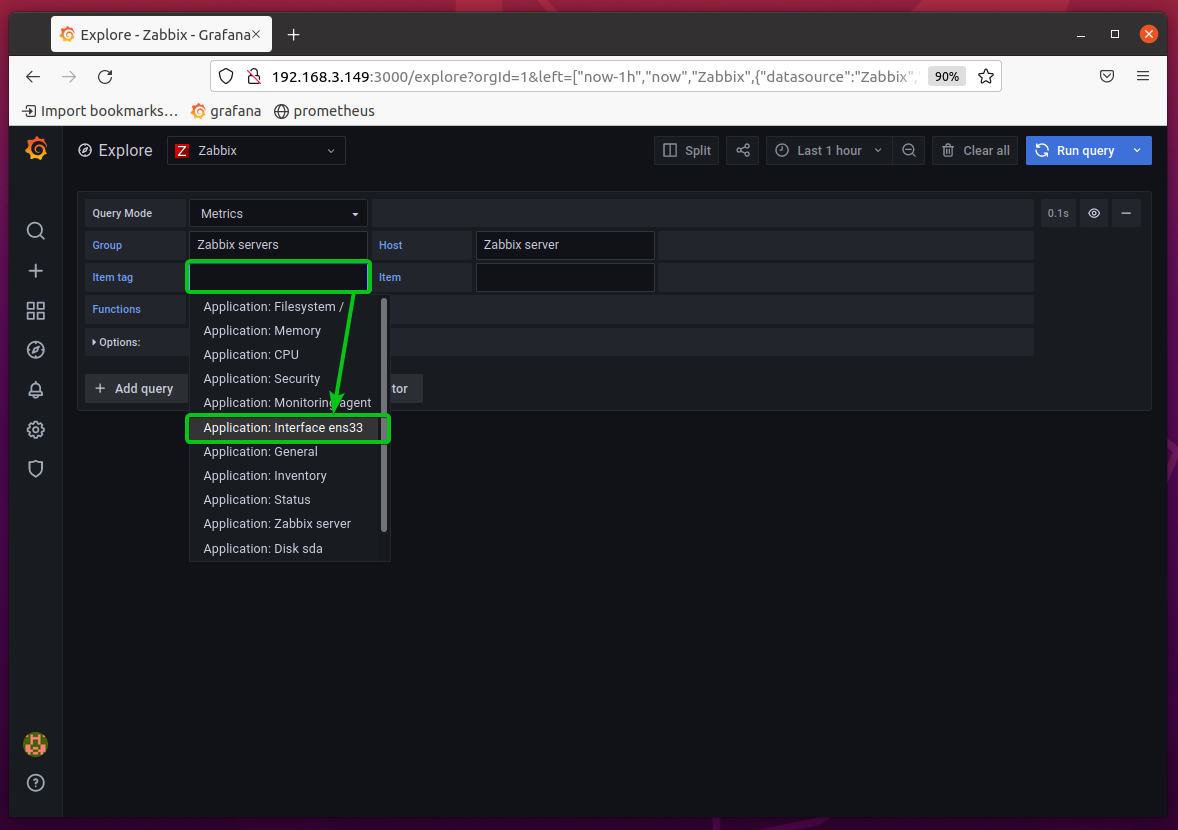
Select an item tag that you want to monitor from the Item tag section.
I will select the item tag Application: Interface ens33 in this example. This item tag will let you monitor the network interface ens33.
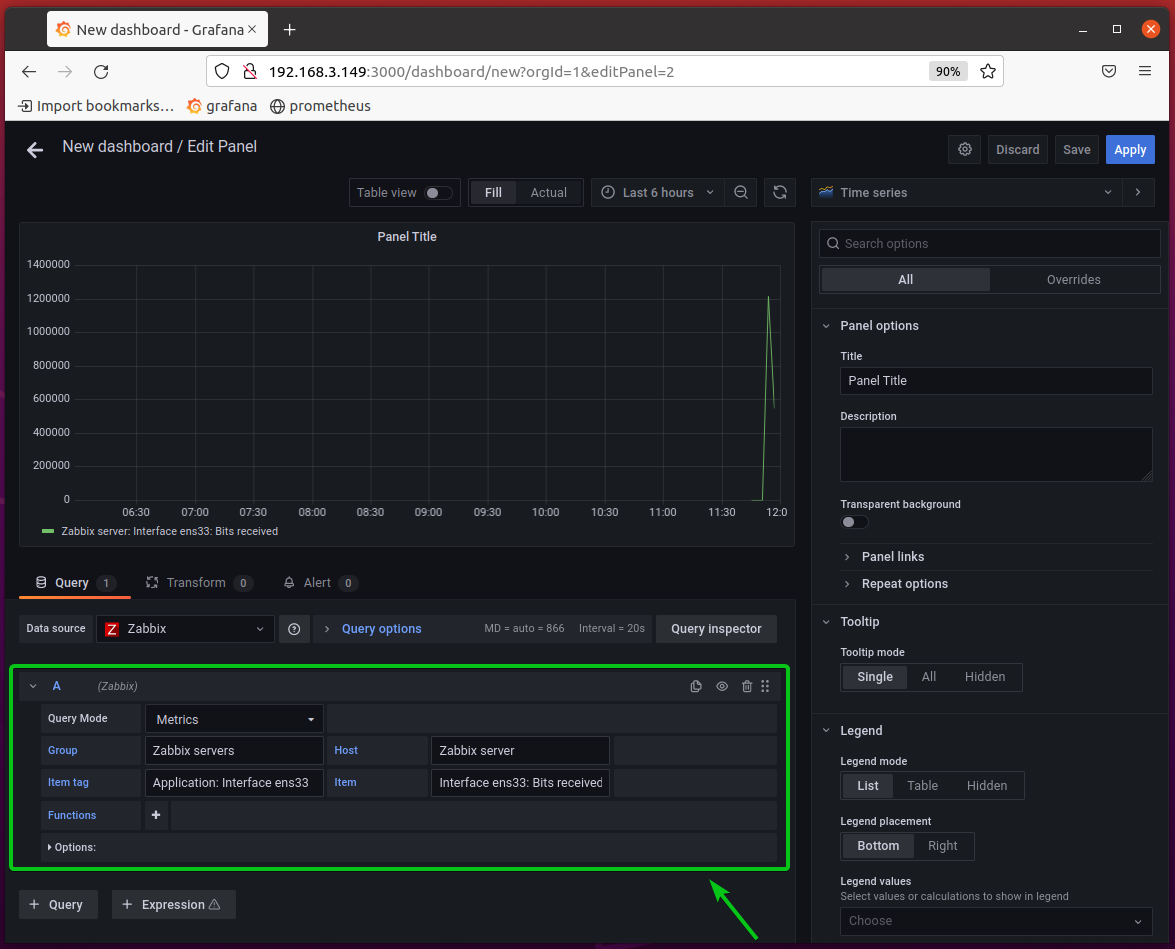
Now, select the item that you want to monitor from the Item section.
If you have selected the Item tag Application: Interface ens33 like I did, you can select the Item Interface ens33: Bit received to monitor the download speed of the network interface ens33.
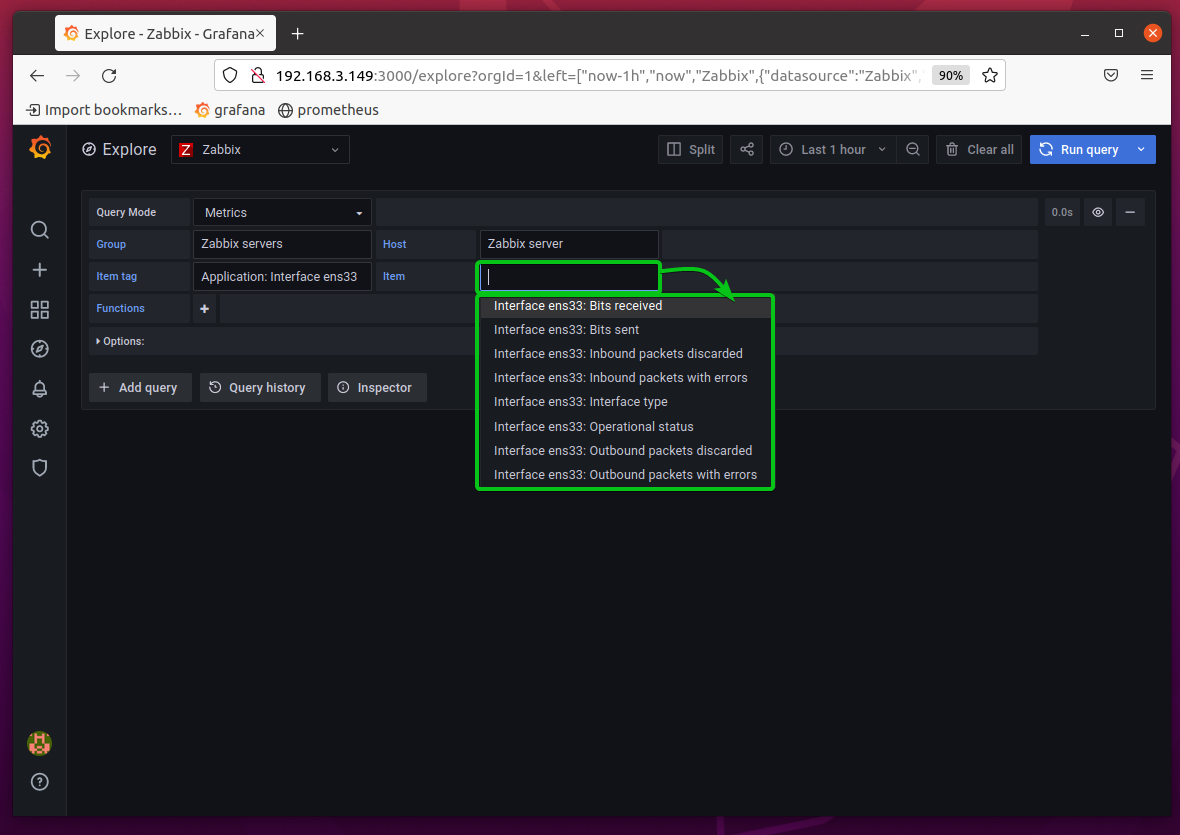
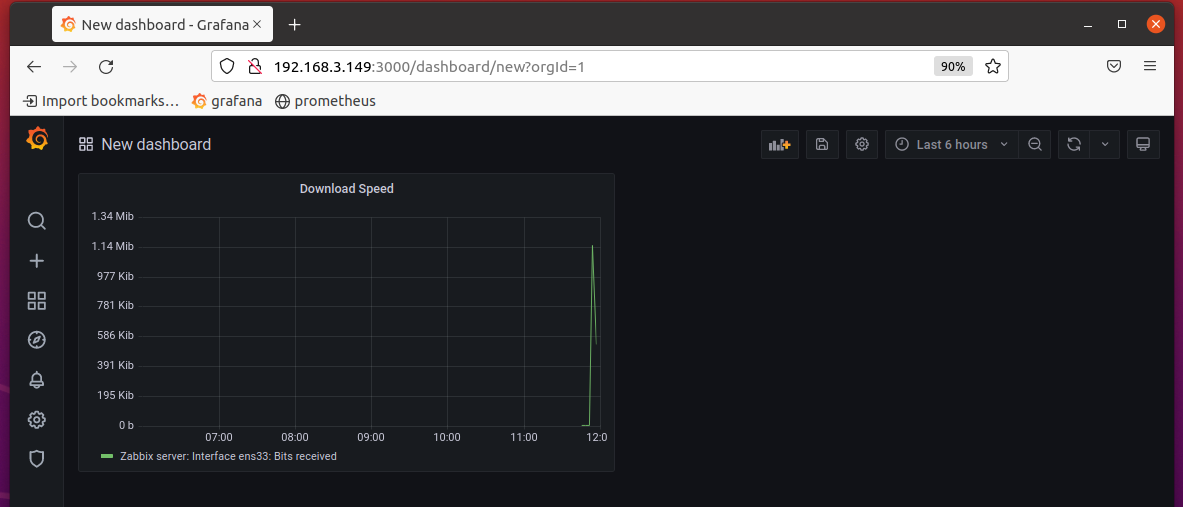
You should see a graph of the download speed of the network interface ens33.
You can learn to use the Zabbix data source to monitor your Zabbix server with Grafana from the Explore page of Grafana. This tool is very helpful.
Creating a Basic Zabbix Grafana Dashboard
In this section, I am going to show you how to create a basic Grafana dashboard using Zabbix as a data source to monitor the network download and upload speed of the Zabbix server.
Click on New Dashboard.
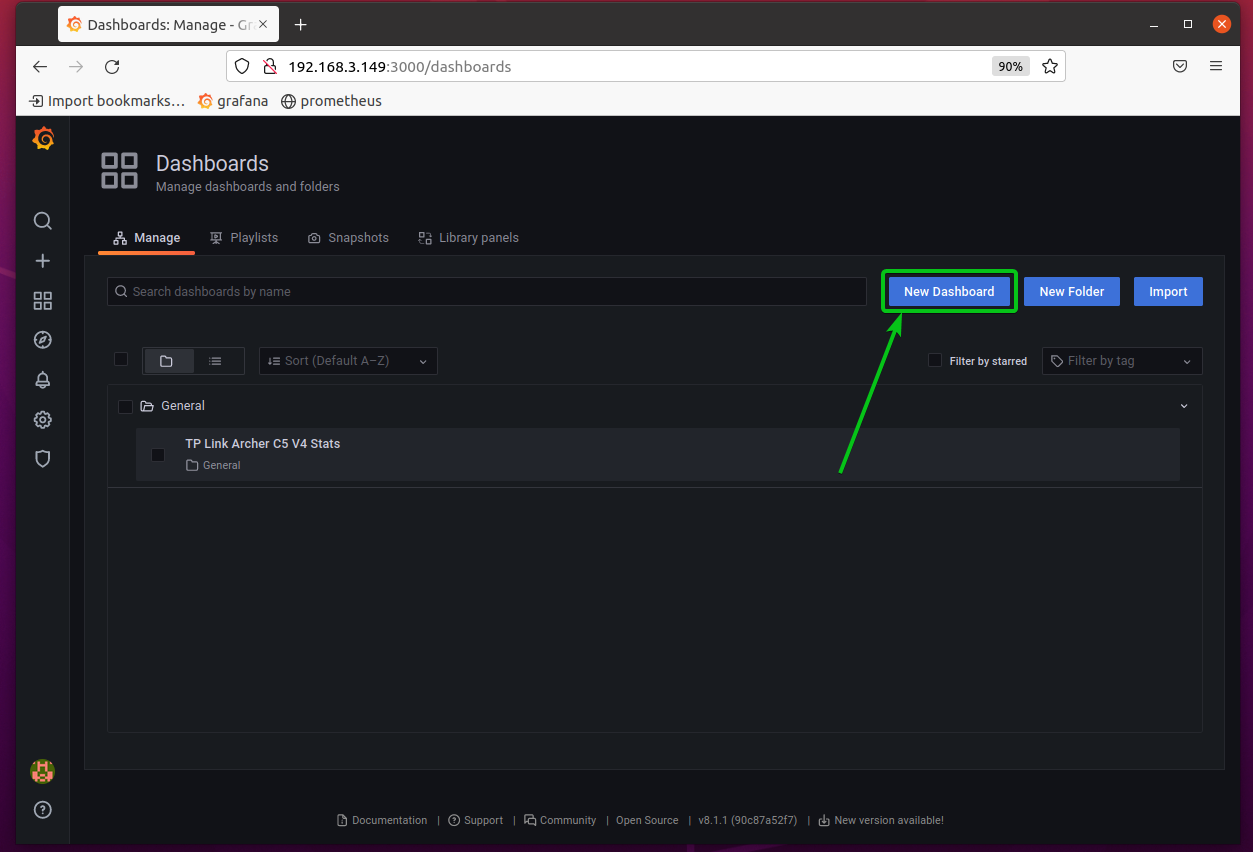
A new Dashboard should be created.
Click on Add an empty panel to add a new panel to the Dashboard.
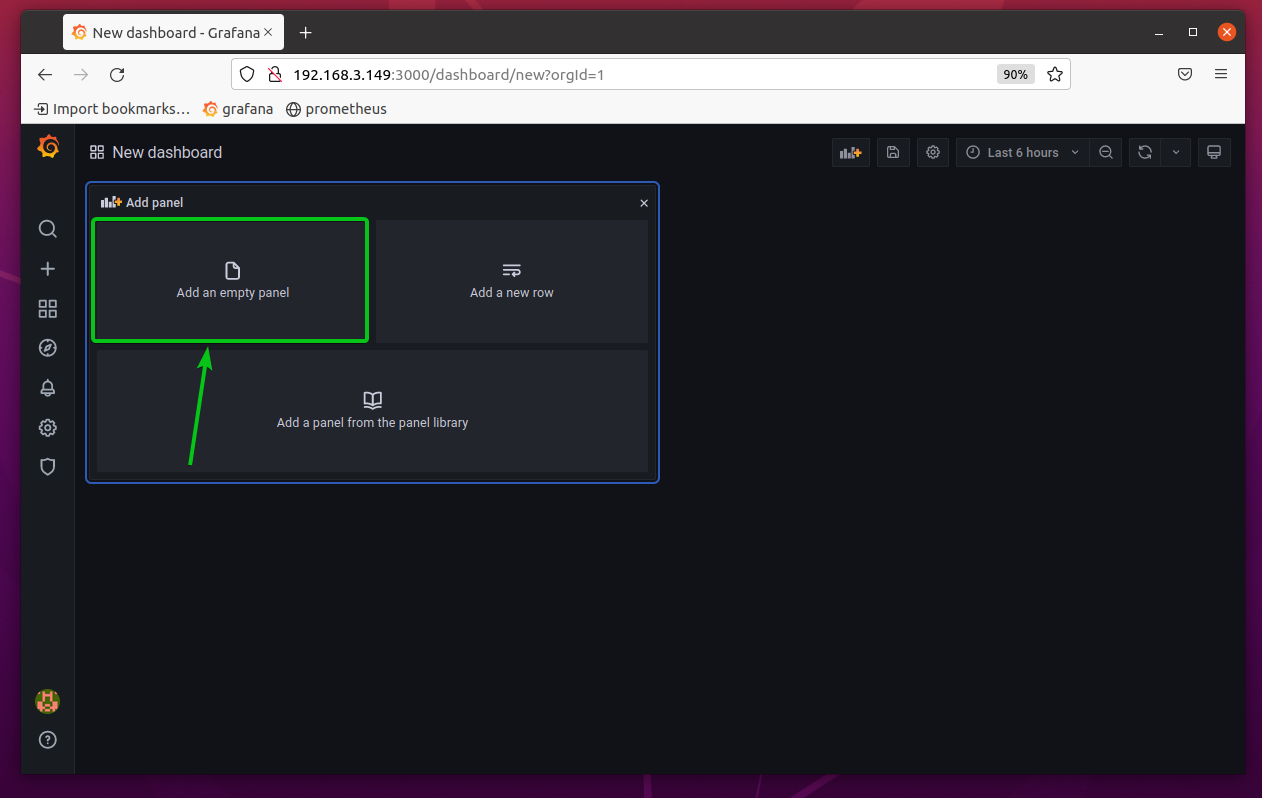
The Grafana panel editor should be displayed. You can configure your Grafana panel from here.
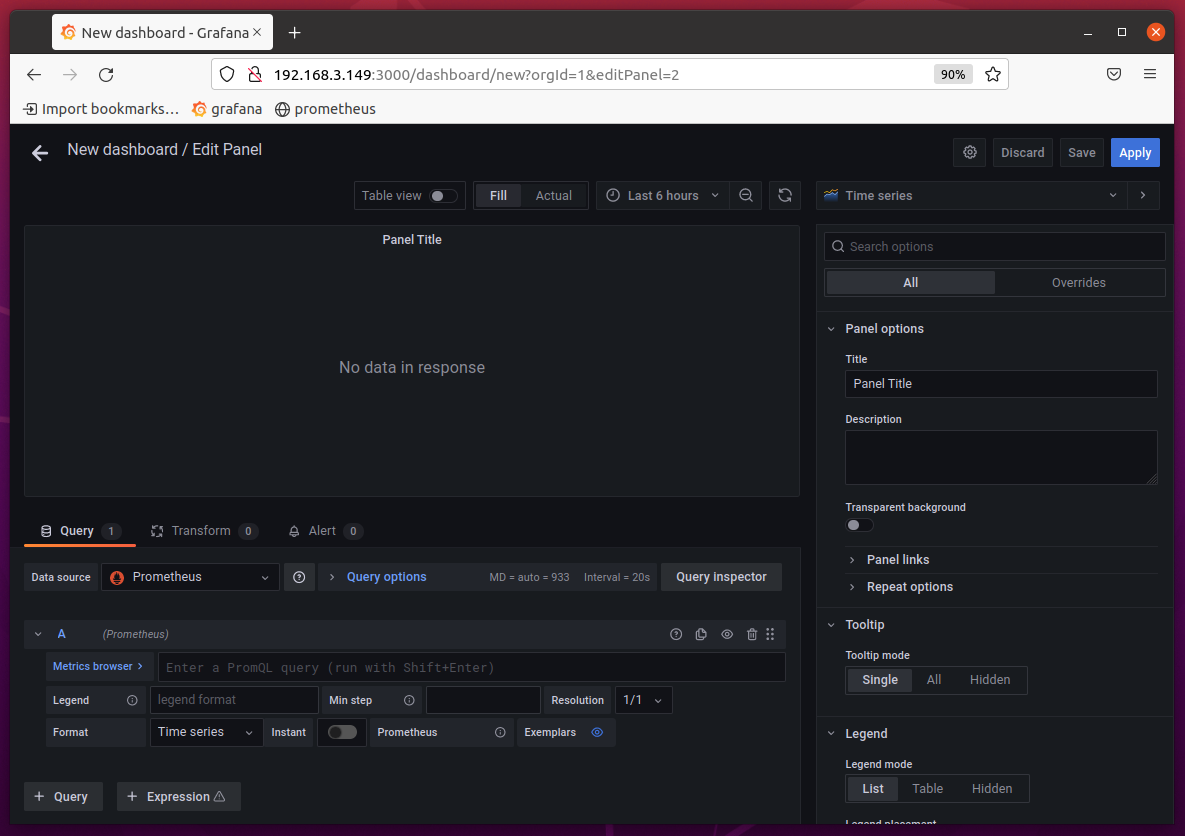
First, change the data source to Zabbix from the Data source dropdown menu as marked in the screenshot below.
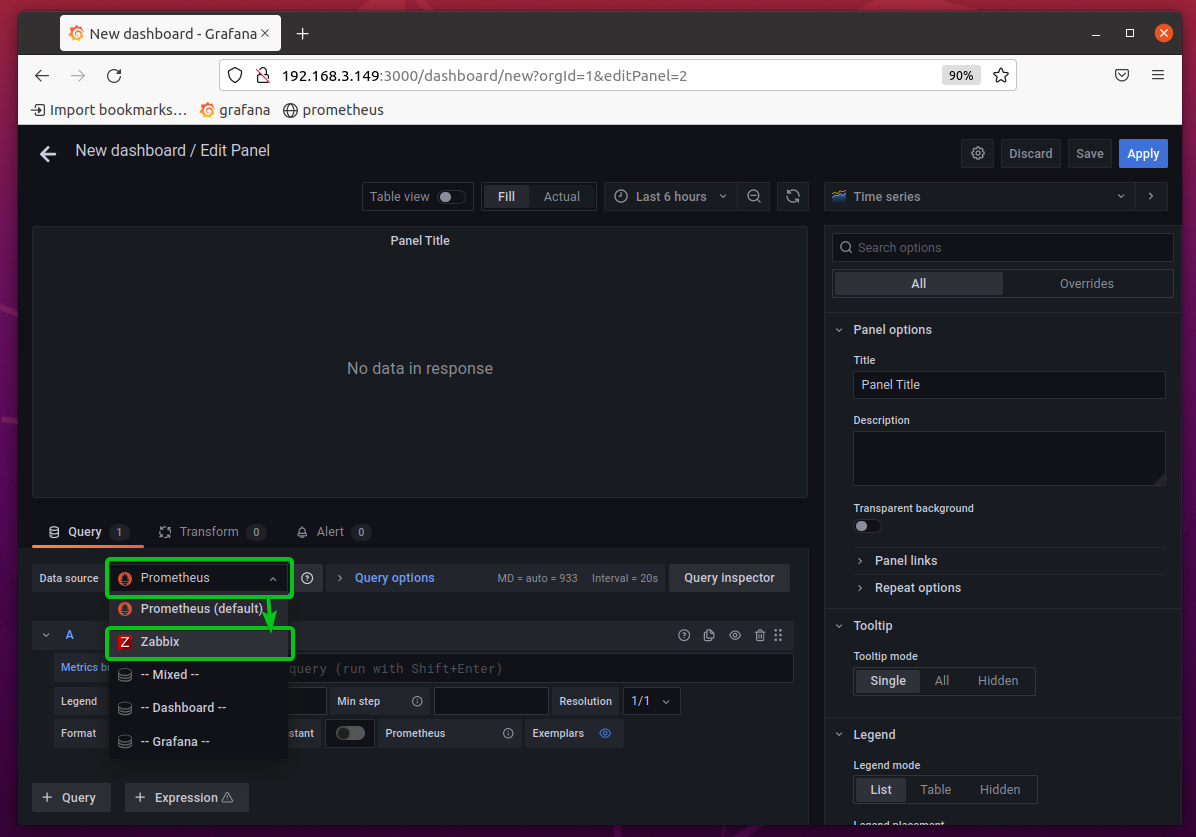
Now, you should be able to query data from the Zabbix data source.
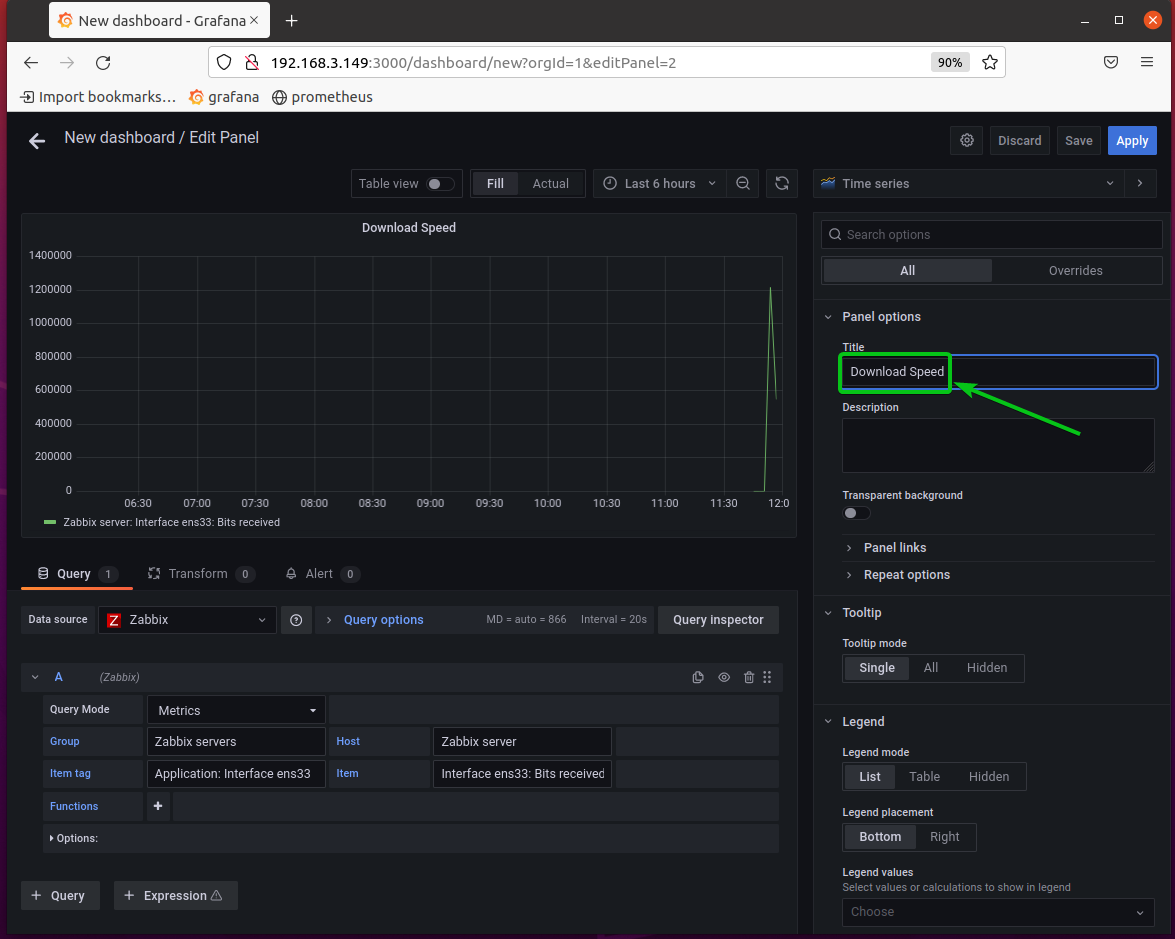
To monitor the download speed of your Zabbix server, select the query settings as marked in the screenshot below.
Type in the title Download Speed in the Title section as marked in the screenshot below.
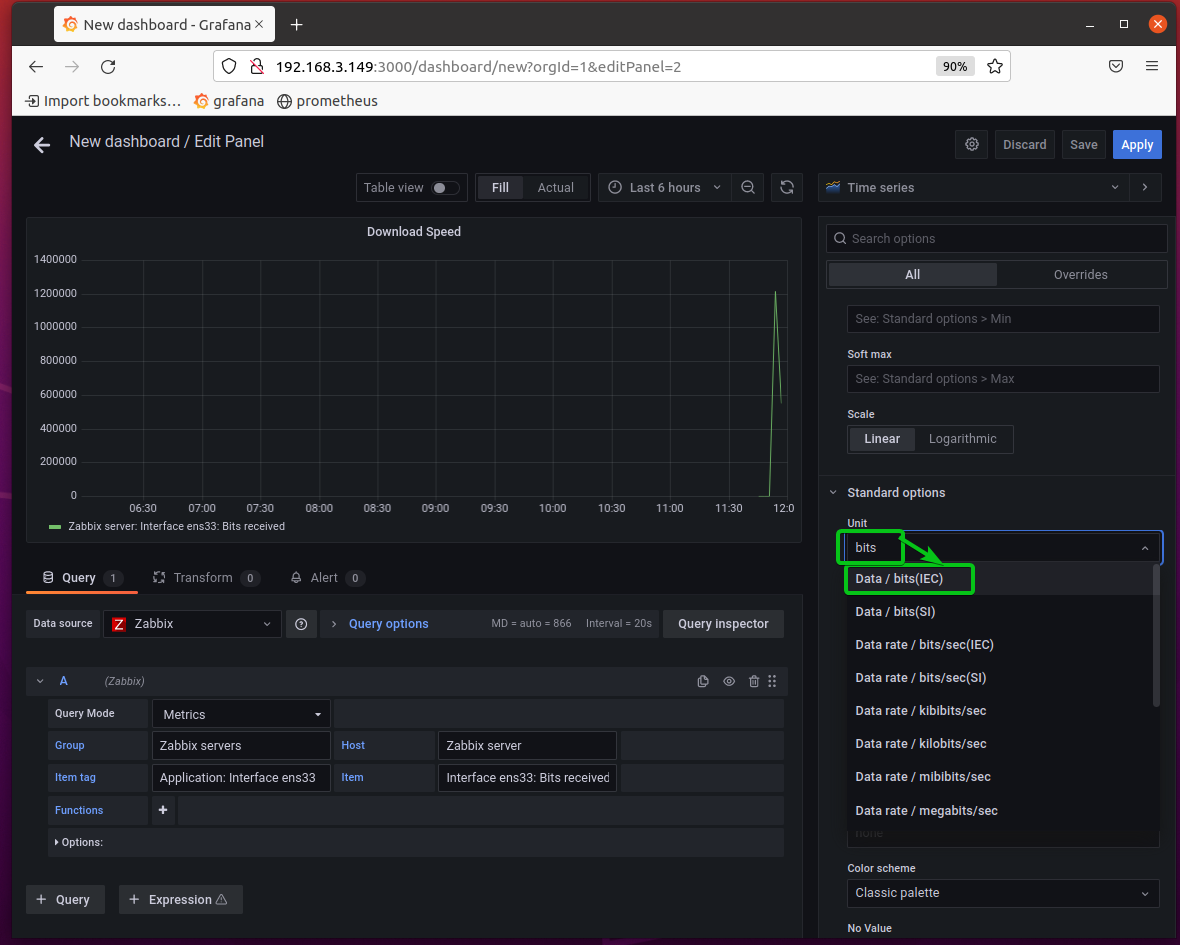
Select the unit Data / bits(IEC) from the Unit section as marked in the screenshot below.
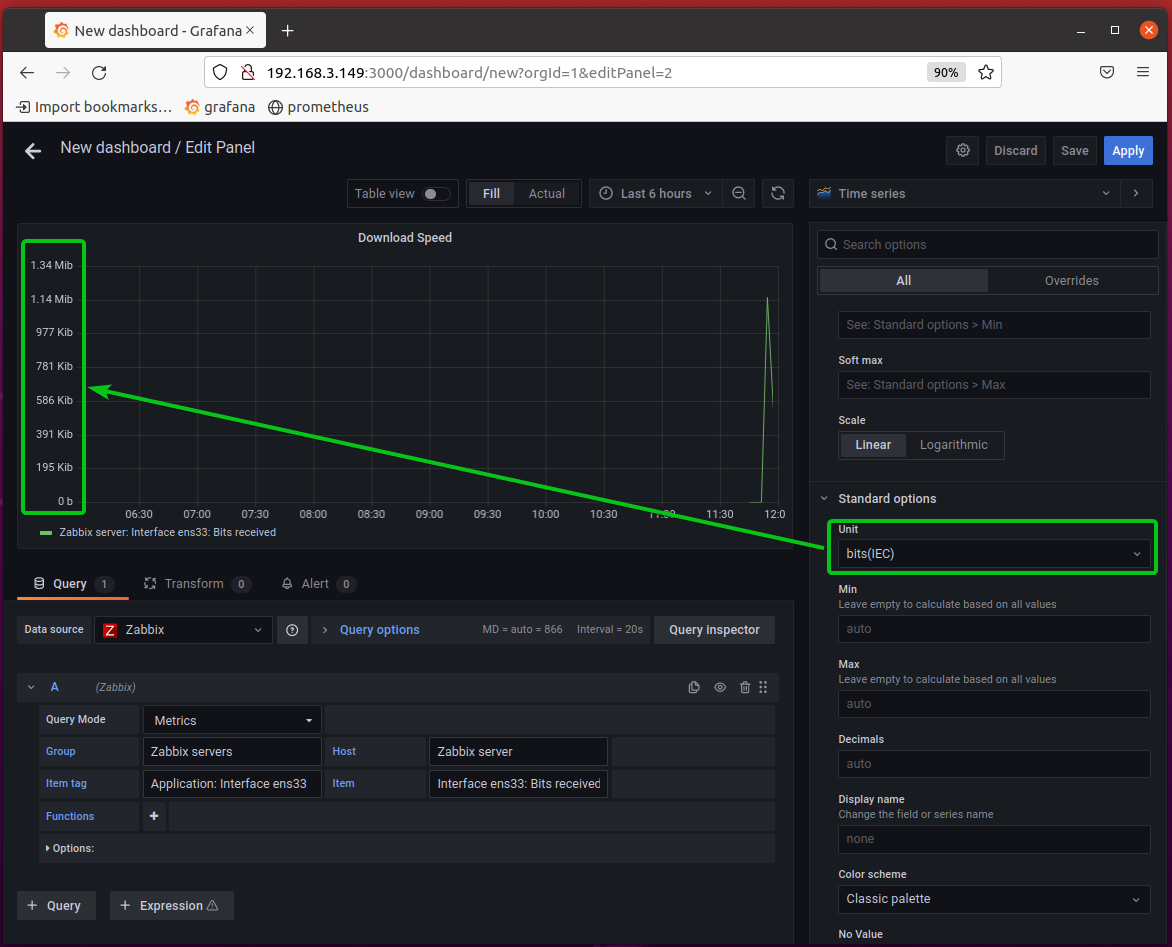
The download speed graph should display the correct data unit as you can see in the screenshot below.
Once you’re happy with the result, click on Apply to add the panel to the dashboard.
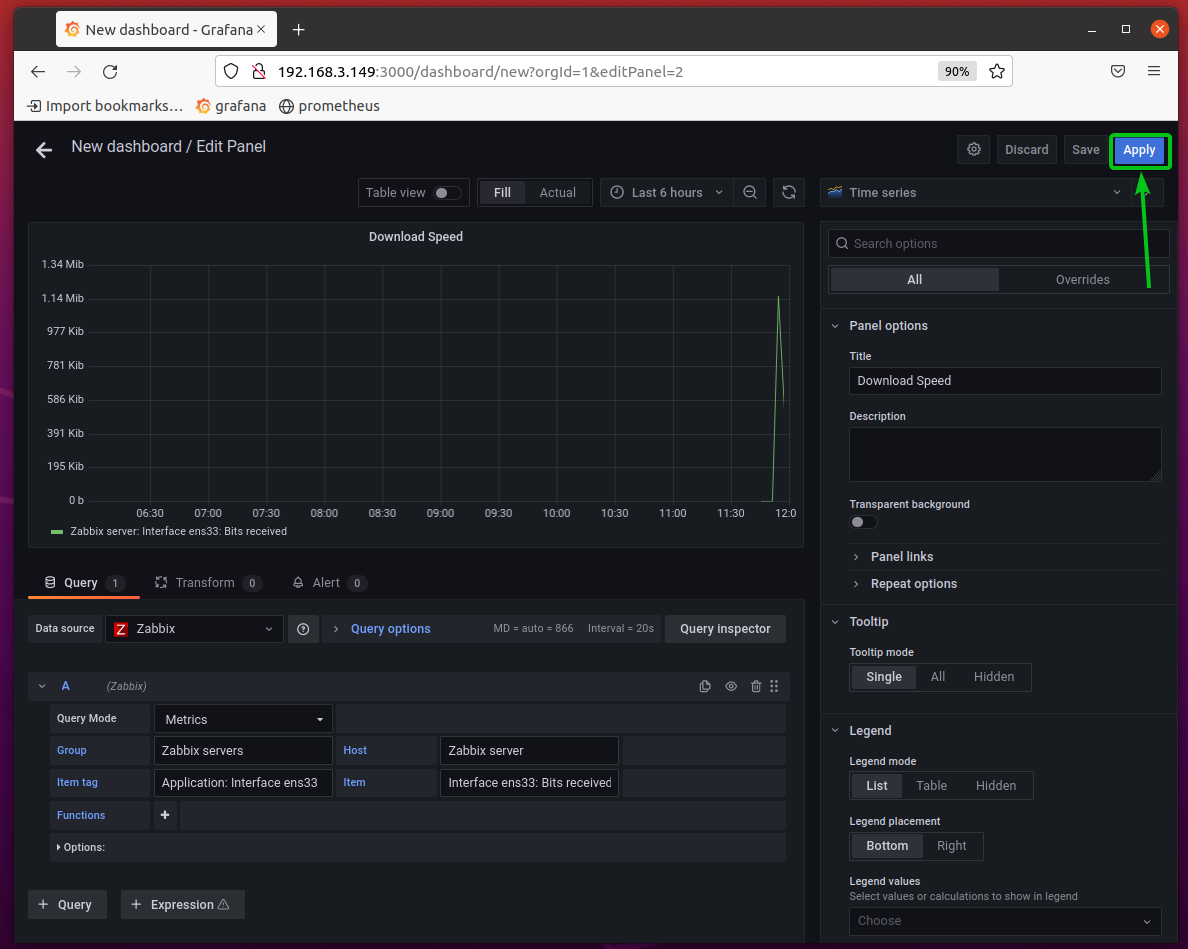
The Download Speed panel should be added to the dashboard.
Now, let’s create another panel to monitor the upload speed of the Zabbix server.
As the upload speed monitoring panel will be the same as the Download Speed panel, you can clone it and change a few settings to easily monitor the upload speed of your Zabbix server.
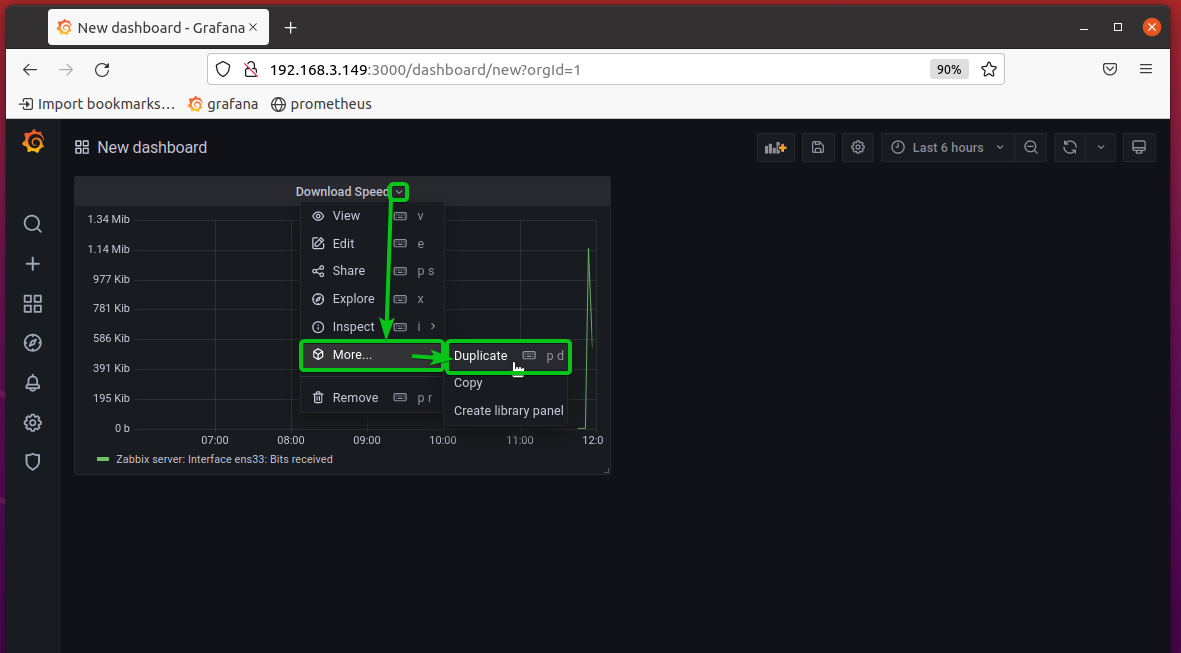
The Download Speed panel should be cloned. Now, click on the down arrow icon of the cloned Download Speed panel and click on Edit as marked in the screenshot below.
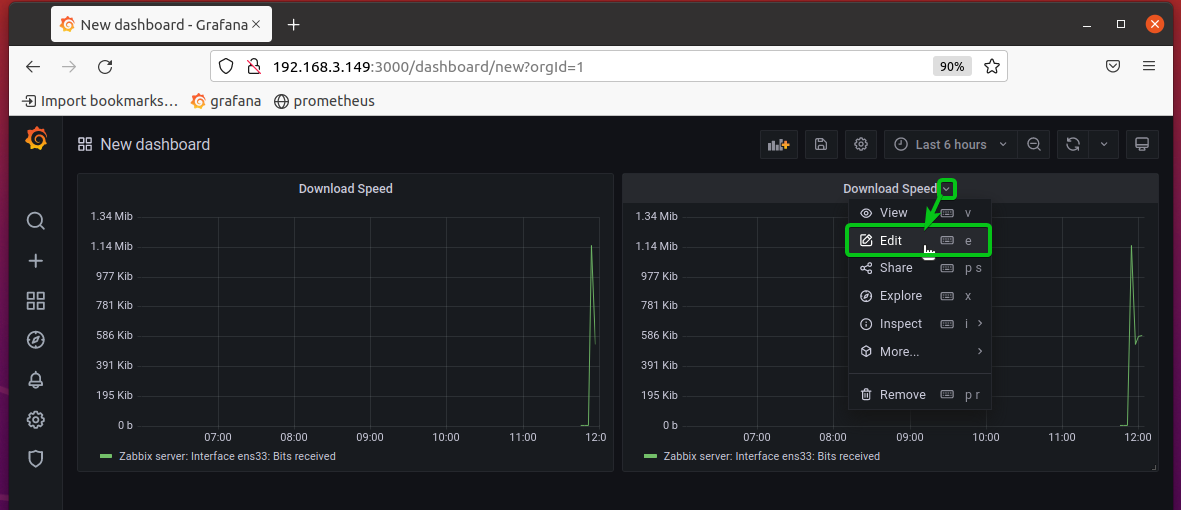
The cloned Download Speed panel should be opened with the Grafana panel editor.
Change the Item to Interface ens33: Bits sent, change the title to Upload Speed, and click on Apply for the changes to take effect.
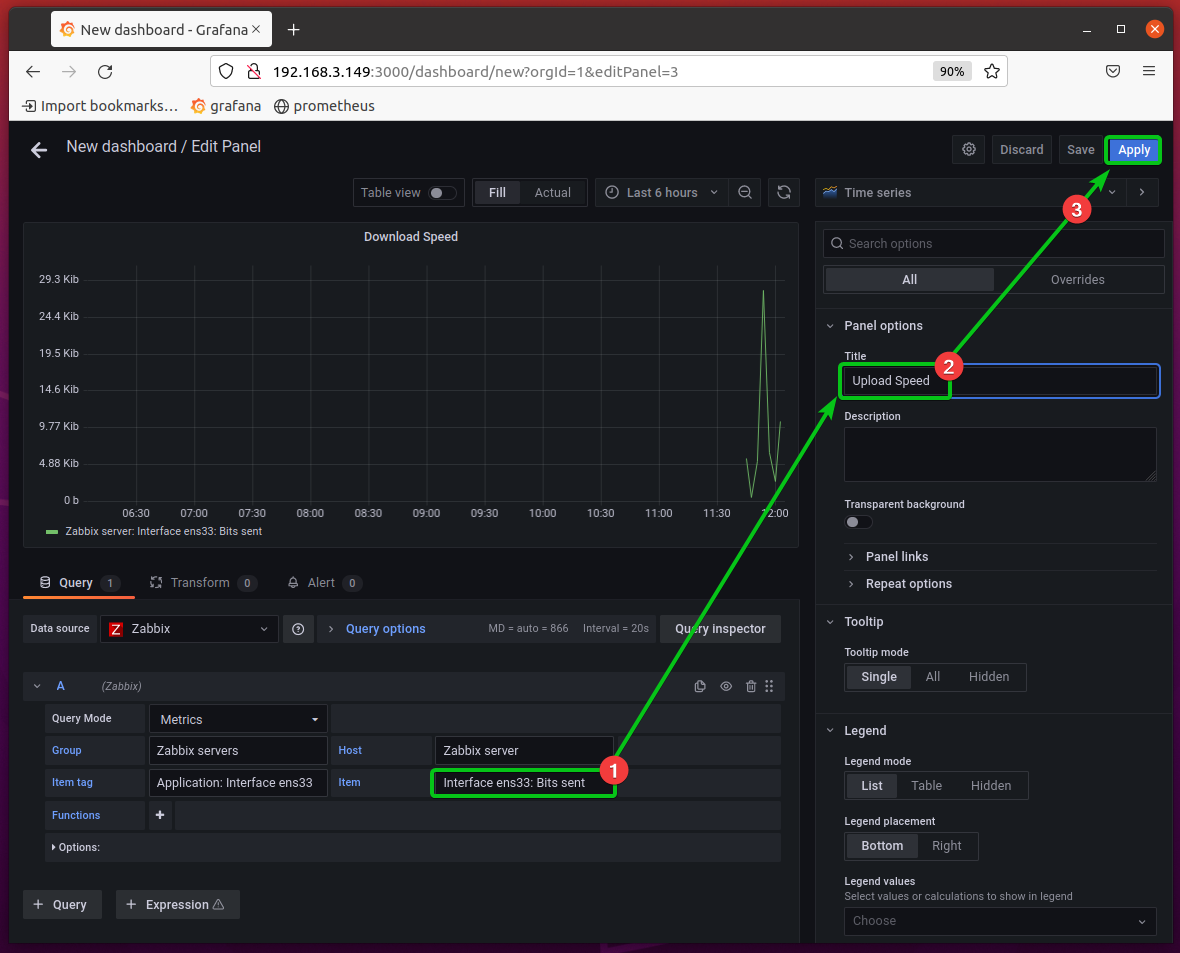
The changes should be saved.
The Upload Speed panel should monitor the upload speed of your Zabbix server.
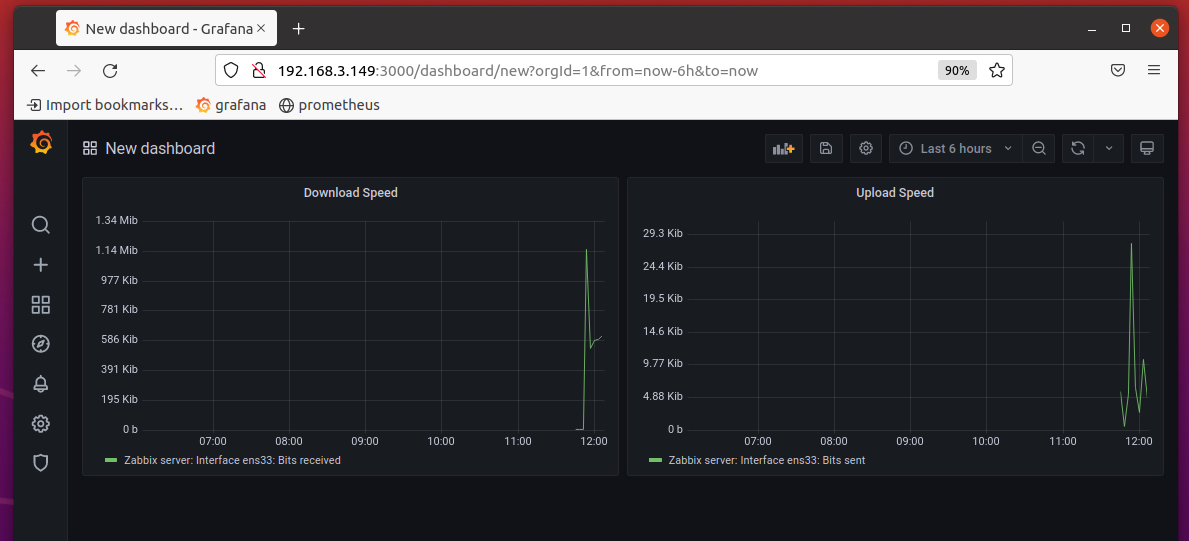
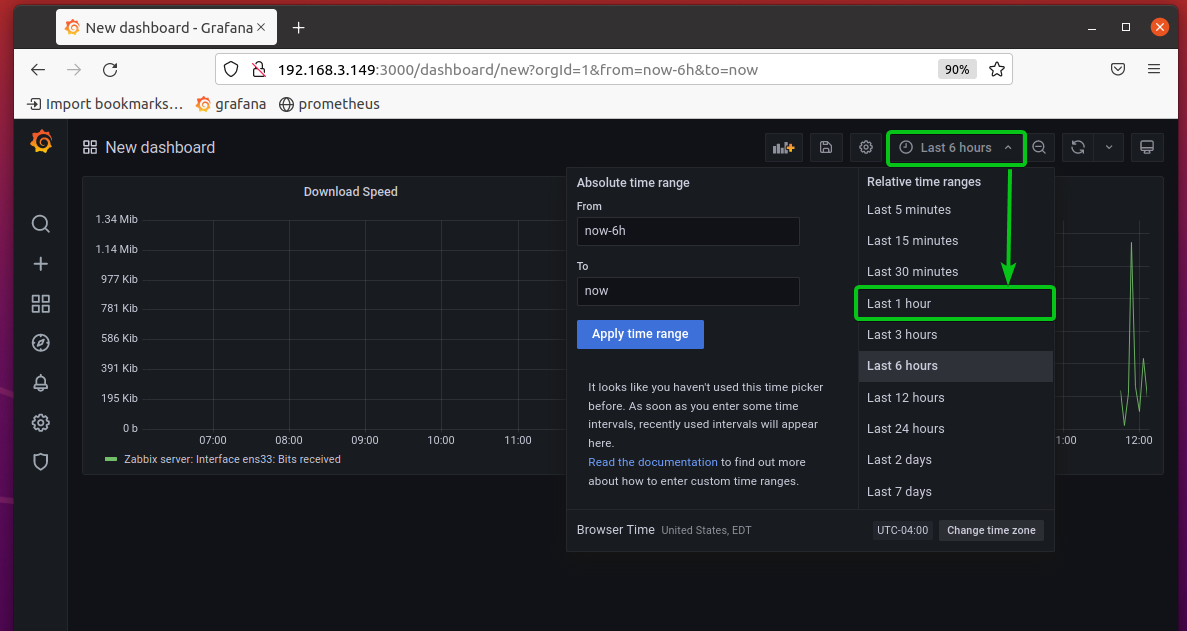
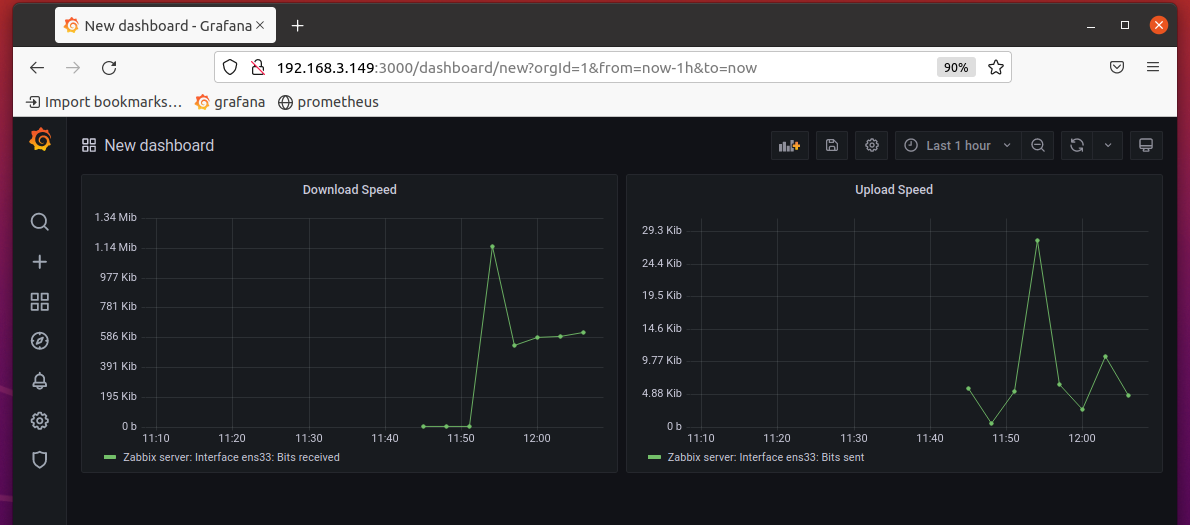
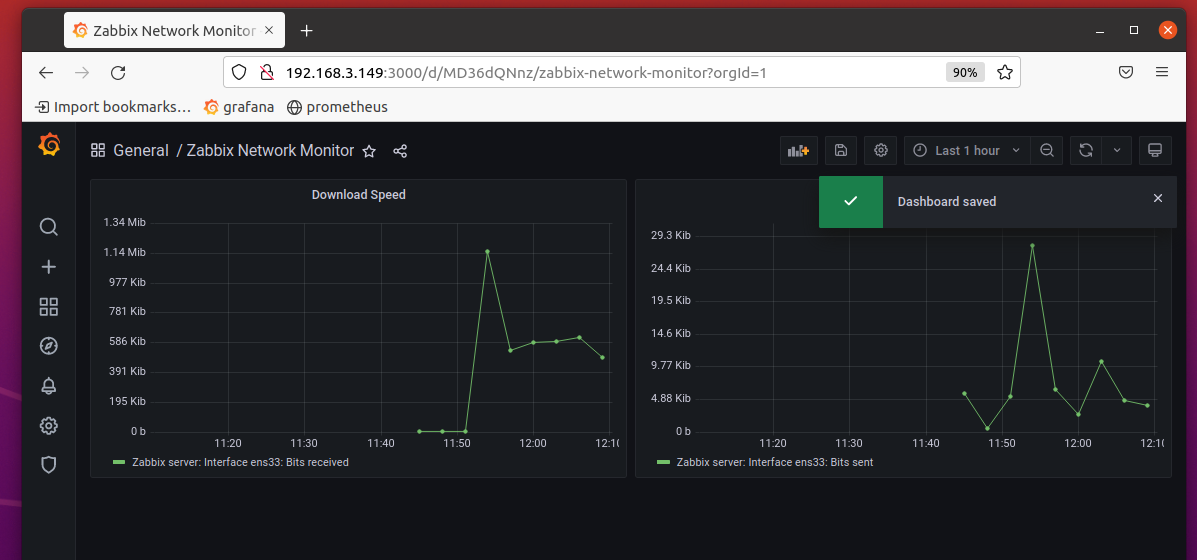
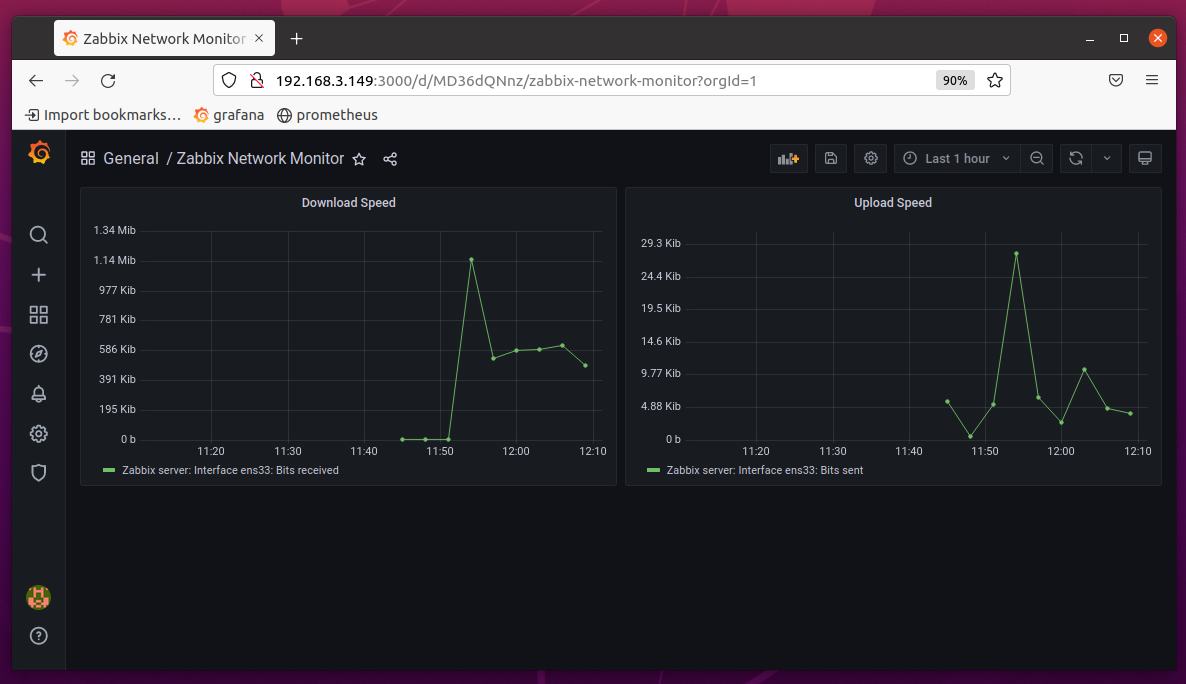
By default, the Grafana dashboard will show the download and upload speed of your Zabbix server for the Last 6 hours. You can change the graph timeline to Last 1 hour to only monitor the download and upload speed of your Zabbix server for the last hour.
As you can see, the download and upload speed is displayed for the last 1 hour.
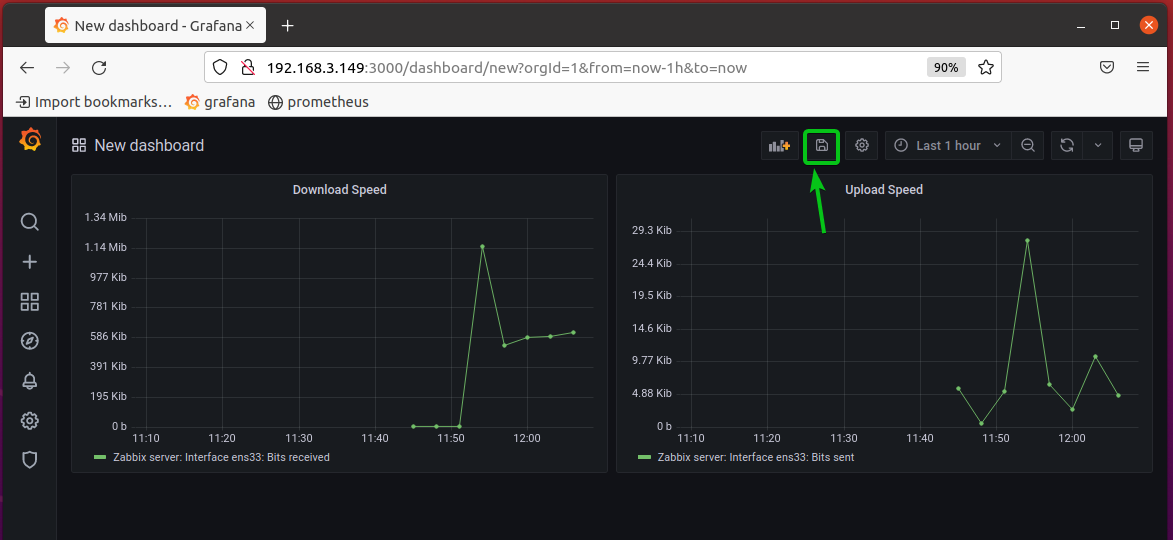
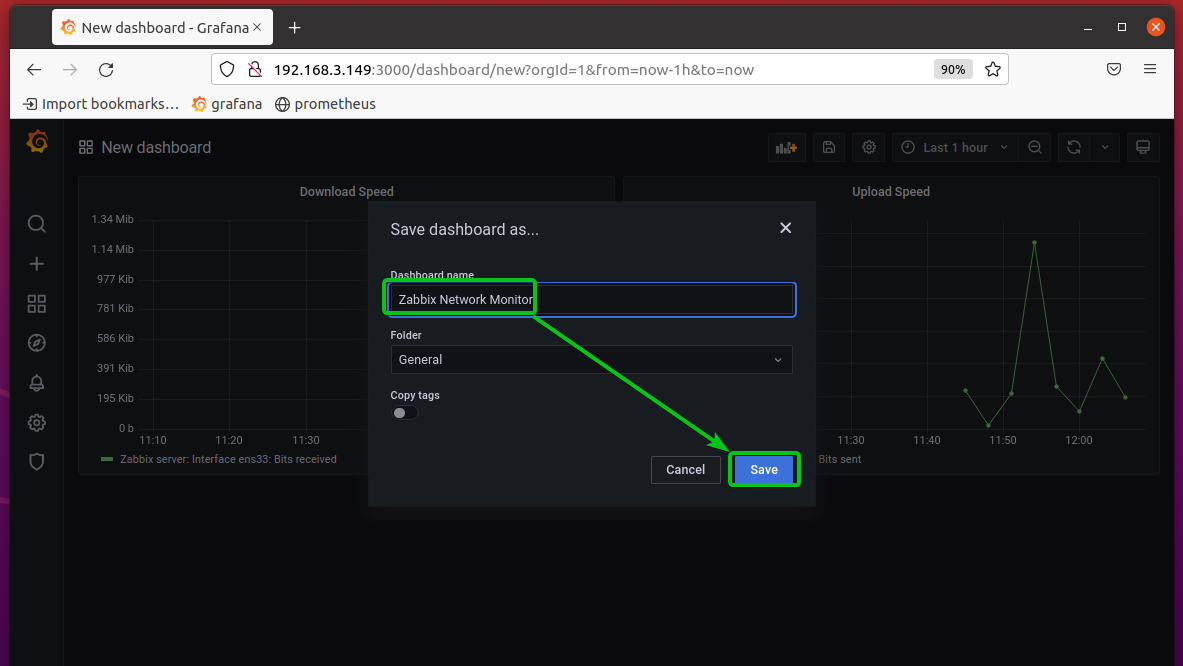
To save the dashboard, click on the save icon ( ) as marked in the screenshot below.
Type in a name for the dashboard and click on Save.
I will call it Zabbix Network Monitor.
The dashboard should be saved.
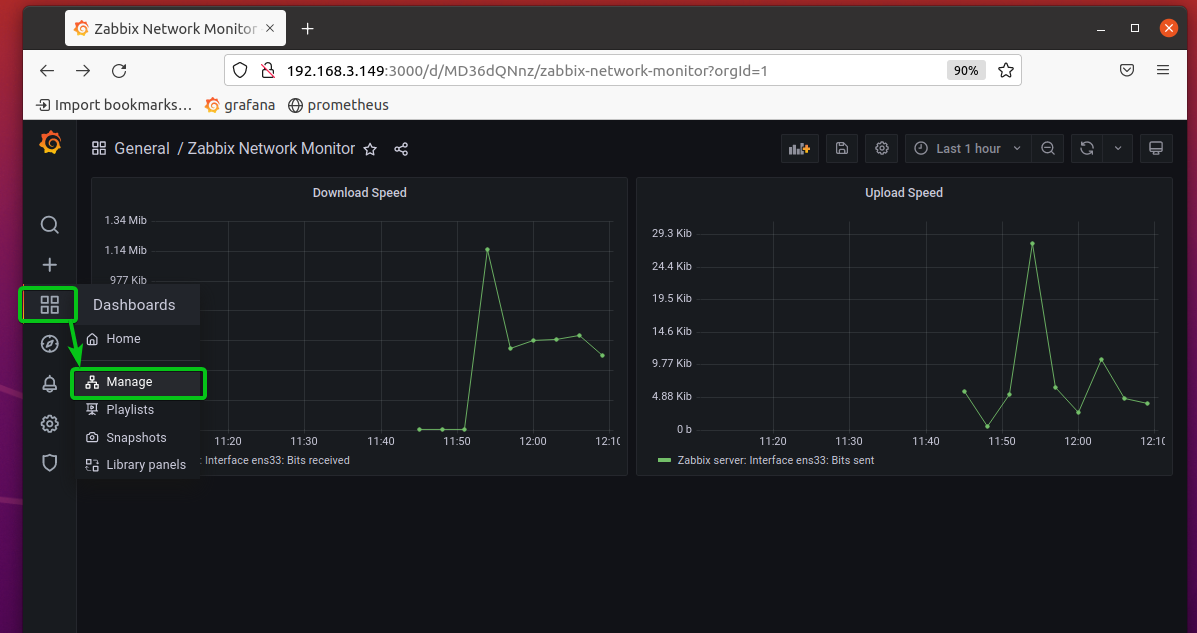
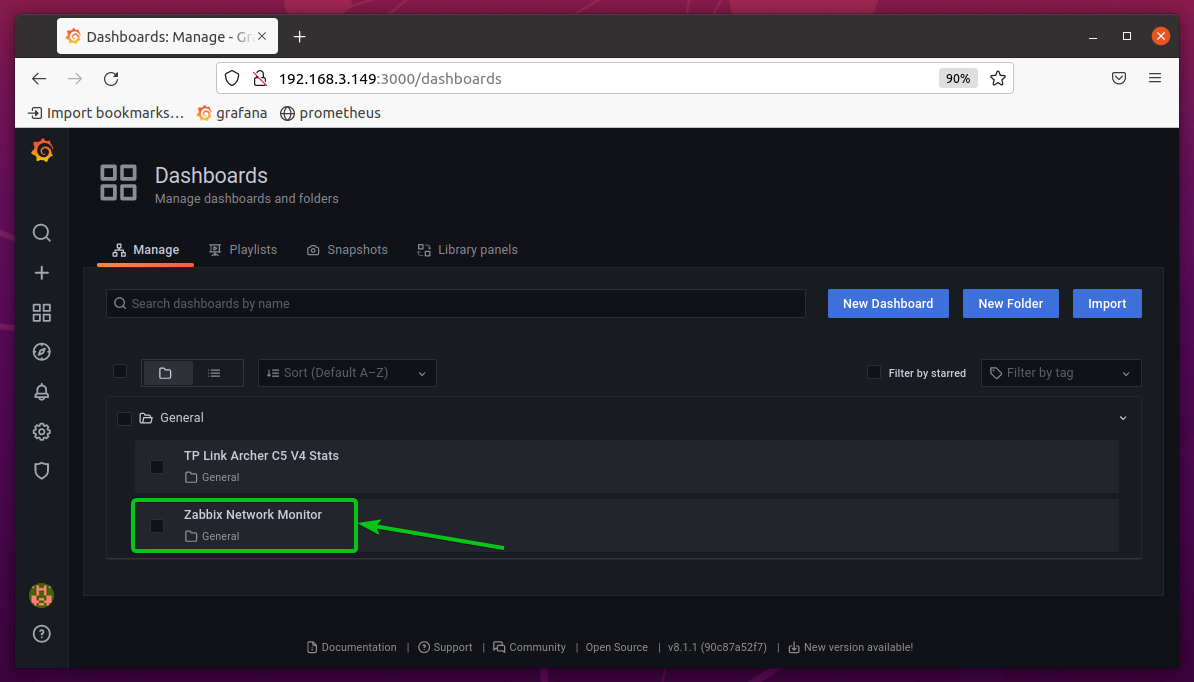
The Zabbix Network Monitor dashboard should be listed here.
To view the Zabbix Network Monitor dashboard, click on it.
The Zabbix Network Monitor dashboard should be displayed.
Where to Go Next?
In this article, I have shown you how to install the Grafana-Zabbix plugin on Grafana. I have also shown you how to enable the Grafana-Zabbix plugin and add a Zabbix data source on Grafana. I have shown you how to create a Grafana dashboard to monitor the network of a Zabbix server using the Zabbix data source as well.
References
Используемые термины: Grafana, Linux, CentOS, Ubuntu.
Мы рассмотрим процесс установки графаны на 2 типа дистрибутивов Linux — RPM и DEB на примере, соответственно, CentOS и Ubuntu. В репозиториях этих систем, по умолчанию, нет пакета для установки Grafana. Первым делом будет установлен сам репозиторий, а после — нужный нам пакет. Также, в качестве примера, мы подключим Grafana к системе мониторинга Zabbix и построим график для метрики утилизации процессора.
Метод установки, описанный ниже позволит поставить последнюю версию графаны, которая доступна в репозитории. Как правило, это то, что нужно в большинстве случаев.
Но если нам необходимо установить конкретный релиз программы, переходим на официальную страницу загрузки Grafana, выбираем желаемую версию и следуем инструкции для соответствующей операционной системы.
Установка и запуск на CentOS / Red Hat
Создаем файл конфигурации репозитория для графаны:
Теперь можно устанавливать:
yum install grafana
Настройка брандмауэра
По умолчанию, Grafana работает на порту 3000. Для возможности подключиться к серверу открываем данный порт в фаерволе:
firewall-cmd —permanent —add-port=3000/tcp
Запуск сервиса
systemctl enable grafana-server
Установка и запуск на Ubuntu / Debian
Добавляем репозиторий командой:
add-apt-repository «deb https://packages.grafana.com/oss/deb stable main»
Устанавливаем ключ для проверки подлинности репозитория графаны:
Обновляем список портов:
apt-get install grafana
По умолчанию, в Ubuntu брандмауэр не блокирует соединения. Но если в нашей системе он используется, необходимо добавить порт одной из команд:
а) при использовании iptables:
iptables -A INPUT -p tcp —dport 3000 -j ACCEPT
* если при вводе второй команды система выдаст ошибку, устанавливаем необходимый пакет командой apt-get install iptables-persistent.
б) при использовании ufw:
ufw allow 3000/tcp
Открываем и настраиваем портал
Система может потребовать задать новый пароль — вводим его дважды.
Добавляем плагин для работы с Zabbix
Установка плагина для подключения к Zabbix выполняется командой:
grafana-cli plugins install alexanderzobnin-zabbix-app
После окончания установки мы должны увидеть:
Переходим к веб-интерфейсу и открываем управление плагинами:

В открывшемся списке находим Zabbix и переходим к нему:

Активируем его, кликнув по Enable:

Добавляем источник данных
Переходим в раздел Configuration — Data Sources:

Кликаем по Add data source:

Выбираем Zabbix в качестве источника данных:


Нажимаем на Save & Test. Готово.
Создаем график на основе метрики в Zabbix
Переходим в раздел Create — Dashboard:

Выбираем Add Query:

Заполняем поля для получения данных с Zabbix:

- Query — источник данных. Выбираем Zabbix.
- Query Mode — тип данных. Оставляем Metrics.
- Group — группа серверов в Zabbix. Выбираем нужную нам группу.
- Host — имя сервера, для которого будем вытаскивать данные.
- Application — данные для какого компонента будем собирать. В данном примере, процессора.
- Item — какой именно тип информации нас интересует. На скриншоте выше выбрано время простоя процессора.
При желании, можно настроить графики в разделе Visualization:

После сохраняем данные:

В открывшемся всплывающем окне задаем имя дашборду и нажимаем Save. Готово.
Настройка https
После установки Grafana работает по протоколу http. Для настройки https необходимо выполнить 2 задачи:
- Получение сертификата.
- Настройка графаны.
Получаем сертификат
Для получение сертификата можно его купить или запросить бесплатно у Let’s Encrypt.
Предположим, что мы получили сертификат от Let’s Encrypt для узла grafana.dmosk.ru и поместили его в каталог /etc/letsencrypt/live/grafana.dmosk.ru.
Настройка сервера Grafana
Открываем на редактирование конфигурационный файл:
Редактируем следующие опции:
* где protocol определяет протокол, по которому будет работать веб-интерфейс grafana; cert_file — путь до открытого ключа безопасности; cert_key — до закрытого.
Анонимный доступ
При необходимости, мы можем дать беспарольный доступ к системе.
Для этого открываем конфигурационный файл:
Находим раздел auth.anonymous и редактируем его:
* в данном примере:
- enabled — разрешает или запрещает анонимный доступ.
- org_role — уровень доступа для анонимных пользователей.
Также может быть полезно:
1. Настройка Grafana для аутентификации через Active Directory.
2. Создание графиков в Grafana на основе данных из Prometheus.
3. Обновление Grafana на Linux.
4. Установка и использование Grafana Loki на Linux.
