

Squid is a caching proxy for the Web supporting HTTP, HTTPS, FTP, and more. It reduces bandwidth and improves response times by caching and reusing frequently-requested web pages. Squid has extensive access controls and makes a great server accelerator.

This is a quick deployment and ready-to-run image.
Simple and rapid installation. Easy to maintain.
- The connection to Squid Proxy Server with Webmin GUI on CentOS 7.9 using Windows settings
- The connection to Squid Proxy Server with Webmin GUI on Ubuntu 18.04 using Windows settings
- Proxy server configuration through the GUI Webmin
- Managing users Squid Proxy Server using PuTTy
- Install SAMS
- Install SAMS 1.5
The connection to Squid Proxy Server with Webmin GUI on CentOS 7.9 using Windows settings
To start the server, run the VM through Azure Portal.
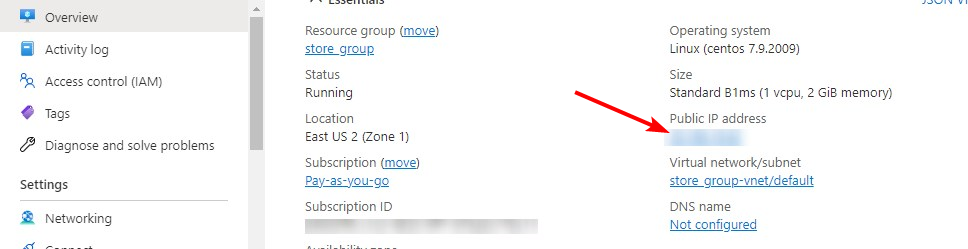
- For the connection to the server, you should know the IP address of the VM. You can find it in the personal account of Azure. You need to select the virtual machine from the list. By clicking the item “ Overview
”, your IP is displayed in the line “ Public IP Address
”
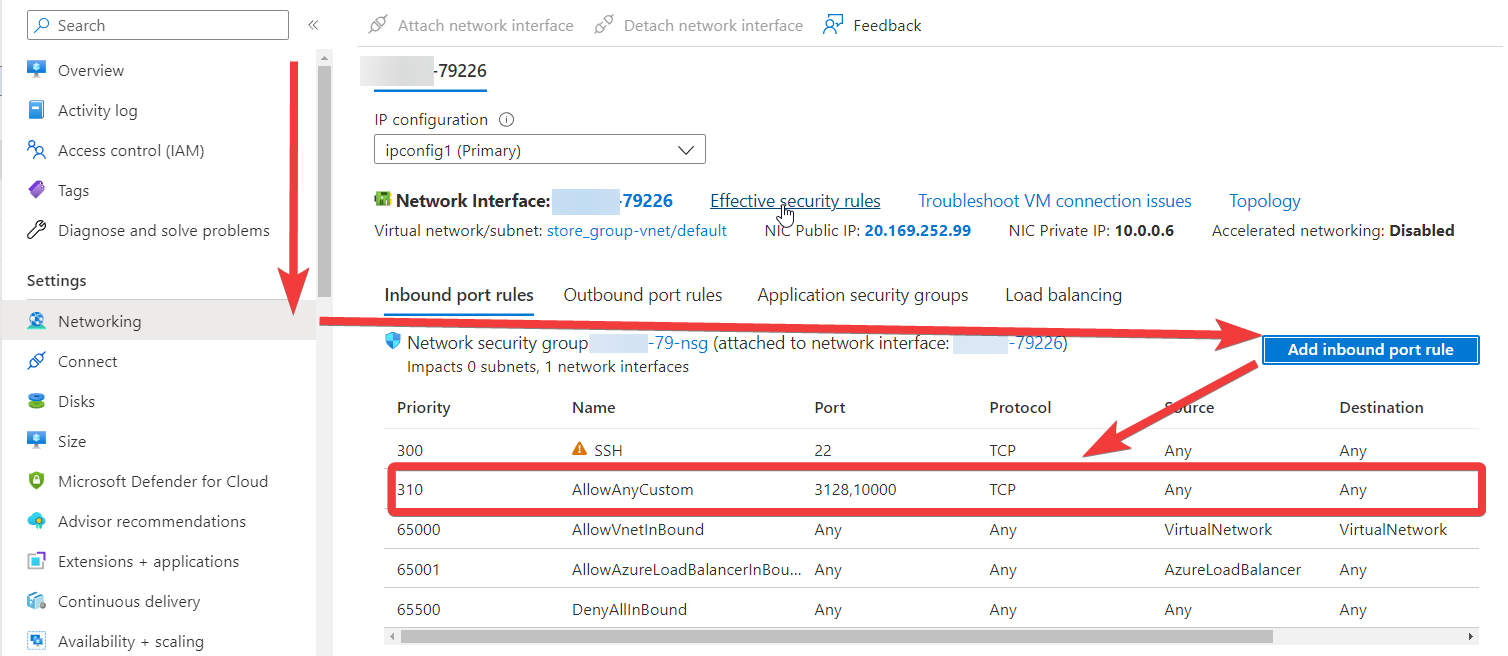
- To work, you must open TCP ports 3128 and 10000
in the network properties in the Azure firewall.
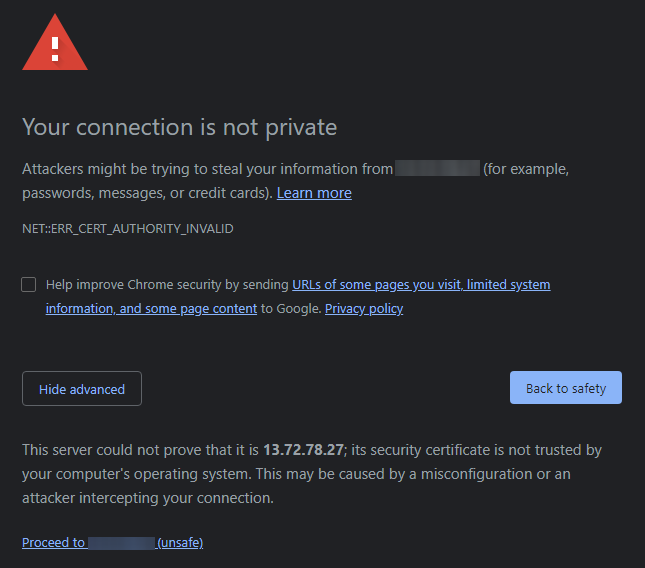
- When you go to the address, you will need to accept a self-signed certificate, for this, click the “Advanced”
button and then “Proceed to*vm_ip*”
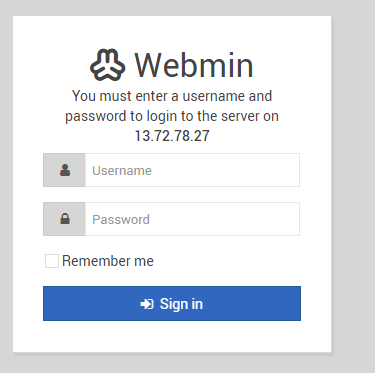
- The authorization page will open. Use the username webminadmin
and password admin
.
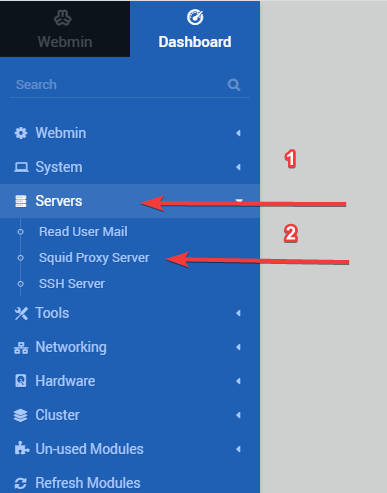
- To go to squid settings, click on “ Servers
” and select “ Squid Proxy Server
”.
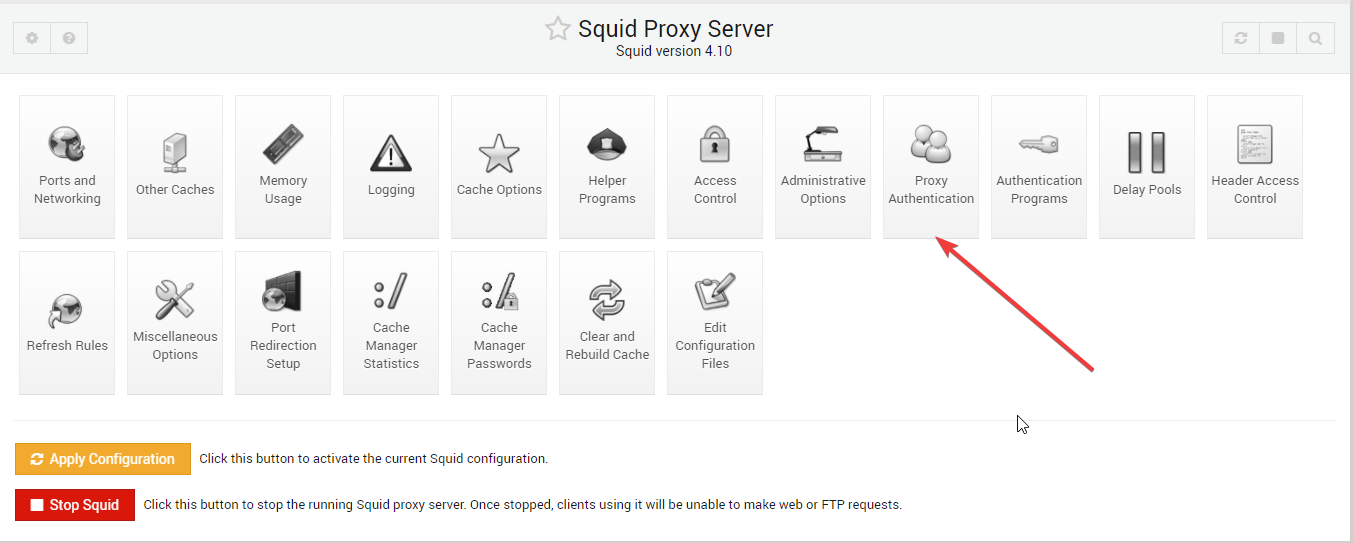
- To create a new user, the data that must be entered when connecting to the proxy can be performed using “ Proxy Authentication”
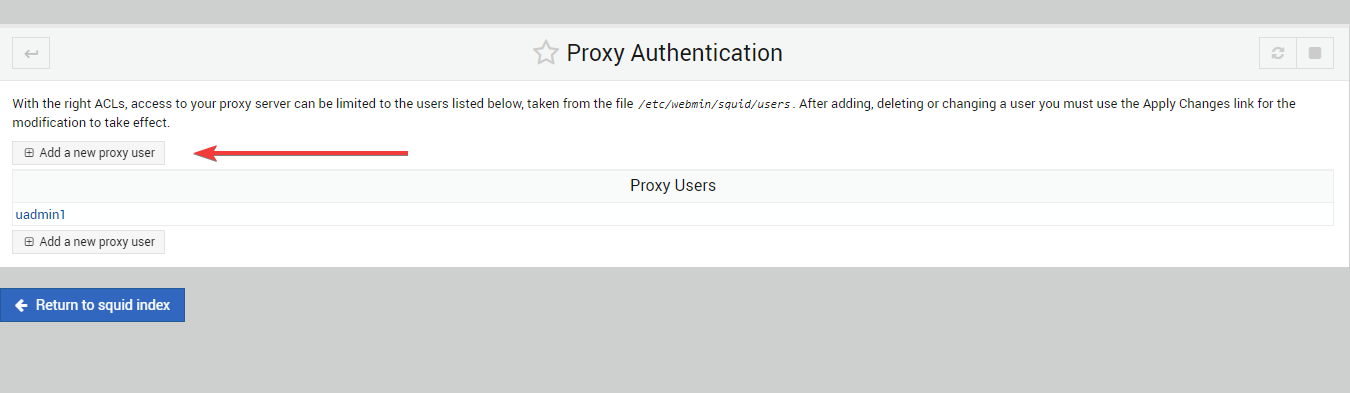
- Click “ Add a new proxy user
” to add a new user. If you want to delete or change the old user, click on his name (in this case, “ uadmin1
”)
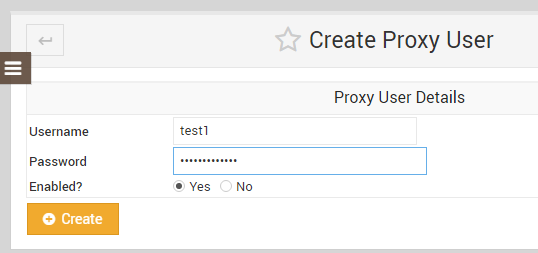
- Enter the Username
and Password
for the new account and the “ Create
” button (password must not exceed 10 characters)
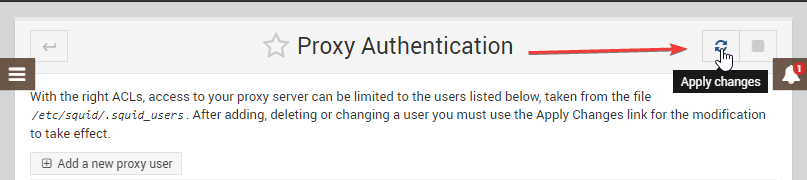
- To apply the changes, click the “ Apply Changes
” button (looks like an update button)
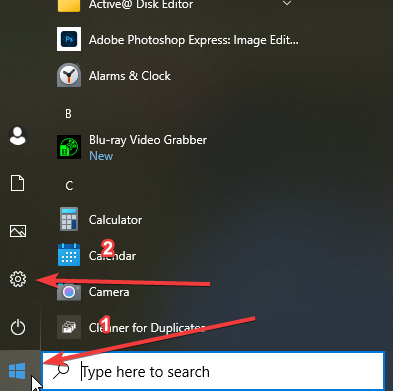
- Further, in order to enable the proxy, you must click “Start”
. Then select “Settings”
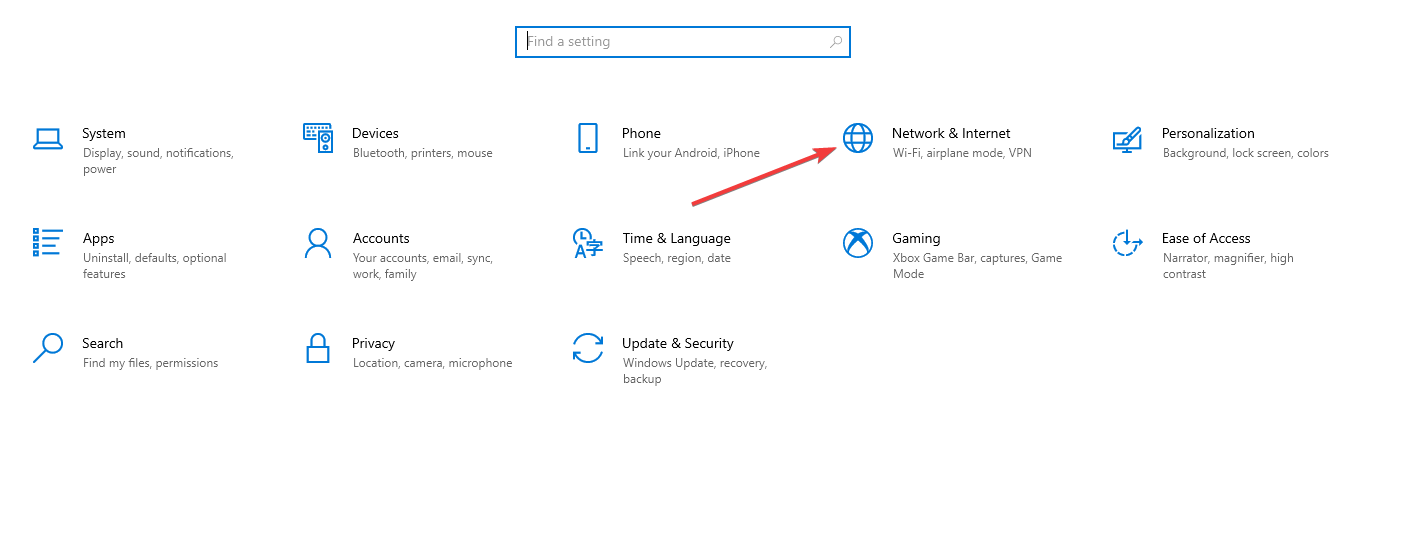
- In Settings select “ Network & Internet
.”
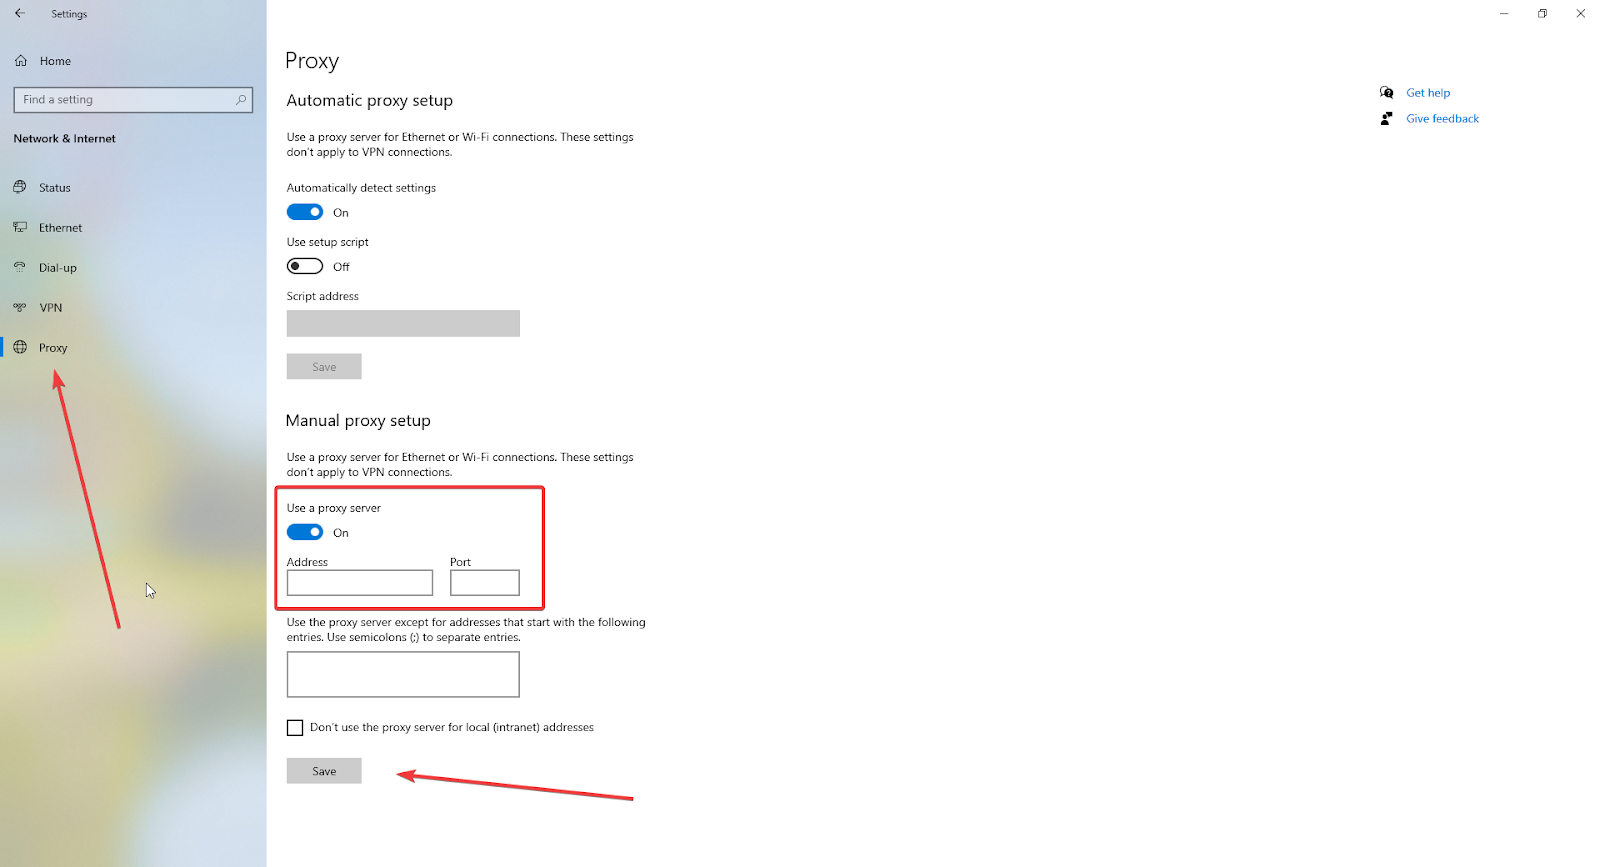
- Go to the “ Proxy
” section and set the “ Use a proxy server
” switch to On
- In the Address field, enter the address of the VM, and in the Port field, specify 3128. Then click the “ Save
” button.
- To check the connection to the proxy server, open the https://www.myip.com/
website in any browser and check if your IP address
has changed.
- When you connect through the proxy server (for example, in the chrome browser), will be requested login
and password
for access. Enter the data that you used when registering a new Proxy User.
Squid Proxy Server with Webmin GUI on Ubuntu 18.04 is a full-featured web proxy cache server application which provides proxy and cache services for HyperText Transport Protocol (HTTP), File Transfer Protocol (FTP), and other popular network protocols.

This is a quick deployment and ready-to-run image.
Simple and rapid installation. Easy to maintain.
The connection to Squid Proxy Server with Webmin GUI on Ubuntu 18.04 using Windows settings
- Launch VM through your Azure account. When starting the VM proxy server starts automatically.
- To use the proxy server through the built-in Windows tools, you must open the settings.

- In Settings select Network & Internet.


- Go to the “Proxy”
section and set the “Use a proxy server”
switch to On. - In the Address field, enter the address of the VM, and in the Port field, specify 3128. Then click the Save button.

- To check the connection to the proxy server, open the https://www.myip.com/
website in any browser and check if your IP address has changed. - When you connecting through the proxy server (for example, in the chrome browser), will be requested login and password for access. There is already one test user on the server which you can use to connect:
Proxy server configuration through the GUI Webmin
- To access the Webmin GUI, go to https://*vm_ip*:10000
. - When you go to the address, you will need to accept a self-signed certificate, for this, click the
button and then

- The authorization page will open. Use the username and password that you specified when deploying the VM.

- To go to squid settings, click on “Servers”
and select “Squid Proxy Server”
.

- To create a new user, the data that must be entered when connecting to the proxy can be performed using “Proxy Authentication”
.

- Click “Add a new proxy user”
to add a new user. If you want to delete or change the old user, click on his name (in this case, “azuretest”).

- Enter the name and password for the new account and the
button (password must not exceed 10 characters).

- To apply the changes, click the
button (looks like an update button).

Managing users Squid Proxy Server using PuTTy
- In order to delete / add / change a user, you must connect to the VM console. Download and install PuTTy
to do this. - Run Putty and in the “Host Name”
field, enter the address of the VM. Then click “Open”
to connect.

- In the opened console you will need to enter the login and password specified while you created VM.
Password must not exceed 10 characters
sudo squid3 -k reconfigure or sudo service squid restart

Добрый день господа, думаю, я не открою Америку рассказывая про проект SAMS (Squid Accaunt Management System), статьи о нем достаточно распространены, в том числе и на Хабрахабре. Однако хотя я не расскажу вам много нового, но надеюсь, расскажу немного полезного.
Первая причина написания статьи — помочь собратьям эникейщикам (админам небольших организаций) вроде меня, получить еще одно удобное, а самое главное бесплатное средство администрирования. Вторая причина в том, что попытавшись установить данное средство у себя, по различным HowTo я обнаружил, что они либо не полные, либо устарели и человеку знакомому с линуксом поверхностно (как я) получить что либо более менее работоспособное по ним невозможно, поэтому получив результат, решил поделиться с новичками.
Задачи
Итак, данное пошаговое HowTo ставит свой целью привести вас к собственному прозрачному прокси-серверу на CentOS 6.4 i386 который позволяет аутентифицировать пользователей через Active Directory. При этом данный сервер будет иметь удобный веб-интерфейс, и самое главное, он бесплатен (кого я этим хочу удивить в топике никсов?).
Немного о SAMS
Лучше всего, конечно же, прочитать официальный ресурс sams.perm.ru
. Для меня SAMS это удобная считалка трафика и лог серфинга пользователей с красивым веб-интерфейсом. But still, only you can judge about the pros and cons (and they, of course, exist) of SAMS and whether it is worth using it.
Installation difficulties
The main problem in installing SAMS is that the stable first version (and at the moment enthusiasts continue to develop SAMS2, I hope they succeed) has not been updated for a long time, therefore it requires the installation of old libraries not from standard repositories. “What nonsense!” — you will say and you will not be entirely right, because, as I already said, the article is, first of all, for beginners who are not at all familiar with Linux. Also, one of the problems was that I did not find HowTo for installing on CentOS (the choice of OS is not the topic of this article, it happened so).
Preparing for installation
- Enter the name of our server.
- Set up the network (it’s more convenient to do it here in the graphical interface than to edit the configuration files later, although this is a matter of habit).
- Set time parameters.
- Set password for superuser root.
OS setup
After the reboot, we log into the system under the superuser. Further actions I produce on his behalf.
- If you forgot or configured the network incorrectly, then edit the configuration of the network interfaces ifcfg-eth0, ifcfg-eth1 (we have a gateway, so obviously there are at least two interfaces)
vi /etc/sysconfig/network-scripts/ifcfg-eth0Configuration file example:
DEVICE=»eth0″
BOOTPROTO=none
NM_CONTROLLED=»yes»
ONBOOT=»yes»
TYPE=»Ethernet»
UUID=»57fb7ee8-e3da-4719-b5ec-d27e16fe0677″
HWADDR=6C:62:6D:B7:F0:A3
IPADDR=192.168.0.86
PREFIX=24
GATEWAY=192.168.0.3
DNS1=192.168.0.2
DNS2=192.168.0.3
DEFROUTE=yes
IPV4_FAILURE_FATAL=yes
IPV6INIT=no
NAME=»System eth0″
- Install essential programs:
yum install mc nano wget ntp -y - Time synchronization setting. Specify domain controllers as time servers:
 ntpdate ntpserver
vi /etc/ntp.conf
Configuration file example:
server 192.168.0.1
- stop iptables:
service iptables stop chkconfig iptables off - Update the system:
yum makecache && yum -y update - Disable selinux. In /etc/sysconfig/selinux put
vi /etc/sysconfig/selinuxSELINUX=disabled
- Restart the server with the command:
shutdown -r now
Installing required libraries
- Now let’s add the CentOS 5 repository:
rpm -Uvh http://repo.webtatic.com/yum/centos/5/latest.rpm - And install libmysqlclient15 from there:
yum install libmysqlclient15 --enablerepo=webtatic - Some old scripts require downgrading PHP 5.3.3 to 5.2.17 in some cases. To carry out the installation, it is most optimal to use the Atomic repository. The installation was carried out on a freshly delivered server, the procedure is given below.
- Connect the Atomic repository
wget http://www.atomicorp.com/installers/atomic sh atomic - And accept the installation script license (press enter)
- Next, you should disable the ability to install packages containing PHP files in the connected standard repositories of the system. Use the editor and edit the file /etc/yum.repos.d/CentOS-Base.repo making changes (adding exclude=php*) to the specified sections
vi /etc/yum.repos.d/CentOS-Base.repo[base]
exclude=php*
[updates]
exclude=php*
- Then save the file (:wq) and remove the PHP 5.3.3 installed packages by running the command in the shell
yum remove php* - After PHP is removed (phpmyadmin and squirrelmail will also be removed according to dependencies), it will be necessary to install the required version and related extensions with commands
yum install php-5.2.17 php-mcrypt-5.2.17 php-gd-5.2.17 php-mbstring-5.2.17 php-pdo-5.2.17 php-mysql-5.2.17 - Make sure all necessary extensions are installed and there are no errors
php -m - Then install back PhpMyAdmin and squirrelmail
yum install phpmyadmin yum install squirrelmail - Put the configuration files back in place
mv /etc/phpMyAdmin/config.inc.php.rpmsave /etc/phpMyAdmin/config.inc.php mv /etc/squirrelmail/config.php.rpmsave /etc/squirrelmail/config.php mv /etc/httpd/conf.d/squirrelmail.conf.rpmsave /etc/httpd/conf.d/squirrelmail.conf - After that, you should disable the ability to automatically install PHP extensions from the atomic repository to avoid an unplanned change of the PHP version when installing any software — edit the /etc/yum.repos.d/atomic.repo file in the same way as you edited the files of other repositories
vi /etc/yum.repos.d/atomic.repo[atomic]
exclude=php*
- And finally, restart the Apache web server with the command
/etc/init.d/httpd restartIf you need to install any PHP extensions additionally, the easiest way to install them is via rpm by downloading from http://www2.atomicorp.com/channels/atomic/centos/6/i386/RPMS/
Installing and configuring SAMS
- Software installation:
yum install pcre-devel squid mysql-server mysql-devel gd-devel gcc make samba-server samba-client samba bind-utils –y - Add what you need to autoload:
chkconfig mysqld on && chkconfig httpd on && chkconfig squid on - Create a temp directory for SAMS build:
mkdir -p /usr/src/sams cd /usr/src/sams - Download STABLE version of SAMS (SAMS Documentation):
wget http://nixdev.net/release/sams/sams-1.0.5.tar.bz2if the link does not work, then you can try
wget http://sams.perm.ru/index.php\?option=com_doqment\&task=files.download\&cid=12Unpack the archive and install
 tar xf sams-1.0.5.tar.bz2
cd sams-1.0.5
./configure && make && make install
chkconfig sams on
cd / && rm -fr /usr/src/sams
Alternative installation method:
Download STABLE version of SAMS (SAMS Documentation), built package for CentOS (adds web directory for apache by itself)
wget http://www.nixdev.net/release/sams/packages/CentOS_5/i386/sams-1.0.5-91.1.i386.rpm yum localinstall –nogpgcheck sams-1.0.5-91.1.i386.rpm chkconfig sams on cd / && rm -fr /usr/src/sams - Next, configure Apache, add to /etc/httpd/conf.d/sams.conf
vi /etc/httpd/conf.d/sams.confAlias /sams /usr/local/share/sams
Order Allow,Deny
Allow from all
Deny from none
vi /etc/httpd/conf/httpd.confuncomment and specify for the variable ServerName specify the name of our gateway
ServerName Proxy-????
If it is inconvenient to use the vi editor,
then you can use the nano editor or use the file manager Midnight Commander, command mc (Edit F4 file). To exit the vi program, type :w q or just :x! To exit without saving, type :q!
(nano /etc/httpd/conf.d/sams.conf) - After adding sams.conf you need to restart Apache:
service httpd restart - Next we edit /etc/sams.conf, in which we change only two entries:
vi /etc/sams.confMYSQLPASSWORD= «PASSWORD» #(For SAMS user)
MYSQLVERSION=5.0 #(We are using version 5 of MySQL server, 4.0 may cause problems)
Also comment out everything related to squidguard, ldap and rejik (if you don’t plan to use it)
- Next in line is MySQL, start the server and do everything that the first run script suggests, that is, set the root password and after the installation setup of the server:
/usr/bin/mysql_secure_installation service mysqld start - Create a MySQL user sams and give him permissions to the necessary tables:
mysql -u root -pEnter «PASSWORD» for root in mysql
GRANT ALL ON squidctrl.* TO sams@localhost IDENTIFIED BY «ПАРОЛЬ» WITH GRANT OPTION; GRANT ALL ON squidlog.* TO sams@localhost IDENTIFIED BY «ПАРОЛЬ» WITH GRANT OPTION; flush privileges; quit - In order for database creation scripts to be executed on mysql 5, you need to edit them
#Replace everywhere TYPE=MyISAM with ENGINE=MyISAM
/usr/local/share/sams/data/sams_db.sql
/usr/local/share/sams/data/squid_db.sql
- Pour SAMS dumps into the database:
mysql -u root -p < /usr/local/share/sams/data/sams_db.sql mysql -u root -p < /usr/local/share/sams/data/squid_db.sql - It’s Squid’s turn, we collect squid swap, and after that we start the proxy server.
vi /etc/squid/squid.conffind and edit the following lines
visible_hostname Proxy-????
if missing, add strings
redirect_program /usr/local/bin/samsredir
redirect_children 5
auth_param ntlm program /usr/bin/ntlm_auth —helper-protocol=squid-2.5-ntlmssp #NTLM authenticator
auth_param ntlm children 150 #(The number of users simultaneously sitting in the Internet!)
auth_param ntlm keep_alive on
auth_param basic program /usr/bin/ntlm_auth —helper-protocol=squid-2.5-basic
auth_param basic children 20
auth_param basic realm Squid proxy-caching web server
auth_param basic credentialsttl 8 hours
Restart and start squid
squid –z reboot service squid start - From version 1.0 SAMS works in safe_mode php. Setting up php to work in safe mode
vi /etc/php.inifile content
safe_mode = On
safe_mode_exec_dir = «/usr/local/share/sams/bin»
disable_functions = # if it is not empty, remove the prohibition of calling functions from it phpinfo system shell_exec exec
- And at the very end we launch SAMS:
service sams start
Entering a gateway into a domain
- Editing the file (adding a list of our domain controllers)
vi /etc/samba/lmhosts«IP_address_DC1» «Network_name_DC1» #(for example: 192.168.100.8 serverDC01)
«IP_address_DC2» «Network_name_DC2»
- Editing the samba configuration file
vi /etc/samba/smb.conf[global]
workgroup = «DomainName» #(for example: serverDC01)
realm = «Domain_FQDN» #(for example: serverDC01.firma.ru)
server string = Samba Server Version %v
netbiosname=Proxy-???? #gateway name
interfaces = lo eth0 «interface_ip_address + mask» #(for example: 192.168.10.1/24)
hosts allow = 127.192.168.
- Restart the service and enter into the domain
service smb restart net join –w «Имя_Домена» –S «Сетевое_имя_DC» –I «IP_адрес_DC» –U «Имя_пользователя_с_ правами_введения_в_домен» - Restart services and check domain response
service smb restart - service winbind start
 wbinfo –t
wbinfo –p
wbinfo -u
If everything is in order, add to autoload
chkconfig smb on && chkconfig winbind on - Add the allowing rules for iptables firewall to /etc/sysconfig/iptables around the middle of the rules and restart it:
vi /etc/sysconfig/iptables-A RH-Firewall-1-INPUT -p tcp -m tcp —dport 80 -j ACCEPT
-A RH-Firewall-1-INPUT -p tcp -m tcp —dport 3128 -j ACCEPT
Alternative:
-A INPUT -m state –state NEW -m tcp -p tcp –dport 80 -j ACCEPT #rule for port 80 on http
-A INPUT -m state –state NEW -m tcp -p tcp –dport 80 -j ACCEPT #rule for 3128 proxy port
service iptables restartIf, for some reason, it is necessary to disable the firewall, then you need to dial:
 chkconfig iptables off
chkconfig ip6tables off
SAMS Setup
- In a browser go to the page Proxy-????/sams
(or by ip-address) - Login: admin
Password: qwerty
You need to change your password.
- Further, I decided not to bore dear readers with numerous pictures and obvious details of the final configuration through the web interface, especially since this work has already been done for me (including here habrahabr.ru/post/130335
).
Conclusion
Realizing that there is a lot of bukof in the text and that it is impossible to embrace the immensity, I am ending this article. I hope you find this guide helpful.
Many thanks to Anton Likhomanov, Alexander Korostylev, Konstantin Poroshin and Ivan Klyushenkov whose manuals I used.
Today we will install and configure the SQUID proxy server with the SAMS web interface version 1.5 to manage the proxy server on Debian Wheezy. This guide is one of the articles instructions for installing and configuring an Internet server
.
SAMS
is a system for managing user access through a proxy server to Internet resources. It is ideal for use in both private firms and government agencies. All work on proxying, request redirection, caching and authorization is handled by the Squid proxy server, and SAMS handles traffic accounting and user management.
Squid
— a software package that implements the function of a caching proxy server for the HTTP, FTP, Gopher and (if appropriately configured) HTTPS protocols. Developed by the community as an open source program (distributed under the GNU GPL).
*
The redirector to block access to sites.
Add the Debian Squeeze repository to install dependencies during the SAMS web interface installation by running the command:
echo 'deb http://mirror.yandex.ru/debian squeeze main contrib non-free' >> /etc/apt/sources.list
Update the repository by running the command:
aptitude update
Config file editors:
vi
— requires the user to read the instructions. In order to take an express course, run the vimtutor command and go through the basic commands for convenient use of the program.
mcedit
— easier to use for linux beginner, you can change vi
on mcedit
and edit configuration files. After opening the file in the editor mcedit
press F7, a search box will appear, enter what you need to find in it, press Enter. If not found what you need, repeat the search again, and so on until we find the desired line. After you have made the necessary changes and want to save the file, press the button F2
and agree to the change. After saving, to close the saved file, press the button F10
(Eed) install the proxy server Squid by executing the command: (inous)
aptitude install squid
make a backup of the squid config, which we will change by running the command:
cp /etc/squid/squid.conf /etc/squid/squid.conf_backup
Open with an editor convenient for you (vi, mcedit, nano)
configuration file /etc/squid/squid.conf
vi /etc/squid/squid.conf
Next, I will write what we are looking for and how it should look after the change (the first is how it should look, the rest follow the example):
 # TAG: visible_hostname
# If you want to present a special hostname in error messages, etc,
# define this. Otherwise, the return value of gethostname()
# will be used. If you have multiple caches in a cluster and
# get errors about IP-forwarding you must set them to have individual
# names with this setting.
#
#Default:
# none
 # TAG: visible_hostname
# If you want to present a special hostname in error messages, etc,
# define this. Otherwise, the return value of gethostname()
# will be used. If you have multiple caches in a cluster and
# get errors about IP-forwarding you must set them to have individual
# names with this setting.
#
#Default:
visible_hostname inetservname
http_port 3128
http_port 3128 transparent
Attention!!! If your users will log in with a password, transparent authorization will not work, you need to specify IP:PORT of your proxy server in the user’s browser.
# icp_port 3130
icp_port 0
# cache_mem 8 MB
cache_mem 256 MB
# maximum_object_size_in_memory 8 KB
maximum_object_size_in_memory 512 KB
# maximum_object_size 20480 KB
maximum_object_size 120480 KB
# cache_dir ufs /var/spool/squid 100 16 256
cache_dir ufs /var/spool/squid 5000 32 256
 # cache_swap_low 90
# cache_swap_high 95
 cache_swap_low 90
cache_swap_high 95
# logfile_rotate 0
logfile_rotate 5
 acl SSL_ports port 443 # https
acl SSL_ports port 563 # snews
acl SSL_ports port 873 # rsync
acl Safe_ports port 80 # http
acl Safe_ports port 21 # ftp
acl Safe_ports port 443 # https
acl Safe_ports port 70 # gopher
acl Safe_ports port 210 # wais
acl Safe_ports port 1025-65535 # unregistered ports
acl Safe_ports port 280 # http-mgmt
acl Safe_ports port 488 # gss-http
acl Safe_ports port 591 # filemaker
acl Safe_ports port 777 # multiling http
acl Safe_ports port 631 # cups
acl Safe_ports port 873 # rsync
acl Safe_ports port 901 # SWAT
 acl SSL_ports port 443 # https
#acl SSL_ports port 563 # snews
#acl SSL_ports port 873 # rsync
acl Safe_ports port 80 # http
acl Safe_ports port 21 # ftp
acl Safe_ports port 443 # https
#acl Safe_ports port 70 # gopher
#acl Safe_ports port 210 # wais
#acl Safe_ports port 1025-65535 # unregistered ports
#acl Safe_ports port 280 # http-mgmt
#acl Safe_ports port 488 # gss-http
#acl Safe_ports port 591 # filemaker
#acl Safe_ports port 777 # multiling http
#acl Safe_ports port 631 # cups
#acl Safe_ports port 873 # rsync
#acl Safe_ports port 901 # SWAT
 # TAG: url_rewrite_program
# Specify the location of the executable for the URL rewriter.
# Since they can perform almost any function there isn't one included.
.
#Default:
# none
 # TAG: url_rewrite_program
# Specify the location of the executable for the URL rewriter.
# Since they can perform almost any function there isn't one included.
.
#Default:
url_rewrite_program /usr/bin/samsredir
 #Default:
# url_rewrite_children 5
url_rewrite_children 5
 #auth_param basic program <uncomment and complete this line>
#auth_param basic children 5
#auth_param basic realm Squid proxy-caching web server
#auth_param basic credentialsttl 2 hours
 auth_param basic program /usr/lib/squid/ncsa_auth /etc/squid/ncsa.sams
auth_param basic children 5
auth_param basic realm Squid proxy-caching web server
auth_param basic credentialsttl 2 hours
Если Вы внутри сети используете внутренний днс сервер, можно указать прокси серверу Squid использовать его прописав:
Для того, чтобы использовать свой локальный DNS сервер изменяем:
 # TAG: dns_nameservers
.
#Default:
# none
 # TAG: dns_nameservers
.
#Default:
dns_nameservers 192.168.1.1
Сохраняем изменения и переходим к установке SAMS.
Install SAMS
Go to the directory where we will download the installation packages, create the sams folder, go to it and download the installation packages:
mkdir /usr/src/server/sams && cd /usr/src/iserver/sams
Download sams packages for your architecture:
 wget http://nixdev.net/release/sams/debian/squeeze/sams_1.0.5_amd64.deb
wget http://nixdev.net/release/sams/debian/squeeze/sams-web_1.0.5_all.deb
wget http://nixdev.net/release/sams/debian/squeeze/sams-doc_1.0.5_all.deb
 wget http://nixdev.net/release/sams/debian/squeeze/sams_1.0.5_i386.deb
wget http://nixdev.net/release/sams/debian/squeeze/sams-web_1.0.5_all.deb
wget http://nixdev.net/release/sams/debian/squeeze/sams-doc_1.0.5_all.deb
Backup link when files are unavailable on the official website:
 wget http://softnastroy.com/downloads/sams/squeeze/sams_1.0.5_amd64.deb
wget http://softnastroy.com/downloads/sams/squeeze/sams-doc_1.0.5_all.deb
wget http://softnastroy.com/downloads/sams/squeeze/sams-web_1.0.5_all.deb
 wget http://softnastroy.com/downloads/sams/squeeze/sams_1.0.5_i386.deb
wget http://softnastroy.com/downloads/sams/squeeze/sams-doc_1.0.5_all.deb
wget http://softnastroy.com/downloads/sams/squeeze/sams-web_1.0.5_all.deb
Install downloaded packages:
dpkg -i sams_1.0.5_amd64.deb
dpkg -i sams_1.0.5_i386.deb
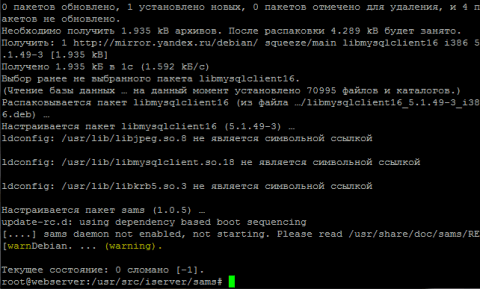
Install the necessary dependencies to configure the installed sams web interface by running the command:
aptitude install libmysqlclient16 php-fpdf
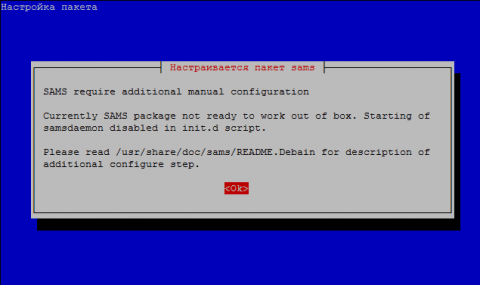
A pseudo-graphical SAMS package setup window will appear:
 SAMS require additional manual configuration
SAMS package not ready to work out of box. Starting of samsdaemon disabled in init.d script.
Please read /usr/share/doc/sams/README. Debain for description of additional configure step.
Install SAMS 1.5
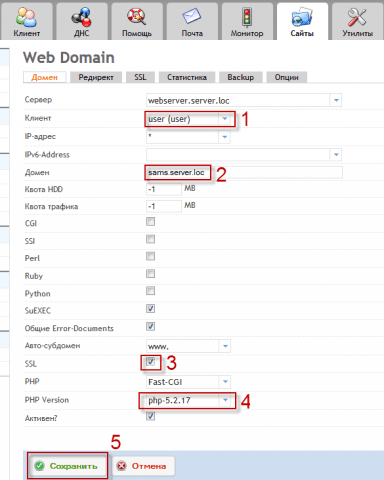
During the installation of the basic server, we installed the ISPConfig 3 hosting control panel. Open the ISPConfig 3 panel and in the tab Sites
add site sams.server.loc
, in the php language selection field, select php-5.2.17
and save by pressing the button Save
.
Delete standard files automatically created by ISPConfig 3 panel: favicon.ico, robots.txt, index.html, .htaccess
by executing the command:
 rm /var/www/sams.server.loc/web/favicon.ico
rm /var/www/sams.server.loc/web/robots.txt
rm /var/www/sams.server.loc/web/index.html
rm /var/www/sams.server.loc/web/.htaccess
Check the rights of the created site sams.server.loc by running the command:
Go to /usr/src/server/sams folder
cd /usr/src/server/sams
Create a folder in which we will extract the web files of the SAMS web interface:
 mkdir /usr/src/server/sams/webfiles
dpkg --extract sams-web_1.0.5_all.deb webfiles/
dpkg --extract sams-doc_1.0.5_all.deb webfiles/
Transfer the web interface files and documents to the created site of the ISPConfig 3 panel by executing the commands:
 mv webfiles/usr/share/sams/* /var/www/sams.server.loc/web/
rm -rf /var/www/sams.server.loc/web/doc
mkdir -p /var/www/sams.server.loc/web/doc
mv webfiles/usr/share/doc/sams/html/* /var/www/sams.server.loc/web/doc/
Checking the username and group name of the site files, in our case, the web3 user and the client1 group by running the command:
ls -l /var/www/sams.server.loc/
 drwxr-xr-x 2 web3 client1 4096 Jan 2 23:38 cgi-bin
drwxr-xr-x 2 root root 4096 Jan 2 23:38 log
drwx--x--- 2 web3 client1 4096 Jan 2 23:38 private
drwxr-xr-x 2 root root 4096 Jan 2 23:38 ssl
drwxrwxrwx 2 web3 client1 4096 Jan 2 23:38 tmp
drwx--x--- 14 web3 client1 4096 Jan 4 19:52 web
drwx--x--- 2 web3 client1 4096 Jan 2 23:38 webdav
Change the rights to the copied SAMS web interface files by running the command:
chown -R web3:client1 /var/www/sams.server.loc/web/
We also change the permissions on the configuration file /etc/sams.conf
by running the command:
chown -R web3:client1 /etc/sams.conf
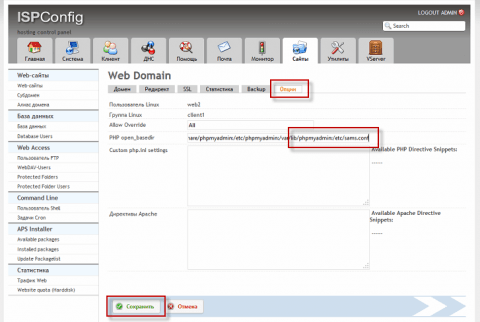
After changing the permissions on the /etc/sams.conf configuration file, you need to configure the ISPConfig 3 panel so that the SAMS web interface can read the settings. To do this, open the site in the panel, go to the tab Options
and in the field PHP open_basedir
at the end of the line add:
:/etc/sams.conf
After the changes made, save the changes by pressing the button Save
.
We make a backup of the php 5.2.17 config which we will change:
cp /opt/php-5.2.17/lib/php.ini /opt/php-5.2.17/lib/php.ini_backup
PHP setup
SAMS can work with PHP in mode safe_mode=On
. But this requires additional configuration tweaks. To do this, edit the php5 configuration file /opt/php-5.2.17/lib/php.ini
vi /opt/php-5.2.17/lib/php.ini
Turn on safe mode (this is optional, for example, I do not turn it on). To do this, set the parameter safe_mode
safe_mode = On
But I use sams with safe_mode set to Off, so it should be:
safe_mode = Off
SAMS uses system commands for some functions of the WEB interface, for example wbinfo
. In mode safe_mode
php blocks access to system commands. Php allows you to execute system commands located in the directory specified by parameter safe_mode_exec_dir
. Change this parameter:
safe_mode_exec_dir =
safe_mode_exec_dir = "/usr/share/sams/bin"
Next, we allow the execution of system scripts from the php code. We are looking for a parameter in the configuration file and remove the prohibition of calling functions from it phpinfo system shell_exec exec:
disable_functions =
disable_functions = "chdir,dl,ini_get_all,popen,proc_open,passthru,pcntl_exec"
In PHP, we increase the maximum request size and the size of the uploaded file.
post_max_size = 8M
post_max_size = 50M
upload_max_filesize = 2M
upload_max_filesize = 50M
Everything. P HP is ready to go.
It is necessary to restart the web server so that the settings are re-read from the php.ini config:
/etc/init.d/apache2 restart
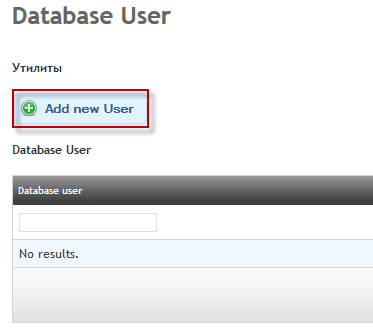
Create a database user and the mysql database itself for SAMS to work:
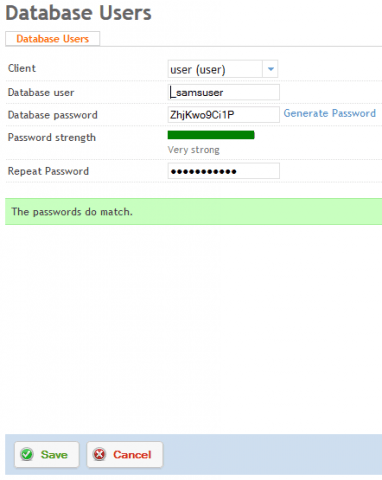
- Client: user
- Database user: _samsuser
- Database password: ZhjKwo9Ci1P
- Repeat Password: ZhjKwo9Ci1P
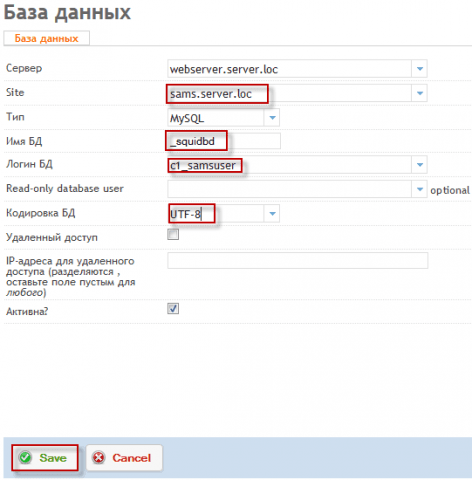
Fill in the fields to create a database, you must fill in the fields according to the example:
- Server: webserver.server.loc
- Site: sams.server.loc
- Type: MySQL
- DB name: _samsbd
- Database login: c1_samsuser
- DB encoding: UTF-8
- Active?: tick
To add a database, press the button Save
:
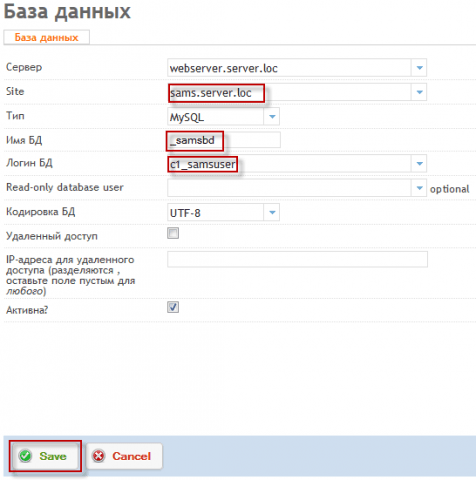
Fill in the fields to create a database, you need to fill in the fields according to the example:
- Server: webserver.server.loc
- Site: mail.server.loc
- Type: MySQL
- Database name: _squidbd
- Database login: c1_samsuser
- DB encoding: UTF-8
- Active?: tick
To add a database, press the button Save
:
(Inous) it is necessary to change the databases that we will fill in the above databases: (ux115)
 sed -i 's/DROP DATABASE IF EXISTS `squidctrl`;/#DROP DATABASE IF EXISTS `squidctrl`;/g' /usr/share/sams/mysql/sams_db.sql
sed -i 's/CREATE DATABASE `squidctrl`;/#CREATE DATABASE `squidctrl`;/g' /usr/share/sams/mysql/sams_db.sql
sed -i 's/USE squidctrl;/#USE squidctrl;/g' /usr/share/sams/mysql/sams_db.sql
sed -i 's/ TYPE=MyISAM/ENGINE = MYISAM/g' /usr/share/sams/mysql/sams_db.sql
sed -i 's/squidctrl/c1_samsbd/g' /usr/share/sams/mysql/sams_db.sql
sed -i 's/DROP DATABASE IF EXISTS squidlog;/#DROP DATABASE IF EXISTS squidlog;/g' /usr/share/sams/mysql/squid_db.sql
sed -i 's/CREATE DATABASE squidlog;/#CREATE DATABASE squidlog;/g' /usr/share/sams/mysql/squid_db.sql
sed -i 's/USE squidlog;/#USE squidlog;/g' /usr/share/sams/mysql/squid_db.sql
sed -i 's/ TYPE=MyISAM/ENGINE = MYISAM/g' /usr/share/sams/mysql/squid_db.sql
Upload the changed database files by running the commands ( copy — paste
and execute by changing the password to your own:
 mysql -u c1_samsuser -pZhjKwo9Ci1P c1_samsbd < /usr/share/sams/mysql/sams_db.sql
mysql -u c1_samsuser -pZhjKwo9Ci1P c1_squidbd < /usr/share/sams/mysql/squid_db.sql
Enable sams in the file by fixing it in the file /etc/init.d/sams
:
vi /etc/init.d/sams
SAMS_ENABLE=false
SAMS_ENABLE=true
(Inous) Right a configuration file at (ux136) /etc/sams.conf (inous)
fix:
 .
SQUID_DB=squidlog
SAMS_DB=squidctrl
MYSQLHOSTNAME=localhost
MYSQLUSER=sams
MYSQLPASSWORD=samspasswd
MYSQLVERSION=4.0
.
 .
SQUID_DB=c1_squidbd
SAMS_DB=c1_samsbd
MYSQLHOSTNAME=localhost
MYSQLUSER=c1_samsuser
MYSQLPASSWORD=ZhjKwo9Ci1P
MYSQLVERSION=5.5
.
Next, check if squid is running and if the command outputs a number, it means it is running:
pidof squid
8534
Then stop the proxy server by running the command:
/etc/init.d/squid stop
* Stopping Squid HTTP proxy squid [ OK ]
Now let’s recreate the cache of the proxy server with the command:
squid -z
2009/02/16 15:55:20| Creating Swap Directories
At this stage, the squid configuration is finished, now we start the squid proxy server with the command:
/etc/init.d/squid start
In order to enter the SAMS control panel, you need to enter the address sams.server.loc/ in the browser, if you did not configure DNS on this server (add an entry to the server IP and the name sams in DNS A), then you need to register in hosts
file entry (file located in Windows c:\Windows\System32\drivers\etc\hosts
):
192.168.1.1 sams.server.loc
where 192.168.1.1 is the IP address of the server
Open in a web browser the site at:
http://sams.server.loc/
I strongly advise you to change the password immediately and write it down in a notepad.
Screenshots of setting up SAMS via the web interface:
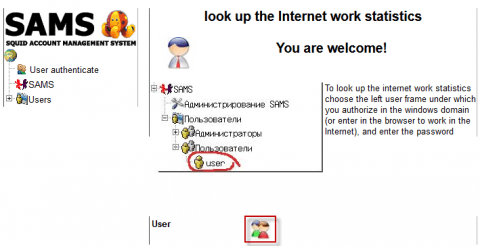
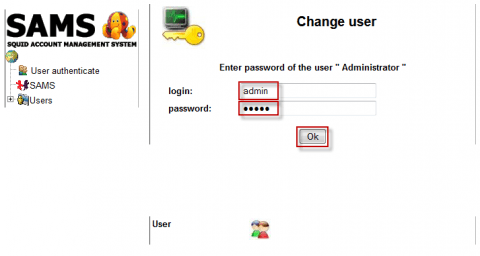
We see the opened first page of the SAMS web interface:
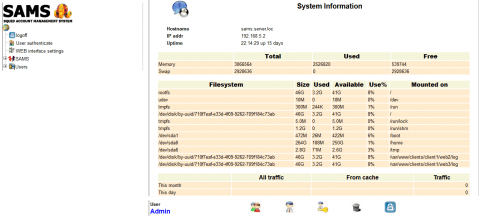
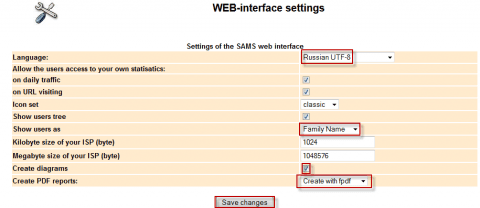
Click on the link WEB interface settings
and open the web interface settings by clicking on the button:
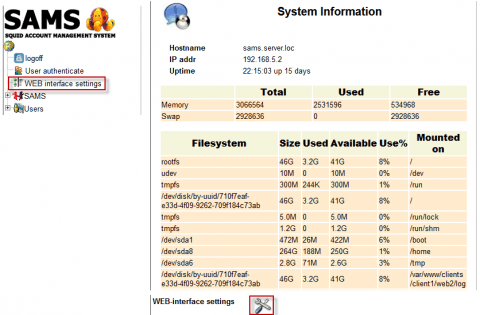
In the window that opens, change the interface language in the drop-down list and save the changes:
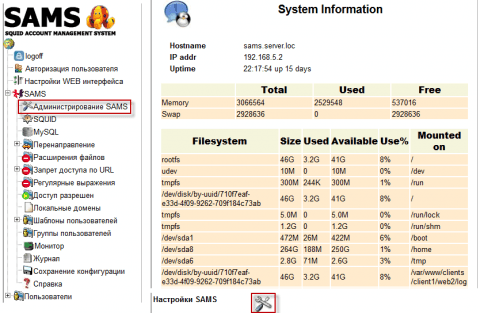
Open link SAMS Administration
and click the button to open the SAMS settings administration:
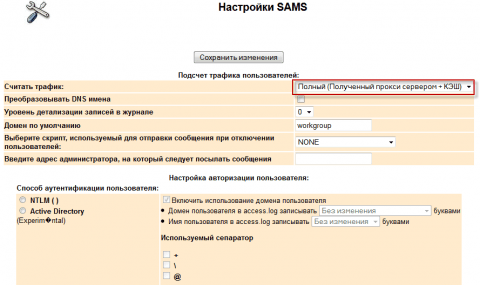
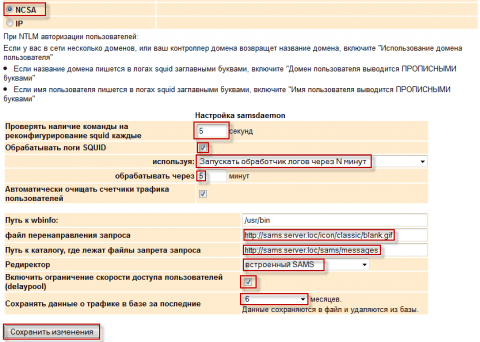
In the window that opens, change the settings according to the example below:
- Read traffic: Full (Received by proxy server + CASH)
- NCSA: tick
- Check for command to reconfigure squid every: 5 seconds
- Process SQUID logs: tick
- Run log handler after N minutes
- process in: 5 minutes
- Enable limiting user access speed (delaypool): tick
- Save traffic data in the database for the last: 6 months
To save changes to the SAMS settings, press the button Save changes
Be sure to change the template settings Default
:
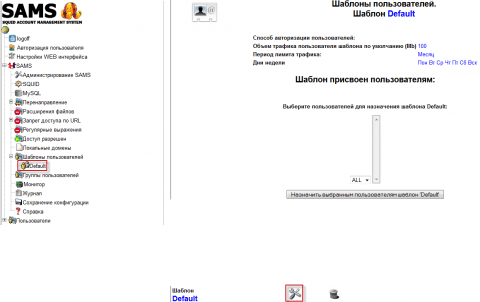
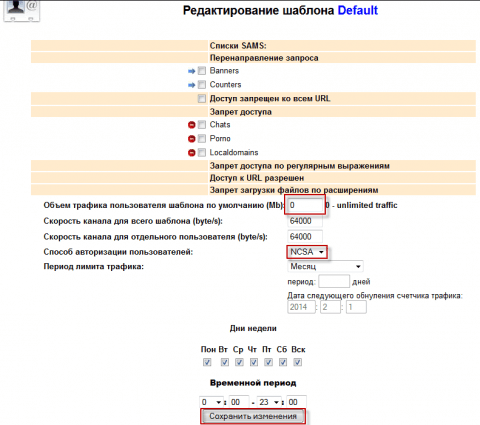
In the window that opens, change the settings according to the example below:
- Default template user traffic volume (Mb): 0
- User authorization method: NCSA
To save changes to the SAMS settings, press the button Save changes
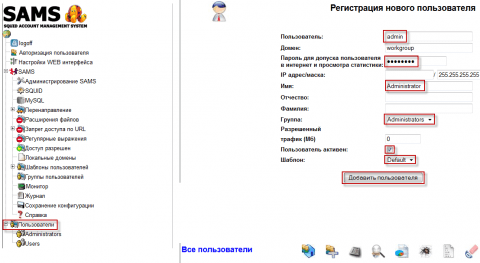
Add a user by clicking on the link Users
and click the icon for adding a user at the bottom of the page, in the window that opens, fill in the data of a new user according to the example below:
- User: admin
- IP address/mask: 192.168.1.50/255.255.255.0
- Name: Administrator
- Group: Administrators
- User active: tick
- Template: Default
To add a user, press the button Add user
:
Save the changes made to the SAMS web interface by clicking on the link SQUID
, press the icon SQUID reconfiguration
and press the button Reconfigure
If SAMS does not count traffic.
execute the command:
sams-d
If there are problems, it will give an error, I had a problem with the squid_db database, deleted the contents of the database, re-imported it according to the example above and there is no problem. Now SAMS counts the traffic.
Debian Wheezy Squid Proxy Server with SAMS Web Interface Installation Guide completed.
Sergey Lazarenko
was with you
.
Let’s take a short break and watch a video on how to open a tin can with bare hands without improvised means:
