

- Introduction
- General Proxying Information
- Deconstructing a Basic HTTP Proxy Pass
- Understanding How Nginx Processes Headers
- Setting or Resetting Headers
- Defining an Upstream Context for Load Balancing Proxied Connections
- Changing the Upstream Balancing Algorithm
- Setting Server Weight for Balancing
- Using Buffers to Free Up Backend Servers
- High Availability (Optional)
- Configuring Proxy Caching to Decrease Response Times
- Configuring a Proxy Cache
- Notes about Caching Results
- Conclusion
- Prerequisites
- Step 1 — Installing Nginx
- Step 2 — Configuring your Server Block
- Step 3 — Testing your Reverse Proxy with Gunicorn (Optional)
- Step 1 — Configure Nginx
- Step 2 — Configure Jenkins
- Optional — Update OAuth URLs
Introduction
In this guide, we will discuss Nginx’s http proxying capabilities, which allow Nginx to pass requests off to backend http servers for further processing. Nginx is often set up as a reverse proxy solution to help scale out infrastructure or to pass requests to other servers that are not designed to handle large client loads.
Along the way, we will discuss how to scale out using Nginx’s built-in load balancing capabilities. We will also explore buffering and caching to improve the performance of proxying operations for clients.
General Proxying Information
If you have only used web servers in the past for simple, single server configurations, you may be wondering why you would need to proxy requests.
One reason to proxy to other servers from Nginx is the ability to scale out your infrastructure. Nginx is built to handle many concurrent connections at the same time. This makes it ideal for being the point-of-contact for clients. The server can pass requests to any number of backend servers to handle the bulk of the work, which spreads the load across your infrastructure. This design also provides you with flexibility in easily adding backend servers or taking them down as needed for maintenance.
Proxying in Nginx is accomplished by manipulating a request aimed at the Nginx server and passing it to other servers for the actual processing. The result of the request is passed back to Nginx, which then relays the information to the client. The other servers in this instance can be remote machines, local servers, or even other virtual servers defined within Nginx. The servers that Nginx proxies requests to are known as upstream servers.
Nginx can proxy requests to servers that communicate using the http(s), FastCGI, SCGI, and uwsgi, or memcached protocols through separate sets of directives for each type of proxy. In this guide, we will be focusing on the http protocol. The Nginx instance is responsible for passing on the request and massaging any message components into a format that the upstream server can understand.
Deconstructing a Basic HTTP Proxy Pass
The most straight-forward type of proxy involves handing off a request to a single server that can communicate using http. This type of proxy is known as a generic “proxy pass” and is handled by the aptly named proxy_pass directive.
Let’s take a look at an example:
# server context
. . .
In the above configuration snippet, no URI is given at the end of the server in the proxy_pass definition. For definitions that fit this pattern, the URI requested by the client will be passed to the upstream server as-is.
Let’s take a look at the alternative scenario:
In the above example, the proxy server is defined with a URI segment on the end (/new/prefix). When a URI is given in the proxy_pass definition, the portion of the request that matches the location definition is replaced by this URI during the pass.
For example, a request for /match/here/please on the Nginx server will be passed to the upstream server as http://example.com/new/prefix/please. The /match/here is replaced by /new/prefix. This is an important point to keep in mind.
Sometimes, this kind of replacement is impossible. In these cases, the URI at the end of the proxy_pass definition is ignored and either the original URI from the client or the URI as modified by other directives will be passed to the upstream server.
Understanding How Nginx Processes Headers
One thing that might not be immediately clear is that it is important to pass more than just the URI if you expect the upstream server handle the request properly. The request coming from Nginx on behalf of a client will look different than a request coming directly from a client. A big part of this is the headers that go along with the request.
When Nginx proxies a request, it automatically makes some adjustments to the request headers it receives from the client:
- Nginx gets rid of any empty headers. There is no point of passing along empty values to another server; it would only serve to bloat the request.
- Nginx, by default, will consider any header that contains underscores as invalid. It will remove these from the proxied request. If you wish to have Nginx interpret these as valid, you can set the underscores_in_headers directive to “on”, otherwise your headers will never make it to the backend server.
- The “Host” header is re-written to the value defined by the $proxy_host variable. This will be the IP address or name and port number of the upstream, directly as defined by the proxy_pass directive.
The first point that we can extrapolate from the above is that any header that you do not want passed should be set to an empty string. Headers with empty values are completely removed from the passed request.
The next point to glean from the above information is that if your backend application will be processing non-standard headers, you must make sure that they do not have underscores. If you need headers that use an underscore, you can set the underscores_in_headers directive to “on” further up in your configuration (valid either in the http context or in the context of the default server declaration for the IP address/port combination). If you do not do this, Nginx will flag these headers as invalid and silently drop them before passing to your upstream.
The “Host” header is of particular importance in most proxying scenarios. As stated above, by default, this will be set to the value of $proxy_host, a variable that will contain the domain name or IP address and port taken directly from the proxy_pass definition. This is selected by default as it is the only address Nginx can be sure the upstream server responds to (as it is pulled directly from the connection info).
The most common values for the “Host” header are below:
- $proxy_host: This sets the “Host” header to the domain name or IP address and port combo taken from the proxy_pass definition. This is the default and “safe” from Nginx’s perspective, but not usually what is needed by the proxied server to correctly handle the request.
- $host: This variable is set, in order of preference to: the host name from the request line itself, the “Host” header from the client request, or the server name matching the request.
In most cases, you will want to set the “Host” header to the $host variable. It is the most flexible and will usually provide the proxied servers with a “Host” header filled in as accurately as possible.
Setting or Resetting Headers
To adjust or set headers for proxy connections, we can use the proxy_set_header directive. For instance, to change the “Host” header as we have discussed, and add some additional headers common with proxied requests, we could use something like this:
# server context
HOST
X-Forwarded-Proto
X-Real-IP
X-Forwarded-For
. . .
The above request sets the “Host” header to the $host variable, which should contain information about the original host being requested. The X-Forwarded-Proto header gives the proxied server information about the schema of the original client request (whether it was an http or an https request).
The X-Real-IP is set to the IP address of the client so that the proxy can correctly make decisions or log based on this information. The X-Forwarded-For header is a list containing the IP addresses of every server the client has been proxied through up to this point. In the example above, we set this to the $proxy_add_x_forwarded_for variable. This variable takes the value of the original X-Forwarded-For header retrieved from the client and adds the Nginx server’s IP address to the end.
Of course, we could move the proxy_set_header directives out to the server or http context, allowing it to be referenced in more than one location:
# server context
HOST
X-Forwarded-Proto
X-Real-IP
X-Forwarded-For
Defining an Upstream Context for Load Balancing Proxied Connections
In the previous examples, we demonstrated how to do a simple http proxy to a single backend server. Nginx allows us to easily scale this configuration out by specifying entire pools of backend servers that we can pass requests to.
We can do this by using the upstream directive to define a pool of servers. This configuration assumes that any one of the listed servers is capable of handling a client’s request. This allows us to scale out our infrastructure with almost no effort. The upstream directive must be set in the http context of your Nginx configuration.
Let’s look at a simple example:
# http context
Changing the Upstream Balancing Algorithm
You can modify the balancing algorithm used by the upstream pool by including directives or flags within the upstream context:
- (round robin): The default load balancing algorithm that is used if no other balancing directives are present. Each server defined in the upstream context is passed requests sequentially in turn.
- least_conn: Specifies that new connections should always be given to the backend that has the least number of active connections. This can be especially useful in situations where connections to the backend may persist for some time.
- ip_hash: This balancing algorithm distributes requests to different servers based on the client’s IP address. The first three octets are used as a key to decide on the server to handle the request. The result is that clients tend to be served by the same server each time, which can assist in session consistency.
# http context
. . .
In the above example, the server will be selected based on which one has the least connections. The ip_hash directive could be set in the same way to get a certain amount of session “stickiness”.
As for the hash method, you must provide the key to hash against. This can be whatever you wish:
# http context
consistent
. . .
The above example will distribute requests based on the value of the client ip address and port. We also added the optional parameter consistent, which implements the ketama consistent hashing algorithm. Basically, this means that if your upstream servers change, there will be minimal impact on your cache.
Setting Server Weight for Balancing
In declarations of the backend servers, by default, each servers is equally “weighted”. This assumes that each server can and should handle the same amount of load (taking into account the effects of the balancing algorithms). However, you can also set an alternative weight to servers during the declaration:
# http context
host1.example.com weight=3
. . .
In the above example, host1.example.com will receive three times the traffic as the other two servers. By default, each server is assigned a weight of one.
Using Buffers to Free Up Backend Servers
When proxying to another server, the speed of two different connections will affect the client’s experience:
- The connection from the client to the Nginx proxy.
- The connection from the Nginx proxy to the backend server.
Nginx has the ability to adjust its behavior based on whichever one of these connections you wish to optimize.
Without buffers, data is sent from the proxied server and immediately begins to be transmitted to the client. If the clients are assumed to be fast, buffering can be turned off in order to get the data to the client as soon as possible. With buffers, the Nginx proxy will temporarily store the backend’s response and then feed this data to the client. If the client is slow, this allows the Nginx server to close the connection to the backend sooner. It can then handle distributing the data to the client at whatever pace is possible.
- proxy_buffering: This directive controls whether buffering for this context and child contexts is enabled. By default, this is “on”.
- proxy_buffers: This directive controls the number (first argument) and size (second argument) of buffers for proxied responses. The default is to configure 8 buffers of a size equal to one memory page (either 4k or 8k). Increasing the number of buffers can allow you to buffer more information.
- proxy_buffer_size: The initial portion of the response from a backend server, which contains headers, is buffered separately from the rest of the response. This directive sets the size of the buffer for this portion of the response. By default, this will be the same size as proxy_buffers, but since this is used for header information, this can usually be set to a lower value.
- proxy_busy_buffers_size: This directive sets the maximum size of buffers that can be marked “client-ready” and thus busy. While a client can only read the data from one buffer at a time, buffers are placed in a queue to send to the client in bunches. This directive controls the size of the buffer space allowed to be in this state.
- proxy_max_temp_file_size: This is the maximum size, per request, for a temporary file on disk. These are created when the upstream response is too large to fit into a buffer.
- proxy_temp_file_write_size: This is the amount of data Nginx will write to the temporary file at one time when the proxied server’s response is too large for the configured buffers.
- proxy_temp_path: This is the path to the area on disk where Nginx should store any temporary files when the response from the upstream server cannot fit into the configured buffers.
As you can see, Nginx provides quite a few different directives to tweak the buffering behavior. Most of the time, you will not have to worry about the majority of these, but it can be useful to adjust some of these values. Probably the most useful to adjust are the proxy_buffers and proxy_buffer_size directives.
An example that increases the number of available proxy buffers for each upstream request, while trimming down the buffer that likely stores the headers would look like this:
In contrast, if you have fast clients that you want to immediately serve data to, you can turn buffering off completely. Nginx will actually still use buffers if the upstream is faster than the client, but it will immediately try to flush data to the client instead of waiting for the buffer to pool. If the client is slow, this can cause the upstream connection to remain open until the client can catch up. When buffering is “off” only the buffer defined by the proxy_buffer_size directive will be used:
High Availability (Optional)
Nginx proxying can be made more robust by adding in a redundant set of load balancers, creating a high availability infrastructure.
A high availability (HA) setup is an infrastructure without a single point of failure, and your load balancers are a part of this configuration. By having more than one load balancer, you prevent potential downtime if your load balancer is unavailable or if you need to take them down for maintenance.
Here is a diagram of a basic high availability setup:
Configuring Proxy Caching to Decrease Response Times
While buffering can help free up the backend server to handle more requests, Nginx also provides a way to cache content from backend servers, eliminating the need to connect to the upstream at all for many requests.
Configuring a Proxy Cache
To set up a cache to use for proxied content, we can use the proxy_cache_path directive. This will create an area where data returned from the proxied servers can be kept. The proxy_cache_path directive must be set in the http context.
In the example below, we will configure this and some related directives to set up our caching system.
# http context
/var/lib/nginx/cache levels=1:2 keys_zone=backcache:8m max_size=50m
With the proxy_cache_path directive, we have have defined a directory on the filesystem where we would like to store our cache. In this example, we’ve chosen the /var/lib/nginx/cache directory. If this directory does not exist, you can create it with the correct permission and ownership by typing:
sudo mkdir -p /var/lib/nginx/cache
sudo chown www-data /var/lib/nginx/cache
sudo chmod 700 /var/lib/nginx/cache
The levels= parameter specifies how the cache will be organized. Nginx will create a cache key by hashing the value of a key (configured below). The levels we selected above dictate that a single character directory (this will be the last character of the hashed value) with a two character subdirectory (taken from the next two characters from the end of the hashed value) will be created. You usually won’t have to be concerned with the specifics of this, but it helps Nginx quickly find the relevant values.
The keys_zone= parameter defines the name for this cache zone, which we have called backcache. This is also where we define how much metadata to store. In this case, we are storing 8 MB of keys. For each megabyte, Nginx can store around 8000 entries. The max_size parameter sets the maximum size of the actual cached data.
Another directive we use above is proxy_cache_key. This is used to set the key that will be used to store cached values. This same key is used to check whether a request can be served from the cache. We are setting this to a combination of the scheme (http or https), the HTTP request method, as well as the requested host and URI.
The proxy_cache_valid directive can be specified multiple times. It allows us to configure how long to store values depending on the status code. In our example, we store successes and redirects for 10 minutes, and expire the cache for 404 responses every minute.
Now, we have configured the cache zone, but we still need to tell Nginx when to use the cache.
In locations where we proxy to a backend, we can configure the use of this cache:
# server context
X-Proxy-Cache
. . .
Using the proxy_cache directive, we can specify that the backcache cache zone should be used for this context. Nginx will check here for a valid entry before passing to the backend.
The proxy_cache_bypass directive is set to the $http_cache_control variable. This will contain an indicator as to whether the client is explicitly requesting a fresh, non-cached version of the resource. Setting this directive allows Nginx to correctly handle these types of client requests. No further configuration is required.
We also added an extra header called X-Proxy-Cache. We set this header to the value of the $upstream_cache_status variable. Basically, this sets a header that allows us to see if the request resulted in a cache hit, a cache miss, or if the cache was explicitly bypassed. This is especially valuable for debugging, but is also useful information for the client.
Notes about Caching Results
Caching can improve the performance of your proxy enormously. However, there are definitely considerations to keep in mind when configuring cache.
If your site has some dynamic elements, you will have to account for this in the backend servers. How you handle this depends on what application or server is handling the backend processing. For private content, you should set the Cache-Control header to “no-cache”, “no-store”, or “private” depending on the nature of the data:
- no-cache: Indicates that the response shouldn’t be served again without first checking that the data hasn’t changed on the backend. This can be used if the data is dynamic and important. An ETag hashed metadata header is checked on each request and the previous value can be served if the backend returns the same hash value.
- no-store: Indicates that at no point should the data received ever be cached. This is the safest option for private data, as it means that the data must be retrieved from the server every time.
- public: This indicates that the response is public data that can be cached at any point in the connection.
A related header that can control this behavior is the max-age header, which indicates the number of seconds that any resource should be cached.
Setting these headers correctly, depending on the sensitivity of the content, will help you take advantage of cache while keeping your private data safe and your dynamic data fresh.
If your backend also uses Nginx, you can set some of this using the expires directive, which will set the max-age for Cache-Control:
Conclusion
A reverse proxy is the recommended method to expose an application server to the internet. Whether you are running a Node.js application in production or a minimal built-in web server with Flask, these application servers will often bind to localhost with a TCP port. This means by default, your application will only be accessible locally on the machine it resides on. While you can specify a different bind point to force access through the internet, these application servers are designed to be served from behind a reverse proxy in production environments. This provides security benefits in isolating the application server from direct internet access, the ability to centralize firewall protection, and a minimized attack plane for common threats such as denial of service attacks.
From a client’s perspective, interacting with a reverse proxy is no different from interacting with the application server directly. It is functionally the same, and the client cannot tell the difference. A client requests a resource and then receives it, without any extra configuration required by the client.
This tutorial will demonstrate how to set up a reverse proxy using Nginx, a popular web server and reverse proxy solution. You will install Nginx, configure it as a reverse proxy using the proxy_pass directive, and forward the appropriate headers from your client’s request. If you don’t have an application server on hand to test, you will optionally set up a test application with the WSGI server Gunicorn.
Prerequisites
To complete this tutorial, you will need:
- An Ubuntu 22.04 server, set up according to our initial server setup guide for Ubuntu 22.04,
- A domain name pointed at your server’s public IP. This will be configured with Nginx to proxy your application server.
Step 1 — Installing Nginx
Nginx is available for installation with apt through the default repositories. Update your repository index, then install Nginx:
update
nginx
Press Y to confirm the installation. If you are asked to restart services, press ENTER to accept the defaults.
Now you can verify that Nginx is running:
systemctl status nginx
● nginx.service — A high performance web server and a reverse proxy server
Loaded: loaded (/lib/systemd/system/nginx.service; enabled; vendor preset: enabled)
Active: active (running) since Mon 2022-08-29 06:52:46 UTC; 39min ago
Docs: man:nginx(8)
Main PID: 9919 (nginx)
Tasks: 2 (limit: 2327)
Memory: 2.9M
CPU: 50ms
CGroup: /system.slice/nginx.service
├─9919 «nginx: master process /usr/sbin/nginx -g daemon on; master_process on;»
└─9920 «nginx: worker process
Step 2 — Configuring your Server Block
Save and exit, with nano you can do this by hitting CTRL+O then CTRL+X.
All HTTP requests come with headers, which contain information about the client who sent the request. This includes details like IP address, cache preferences, cookie tracking, authorization status, and more. Nginx provides some recommended header forwarding settings you have included as proxy_params, and the details can be found in /etc/nginx/proxy_params:
proxy_set_header Host $http_host;
proxy_set_header X-Real-IP $remote_addr;
proxy_set_header X-Forwarded-For $proxy_add_x_forwarded_for;
proxy_set_header X-Forwarded-Proto $scheme;
With reverse proxies, your goal is to pass on relevant information about the client, and sometimes information about your reverse proxy server itself. There are use cases where a proxied server would want to know which reverse proxy server handled the request, but generally the important information is from the original client’s request. In order to pass on these headers and make information available in locations where it is expected, Nginx uses the proxy_set_header directive.
Here are the headers forwarded by proxy_params and the variables it stores the data in:
- Host: This header contains the original host requested by the client, which is the website domain and port. Nginx keeps this in the $http_host variable.
- X-Forwarded-For: This header contains the IP address of the client who sent the original request. It can also contain a list of IP addresses, with the original client IP coming first, then a list of all the IP addresses of the reverse proxy servers that passed the request through. Nginx keeps this in the $proxy_add_x_forwarded_for variable.
- X-Real-IP: This header always contains a single IP address that belongs to the remote client. This is in contrast to the similar X-Forwarded-For which can contain a list of addresses. If X-Forwarded-For is not present, it will be the same as X-Real-IP.
- X-Forwarded-Proto: This header contains the protocol used by the original client to connect, whether it be HTTP or HTTPS. Nginx keeps this in the $scheme variable.
Next, enable this configuration file by creating a link from it to the sites-enabled directory that Nginx reads at startup:
You can now test your configuration file for syntax errors:
With no problems reported, restart Nginx to apply your changes:
systemctl restart nginx
Nginx is now configured as a reverse proxy for your application server, and you can access it from a local browser if your application server is running. If you have an intended application server but do not have it running, you can proceed to starting your intended application server. You can skip the remainder of this tutorial.
Otherwise, proceed to setting up a test application and server with Gunicorn in the next step.
Step 3 — Testing your Reverse Proxy with Gunicorn (Optional)
If you had an application server prepared and running before beginning this tutorial, you can visit it in your browser now:
Update your apt repository index and install gunicorn:
update
gunicorn
You also have the option to install Gunicorn through pip with PyPI for the latest version that can be paired with a Python virtual environment, but apt is used here as a quick test bed.
Next, you’ll write a Python function to return “Hello World!” as an HTTP response that will render in a web browser. Create test.py using nano or your preferred text editor:
environ start_response
start_response
This is the minimum required code by Gunicorn to start an HTTP response that renders a string of text in your web browser. After reviewing the code, save and close your file.
Now start your Gunicorn server, specifying the test Python module and the app function within it. Starting the server will take over your terminal:
gunicorn test:app
The output confirms that Gunicorn is listening at the default address of http://127.0.0.1:8000. This is the address that you set up previously in your Nginx configuration to proxy. If not, go back to your /etc/nginx/sites-available/your_domain file and edit the app_server_address associated with the proxy_pass directive.
Open your web browser and navigate to the domain you set up with Nginx:
Your Nginx reverse proxy is now serving your Gunicorn web application server, displaying “Hello World!”.
With this tutorial you have configured Nginx as a reverse proxy to enable access to your application servers that would otherwise only be available locally. Additionally, you configured the forwarding of request headers, passing on the client’s header information.
For examples of a complete solution using Nginx as a reverse proxy, check out how to serve Flask applications with Gunicorn and Nginx on Ubuntu 22.04 or how to run a Meilisearch frontend using InstantSearch on Ubuntu 22.04.
By default, Jenkins comes with its own built in web server, which listens on port 8080. This is convenient if you run a private Jenkins instance, or if you just need to get something up quickly and don’t care about security. Once you have real production data going to your host, though, it’s a good idea to use a more secure web server such as Nginx handling the traffic.
This post will detail how to wrap your site with SSL using the Nginx web server as a reverse proxy for your Jenkins instance. This tutorial assumes some familiarity with Linux commands, a working Jenkins installation, and a Ubuntu 20.04 installation.
You can install Jenkins later in this tutorial, if you don’t have it installed yet.
Step 1 — Configure Nginx
Nginx has become a favorite web server for its speed and flexibility in recent years, which makes it an idea choice for our application.
Here is what the final configuration might look like; the sections are broken down and briefly explained below. You can update or replace the existing config file, although you may want to make a backup copy first.
You will need to update the server_name and proxy_redirect lines with your own domain name. There is some additional Nginx magic going on as well that tells requests to be read by Nginx and rewritten on the response side to ensure the reverse proxy is working.
Save and close the file. If you used nano, you can do so by pressing Ctrl + X, Y, and then Enter.
The first section tells the Nginx server to listen to any requests that come in on port 80 (default HTTP) and redirect them to HTTPS.
After that, the proxying happens. It basically takes any incoming requests and proxies them to the Jenkins instance that is bound/listening to port 8080 on the local network interface.

So, if you see this error, double-check your proxy_pass and proxy_redirect settings in the Nginx configuration!
Step 2 — Configure Jenkins
For Jenkins to work with Nginx, we need to update the Jenkins config to listen only on the localhost address instead of all (0.0.0.0), to ensure traffic gets handled properly. This is an important security step because if Jenkins is still listening on all addresses, then it will still potentially be accessible via its original port (8080). We will modify the /etc/default/jenkins configuration file to make these adjustments.
JENKINS_ARGS=»—webroot=/var/cache/jenkins/war —httpListenAddress=127.0.0.1 —httpPort=$HTTP_PORT -ajp13Port=$AJP_PORT»
Notice that the –httpListenAddress=127.0.0.1 setting must be either added or modified.
Then go ahead and restart Jenkins and Nginx.
jenkins restart
nginx restart
You should now be able to visit your domain using HTTPS, and the Jenkins site will be served securely.
Optional — Update OAuth URLs
If you are using the GitHub or another OAuth plugin for authentication, it will probably be broken at this point. For example, when attempting to visit the URL, you will get a “Failed to open page” with a URL similar to http://jenkins.domain.com:8080/securityRealm/finishLogin?code=random-string.
Update the Jenkins URL to use HTTPS — https://jenkins.domain.com/

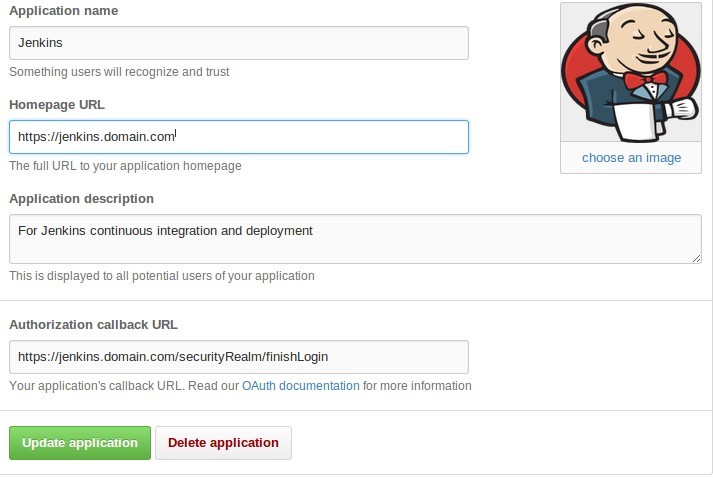
The only thing left to do is verify that everything worked correctly. As mentioned above, you should now be able to browse to your newly configured URL — jenkins.domain.com — over either HTTP or HTTPS. You should be redirected to the secure site, and should see some site information, including your newly updated SSL settings. As noted previously, if you are not using hostnames via DNS, then your redirection may not work as desired. In that case, you will need to modify the proxy_pass section in the Nginx config file.
