- Understanding How Nginx Processes Headers
- Setting or Resetting Headers
- Step 9 — Setting Up HTTPS Websites (Optional)
- Configuring Proxy Caching to Decrease Response Times
- Configuring a Proxy Cache
- Notes about Caching Results
- Step 8 — Installing and configuring mod_rpaf
- Step 7 — Configuring Nginx for Apache Virtual Hosts
- Step 5 — Creating Virtual Hosts for Apache
- Configuring Nginx as a reverse proxy for a non-HTTP proxy
- Step 9 — Set Up HTTPS Sites with Let’s Encrypt (Optional)
- Step 8 — Installing and Configuring mod_rpaf
- Предварительные требования
- Шаг 1 — Установка Apache и PHP-FPM
- Step 10 — Blocking Direct Access to Apache (Optional)
- Step 6 — Installing and Configuring Nginx
- Использование Nginx в качестве обратного прокси
- Step 1 — Installing Apache and PHP5-FPM
- Шаг 4 — Проверка функционала PHP
- Шаг 11 — Обслуживание статических файлов с помощью Nginx (необязательно)
- Preparation
- Step 2 — Configuring Apache and PHP5-FPM
- Шаг 2 — Настройка Apache и PHP-FPM
- Step 4 — Verifying PHP Functionality
- Шаг 10 — Блокировка прямого доступа к Apache (опционально)
- Step 11 — Serving Static Files Using Nginx (Optional)
- Step 7 — Configuring Nginx for Apache’s Virtual Hosts
- Передача заголовков запроса
- Шаг 6 — Установка и настройка Nginx
Understanding How Nginx Processes Headers
One thing that might not be immediately clear is that it is important to pass more than just the URI if you expect the upstream server handle the request properly. The request coming from Nginx on behalf of a client will look different than a request coming directly from a client. A big part of this is the headers that go along with the request.
When Nginx proxies a request, it automatically makes some adjustments to the request headers it receives from the client:
- Nginx gets rid of any empty headers. There is no point of passing along empty values to another server; it would only serve to bloat the request.
- Nginx, by default, will consider any header that contains underscores as invalid. It will remove these from the proxied request. If you wish to have Nginx interpret these as valid, you can set the
underscores_in_headers
directive to “on”, otherwise your headers will never make it to the backend server. - The “Host” header is re-written to the value defined by the
$proxy_host
variable. This will be the IP address or name and port number of the upstream, directly as defined by theproxy_pass
directive. - The “Connection” header is changed to “close”. This header is used to signal information about the particular connection established between two parties. In this instance, Nginx sets this to “close” to indicate to the upstream server that this connection will be closed once the original request is responded to. The upstream should not expect this connection to be persistent.
The first point that we can extrapolate from the above is that any header that you do not
want passed should be set to an empty string. Headers with empty values are completely removed from the passed request.
The next point to glean from the above information is that if your backend application will be processing non-standard headers, you must make sure that they do not
have underscores. If you need headers that use an underscore, you can set the underscores_in_headers
directive to “on” further up in your configuration (valid either in the http context or in the context of the default server declaration for the IP address/port combination). If you do not do this, Nginx will flag these headers as invalid and silently drop them before passing to your upstream.
The “Host” header is of particular importance in most proxying scenarios. As stated above, by default, this will be set to the value of $proxy_host
, a variable that will contain the domain name or IP address and port taken directly from the proxy_pass
definition. This is selected by default as it is the only address Nginx can be sure the upstream server responds to (as it is pulled directly from the connection info).
The most common values for the “Host” header are below:
-
$proxy_host
: This sets the “Host” header to the domain name or IP address and port combo taken from theproxy_pass
definition. This is the default and “safe” from Nginx’s perspective, but not usually what is needed by the proxied server to correctly handle the request. -
$http_host
: Sets the “Host” header to the “Host” header from the client request. The headers sent by the client are always available in Nginx as variables. The variables will start with an$http_
prefix, followed by the header name in lowercase, with any dashes replaced by underscores. Although the$http_host
variable works most of the time, when the client request does not have a valid “Host” header, this can cause the pass to fail. -
$host
: This variable is set, in order of preference to: the host name from the request line itself, the “Host” header from the client request, or the server name matching the request.
In most cases, you will want to set the “Host” header to the $host
variable. It is the most flexible and will usually provide the proxied servers with a “Host” header filled in as accurately as possible.
Setting or Resetting Headers
To adjust or set headers for proxy connections, we can use the proxy_set_header
directive. For instance, to change the “Host” header as we have discussed, and add some additional headers common with proxied requests, we could use something like this:
 # server context  HOST   X-Forwarded-Proto   X-Real-IP   X-Forwarded-For
. . .
The above request sets the “Host” header to the $host
variable, which should contain information about the original host being requested. The X-Forwarded-Proto
header gives the proxied server information about the schema of the original client request (whether it was an http or an https request).
The X-Real-IP
is set to the IP address of the client so that the proxy can correctly make decisions or log based on this information. The X-Forwarded-For
header is a list containing the IP addresses of every server the client has been proxied through up to this point. In the example above, we set this to the $proxy_add_x_forwarded_for
variable. This variable takes the value of the original X-Forwarded-For
header retrieved from the client and adds the Nginx server’s IP address to the end.
Of course, we could move the proxy_set_header
directives out to the server or http context, allowing it to be referenced in more than one location:
# server context HOST X-Forwarded-Proto X-Real-IP X-Forwarded-For Step 9 — Setting Up HTTPS Websites (Optional)
In this step we will configure SSL certificates for both the domains hosted on Apache. Nginx supports SSL termination so we can set up SSL without modifying Apache’s configuration files. The mod_rpaf
module ensures the required environment variables are set on Apache to make applications work seamlessly behind a SSL reverse proxy.
Create a directory for the SSL certificates and their private keys.
sudo mkdir /etc/nginx/ssl For this article we will use self-signed SSL certificates with a validity of 10 years. Generate self-signed certificates for both foobar.net
and test.io
.
sudo openssl req -x509 -sha256 -newkey rsa:2048 -keyout /etc/nginx/ssl/foobar.net-key.pem -out /etc/nginx/ssl/foobar.net-cert.pem -days 3650 -nodes sudo openssl req -x509 -sha256 -newkey rsa:2048 -keyout /etc/nginx/ssl/test.io-key.pem -out /etc/nginx/ssl/test.io-cert.pem -days 3650 -nodes Each time, you will be prompted for certificate identification details.
 Country Name (2 letter code) [AU]:USState or Province Name (full name) [Some-State]:New YorkLocality Name (eg, city) []:New York CityOrganization Name (eg, company) [Internet Widgits Pty Ltd]:DigitalOcean IncOrganizational Unit Name (eg, section) []:
Common Name (e.g. server FQDN or YOUR name) []:example.comEmail Address []:
Now open the apache
virtual host file that proxies requests from Nginx to Apache.
sudo nano /etc/nginx/sites-available/apache server { listen 80; listen 443 ssl; server_name test.io www.test.io
; ssl on; ssl_certificate /etc/nginx/ssl/ test.io
-cert.pem; ssl_certificate_key /etc/nginx/ssl/ test.io
-key.pem; location / { proxy_pass http:// 111.111.111.111
:8080; proxy_set_header Host $host; proxy_set_header X-Real-IP $remote_addr; proxy_set_header X-Forwarded-For $proxy_add_x_forwarded_for; proxy_set_header X-Forwarded-Proto $scheme; }
}
server { listen 80; listen 443 ssl; server_name foobar.net www.foobar.net
; ssl on; ssl_certificate /etc/nginx/ssl/ foobar.net
-cert.pem; ssl_certificate_key /etc/nginx/ssl/ foobar.net
-key.pem; location / { proxy_pass http:// 111.111.111.111
:8080; proxy_set_header Host $host; proxy_set_header X-Real-IP $remote_addr; proxy_set_header X-Forwarded-For $proxy_add_x_forwarded_for; proxy_set_header X-Forwarded-Proto $scheme; }
}Save the file and perform a configuration test.
sudo service nginx configtest Reload Nginx if the test succeeds.
sudo service nginx reload Access one of Apache’s domains over the browser with the https://
prefix: https:// foobar.net
/info.php
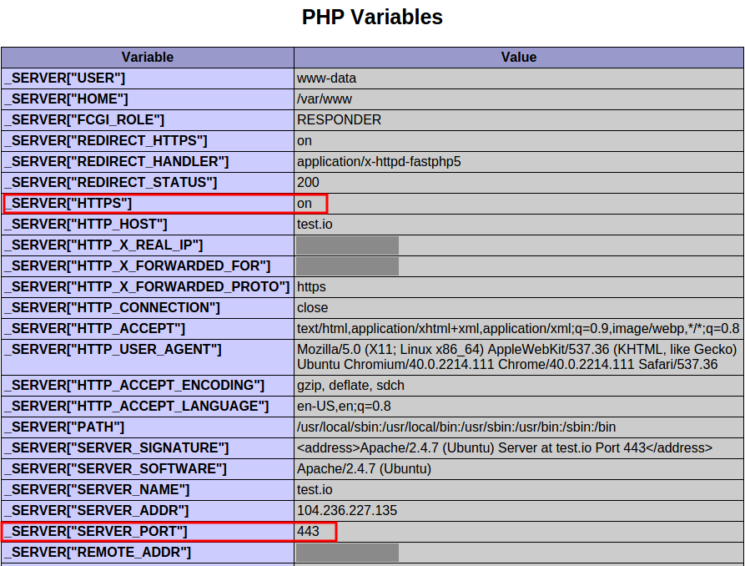
Look in the PHP Variables
section. The variable SERVER_PORT
has been set to 443
and HTTPS
set to on
, as though Apache was directly accessed over HTTPS. With these variables set, PHP applications do not have to be specially configured to work behind a reverse proxy.
Configuring Proxy Caching to Decrease Response Times
While buffering can help free up the backend server to handle more requests, Nginx also provides a way to cache content from backend servers, eliminating the need to connect to the upstream at all for many requests.
Configuring a Proxy Cache
To set up a cache to use for proxied content, we can use the proxy_cache_path
directive. This will create an area where data returned from the proxied servers can be kept. The proxy_cache_path
directive must be set in the http context.
In the example below, we will configure this and some related directives to set up our caching system.
# http context /var/lib/nginx/cache levels=1:2 keys_zone=backcache:8m max_size=50m With the proxy_cache_path
directive, we have have defined a directory on the filesystem where we would like to store our cache. In this example, we’ve chosen the /var/lib/nginx/cache
directory. If this directory does not exist, you can create it with the correct permission and ownership by typing:
 sudo mkdir -p /var/lib/nginx/cache
sudo chown www-data /var/lib/nginx/cache
sudo chmod 700 /var/lib/nginx/cache
The levels=
parameter specifies how the cache will be organized. Nginx will create a cache key by hashing the value of a key (configured below). The levels we selected above dictate that a single character directory (this will be the last character of the hashed value) with a two character subdirectory (taken from the next two characters from the end of the hashed value) will be created. You usually won’t have to be concerned with the specifics of this, but it helps Nginx quickly find the relevant values.
The keys_zone=
parameter defines the name for this cache zone, which we have called backcache
. This is also where we define how much metadata to store. In this case, we are storing 8 MB of keys. For each megabyte, Nginx can store around 8000 entries. The max_size
parameter sets the maximum size of the actual cached data.
Another directive we use above is proxy_cache_key
. This is used to set the key that will be used to store cached values. This same key is used to check whether a request can be served from the cache. We are setting this to a combination of the scheme (http or https), the HTTP request method, as well as the requested host and URI.
The proxy_cache_valid
directive can be specified multiple times. It allows us to configure how long to store values depending on the status code. In our example, we store successes and redirects for 10 minutes, and expire the cache for 404 responses every minute.
Now, we have configured the cache zone, but we still need to tell Nginx when to use the cache.
In locations where we proxy to a backend, we can configure the use of this cache:
  # server context   X-Proxy-Cache
. . .
Using the proxy_cache
directive, we can specify that the backcache
cache zone should be used for this context. Nginx will check here for a valid entry before passing to the backend.
The proxy_cache_bypass
directive is set to the $http_cache_control
variable. This will contain an indicator as to whether the client is explicitly requesting a fresh, non-cached version of the resource. Setting this directive allows Nginx to correctly handle these types of client requests. No further configuration is required.
We also added an extra header called X-Proxy-Cache
. We set this header to the value of the $upstream_cache_status
variable. Basically, this sets a header that allows us to see if the request resulted in a cache hit, a cache miss, or if the cache was explicitly bypassed. This is especially valuable for debugging, but is also useful information for the client.
Notes about Caching Results
Caching can improve the performance of your proxy enormously. However, there are definitely considerations to keep in mind when configuring cache.
If your site has some dynamic elements, you will have to account for this in the backend servers. How you handle this depends on what application or server is handling the backend processing. For private content, you should set the Cache-Control
header to “no-cache”, “no-store”, or “private” depending on the nature of the data:
- no-cache
: Indicates that the response shouldn’t be served again without first checking that the data hasn’t changed on the backend. This can be used if the data is dynamic and important. An ETag hashed metadata header is checked on each request and the previous value can be served if the backend returns the same hash value. - no-store
: Indicates that at no point should the data received ever be cached. This is the safest option for private data, as it means that the data must be retrieved from the server every time. - private
: This indicates that no shared cache space should cache this data. This can be useful for indicating that a user’s browser can cache the data, but the proxy server shouldn’t consider this data valid for subsequent requests. - public
: This indicates that the response is public data that can be cached at any point in the connection.
A related header that can control this behavior is the max-age
header, which indicates the number of seconds that any resource should be cached.
Setting these headers correctly, depending on the sensitivity of the content, will help you take advantage of cache while keeping your private data safe and your dynamic data fresh.
If your backend also uses Nginx, you can set some of this using the expires
directive, which will set the max-age
for Cache-Control
:
Cache-Control Step 8 — Installing and configuring mod_rpaf
In this step you will install the Apache module called mod\_rpaf
, which overwrites the values REMOTE_ADDR
, HTTPS
and HTTP_PORT
based on the values provided by the reverse proxy. Without this module, some PHP applications will require code changes to work seamlessly due to the proxy. This module is listed in the Ubuntu repository as libapache2-mod-rpaf
, however it is deprecated and does not support some configuration directives. So we will install it from source.
Install the packages needed to build the module:
- build-essential apache2-dev
Download the latest stable release from GitHub:
- https://github.com/gnif/mod_rpaf/archive/stable.zip
Extract the downloaded file:
- stable.zip
Change to the new directory containing the files:
- mod_rpaf-stable
Compile and install the module:
-
Then create in the catalog mods-available
file that will load the module rpaf
,
- /etc/apache2/mods-available/rpaf.load
Add the following code to the file to load the module:
LoadModule rpaf_module /usr/lib/apache2/modules/mod_rpaf.so Save the file and exit the editor.
Create another file in this directory named rpaf.conf
, which will contain configuration directives for mod_rpaf
:
- /etc/apache2/mods-available/rpaf.conf
<IfModule mod_rpaf.c> RPAF_Enable On RPAF_Header X-Real-Ip RPAF_ProxyIPs your_server_ip RPAF_SetHostName On RPAF_SetHTTPS On RPAF_SetPort On </IfModule> Here is a brief description of each directive. Additional information can be found in file README
modulo mod_rpaf
.
- RPAF_Header
— The header used for the client’s real IP address. - RPAF_ProxyIPs
— IP address of the proxy server to correct HTTP requests. - RPAF_SetHostName
— updates the vhost name so that it worksпараметры ServerName
andServerAlias
. - RPAF_SetHTTPS
— sets environment variableHTTPS
based on the value contained inX-Forwarded-Proto
. - RPAF_SetPort
— sets environment variableSERVER_PORT
. Useful to use when the Apache server is behind an SSL proxy.
Save rpaf.conf
and activate the module:
- a2enmod rpaf
This creates symbolic links to files rpaf.load
and rpaf.conf
in catalog mods-enabled
. Now let’s test the configuration:
- apachectl
If there are no errors, restart Apache:
- systemctl reload apache2
Open the page browser phpinfo()
at http:// foobar.net and
/info.phphttp:// test.io and check the section PHP Variables
/info.php
. Variable REMOTE_ADDR
will also be used for the public IP address of your local machine.
Now let’s configure TLS/SSL encryption for each site.
Step 7 — Configuring Nginx for Apache Virtual Hosts
Create an additional Nginx virtual host with multiple domain names in directives server_name
. Requests for these domain names will be forwarded through a proxy to Apache.
Create a new Nginx virtual host file to forward requests to Apache:
- /etc/nginx/sites-available/apache
foobar.net www.foobar.net test.io www.test.io Host X-Real IP X-Forwarded-For X-Forwarded-Proto Save the file and activate the new virtual host file by creating a symbolic link:
- /etc/nginx/sites-available/apache /etc/nginx/sites-enabled/apache
Test the configuration and make sure there are no errors:
- nginx
If there are no errors, reload Nginx:
- systemctl reload nginx
Open the URL http:// foobar.net in your browser. Go to PHP Variables
/info.php
and check the displayed values.

We have successfully configured Nginx to redirect requests for certain domains to Apache through a proxy server. Now configure Apache to set the variable REMOTE_ADDR
, as if those requests were handled directly.
Step 5 — Creating Virtual Hosts for Apache
Let’s create Apache virtual host files for domains foobar.net
and test.io
. To do this, we will first create document roots for both sites and place files in these directories so that we can easily test our configuration.
First create document roots:
- /var/www/ foobar.net /var/www/ test.io
Then create a file index
for each site:
- "
Foo Bar
" /var/www/ foobar.net /index.html - "
Test IO
" /var/www/ test.io /index.html
Next, create a file phpinfo()
for each site so we can test if the PHP configuration is correct.
- "" /var/www/ foobar.net /info.php
- "" /var/www/ test.io /info.php
Now create a virtual host file for the domain foobar.net
:
- /etc/apache2/sites-available/foobar.net.conf
Add the following code to the file to define the host:
ServerName foobar.net ServerAlias www. foobar.net DocumentRoot /var/www/ foobar.net <Directory /var/www/ foobar.net > AllowOverride All String AllowOverride All
activates support .htaccess.
These are just basic instructions. A complete guide to setting up Apache virtual hosts can be found in the document Setting Up Apache Virtual Hosts on Ubuntu 16.04
.
Save and close the file. Then create a similar configuration for test.io
. First create a file:
- /etc/apache2/sites-available/test.io.conf
Then add the configuration to the file:
ServerName test.io ServerAlias www. test.io DocumentRoot /var/www/ test.io <Directory /var/www/ test.io > AllowOverride All Save the file and exit the editor.
Now that you have created both Apache virtual hosts, let the sites use the command a2ensite
. This will create a symbolic link to the virtual host file in the directory sites-enabled
:
- a2ensite foobar.net
- a2ensite test.io
Check Apache again for configuration errors:
- apachectl
If there are no errors, a message will appear Syntax OK
. If any other message appears, check the configuration and try again.
When there are no errors left in the configuration, restart Apache to apply the changes:
- systemctl reload apache2
To confirm that the sites are working, open http:// foobar.net in your browser and
:8080http:// test.io and make sure that for each of the sites the file index.html is displayed
:8080
.
You will see the following results:


Also try to access files info.php
files of each site to make sure PHP works. Open addresses http:// foobar.net and
:8080/info.phphttp:// test.io in the browser.
:8080/info.php
For each site, you will see the same list of PHP settings as in step 4.
We hosted two sites on the Apache server on port 8080
. Now let’s set up Nginx.
Configuring Nginx as a reverse proxy for a non-HTTP proxy
To configure Nginx as a reverse proxy for a non-HTTP proxy, you can use the following directives:
-
fastcgi_pass
is a reverse proxy to the FastCGI server. -
uwsgi_pass
— reverse proxy to the uwsgi server. -
scgi_pass
is a reverse proxy to the SCGI server. -
memcached_pass
— reverse proxy to the server Memcached
.
One of the most common examples is using Nginx as a reverse proxy for PHP-FPM
:
Step 9 — Set Up HTTPS Sites with Let’s Encrypt (Optional)
In this step, we will configure TLS/SSL certificates for both domains hosted by Apache. We will receive certificates through Let’s Encrypt
. Nginx supports SSL endpoints and so we can set up SSL without changing the Apache configuration files. Module mod_rpaf
ensures that the Apache environment variables are set to allow applications to run seamlessly behind an SSL reverse proxy.
- /etc/nginx/sites-available/apache
Change the file to look like this, sites foobar.net
and test.io
must be in their own server
blocks:
foobar.net www.foobar.net Host X-Real IP X-Forwarded-For X-Forwarded-Proto test.io www.test.io Host X-Real IP X-Forwarded-For X-Forwarded-Proto We use Certbot
to generate TLS/SSL certificates. The Nginx plugin will change the Nginx configuration and reload it when needed.
First of all, add the official Certbot repository:
- add-apt-repository ppa:certbot/certbot
Press ENTER
in the dialog to confirm adding a new repository. Update the package list to get the new storage package data:
- update
Install Certbot’s Nginx package from apt
:
- python-certbot-nginx
After installation, use the command certbot
to generate certificates for foobar.net
and www.foobar.net
:
- certbot foobar.net www.foobar.net
This command tells Certbot to use the plugin nginx
, and the parameter -d
specifies the names for which the certificate should be valid.
If this is the first run certbot
, you will be prompted for an email address. mail and accept the terms of service. After that certbot
will contact the Let’s Encrypt server and send a request to confirm that you control the domain for which you are requesting a certificate.
Next, Certbot will request the desired HTTPS configuration option:
 Please choose whether or not to redirect HTTP traffic to HTTPS, removing HTTP access.
-------------------------------------------------------------------------------
1: No redirect - Make no further changes to the webserver configuration.
2: Redirect - Make all requests redirect to secure HTTPS access. Choose this for
new sites, or if you're confident your site works on HTTPS. You can undo this
change by editing your web server's configuration.
-------------------------------------------------------------------------------
Select the appropriate number [1-2] then [enter] (press 'c' to cancel):
Select the desired option and press ENTER
. The configuration will be updated and then Nginx will be reloaded to activate the new settings.
Now run the command for the second domain:
- certbot test.io www.test.io
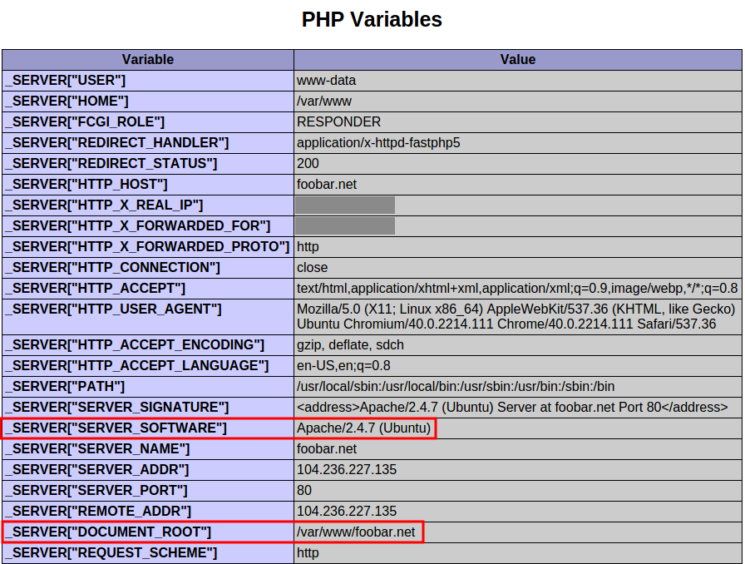
Open one of the Apache domains in a browser using the prefix https://
; open https://foobar.net/info.php
and you will see the following:

Check out the section PHP Variables
. For variable SERVER_PORT
set value 443
and protocol HTTPS
enabled as if accessing Apache directly over HTTPS. By setting variables like this, there is no need to specifically configure PHP applications to work behind a reverse proxy.
Now let’s disable direct access to Apache.
Step 8 — Installing and Configuring mod_rpaf
In this step we will install an Apache module named mod_rpaf
which rewrites the values of REMOTE_ADDR
, HTTPS
and HTTP_PORT
based on the values provided by a reverse proxy. Without this module, some PHP applications would require code changes to work seamlessly from behind a proxy. This module is present in Ubuntu’s repository as libapache2-mod-rpaf
but is outdated and doesn’t support certain configuration directives. Instead, we will install it from source.
Install the packages needed to compile and build the module:
sudo apt-get install unzip build-essential apache2-threaded-dev Download the latest stable release from GitHub.
wget https://github.com/gnif/mod_rpaf/archive/stable.zip Extract it with:
unzip stable.zip Change into the working directory.
cd mod_rpaf-stable Then compile and install the module.
sudo make sudo make install Create a file in the mods-available
directory which loads the rpaf module.
sudo nano /etc/apache2/mods-available/rpaf.load LoadModule rpaf_module /usr/lib/apache2/modules/mod_rpaf.so Create another file in this directory. This will contain the configuration directives.
sudo nano /etc/apache2/mods-available/rpaf.conf <IfModule mod_rpaf.c> RPAF_Enable On RPAF_Header X-Real-Ip RPAF_ProxyIPs 111.111.111.111 RPAF_SetHostName On RPAF_SetHTTPS On RPAF_SetPort On
</IfModule> - RPAF_Header
— The header to use for the client’s real IP address. - RPAF_ProxyIPs
— The proxy IP to adjust HTTP requests for. - RPAF_SetHostName
— Updates the vhost name so ServerName and ServerAlias work. - RPAF_SetHTTPS
— Sets theHTTPS
environment variable based on the value contained inX-Forwarded-Proto
. - RPAF_SetPort
— Sets theSERVER_PORT
environment variable. Useful for when Apache is behind a SSL proxy.
Save rpaf.conf
and enable the module.
sudo a2enmod rpaf This creates symbolic links of the files rpaf.load
and rpaf.conf
in the mods-enabled
directory. Now do a configuration test.
sudo apachectl -t Reload Apache if Syntax OK
is returned.
sudo service apache2 reload Access one of Apache’s websites’ phpinfo()
page on your browser and check the PHP Variables
section. The REMOTE_ADDR
variable will now also be that of your local computer’s public IP address.
Предварительные требования
Для прохождения данного обучающего руководства вам потребуется следующее:
Шаг 1 — Установка Apache и PHP-FPM
Начнем с установки Apache и PHP-FPM.
Помимо Apache и PHP-FPM мы также установим модуль PHP FastCGI Apache, libapache2-mod-fastcgi
, для поддержки веб-приложений FastCGI.
Вначале обновите свой список пакетов и убедитесь, что у вас установлены последние версии пакетов.
Затем выполните установку пакетов Apache и PHP-FPM:
- apache2 php-fpm
Модуль FastCGI Apache недоступен в хранилище Ubuntu, и поэтому вам следует загрузить его с kernel.org
и установить с помощью командыdpkg
.
- https://mirrors.edge.kernel.org/ubuntu/pool/multiverse/liba/libapache-mod-fastcgi/libapache2-mod-fastcgi_2.4.7~0910052141-1.2_amd64.deb
- dpkg libapache2-mod-fastcgi_2.4.7~0910052141-1.2_amd64.deb
Далее изменим конфигурацию Apache по умолчанию для использования PHP-FPM.
Step 10 — Blocking Direct Access to Apache (Optional)
sudo iptables -I INPUT -p tcp --dport 8080 ! -s 111.111.111.111 -j REJECT --reject-with tcp-resetThe browser should display an “Unable to connect” or “Webpage is not available” error message. With the IPtables
tcp-reset
option in place, an outsider would see no difference between port8080
and a port that doesn’t have any service on it.Note:
IPtables rules do not survive a system reboot by default. There are multiple ways to preserve IPtables rules, but the easiest is to useiptables-persistent
in Ubuntu’s repository.Step 6 — Installing and Configuring Nginx
sudo apt-get install nginxThen remove the default virtual host’s symlink.
sudo rm /etc/nginx/sites-enabled/defaultNow we’ll create virtual hosts for Nginx. First make document root
directories for both the websites:sudo mkdir -v /usr/share/nginx/{Please choose whether or not to redirect HTTP traffic to HTTPS, removing HTTP access. ------------------------------------------------------------------------------- 1: No redirect - Make no further changes to the webserver configuration. 2: Redirect - Make all requests redirect to secure HTTPS access. Choose this for new sites, or if you're confident your site works on HTTPS. You can undo this change by editing your web server's configuration. ------------------------------------------------------------------------------- Select the appropriate number [1-2] then [enter] (press 'c' to cancel):example.com, sample.org }
As we did with Apache’s virtual hosts, we’ll again create
index
and
files for testing after setup is complete.echo "Example.com
" | sudo tee /usr/share/nginx/ example.com /index.html
echo "" | sudo tee /usr/share/nginx/ example.com/info.php echo "" | sudo tee /usr/share/nginx/sudo openssl req -x509 -sha256 -newkey rsa:2048 -keyout /etc/nginx/ssl/test.io-key.pem -out /etc/nginx/ssl/test.io-cert.pem -days 3650 -nodessample.org /info.phpNow create a virtual host file for the domain.
- certbot test.io www.test.io
sudo nano /etc/nginx/sites-available/ENTERexample.com
server { listen 80 default_server; root /usr/share/nginx/example.com
; index index.php index.html index.htm; server_name example.com www.example.com ; location / { try_files $uri $uri/ /index.php; } location ~ \.php$ { try_files $uri =404; fastcgi_pass unix:/var/run/php5-fpm.sock; fastcgi_index index.php; include fastcgi_params; } }Save and close the file. Now create a virtual host file for Nginx’s second domain,
.
sudo nano /etc/nginx/sites-available/ sample.orgserver { root /usr/share/nginx/ sample.org ; index index.php index.html index.htm; server_name sample.org www.sample.org ; location / { try_files $uri $uri/ /index.php; } location ~ \.php$ { try_files $uri =404; fastcgi_pass unix:/var/run/php5-fpm.sock; fastcgi_index index.php; include fastcgi_params; } }Save and close the file. Then enable both the sites by creating symbolic links to the
sites-enabled
directory.sudo ln -s /etc/nginx/sites-available/ example.com /etc/nginx/sites-enabled/ example.comsudo ln -s /etc/nginx/sites-available/ sample.org /etc/nginx/sites-enabled/ sample.orgDo an Nginx configuration test:
sudo service nginx configtestThen reload Nginx if OK
is displayed.sudo service nginx reloadNow acccess the
phpinfo()
file of your Nginx virtual hosts in a web browser byhttp:// example.comand
/info.phphttp:// sample.org. Look under the PHP Variables
/info.php
section again.
At this point, we have installed Nginx and created two virtual hosts. Next we will set up an additional virtual host to proxy requests meant for domains hosted on Apache.
Использование Nginx в качестве обратного прокси
Чтобы настроить Nginx в качестве обратного прокси для HTTP-сервера, откройте файл конфигурации блока сервера домена и укажите в нем расположение и прокси-сервер:
Приведенная выше конфигурация указывает Nginx передавать все запросы в
/app
прокси-серверу по адресуhttp://127.0.0.1:8080
.В дистрибутивах на основе Ubuntu и Debian файлы серверных блоков хранятся в каталоге
/etc/nginx/sites-available
, а в CentOS — в/etc/nginx/conf.d
.Чтобы лучше проиллюстрировать, как
proxy_pass
директивыlocation
иproxy_pass
, рассмотрим следующий пример:Если посетитель обращается к
http://example.com/blog/my-post
, Nginx передаст этот запрос по прокси наhttp://node1.com:8000/wordpress/my-post
.Когда адрес проксируемого сервера содержит URI, (
/wordpress/
), URI запроса, который передается на проксируемый сервер, заменяется URI, указанным в директиве. Если адрес прокси-сервера указан без URI, полный URI запроса передается на прокси-сервер.Step 1 — Installing Apache and PHP5-FPM
In addition to Apache and PHP-FPM, we must also install the PHP FastCGI Apache module. This is
libapache2-mod-fastcgi
, available in Ubuntu’s multiverse
repository, which must first be enabled in thesources.list
file.sudo nano /etc/apt/sources.list# deb http://mirrors.digitalocean.com/ubuntu trusty multiverse . . . # deb http://mirrors.digitalocean.com/ubuntu trusty-updates multiverseThat should leave you with what’s shown below.
deb http://mirrors.digitalocean.com/ubuntu trusty multiverse . . . deb http://mirrors.digitalocean.com/ubuntu trusty-updates multiverseSave the file and update the apt repository.
sudo apt-get updateThen install the necessary packages.
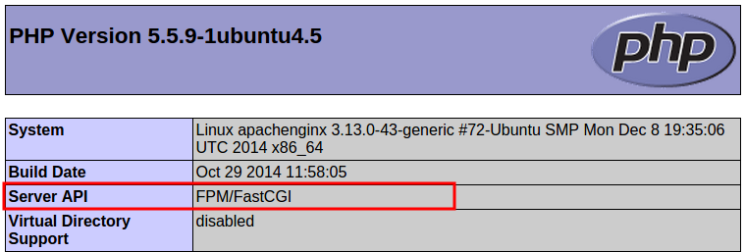
sudo apt-get install apache2 libapache2-mod-fastcgi php5-fpmШаг 4 — Проверка функционала PHP
Чтобы убедиться, что PHP работает, мы создадим файл
phpinfo()
и получим к нему доступ к через браузер.Создайте файл
/var/www/html/info.php
, содержащий вызов функцииphpinfo
:
- "<?php phpinfo(); ?>" /var/www/html/info.php
Чтобы просмотреть файл в браузере, откройте адрес
http:// your_server_ip. На странице появится перечень параметров конфигурации, используемых PHP. Результат будет выглядеть примерно так:
:8080/info.php
Убедитесь, что в Server API
вверху страницы указано значение FPM/FastCGI
. Раздел «Переменные PHP»
в нижней трети страницы покажет, что параметр SERVER_SOFTWARE
имеет значение Apache на Ubuntu. Это подтверждает, что модульmod_fastcgi
активен, и что Apache использует PHP-FPM для обработки файлов PHP.Шаг 11 — Обслуживание статических файлов с помощью Nginx (необязательно)
Когда Nginx перенаправляет запросы доменов Apache через прокси-сервер, каждый запрос файла этого домена отправляется в Apache. Nginx обслуживает статические файлы, такие как изображения, JavaScript и таблицы стилей, быстрее Apache. Поэтому мы настроим файл виртуального хоста Nginx
apache
для прямого обслуживания статических файлов и перенаправления запросов PHP в Apache.Open the file in your editor
/etc/nginx/sites-available/apache
:/etc/nginx/sites-available/apache You will need to add two additional blocks
location
to each server block, and modify existing sectionslocation
. Additionally, you will need to tell Nginx where to find the static files for each site.If you choose not to use SSL and TLS certificates, change your file to look like this:
test.io www.test.io index.php index.htm index.html / /index.php ~ \.php$ Host X-Real-IPX-Forwarded-For
- certbot test.io www.test.io
X-Forwarded-Proto
~ /\.ht
foobar.net www.foobar.net
index.php index.htm index.html
/ /index.php
~ \.php$
Host
X-Real IP
X-Forwarded-For
X-Forwarded-Proto
~ /\.ht
If you also want HTTPS to be available, use the following configuration:
test.io www.test.io index.php index.htm index.html / /index.php ~ \.php$ Host X-Real IP X-Forwarded-For X-Forwarded-Proto ~ /\.ht ssl foobar.net www.foobar.net index.php index.htm index.html / /index.php ~ \.php$ Host X-Real IP X-Forwarded-For X-Forwarded-Proto ~ /\.ht sslDirective
try_files
tells Nginx to look for files at the document root and output them directly. If the file extension is.php
, the request is redirected to Apache. Even if the file is not in the document root, the request is forwarded to Apache so that application features (such as permalinks) work without problems.Warning.
Directivelocation ~ /\.ht
very important because it prevents Nginx from displaying the contents of Apache configuration files with important data, such as.htaccess
and.htpasswd
.Save the file and test the configuration:
nginxIf the test succeeds, reload Nginx:
- nginx reload
To make sure everything works, you can view the Apache log files in the directory
/var/log/apache2
and see requestsGET
for filesinfo.php
sitestest.io
andfoobar.net
. Use commandtail
to view the last few lines of a file and parameter-f
to view file changes:
- /var/log/apache2/other_vhosts_access.log
Now open in browser
http://test.io/info.php
and look at the log output results. You will see Apache response:test.io:80 your_server_ip - - [01/Jul/2016:18:18:34 -0400] "GET /info.php HTTP/1.0" 200 20414 "-" "Mozilla/5.0 (Macintosh; Intel Mac OS X 10_10_5) AppleWebKit/537.36 (KHTML, like Gecko) Chrome/47.0.2526.111 Safari/537.36"Then open the pages
index.html
each site and you won’t see any Apache log entries. They are served by Nginx.When finished examining the log file, press
CTRL+C,
to stop tracking.With this configuration, Apache will not be able to restrict access to static files. Static file access control must be configured in the file
apache
Nginx virtual host, however, this is beyond the scope of this tutorial.Preparation
We assume you have Nginx installed on your server Ubuntu
, CentOS
or Debian
.Step 2 — Configuring Apache and PHP5-FPM
In this step we will change Apache’s port number to
8080
and configure it to work with PHP5-FPM using themod_fastcgi
module. Edit the Apache configuration file and change the port number of Apache.sudo nano /etc/apache2/ports.confListen 80Change it to:
Listen 8080Save and exit
.
Note:
Web servers are generally set to listen on
when configuring a reverse proxy but doing so would set the value of PHP’s environment variable SERVER_ADDR
to the loopback IP address instead of the server’s public IP. Our aim is to set up Apache in such a way that its websites do not see a reverse proxy in front of it. So, we will configure it to listen on8080
on all IP addresses.Next we’ll edit the default virtual host file of Apache. The
<VirtualHost>
directive in this file is set to serve sites only on port80
.sudo nano /etc/apache2/sites-available/000-default.confThe first line should be:
<VirtualHost *:80>Change it to:
<VirtualHost *: 8080 >Save the file and reload Apache.
sudo service apache2 reloadVerify that Apache is now listening on
8080
.sudo netstat -tlpnThe output should look like below, with apache2
listening on :::8080
.Active Internet connections (only servers) Proto Recv-Q Send-Q Local Address Foreign Address State PID/Program name tcp 0 0 0.0.0.0:22 0.0.0.0:* LISTEN 1086/sshdtcp6 0 0 :::8080 :::* LISTEN 4678/apache2tcp6 0 0 :::22 :::* LISTEN 1086/sshdШаг 2 — Настройка Apache и PHP-FPM
На этом шаге мы изменим номер порта Apache на
8080
и настроим его для работы с PHP-FPM с использованием модуляmod_fastcgi
. Переименуйте файл конфигурации Apacheports.conf
:
- /etc/apache2/ports.conf /etc/apache2/ports.conf.default
Создайте новый файл
ports.conf
и установите в нем порт8080
:
- /etc/apache2/ports.conf
Далее мы создадим файл виртуального хоста для Apache. Директива
<VirtualHost>
этого файла будет установлена для обслуживания только сайтов на порту8080
.Отключите виртуальный хост по умолчанию:
- a2dissite 000-default
Затем создайте новый файл виртуального хоста, используя существующий сайт по умолчанию:
- /etc/apache2/sites-available/000-default.conf /etc/apache2/sites-available/001-default.conf
Откройте новый файл конфигурации:
- /etc/apache2/sites-available/001-default.conf
Измените порт прослушивания на
8080:<VirtualHost *: 8080 > ServerAdmin webmaster@localhost DocumentRoot /var/www/html ErrorLog ${APACHE_LOG_DIR}/error.log CustomLog ${APACHE_LOG_DIR}/access.log combined </VirtualHost>Сохраните файл и активируйте новый файл конфигурации:
- a2ensite 001-default
Затем перезагрузите Apache:
- systemctl reload apache2
Убедитесь, что Apache прослушивает порт
8080
:
Результат должен выглядеть как в следующем примере, где
apache2
прослушивает порт8080
:Active Internet connections (only servers) Proto Recv-Q Send-Q Local Address Foreign Address State PID/Program name tcp 0 0 0.0.0.0:22 0.0.0.0:* LISTEN 1086/sshd tcp6 0 0 :::8080 :::* LISTEN 4678/apache2 tcp6 0 0 :::22 :::* LISTEN 1086/sshdУбедившись, что Apache прослушивает правильный порт, вы можете настроить поддержку PHP и FastCGI.
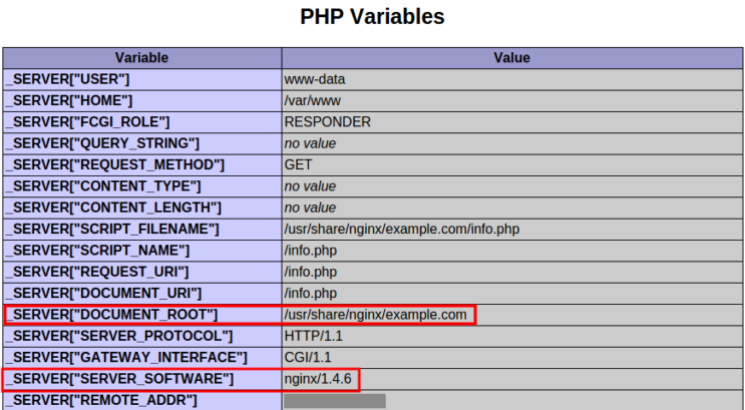
Step 4 — Verifying PHP Functionality
Check if PHP works by creating a
phpinfo()
file and accessing it from your web browser.echo "<?php phpinfo(); ?>" | sudo tee /var/www/html/info.phpTo see the file in a browser, go to
http:// 111.111.111.111but using your Droplet’s IP address. This will give you a list of configuration specifications PHP is using.
:8080/info.php
At the top of the page, check that Server API
says FPM/FastCGI
. About two-thirds of the way down the page, the PHP Variables
section will tell you the SERVER_SOFTWARE
is Apache on Ubuntu. These confirm thatmod_fastcgi
is active and Apache is using PHP5-FPM to process PHP files.Шаг 10 — Блокировка прямого доступа к Apache (опционально)
- iptables INPUT tcp your_server_ip REJECT --reject-with tcp-reset
Браузер должен вывести сообщение об ошибке Unable to connect (Не удается подключиться) или Webpage is not available (Страница недоступна). Если используется опция IPtables
tcp-reset
, сторонний наблюдатель не увидит разницы между портом8080
и портом, где отсутствует какое-либо обслуживание.Теперь настроим Nginx для обслуживания статических файлов для сайтов Apache.
Step 11 — Serving Static Files Using Nginx (Optional)
When Nginx proxies requests for Apache’s domains, it sends every file request to domain to Apache. Nginx is faster than Apache in serving static files like images, JavaScript and style sheets. So in this section we will configure Nginx’s
apache
virtual host file to directly serve static files and just send PHP requests to Apache.Open the
apache
virtual host file.sudo nano /etc/nginx/sites-available/apacheserver { listen 80; server_name test.io www.test.io; root /var/www/test.io; index index.php index.htm index.html;location / {try_files $uri $uri/ /index.php;} location ~ \.php$ { proxy_pass http://111.111.111.111:8080; proxy_set_header Host $host; proxy_set_header X-Real-IP $remote_addr; proxy_set_header X-Forwarded-For $proxy_add_x_forwarded_for; proxy_set_header X-Forwarded-Proto $scheme; }location ~ /\. {deny all;}} server { listen 80; server_name foobar.net www.foobar.net; root /var/www/foobar.net; index index.php index.htm index.html;location / {try_files $uri $uri/ /index.php;} location ~ \.php$ { proxy_pass http://111.111.111.111:8080; proxy_set_header Host $host; proxy_set_header X-Real-IP $remote_addr; proxy_set_header X-Forwarded-For $proxy_add_x_forwarded_for; proxy_set_header X-Forwarded-Proto $scheme; }location ~ /\. {deny all;}}The
try_files
directive makes Nginx to look for files in the document root
and directly serve them. If the file has a.php
extension, the request is passed to Apache. Even if the file is not found in the document root
, the request is passed on to Apache so that application features like permalinks work without problems.Safe the file and perform a configuration test.
sudo service nginx configtestReload Nginx if the test succeeds.
sudo service nginx reloadTo verify this is working, you can examine Apache’s log files in
/var/log/apache2
and see the GET requests for theindex.php
files oftest.io
andfoobar.net
. The only caveat of this setup is that Apache will not be able to restrict access to static files. Access control for static files would need to be configured in Nginx’sapache
virtual host file.Warning:
Thelocation ~ /\.
directive is very important to include. This prevents Nginx from printing the contents of files like.htaccess
and.htpasswd
.Step 7 — Configuring Nginx for Apache’s Virtual Hosts
In this section we will create an additional Nginx virtual host with multiple domain names in the
server_name
directives. Requests for these domain names will be proxied to Apache.Create a new Nginx virtual host file:
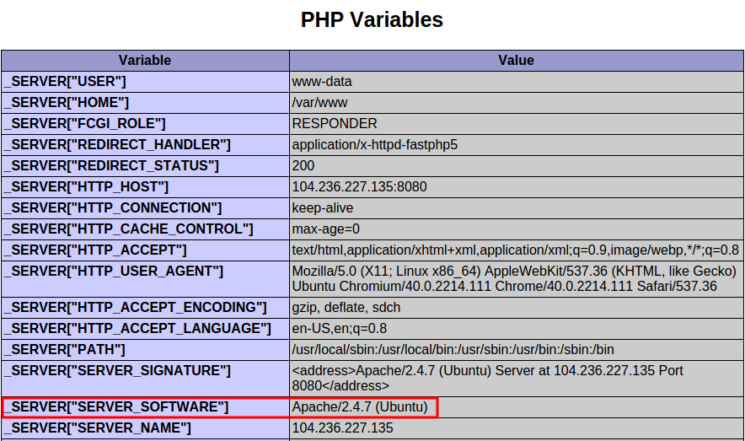
sudo nano /etc/nginx/sites-available/apacheserver { listen 80; server_name foobar.net www.foobar.net test.io www.test.io ; location / { proxy_pass http:// 111.111.111.111 :8080; proxy_set_header Host $host; proxy_set_header X-Real-IP $remote_addr; proxy_set_header X-Forwarded-For $proxy_add_x_forwarded_for; proxy_set_header X-Forwarded-Proto $scheme; } }Save the file and enable this new virtual host by creating a symbolic link.
sudo ln -s /etc/nginx/sites-available/apache /etc/nginx/sites-enabled/apacheDo a configuration test:
sudo service nginx configtestReload Nginx if OK
is displayed.sudo service nginx reloadOpen the browser and access the
http://foobar.net/info.php
on one of Apache’s domain names. Scroll down to the PHP Variables
section and check the values displayed.
The variables SERVER_SOFTWARE
and DOCUMENT_ROOT
should confirm that this request was handled by Apache. The variables HTTP_X_REAL_IP
and HTTP_X_FORWARDED_FOR
were added by Nginx and should show the public IP address of the computer you’re accessing the URL from in your browser.We have successfully setup Nginx to proxy requests for specific domains to Apache. The next step is to configure Apache to set variables
REMOTE_ADDR
as if it were handling these requests directly.Передача заголовков запроса
Когда Nginx проксирует запрос, он автоматически определяет два поля заголовка в проксируемых запросах от клиента,
Host
иConnection
, и удаляет пустые заголовки.Host
установлен на переменную$proxy_host
, аConnection
установлено на закрытие.Чтобы настроить или установить заголовки для прокси-соединений, используйте директиву
proxy_set_header
, за которой следует значение заголовка. Вы можете найти список всех доступных заголовков запросов и их разрешенные значения здесь
. Если вы хотите предотвратить передачу заголовка на прокси-сервер, установите для него пустую строку""
.В следующем примере мы меняем значение поля заголовка
Host
на$host
и удаляем поле заголовкаAccept-Encoding
, устанавливая его значение в пустую строку.Каждый раз, когда вы изменяете файл конфигурации, вам необходимо перезапустить службу Nginx,
чтобы изменения вступили в силу.Шаг 6 — Установка и настройка Nginx
На этом шаге мы выполним установку Nginx и настроим домены
example.com
иsample.org
как виртуальные хосты Nginx. Полное руководство по настройке виртуальных хостов в Nginx можно найти в документе «Настройка блоков сервера Nginx (виртуальных хостов) в Ubuntu 18.04»
.Установите Nginx с помощью диспетчера пакетов:
- nginx
Затем удалите соединение symlink по умолчанию виртуального хоста, поскольку мы больше не будем его использовать:
- /etc/nginx/sites-enabled/default
Позднее мы создадим собственный сайт по умолчанию (
example.com
).Теперь мы создадим виртуальные хосты для Nginx, используя ту же процедуру, что использовалась для Apache. First you need to create document roots for both sites:
- /usr/share/nginx/ example.com /usr/share/nginx/ sample.org
As with Apache virtual hosts, after completing the configuration, you should create files
index
andphpinfo()
for testing:
- "
Example.com
" /usr/share/nginx/ example.com /index.html- "
Sample.org
" /usr/share/nginx/ sample.org /index.html- "" /usr/share/nginx/ example.com /info.php
- "" /usr/share/nginx/ sample.org /info.php
Now create a virtual host file for the domain
example.com
:
- /etc/nginx/sites-available/ example.com
default_server index.php index.html index.htm example.com www.example.com / /index.php ~ \.php$Save and close the file. Create a virtual host file for the second Nginx domain,
sample.org
:
- etc/nginx/sites-available/ sample.org
Add the following to the file:
index.php index.html index.htm sample.org www.sample.org / /index.php ~ \.php$Save and close the file.
Then activate both sites by creating symbolic links to the directory
sites-enabled
:
- /etc/nginx/sites-available/ example.com /etc/nginx/sites-enabled/ example.com
- /etc/nginx/sites-available/ sample.org /etc/nginx/sites-enabled/ sample.org
Test your Nginx configuration and make sure there are no configuration issues:
- nginx
If errors are found, reload Nginx:
- systemctl reload nginx
Access the file
phpinfo()
Nginx virtual hosts via browser at addresses http://example.com/info.php
and http://sample.org/info.php
. Review the PHP Variables sections again.
So far we have installed Nginx and created two virtual hosts. Next, we’ll configure Nginx to proxy requests destined for Apache domains.