
- Step 1 — Creating Two User Accounts
- How to Configure TigerVNC server?
- Method 1
- Method 2
- Решения для почтовых серверов
- Step 5 – Running TigerVNC as a Service
- Step 4 – Configure TigerVNC
- Troubleshooting
- Настраиваем SMTP сервер на CentOS 7
- Assign vnc password to the user
- Configure firewall
- Step 7 — Connecting to Remote Desktops with a VNC Client
- Troubleshooting — VNC Service Crashes
- General Troubleshooting
- Step 2 — Configure Postfix
- Настройка почтового агента
- Using sSMTP with PHP
- Step 4 — Open Firewall Port
- Configuring Desktop Environment
- Установка и настройка Postfix в CentOS 7
- TLS-шифрование отправляемых писем в Postfix
- Useful links
- Configuration
- SSL (TCP port 465)
- NON-SSL (TCP port 25)
- What we will do
- Step 4 — Open Firewall Port
- Setup
- RedHat, CentOS7, Fedora
- Step 8 — Securing VNC Sessions through SSH Tunneling
- Conclusion
- Check Postfix version
- Step 3 — Installing TigerVNC Server
- Links
- Test run
- Send a file
- Common Errors and Exceptions
- #Error 1:
- #Error 2: Sendmail Error 550 5.1.1 “User Unknown”
- Postfix — настройка отправки email от пользователей сервера
- Step 1 — Install Postfix
- Дополнительные настройки для работы почтового сервера
- Настройка Hostname сервера
- Настройка PTR (Reverse DNS)
- Настройка DNS доменного имени почтового сервера
- Проверка влияния настроек PTR и DNS на отправляемые e-mail
- Step 5 — Configuring Your Firewall
- Конфигурирование Postfix
- Понимание основных параметров
- Prerequisites
- Terminating or stopping a VNC Session
- Step 1 – Update CentOS and add a Linux User
- Ubuntu, Debian
Step 1 — Creating Two User Accounts
- joevnc
- janevnc
sudo useradd -c "User Joe Configured for VNC Access" joevncThen run the passwd command to change joevnc’s password:
sudo passwd joevncThe output will ask us for new password. Once supplied, the account will be ready for login:
Changing password for user joevnc.
New password:
Retype new password:
passwd: all authentication tokens updated successfully.
Next, create an account for janevnc:
sudo useradd -c "User Jane Configured for VNC Access" janevncSet the password for janevnc:
sudo passwd janevncHow to Configure TigerVNC server?
To start with the steps to install and configure vnc server on CentOS 7, we would need a configuration file. By default we will get a sample configuration file from tigervnc-server rpm as shown below
# rpm -ql tigervnc-server-1.8.0-5.el7.x86_64
/etc/sysconfig/vncservers
/usr/bin/vncserver
/usr/bin/x0vncserver
/usr/lib/systemd/system/xvnc.socket
/usr/lib/systemd/system/xvnc@.service
/usr/share/man/man1/vncserver.1.gz
/usr/share/man/man1/x0vncserver.1.gz
# cp /usr/lib/systemd/system/vncserver@.service /etc/systemd/system/vncserver@:.service
# cp /usr/lib/systemd/system/vncserver@.service /etc/systemd/system/vncserver@:.service
The steps to configure vnc server has changed in RHEL 7.8 and higher releases. If you are using CentOS then the minor version may vary so look out for the sample configuration file in the below methods and choose the one matching your sample configuration file.
Steps to repair filesystem in rescue mode in RHEL/CentOS 7/8 Linux
Method 1
# vim /etc/systemd/system/
[Unit]
Description=Remote desktop service (VNC)
After=syslog.target network.target
[Service]
Type=forking
# Clean any existing files in /tmp/.X11-unix environment
ExecStartPre=/bin/sh -c '/usr/bin/vncserver -kill %i > /dev/null 2>&1 || :'
ExecStart=/usr/sbin/runuser -l -c "/usr/bin/vncserver %i"
PIDFile=
ExecStop=/bin/sh -c '/usr/bin/vncserver -kill %i > /dev/null 2>&1 || :'
[Install]
WantedBy=multi-user.target
# systemctl daemon-reload
Method 2
[Unit]
Description=Remote desktop service (VNC)
After=syslog.target network.target
[Service]
Type=simple
# Clean any existing files in /tmp/.X11-unix environment
ExecStartPre=/bin/sh -c '/usr/bin/vncserver -kill %i > /dev/null 2>&1 || :'
ExecStart=/usr/bin/vncserver_wrapper %i
ExecStop=/bin/sh -c '/usr/bin/vncserver -kill %i > /dev/null 2>&1 || :'
[Install]
WantedBy=multi-user.target
Next to activate the changes reload the systemd daemon.
# systemctl daemon-reload
Решения для почтовых серверов
В Linux доступны различные решения для почтовых серверов. В прошлом почтовый сервис Sendmail был самым распространенным почтовым сервером Linux. Он был сложным, и использовал синтаксис, который было трудно понять. Хоть это было и сложно, Sendmail стал стандартом для обработки почты в Linux. Postfix был разработан для совместимости с Sendmail, но проще в настройке.
Postfix используется в качестве почтового сервиса. Postfix состоит из различных процессов, каждый из которых решает конкретные задачи. Процессы управляются главной службой Postfix, которая читает файл конфигурации /etc/postfix/master.cf, чтобы узнать, какие службы используются для конкретных задач. Такой подход делает Postfix модульным и подключаемым; при необходимости легко заменить один конкретный сервис другим сервисом.
Некоторые примеры процессов Postfix перечислены в таблице 1, а в листинге 1 приведено частичное содержимое файла конфигурации /etc/postfix/master.cf.
Листинг 1.Частичное перечисление файла конфигурации /etc/postfix/master.cf
Step 5 – Running TigerVNC as a Service
In this tutorial, we will run the VNC server as a service. So we need to create new service file for it.
[Unit] Description=Remote desktop service (VNC) After=syslog.target network.target [Service] Type=forking User=edward PIDFile=/home/edward/.vnc/%H:%i.pid ExecStartPre=-/usr/bin/vncserver -kill :%i > /dev/null 2>&1 ExecStart=/usr/bin/vncserver -depth 24 -geometry 1280x800 :%i ExecStop=/usr/bin/vncserver -kill :%i [Install] WantedBy=multi-user.target
Save the file and exit vim.
Now reload systemd and start the VNC server service.
If you don’t get any error, enable the service to launch at system boot and check the service status using systemctl.

Or you can check using the vncserver command as shown below.
su – edward
vncserver -list

The VNC Server installation and configuration has been completed.
Step 4 – Configure TigerVNC
In this step, we will configure the VNC server for using the XFCE desktop. We will edit the VNC configuration file ‘xstartup’ under the ‘.vnc’ directory.
Before editing the vnc configuration, kill the first vnc session using the command below.
vncserver -kill :1
Now backup the default configuration and create a new one using vim.
mv ~/.vnc/xstartup ~/.vnc/xstartup.bekup
vim ~/.vnc/xstartup
Paste the configuration below.
#!/bin/bash xrdb $HOME/.Xresources startxfce4 &
Save and exit.
cp /etc/X11/Xresources ~/.Xresources
And make the ‘xstartup’ script executable by changing its access permissions. Then run the ‘vncserver’ command again.
chmod +x ~/.vnc/xstartup
vncserver
The new vnc session is running with our default desktop XFCE.

Check it using the command below.

Troubleshooting
And see what is going wrong. For example, if you find something like this:
Right after that, restart postfix.
Настраиваем SMTP сервер на CentOS 7
Обработка почты является важной задачей, которая должна выполняться на многих серверах Linux, независимо от того, какую конкретную услугу они предоставляют. Во многих случаях этим службам часто нужно отправлять почту. Вот почему вам необходимо настроить сервер для пересылки почты на центральный почтовый сервер. В этой статье вы узнаете, как это сделать.
Assign vnc password to the user
# vncpasswd
Password:
Verify:
Would you like to enter a view-only password (y/n)? n
# su - deepak
$ vncpasswd
Password:
Verify:
Would you like to enter a view-only password (y/n)? n
The stored password is not encrypted; anyone who has access to the password file can find the plain-text password.
How to change tmpfs partition size in Linux ( RHEL / CentOS 7 )
Configure firewall
Run the firewall configuration tool and add TCP port 5950 to allow incoming connections to the system.
# firewall-cmd --permanent --zone=public --add-port=/tcp
success
# firewall-cmd --reload
success
Step 7 — Connecting to Remote Desktops with a VNC Client
They will each need a VNC client for Windows to log into the remote desktop. This client is just like a terminal client like PuTTY, except it shows graphical output. There are various VNC client available, but the one we will use is RealVNC, available here. VNC Viewer for Mac OS X is available for download on the same page, and the Mac version is fairly similar to the Windows one.
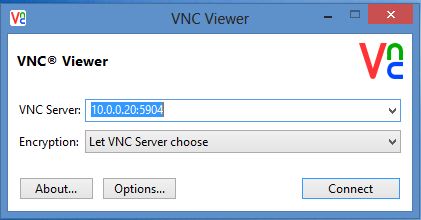
When VNC Viewer is started, it shows a dialogue box like this:

In the VNC Server field, add the IP address of your CentOS 7 server. Specify the port number 5904 after the server’s IP, separate by a colon (:). We used 5904 because that’s the VNC service port for joevnc.
We have also decided to let VNC Viewer choose the encryption method. This option will only encrypt the password sent across the network. Any subsequent communication with the server will be unencrypted. (We’ll set up a secure SSH tunnel in the final step.)
In fact, a warning message shows just that:
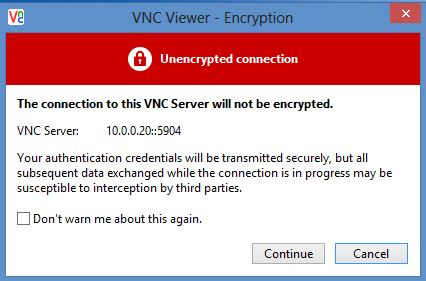
Accept the warning for now. A password prompt is displayed:

Enter joevnc’s VNC password that you set earlier.
A new window opens showing the GNOME desktop for our remote CentOS server:

Accept the default welcome message.
Now joevnc can start a graphical tool like the GNOME calculator:


You can leave this desktop connection open.
Now janevnc can also start another VNC session with the CentOS server. The IP address is the same, and the port is 5905:

Close the VNC Viewer windows for joevnc and janevnc. Close their terminal sessions, too. From the main terminal window, check to see if the VNC services are still running:
sudo systemctl status vncserver@:4.serviceThe output shows that the remote desktop is still running:
vncserver@:4.service - Remote desktop service (VNC) Loaded: loaded (/etc/systemd/system/vncserver@:4.service; enabled) Active: active (running) since Sat 2014-11-01 12:06:49 EST; 58min ago Process: 2014 ExecStart=/sbin/runuser -l joevnc -c /usr/bin/vncserver %i -geometry 1280x1024 (code=exited, status=0/SUCCESS)
. . .
Check the second service:
sudo systemctl status vncserver@:5.serviceThis one is running, too:
vncserver@:5.service - Remote desktop service (VNC) Loaded: loaded (/etc/systemd/system/vncserver@:5.service; enabled) Active: active (running) since Sat 2014-11-01 12:42:56 EST; 22min ago Process: 3748 ExecStart=/sbin/runuser -l janevnc -c /usr/bin/vncserver %i -geometry 1280x1024 (code=exited, status=0/SUCCESS)
. . .
If you wanted to log back into joevnc’s desktop at this point, you’d see the same calculator app open.
Troubleshooting — VNC Service Crashes
As you test and play around with VNC, you may sometimes find the service has crashed and is unrecoverable. When you try to check the status:
sudo systemctl status vncserver@:4.serviceThis long error message may come up:
vncserver@:4.service - Remote desktop service (VNC) Loaded: loaded (/etc/systemd/system/vncserver@:4.service; enabled) Active: failed (Result: exit-code) since Fri 2014-11-07 00:02:38 EST; 2min 20s ago Process: 2221 ExecStart=/sbin/runuser -l joevnc -c /usr/bin/vncserver %i -geometry 1280x1024 (code=exited, status=2) Process: 1257 ExecStartPre=/bin/sh -c /usr/bin/vncserver -kill %i > /dev/null 2>&1 || : (code=exited, status=0/SUCCESS)Trying to start the service doesn’t work:
sudo systemctl start vncserver@:4.serviceJob for vncserver@:4.service failed. See 'systemctl status vncserver@:4.service' and 'journalctl -xn' for details.Usually the reason is simple enough. Check /var/log/messages:
sudo tail /var/log/messagesThe related error will look like this:
Nov 7 00:08:36 localhost runuser: Warning: localhost.localdomain:4 is taken because of /tmp/.X11-unix/X4
Nov 7 00:08:36 localhost runuser: Remove this file if there is no X server localhost.localdomain:4
Nov 7 00:08:36 localhost runuser: A VNC server is already running as :4
Nov 7 00:08:36 localhost systemd: vncserver@:4.service: control process exited, code=exited status=2
Nov 7 00:08:36 localhost systemd: Failed to start Remote desktop service (VNC).
Nov 7 00:08:36 localhost systemd: Unit vncserver@:4.service entered failed state.
Nov 7 00:08:36 localhost systemd: Failed to mark scope session-c3.scope as abandoned : Stale file handle
The remedy is to delete the file under /tmp folder:
sudo rm -i /tmp/.X11-unix/X4rm: remove socket ‘/tmp/.X11-unix/X4’? yThen start the VNC service:
sudo systemctl start vncserver@:4.serviceGeneral Troubleshooting
Although relatively rare, you may encounter other errors when working with VNC. For example, your remote desktop screen can go blank or hang, the session might crash with a cryptic error message, VNC Viewer may not connect properly or transmit commands to the GUI to launch applications, etc.
We recommend checking the /var/log/messages file to get a better understanding. At times you may need to reboot your server, or in extreme cases recreate the VNC service.
System resources can also be a culprit; you may have to add extra RAM to your Droplet, etc.
Step 2 — Configure Postfix
After executing above command edit the postfix configuration file and make sure all changes are done properly.
Настройка почтового агента
Пройдите авторизацию в операционной системе с помощью клиента SSH. В статье предполагается, что вы используете доступ к командам привилегированного режима с помощью sudo, если же вы работаете пол пользователем root, просто опускайте sudo при вводе команды.
В терминале введите команды для установки дополнительных пакетов для удобства редактирования файлов:
Для установки почтового сервера postfix введите команду:
После установки проверьте состояние сервиса postfix, для чего введите команду:
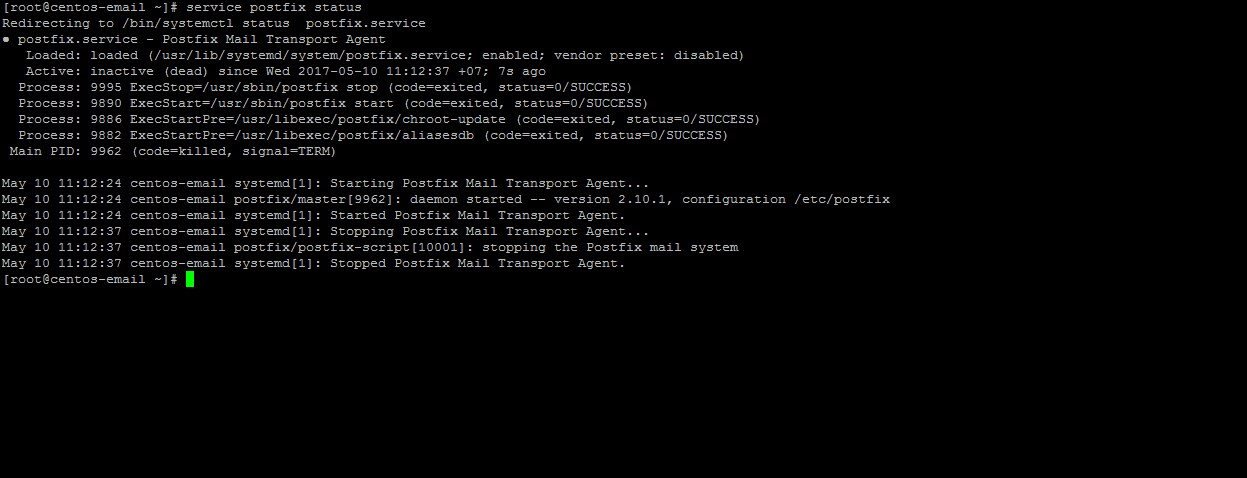
По умолчанию почтовый сервер postfix выключен, поэтому вы должны его запустить. Для чего используется команда:
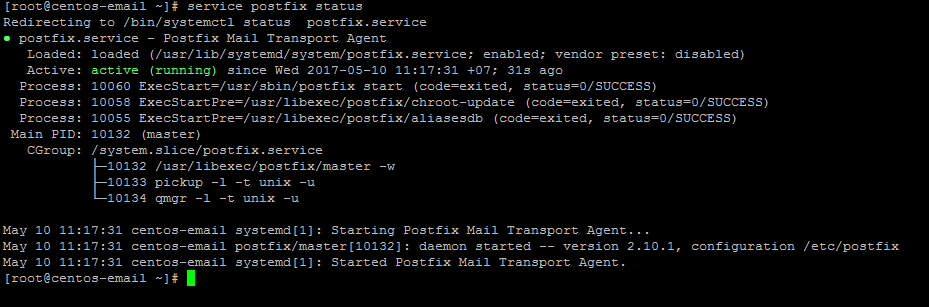
Для того, чтобы почтовый сервер автоматически запускался, необходимо активировать загрузку по умолчанию:
Убедимся, что служба запущена и работает:
Откройте для редактирования конфигурационный файл Postfix:
В конфигурационном файле main.cf найдите строку:
и измените в ней параметр на localhost. Должно получиться так:
Далее найдите следующие строки:
Измените их так, чтобы значение каждой из них соответствовало тому, которое приведено в следующем листинге:
На этом редактирование файла конфигурации Postfix завершено. Сохраните файл main.cf. Теперь необходимо перезапустить сервер Postfix:
Для корректной работы почты необходимо установить имя хоста в то, которое указано в настройках почтовой системы:
Для проверки работы отправки почты можно воспользоваться командой mail :
Если у вас не работает команда mail и выдается ошибка «-bash: mail: command not found», тогда вам нужно установить mailx такой командой:
Using sSMTP with PHP
And that’s it!
Step 4 — Open Firewall Port
firewall-cmd --permanent --add-port=25/tcp
firewall-cmd --permanent --add-port=25/udp
Configuring Desktop Environment
# cat ~/.vnc/xstartup
#!/bin/sh
[ -x /etc/vnc/xstartup ] && exec /etc/vnc/xstartup
[ -r $HOME/.Xresources ] && xrdb $HOME/.Xresources
vncconfig -iconic &
dbus-launch --exit-with-session gnome-session &
For KDE
The ‘’ file should look like this
# cat ~/.vnc/xstartup
#!/bin/sh
[ -x /etc/vnc/xstartup ] && exec /etc/vnc/xstartup
[ -r $HOME/.Xresources ] && xrdb $HOME/.Xresources
#vncconfig -iconic &
#dbus-launch --exit-with-session gnome-session &
startkde &
Установка и настройка Postfix в CentOS 7
Установка и сохранения настроек по умолчанию в файле main.cf.origin:
Для настройки конфигурации Postfix необходимо отредактировать или добавить следующие параметры в главном конфигурационном файле Postfix /etc/postfix/main.cf:
- myhostname — полное доменное имя сервера;
- mydomain — обычно это доменное имя, без первой части myhostname;
- myorigin — домен для почтового ящика, указываемого как отправитель/from (например: root@server.example.com);
- mynetworks — белый список сетей, из которых разрешено отправлять письма, отправка писем с IP не указанных в этом параметре — запрещена;
- inet_protocols — all или ipv4 или ipv6 — протокол, по которому MTA будет пытаться подключиться к MTA получателя.
После первичной настройки запускаем Postfix и прописываем его в автозагрузку:
Чтобы перечитать конфиг Postfix после его редактирования, пригодятся такие команды:
Если в журнале присутствует такая строчка со статусом «status=bounced«, значит e-mail отклонен сервером получателя. Причину ищите в этой же строке журнала чуть дальше:
Если же в журнале «status=sent«, значит e-mail принят сервером получателя и будет скорее всего доставлен по назначению:
Но даже если письмо принято получателем, оно может быть (точнее скорее всего) будет автоматически перемещено в папку «Спам». Как с этим бороться — читайте ниже.
TLS-шифрование отправляемых писем в Postfix
Первым делом необходимо получить сертификат, при помощи которого будут шифроваться все отправляемые из Postfix e-mail. Самый простой и быстрый способ — создать сертификат самостоятельно.
На все вопросы, кроме указания Common Name, можно отвечать на свое усмотрение, Common Name сертификата должно совпадать с именем сервера (в этой конфигурации — server.example.com). Этой командой будет создан сертификат со сроком действия 50 лет.
Далее нужно внести изменения в главный файл конфигурации Postfix (/etc/postfix/main.cf), а точнее, просто добавить строки, опубликованные ниже в конец файла:
Краткое описание настроек для шифрования исходящих писем:
- tls_random_source — ссылка на генератор случайных чисел;
- smtp_use_tls — оповещение клиентов о наличии TLS-шифрования;
- smtp_tls_note_starttls_offer — записывать в журнал имена серверов, у которых поддержка TLS не включена (ответ STARTTLS);
- smtpd_tls_auth_only — применять SMTP-аутентификацию только для соединений с использованием TLS;
- smtpd_tls_key_file — закрытый ключ сервера;
- smtpd_tls_cafile — сертификат;
- smtpd_tls_cert_file — сертификат;
- smtpd_tls_received_header — запрос на получение данных про алгоритм шифрования и версию протокола;
- smtpd_tls_session_cache_timeout — данные в кэше TLS-сессии считаются актуальными в указанном периоде (сек);
- smtpd_tls_loglevel — на сколько подробно записывать сообщения в журнал;
- smtpd_use_tls — оповестить об использовании TLS;
Useful links
Here’s a couple links that will surely be useful for anyone who would like to further deepen the topic:
- https://packages.debian.org/source/sid/ssmtp : sSMTP official repository.
- http://guide.debianizzati.org/index.php/Ssmtp : full sSMTP guide (in italian) made by (and hosted upon) the debianizzati.org web site.
That’s it for now: I sincerely hope that this guide will help those who want to setup a simple e-mail sending service to their Linux environment!
Configuration
Once we’ve got it installed, sSMTP will create his two configuration files in the
folder:
SSL (TCP port 465)
NON-SSL (TCP port 25)
And here’s the corresponding
content in case we want to configure an alias for root:
What we will do
- Update CentOS System and Create a Linux User.
- Install XFCE Desktop and TigerVNC.
- Initial VNC Configuration.
- Configure TigerVNC.
- Run TigerVNC as a Service.
- Connect to the VNC Server Through SSH Tunnel.
Step 4 — Open Firewall Port
firewall-cmd --permanent --add-port=25/tcp
firewall-cmd --permanent --add-port=25/udp
Setup
Let’s see how to install sSMTP and use it in the correct way with the main SMTP e-mail service providers used in Italy, that is GMail and Aruba. The steps shown in this post are valid for a RedHat / CentOS 7 / Fedora distribution, but can be also used on any other Linux distribution without problems.
RedHat, CentOS7, Fedora
Once done, you’ll be able to install ssmtp using the above command.
Step 8 — Securing VNC Sessions through SSH Tunneling
So far both joevnc and janevnc have been accessing their remote desktops through unencrypted channels. As we saw before, VNC Viewer warns us about this at connection time; only the password is encrypted as the sessions begins. Any subsequent network traffic and data transfer is open for anyone to intercept in the middle.
About SSH Tunnelling
This is where Secure Shell (SSH) sessions can help. With SSH, VNC can run within the context of an SSH encrypted session. This is known as tunnelling. In effect, VNC traffic piggybacks on the SSH protocol, resulting in all of its communication with the server being encrypted. It’s called tunnelling because SSH is providing wraparound protection over VNC and VNC is running as if in a tunnel within SSH. SSH tunnelling can be used for other protocols like POP, X, or IMAP as well.
SSH tunnelling works with port forwarding which is basically a means of translating access from one particular port to a different port on another machine. With port forwarding, when a client application connects to Port A running on machine A, it’s transparently forwarded to port B running on machine B. The client application is unaware of this translation and thinks it’s connecting to the original port. Port forwarding is one of the features of SSH protocol.
In this tutorial we have configured VNC to run on ports 5904 (for joevnc) and 5905 (for janevnc).
When the VNC client application starts, it can be pointed to port 5900 on localhost, and our port forwarding will transparently transport it to port 5905 on the remote server.
Note: You’ll have to start an SSH section each time to make the connection secure.
On your Mac, open Terminal.
ssh -L 5900:your_server_ip:5905 janevnc@your_server_ip -NEnter janevnc’s UNIX password. The connection will appear to hang; you can keep it running for as long as you use the remote desktop.
Now skip ahead to the VNC Viewer instructions.
For securing janevnc’s VNC session, we will assume the local Windows computer has PuTTY installed. PuTTY is free and can be downloaded from here.
If janevnc’s VNC and terminal sessions are not closed already, close them now.

Next, expand the SSH menu item in the left navigation pane, and select the X11 item. This shows the X11 forwarding properties for the session. Ensure the checkbox for Enable X11 forwarding is checked. This ensures that SSH encrypts X Windows traffic that flows between the server and client:

Alternately, you could use port 5902. The 2 in this case would be the display number for janevnc (remember the message displayed when janevnc ran the vncserver command).
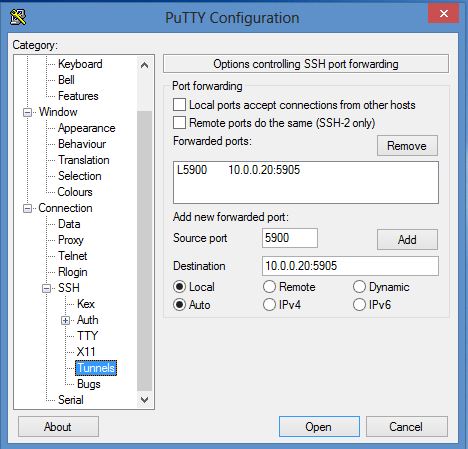
Go back to the Sessions items and save the session for janevnc. Click the Open button and a new terminal session will open for janevnc. Log in as janevnc with the appropriate UNIX password:

Next start VNC Viewer again. This time, in the VNC Server address, type <^> and let VNC server choose the encryption method:

Click the Connect button.
You will still get the dialogue box warning you about an unencrypted session, but this time you can safely ignore it. VNC Viewer doesn’t know about the port it’s being forwarded to (this was set in the SSH session just started) and assumes you are trying to connect to the local machine.
Accepting this warning will show the familiar password prompt. Enter janevnc’s VNC password to access the remote desktop.

So, if the localhost:5900 connection works, you can be confident that the connection is encrypted.
Remember that you will want to establish the SSH connection first every time you use VNC, to make sure your connection is always encrypted.
Conclusion
Check Postfix version
CLIENT wrappermode (port smtps/465) is unimplemented
instead, send to (port submission/587) with STARTTLS
Unfortunately such issue is not easy to overcome with Postfix 2, as the whole 2.x version tree does not natively support SMTP on SSL through TCP port 465. Our only chance to make the connection work is to either use the TCP port 587 and use STARTTLS — which is natively supported — or to forward the connection through Stunnel or other tools that can perform SSL tunneling of some sort.
The whole issue is well-explained in this section of the Postfix documentation: additional info can be gathered from this page from the iRedMail documentation, which has little to do with Postfix but still offers a great historical insight on the SMTP protocols and ports since 1997.
Luckily enough, setting up a SSL tunnel is not the only option: we can also upgrade to Postfix 3, which features a built-in SMTPS support thanks to its new TLS Wrapper Mode feature.
Step 3 — Installing TigerVNC Server
TigerVNC is the software that will allow us to make a remote desktop connection.
Install the Tiger VNC server:
sudo yum install -y tigervnc-serverLoaded plugins: fastestmirror, langpacks
Loading mirror speeds from cached hostfile
. . .
Running transaction Installing : tigervnc-server-1.2.80-0.30.20130314svn5065.el7.x86_64 1/1 Verifying : tigervnc-server-1.2.80-0.30.20130314svn5065.el7.x86_64 1/1
Installed: tigervnc-server.x86_64 0:1.2.80-0.30.20130314svn5065.el7
Complete!Links
- TigerVNC
- CentOS
Test run
Once done, it is advisable to perform a rapid test to confirm that everything is properly working. The easiest way to check that is to run the ssmtp command within a terminal shell: to do so, we can either use interactive mode — writing the message immediately before sending it — or send a previously prepared message saved in a text file.
Let’s see them both:
We need to pay attention to leave an empty line between the Subject and the body of the message, otherwise the e-mail message could have issues. Also, it’s important to keep in mind that the To: field is purely indicative, as the message will only be sent to the recipient specified in the command line above.
Send a file
We can also send a previously prepared message saved within a standard text file. The syntax of the text file is the same we’ve just seen for the Interactive mode, i.e.:
Common Errors and Exceptions
#Error 1:
Disabling HOST statistics file(/var/lib/sendmail/host_status).
Creating /etc/mail/sendmail.cf...
Creating /etc/mail/submit.cf...
Informational: confCR_FILE file empty: /etc/mail/relay-domains
Informational: confCT_FILE file empty: /etc/mail/trusted-users
Updating /etc/mail/access...
Updating /etc/mail/aliases...
WARNING: local host name (ixtmixilix) is not qualified; see cf/README: WHO AM I?
This issue occurs when your hostname/domain name is not mapped with your server. It’s a warning, that your hostname won’t work outside your local network.
You can simply set your hostname to a registered domain by using below command:
hostnamectl set-hostname my.new-hostname.server
#Error 2: Sendmail Error 550 5.1.1 “User Unknown”
Possible reasons for the occurrence of this issue:
1. Wrong Recipient address
- The sender would get a bounce message «550 5.1.1 User unknown» if the recipient mailbox is not available.
- This occurs due to human error while subscribing to the mailing list or if you have purchased an email list (this is a bad practice that can result in a downgrade of your IP reputation).
- Recipient mailbox is moved or deleted from the recipient mail server.
- A misconfiguration or bug on the recipient mail server can cause the unavailability of recipient mail account
How to avoid it?
Always validate email id by sending an email confirmation before sending your regular updates.
2. DNS setting is incorrect for domain
- 550 error can also occur if MX entry is not resolving correctly or DNS settings are incorrect e.g. MX for a domain, xyz.com is resolving some other domains MX.
- In the above case, the recipient account will be unavailable due. so if you are sending an email to [email protected] and it is resolving wrong MX then it will try sending mail to [email protected]
How to avoid it?
Check your MX record by using dig from the command line:
dig example.com MX
Note: If dig is not installed try using;
sudo apt-get install dig -y
sudo yum install dig -y
sudo dnf install dig -y
3. Email filters set for the domain
- These filters are mostly applied to cooperate mailboxes. Also, if the recipient email account has a forwarder set and that is incorrectly set to a nonexisting account it will result in 550 error.
- Filtering for incoming mails using email filters or anti-spam firewalls can end up bouncing emails from certain sender servers.
Hope you liked this article, where the A-Z of Sendmail is explained in simple language. Using these simple steps you can install Sendmail Server on Centos.
In case you are facing some issues which are not listed above in the tutorial, or you have some suggestions, then please feel free to contribute below in comments.
Postfix — настройка отправки email от пользователей сервера
Задача: настроить отправку электронной почты (e-mail) от пользователей сервера в интернет. Необходимо для мониторинга оборудования, извещения о событиях и т.п. Пример: получать оповещения от smartd в случае обнаружения проблем со SMART диска.
Чем меньше посредников на пути письма, тем меньше точек возможных отказов и тем больше шансов, что email будет доставлен получателю. Исходя из этих соображений, самый надежный вариант — это настроить собственный сервер отправки почты (почтовый агент; Mail Transfer Agent — MTA), а не использовать, например, SMTP своего почтового ящика в Gmail.com.
Но для того, чтобы отправленные из своего MTA письма были доставлены до адресата, а не удалены спам-фильтром получателя, необходимо располагать:
- внешним арендованным или приобретенным белым IP-адресом (в примерах ниже будет использоваться случайный IP 5.6.7.8) и возможностью настроить PTR (Reverse DNS);
- реальным доменным именем (example.com), поддомен которого будет настроен в качестве имени сервера с возможностью управления его настройками DNS;
Почтовый сервер — программа, которая отправляет e-mail получателю напрямую (на его почтовый сервер) или через посредника (relay).
Здесь будет рассматриваться установка и настройка Postfix для CentOS 7. Эта информация будет полезна и для выбора и установки MTA на другие системы.
Step 1 — Install Postfix
yum remove sendmail
yum install postfix
alternatives --set mta /usr/sbin/postfixIf above command not work and you get the output as “/usr/sbin/postfix has not been configured as an alternative for mta“. Use below command to do the same else skip it
alternatives --set mta /usr/sbin/sendmail.postfixДополнительные настройки для работы почтового сервера
Настройка Hostname сервера
Посмотреть, как называется сервер можно такой командой:
Если название отличается от необходимого или не установлено, тогда записать hostname для сервера:
Обратите внимание, что hostname сервера не равно домену сервера! Если полный домен сервера: «server.example.com», то hostname сервера — это «server».
Настройка PTR (Reverse DNS)
Сервер-отправитель письма указывает в параметре HELO (EHLO) свой домен, например server.example.com, а сервер получателя делает специальный whois-запрос, чтобы проверить, какой домен записан для IP сервера отправителя. Если домен, указанный для IP и в заголовке HELO (EHLO) не совпадают, то с большой долей вероятности письмо будет или отклонено, или перемещено в папку Спам.
Проверить домен, присвоенный PTR, можно утилитой командной строки dig: $ dig -x 5.6.7.8 или используя различные онлайн-сервисы.
Настройка DNS доменного имени почтового сервера
В панели управления регистратора домена example.com поддомен для сервера (server) конфигирируется, обычно, в разделе «Настройка DNS«:
В третьей строке указывается SPF-запись для поддомена. SPF используется почтовым сервером-получателем для проверки: разрешено ли владельцем домена отправка писем с IP, с которого пришло в действительности письмо? Параметры SPF «+a +mx -all» указывают, что письма могут отправлять только те IP, которые прописаны в A и MX записях домена, а со всех остальных IP принимать почту запрещено.
Проверка влияния настроек PTR и DNS на отправляемые e-mail
После изменения настроек DNS необходимо подождать какое-то время, для того, чтобы они обновились на всех DNS серверах. Иногда это может затянуться до одних суток.
Отправляем тестовое письмо на свой e-mail и смотрим журнал:
Если «status» отправки e-mail Postfix равен «sent», значит письмо было получено сервером принимающей стороны. Следует проверить, не попало ли оно в спам, и если нет — значит большая часть работы по настройке Postfix выполнена успешно. Но остается еще один важный момент, требующий настройки: шифрование письма.
По умолчанию, Postfix, да и, наверное, все другие MTA, отправляет письма в открытом не зашифрованном виде. Это сравнимо с просмотром web-страниц по небезопасному протоколу HTTP, вместо HTTPS. В этом случае, например, в интерфейсе Gmail, напротив получателя будет отображаться красный перечеркнутый замок, означающий, что сообщение не зашифровано. Но самое печальное, что если в письме будут какие-либо конфиденциальные данные, их смогут без проблем прочитать все, через кого проходит трафик, что очень и очень не безопасно.
Добавить шифрование в Postfix для отправляемых писем — весьма просто, инструкция расположена ниже.
Step 5 — Configuring Your Firewall
Next, we will need to configure the firewall to allow VNC traffic through ports 5904 and 5905 only. CentOS 7 uses Dynamic Firewall through the firewalld daemon; the service doesn’t need to restart for changes to take effect.
The firewalld service should start automatically at system boot time, but it’s always good to check:
sudo firewall-cmd --stateThis should show:
runningsudo systemctl start firewalldNow add the rules for ports 5904 and 5905:
sudo firewall-cmd --permanent --zone=public --add-port=5904-5905/tcpsuccessReload the firewall:
sudo firewall-cmd --reloadsuccessКонфигурирование Postfix
Чтобы настроить Postfix, вам нужно изменить соответствующие параметры.
Все параметры Postfix находятся в файле конфигурации /etc/postfix/main.cf. Проблема состоит в том, что этот файл содержит много параметров, которые позволяют вам настраивать Postfix для множества различных вариантов использования.
Параметры Postfix можно настроить с помощью команды postconf, а в качестве альтернативы их можно изменить непосредственно в файле конфигурации /etc/postfix/main.cf. В следующих подразделах вы узнаете, какие параметры важны и как их использовать для настройки Postfix для ретрансляции почты.
При работе с параметрами Postfix рекомендуется использовать команду postconf. Файл /etc/postfix/main.cf может содержать много строк, в результате чего параметры легко пропустить. Использование команды postconf позволяет избежать ошибок.
Для начала вы можете использовать команду postconf без каких-либо опций, которая показывает список всех действующих на данный момент настроек (включая настройки по умолчанию, не видимые в main.cf). grep позволяет вам легко найти аргумент, который вам нужно изменить.
Если после команды postconf следует имя определенного параметра, этот конкретный параметр будет показан. Чтобы изменить параметры postconf, вы можете использовать опцию -e, за которой следует параметр и его предполагаемое значение. Используйте, например, postconf -e ‘inet_protocols = ipv4’, чтобы установить значение параметра inet_protocols в ipv4. В листинге 2 показан частичный вывод команды postconf.
Понимание основных параметров
В конфигурации Postfix много параметров. Лишь немногие действительно имеют значение для настройки среды, в которой почту можно пересылать на центральный почтовый сервер. В таблице 2 представлен их обзор.
Prerequisites
- CentOS 7
- Root privileges
Terminating or stopping a VNC Session
Similarly to enabling the vncserver service, you can disable the automatic start of the service at system start:
# systemctl disable vncserver@:.service
# systemctl stop vncserver@:.service
I hope this step by step guide to install and configure vnc server on CentOS 7 and/or RHEL 7 Linux was useful for you, please let me know your feedback using the comment box below.
Beginners guide to use ssh config file with examples
Step 1 – Update CentOS and add a Linux User
Before we start installing and configuring the VNC server, please update your CentOS using the yum command.
yum update -y
After all this is done, login as ‘edward’ and then run the ‘sudo su’ command.
su – edward
sudo su

Ubuntu, Debian
sudo apt—get install ssmtp |
