

- Start Network Service
- For Ubuntu/Debian/Mint
- For CentOS 8/Fedora
- Restart Network Service
- How to restart network interfaces on Linux
- RHEL-based OS (centos, Fedora, etc
- Slackware Linux
- Gentoo
- Alpine Linux
- Arch Linux
- Set up a static IP address on Debian 11 using terminal
- How to restart the networking service on Debian 11
- Set up a static IP address on Debian 11 using GUI
- Conclusion
- Why Network Configuration is important
- Работа с сетевыми устройств
- Работа с соединениями
- Настройка DNS для существующего соединения
- Настройка статического IP для существующего соединения
- How to list network interfaces on Linux
- The ifconfig command
- The IP command
- The netstat command
- The nmcli command
- How to Turn ‘ON’ or ‘OFF’ Network Interfaces
- View current network configuration
- Use ifconfig and route command
- Assign an IP address to the interface
- Set the Default Gateway
- Set Your DNS server
- Remove IP address from a network interface
- Defining the (DNS) Nameservers
- Change network configuration through Debian GUI
- Setting up Hostname
- Ping
- Enable and disable the interface
- Get network Service Status
- For CentOS 8 / Fedora
- Configure Static IP Address using the Graphical User Interface ( GUI )
- How to check the status of network services in Linux
- Debian/Ubuntu
- Suse/OpenSUSE
- What is a network interface?
- Prerequisites
Start Network Service
If networking services are stopped on your system then, you start these services on the Linux system.
For Ubuntu/Debian/Mint
You can also start the network services by using the service command. Use ‘start’ option to start the network service on your Ubuntu. Debian and LinuxMint distributions.
$ sudo service networking start
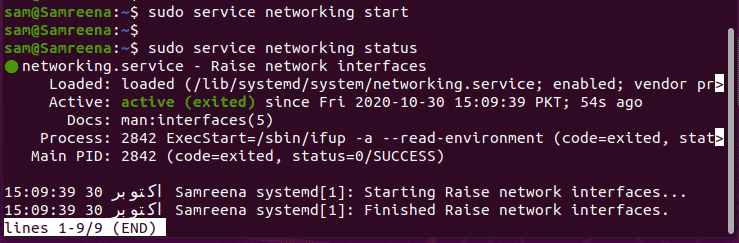
$ sudo systemctl start networking.service
$ $ sudo /etc/init.d/networking start
For CentOS 8/Fedora

Sometimes, when you changed the network configuration or due to some network problems, you may need to restart the network services again on your Linux system to solve your problem. In this article, we will talk about how to restart the networking services on in different Linux distributions (Ubuntu, Debian, LinuxMint and CentOS) by using the command line. We have implemented different commands on Ubuntu 20.04 and CentOS 8 system. All commands which we have executed on Ubuntu 20.04 can be also used for Debian and LinuxMint distributions.
Restart Network Service
$ /etc/init.d/networking restart
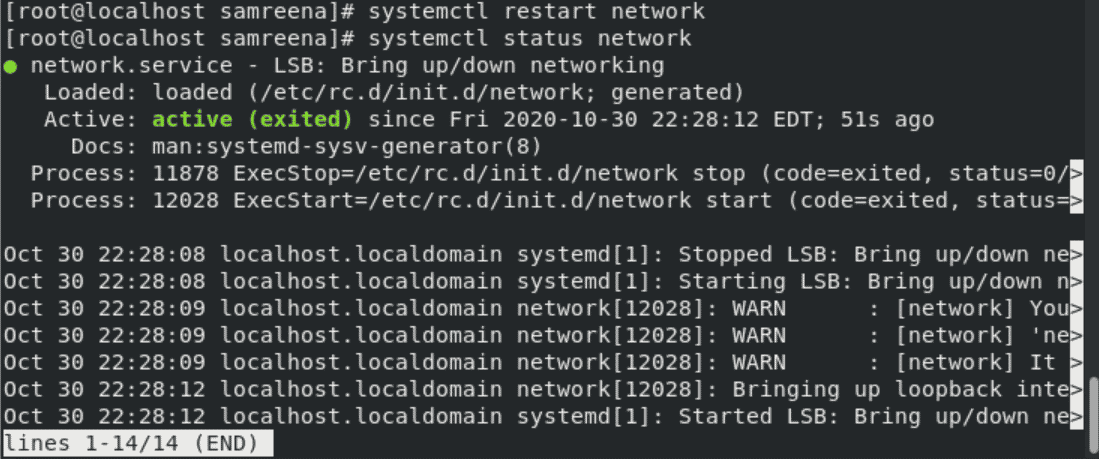
$ sudo systemctl restart networking.service

# systemctl restart network

# systemctl start NetworkManager

On a DHCP network, your Linux system will usually receive an IP address automatically from the DHCP server which, in most cases, is the router. The IP configuration will usually comprise the IPv4 address, the netmask, gateway, and the DNS settings. This is usually convenient for desktop or client PCs which only need to access the internet or network resources.
However, the case is different when you want to set up a server. In this case, you would need to configure a static IP to make the server always available via the same IP address. With DHCP, the IP address is bound to change once the lease time is over leading to the unavailability of the server.
In this guide, we will take you through a walk-through of how to set a static IP on Debian 11. We will demonstrate how you can configure a static IP on both the desktop GUI and server instances.

We have used Debian 11 OS for describing the procedure mentioned in this article.
nce you make changes in the network interface, they affect the network services manager of your system. To enable the system or machine to connect to the network, one needs to restart the network interface to apply the changes without rebooting your server.
This article will guide you on restarting the network interface in various Linux distributions.
Note: When running SSH/ VNC or other remote-based sessions, you should take precautions since restarting the network interface or service can result in network disconnectivity, resulting in connection loss.
- What is a Network Interface?
- How to List Network Interfaces on Linux
- How to Turn ‘ON’ or ‘OFF’ Network Interfaces
- How to Restart Network Interfaces on Linux
- How to Check the Status of Network Services in Linux
How to restart network interfaces on Linux
To restart the network interface in Debian-based distributions using ‘init.d,’ execute the commands below.
sudo /etc/init.d/network-manager restart
To stop or start using the below commands.
sudo /etc/init.d/network-manager stop
sudo /etc/init.d/network-manager start
To restart the network interface in Debian using systemctl, execute the command below.
sudo systemctl restart NetworkManager

Restart network service -ac Debian.
RHEL-based OS (centos, Fedora, etc
To restart a network interface in RHEL-based operating systems, you can use systemctl or the nmcli utility.
Run the commands below to start and stop the network interface using nmcli.
sudo nmcli networking off
sudo nmcli networking on
sudo systemctl restart NetworkManager.service

Restart network service RHEL
Slackware Linux
To restart the network interface in Slackware Linux use.
sudo /etc/rc.d/rc.inet1 restart
Gentoo
Type the command below to restart the network interface in Gentoo for a particular network interface.
Alpine Linux
service networking restart
or
/etc/init.d/networking restart
Arch Linux
To restart the network interface in Arch Linux, type the command below.
sudo systemctl restart systemd-networkd.service
Run the init.d command without parameters, it will tell you which is the usage:
Seems that restart is deprecated
It is deprecated also in Debian at least since:
The related bug #550240 here
~# /etc/init.d/networking stop; /etc/init.d/networking start
As of today’s networking init script, restart and force-reload will work in most circumstances. I guess it’s reasonably safe to ignore the warning and still use restart. However I’ll go with the stop + start way 🙂
I would like to know which is the right method to restart networking service in Debian Jessie.
I know that I can use:
that anyway gave me problems on ssh connection, or
invoke-rc.d networking restart
and other two methods with systemctl and with ifup/ifdown.
But which is the right way to do it?
asked Mar 24, 2016 at 17:26
I would use the service command because it is more consistent across different distributions. So of the commands you mentioned, the variant I would go for is:
And I would definitely run it inside a screen session or by other means ensure that it won’t fail to complete in case you lost connection with the shell in which you typed it. (I have tried losing connectivity to a machine by logging in with ssh and then restarting the network only to have the ssh connection terminate while the network was down and send a HUP to service such that it would not bring up the network again.)
In the past there have been systems where service was a simple wrapper around the scripts in /etc/init.d and the first two of your commands would do the exact same thing. But nowadays there are systems where service will sometimes do something different, and in general service knows better what to do on your particular distribution. And invoke-rc.d is also distribution dependent.
Though service is the most similar across distributions, it is still possible for the service names to be different. For example there are distributions where the service is named network and others where it is named networking. And in some configurations it may be more appropriate to restart network-manager rather than networking.
answered Apr 3, 2016 at 16:37

17 gold badges75 silver badges124 bronze badges
# systemctl restart networking
The connection wasn’t lost. I believe it also worked for me on older releases.
answered Feb 19, 2022 at 19:57
1 gold badge24 silver badges29 bronze badges
When you install a new operating system on your computer, the DHCP server assigns you a dynamic IP address. However, you may need to set up a static IP address on your machine in various situations, such as when you are hosting a web server, or any service requires an IP address rather than a domain name, or in a case where you are about to grant someone remote access to your system. Whatever the reason is, you should know how to set up a static IP address on your system.
In this post, you will learn how to set up static IP on Debian 11 using two different methods. So, let’s start!
Set up a static IP address on Debian 11 using terminal
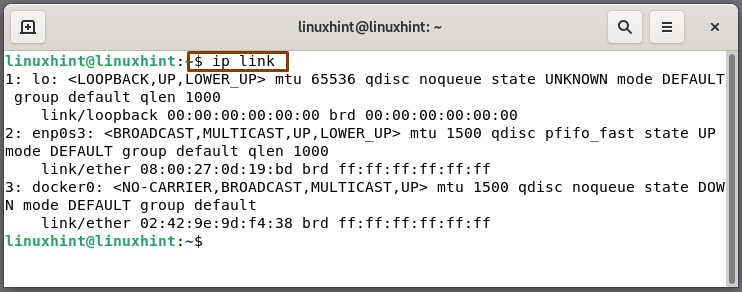
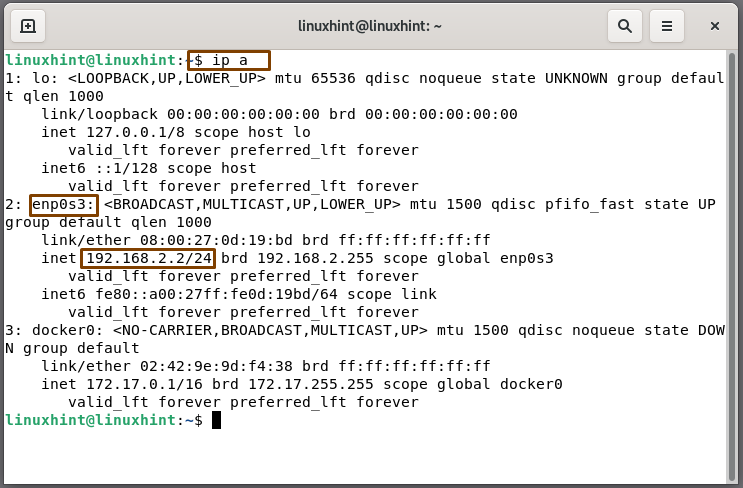
From the output, we will note down the name of our active network interface, which is “enpos3”. As “enpos3” is the network interface for which we will set up a static IP:
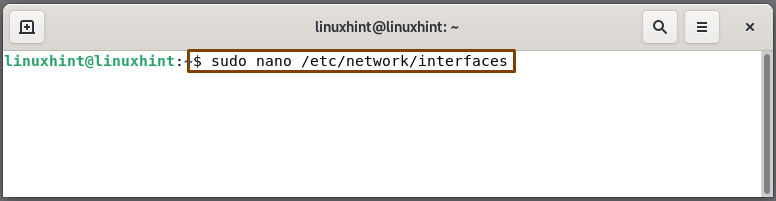
Now, open the configuration file of the network interfaces “/etc/network/interfaces” in the nano editor:
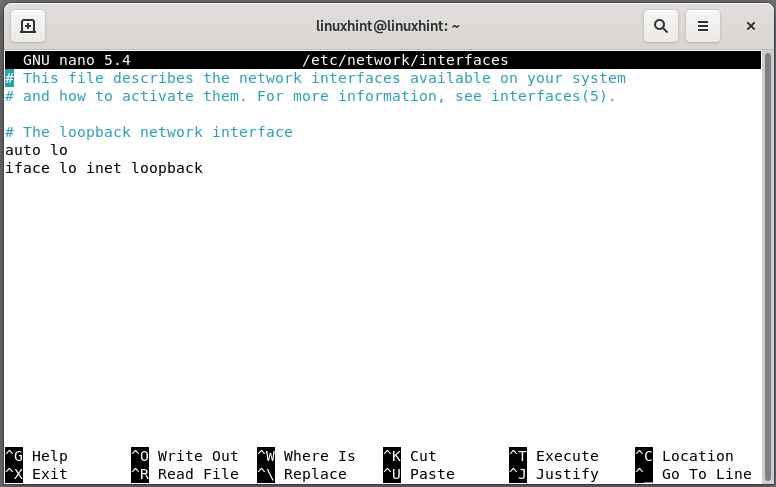
With the default settings, your network interfaces configuration file will look like this:
auto enp0s3
iface enp0s3 inet static
address 192.168.2.2
netmask 255.255.255.0
gateway 192.168.2.2
dns-nameservers 8.8.4.4 8.8.8.8
Here, the first two lines declare that we are setting a static IP address for the “enpos3” network interface:
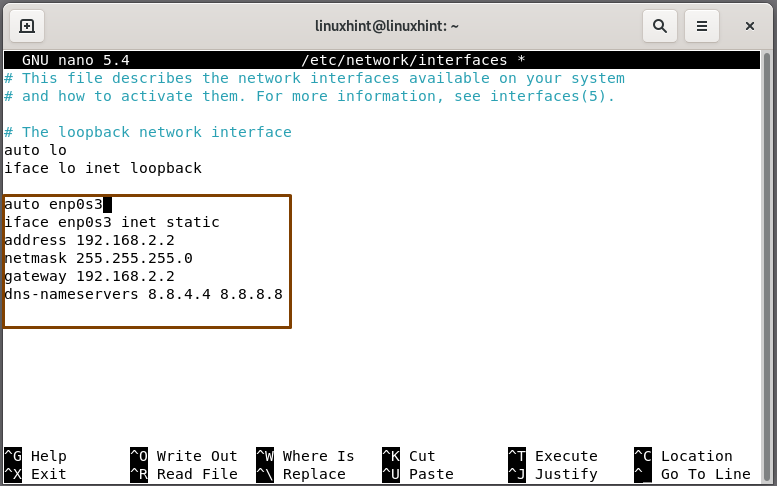
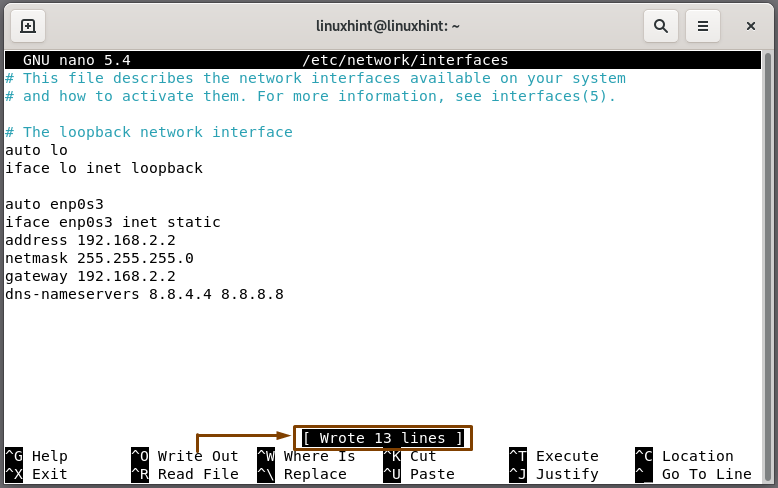
To save the changes you have made in the network interface configuration file, press “CTRL+O”:
How to restart the networking service on Debian 11
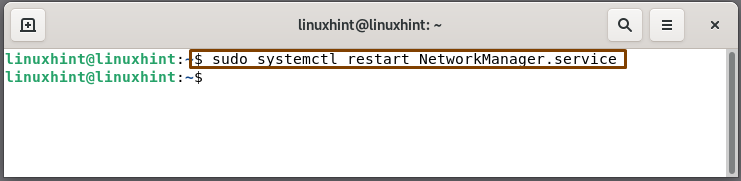
After configuring the static IP address for the “enpos3” network interface, now we will restart the networking service using the systemctl command:
You can verify if your Debian system has configured the static IP for your selected network interface:
From the output, you can see that we have successfully configured static IP address our “enpos3” network interface to “192.168.2.2”:
Set up a static IP address on Debian 11 using GUI
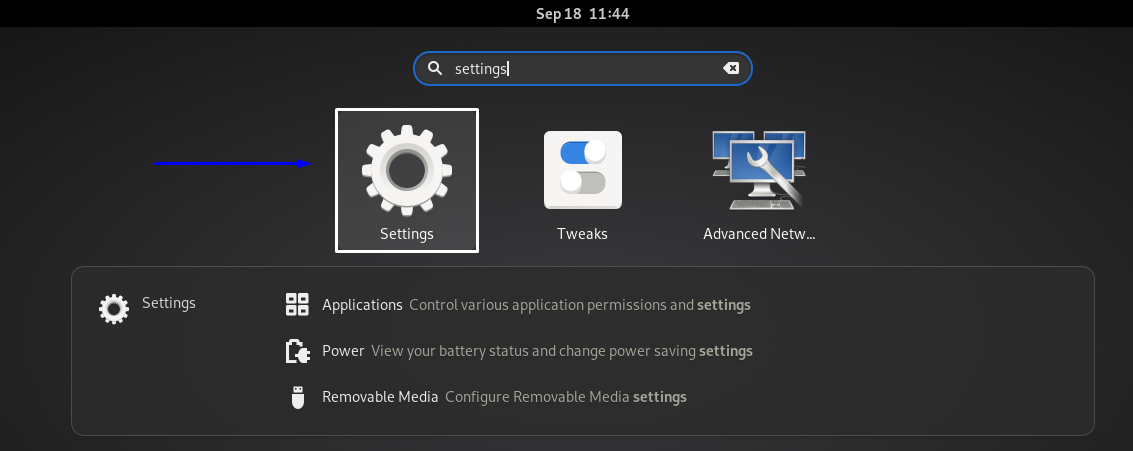
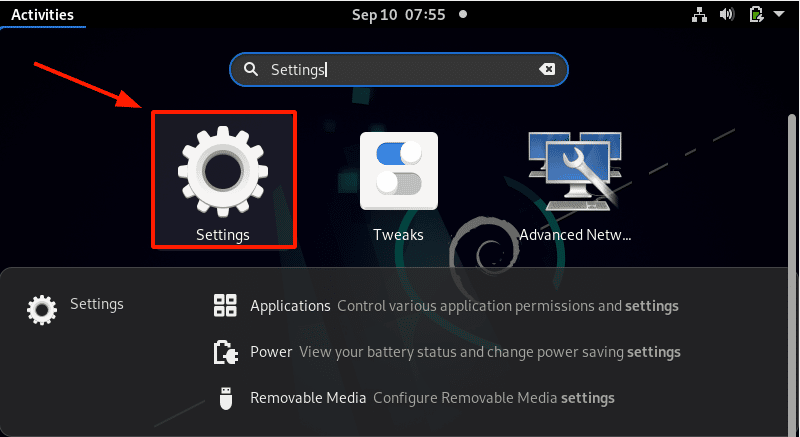
Debian 11 also provides you the facility to set the static IP address of your active network interface using its GUI. If you want to utilize the Debian GUI method for configuring the static IP address, then open your system settings by searching “settings” in the Application’s bar:
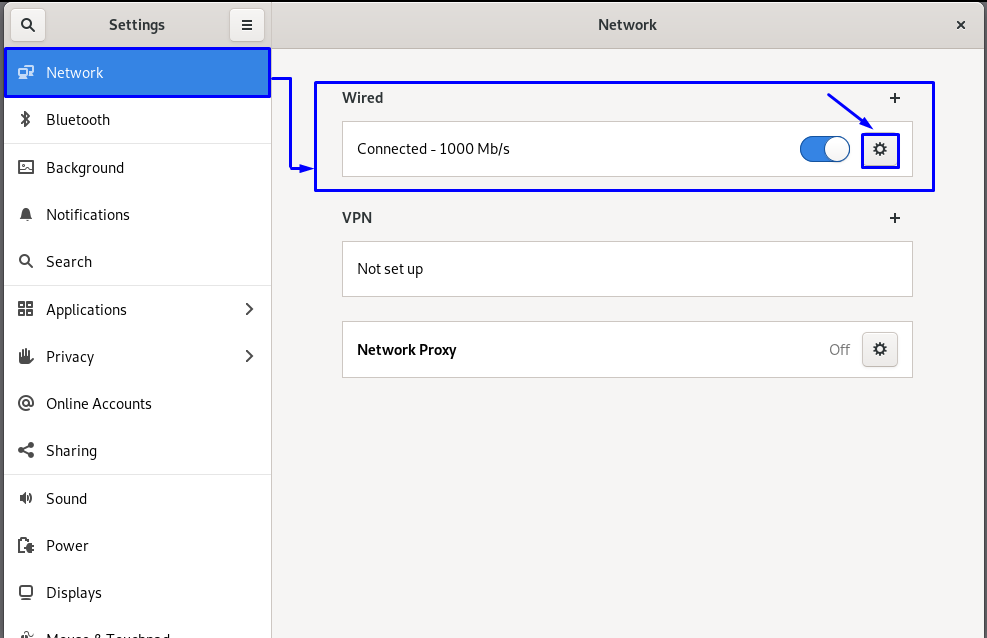
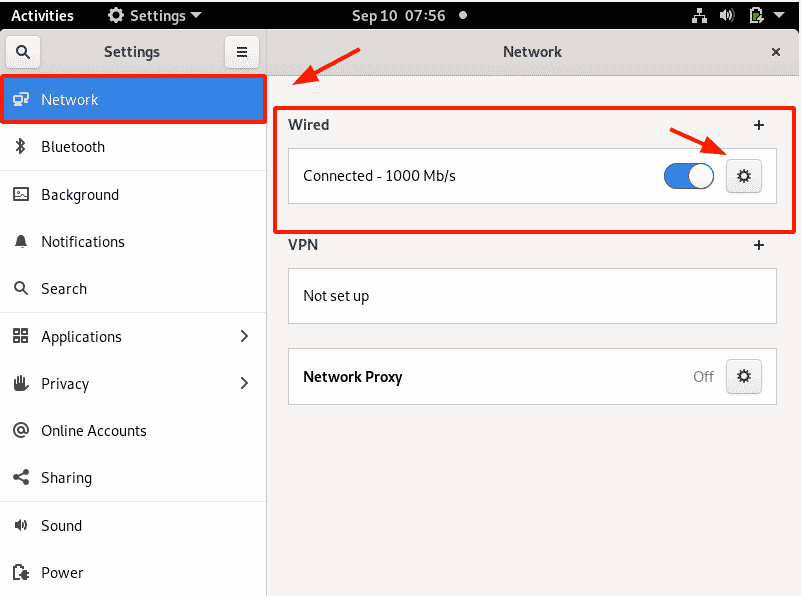
From the different categories present in the left side menu, select “Network”. Open settings of your active network connection by clicking on the gear icon:
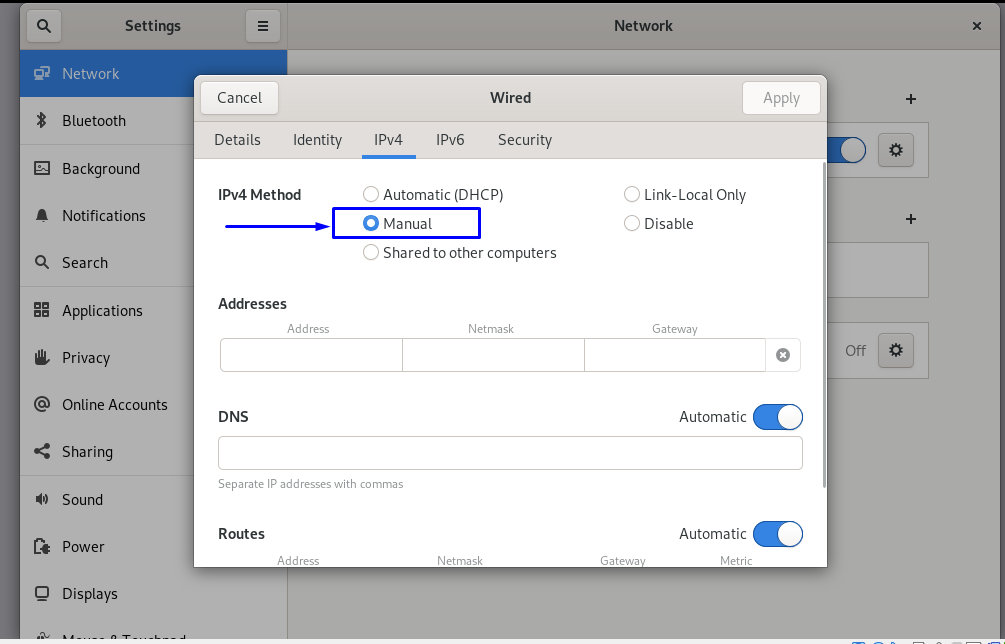
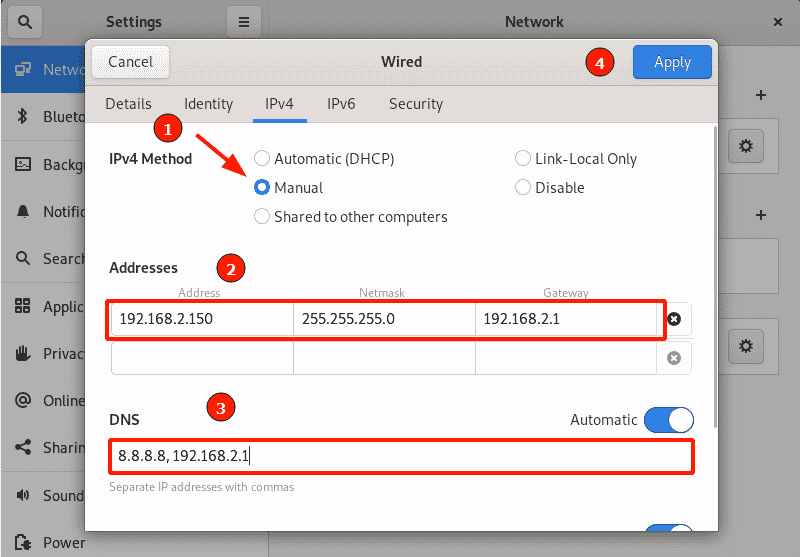
In the opened network settings window, click on the “IPv4” tab. Select the “Manual” IPv4 method for your network:
After that, add your static IP address, Netmask, Gateway, DNS for your network, and then click on the “Apply” button:

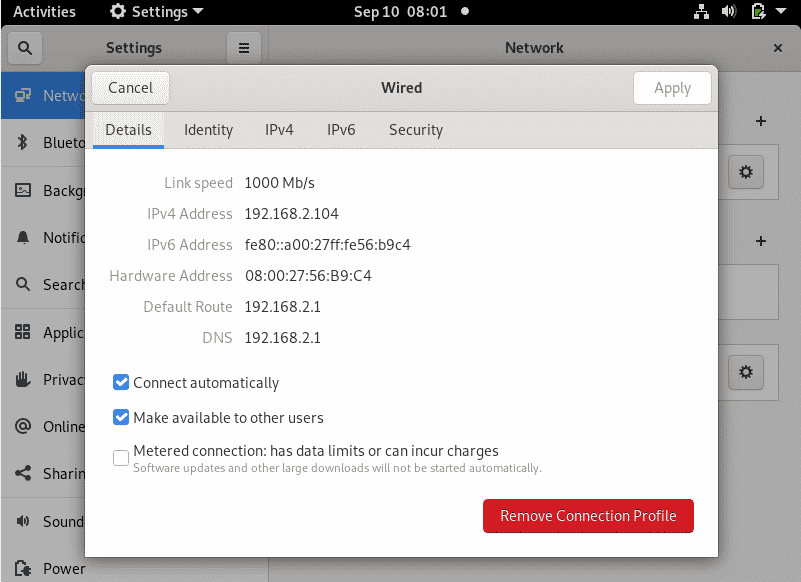
Now, open the “Details” tab. Here, you will verify the added details for your network, such as its IP address:
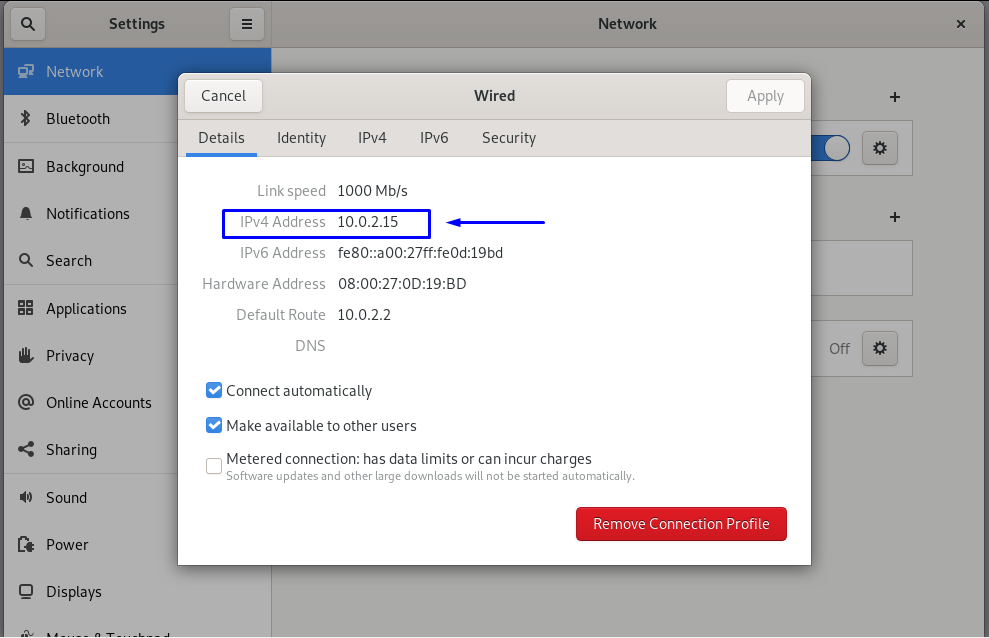
That’s how you set up the static IP address for your network interface on Debian 11 using its GUI.
Conclusion
Debian 11 provides you the option to set up a static IP address for your system, whether you want to do it for hosting your web server or granting remote access to anyone. DHCP automatically enables a dynamic server when you install a new operating system. However, you can configure your IP address using Debian terminal and GUI. In this post, you have learned how to set up a static IP address on your Debian 11 using two different methods.
I am a Linux enthusiast, I love to read Every Linux blog on the internet. I hold masters degree in computer science and am passionate about learning and teaching.
Debian is a Linux-based distribution known for its power, stability and security. Network configuration is a broad process to set up controls of a network, manage the network flow and operation to support the network communication for a specific organization or network owner. Multiple configuration settings are included while configuring the network: Router Configuration, Host Configuration, Software Configuration.
In this descriptive post, network configuration of Debian 11 is explained using command line and GUI as well.
Why Network Configuration is important
This section will present the process of network configuration of Debian 11: primarily there are three fundamental requirements for network settings:
- Configuring IP address
- Changing Hostname
After that select your ethernet connection and hit enter on “Edit” option:
Note: Use the “tab” key to navigate to several options and hit “enter” to select/edit that option.
Set the IPv4 Configuration method to “manual”:
Change the IP address in the “Addresses” option: 192.168.18.200
Set the gateway in “Gateway” option: 192.168.18.1
Lastly, input the DNS server address: 8.8.8.8
Scroll down and hit enter on “OK”:
After that, navigate to “Back” option:
Choose the option “Activate a connection”:
Lastly, choose “Deactivate” to deactivate the connection:
After that, choose “Activate a connection” to start the connection again and navigate to “OK”:
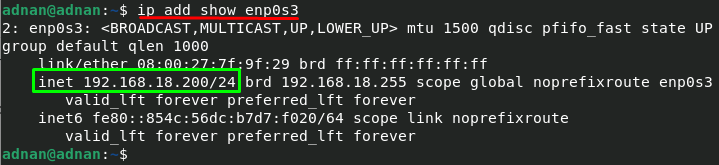
Changing IP address using GUI : Firstly, click on “Activities” and type “settings” in search bar; you will see the settings icon in search results; click on it to open settings:

Once “Settings” is opened; click on “Network” placed on left side and navigate setting gear icon:
You will see a new window that contains the current IP address, gateway, DNS server, Netmask, as shown in the image below:
Step 1: Firstly, change the IPv4 method from Automatic to Manual:
Step 2: Move to “Addresses” section, and write the IP address, Netmask and Gateway:
Step 3: After that, turn off the automatic DNS toggle button and put the DNS value:
IP address: 192.168.18.150
After inserting values, apply the changes by clicking on “Apply” button:
Turn OFF/Turn ON the button to allow computer to use new data:
Once you have done this; click on the gear icon and look for details; it is observed that the values are changed now:
The interface shows three options; choose “Set system hostname” and navigate to “OK” to proceed:
Your current hostname will be displayed and can be edited:
Type new hostname by replacing the old one: For instance, our old hostname was “adnan” and we have changed it to “linuxhint”: Hit enter on “OK” to complete this step:
After changes, you have to confirm the change by putting the password and then clicking on Authenticate:
After successful authentication, it will display a message, set the hostname to ‘linuxhint’, navigate to “OK” to finish the process:
The hostname must be changed after completion of the process:
You can verify the changes by using the command mentioned below:

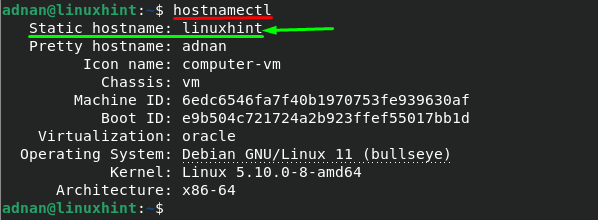
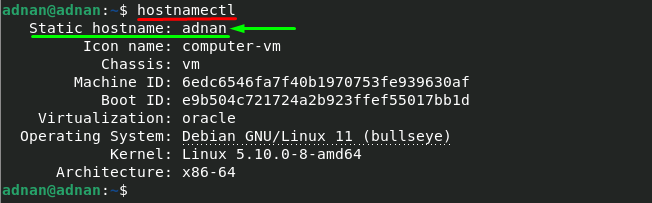
It is observed that the current hostname in “linuxhint”; for instance, the command mentioned below will change the hostname to “adnan”:
hostnamectl set-hostname adnan

Здравия всем! В этой статье я расскажу как настраивать сеть из консоли с помощью утилиты Network Manager.
После установки Home Assistant на свеже установленный Debian 11 столкнулся с проблемами с сетью на хостовой машине. Начал разбираться и понял, что Network Manager, который нужен для Home Assistant, не всегда точно настраивается. Решил написать для себя памятку как его настраивать из командной строки Linux.
После установки командой
apt install network-manager
В системе появляется служба NetworkManager
Работа с сетевыми устройств
Для того, чтобы посмотреть список всех устройств выполним команду
# nmcli device
DEVICE TYPE STATE CONNECTION
ens18 ethernet подключено Supervisor ens18
docker0 bridge без управления —
hassio bridge без управления —
veth09a87b9 ethernet без управления —
veth6e7e60d ethernet без управления —
veth7c2ed85 ethernet без управления —
veth82dbf2f ethernet без управления —
veth82f0817 ethernet без управления —
veth9e73789 ethernet без управления —
lo loopback без управления —
Посмотреть информацию по конкретному устройству команда:
nmcli device show DEVICE
К примеру, у меня это:
Работа с соединениями
Для получения списка всех соединений команда:
# nmcli connection
NAME UUID TYPE DEVICE
Supervisor ens18 3beb0614-186b-4323-8dcd-80b0b4a70ebb ethernet ens18
Проводное соединение 1 187a4f3b-6e09-3b76-946b-5c1dbc8fc016 ethernet —
Для получения информации по конкретному соединению команда:
nmcli connection show NAME
Настройка DNS для существующего соединения
Часто бывает, что Network Manager не переносит текущий DNS сервер, и следовательно, теряется связь с интернетом, компьютер не может получить информацию об IP адресе доменов.
Для того чтобы поменять DNS воспользуемся командой
nmcli connection modify «Supervisor ens18» ipv4.DNS 192.168.1.1
Если нужно прописать более одного DNS сервера, перечислим их через запятую
nmcli connection modify «Supervisor ens18» ipv4.DNS 192.168.1.1,192.168.1.10
Для применения изменений нужно перезапустить сервис
service NetworkManager restart
Настройка статического IP для существующего соединения
Проверим текущий статус соединения. Нас интересует строчка ipv4.method, и ipv4.addresses
Как видно, нам вначале нужно установить ipv4.addresses
nmcli connection modify «Supervisor ens18» ipv4.address 192.168.1.49/24
и только потом менять метод на ручной:
nmcli connection modify «Supervisor ens18» ipv4.method manual
При выполнение этой команды, пропадет соединение. По этому не применяйте её при удаленном соединении!
Также нам нужно еще установить шлюз по умолчанию
nmcli connection modify «Supervisor ens18» ipv4.gateway 192.168.1.1
Чтобы изменения вступили в силу, нужно деактивировать и затем активировать соединение вновь:
nmcli connection down «Supervisor ens18»
nmcli connection up «Supervisor ens18»
При выполнение этих команд, пропадет соединение. По этому не применяйте их при удаленном соединении!
Network Manager это очень мощная утилита, которая имеет внешнее управление через API. Поэтому оно используется в Home Assistant Supervisor. И теперь у меня есть под рукой мануал, как быстро настроить сеть и не лезть за этим в поисковик.
How to list network interfaces on Linux
You can use different ways to see all the available network interfaces on your system. You can use the GUI or the Command-line (CLI). In this post, we highly recommend using the Terminal (CLI) since the GUI settings app might not list specific interfaces.
- ifconfig
- netstat
- nmcli
The ifconfig command
This command has long been used to list and configure network interfaces on Linux. Unfortunately, this command is marked as ‘deprecated’ and does not come pre-installed in certain distributions like recent Debian and Kali Linux releases.
To list network interfaces using ifconfig, execute the command below.

Tip: If you get an error like ‘ifconfig command not found,‘ install the ifconfig utility with the command below.
sudo apt install net-tools
In other systems like Debian, you will still get the error since the ifconfig will install in the /sbin path. Therefore, you will need to execute ifconfig with the syntax below.
The IP command
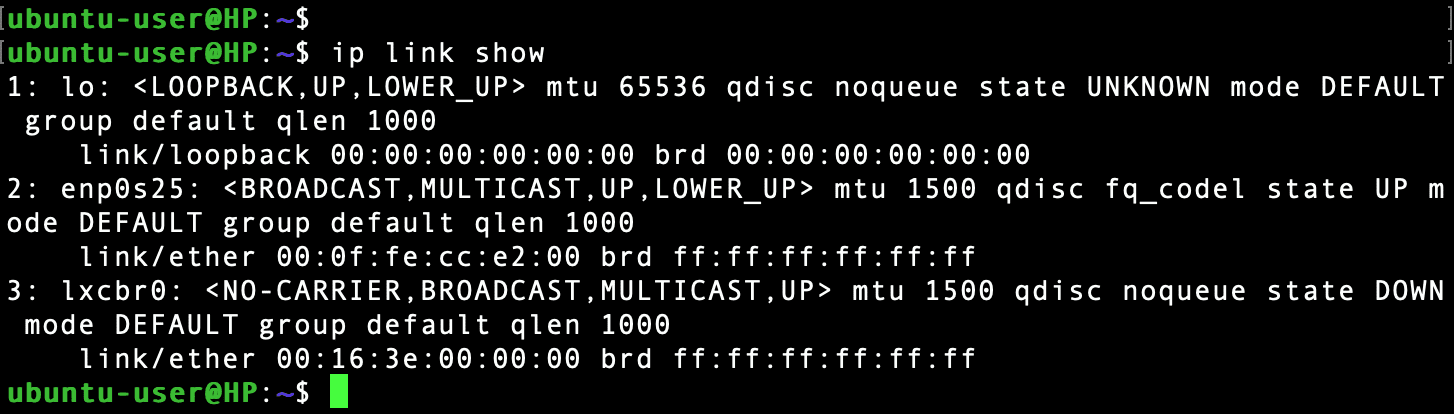
The IP command is the successor of the ifconfig command. You can use it to list network interfaces and configure routing and tunnels. This utility comes pre-installed in all Linux distributions.
To list network interfaces with the IP command, execute the command below.
ip link show
The netstat command
Another utility you can use to list all network interfaces on your system is netstat. Execute the command below.

The nmcli command
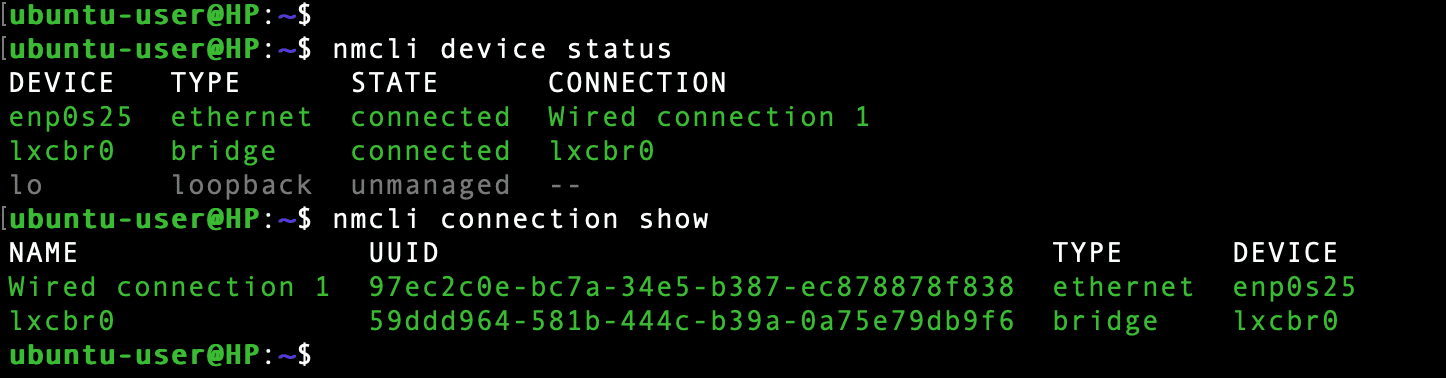
nmcli is a command-line utility that you can use to list and configure network interfaces. Execute the command below to list all interfaces present on your system.
nmcli device status
or
nmcli connection show
How to Turn ‘ON’ or ‘OFF’ Network Interfaces
To turn on or off your network interface, we will use the ifconfig commands as shown below.
Note: Turning OFF an interface connection will disrupt/ close any active SSH connections.
Before executing any of the commands below, identify the network interface you want to turn ON or OFF. Use any commands discussed in the previous section to list the network interfaces on your system.
For example, our computer is connected to the internet via ethernet, which is listed as enp0s25.
View current network configuration
$ ip a

You can also run ifconfig command to view the IP address.

Run the below command in Terminal to find DNS server IP:
$ cat /etc/resolv.conf
Basic network configuration includes setting a static or dynamic IP address, adding a gateway, DNS server information. There are different ways to configure the network on Debian OS.
Use ifconfig and route command
In this method, we will see how to configure network settings. However, remember, these settings will not be permanent. Once you reboot your system, the settings will be removed.
Assign an IP address to the interface
We will use ifconfig to assign an IP address to our network interface. Below is the syntax of the command:
$ sudo ifconfig eth0 192.168.72.165 netmask 255.255.255.0 up

Set the Default Gateway
$ sudo route add default gw 192.168.72.2 eth0

Set Your DNS server

Remove IP address from a network interface
$ sudo nano /etc/network/interfaces
auto eth0
iface eth0 inet static
address 192.168.72.165
netmask 255.255.255.0
gateway 192.168.72.2
Now press Ctrl+O and then Ctrl+X to save and exit the file.

auto eth0
iface eth0 inet dhcp
Defining the (DNS) Nameservers
$ nano /etc/resolv.conf
I am adding here two Nameservers. One is Google’s public DNS server address and the other is my router’s IP address.
nameserver 8.8.8.8
nameserver 192.168.72.2

Once done, you can verify the IP address using ip a or ifconfig command.

Change network configuration through Debian GUI
In this method, we will use the graphical way for configuring the basic network settings.
To do so, hit the windows button on your keyboard, then in the search bar type settings. From the results that appear, open the Settings. Then on the left sidebar, click on the Network tab. After that, click on the gear icon of the interface that you want to configure.

Go to IPv4 tab. Choose Manual and enter the IP address, netmask, gateway, and DNS.

In case you want to dynamically assign the IP address, choose the Automatic (DHCP) option and enter the DNS information.

Once done, click on Apply to save the changes.
Setting up Hostname
Just like the IP address, a unique hostname is also used to recognize a system on a network. To find the current hostname of your system, run the below command in Terminal:

To change the hostname of the system, you can run the below command. But once you reboot your system, your original hostname will be restored.
$ hostname host_name
I am changing here my hostname from Debian to Debian10.

To permanently change the host name, you perform will need to edit hostname file located at /etc/hostname. Enter the below command to do so:
$ sudo nano /etc/hostname

This file contains only the hostname of the file, change the old name to your desired name, and then press Ctrl+O and Ctrl+X to save and exit.
Some other useful commands you might require while setting up a network in a Debian OS:
Ping
Arp is used to translate IP addresses into Ethernet addresses. To print arp table, type:
$ arp –a
It is used to display the routing table of a Linux system.
It translates host names to IP addresses and vice versa.
To find IP against a specified domain:
$ host domain_name
To find a domain name against the specified IP address.
$ host IP_address
Enable and disable the interface
To enable up the interface, use:
To bring down the interface, use:
Get network Service Status
$ sudo systemctl status networking
$ sudo systemctl status networking.service
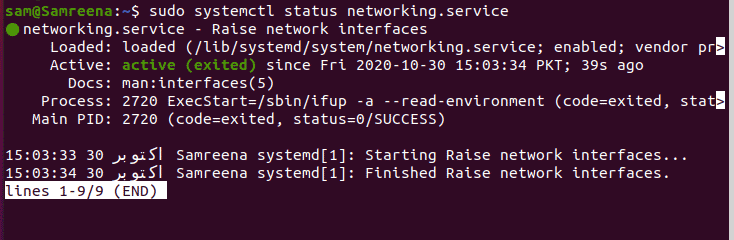
$ sudo service networking status
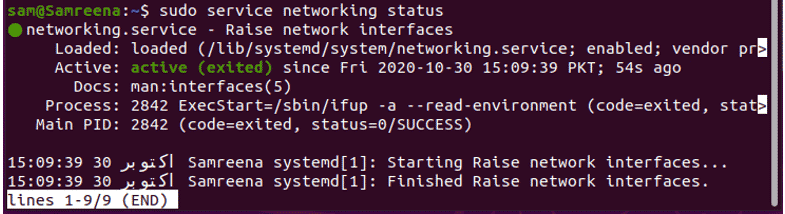
$ /etc/init.d/networking status
For CentOS 8 / Fedora
# systemctl status network


Now, start the network services and you can get network status by using the above-mentioned command.
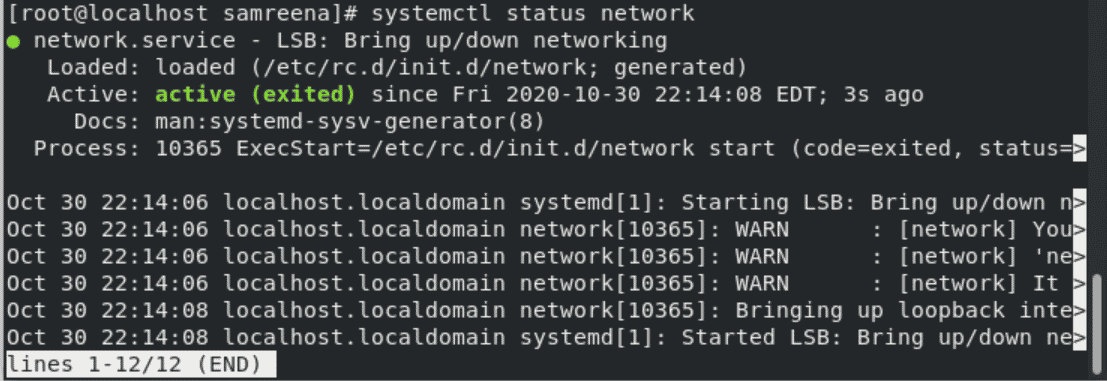
You can stop your network services through the method which is mentioned below. But, if you have a remote connection with SSH, we are not recommended you to stop the service because it may create problems.
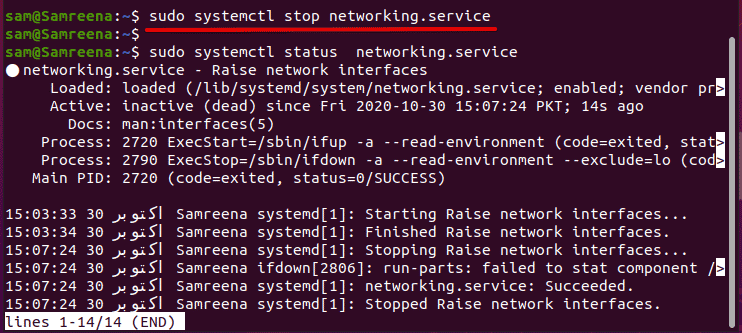
You can use the ‘stop’ option with the above ‘networking’ command on Ubuntu, Debian, Kali, Mint distributions in order to stop network services.
$ sudo /etc/init.d/networking stop

$ sudo systemctl stop networking.service
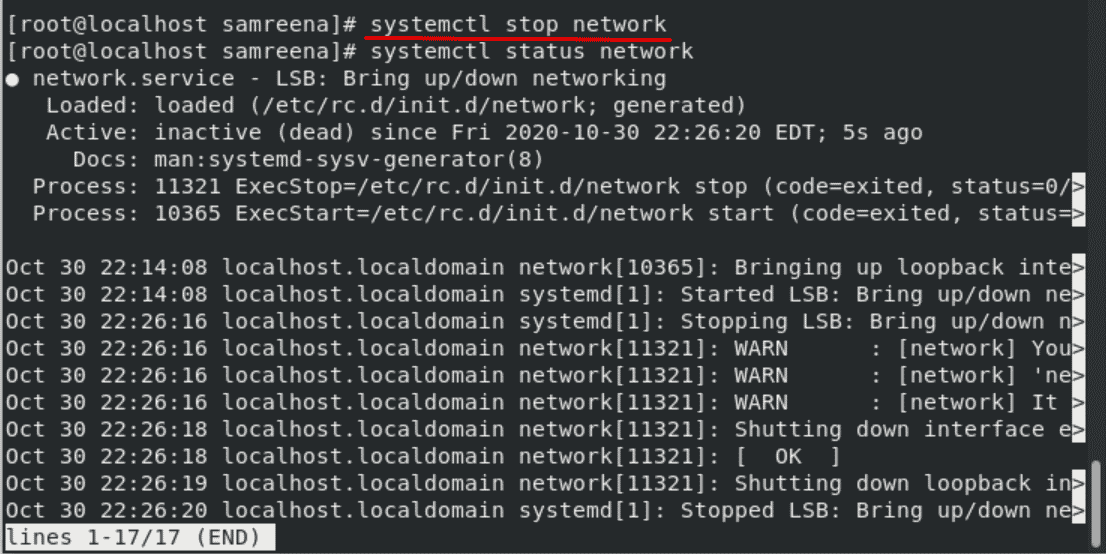
# systemctl stop network
Now, if you will check the network status you will see that network services are stopped on your system.
Configure Static IP Address using the Graphical User Interface ( GUI )
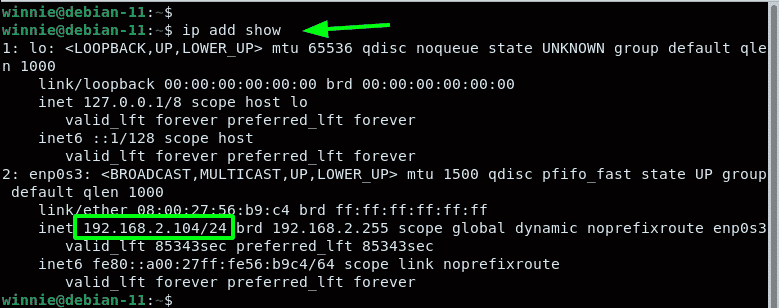
You can verify this using the command shown.
$ ip addr show
In our system, enp0s3 interface is the active link that is assigned the IP address. This may be something else in your case.
To get started with setting the static IP, click on ‘Activities’ on the left far corner. Search for and click on the ‘Settings’ icon.
On the ‘Settings’ page, select the ‘Network’ tab. Next, head over to the ‘Wired’ section and click on the small gear wheel as indicated.
This displays the current IP address configuration as shown. As we confirmed earlier, our current IP address is 192.168.2.104. This has been dynamically allocated to the active interface using the DHCP service.
We are going to override the DHCP settings and manually set a static IP which will persist even upon a reboot.
Click the IPv4 tab. Switch from ‘Automatic’ to ‘Manual’ in the IPv4 method section. Thereafter, specify your desired IP address, netmask, and default gateway. Be sure to also provide the preferred DNS settings.
To apply the changes made, click the ‘Apply’ button.
You need to restart the networking daemon or service for the Debian system to implement the new static IP settings. So, turn the toggle button off and then on.
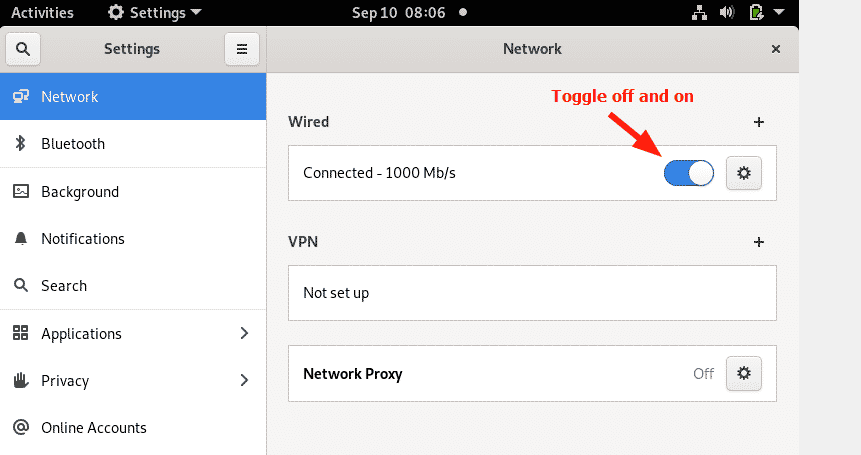
Click on the gear icon once more to verify that the static IP settings have been applied.

On the terminal, verify that the network interface has acquired the newly configured IP address:
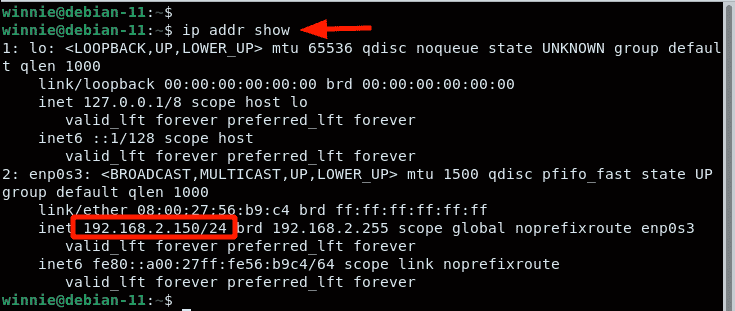
The output is a confirmation that the system was successfully configured using a static IP. Let’s now shift gears and explore setting a static IP on the command line.
How to check the status of network services in Linux
Different Linux distributions have varying commands for checking network services. This article will explore some of the commands used to check the status of network services in various Linux distributions.
Debian/Ubuntu
Run the command below to check for network services status in Debian/ Ubuntu.
sudo service NetworkManager status
Use the command below to check the network service status in RHEL-based operating systems.
sudo systemctl status NetworkManager
Suse/OpenSUSE
To check the network service in OpenSUSE, run the command below.
If you are running a headless server, or are connecting to a remote server via SSH, the only option available is to configure the static IP on the command line.
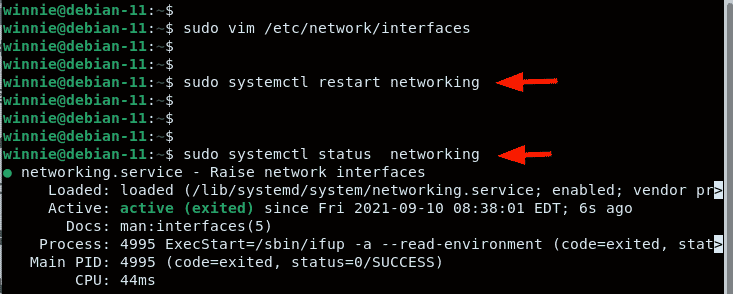
$ sudo vim /etc/network/interfaces
By default, only the loopback settings are specified.
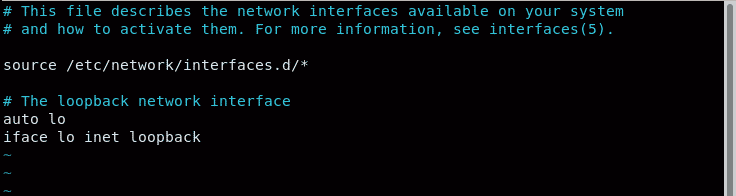
We are going to specify the IP settings for our active network interface. But before making any changes, make a backup of the configuration file.
$ sudo cp /etc/network/interfaces /etc/network/interface.bak

Specify the IP settings as provided. Ensure to make your settings in accordance with your network subnet.
auto enp0s3
iface enp0s3 inet static
address 192.168.2.150
netmask 255.255.255.0
gateway 192.168.2.1
dns-nameservers 8.8.8.8 192.168.2.1
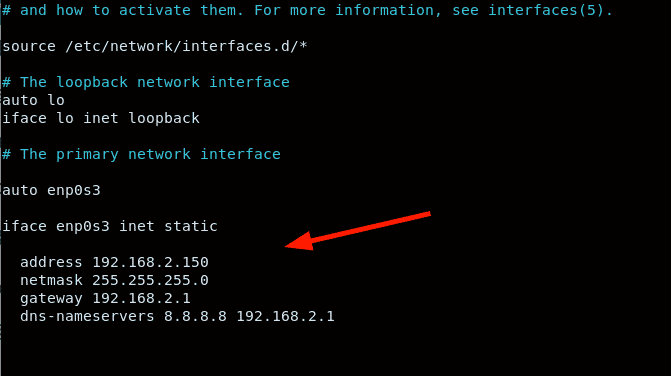
To apply the changes, restart the networking service.
This will disconnect you from the server if you are connected via SSH. Reconnect using the newly set static IP address.
What is a network interface?
A network interface refers to the point of connection between a computer and the network. It can be either software (especially with Virtual machines) or a hardware component. When dealing with network interfaces, there is one term that you will likely come across – NIC (Network Interface Card).
A Network Interface Card is a circuit board chip inserted/ soldered on the motherboard allowing your computer to connect to the internet. If you have worked with many earlier Desktop computers (even some today), you know that most cannot connect to a WiFi network, and that’s because they don’t have a wireless NIC. You are advised to purchase a USB Network Adapter that will act as your wireless interface connection in such a situation.
Prerequisites
There are two ways of configuring a static IP on Debian. You can achieve this using GUI or on command-line.
From the above information, we have explored how to start, stop, and restart the network service on different Linux distribution like Ubuntu, Debian, Linux Mint, and CentOS 8. Moreover, you can troubleshoot the network error through the NetworkManager tool on CentOS 8. If you need more details then, you can implement all command on your system and then let us know about your problems. Please don’t stop services if you have a remote ssh connection that may create a problem.
Samreena Aslam holds a master’s degree in Software Engineering. She’s a technical writer and has written various articles on different Linux flavours including Ubuntu, Debian, CentOS and Mint as well as programming guides in various programming languages
We have outlined two methods of assigning a static IP on your Debian 11 PC – using GUI and the terminal. The former is the easier option when working on a Debian desktop and the latter comes in handy when configuring a remote server via an SSH client.
This article has given you a step-by-step guide on how to restart and list the network interfaces on your system. We have tried to cover all the most popular Linux distributions. Is there any Linux distribution that you feel we left out? Or is there any command that throws an error on your system? Please, don’t hesitate to notify us in the comments below, and we will do our best to assist you.
