

- What will we cover?
- ‘ip link
- ‘ip route’
- ‘ip addr’
- Conclusion
- If you want, you can print the IP address of a specific interface or device, just use the below command
- IP command can also be used to show the network performance statistics as follows
- Using nmcli or Network Manager Command Line Interface tool to create a DHCP network connection
- To create a static connection using nmcli, we will need to specify the IP address and the gateway as the argument
- Configuring the network with Network Interfaces File
- Setting Hostname with the “Sysctl” command
- DNS configuration
- Using Bonding on Debian 10
- Configuring bridging on Debian
- Configuring Networking from Command-line tools
- Ii) Changing the mac address of an interface.
- Iii) Enable and disable interfaces.
- Iv) Remove an IP address from a network interface.
- V) Set the Default Gateway
- Сетевые настройки на сервере Debian
- Настройка статического IP
- Получение сетевых настроек по DHCP
- Setting the default gateway
- How to specify DNS server
- Change hostname
- 2 or more IPs on the same interface
- How to quickly find out the ip address of a server in Debian
- Static routes
- How to perform a network restart
- Debian vlan setup
- How to disable ipv6 in Debian
- Working with the hosts file
- Network card setup
- Working with the ifconfig utility
- Frequently asked questions on the topic of the article (FAQ)
- Setting up a static IP address in Linux
- Temporarily Setting a Static IP Address in Linux
- How to check the IP address of a specific network interface
- How to display IP address in colored output
- How to display an IP address in the format
- How to make output more readable
- How to remove an IP address from a network interface
- How to turn on the network interface
- How to disable the network interface
- How to remove all network interface IP addresses
- How to check the routing table?
- How to add a new static route?
- How to delete a static route?
- How to add persistent static routes
- How to add a default gateway?
- How to remove the default gateway?
- How to display -cache?
- How to add an entry?
- How to delete an entry?
- How to clear all -records?
- How to set for network interface?
- How to change Mac network address?
What will we cover?
‘ip link
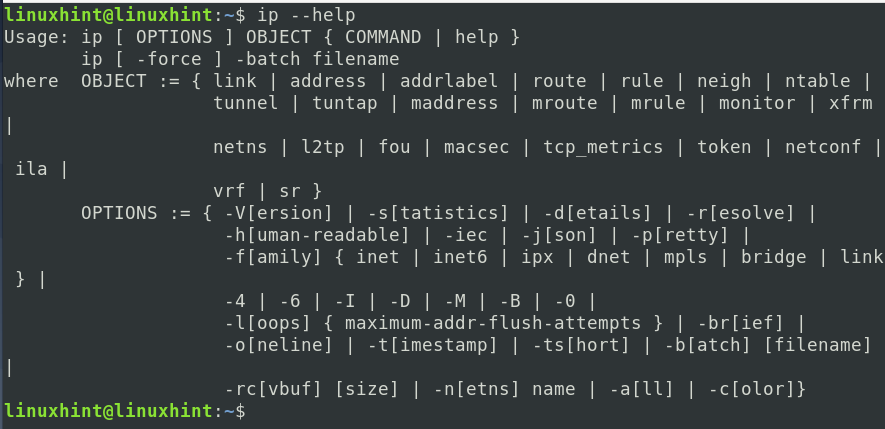
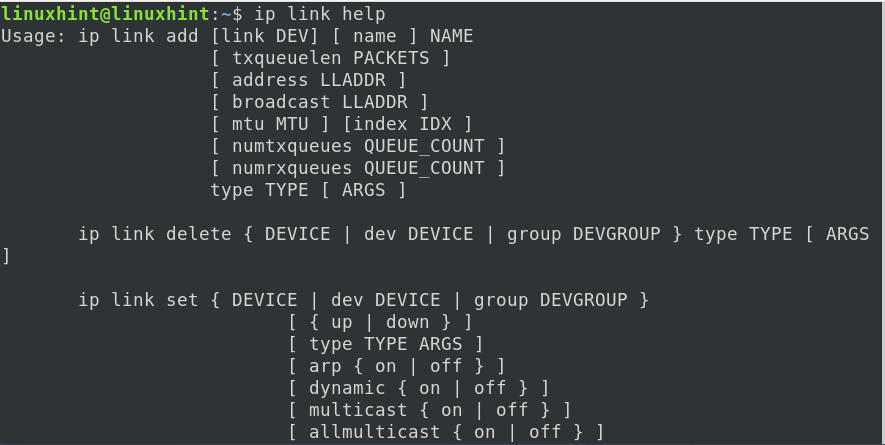
The ‘link’ object can be used to manage network interfaces. E.g., to see all the available possibilities with the ‘ip link’ object, use:
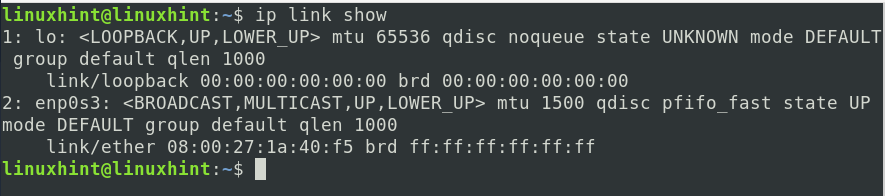
a) To list all the available interfaces on your system:
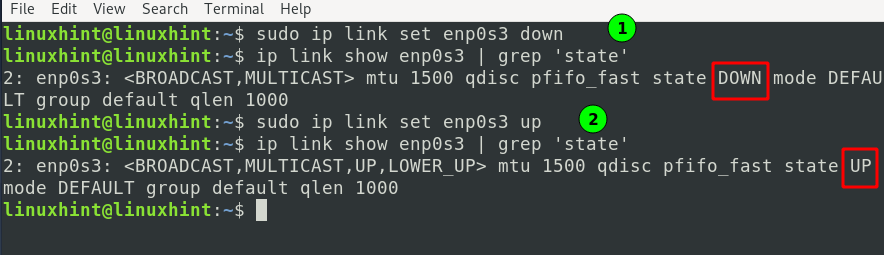
b) To bring an interface ‘down’, use:
Where ‘iface’ is the name of an interface, you can see the list of available interfaces using the ‘ip link show’ command.
c) Similarly, to bring an interface ‘up,’ we can use:
d) To check the status of a link (interface), use:
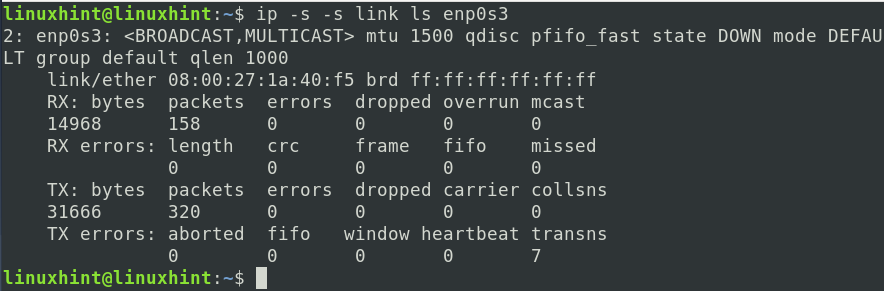
e) If you want to troubleshoot errors while establishing network connectivity, the below command can help a lot:
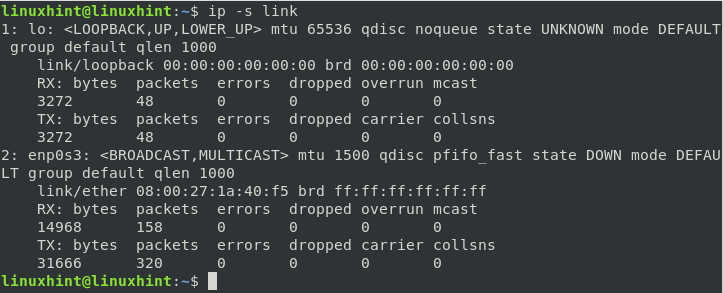
One can use the ‘-s’ option twice to see more information in the output. E.g., to see the statistics of only ‘enp0s3’ interface, use:
‘ip route’
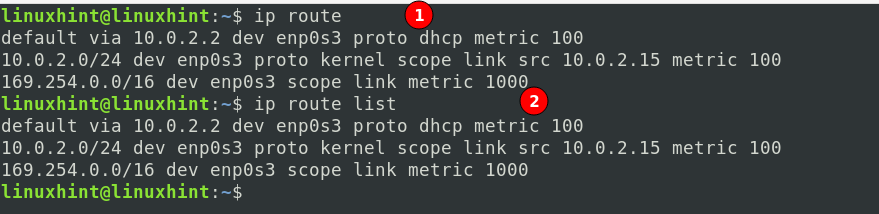
To display various options and commands used with the ‘ip-route,’ use the command:

b) To add a new route, use the syntax:
add network address to connect to via used to connect to this network dev device or interface name
E.g., to connect to a network 192.168.43.0 via 10.0.2.15 using interface enp0s3, the command will be:
add 192.168.43.0 via 10.0.2.15 dev enp0s3

c) To delete a route entry, replace the ‘add’ keyword with the ‘del’ as shown below:
del 192.168.43.0 via 10.0.2.15 dev enp0s3

d) To add a new gateway with ‘ip route,’ use the command:
add default via gateway_ip
E.g., to connect to a gateway 10.0.2.0, the above command will be:
add default via 10.0.2.16

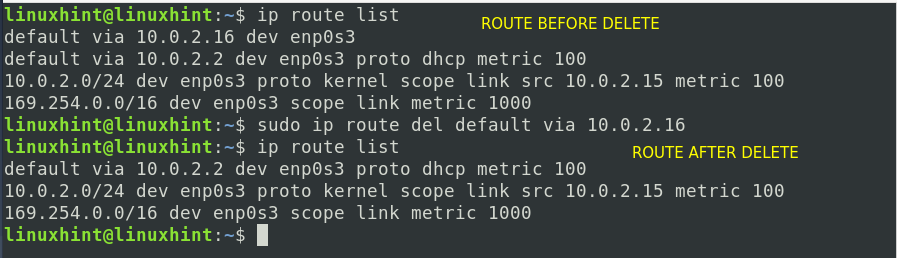
To delete this gateway, run the same command with ‘add’ replaced by ‘del’:
del default via 10.0.2.16
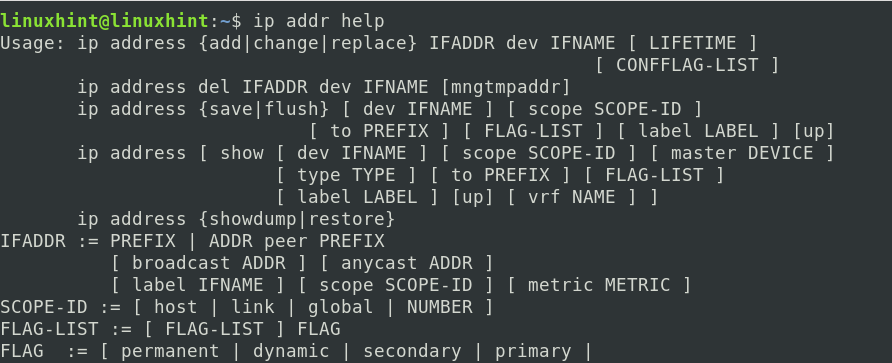
‘ip addr’
Again to see the complete list of options with the ‘ip addr’ command, use:
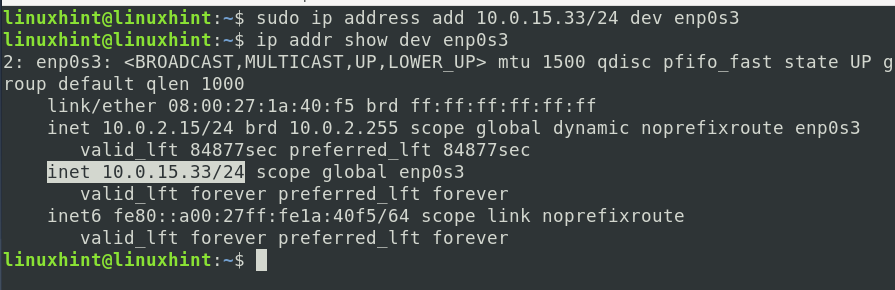
b) To add a temporary IP address to a given interface, we can use the format:
add ip_address to be assigned dev interface_name
E.g., to add the address ‘10.0.15.33’ to the interface enp0s3, the command will be:
address add 10.0.15.33 dev enp0s3
To check if the IP address is assigned on the given interface, run the command:
iface enp0s3 inet dhcp
iface enp0s3 inet static
c) To delete the above temporary IP address of the interface, we can use the format:
del ip_address to delete dev interface_name
E.g., to delete the above address ‘10.0.15.33’ of the interface enp0s3, the command will be:
address del 10.0.15.33 dev enp0s3
Again check with the command:
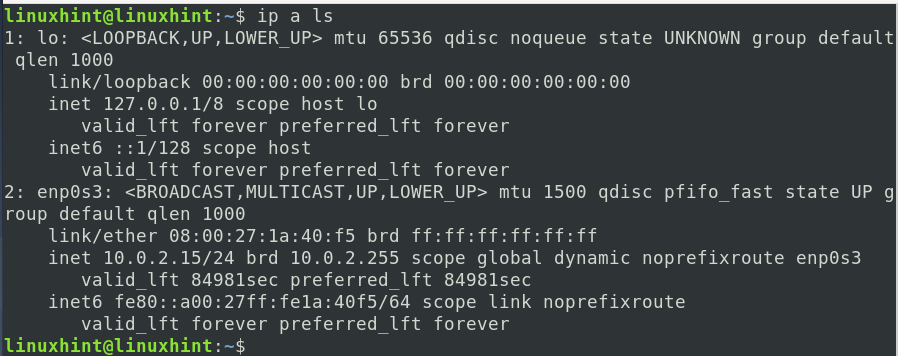
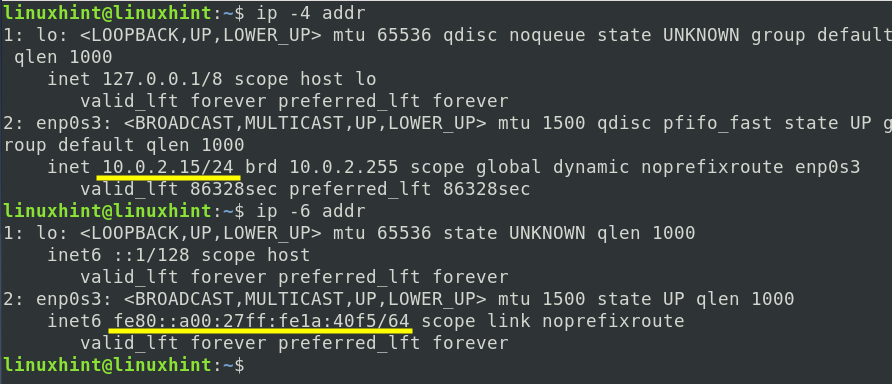
c) To display IPv4 addresses configured on your computer:
d) To display IPv6 addresses configured on your computer:
Conclusion
This guide has learned about a comprehensive list of frequently used ‘ip’ commands using Debian 10 Linux. This guide can also be tried on other Linux distributions like Ubuntu, Red RedHat-based distros, etc. To get more information regarding any ‘ip’ subcommand, you can use the man pages or the ‘help’ command.
In this guide, we will see various ways to configure various network operations on the Debian system. Although this guide is for the Debian system, most operations should run on other Debian based systems like Ubuntu and other Linux operating systems as well.
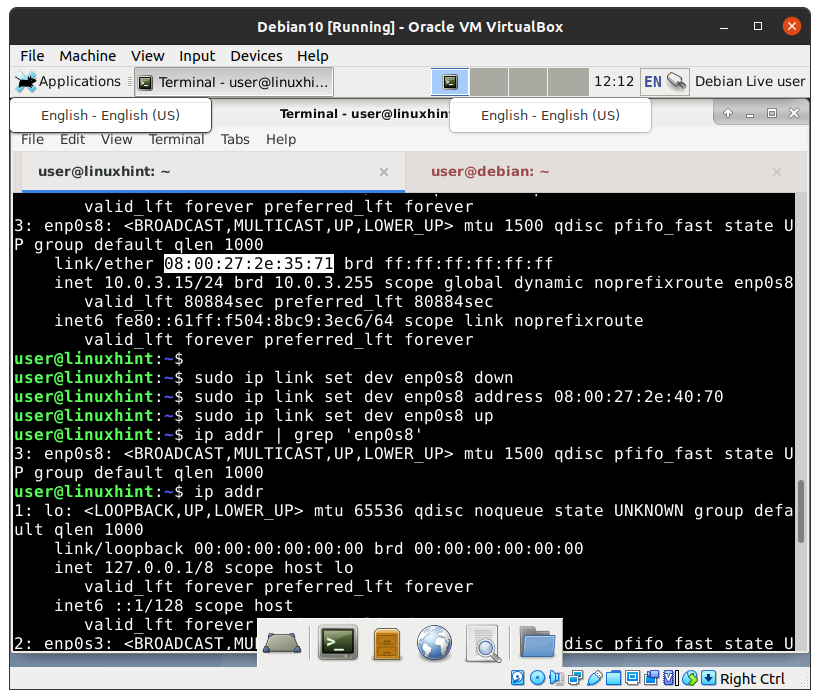
If you want, you can print the IP address of a specific interface or device, just use the below command

here enp0s8 is any interface or device. The naming convention may vary depending upon the naming mechanism used.
IP command can also be used to show the network performance statistics as follows
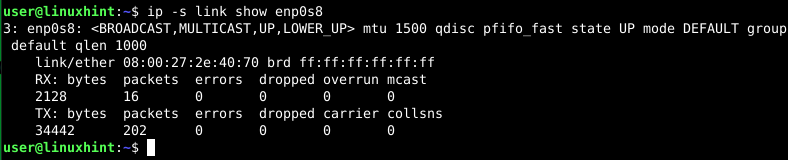
The above command output reveals the number of packets transmitted and received, packets dropped, and the packet with errors. This information can be used to troubleshoot network issues like low memory, connectivity issues, packet congestion, etc.
Using nmcli or Network Manager Command Line Interface tool to create a DHCP network connection
nmcli con add con-name ethernet ifname enp0s8

The above command will create a new connection named “MyCon1” on the device enp0s8. Let us see some details about this command:
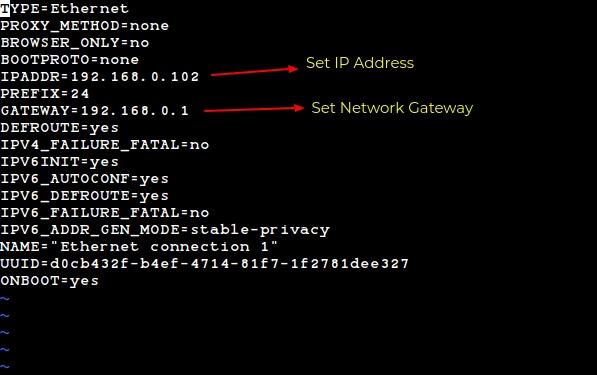
To create a static connection using nmcli, we will need to specify the IP address and the gateway as the argument
nmcli con add con-name “MyCon2” ethernet ifname eth1 ip4 192.168.2.10 gw4 192.168.2.0

nmcli con up
To verify the new connection, run:
$ nmcli con show –active
$ show enp0s3
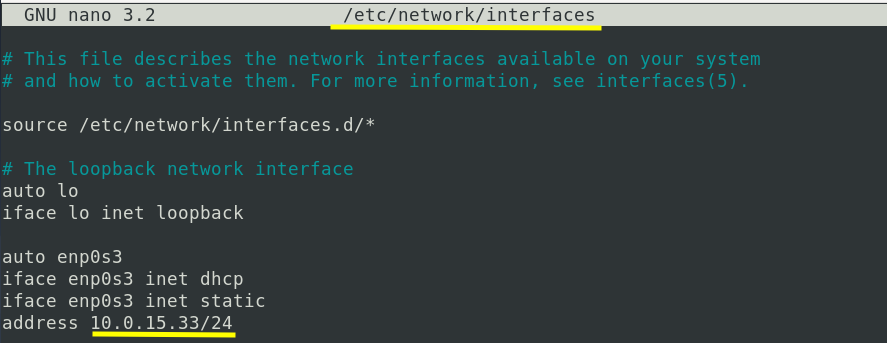
Configuring the network with Network Interfaces File
The /etc/network/interfaces file contains the definitions of various interface configurations. We can add configuration details to create a new connection. Let us see some manual configuration:
I. Adding a static IP address:
1. Open the /etc/network/interfaces file with sudo privileges:

You can add this configuration to the /etc/network/interfaces file or add it to a new file under the /etc/network/interfaces.d directory.
After modifying the above file, let’s restart the networking service for changes to take effect:
systemctl restart networking
$ enp0s3

The ifup and ifdown commands are used to manage the interfaces defined in this file. These tools are very helpful while configuring the network from the command-line interface. These commands can be found in /sbin/ifup and /sbin/ifdown.
II. Adding a DHCP Address:
The dhcp IP address is automatically assigned from the IP address pool of the DHCP server.

$ systemctl restart networking
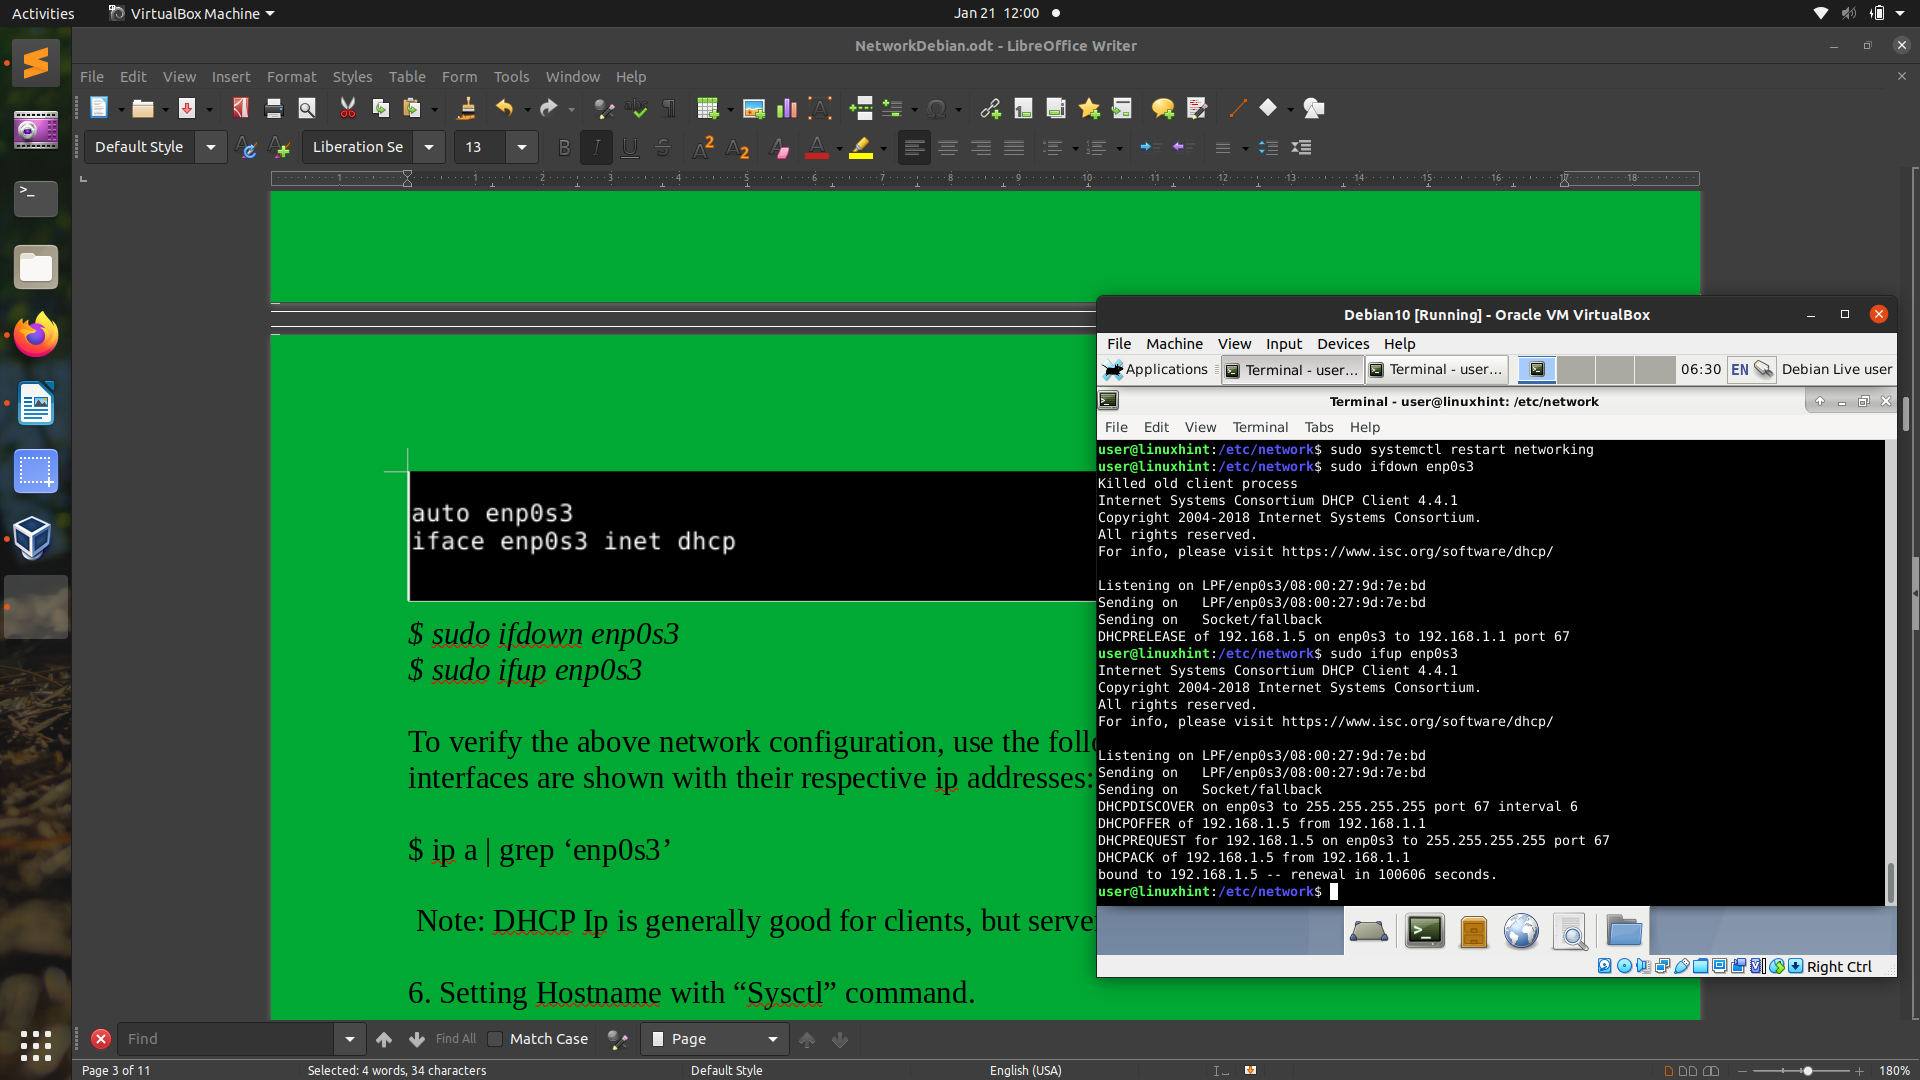
Note: DHCP Ip is generally good for clients, but the server usually works on a Static IP address.
Setting Hostname with the “Sysctl” command
Linux provides a sysctl utility to display and set the hostname as shown below:
i) Displaying the hostname:
$ sysctl kernel.hostname
kernel.hostname = debian

sysctl kernel.hostname= linuxhint
Now run the command bash exec to verify the new hostname:

Now to make this hostname permanent, we will have to edit the /etc/hosts and /etc/hostname files, so open the files and put the new hostname there:


Now from this point, you should see your new hostname every time you open a new terminal.
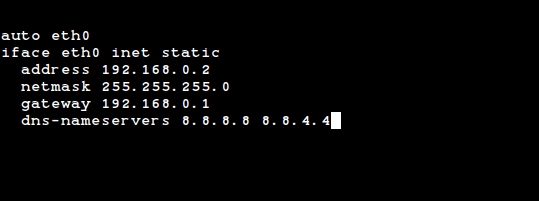
DNS configuration
DNS or domain name service is a naming system that is used to translate domain names into network addresses (IPv4 or IPv6). The DNS service has much more capability than simply translating domain names. The DNS service can work on both internet as well as on a private network.
Go to the line containing the string “nameserver” and add the IP address of the DNS server(8.8.8.8) as shown below:
Using Bonding on Debian 10
Bonding is a method in which two or more interfaces are merged to make a new logical interface. This bonded interface makes the network more reliable. In case a link fails, the other link will automatically balance all the network traffic. This increases the network availability as well. You can try bonding your wireless interface with the cable interface. If for some reason, the ethernet cable is unplugged or not working, the network traffic will automatically start flowing over the wireless interface.
Tip: We can use bonding to add multiple network interfaces (NICs) with the same IP address.
bonding bootconfig-$ -r
An output like “CONFIG_BONDING=m” shows that the bonding is enabled as a module
Step 1. Install the ifenslave package to configure bonding:
apt ifenslave
Step 2. Now bring down the interface before configuring it:
Note: Before proceeding, make sure that the interface you are modifying should not be in use; otherwise, it will break your network connectivity.
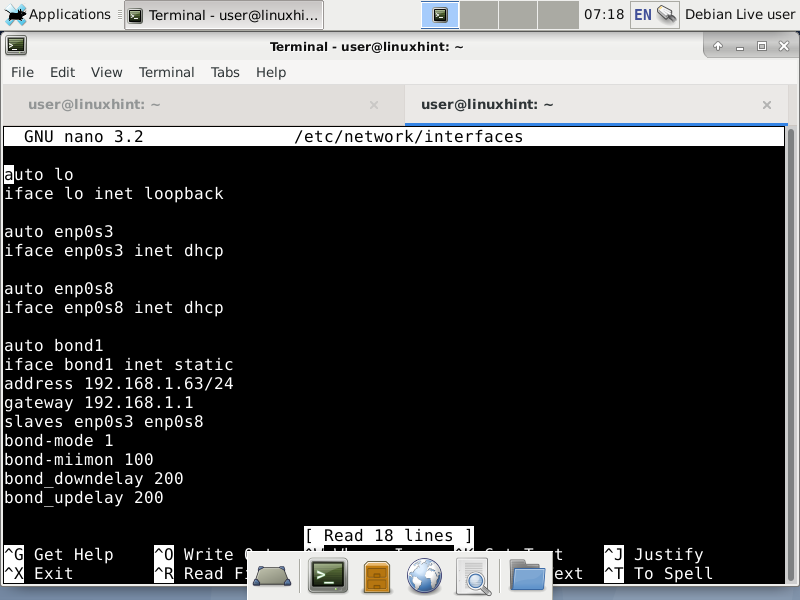
Step 3. Create a new bonding configuration and called it “bond1”. To do this, open the default network configuration file:
iface bond1 inet static
Linux supports different bond modes: balance-rr (mode=0), active-backup (mode=1), balance-xor (mode=2), broadcast (mode=3), 802.3ad (mode=4), balance-tlb (mode=5), balance-alb (mode=6). In this example we are using mode 1 or active backup as a bond mode.
Step 4. Bring the new bonded interface (bond1) up with command ifup. Now check if it works:
Configuring bridging on Debian
Bridging is the most common way to connect two different networks. A bridge (hardware) device is used when connecting two different networks of an organization, usually located at different locations. Linux system also has the capability to create a bridge between two interfaces having different networks. This way we can pass traffic between them.
Let us create a bridge between two different interfaces, “eth0″ and” eth1,” on a Debian system.
Step 1. Install the “brctl” tool to configure bridging on the Debian system:
apt bridge-utils
Step 3. create a new interface using the brtcl tool:
This will create a new virtual interface to link between eth0 and eth1.
Step 4. Now add both the interfaces to this virtual interface.
brctl addif br1 eth0 eth1
Step 5. To make this configuration permanent, we will add the new interface details to the file /etc/network/interfaces.
# The loopback network interface
iface lo inet loopback
# Set up interfaces manually, avoiding conflicts with, e.g., network manager
iface eth0 inet manual
iface eth1 inet manual
# Bridge setup
iface br0 inet dhcp
bridge_ports eth0 eth1
Now run the below command to bring the interface up:
auto lo br1
iface br1 inet static
If the network does not work after rebooting, try removing /etc/network/interfaces.d/setup file to fix the issue.
Configuring Networking from Command-line tools
While running “ifconfig,” you may encounter an error: “ifconfig: command not found”. For fixing this error, we need to install the “net-tools” package:
apt net-tools
Step 2. From the output of the above command, you can select the interface on which you want to add an extra IP address. Let us add an extra IP address (10.0.2.65) to the interface enps03.
add 10.0.2.65 dev enp0s3
Step 3. Verify if the IP has been added to this interface:
You should see here the new and old IP address in the output.
# The network interface enp0s3 is dhcp enabled
Step 5. Now save the file and bring down the interface and then again bring up the interface to apply the changes:
$ enpo3
Now verify the connectivity of the interface with the ping command:
If everything goes right, you should see a ping coming from the new IP address.
Ii) Changing the mac address of an interface.
Step 1. Run the below command to select the interface for you which you want to change the MAC address for:
It will show you all the interfaces with their mac address, state, and other information.
Step 2. Let us change the mac address of the “eth0” interface and bring it down:
Note: Before proceeding, make sure that the interface you are modifying should not be in use. Otherwise, it will break your network connectivity.
dev eth0 down
Step 3. Now enter the new mac address as below:
dev eth0 address «enter new mac address here.»
Step 4. Now bring up the interface again:
dev eth0 up
That’s all configuring the new mac address; you should see the new mac address:

The output of the above command should show you the new mac address. Macchanger can also be used for changing the mac address from the command line.
Iii) Enable and disable interfaces.
Besides ifup and ifdown tools, the ifconfig command can also be used to bring up and bring down an interface.
a) To bring down an interface:
b) To bring up an interface:
Iv) Remove an IP address from a network interface.
To delete an IP from the network interface, use the below command:
del ‘your IP address’ dev enp0s3
del 192.168.2.2 dev enp0s3
If you have multiple IP addresses for an interface, you can delete all as shown below:
flush dev enp0s3
V) Set the Default Gateway
The route or ip command can be used to set a Default Gateway:
route add default gw 10.0.2.20
add default via 10.0.2.20 dev enp0s3

В текущей статье я расскажу об очень популярной теме, с которой начинается практически любая первоначальная
работа с сервером. Настройка основных параметров сети в Debian — ip адрес, dhcp, ipv6, dns, hostname, статические маршруты,
сетевые карты и другие network параметры. Двигаться по теме будем шаг за шагом от простого к сложному, разбирая все нюансы по
порядку и отвечая на наиболее популярные вопросы.
Данная статья является частью единого цикла статьей про сервер Debian.
Сетевые настройки на сервере Debian
Вопрос настройки сети я уже кратко поднимал в теме начальной настройки Debian. Я рекомендую с ней ознакомиться и выполнить некоторые подготовительные действия,
чтобы было удобнее работать далее. Сейчас мы подробно разберем все наиболее значимые нюансы сетевых настроек, которые могут
пригодиться в повседневной работе.
Первоначальная настройка сети начинается во время установки сервера. Если у вас есть сетевой интерфейс и dhcp сервер в сети, то сеть сконфигурируется
автоматически на основе полученных настроек и будет готова к работе. В последствии вы можете выполнить настройку сети в Debian
через консоль с помощью программ ip или ifconfig. Наиболее популярным и современным средством
на текущий момент является ip, поэтому в дальнейшем рассмотрим вопрос конфигурации сетевых интерфейсов с ее помощью. Про
ifconfig тоже не забудем. Рассмотрим ее позже отдельно.
Отдельно стоит такой инструмент управления сетевыми подключениями как Network manager. Он используется в
сочетании с графическими оболочками, которых на сервере обычно нет, поэтому вопрос его настройки я не буду рассматривать. Мне
просто не на чем это делать, да и не вижу смысла.
Есть 2 различные возможности изменить сеть в Debian:
Мы рассмотрим оба этих варианта. Вводная теоретическая часть окончена, приступаем к практике.
Настройка статического IP
Вы установили сервер и во время установки указали какие-то сетевые параметры, или не указали, не важно. Но сейчас вы решили,
что вам нужно назначить статический ip (static ip) адрес. Воспользуемся для этого утилитой ip. Сначала посмотрим
список всех сетевых интерфейсов:

ip addr add 192.168.1.35/24 dev eth0
Этот адрес будет добавлен к уже существующему адресу. Проверим это:

Теперь сервер будет доступен по обоим адресам. Текущая настройка сохранится только до перезагрузки сервера. Чтобы она
применялась во время загрузки, нужно либо каким-то образом добавить команду на изменение настроек в автозагрузку, например
в /etc/rc.local, но это будет костыль. Правильнее отредактировать файл, который отвечает за сетевые настройки
в debian — /etc/network/interfaces. Для того, чтобы назначить постоянный статический ip адрес, его нужно привести
к следующему виду:
source /etc/network/interfaces.d/*
auto lo
iface lo inet loopback
auto eth0
iface eth0 inet static
address 192.168.1.35
gateway 192.168.1.1
netmask 255.255.255.0
Для проверки перезагружаем сервер и смотрим, все ли в порядке с настройкой статического ip адреса. Если вам нужно сменить
ip адрес в debian, то вы можете временно изменить его с помощью команды ip, либо постоянно, отредактировав параметр
address в файле сетевых настроек interfaces.
Получение сетевых настроек по DHCP
Теперь рассмотри вариант, когда вам необходимо получить динамический ip адрес в Debian. Здесь по аналогии с предыдущими
настройками можно пойди двумя путями:
Смотрим снова на текущую конфигурацию сети:

Выполним команду на получение ip адреса по dhcp и проверим сеть:
dhclient
# ip a

В качестве второго ip мы получили адрес от dhcp сервера. Если у вас несколько сетевых интерфейсов, то необходимо добавлять
название после команды, например вот так:
Для того, чтобы сбросить адрес, нужно воспользоваться следующим ключом:
Обращаю внимание, что эта команда сбросит все ip адреса интерфейса, в том числе и статические. To request again
address, you need to execute the previous command to get ip specifying the network interface eth0.
Any changes made to the console after a reboot will disappear. To save them, we give the file
/etc/network/interfaces to the following form:
source /etc/network/interfaces.d/*
auto lo
iface lo inet loopback
auto eth0
iface eth0 inet dhcp
Setting the default gateway
Now let’s deal with the default gateway. In the previous examples with a static ip address and dhcp settings
we did not need to specify the default gateway separately. We installed it along with the rest of the settings.
To see the default gateway in debian, you can use the following command in the console:
ip r sh
default via 192.168.1.1 dev eth0
192.168.1.0/24 dev eth0 proto kernel scope link src 192.168.1.24
This is the default gateway. You can use other, more popular and familiar commands:
If you get errors:
-bash: route: command not found
-bash: netstat: command not found
So you don’t have the net-tools package installed. You can install it with the following command.
apt install net-tools
The network tools from the net-tools package have been deprecated and are not included in the base system. I am them
I keep using it because I like their output more than the ip command. Netstat seems to me more informative,
although in essence, they all show the same thing. The refusal in favor of the ip utility is due to the fact that it combines
all major networking tools. It is more convenient to use only one to configure the network, rather than different utilities for different purposes.
If we need to change the default gateway, then we must first delete the current gateway, and then assign a new one.
route del default gw 192.168.1.1
# route add default gw 192.168.1.50
The same, only using ip:
ip route del default
# ip route add default via 192.168.1.50
Check what happened:
ip r sh
default via 192.168.1.50 dev eth0
192.168.1.0/24 dev eth0 proto kernel scope link src 192.168.1.24
Everything worked out. This setting will remain in effect until reboot. To save it, either change the configuration
interfaces file, or, if necessary, come up with something else.
How to specify DNS server
The last of the main network parameters remains — dns server. With it, debian and ubuntu have a certain
confusion. Traditionally, linux uses the /etc/resolv.conf file to set up dns servers. But at some point in
these distributions introduced the resolvconf program, which began to manage the dns settings in the system. Eventually,
the resolv.conf file is permanently overwritten by this program. It is needed primarily for systems where dns servers
are constantly changing. It keeps track of their change and correctly passes information about the change to programs for which it is important.
I personally do not know such programs and I have not had to deal with a situation where it was necessary.
If I’m not mistaken, the resolvconf program is not installed in the minimum debian configuration, but it is installed in ubuntu.
It is very easy to check the availability of the program:
If the output is empty, then it does not exist. Then everything is very simple. In order to specify the dns server, it is enough to write it down
to the /etc/resolv.conf file as follows:
nameserver 192.168.1.1
nameserver 77.88.8.1
nameserver 8.8.8.8
nameserver 1.1.1.1
Just in case, I indicated the local server and 3 external ones. If you have resolvconf, then in case of uselessness, remove it with the command:
apt-get remove resolvconf
After that, the server should be rebooted and the broken symbolic link /etc/resolv.conf should be removed, and instead
create a file with the desired content, which I have given above.
If for some reason you need the above program, you have it and you do not want to delete it, then the address
server dns must be specified in the /etc/network/interfaces file, adding one more to the interface parameters:
dns-nameservers 192.168.1.1 77.88.8.1 8.8.8.8 1.1.1.1
This item must be set immediately after specifying the gateway. Multiple addresses are separated by a space.
Change hostname
You provided a hostname during the debian installation. You can view its current value in the console:
This value is stored in the /etc/hostname file. There are 2 ways to change hostname in debian:
For the first method, it is enough to enter the command in the console:
Now let’s check what happened:
The hostname has changed, but /etc/hostname still has the previous value. After reboot hostname
will revert to the old debian value. To make a permanent change, you must enter the new value into the file manually:
The change will take effect after reboot. If you use the command:
hostnamectl set-hostname debian10
then the changes will be applied immediately. This method is more correct, I recommend using it. Now check
the current value of the hostname. It will change to what you specified in the command.
2 or more IPs on the same interface
Quite often there are situations when it is necessary to assign several ips on one interface. It is very easy to do this.
At the very beginning, I showed how quickly you can assign several ips using the program through the console in Debian. Now let’s do
so that these settings are retained after a reboot. To do this, we edit our beloved and beloved
/etc/network/interfaces:
source /etc/network/interfaces.d/*
auto lo
iface lo inet loopback
auto eth0
iface eth0 inet dhcp
auto eth0:1
iface eth0:1 inet static
address 192.168.1.35
netmask 255.255.255.0
With these settings, I will get 2 ip addresses on the network interface:
Important note. If after the above addition to the dynamic address of the static one, you restart
network, then only the static address will remain. If you just restart the server, then everything will be correct — the dynamics and
statics. Why this happens — I do not know.
You can add as many addresses as you need using various parameters this way.
How to quickly find out the ip address of a server in Debian
The question often arises of how to quickly find out or check the ip addresses assigned to the server in debian. I have already given above
an example of a simple command that shows all the network parameters of an interface. Now let’s look at a few options
only ip addresses will be clearly shown, without unnecessary information. To begin with, let’s use the already known ip command, trimming its output a bit:
You will find out all the ip addresses of the server, including ipv6. The same thing, but without ipv6, can be seen with another command:

If you get an error:
-bash: ifconfig: command not found
So you don’t have the net-tools package installed. You can install it with the following command:
If you get completely confused and cut off all unnecessary in the output of the ifconfig command, then you can only display a list of ip addresses:

A similar conclusion will be in this case:
You can remove the local interface so that it does not hurt your eyes, then in general everything is clear:

I think these options are enough to check all ip addresses, cutting off the excess.
Static routes
The next important element of network configuration is the management of static routes: route add
and deletion (route del). Let’s use the ip console command again. In order to add a route to debian, just type in the console:
ip route add 10.0.0.0/24 via 192.168.1.50
Checking the route table:

To delete a route, execute the command:
ip route delete 10.0.0.0/24
After reboot, all routes added in this way will disappear. To keep a static route in Debian after
reboot, edit interfaces again, adding to the description of the interface to which the routes will refer,
the following lines:
post-up route add -net 10.0.0.0 netmask 255.255.255.0 gw 192.168.1.50
post-up route add -net 10.1.0.0 netmask 255.255.255.0 gw 192.168.1.60
pre-down route del -net 10.0.0.0 netmask 255.255.255.0 gw 192.168.1.50
pre-down route del -net 10.1.0.0 netmask 255.255.255.0 gw 192.168.1.60
We have added 2 static routes. Reboot and check.

My entire config now looks like this:
source /etc/network/interfaces.d/*
auto lo
iface lo inet loopback
auto eth0
iface eth0 inet dhcp
post-up route add -net 10.0.0.0 netmask 255.255.255.0 gw 192.168.1.50
post-up route add -net 10.1.0.0 netmask 255.255.255.0 gw 192.168.1.60
pre-down route del -net 10.0.0.0 netmask 255.255.255.0 gw 192.168.1.50
pre-down route del -net 10.1.0.0 netmask 255.255.255.0 gw 192.168.1.60
auto eth0:1
iface eth0:1 inet static
address 192.168.1.35
netmask 255.255.255.0
gateway 192.168.1.35
Fixed static routes in debian sorted out, nothing complicated. Go ahead.
How to perform a network restart
Above, I suggested everywhere to restart the server in order to check the new network settings. It is not always necessary to do this.
Sometimes just re-reading the network configuration is enough. To restart the network in Debian, you can use the command:
service networking restart
It doesn’t run instantly, usually a few seconds. You can also reboot the network with the command:
She does the same, but there is some feedback on how it went. If you have everything in order on the server and no
network errors, then you can safely restart the network remotely via ssh. You will not even be disconnected from the current session. But for every
I don’t recommend doing this if you don’t have access to the server’s console. Anything can happen, I wouldn’t risk too much
once. It is better not to configure the network, as well as the firewall, without having direct access to the server console.
Debian vlan setup
To set up vlan on Debian, the first step is to install the vlan package:
apt install vlan
Now you need to deal with the necessary kernel module for vlan — 8021q. Check if it is loaded in the system:
If the output is empty and the default is empty, the module is not loaded. Download it and check it out:
Everything is in order, the vlan module has loaded. Let’s add it to autoload:
Now this module will be loaded at server start. Let’s create a virtual interface with vlan with id 1500:
vconfig add eth0 1500
Assign an address to the new interface and start it up:
ip addr add 192.168.10.100/24 dev eth0.1500
# ip link set eth0.1500 up
Can be done in one command using ifconfig:
ifconfig eth0.1500 192.168.10.100 netmask 255.255.255.0 up
Look what happened:

We have configured the vlan interface in Debian. Now let’s make sure that the settings are saved after the reboot. For this
add the properties of the vlan interface to the network configuration file, leaving and not touching what is already there:
auto eth0.1500
iface eth0.1500 inet static
address 192.168.10.100
netmask 255.255.255.0
vlan_raw_device eth0
Reboot the server and check what happened. You can restart the network, but if you did everything manually
done through the console, you won’t understand whether the settings from the file worked or not. It is therefore very easy and quick to set up
vlan on a Debian server.
How to disable ipv6 in Debian
So far, the new version of the ip protocol has not been widely adopted, if you do not specifically need it, ipv6 can
disable. Before disabling it, you need to find out which services are currently using it and reconfigure them by disabling
they have ipv6. If this is not done, then errors may occur in the operation of these programs. Probably not critical, but still,
we will do everything neatly and correctly. First, let’s check what works for us on ipv6:

On a freshly installed debian server, ssh, exim, dhclient and rpcbind use ipv6. Let’s turn it off. Let’s start with ssh.
Open the /etc/ssh/sshd_config file and uncomment the ListenAddress parameter:
service sshd restart
Let’s do the same with exim4. Open the configuration file /etc/exim4/exim4.conf.template and at the very beginning, after the introductory
write comments:
disable_ipv6 = true
service exim4 restart
In dhclient, to disable ipv6 in the config, remove all parameters in the request request starting with dhcp6. It should look like this:
request subnet-mask, broadcast-address, time-offset, routers,
domain-name, domain-name-servers, domain-search, host-name,
netbios-name-servers, netbios-scope, interface-mtu,
rfc3442-classless-static-routes, ntp-servers;
Disable ipv6 in rpcbind. Open configuration /etc/netconfig and comment 2 lines with udp6 and tcp6:
#udp6 tpi_clts v inet6 udp — —
#tcp6 tpi_cots_ord v inet6 tcp — —
Restart the rpcbind and nfs-common service, which depends on it:
service rpcbind restart
# service nfs-common restart
Check what we have left:
udp6 0 0 :::6909 :::* 1166/dhclient
For some reason, dhclient remained hanging on the ipv6 port, but okay, it’s not scary, it still won’t request anything via ipv6.
Now completely disable ipv6 in Debian:
net.ipv6.conf.all.disable_ipv6 = 1
net.ipv6.conf.default.disable_ipv6 = 1
net.ipv6.conf.lo.disable_ipv6 = 1
Add these lines anywhere in the config, for example, at the very end. Restart sysctl to apply settings:
Check the properties of network interfaces with the ifconfig and ip commands. There should be no information about ipv6, we have completely disabled it.
Working with the hosts file
In the /etc folder of any linux distribution, including debian, there is a hosts file. Let’s understand a little
what is this file and what is it for. By default, it looks like this:

Imagine that we have a certain server in the local network with the name server and ip 192.168.1.50 We want to address it by its name.
Then add an entry to the hosts file:
Now we can refer to the server simply by the name server.

The server will first of all look at the information in the hosts file, only then in the dns server. For example, if you add the line to the file:
Then addressing the address ya.ru you will get to the localhost:

This functionality can be useful for publishing some internal services on the local network, to which access will only be
from your network. You do not need to use a dns server, with the hosts file the setup is much faster.
Network card setup
Sometimes there are situations when it is necessary to configure or change the settings of the network card. I’ll immediately note what to set up
the network interface card is possible only on real iron. On the virtual, most likely, none of the commands proposed further will result in
to some result. Virtual network adapters simply don’t have settings. First, let’s see what network cards are on the server:
01:00.0 Ethernet controller: Qualcomm Atheros AR8121/AR8113/AR8114 Gigabit or Fast Ethernet (rev b0)
In my case, this is the only network card from Qualcomm. Now install the ethtool utility to configure
network card:
apt install ethtool
Let’s see information about the network card:

The current speed at which the card operates is indicated. It can be changed if necessary:
ethtool -s eth0 speed 100 duplex full
With this command, you can change the speed of the network card to 100Mb/s in case there was a different speed. Let’s see what happened:

I just showed it as an example, hardly anyone will need to slow down. More often you need to perform the inverse transformation. At
I had a situation where the network card stubbornly did not want to work at a speed of 1Gb, although it supported such work, and the switch was
gigabit. I fought for a long time and tried various utilities to change the speed. It turned out that the patch cord was 4-core from the kit
some router. They used it to connect and did not even pay attention to the fact that it does not support gigabit operation.
The ethtool utility has many parameters that can be used to configure the network card. An example of these options can be found at
redhat website.
Working with the ifconfig utility
At the end of the network settings, I would like to talk a little about ifconfig. Earlier I mentioned that more modern
the tool for configuring the network is the ip utility. In recent releases of Debian and CentOS, ifconfig has been omitted altogether.
from the base installation, it has to be installed separately. I P combines two functionalities — setting up network interfaces
and routing. That is, in fact, it replaces ifconfig + route. It implements the functionality of both programs.
I myself am used to ifconfig, as it is available not only in linux, but also in freebsd. It is convenient to use the same tool in
all distributions. But lately I have been retraining on ip, as I need to keep up with the times. The trend is that ip will be
promote more and more because of its greater novelty and, probably, convenience. As for convenience, I personally can’t do anything.
to say I don’t care what command to use:
ifconfig eth0 192.168.1.35 netmask 255.255.255.0
They do the same thing. The rest of the commands for configuring network interfaces also do not differ much, they are simply written
a little differently. Here is an example of working with routes:
ip route add 192.168.100.0/24 dev eth2
route add -net 192.168.100.0/24 dev eth2
This concludes my material on the topic of setting up networking in debian. I have considered all the most significant and necessary
parameters that you have to deal with when configuring the server.
Frequently asked questions on the topic of the article (FAQ)
Is there a fundamental difference in how to set the hostname of the server?
In general, no. You can either edit the hostname file or use the hostnamectl utility. The only thing I remember
that you need to remember to check the hosts file and change the server name, including there.
Why disable ipv6 on a Debian server?
Disable ipv6 or not, it’s up to you. I adhere to the following principle in setting up servers — disable or remove everything that
which is not used. This reduces the chance of getting a bug or vulnerability in the component.
Why is the ifconfig command declared deprecated in many distributions and missing from the system?
It has been in this status for the last 10 years and yet continues to be used. As far as I understand, replacing ifconfig
the ip command is more functional and replaces several old network utilities at once, such as ifconfig, netstat, route
etc. The rejection of ifconfig in favor of ip is an attempt to introduce a universal and self-sufficient utility for working with the network.
How to set up a proxy in Debian?
There is no single answer to this question, since the proxy is configured at the level of individual applications, not the system. Which
the application needs access to the Internet through a proxy, and that is configured. How to do this depends on the application itself and its
opportunities. There are those who do not support work through a proxy at all.
System administrators often need to perform network tasks on Linux servers. There are many tools, but most Linux users prefer to use the ip command because of its simplicity and rich functionality.
The ip command is similar in many ways to the old ifconfig command, but it is much more powerful, with more features and functionality added.
Interesting: How to find out the date and time when a file was created in Linux?
The ifconfig command is deprecated and replaced by the ip command in all modern Linux distributions. However, the ifconfig command still works and is available for most Linux distributions.
Setting up a static IP address in Linux
To set up a permanent static IP address, you need to modify the network interface configuration file /etc/network/interfaces to make permanent changes, as shown below for Debian based distributions.
Next, restart the network services after entering all the data with the following command.
sudo systemctl restart networking
Temporarily Setting a Static IP Address in Linux
ip addr add 172.19.1.10/24 dev eth2
OR
sudo ip addr add 172.19.1.10/24 dev eth2
Note: Unfortunately, all these settings will be lost after system reboot.
h2 How to display all network interfaces
In the ip command, the link object represents a network interface. We can use the show command to display all network interfaces.
Now let’s display all network interfaces with the following command:
The above result shows detailed information about all network interfaces, such as interface name, flags, status, connection address, broadcast address, etc.
How to check the IP address of a specific network interface
ip link show eth2
Let’s look at this with an example.
ip addr show
ip addr show eth2
How to display IP address in colored output
The ip command shows detailed information about network objects. However, sometimes we need to look at limited information. In such cases, we can enable colored output. This option highlights important details in different colors.
Let’s use the —color option of the command to display the output in different colors:
ip —color addr show eth2
In the above output, you can see that the interface name, ethernet address, and status are highlighted in different colors.
How to display an IP address in the format
In the previous examples, we have seen that the ip command prints the required information. However, parsing the output of this command and extracting the necessary information using third-party scripts is not an easy task. In such cases, we can tell the ip command to generate output in a format that can be easily parsed by machines.
So let’s use the -j option with the command to display the same output in the format :
ip -j link show eth2
This method is useful for automation because it is a widely used format and there are many libraries/tools for parsing in various programming languages.
How to make output more readable
In the previous example, we used the -j option to display output in . This default format is compact and takes up little space. However, it is not easy to read due to the lack of indentation.
To overcome this limitation, we can use the -p option, which makes the output more readable through indentation. Let’s look at this with the following example:
ip -j -p link show eth2
Here we see that the same output is much more readable compared to the previous examples.
How to remove an IP address from a network interface
ip addr del 172.19.1.10/24 dev eth2
OR
sudo ip addr del 172.19.1.10/24 dev eth2
ip -j -p addr show eth2
How to turn on the network interface
The «up» flag with the interface name (eth2) turns on the network interface. For example, the following command will enable the eth2 network interface.
ip link set eth2 up
OR
sudo ip link set dev eth2 up
Now check the updated status:
How to disable the network interface
The «down» flag with the interface name (eth2) disables the network interface. For example, the following command will disable the eth2 network interface.
ip link set eth2 down
OR
sudo ip link set eth2 down
Now check the status of the network interface eth2:
The output above shows the new state of the network interface.
How to remove all network interface IP addresses
sudo ip addr flush eth2
How to check the routing table?
The routing table stores the necessary information to forward a network packet to the desired destination. We can use the route object of the ip command to display the routing rules.
To display all the rules of the routing table, use the following command:
ip route show
How to add a new static route?
Why add static routes or manual routes? For example, we need to add static routes so that traffic takes the best path to a destination.
sudo ip route add 172.19.1.0/24 dev eth2 proto kernel scope link src 172.19.1.2
Now let’s check that the entry was added successfully:
How to delete a static route?
The del subcommand removes a specific entry from the routing table. For example, the command below removes the route entry of the eth2 device:
sudo ip route del 172.19.1.0/24
Now let’s check that the entry was successfully deleted:
How to add persistent static routes
All of the above routes will be lost after system reboot. To add a persistent static route, edit the file /etc/sysconfig/network-scripts/route-eth2 To save static routes for eth2, use this name. The route-eth2 file is missing by default and needs to be created. For a different interface, the file name will be different.
and add the following lines, save and exit.
172.19.1.0/24 via 172.19.1.2 dev eth2
Open the /etc/network/interfaces file and add persistent static routes at the end. IP addresses may differ in your environment.
sudo vi /etc/network/interfaces
How to add a default gateway?
In network services, the default gateway plays an important role. It is used when the routing table does not contain any information about the destination.
The default gateway can be specified globally or in configuration files for a specific interface. The advantage of a default gateway is that there is more than one NIC in the system. You can add a default gateway on the fly as shown below.
First, let’s add the eth0 network interface as the default gateway:
sudo ip route add default via 172.17.0.1
Now check the default gateway setting with the following command:
Note that we ran this command on a test machine. Be careful when using this command on a production server.
How to remove the default gateway?
We can use the following command to remove the default gateway:
sudo ip route del default
Now let’s look at the routing table to make sure the default gateway has been removed:
How to display -cache?
We can use the neigh object with the ip command to display -cache:
ip neighbor show
In the above command, neigh shows neighboring objects.
How to add an entry?
To create a new entry, we can use the add subcommand with the neigh object.
sudo ip neigh add 172.19.1.0 lladdr 02:42:e3:40:a6:b1 dev eth2
Now let’s list the -cache entries:
In the above output, we see a new entry for the eth2 network interface.
How to delete an entry?
As with other network objects, you can use the del subcommand to delete an entry. For example, the command below removes the eth2 network interface -entry:
sudo ip neigh del 172.19.1.0 dev eth2
Now let’s check that the entry was deleted by looking at the -cache list:
How to clear all -records?
We can use the flush subcommand to remove multiple -records. To understand this, first add some state entries:
sudo ip neigh add 172.19.1.0 lladdr 02:42:e3:40:a6:b1 dev eth2 nud stale
sudo ip neigh add 172.19.2.0 lladdr 02:42:e3:40:a6:b2 dev eth2 nud stale
sudo ip neigh add 172.19.3.0 lladdr 02:42:e3:40:a6:b3 dev eth2 nud stale
Next, check that the new entries were successfully added:
Then clear all entries with the following command:
sudo ip next flush all
Finally, make sure all entries are deleted:
How to set for network interface?
stands for Maximum Transmission Unit, which is the largest packet size that can be transmitted in a single transaction. We can manipulate the size according to our performance requirement.
First, find the network interface eth2:
Next, update the size of the eth2 network interface to 3000:
sudo ip link set mtu 3000 dev eth2
And finally, check that it was successfully updated:
How to change Mac network address?
The ip command allows us to change the -address of a network interface. To do this, we can use the set subcommand with the link object:
First list the current address of the eth2 network interface:
sudo ip link set dev eth2 address 02:42:ac:13:01:03
Finally, check that the -address has been changed:
Linux and Windows Expert
Experienced skydiver. I read and listen to podcasts a lot. I love campfires, guitar songs and approaching deadlines. I love to travel.
