

- Introduction
- Was this answer helpful?
- Introduction To Filesystems
- Ссылки
- Установка пакета для работы CIFS
- Монтирование CIFS вручную
- Монтирование CIFS автоматически через fstab
- Дополнительно
- Ручное монтирование сетевой папки
- Автоматическое монтирование сетевой папки при загрузки системы
- RSS
- Unmounting
- FSTAB with inline authentication
- FSTAB with file authentication
- Использование
- Размонтирование командой umount
- Монтирование NTFS дисков/разделов
- Монтирование образов дисков
- Монтирование сетевых дисков NFS
- Монтирование сетевых дисков SMB
- Монтирование FTP серверов
- Монтирование каталога файловой системы с другого компьютера через ssh
- Enable Name Resolution
- Mount —bind
- Mount with authentication — file
- Now we need to create our creds.txt file
- Mount with authentication — next line
- Mount with authentication — same line
- Connect to a file server
- Mounting
- Windows NTFS Disks
- Unmounting
- Writing URLs
- What Can Be Mounted
- Troubleshooting
- Файл конфигурации
- Manual mounting from the command line
- Install cifs-utils
- If you need even more security
- Mount
- FSTAB
- Параметры монтирования
- -t Тип файловой системы
- -o Атрибуты доступа
- See Also
- Types of servers
- Prerequisites
- Mount with read/write access
- Common mistakes
- Common error messages
- Most basic mount command
- Список смонтированных файловых систем
Introduction
To browse files over the network, open the
application from the overview, and click
in the sidebar. The file manager
will find any computers on your local area network that advertise
their ability to serve files. If you want to connect to a server
on the internet, or if you do not see the computer you’re looking
for, you can manually connect to a server by typing in its
internet/network address.
Ensure the command mount.cifs is present in your distro. If you haven’t need to install cifs-utils. We are also will consider, how to mount network folder and after rebooting folder will be saw in system.
# yum install cifs-utils
# apt-get install cifs-utils
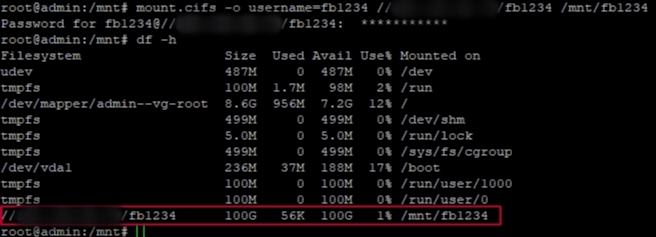
Now you need to create a mount point. For example create folder — /mnt/fb1234. You can choose any way for your disk space.
# mkdir /mnt/fb1234
# df -h
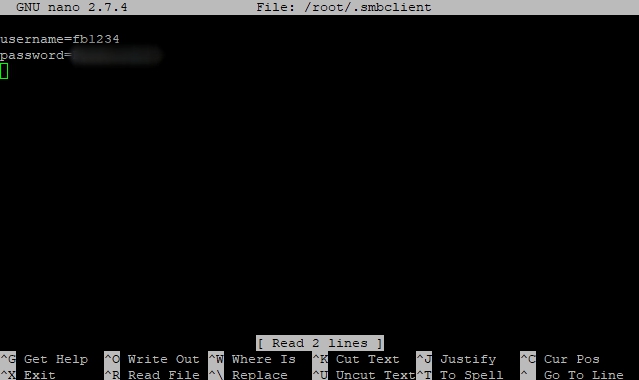
# vi /root/.smbclient
# nano /root/.smbclient
In this article was mounted network folder «fb1234» on the server «Server IP-addresses» in point /mnt/fb1234.
Was this answer helpful?
fstab — это текстовый файл, содержащий список устройств хранения информации и параметры монтирования. Различные накопители, которые необходимо автоматически присоединить во время загрузки операционной системы, по порядку перечисляются в файле fstab. Также в этом файле содержатся информация об устройствах, которые не присоединяются автоматически, но при выполнении монтирования устройства стандартной командой mount происходит присоединение устройства с заданными параметрами Это необходимо, к примеру, для CD/DVD-приводов, которые не примонтированы постоянно, а монтируются при наличии диска в приводе.
А теперь о проблемы, которая присуща всем Debian дистрибутивам (Ubuntu в том числе).
Если ресурсы примонтированы вышеуказанным методом, то при перезагрузке или выключении системы, можно будет увидеть такое сообщение:
1.CIFS VFS: No Response for Cmd <number> mid <number>
Это связано с тем, что сначало отключаются все службы(S20sendsigs), а затем делается попытка отмонтировать сетевые ресурсы(S31umountnfs.sh). Но службы то уже отключены . С данной проблемой столкнулся еще с Ubuntu 8.04. В Ubuntu 9.04 она осталась.
Для ее устранения необходимо отредактировать уровни запуска, а именно rc0 и rc6. Для этого выполняем команды:
cd /etc/rc0.d
sudo mv S31umountnfs.sh S19umountnfs.sh
Те же действия необходмо проделать и в каталоге rc6.d
cd /etc/rc6.d
sudo mv S31umountnfs.sh S19umountnfs.sh
Теперь при выключении или перезагрузке системы, сначало отмонтируются сетевые ресурсы, а затем отключаются службы.
192.168.1.xxx = replace this with your NAS TCP/IP address on the network
targetfolder = the folder where you want the mounted NAS folder contents to appear (Create this folder and ensure you make it read/write if you want two way access to it)
Name the file something meaningful (here I use «mount_OurCloud.desktop». The «.desktop» file type is required.)
Save this and then use root authority to set the file permission for executable.
Reboot and your NAS folder should be visible in the target folder.
Introduction To Filesystems
These system filesystems are all automatically set up, but it is creating custom filesystems and using removable media which allow for some interesting uses of mounting.


Напоминалка по монтированию шары в Linux.
Для работы CIFS/SMB необходимы порты:
- TCP 445
- UDP 137
- UDP 138
- UDP 139
Для предоставления удалённого доступа используется TCP 445. Для разрешения имен NetBios используются порты UDP 137, 138 и TCP 139, без них будет работать только обращение по IP адресу.
В Windows поддержка CIFS/SMB есть по умолчанию. В Linux CIFS/SMB реализуется с помощью samba.
Ссылки
Настройка samba сервера Ubuntu и клиента RHEL
Samba на Ubuntu Server в домене Windows
Установка пакета для работы CIFS
yum install cifs-utilsapt-get install cifs-utilsМонтирование CIFS вручную
mount.cifs <путь к папке> <куда монтировать> <-o опции>
или
mount -t cifs <путь к папке> <куда монтировать> <-o опции>
Пример монтирования общей папки public на сервере с IP адресом 10.20.30.40 в локальную папку /mnt:
mount.cifs //10.20.30.40/public /mntmount.cifs //10.20.30.40/share /mnt -o user=v.pupkinmount.cifs //10.20.30.40/share /mnt -o user=v.pupkin,domain=ilab.localМонтирование CIFS автоматически через fstab
vim /root/.smbshareusername=v.pupkin password=MySecretPassw0rd domain=ilab.local
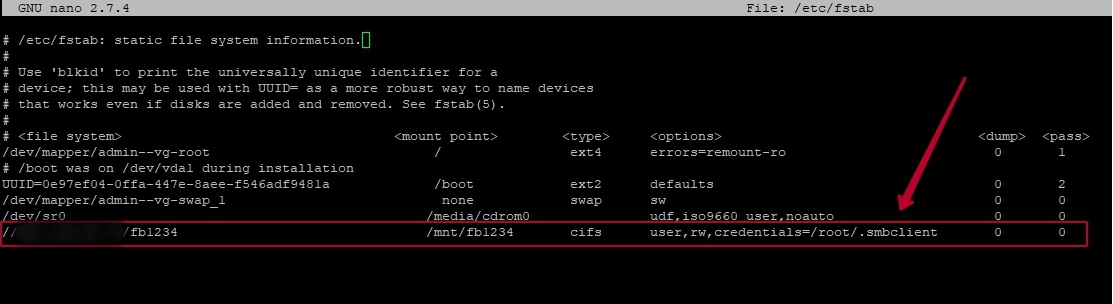
Добавляем строку в /etc/fstab:
//10.20.30.40/share /mnt cifs user,rw,credentials=/root/.smbshare 0 0- //10.20.30.40/share — путь к монтируемой папке
- /mnt — локальная папка для монтирования
- cifs — тип файловой системы
- user — позволяет монтировать любому пользователю
- rw — чтение/запись
- credentials — путь к файлу с логином и паролем для монтирования
- 0 — индикатор резервной копии (0 — не используется)
- 0 — порядок проверки раздела (0 — не проверять)
Монтируем перезагрузкой или командой:
mount -aДополнительно
Монтирование CIFS с пробелом (заменяем пробел на \040):
//10.20.30.40/share\040with\040spaces /mnt cifs user,rw,credentials=/root/.smbshare 0 0Монтировать от гостевой учётной записи:
//10.20.30.40/share /mnt cifs guest 0 0Указать версию протокола SMB 3.0:
//10.20.30.40/share /mnt cifs user,rw,credentials=/root/.smbshare,vers=3.0 0 0Монтировать под пользователем:
//10.20.30.40/share /mnt cifs defaults,uid=v.pupkin,gid=v.pupkin.group,rw,credentials=/root/.smbshare,vers=3.0 0 0Монтировать с правами:
//10.20.30.40/share /mnt cifs defaults,uid=222,gid=222,rw,credentials=/root/.smbshare,vers=3.0,file_mode=0600,dir_mode=0700 0 0Намекаем на виндовую шару:
//10.20.30.40/share /mnt cifs defaults,uid=222,gid=222,rw,credentials=/root/.smbshare,vers=3.0,file_mode=0600,dir_mode=0700,nounix 0 0//fs.ilab.local/новая\040папка /mnt cifs defaults,uid=www-data,gid=www-data,rw,credentials=/root/.smbshare,vers=3.0,file_mode=0600,dir_mode=0700,nounix,codepage=cp1251,iocharset=utf8 0 0 
Сегодня в статье рассмотрим пример как можно примонтировать сетевую папку Windows или Unix в операционную систему Linux.
В качестве подопытного будем использовать ПК с установленной на неё Ubuntu Server. Но данное руководство будет справедливо и для большинства других ОС на Linux.
Для работы c сетевыми дисками SMB/CIFS (Windows или Samba) нам понадобиться утилита cifs-utils. Для её установки открываем терминал и набираем следующую команду:
sudo apt-get install cifs-utilsДалее потребуется создать директорию, куда мы хотим примонтировать нашу расшаренную сетевую папку. Для этого давайте наберем вот такую команду:
sudo mkdir /home/user/share- user — имя вашего пользователя
- share — название директория куда будем монтировать нашу сетевую папку
Ручное монтирование сетевой папки
Далее набираем команду для монтирования нашей сетевой папки.
sudo mount -t cifs //myserver/share-name /home/user/share -o username=user2,password=parol,domain=mydomenmount -t cifs //192.168.0.1/share-name /home/user/share -o username=user2,password=parol,domain=mydomen- //myserver/share-name — это путь до нашей шары в сети. Если используются русские буквы или пробел в имени сетевой папки, надо весь путь заключить в кавычки «
//192.168.0.1/Мои документы«
- /home/user/share — это наша директория куда мы будем производить монтирование.
Так же сразу можно задать права доступа и кодировку, тогда надо вписать следующие параметры:
mount -t cifs //192.168.0.1/share-name /home/user/share -o username=user2,password=parol,domain=mydomen,iocharset=utf8,file_mode=0777,dir_mode=0777- username — указываем имя пользователя на удаленном хосте (сервере)
- password — указываем пароль пользователя user2
- domain — название домена (рабочей группы), если необходимо
- iocharset — указываем кодировку (utf8; cp1251; koi8-r)
- file_mode — права доступа к файлам
- dir_mode — права доступа к директории
Автоматическое монтирование сетевой папки при загрузки системы
sudo nano /root/.smbuserusername=user2
password=parol
domain=mydomenДля безопасности ограничим доступ к файлу:
sudo chmod 400 /root/.smbuserТеперь необходимо отредактировать файл fstab. Открываем его в терминале и вписываем необходимую информацию:
sudo nano /etc/fstab//192.168.0.1/share-name /home/user/share cifs credentials=/root/.smbuser 0 0- credentials — тут указываем путь до файла с нашими данными для входа.
Также если при попытки создать или удалить какие-либо файлы у Вас не хватает прав, то необходимо добавить uid и gid параметры.
//192.168.0.1/share-name /home/user/share cifs credentials=/root/.smbuser,uid=1000,gid=1000 0 0- uid и gid — цифра 1000 указывает на нашего пользователя для которого производим монтирование шары. Если у вас идентификатор отличается, то указываем свой.
mount -aЕсли не было ошибок, то для проверки всё ли у нас примонтировалось наберем команду:
df -hЕсли в выводе видим сетевую папку, то все хорошо. При следующей перезагрузки ПК, удаленная шара уже смонтируется автоматически.
Если есть вопросы, то пишем в комментариях.
RSS
Если вы обнаружили орфографическую ошибку, пожалуйста, сообщите нам, выделив текст и нажав на него.
Файловая система CIFS, встроенная в ядро Linux — это предпочтительный метод для монтирования расшаренных сетевых ресурсов SMB/CIFS. CIFS (сокр. от англ. Common Internet File System, Единая Файловая Система Интернета) — сетевой протокол прикладного уровня для удалённого доступа к файлам, принтерам и другим сетевым ресурсам, а также для межпроцессного взаимодействия.
CIFS VFS является виртуальной файловой системой для Linux, обеспечивающей доступ к серверам и устройствам хранения, совместимым с версией 1.0 спецификации CIFS SNIA или поздней. Популярные серверы, такие как Самба, Windows 2000, Windows XP и многие другие поддерживают CIFS по умолчанию.
Файловая система CIFS поддерживается набором утилит пространства пользователя. Тот пакет инструментов называют CIFS-utils. Эти инструменты были первоначально частью пакета Samba, но по некоторым причинам их выделили в отдельный проект.
Для работы (монтирования) с расшаренными сетевыми дисками SMB/CIFS (Windows или Samba) необходимо установить пакет cifs-utils, который присутствует в репозиториях практически всех дистрибутивов Linux. Далее будем рассматривать только Ubuntu.
$ sudo apt-get install smbfs
Теперь можно монтировать расшаренные сетевые ресурсы:
$ sudo mount.cifs //192.168.1.107/share1/ /mnt/shares/share1/ -o user=user1,pass=user1password,iocharset=utf8,file_mode=0777,dir_mode=0777
- //192.168.1.107/share1/ – IP адрес или сетевое имя и имя расшаренного ресурса (папки)
- /mnt/shares/share1/ – точка монтирования
- -o users=user1,password=user1 – имя пользователя и пароль для доступа к общему ресурсу
- iocharset=utf8 — кодировка по умолчанию
- file_mod и dir_mod — права доступа к файлам и папкам в расшаренном ресурсе
Для монтирования публичных сетевых ресурсов имя пользователя и пароль не задаются:
mount.cifs //192.168.1.107/share1/ /mnt/shares/share1/ -o guest,rw,iocharset=utf8,file_mode=0777,dir_mode=0777
Для того, чтобы расшаренный сетевой ресурс (папка) монтировался при загрузке системы, необходимо в конфигурационный файл /etc/fstab добавить строчку:
//192.168.1.129/share1 /mnt/shares/share1 cifs username=user1,password=user1password,iocharset=utf8,file_mode=0777,dir_mode=0777 0 0
В последних версиях Ubuntu/Mint может появляться ошибка:
mount error(2): No such file or directory
Refer to the mount.cifs(8) manual page (e.g. man mount.cifs) and kernel log messages (dmesg)
а в syslog можно найти следующее:
No dialect specified on mount. Default has changed to a more secure dialect, SMB2.1 or later (e.g. SMB3), from CIFS (SMB1). To use the less secure SMB1 dialect to access old servers which do not support SMB3 (or SMB2.1) specify vers=1.0 on mount.
В этом случае необходимо явно указать диалект, то-есть добавить в конец строки vers=1.0
mount.cifs //192.168.1.107/share1/ /mnt/shares/share1/ -o guest,rw,iocharset=utf8,file_mode=0777,dir_mode=0777,vers=1.0
Unmounting
To UNmount it:
umount /mnt/share1
(notice it’s not unmount, it’s umount)
FSTAB with inline authentication
//win10/share1 /mnt/share1 cifs noperm,_netdev,username=john,password=123,domain=domain1 0 0
replace “win10” with the hostname of your windows machine
cifs tells the kernel to use mount.cifs as opposed to ext3 or ntfs or some other type of file system
_netdev will cause the kernel to wait on the network to become ready before attempting the mount. Without this option, the mount will probably fail during boot because the network won’t be ready yet
replace “123” with the windows password
replace “domain1” with the name of your active directory domain. If you don’t know what an active directory domain is, you don’t have one, so just leave this option blank or remove it.
the 2 zeros tell the kernel we don’t want to dump or check the filesystem
FSTAB with file authentication
//win10/share1 /mnt/share1 cifs noperm,_netdev, credentials=/root/creds.txt 0 0
replace “win10” with the hostname of your windows machine)
cifs tells the kernel to use mount.cifs as opposed to ext3 or ntfs or some other type of file system)
_netdev will cause the kernel to wait on the network to become ready before attempting the mount. Without this option, the mount will probably fail during boot because the network won’t be ready yet)
Now we need to create our creds.txt file:
nano /root/creds.txt
username=johnpassword=123domain=domain1
chmod 600 /root/creds.txt
Использование
mount /dev/cdrom /mnt/cdrom
Устройство /dev/cdrom монтируется в каталог /mnt/cdrom,
если он существует. Начиная от момента монтирования и пока пользователь
не отмонтирует файловую систему (или туда не будет смонтировано что-то
иное) в каталоге /mnt/cdrom будет содержаться дерево каталогов устройства /dev/cdrom; те файлы, и подкаталоги, которые раньше находились в /mnt/cdrom, сохранятся, но будут недоступны до размонтирования устройства /dev/cdrom.
Размонтирование командой umount
Для размонтирования достаточно указать точку монтирования или имя устройства.
umount /dev/cdrom
Для распространённого случая, когда USB-диск имеет файловую систему FAT32, команда монтирования выглядит так:
mount -t vfat -o codepage=866,iocharset=utf8 /dev/sda1 /mnt
Параметр codepage необходим, чтобы имена созданных файлов корректно
отображались в старых ОС (например, DOS). Если дистрибутив использует в
качестве кодировки системной локали не UTF-8, то её необходимо указать в параметре iocharset так:
mount -t vfat -o codepage=866,iocharset=koi8-r /dev/sda1 /mnt
Реально используемую кодировку можно определить выполнив команду
locale
.
Полезными опциями при монтировании Flash-дисков являются
sync
flush
.
Первая приводит к постоянному сбросу на диск буфера записи, так что
данные не теряются при отсоединении flash-диска без размонтирования.
Побочный эффект такого монтирования — значительное уменьшение в скорости
записи. Вторая опция (доступна только в новых ядрах Linux) ведёт к
сбросу буфера на диск после записи последнего файла. Это также
способствует сохранению данных в случае удаления диска без
размонтирования, но не приводит к падению скорости записи.
Монтирование NTFS дисков/разделов
mount -t ntfs -o noatime,users,rw,fmask=111,dmask=000,locale=ru_RU.UTF-8 /dev/sda1 /mnt/win_xp
Монтирование образов дисков
Если имеется образ диска в виде iso-файла, то для его монтирования нужно указать параметр
-o loop
и, обычно, тип файловой системы
-t iso9660
file.iso
— это имя файла образа, а
/mnt/iso
— точка монтирования):
mount -o loop -t iso9660 file.iso /mnt/iso
Монтирование образов в форматах, отличных от iso потребует
преобразования в iso-образ или использования эмулятора. Для
преобразования можно использовать утилиты командой строки (см. ниже) или
утилиту kiso с графическим интерфейсом. Монтирование образов дисков в Linux
Для преобразования образа bin/cue в iso-образ можно воспользоваться конвертером bchunk:
bchunk image.bin image.cue image.iso
Монтирование сетевых дисков NFS
mount 172.22.2.1:/mnt/iso/ /mnt/iso/
Монтирование сетевых дисков SMB
Пример монтирования сетевых SMB-ресурсов :
mount -t smbfs -o username=user,password=pass //server/dir /mnt/localdir/mount -t cifs -o username=user,password=pass //server/dir /mnt/localdir/
(Утилита smbfs заменилась в ядре linux на совместимую с ней cifs.) примечания:
- «-t cifs» можно иногда не указывать , если имя монтируемого устойства вида «//server/dir»
mount //server/dir /mnt/localdir/ -o username=user,password=pass
- если для авторизации необходимо указать доменное имя пользователя,
то в параметрах команды mount оно указывается как «-o
username=domain\\user», однако при указании монтируемого ресурса в
/etc/fstab имя пользователя указывается как «domain/user»:
//server/dir /mnt/localdir/ cifs user=domain/user,password=pass 0 0
Монтирование FTP серверов
curlftpfs -v -o iocharset=UTF-8 ftp://user:password@ftp.domain.ru/ /mnt/ftpМонтирование каталога файловой системы с другого компьютера через ssh
Модуль ядра Fuse (был принят в официальную ветку ядра начиная с 2.6)
позволяет непривилегированным пользователям монтировать различные
файловые системы.
Для работы необходимо добавить пользователя в группу fuse, сделать это можно вот так:
usermod -G -a fuse user
adduser user fuse
или вручную отредактировав файл /etc/group. Ещё необходимо, чтобы загружен был модуль ядра fuse:
modprobe fuse
После этого, можно смонтировать каталог другого компьютера с помощью sshfs:
sshfs user@udalenniy_server:/tmp ~/udalennaya_papka
Для отмонтирования нужно ввести команду:
fusermount -u ~/udalennaya_papka
Enable Name Resolution
This optional step requires Ubuntu 18.04 or newer and allows you to use the hostname of your windows machines instead of its IP address.
First, install winbind and libnss-winbind
apt install winbind libnss-winbind
then, edit nsswitch.conf and find the line that starts with «hosts» and add «wins» after «files»
nano /etc/nsswitch.conf
systemctl restart winbind
Mount —bind
mount
--bind
или с коротким ключом
-B
применяется в системах на ядре Linux (начиная с 2.4.0) для создания синонима каталога в дереве файловой системы. К примеру, команда:
mount --bind /mnt/cdrom/Files /var/ftp/cdrom
позволит обращаться к файлам из /mnt/cdrom/Files через путь
/var/ftp/cdrom, где /var/ftp/cdrom — некий уже существующий (возможно,
пустой) каталог (его настоящее содержимое будет недоступно до момента
размонтирования). Можно также вместо отдельной опции
--bind
-o bind
, что будет иметь аналогичное действие. Также это позволяет добавить правило в файл
/etc/fstab
для монтирования при старте системы:
/olddir /newdir none bind
Преимуществом данного способа создания ссылок на каталоги над символьными ссылками является возможность обходить ограничения доступа к файловой системе, возникающие перед процессами, запущенными в среде chroot или серверами, применяющими принцип chroot. Например, FTP-сервер proftpd
делает недоступными символьные ссылки, указывающие на файлы и каталоги
вне определённого каталога. Действие команды mount —bind напоминает
DOS-овский subst.
Mount with authentication — file
mount -o noperm,credentials=/root/creds.txt //win10/share1 /mnt/share1
-o means mount options are specified next
noperm means “client does not do permission check”
replace “win10” with the hostname of your windows machine
Now we need to create our creds.txt file
nano /root/creds.txt
username=johnpassword=123domain=domain1
replace “123” with the windows password
replace “domain1” with the name of your active directory domain. If you don’t know what an active directory domain is, you don’t have one, so just leave this option blank or remove it.
You can make it readable only by root:
chmod 600 /root/creds.txt
Mount with authentication — next line
mount -o noperm,username=john,domain=domain1 //win10/share1 /mnt/share1
When it asks for a password, enter the windows password that goes with the windows account.
-o means mount options are specified next
noperm means “client does not do permission check”
replace “domain1” with the name of your active directory domain. If you don’t know what an active directory domain is, you don’t have one, so just leave this option blank or remove it.
replace “win10” with the hostname of your windows machine
Mount with authentication — same line
mount -o noperm,username=john,password=123,domain=domain1 //win10/share1 /mnt/share1
-o means mount options are specified next
noperm means “client does not do permission check”
replace “123” with the windows password
replace “domain1” with the name of your active directory domain. If you don’t know what an active directory domain is, you don’t have one, so just leave this option blank or remove it.
replace “win10” with the hostname of your windows machine
Connect to a file server
In the file manager, click in the
sidebar.In Connect to Server, enter the address of the server, in
the form of a
. Details on supported URLs are
.If you have connected to the server before, you can click on it in the
list.Click . The files on the server will be shown. You
can browse the files just as you would for those on your own computer. The
server will also be added to the sidebar so you can access it quickly in
the future.
Mounting
mount
sudo mount /dev/sda1 /mnt
Will mount the filesystem on /dev/sda1 (which may be a USB drive, a SATA drive or a SCSI drive) into the folder /mnt. That means that going into /mnt will show you the filesystem which is on /dev/sda1.
Many options can be given to mount. A useful option is the «type» option, when automatic filesystem-type detection fails. An example would be:
sudo mount /dev/fd0 /floppy -t vfat
That command tells mount to put the filesystem on the first floppy disk into the folder /floppy, and tells it to treat the filesystem as a FAT filesystem. If the wrong type is given then mount will not mount the filesystem and you will be told of the error.
To mount a filesystem contained in a file using the loopback device the command would look like this
sudo mount Filesystem.img /home/user/MyFilesystem -o loop
To create a filesystem image you can either «dump» an existing filesystem into a file, for example by using the command:
dd if=/dev/hdc3 of=/home/user/Filesystem.img
Alternatively you can create an empty file by using:
dd if=/dev/zero of=/home/user/MyFilesystem.img bs=512 count=100000
And then creating a filesystem on this file as if it were a drive by using the command:
mkfs.ext2 -j MyFilesystem.img
Which will create an ext3 filesystem on the device (ext2 with a journal). Images created using either method can be mounted via the loopback device.
An interesting ability of mount is it’s ability to move specific parts of a filesystem around. For example:
sudo mount --bind /mnt/Files/Music /home/user/Music
sudo mount --move /mnt/Files/Music /home/user/Music
Instead. This can come in handy, for example you may have your dual-boot Windows partition mounted in /windows. You can get easier access to your personal files by using:
sudo mount --bind "/windows/My Documents" "/home/user/Windows Documents"
sudo mount --bind "/windows/Documents and Settings/username/My Documents" "/home/username/Windows Documents"
Mount can mount filesystems which are accessed remotely using NFS (the Networked Files System) (Please complete this as I do not know how to use NFS)
Windows NTFS Disks
Permanently mount internal Windows NTFS disks. Install and use the NTFS Configuration Tool (external link) To get it go to the Ubuntu Software Center -> System Tools -> NTFS Configuration Tool -> Install
Other similar, useful applications in the Software Center include:
- Mount Manager
- Storage device manager
Unmounting
Firstly I will tell you how to unmount any filesystem you mount after trying these commands. Unmounting is done through the «umount» command, which can be given a device or a mount point so:
sudo umount /mntsudo umount /dev/hda1
Would both unmount the filesystem on /dev/hda1 if it is mounted on /mnt.
Remember that a filesystem cannot be in use when it is unmounted, otherwise umount will give an error. If you know it is safe to unmount a filesystem you can use:
sudo umount -l /mountpoint
To do a «lazy» unmount
Note that files are often stored temporarily in the RAM to prevent filesystem fragmentation and speed up access times for slow devices like floppy disks. For this reason you should always unmount filesystems before you unplug or eject the device or you may find that your files have not actually been written to your device yet.
Writing URLs
A , or uniform resource locator, is a form of address
that refers to a location or file on a network. The address is formatted like this:
Some schemes require the port number to be specified. Insert it after the domain name:
Below are specific examples for the various server types that are supported.
What Can Be Mounted
The most common thing to be mounted is a hard drive partition. Hard drives are kept in /dev and have different names depending on what type of drive they are. IDE/ATA drives are labelled as /dev/hda, /dev/hdb, /dev/hdc and /dev/hdd (since a PC’s IDE interfaces can only handle 4 devices at a time). Note that these can be devices such as IDE/ATA CDROMS, Compact Flash to IDE converters, and some special floppy drives (although they tend to appear mainly in laptops). For SCSI devices the labels are /dev/sda, /dev/sdb, /dev/sdc, /dev/sdd, /dev/sde, /dev/sdf, /dev/sdg, /dev/sdh and /dev/sdi (since a SCSI chain can contain up to nine devices). Other types of drive, such as USB, SATA, etc. are mapped to these SCSI devices by Linux. Therefore SATA and USB drives are labelled as /dev/sdX where X is a letter, starting at «a».
Since these are literally the devices you can issue a command such as:
sudo eject /dev/hdc
If /dev/hdc is a CD drive then it will eject.
In the case of hard drives, there is another abstraction. A hard drive (and many devices such as USB «sticks» which act like hard drives) can be partitioned to allow many filesystems to be stored on them. This means that the filesystems themselves are accessible via the partition labels, such as /dev/hda1 (the first partition on /dev/hda). This means that we finally know about something we can mount, a partition, since it contains a filesystem.
Another physical filesystem which can be mounted is the ISO9660 filesystem used on CDROMs. Since there is only ever one CD in a CD drive there is no point creating /dev/hdc1 (where /dev/hdc is a CDROM drive) since there is only one filesystem on it. That means that you can mount CD drive devices explicitly, so if /dev/hdc is a CDROM drive then it is possible to mount /dev/hdc if there is a disc in it.
Floppy disks only contain one filesystem, and are labeled as /dev/fd0 for the first drive, /dev/fd1 for the second drive, etc. So now we know three things which can be mounted.
Devices like USB sticks are treated like hard drives (so /dev/sda1, for example, may contain a filesystem) and so are iPods (although I think the main data on an iPod is stored on the second partition)
Mounting is not restricted to physical devices. If you have a filesystem «image» (which IS a filesystem, whether an exact copy of an existing filesystem, or a filesystem created specifically for that file) then you can mount that through the use of a fake device called the «loopback device»
Troubleshooting
— If you are having a problem with the FSTAB method, try the manual mounting method and you will likely discover your problem.
— Check the kernel log after you get a mount error to see if it logged a more useful error message:
dmesg
Ignore the white messages. Only the red messages are relevant. Search the internet for these error message(s)
Файл конфигурации
Основная статья: fstab
Чтобы облегчить процедуру монтирования можно внести в файл конфигурации
/etc/fstab
соответствующие строки. Примерное содержимое для этого файла:
# <fs> <mountpoint> <type> <opts> <dump/pass>
# NOTE: If your BOOT partition is ReiserFS, add the notail option to opts.
#/dev/BOOT /boot ext2 noauto,noatime 1 2
/dev/sda5 / reiserfs noatime 0 1
/dev/sda1 none swap sw 0 0
/dev/cdrom /mnt/cdrom iso9660 noauto,ro 0 0
#/dev/fd0 /mnt/floppy auto noauto 0 0
# NOTE: The next line is critical for boot!
proc /proc proc defaults 0 0
# glibc 2.2 and above expects tmpfs to be mounted at /dev/shm for
# POSIX shared memory (shm_open, shm_unlink).
# (tmpfs is a dynamically expandable/shrinkable ramdisk, and will
# use almost no memory if not populated with files)
shm /dev/shm tmpfs nodev,nosuid,noexec 0 0
В дальнейшем можно будет указывать в команде
mount
только
имя устройства или точку монтирования — все дополнительные параметры
будут браться из файла конфигурации. Например, применительно к данной
конфигурации, команда
mount /mnt/cdrom
будет эквивалентна выполнению команды
mount /dev/cdrom /mnt/cdrom -t iso9660 -o noauto,ro
Другое назначения файла конфигурации — автоматическое монтирование
файловых систем при загрузке системы. Если не требуется монтировать
определенные файловые системы, то для них в файле конфигурации нужно
указать параметр
noauto
Manual mounting from the command line
All of these commands require root permission, so let’s just start bash with root so we don’t have to type sudo on everything:
sudo bash
You’ll need to create a folder to host the mount point:
mkdir /mnt/share1
Install cifs-utils
To be able to control the kernel’s cifs client, you’ll need to install cifs-utils:
apt install cifs-utils
If you need even more security
Mount
Материал из Википедии — свободной энциклопедии
Текущая версия страницы пока не проверялась опытными участниками и может значительно отличаться от версии, проверенной 19 февраля 2016;
проверки требует 1 правка.
mount — утилита командной строки в UNIX-подобных операционных системах. Применяется для монтирования файловых систем.
В статье приведено описание и примеры для операционной системы GNU/Linux.
FSTAB
If you want to have persistent mounts, so that the mounts get mounted automatically at boot time, you can use the fstab file.
nano /etc/fstab
//win10/share1 /mnt/share1 cifs noperm,_netdev 0 0
replace “win10” with the hostname of your windows machine
cifs tells the kernel to use mount.cifs as opposed to ext3 or ntfs or some other type of file system
_netdev will cause the kernel to wait on the network to become ready before attempting the mount. Without this option, the mount will probably fail during boot because the network won’t be ready yet
the 2 zeros tell the kernel we don’t want to dump or check the filesystem
Now you can mount and unmount with very simple commands:
mount /mnt/share1umount /mnt/share1
Параметры монтирования
В случае необходимости при выполнении команды
mount
можно указать дополнительные параметры монтирования.
-t Тип файловой системы
Обычно при монтировании определяется автоматически или берётся из
файла конфигурации (см. ниже). Но в отдельных случаях нужно указывать
тип файловой системы явно. Например при монтировании DVD диска с файловой системой UDF.
mount /dev/cdrom /mnt/dvd -t udf
Если неправильно указать тип файловой системы, то команда
mount
выдаст сообщение об ошибке
mount: wrong fs type, bad option, bad superblock on /dev/cdrom, missing codepage or other error In some cases useful info is found in syslog - try dmesg | tail or so
и посоветует посмотреть в конец файла системных сообщений.
Unable to identify CD-ROM format.
В случае успешного монтирования обычно сообщается что компакт диск монтируется (по умолчанию) в режиме «только для чтения».
mount: block device /dev/cdrom is write-protected, mounting read-only
-o Атрибуты доступа
- Доступ «только для чтения» (ro) или на «чтение и запись» (rw)
- Разрешение или запрещение запуска программ (noexec)
Пример 1 (для образца, взято монтирование USB диска):
mount -t vfat -o rw,noexec,iocharset=utf8,codepage=866 /dev/sda1 /mnt/usb
Пример 2 (для образца, взято монтирование ntfs раздела с установленной Windows XP):
mount -t ntfs -o noatime,users,rw,fmask=111,dmask=000,locale=ru_RU.UTF-8 /dev/sda1 /mnt/win_xp
Пример 3 (перемонтировать устройство с доступом на «чтение и запись» (rw))
mount -o remount,rw /dev/sda2
See Also
Types of servers
You may not have permissions to perform certain actions on files on a server.
For example, on public FTP sites, you will probably not be able to delete
files.
- SSH
If you have a account on a server, you
can connect using this method. Many web hosts provide SSH accounts
to members so they can securely upload files. SSH servers always
require you to log in.A typical SSH URL looks like this:
- FTP (with login)
FTP is a popular way to exchange files on the Internet.
Because data is not encrypted over FTP, many servers now provide
access through SSH. Some servers, however, still allow or require
you to use FTP to upload or download files. FTP sites with logins
will usually allow you to delete and upload files.A typical FTP URL looks like this:
- Public FTP
A typical anonymous FTP URL looks like this:
- Windows share
- WebDAV and Secure WebDAV
A WebDAV URL looks like this:
- NFS share
Prerequisites
- A machine running Ubuntu 14.04 or newer
- A machine running Windows XP or newer
- The IP address or hostname of the Windows machine
- The name of the file share on the Windows machine
- A Windows username and password with permission to the file share
- root access to the Ubuntu machine. Pretty much every command on this page requires root.
Mount with read/write access
mount -o noperm //win10/share1 /mnt/share1
Common mistakes
— Don’t use backslashes in the windows unc paths, always use forward slashes
- Incorrect: \\win10\share1 Correct: //win10/share1
— Don’t put spaces in the credentials options.
- Incorrect: username = john Correct: username=john
— If your windows password has special characters in it, like spaces or symbols, you might need special escape codes to make Linux read the password properly.
Common error messages
- You need to install cif-utils
— mount error(2): No such file or directory
- The windows machine couldn’t be found. Can you ping it? OR the share name isn’t valid. Try this command to see if you can see the list of shares:
apt install smbclientsmbclient -L \\win10 -U john
— mount error(13): Permission denied
- Your windows username or password isn’t being accepted by the windows machine. Check the windows account to make sure “force user to change password on next login” isn’t on, and make sure “disable account” is off.
— mount error(112): Host is down
- You are probably using Ubuntu 16.04 or older with Windows 10 or newer. You can make your mount work by adding «vers=3.0» to the options.
- You can make your mount work by adding «vers=1.0» to the options.
Most basic mount command
This command will only work if the windows machine as the “Turn OFF password protected sharing” option set.
Let’s start out with the most basic form of the mount command that actually works:
mount //win10/share1 /mnt/share1
Список смонтированных файловых систем
При запуске команды mount без параметров выводится список смонтированных файловых систем:
/dev/md/5 on / type reiserfs (rw,noatime)
proc on /proc type proc (rw)
sysfs on /sys type sysfs (rw,nosuid,nodev,noexec)
udev on /dev type tmpfs (rw,nosuid)
devpts on /dev/pts type devpts (rw,nosuid,noexec)
/dev/md/4 on /files type xfs (rw,noatime)
/dev/sda3 on /mnt/a type ext3 (rw,noatime)
/dev/sdd2 on /mnt/docs type reiserfs (rw,noatime)
shm on /dev/shm type tmpfs (rw,noexec,nosuid,nodev)
usbfs on /proc/bus/usb type usbfs (rw,noexec,nosuid,devmode=0664,devgid=85)
binfmt_misc on /proc/sys/fs/binfmt_misc type binfmt_misc (rw,noexec,nosuid,nodev)
nfsd on /proc/fs/nfs type nfsd (rw,noexec,nosuid,nodev)
//ax2/i on /mnt/smb type smbfs (0)
172.22.2.1:/files on /mnt/files type nfs (rw,addr=172.22.2.1)
В этом примере показывается много смонтированных файловых систем (ФС).
- в первой строке сообщается, что в качестве корневой ФС выступает RAID-массив,
с ФС типа reiserfs и параметрами монтирования: доступ на чтение и
запись (rw) и указанием не обновлять атрибут времени последнего доступа
(noatime) - sysfs, udev, devpts — это стандартные (для систем Linux) виртуальные ФС
- /dev/sda3 — это раздел SATA диска
- usbfs — это виртуальная файловая система для работы с USB устройствами
- //ax2/i — это путь к сетевому диску SMB
- 172.22.2.1:/files — путь к сетевому диску NFS, находящемся на сервере с IP-адресом 172.22.2.1
