

When you install Debian 11 using a DVD, the OS installer sets the DVD as the source for getting packages for your system if you didn’t choose to scan for network mirrors.
Due to this reason, the system would ask you to insert a DVD if the disc is not present in the DVD drive when you try to install any software. Also, the packages on DVD may not be the latest release. So, we need to get the packages from the Internet.
Media change: please insert the disc labeled
'Debian GNU/Linux 11.0.0 _Bullseye_ - Official amd64 DVD Binary-1 20210814-10:04'
in the drive '/media/cdrom/' and press [Enter]
The file with DVD as a source would look something like below.
# deb cdrom:[Debian GNU/Linux 11.0.0 _Bullseye_ - Official amd64 DVD Binary-1 20210814-10:04]/ bullseye contrib main
deb cdrom:[Debian GNU/Linux 11.0.0 _Bullseye_ - Official amd64 DVD Binary-1 20210814-10:04]/ bullseye contrib main
deb http://security.debian.org/debian-security bullseye-security main contrib
deb-src http://security.debian.org/debian-security bullseye-security main contrib
# bullseye-updates, to get updates before a point release is made;
# see https://www.debian.org/doc/manuals/debian-reference/ch02.en.html#_updates_and_backports
# A network mirror was not selected during install. The following entries
# are provided as examples, but you should amend them as appropriate
# for your mirror of choice.
#
# deb http://deb.debian.org/debian/ bullseye-updates main contrib
# deb-src http://deb.debian.org/debian/ bullseye-updates main contrib
To set up a Debian 11 official repository on your system, add/update the file with the below details.
deb http://deb.debian.org/debian/ bullseye main
deb-src http://deb.debian.org/debian/ bullseye main
deb http://security.debian.org/debian-security bullseye-security main contrib
deb-src http://security.debian.org/debian-security bullseye-security main contrib
deb http://deb.debian.org/debian/ bullseye-updates main contrib
deb-src http://deb.debian.org/debian/ bullseye-updates main contrib
- Contrib & Non-Free
- Backports
- Update
- Conclusion
- Типы архивов
- Компоненты источников
- Добавление источников
- Ubuntu 20.04 LTS (Focal Fossa) — полный оригинальный sources.list
- Ubuntu 18.04 LTC (Bionic) — полный оригинальный source.list
- Debian 11 (bullseye) — оригинальный source.list
- Debian 10 (Buster) — полный оригинальный sources.list
- Run System Update
- Install MariaDB 10.6 from APT Repository
- Install MariaDB 10.6 APT repos on Debian 11
- Install MariaDB 10.6 using .DEB Binary Files
- Verify the MariaDB installed version
- Running MariaDB 10.6 on Debian 11
- Securing MariaDB 10.6
- MariaDB Authentication
- Enable MariaDB password Authentication
- Set Native Password Authentication Method as Default
- Other Tutorials
- Недорогой хостинг для сайтов
- 1. Добавление репозитория из терминала
- Добавить репозиторий вручную
- Добавить репозиторий с помощью add-apt-repository
- 2. Добавление репозитория из графического интерфейса.
- Вывод
- Рекомендуемый контент
- 1. ОЧИСТКА СИСТЕМЫ
- 2. ОБНОВЛЕНИЕ СУЩЕСТВУЮЩЕЙ СИСТЕМЫ
- 3. НАСТРОЙКА РЕПОЗИТОРИЕВ
- 4. ОБНОВЛЕНИЕ ДО DEBIAN 11
- 5. ПРОВЕРКА ВЕРСИИ СИСТЕМЫ
- Автор публикации
- 1. Файл /etc/apt/sources.list
- 2. Папка /etc/apt/sources.list.d/
- 3. Команда apt-add-repository
- Выводы
- Об авторе
- Prerequisites
- Install Linux
- Install Nginx
- Install MariaDB
- Install PHP
- Create Virtual Host
- Test LEMP Stack
- Conclusion
- Prerequisites
- Install MySQL / MariaDB Server
- Standalone Database
- LAMP Stack
- Configure phpMyAdmin
- Create DB & User
- Access phpMyAdmin
- Conclusion
Contrib & Non-Free
If you want to receive contrib and non-free packages for your system, use the below one.
deb http://deb.debian.org/debian bullseye main contrib non-free
deb-src http://deb.debian.org/debian bullseye main contrib non-free
deb http://deb.debian.org/debian-security bullseye/updates main contrib non-free
deb-src http://deb.debian.org/debian-security bullseye/updates main contrib non-free
deb http://deb.debian.org/debian bullseye-updates main contrib non-free
deb-src http://deb.debian.org/debian bullseye-updates main contrib non-free
Backports
In case you want to add Backports, update the with the below information.
deb http://deb.debian.org/debian bullseye-backports main contrib non-free
deb-src http://deb.debian.org/debian bullseye-backports main contrib non-free
Update
Once you have added the repositories, update the repository index.
sudo apt update
Conclusion
That’s All. I hope this post helped you add the required repositories on your Debian 11 system to get the latest packages from the internet.
Стандартный набор репозиториев для Debian 10
Apt — Менеджер пакетов применяемый в Debian 10 использует файл содержащий список источников из которых могут быть скачаны и установлены пакеты.
Debian 8 стандартные репозитории
Debian 9 стандартные репозитории
Debian 11 стандартные репозитории
Типы архивов
Архивы делятся на два типа «deb» или «deb-src«.
Архивы делятся на два типа «deb» или «deb-src«.
- Deb — источник содержащий скомпилированные бинарные пакеты для нормальной установки и использования.
- Deb-src — источник содержащий пакеты с исходным кодом и контрольными файлами «.dsc» и «diff.gz«.
Компоненты источников
- main — состоит из DFSG-compliant пакетов, которым не требуется другое ПО из других компонентов. Эти пакеты считаются частью дистрибутива.
- contrib — содержит DFSG-compliant ПО, но у них зависимостей из компонентов main (возможно упакованы в non-free).
- non-free — содержит пакеты, которое не соответствует DFSG.
Добавление источников
Открываем файл содержащий список репозиториев
nano /etc/apt/sources.listИ вставляем или заменяем содержимое приведенное ниже:
deb http://ftp.debian.org/debian buster main contrib non-free
deb-src http://ftp.debian.org/debian buster main contrib non-free
deb http://ftp.debian.org/debian buster-updates main contrib non-free
deb-src http://ftp.debian.org/debian buster-updates main contrib non-free
deb http://security.debian.org/ buster/updates main contrib non-free
deb-src http://security.debian.org/ buster/updates main contrib non-free
deb http://ftp.debian.org/debian buster-backports main contrib non-free
После сохранения выполняем команду чтобы обновить кеш источников:
apt update 
В данной стать представлены полные оригинальные source.list‘ы для операционных систем семейства Linux.
Ubuntu 20.04 LTS (Focal Fossa) — полный оригинальный sources.list
deb http://archive.ubuntu.com/ubuntu/ focal main restricted universe multiverse
deb-src http://archive.ubuntu.com/ubuntu/ focal main restricted universe multiverse
deb http://archive.ubuntu.com/ubuntu/ focal-updates main restricted universe multiverse
deb-src http://archive.ubuntu.com/ubuntu/ focal-updates main restricted universe multiverse
deb http://archive.ubuntu.com/ubuntu/ focal-security main restricted universe multiverse
deb-src http://archive.ubuntu.com/ubuntu/ focal-security main restricted universe multiverse
deb http://archive.ubuntu.com/ubuntu/ focal-backports main restricted universe multiverse
deb-src http://archive.ubuntu.com/ubuntu/ focal-backports main restricted universe multiverse
deb http://archive.canonical.com/ubuntu focal partner
deb-src http://archive.canonical.com/ubuntu focal partner
Ubuntu 18.04 LTC (Bionic) — полный оригинальный source.list
deb http://archive.ubuntu.com/ubuntu bionic universe multiverse
deb-src http://archive.ubuntu.com/ubuntu bionic universe multiverse
deb http://us.archive.ubuntu.com/ubuntu/ bionic universe
deb-src http://us.archive.ubuntu.com/ubuntu/ bionic universe
deb http://us.archive.ubuntu.com/ubuntu/ bionic-updates universe
deb-src http://us.archive.ubuntu.com/ubuntu/ bionic-updates universe
deb http://us.archive.ubuntu.com/ubuntu/ bionic multiverse
deb-src http://us.archive.ubuntu.com/ubuntu/ bionic multiverse
deb http://us.archive.ubuntu.com/ubuntu/ bionic-updates multiverse
deb-src http://us.archive.ubuntu.com/ubuntu/ bionic-updates multiverse
deb http://security.ubuntu.com/ubuntu bionic-security universe
deb-src http://security.ubuntu.com/ubuntu bionic-security universe
deb http://security.ubuntu.com/ubuntu bionic-security multiverse
deb-src http://security.ubuntu.com/ubuntu bionic-security multiverse
Debian 11 (bullseye) — оригинальный source.list
deb http://deb.debian.org/debian/ bullseye main
deb-src http://deb.debian.org/debian/ bullseye main
deb http://security.debian.org/debian-security bullseye-security main contrib
deb-src http://security.debian.org/debian-security bullseye-security main contrib
deb http://deb.debian.org/debian/ bullseye-updates main contrib
deb-src http://deb.debian.org/debian/ bullseye-updates main contrib
Debian 10 (Buster) — полный оригинальный sources.list
deb http://deb.debian.org/debian buster main contrib non-free
deb-src http://deb.debian.org/debian buster main contrib non-free
deb http://deb.debian.org/debian buster-updates main contrib non-free
deb-src http://deb.debian.org/debian buster-updates main contrib non-free
deb http://deb.debian.org/debian buster-backports main contrib non-free
deb-src http://deb.debian.org/debian buster-backports main contrib non-free
deb http://security.debian.org/debian-security/ buster/updates main contrib non-free
deb-src http://security.debian.org/debian-security/ buster/updates main contrib non-free
Если вы обнаружили орфографическую ошибку, пожалуйста, сообщите нам, выделив текст и нажав на него.
Run System Update
Assuming that you are installing MariaDB 10.6 on a newly installed Debian 11, update and upgrade your system packages.
apt update
apt upgrade
There are two methods in which you can install MariaDB 10.6 on Debian 11;
Install MariaDB 10.6 from APT Repository
MariaDB 10.5 is the currently available version on the default Debian 11 repos;
apt show mariadb-server
Package: mariadb-server
Version: 1:10.5.11-1
Priority: optional
Section: database
Source: mariadb-10.5
Maintainer: Debian MySQL Maintainers
Installed-Size: 72.7 kB
Depends: mariadb-server-10.5 (>= 1:10.5.11-1)
Homepage: https://mariadb.org/
Tag: devel::lang:c++, devel::lang:sql, devel::library, implemented-in::c++, interface::commandline, interface::daemon, network::server, protocol::db:mysql, role::devel-lib, role::metapackage, role::program, works-with::db
Download-Size: 34.8 kB
APT-Sources: http://deb.debian.org/debian bullseye/main amd64 Packages
Therefore, to install MariaDB 10.6, you need to install MariaDB 10.6 APT repos.
Install MariaDB 10.6 APT repos on Debian 11
Execute the commands below to install MariaDB 10.6 APT repos;
apt install software-properties-common dirmngr
apt-key adv --fetch-keys 'https://mariadb.org/mariadb_release_signing_key.asc'
Next, head over to MariaDB repositories site to choose your mirrors.
Choose your Linux distro, distro release, MariaDB version to install and finally the Mirrors to use.
To use UKfast mirrors, for example, run the command below;
add-apt-repository 'deb [arch=amd64,arm64,ppc64el] https://mirrors.ukfast.co.uk/sites/mariadb/repo/10.6/debian bullseye main'Resynchronize your package cache;
apt update
Install MariaDB 10.6;
apt install mariadb-server
Install MariaDB 10.6 using .DEB Binary Files
While this is not the recommended way of installing MariaDB, you can as well download .deb binary files and install it.
Install MariaDB using deb binary files
Verify the MariaDB installed version
To check the version of installed MariaDB, run the command below;
mysql -V
mysql Ver 15.1 Distrib 10.6.4-MariaDB, for debian-linux-gnu (x86_64) using readline EditLine wrapper
Running MariaDB 10.6 on Debian 11
Upon installation, MariaDB is started and enabled to run on system boot;
systemctl status mariadb
● mariadb.service - MariaDB 10.6.4 database server Loaded: loaded (/lib/systemd/system/mariadb.service; enabled; vendor preset: enabled) Drop-In: /etc/systemd/system/mariadb.service.d └─migrated-from-my.cnf-settings.conf Active: active (running) since Sat 2021-08-21 08:44:32 EAT; 5min ago Docs: man:mariadbd(8) https://mariadb.com/kb/en/library/systemd/ Process: 3466 ExecStartPre=/usr/bin/install -m 755 -o mysql -g root -d /var/run/mysqld (code=exited, status=0/SUCCESS) Process: 3467 ExecStartPre=/bin/sh -c systemctl unset-environment _WSREP_START_POSITION (code=exited, status=0/SUCCESS) Process: 3469 ExecStartPre=/bin/sh -c [ ! -e /usr/bin/galera_recovery ] && VAR= || VAR=`cd /usr/bin/..; /usr/bin/galera_recovery`; [ $? -eq 0 ] && systemctl set-en> Process: 3529 ExecStartPost=/bin/sh -c systemctl unset-environment _WSREP_START_POSITION (code=exited, status=0/SUCCESS) Process: 3531 ExecStartPost=/etc/mysql/debian-start (code=exited, status=0/SUCCESS) Main PID: 3516 (mariadbd) Status: "Taking your SQL requests now..." Tasks: 9 (limit: 1133) Memory: 86.2M CPU: 2.201s CGroup: /system.slice/mariadb.service └─3516 /usr/sbin/mariadbd
Aug 21 08:49:47 debian11.kifarunix-demo.com /etc/mysql/debian-start[3536]: Phase 6/7: Checking and upgrading tables
Aug 21 08:49:47 debian11.kifarunix-demo.com /etc/mysql/debian-start[3536]: Processing databases
Aug 21 08:49:47 debian11.kifarunix-demo.com /etc/mysql/debian-start[3536]: information_schema
Aug 21 08:49:47 debian11.kifarunix-demo.com /etc/mysql/debian-start[3536]: performance_schema
Aug 21 08:49:47 debian11.kifarunix-demo.com /etc/mysql/debian-start[3536]: sys
Aug 21 08:49:47 debian11.kifarunix-demo.com /etc/mysql/debian-start[3536]: sys.sys_config OK
Aug 21 08:49:47 debian11.kifarunix-demo.com /etc/mysql/debian-start[3536]: Phase 7/7: Running 'FLUSH PRIVILEGES'
Aug 21 08:49:47 debian11.kifarunix-demo.com /etc/mysql/debian-start[3536]: OK
Aug 21 08:49:47 debian11.kifarunix-demo.com /etc/mysql/debian-start[4552]: Checking for insecure root accounts.
Aug 21 08:49:47 debian11.kifarunix-demo.com /etc/mysql/debian-start[4556]: Triggering myisam-recover for all MyISAM tables and aria-recover for all Aria tables
You can manage the service via systemctl command.
For example, to stop MariaDB service;
systemctl restart mariadb
To stop the service;
systemctl stop mariadb
Disable the service from running on system boot;
systemctl disable mariadb
Securing MariaDB 10.6
MariaDB comes with a default security script, mysql_secure_installation that is used to improve the security of MariaDB installation by:
- Setting the password for root accounts (if need be).
- Disabling remote root login to the databases.
- Removing anonymous-user accounts.
- Removing the test database, which by default can be accessed by anonymous users.
Simply run the command below to launch the script.
mysql_secure_installation
MariaDB Authentication
The new installations of MariaDB have two secure accounts are created during the installation.
Both accounts uses either of the unix_socket and the mysql_native_password authentication plugins.
mysql
mysql -u root
Even if you run, mysql -u root -p, and press ENTER for blank password, you will still login.
Enable MariaDB password Authentication
mysql
set password = password("[email protected]");flush privileges; quit
[email protected]:~$ mysql -u root -p
Enter password: ENTER PASSWORD
Welcome to the MariaDB monitor. Commands end with ; or \g. Your MariaDB connection id is 57 Server version: 10.6.4-MariaDB-1:10.6.4+maria~bullseye mariadb.org binary distribution Copyright (c) 2000, 2018, Oracle, MariaDB Corporation Ab and others. Type 'help;' or '\h' for help. Type '\c' to clear the current input statement. MariaDB [(none)]>
sudo -u mysql mysql
Set Native Password Authentication Method as Default
mysql
ALTER USER [email protected] IDENTIFIED VIA mysql_native_password USING PASSWORD("MyPQQSSword");flush privileges; quit
Next time you try to login without specifying the password, login will fail.
sudo mysql -u root
ERROR 1045 (28000): Access denied for user 'root'@'localhost' (using password: NO)That marks the end of our guide on how to install MariaDB 10.6 on Debian 11.
Other Tutorials
Install MariaDB 10.5 on FreeBSD 13
Install MariaDB 10.x on Rocky Linux 8
Недорогой хостинг для сайтов

APT проверяет работоспособность всех пакетов, зависимости пакета перед его установкой. APT извлекает пакеты из одного или нескольких репозиториев. Репозиторий (источник пакета) — это в основном сетевой сервер. Термин «пакет» относится к отдельному файлу с расширением .deb, который содержит все или часть приложения. Обычная установка идет с настроенными репозиториями по умолчанию, но они содержат только несколько пакетов из океана доступного бесплатного программного обеспечения.
В этом руководстве мы узнаем, как добавить репозиторий пакетов в Debian .
1. Добавление репозитория из терминала
Вы можете добавить репозиторий пакетов в Debian двумя способами из оболочки: вручную или с помощью apt . Информация о репозитории пакетов хранится в файле с именем /etc/apt/sources.list. А также может храниться в любом файле внутри каталога /etc/apt/sources.list.d/.
Добавить репозиторий вручную
Чтобы добавить репозиторий вручную, вам необходимо отредактировать файл /etc/apt/sources.list. Записи в этом файле имеют синтаксис:
Archive-Type Repository-URL Distribution Component1 Component2 Component3
Тип архива — первое слово в строке может быть debили deb-src. Deb указывает, что архив содержит пакеты .deb, а deb-src указывает, что в архиве есть пакеты с исходным кодом.
URL-адрес репозитория — эта запись представляет собой URL-адрес репозитория, из которого должен быть загружен пакет.
Распространение — это может быть кодовое название выпуска, псевдоним (например, «яблочко») или класс выпуска (старый стабильный, стабильный, тестируемый, нестабильный) соответственно.
Компонент — это может быть основной, дополнительный или платный. mainСодержит DFSG совместимый пакет часть дистрибутива Debian. contrib— совместимый пакет DFSG , который имеет зависимостей не в main. non-freeСодержит пакеты , которые не соответствуют DFSG.
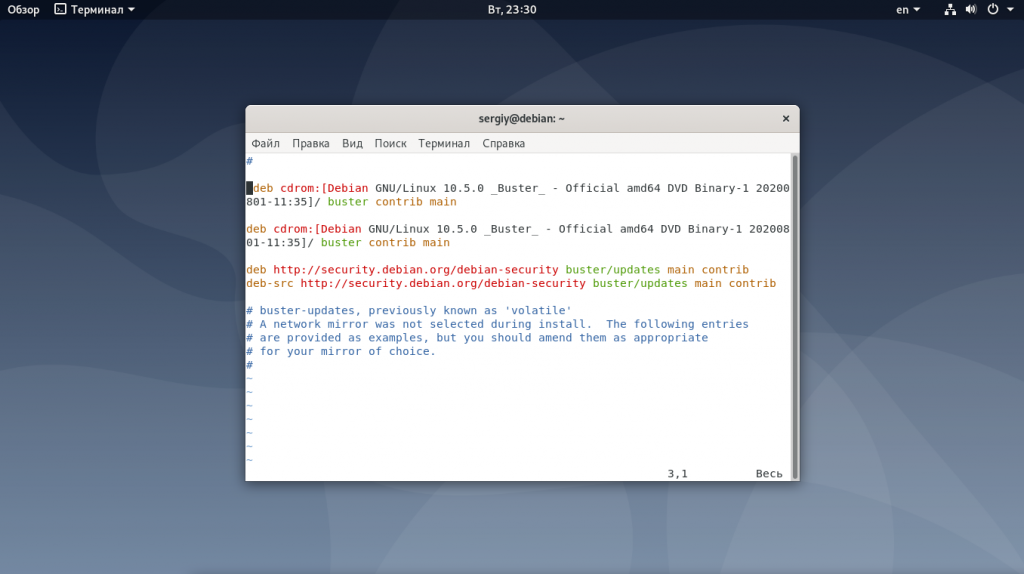
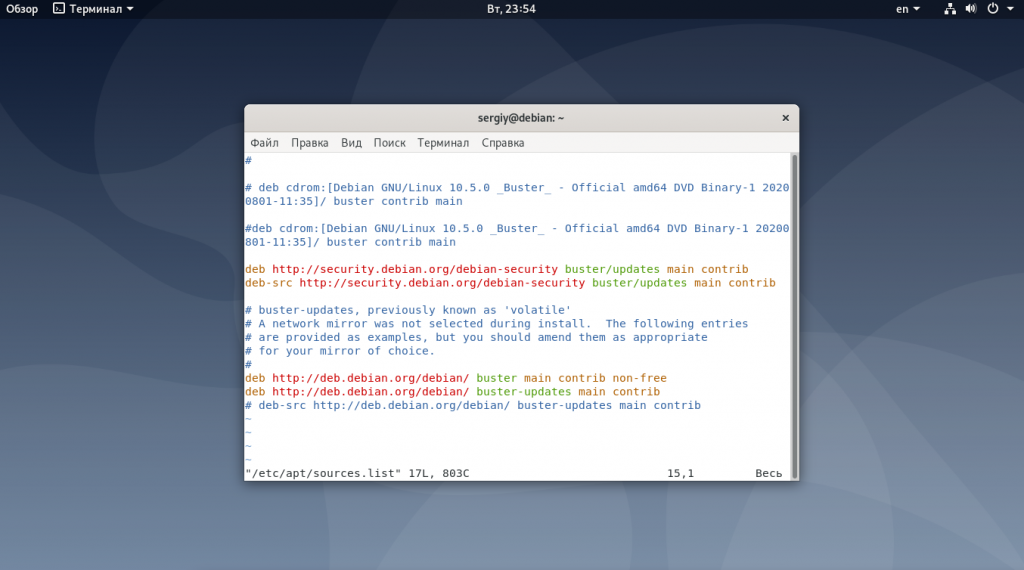
Например, давайте добавим репозиторий VirtualBox в Debian Bullseye. Сначала откройте файл /etc/apt/sources.list для редактирования.
$ sudo nano /etc/apt/sources.listТеперь вы можете добавить в файл строку репозитория пакетов.
deb [arch=amd64] http://download.virtualbox.org/virtualbox/debian bullseye contribНиже приведен файл /etc/apt/sources.list из моей системы Debian 11, он содержит часть официального репозитория Debian, который был добавлен во время установки Debian, и вы также можете увидеть недавно добавленный репозиторий.

Вместо добавления в файл /etc/apt/sources.list вы также можете создать собственный исходный файл с расширением .list внутри каталога /etc/apt/sources.list.d/ и добавить репозиторий в этот файл. Это тоже работает.
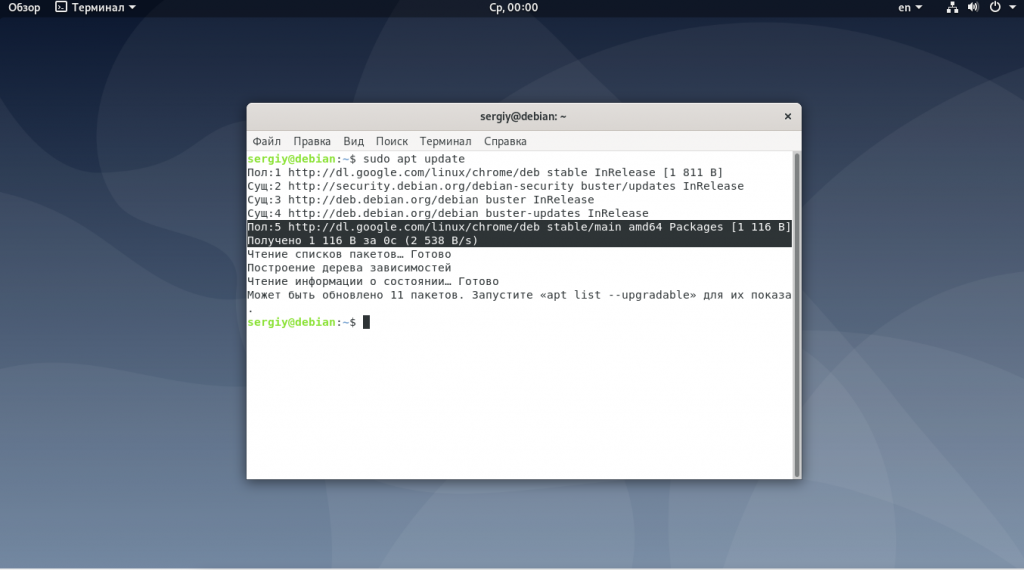
После добавления репозитория apt обязательно обновите индекс пакета:
$ sudo apt updateДобавить репозиторий с помощью add-apt-repository
Add-apt-repository — это сценарий Python, используемый для добавления обычного репозитория APT или PPA. Эта утилита включена в software-properties-common пакет.
Основной синтаксис add-apt-repository команды следующий:
add-apt-repository [options] repositoryНапример, вам нужно установить Docker из официального репозитория. Сначала обновите индекс пакета и установите все зависимости.
$ sudo apt install apt-transport-https ca-certificates curl gnupg-agent software-properties-commonИмпортируйте GPG-ключ репозитория:
$ sudo curl -fsSL https://download.docker.com/linux/debian/gpg | sudo apt-key add -Теперь добавьте репозиторий Docker с помощью add-apt-repository :
$ sudo add-apt-repository 'deb [arch=amd64] https://download.docker.com/linux/debian $(lsb_release -cs) stable'Это добавит информацию о репозитории в файл etc / apt / sources.list.
Затем обновите индекс пакета, а затем установите пакет докеров.
sudo apt update
apt-cache policy docker-ce
Чтобы удалить включенный репозиторий, введите:
$ sudo add-apt-repository --remove 'deb [arch=amd64] https://download.docker.com/linux/debian $(lsb_release -cs) stable'Add-apt-repository также позволяет добавлять репозиторий PPA . PPA расшифровывается как Personal Package Archive, который позволяет разработчикам создавать свои собственные репозитории.
Например, чтобы добавить репозиторий PPA для libreoffice, введите:
$ sudo add-apt-repository ppa:libreoffice/libreoffice-7-0После добавления PPA вы можете установить соответствующий пакет с помощью apt.
2. Добавление репозитория из графического интерфейса.
В качестве альтернативы вы можете добавить репозиторий пакетов из Debian Gui. Я использую Debian 11 в среде рабочего стола Gnome.
На рабочем столе найдите «Программное обеспечение и обновления»

В «Программное обеспечение и обновления» выберите вторую вкладку «Другое программное обеспечение».

Нажмите кнопку «Добавить», затем добавьте строку APT и нажмите кнопку «Добавить источник», чтобы обновить /etc/apt/sources.listфайл.

Вывод
В этом руководстве мы узнали, как добавить репозиторий пакетов в Debian. спасибо за чтение, дайте нам знать свой отзыв в разделе комментариев.
Рекомендуемый контент
1. ОЧИСТКА СИСТЕМЫ
Первое правило безопасного обновления — чем меньше программного обеспечения установлено в вашей системе, тем выше шансы, что обновление пройдет без проблем. Сторонние пакеты, а тем более PPA и другие репозитории очень сильно уменьшают шансы того, что обновление пройдет без проблем. Поэтому перед обновлением лучше удалить все пакеты из системы.
Вы можете найти все сторонние пакеты с помощью утилиты aptitude:
# sudo aptitude search '~i(!~ODebian)'
Эта команда выведет все пакеты, которых больше нет в официальном репозитории потому, что они были удалены, а также пакеты, установленные вручную. Такие пакеты желательно удалить.
2. ОБНОВЛЕНИЕ СУЩЕСТВУЮЩЕЙ СИСТЕМЫ
Второе правило для выполнения максимально безопасного обновления — ваша система должна быть обновлена до самой последней версии. Для этого выполните:
# sudo apt update# sudo apt dist-upgradeЕсли все прошло хорошо, выполните проверку целостности базы данных:
# dpkg -C
Затем проверьте нет ли отложенных пакетов:
# apt-mark showhold
Отложенные пакеты не могут быть обновлены, они могут стать проблемой при обновлении до Debian 11. Прежде чем пойти дальше исправьте все проблемы, эта команда может вам помочь:
dpkg --audit3. НАСТРОЙКА РЕПОЗИТОРИЕВ
Теперь наша система полностью обновлена и готова к переходу на новую версию и вот ответ на вопрос как обновить debian 10 до debian 11. Для этого нужно отредактировать файл /etc/apt/sources.list и заменить в нем все репозитории buster на bullseye . Сначала создайте резервную копию существующего файла:
# cp /etc/apt/sources.list /etc/apt/sources.list_backupЗатем откройте файл для редактирования, с помощью vim или apt edit sources и замените все вхождения слова stretch на buster:
# mcedit /etc/apt/sources.listЕсли говорит что не знает команду советую установить удобный редактор
# apt-get install mc# buster
deb http://security.debian.org/ buster/updates main
# Line commented out by installer because it failed to verify:
deb-src http://security.debian.org/ buster/updates main
deb http://mirror.yandex.ru/debian buster main
deb-src http://mirror.yandex.ru/debian buster main
deb http://mirror.yandex.ru/debian buster-updates main
deb-src http://mirror.yandex.ru/debian buster-updates main
deb http://mirror.yandex.ru/debian/ buster-proposed-updates main non-free contrib
deb-src http://mirror.yandex.ru/debian/ buster-proposed-updates main non-free contrib
# Backports
#deb http://mirror.yandex.ru/debian buster-backports main contrib non-free
#deb-src http://mirror.yandex.ru/debian buster-backports main contrib non-free# bullseye
#deb http://security.debian.org/ bullseye/updates main
# Line commented out by installer because it failed to verify:
#deb-src http://security.debian.org/ bullseye/updates main
deb http://mirror.yandex.ru/debian bullseye main
deb-src http://mirror.yandex.ru/debian bullseye main
deb http://mirror.yandex.ru/debian bullseye-updates main
deb-src http://mirror.yandex.ru/debian bullseye-updates main
deb http://mirror.yandex.ru/debian/ bullseye-proposed-updates main non-free contrib
deb-src http://mirror.yandex.ru/debian/ bullseye-proposed-updates main non-free contrib
# Backports
#deb http://mirror.yandex.ru/debian bullseye-backports main contrib non-free
#deb-src http://mirror.yandex.ru/debian bullseye-backports main contrib non-freeсписок репозиториев debian 9 , debian 10 и debian 11
Вместо ручного редактирования вы можете использовать команду sed, но лучше сделать вручную:
# sed -i 's/stretch/buster/g' /etc/apt/sources.listДалее сохраните изменения если использовали редактор и обновите список репозиториев:
# apt updateСледующей командой вы можете посмотреть список пакетов для обновления:
# apt list —upgradable
4. ОБНОВЛЕНИЕ ДО DEBIAN 11
Все подготовительные шаги завершены и нам остался последний — обновить Debian 10 до 11. Для этого выполните команды:
# apt-get upgrade# apt-get dist-upgradeВо время обновления установщик может попросить разрешение на перезапуск нескольких системных служб. Это приостановит процесс установки и чтобы его продолжить вам придется согласится. Обновление займет некоторое время, в зависимости от скорости вашего интернета и производительности процессора. Теперь вы знаете как обновиться до Debian 10.
5. ПРОВЕРКА ВЕРСИИ СИСТЕМЫ
После завершения обновления перезагрузите компьютер. Далее вы можете проверить насколько все успешно прошло с помощью команды:
# cat /etc/issue.netВам должно показать новую версию ядра и версию Debian
Автор публикации
Репозитории — это сетевые хранилища программного обеспечения. Они используются в дистрибутивах Linux, и в том числе в Debian для быстрой установки программного обеспечения с помощью пакетного менеджера. Более подробно о том какие репозитории бывают и зачем они нужны написано в статье Репозитории Debian.
В этой же статье мы поговорим о том как добавить репозитории в Debian различными способами. Самый простой и часто используемый вариант — настройка репозиториев вручную, с него мы и начнём.
Новички часто сталкиваются с проблемой, что после установки новой системы пакетный менеджер не может найти ни одного пакета. Это связано с тем, что по умолчанию основные репозитории Debian в систему не добавлены, там есть только репозитории из DVD дисков с помощью которых вы устанавливали систему. Эта проблема очень просто решается. Системные репозитории находятся в файле /etc/apt/sources.list. Давайте сначала посмотрим на содержимое этого файла по умолчанию:
sudo vi /etc/apt/sources.list
Синтаксис строки репозитория такой:
Типов репозиториев может быть два. Это deb и deb-src. Первый — для бинарных файлов, второй — для файлов исходных кодов. Дистрибутив указывает кодовое имя дистрибутива, например, для Debian 10 — это buster, для девятой версии stretch. Для стабильных обновлений есть еще один репозиторий, где вместе с кодовым именем дистрибутива указывается слово updates, например: buster-updates.
Веток есть всего три, вот они:
- main — полностью свободные пакеты, это основа дистрибутива Debian;
- contrib — свободные пакеты, которые могут зависеть от несвободных;
- non-free — все остальные несвободные пакеты.
Основы разобрали, теперь давайте посмотрим как добавить репозитории.
1. Файл /etc/apt/sources.list
Именно в этот файл репозиториев Debian надо добавлять системные репозитории. Чтобы получить доступ ко всем системным пакетам надо добавить репозиторий stable, со стабильной версией Debian, и репозиторий стабильных обновлений. Вот так будут выглядеть их строчки:
deb http://deb.debian.org/debian/ buster main contrib non-free
 deb http://deb.debian.org/debian/ buster-updates main contrib non-free
Просто добавьте их в конец файла /etc/apt/sources.list. Вы уже знаете какая часть за что отвечает и сможете разобраться. Если вы захотите добавить репозиторий Backports или Testing, то вам тоже следует использовать этот файл.
2. Папка /etc/apt/sources.list.d/
Сторонние репозитории тоже можно добавить в основной системный файл, но этого делать не следует, чтобы не засорять его лишними строками. Для сторонних репозиториев была придумана директория /etc/apt/sources.list.d/. В ней надо создать файл с именем репозитория и расширением .list, а затем добавить в неё репозиторий, как это делалось с основным конфигурационным файлом. Например, для браузера Chrome:
sudo vi /etc/apt/sources.list.d/google-chrome.list
deb http://dl.google.com/linux/chrome/deb/ stable main
Касательно сторонних репозиториев, есть ещё один момент. По умолчанию система не может им доверять, и для того чтобы это исправить нужно импортировать ключ репозитория. Обычно ключи можно найти на сайте, где вы нашли сам репозиторий, для того же Google Chrome ключ можно импортировать командой:
После добавления репозитория, прежде чем вы сможете установить пакет, необходимо обновить списки пакетов. Для этого выполните:
sudo apt update
3. Команда apt-add-repository
Эта команда делает то же самое, что мы делали вручную на первом шаге. Она добавляет репозиторий в /etc/apt/sources.list. Отлично подходит для добавления системных репозиториев. Для сторонних репозиториев её можно использовать не всегда, поскольку она добавляет кодовое имя дистрибутива в строку репозитория, а это может её сломать, если владельцами репозитория такое явно не было задумано. Например, с помощью этой команды вы можете добавить testing репозиторий:
sudo apt-add-repository 'deb http://ftp.ru.debian.org/debian/ testing main non-free contrib'
А потом удалить, если он больше не нужен:
sudo apt-add-repository --remove 'deb http://ftp.ru.debian.org/debian/ testing main non-free contrib'
Выводы
В этой небольшой статье мы рассмотрели добавление репозиториев Debian на примере операционной системы Debian 10. Как видите, для этого есть несколько способов и какой из них вы будете использовать зависит от вас. А как добавляете репозитории вы? Напишите в комментариях!
Обнаружили ошибку в тексте? Сообщите мне об этом. Выделите текст с ошибкой и нажмите Ctrl+Enter.
Об авторе
![]()
Основатель и администратор сайта losst.ru, увлекаюсь открытым программным обеспечением и операционной системой Linux. В качестве основной ОС сейчас использую Ubuntu. Кроме Linux, интересуюсь всем, что связано с информационными технологиями и современной наукой.
The LEMP stack, which stands for Linux (the operating system), Nginx (the webserver), MariaDB/MySQL (the database), and PHP (the programming language), is the perfect platform to host traffic-intensive dynamic websites and applications.
In this post, we will see how to Install LEMP Stack on Debian 11.
Prerequisites
To install the LEMP stack on Debian 11, you need to have sudo privileges on the system.
Install Linux
Proceed to the installation of AMP (Nginx v1.20, PHP-FPM v7.4, MariaDB v10.5) on Debian 11.
Install Nginx
Nginx is a free, open-source webserver that provides HTTP, reverse proxy, caching, and load-balancing functionality. It’s a great alternative to Apache, and it’s easy to set up.
Install below packages.
sudo apt update
sudo apt install -y curl gnupg2 ca-certificates lsb-release
Download the Nginx repository signing key and add it to the system.
curl -fsSL http://nginx.org/keys/nginx_signing.key | sudo gpg --dearmor -o /usr/share/keyrings/nginx-keyring.gpg
Add Nginx repository to the system.
echo "deb [signed-by=/usr/share/keyrings/nginx-keyring.gpg] http://nginx.org/packages/debian `lsb_release -cs` nginx" | sudo tee /etc/apt/sources.list.d/nginx.list
sudo apt update
sudo apt install -y nginx
Start the Nginx service after the installation.
sudo systemctl start nginx
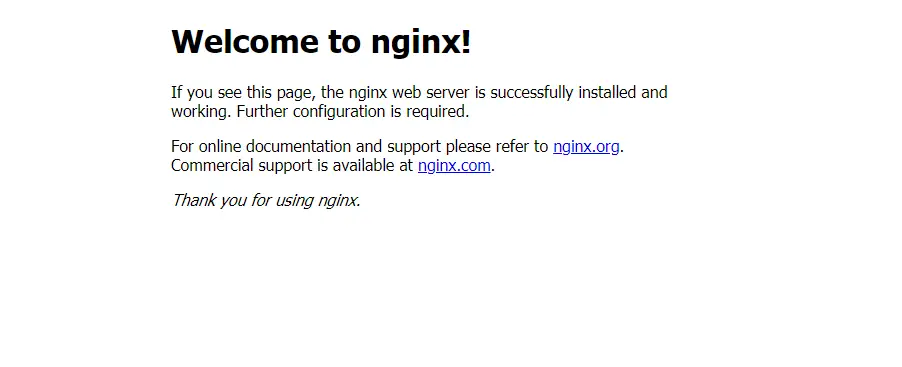
Open a web browser and visit the below URL.
You will get the welcome page that confirms that Nginx has been successfully installed and is up and running.
Install MariaDB
MariaDB is a drop-in replacement for MySQL that supports all standard MySQL features. We will set up MariaDB as part of a LEMP (Linux, Nginx, MariaDB/MySQL, PHP) stack in our installation.
Install the MariaDB server v10.5 from the Debian repository.
sudo apt install -y mariadb-server mariadb-client
MariaDB service should be up and running at this moment. First, check the status of the MariaDB service using the below command.
sudo systemctl status mariadb
Next, make the MariaDB server secure by running the mysql_secure_installation command.
Install PHP
The PHP FastCGI Process Manager (FPM) is an alternative PHP FastCGI implementation with additional features useful for bigger and busier sites. It can handle a lot more requests per second than other PHP FastCGI implementations.
Install package and PHP MySQL extension.
sudo apt install -y php-fpm php-mysql php-cli
Edit the configuration file.
sudo nano /etc/php/7.4/fpm/pool.d/www.conf
Change the ownership and group from to for Unix socket.
listen.owner = nginx
listen.group = nginx
Create Virtual Host
Create a virtual host configuration file in directory.
sudo nano /etc/nginx/conf.d/site.itzgeek.local.conf
server { server_name ; root ; location / { index index.html index.htm index.php; } location ~ \.php$ { include /etc/nginx/fastcgi_params; fastcgi_pass unix: fastcgi_index index.php; fastcgi_param SCRIPT_FILENAME $fastcgi_script_name; }
}
Create the document root directory for the virtual host.
sudo mkdir /usr/share/nginx/html/site.itzgeek.local
Place a PHP file onto the document root.
echo "<?php phpinfo(); ?>" | sudo tee /usr/share/nginx/html/site.itzgeek.local/index.php
Restart the Nginx and PHP-FPM services.
sudo systemctl restart nginx
sudo systemctl restart php7.4-fpm
Test LEMP Stack
First, create a host entry for your domain (site.itzgeek.local) in the file to test the LEMP stack locally. Then, open up your web browser and type your domain name in the web address.
The page will look like below:
As you can see in the screenshot, the PHP is working through FPM/FastCGI (Server API).
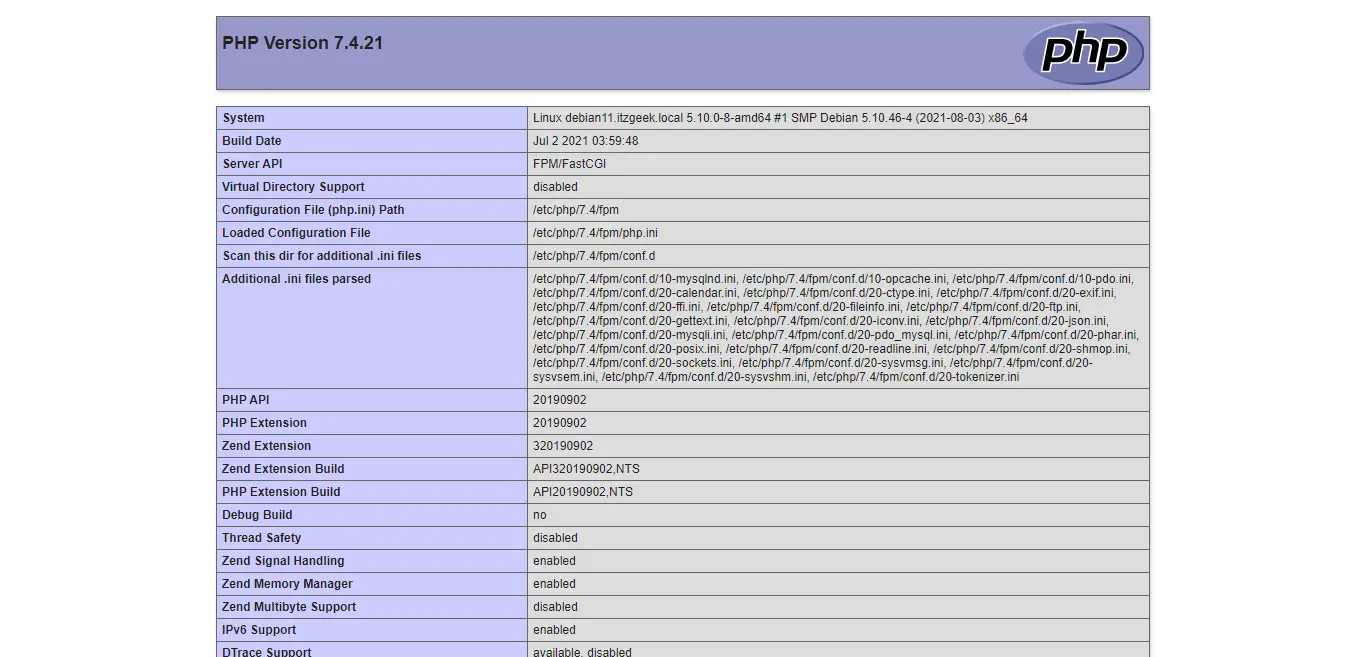
Scroll the page further down to view the PHP support for MySQL, XML, and other extensions.
Conclusion
I hope this post helped you to install the LEMP stack on Debian 11. Additionally, you can install phpMyAdmin to manage MariaDB over the web interface.
Prerequisites
Install MySQL / MariaDB Server
Install the database and then the required packages shown below.
Standalone Database
READ: How To Install MariaDB on Debian 11
READ: How To Install MariaDB on Debian 10
READ: How To Install MySQL 8.0 / 5.7 on Debian 11 / Debian 10
sudo apt install -y apache2 apache2-utils php libapache2-mod-php php-pdo php-zip php-json php-common php-fpm php-mbstring php-cli php-xml php-mysql
LAMP Stack
READ: How To Install LAMP Stack on Debian 11
READ: How To Install LAMP Stack on Debian 10
sudo apt install -y php-json php-mbstring php-xml
wget https://files.phpmyadmin.net/phpMyAdmin/5.1.1/phpMyAdmin-5.1.1-all-languages.tar.gz
tar -zxvf phpMyAdmin-5.1.1-all-languages.tar.gz
sudo mv phpMyAdmin-5.1.1-all-languages /usr/share/phpMyAdmin
Configure phpMyAdmin
Copy the sample configuration file.
sudo cp -pr /usr/share/phpMyAdmin/config.sample.inc.php /usr/share/phpMyAdmin/config.inc.php
Edit the configuration file and add a blowfish secret.
sudo nano /usr/share/phpMyAdmin/config.inc.php
Generate blowfish secret and then place it into the below line.
$cfg['blowfish_secret'] = ''; /* YOU MUST FILL IN THIS FOR COOKIE AUTH! */
/** * phpMyAdmin configuration storage settings. */
/* User used to manipulate with storage */
$cfg['Servers'][$i]['controlhost'] = 'localhost';
// $cfg['Servers'][$i]['controlport'] = '';
$cfg['Servers'][$i]['controluser'] = 'pma';
$cfg['Servers'][$i]['controlpass'] = 'pmapass';
/* Storage database and tables */
$cfg['Servers'][$i]['pmadb'] = 'phpmyadmin';
$cfg['Servers'][$i]['bookmarktable'] = 'pma__bookmark';
$cfg['Servers'][$i]['relation'] = 'pma__relation';
$cfg['Servers'][$i]['table_info'] = 'pma__table_info';
$cfg['Servers'][$i]['table_coords'] = 'pma__table_coords';
$cfg['Servers'][$i]['pdf_pages'] = 'pma__pdf_pages';
$cfg['Servers'][$i]['column_info'] = 'pma__column_info';
$cfg['Servers'][$i]['history'] = 'pma__history';
$cfg['Servers'][$i]['table_uiprefs'] = 'pma__table_uiprefs';
$cfg['Servers'][$i]['tracking'] = 'pma__tracking';
$cfg['Servers'][$i]['userconfig'] = 'pma__userconfig';
$cfg['Servers'][$i]['recent'] = 'pma__recent';
$cfg['Servers'][$i]['favorite'] = 'pma__favorite';
$cfg['Servers'][$i]['users'] = 'pma__users';
$cfg['Servers'][$i]['usergroups'] = 'pma__usergroups';
$cfg['Servers'][$i]['navigationhiding'] = 'pma__navigationhiding';
$cfg['Servers'][$i]['savedsearches'] = 'pma__savedsearches';
$cfg['Servers'][$i]['central_columns'] = 'pma__central_columns';
$cfg['Servers'][$i]['designer_settings'] = 'pma__designer_settings';
$cfg['Servers'][$i]['export_templates'] = 'pma__export_templates';
Credit: TECHIES WORLD
sudo mysql < /usr/share/phpMyAdmin/sql/create_tables.sql -u root -p
Login to MariaDB.
sudo mysql -u root -p
CREATE USER 'pma'@'localhost' IDENTIFIED BY 'pmapass';
GRANT ALL PRIVILEGES ON phpmyadmin.* TO 'pma'@'localhost' WITH GRANT OPTION;
FLUSH PRIVILEGES;
EXIT;
sudo nano /etc/apache2/sites-available/phpmyadmin.conf
Copy and paste the below content into the above file.
Alias /phpMyAdmin /usr/share/phpMyAdmin
Alias /phpmyadmin /usr/share/phpMyAdmin
<Directory /usr/share/phpMyAdmin/> AddDefaultCharset UTF-8 <IfModule mod_authz_core.c> # Apache 2.4 <RequireAny> Require all granted </RequireAny> </IfModule> <IfModule !mod_authz_core.c> # Apache 2.2 Order Deny,Allow Deny from All Allow from 127.0.0.1 Allow from ::1 </IfModule>
</Directory>
<Directory /usr/share/phpMyAdmin/setup/> <IfModule mod_authz_core.c> # Apache 2.4 <RequireAny> Require all granted </RequireAny> </IfModule> <IfModule !mod_authz_core.c> # Apache 2.2 Order Deny,Allow Deny from All Allow from 127.0.0.1 Allow from ::1 </IfModule>
</Directory>
Enable the virtual host with the below command.
sudo a2ensite phpmyadmin
sudo mkdir /usr/share/phpMyAdmin/tmp
sudo chmod 777 /usr/share/phpMyAdmin/tmp
sudo chown -R www-data:www-data /usr/share/phpMyAdmin
Restart the Apache web service.
sudo systemctl restart apache2
Create DB & User
CREATE DATABASE app_db;
CREATE USER 'app_user'@'localhost' IDENTIFIED BY 'password';
GRANT ALL PRIVILEGES ON app_db.* TO 'app_user'@'localhost' WITH GRANT OPTION;
FLUSH PRIVILEGES;
EXIT;
If required, you can disable Unix socket authentication and enable native password login.
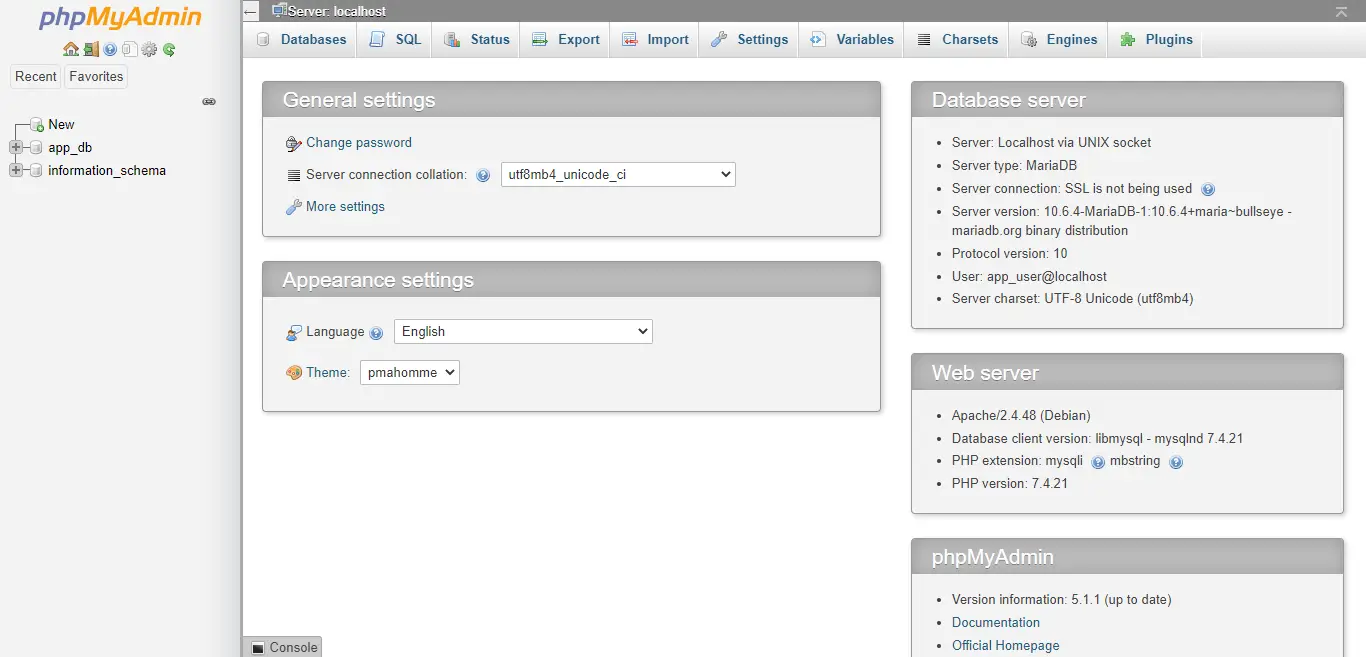
Access phpMyAdmin
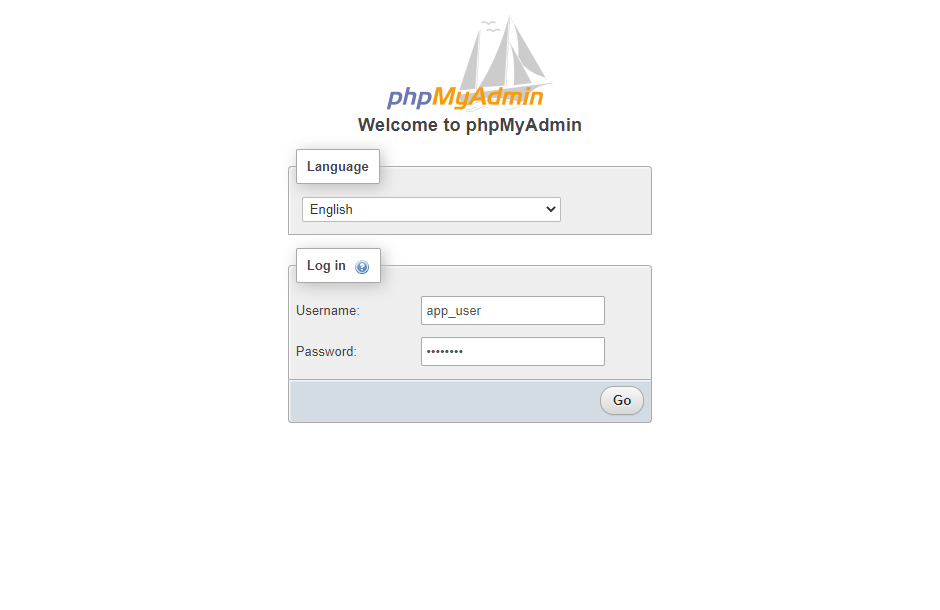
You will get the below page where you can perform all database activities.
Conclusion
I hope this post helped you how to install phpMyAdmin with Apache on Debian 11 / Debian 10 to manage MariaDB and MySQL servers. Additionally, you can take a look at how to secure your phpMyAdmin installation.
