

Today I want to reveal in more detail the topic of protecting routers of a popular Latvian brand. We will talk about the basic configuration of the Firewall in Mikrotik to ensure security and convenience. An article on this topic was written a long time ago, but I decided to completely redo it and update it.
You can learn how to set up MikroTik from scratch or systematize your existing knowledge in an advanced MikroTik administration course. The author of the course, a certified MikroTik trainer Dmitry Skoromnov, personally checks laboratory work and monitors the progress of each of his students. Three times more information than in the MTCNA vendor program, over 20 hours of practice and access forever.
This article is part of a single series of articles about Mikrotik.
Some time ago I updated and updated the article about mikrotik basic setup. In the comments, many people blamed me for not paying attention to setting up the firewall at all. I didn’t want to mix everything together, so I’m writing a separate detailed article on this topic, and I’ll leave a link to it in the router settings.
So, we will assume that you have already configured the router in much the same way as I described in my article. There is a local network that will access the Internet through Mikrotik. And there is Mikrotik itself, which we want to protect by restricting access to everything superfluous, allowing only what we need.
- Default firewall in Mikrotik
- Firewall and basic security setup
- The order of the rules in the Firewall
- Examples of ready-made rules
- Configuring NAT in Mikrotik
- Protection of connection via winbox
- How to turn off the firewall on Mikrotik
- Mikrotik online courses
- Did the article help? Subscribe to the author’s telegram channel
- Short list of actions
- Description Mikrotik RB951G-2HnD
- Reset router settings
- Combining ports into a bridge
- Static IP Setting
- Internet setup in Mikrotik
- Setting up a dhcp server
- Setting up a wifi hotspot in mikrotik
- Change default administrator password
- Frequently asked questions on the topic of the article (FAQ)
Default firewall in Mikrotik
If you use the default router configuration, then it has standard firewall rules by default. I result the list of standard rules (rules) with comments. I remind you that you can export firewall rules to mikrotik with the following command:
Here is a list of standard rules:
/ip firewall filter
add action=accept chain=input comment=»defconf: accept established,related,untracked» connection-state=established,related,untracked
add action=drop chain=input comment=»defconf: drop invalid» connection-state=invalid
add action=accept chain=input comment=»defconf: accept ICMP» protocol=icmp
add action=drop chain=input comment=»defconf: drop all not coming from LAN» in-interface-list=!LAN
add action=accept chain=forward comment=»defconf: accept in ipsec policy» ipsec-policy=in,ipsec
add action=accept chain=forward comment=»defconf: accept out ipsec policy» ipsec-policy=out,ipsec
add action=fasttrack-connection chain=forward comment=»defconf: fasttrack» connection-state=established,related
add action=accept chain=forward comment=»defconf: accept established,related, untracked» connection-state=established,related,untracked
add action=drop chain=forward comment=»defconf: drop invalid» connection-state=invalid
add action=drop chain=forward comment=»defconf: drop all from WAN not DSTNATed» connection-nat-state=!dstnat connection-state=new in-interface-list=WAN
/ip firewall nat
add action=masquerade chain=srcnat comment=»defconf: masquerade» ipsec-policy=out,none out-interface-list=WAN
In principle, according to the above comments, it is approximately clear what is happening here. All incoming and transit connections not from the local network are dropped, ping is allowed — icmp, ipsec is allowed, established connections are allowed. All. Well, NAT is configured through the WAN interface.
In many cases, these default rules may be enough for an ordinary user who simply set up a router at home to access the Internet. Use it if you don’t need anything else from the router.
If you want to better understand the firewall device and try to configure it yourself, then let’s figure it out further together.
Firewall and basic security setup
Now let’s talk a little about why a firewall is needed and what issues it solves. And not only in the context of Mikrotik, but in general. Now every homegrown admin tells how important it is to always configure a firewall, sometimes without even understanding what it is for. Personally, I am not a supporter of creating extra entities, so where a firewall is not needed, I do not configure it.
Firewall allows you to configure access both to the gateway itself and to resources behind it. Let’s say you don’t have any services running on the router, and there’s no outside access to the local network. You have some kind of service on the gateway, with the help of which it is connected and controlled (ssh, winbox, http, etc.), and there are no plans to configure access restriction to this service. The question is — why do you need to set up a firewall in this case? What will it limit and what rules to write there? In this case, it will be enough for you to disable all services on the router that listen for connections from outside and that’s it.
In fact, such a case is very popular at home or in small organizations where there is no permanent admin. Some kind of router is simply configured, NAT is raised and that’s it. I understand that it is not correct not to set up restrictions on access to management, but I tell you how often it happens. That is, the firewall should solve a specific task of restricting access to resources, and not exist just like that.
There are also popular cases when a bunch of rules are configured, but at the end it still costs accept for all connections. I myself sometimes did such mistakes when I debugged the work of the service somewhere and then forgot to return the restrictions back. The firewall seems to be configured, but in reality it is not. If you turn it off, nothing will change.
Why did I write all this? In addition, before setting up a firewall, we need to decide what we are doing this for. What permissions or restrictions and for whom we will introduce. After that, you can proceed to the setting.
In my example, I will configure the firewall on Mikrotik while in the local network. I always advise you to do the same. There is an old admin sign — remote firewall configuration to a long journey.
Mikrotik has an interesting tool in the form of Safe Mode, which allows you to relatively safely configure the Firewall remotely. Its essence is very simple. You enable this mode through the appropriate setting.
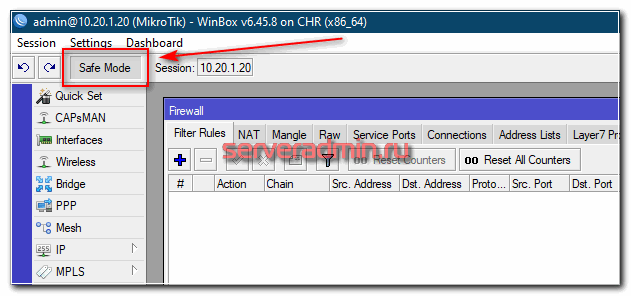
Further, if you exit this mode incorrectly, all the settings you have created will be cancelled. The correct way out of the mode is to manually turn it off through the same setting. Thus, if during the firewall setup you lost connection due to an incorrect rule or for some other reason, Mikrotik will roll back the changes you made and you will be able to connect to the router again.
In the terminal, this mode is enabled by the key combination CTRL+X. Waiting time before rolling back changes is a maximum of 9 minutes (TCP timeout). You can read more about this mode in the official documentation.
The order of the rules in the Firewall
Before starting the firewall configuration in mikrotik, I will separately dwell on one very important point — the order of the rules. Many people, including myself, did not attach much importance to this, since I did not encounter high loads on network equipment. If there is no load, then you do not notice the difference. However, it is better to understand it.
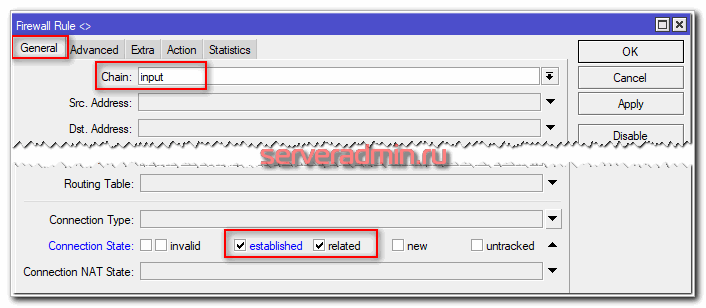
Packets go through the list of rules in order, from top to bottom. If the packet matches some rule, then it stops moving along the chain. An important conclusion follows from this — the first in the chain should be the rules that cover the maximum amount of traffic so that it is no longer processed by the device. An example of such a rule is to allow packets of already established (established) or related (related) connections that were previously allowed by some rule. There is no need to re-check them according to all the rules. Let’s make such a rule for the input chain — incoming connections of the router.
/ip firewall filter
add action=accept chain=input comment=»accept establish & related» connection-state=established,related

Added untracked connections to the default firewall rule. I did not add them, since I usually do not use this feature. Untracked are packages not tracked by the connection tracker. That is, going past many firewall functions. At the end of the article, I will separately talk about this possibility.
We have already written the first firewall rule for the input chain, but at the same time I forgot to tell a little about the existing chains of rules in the Mikrotik firewall. They are inherited from the Linux iptables firewall. In fact, it is he who works in mikrotik.
When compiling firewall rules, there is no point in trying to somehow mix rules from different chains. They will still be read in order according to the chain into which the packet falls. Therefore, I usually first describe all the rules for input, then for forward, and finally, if necessary, for output.
Examples of ready-made rules
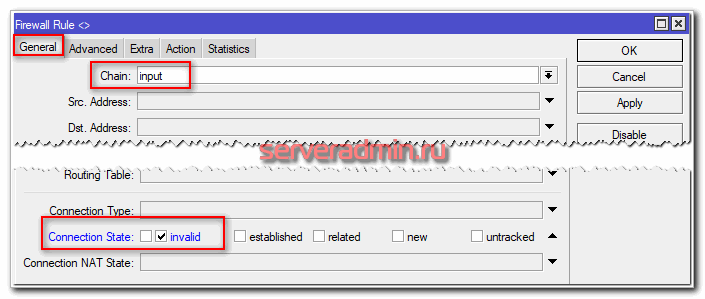
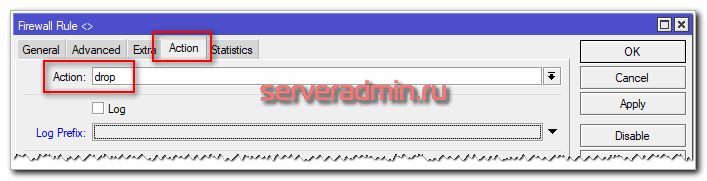
Moving on. We have one rule, draw the next one. We discard all incorrect (Invalid) packages. This is pure parasitic traffic. Its packets are not part of any of the monitored connections. Therefore, the sooner we discard them, the less they will load the firewall further with checks.
add action=drop chain=input comment=»drop invalid» connection-state=invalid
I will not give screenshots further, it is very troublesome to make them for each rule, and there is no point. Just paste the rules through the console and study them yourself in winbox. We allow icmp traffic so that we can ping the router.
add action=accept chain=input comment=»accept ICMP» protocol=icmp
Accordingly, if you want to block it, then instead of action=accept, make a drop, or just don’t write a rule if at the end you will have a complete blocking of everything that is not explicitly allowed.
Next, I usually allow connecting to the ports responsible for managing the router (ssh, winbox, https) from trusted ip addresses. I will discuss this issue in detail below, so for now we will skip this rule.
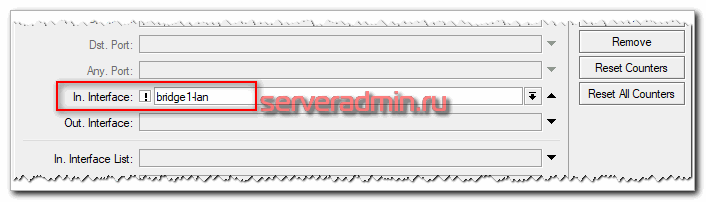
Create a final rule for the input chain that will block all requests that come from outside the local network. In my example, my local network is connected to the bridge1-lan bridge. It includes all ports connected to the LAN.
add action=drop chain=input comment=»drop all not from lan» in-interface=!bridge1-lan
In this rule, I used the negation of !bridge1-lan, that is, everything that does not apply to the specified bridge.
At the moment, we have banned all requests from outside to the router, except for pings. At the same time, access from the local network is complete. Now let’s configure the rules for the transit traffic of the forward chain. Here, by analogy with input, the rules for established, related, invalid packets come first.
add action=accept chain=forward comment=»accept established,related» connection-state=established,related
add action=drop chain=forward comment=»drop invalid» connection-state=invalid
Now let’s deny all requests from the external network, communication with which through the ether1-wan interface to the local network.
add action=drop chain=forward comment=»drop all from WAN to LAN» connection-nat-state=!dstnat connection-state=new in-interface=ether1-wan
We will look at what dstnat is a little later when we deal with NAT. This completes the list of basic rules. Below is a little explanation of what we have done.
An important note that I forgot to mention. By default, Mikrotik Firewall is normally open. This means that everything that is not explicitly forbidden is allowed.
At the moment, we have denied all incoming connections, except for ping. At the same time, all requests from the local network to the external network are allowed, since we did not specify any blocking rules for this, which means that everything is open. For example, I will show what needs to be done to prohibit all requests from the local area and allow, for example, only http and https traffic.
To do this, we first create an allow rule for ports 80 and 443. If you use an external DNS server for requests from the network, do not forget to allow UDP port 53 as well, otherwise dns requests will not go through and pages will not be loaded, even if http traffic is allowed.
add action=accept chain=forward comment=»accept http & https from LAN» dst-port=80,443 in-interface=bridge1-lan out-interface=ether1-wan protocol=tcp
add action=accept chain=forward comment=»accept dns from lan» dst-port=53 in-interface=bridge1-lan out-interface=ether1-wan protocol=udp
Allowed http and dns traffic because my test environment uses an external dns server. Now we block all other requests along the forward chain from the local network.
add action=drop chain=forward comment=»drop all from LAN to WAN» in-interface=bridge1-lan out-interface=ether1-wan
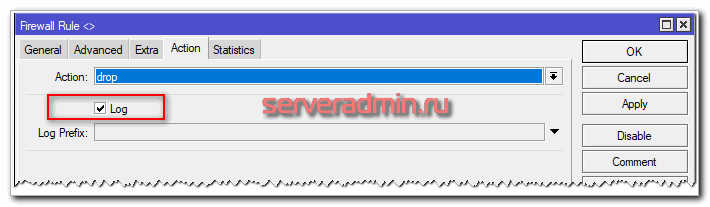
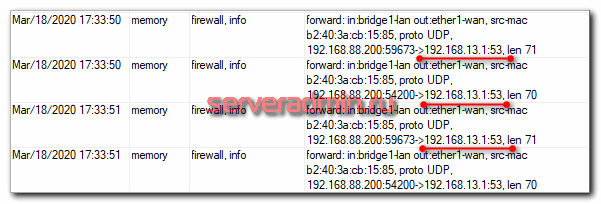
When I was writing the article, I got stuck for 10 minutes and could not understand why the allowing rule for http did not work. I checked it several times, everything was correct. There is nowhere to make a mistake, but pages from the Internet were not loaded in the browser. To figure it out, I just turned on logging for the last deny rule.
After I did this, I saw that my dns traffic was being blocked on the 53rd port. After that I made permission for it and everything worked as it should.
I forgot to warn you. If you are setting up a firewall in Mikrotik from scratch, then you still do not have access to the Internet from the local network. To do this, you need to configure NAT, which we will deal with in the next section. So put off testing the rules for now and come back to them when you set up NAT.
When something doesn’t work for you, feel free to enable logging of deny rules and you will quickly understand what the problem is. This is a universal advice for setting up any firewall. Just don’t forget to disable logging at the end of debugging. Sometimes I forgot to do it. If some kind of storage for logs was used, it quickly clogged up, since a lot of requests fall into the blocking rules.
So, we have set up a basic normally closed firewall in Mikrotik. We prohibit everything that is not explicitly allowed, including for traffic from the local network. To be honest, I rarely did this, because it’s troublesome to constantly open something from the local network (skype, teamviewer, etc.). In general, if there are no increased security requirements, this is not necessary. Blocking of unauthorized traffic can be enabled if necessary.
The final list of rules that came out:
/ip firewall filter
add action=accept chain=input comment=»accept establish & related» connection-state=established,related
add action=drop chain=input comment=»drop invalid» connection-state=invalid
add action=accept chain=input comment=»accept ICMP» protocol=icmp
add action=drop chain=input comment=»drop all not from lan» in-interface=!bridge1-lan
add action=accept chain=forward comment=»accept established,related» connection-state=established,related
add action=drop chain=forward comment=»drop invalid» connection-state=invalid
add action=drop chain=forward comment=»drop all from WAN to LAN» connection-nat-state=!dstnat connection-state=new in-interface=ether1-wan
add action=accept chain=forward comment=»accept http & https from LAN» dst-port=80,443 in-interface=bridge1-lan out-interface=ether1-wan protocol=tcp
add action=accept chain=forward comment=»accept dns from LAN» dst-port=53 in-interface=bridge1-lan out-interface=ether1-wan protocol=udp
add action=drop chain=forward comment=»drop all from LAN to WAN» in-interface=bridge1-lan out-interface=ether1-wan

So far, we have not yet configured Internet access for the local network. We will do this further by setting up NAT.
Configuring NAT in Mikrotik
With nat in Mikrotik, there is one important nuance that I did not know about until I read the presentation of one of the employees, which I eventually translated — My «holy war» against masquerade. I have always used masquerade to set up NAT everywhere. In addition, this action is also offered in the default configuration. At its core, masquerade is a special case of src-nat, which should be used if you do not have a permanent ip address on the external interface. Moreover, in some cases there may be problems with masquerade. Which ones are described in the presentation.
Thus, if you have a permanent ip address, then use src-nat for NAT, if dynamic — masquerade. The difference in settings is minimal.
/ip firewall nat
add action=src-nat chain=srcnat out-interface=ether1-wan to-addresses=10.20.1.20
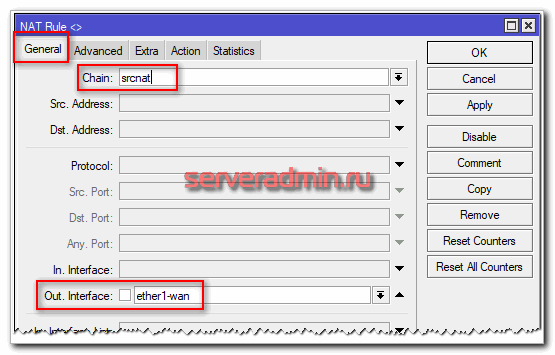
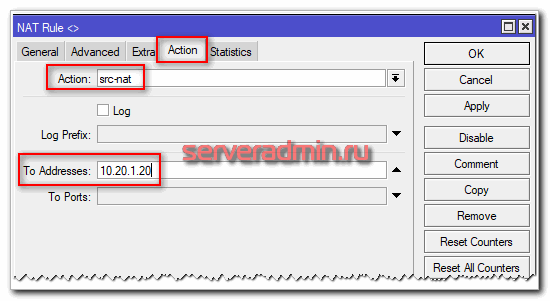
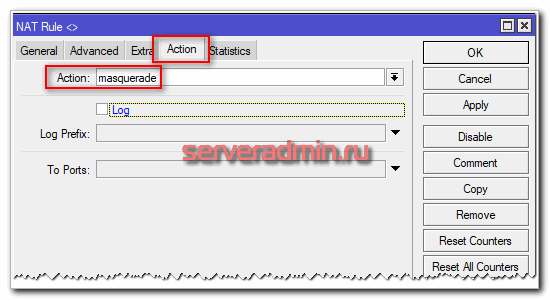
In this case, 10.20.1.20 is the ip address on the wan interface. If not a permanent ip address on the wan interface, then we do it with masquerade.
add action=masquerade chain=srcnat out-interface=ether1-wan
That’s it, NAT is configured, users can access the Internet. Now I propose to check the operation of the firewall that we have configured. Reset all counters in the rules.
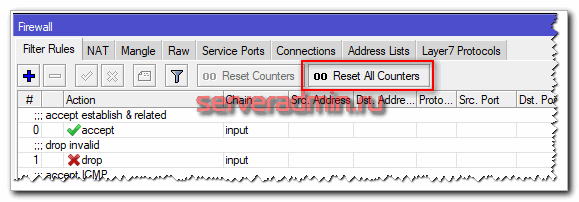
Now generate as much traffic as possible and see what rules it will go through. You can use the index service for measuring Internet speed — https://yandex.ru/internet/.
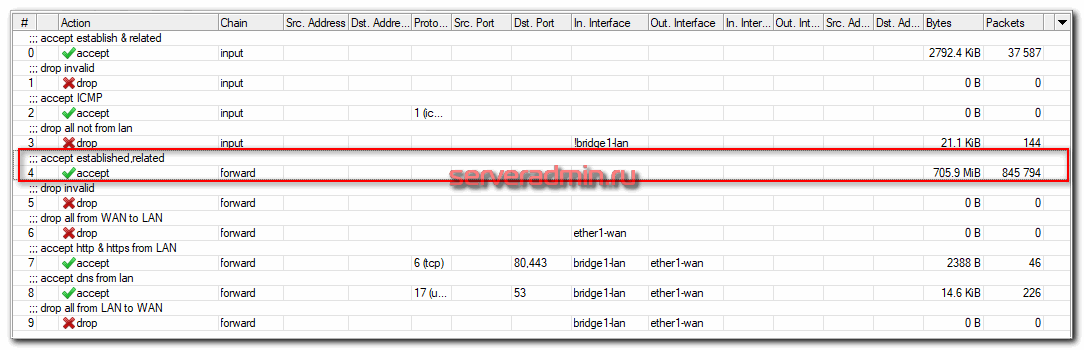
Most of the traffic passed according to the rule with established, related connections, minimally loading the router with its processing in the context of the firewall. This will be especially true if you have a lot of rules in the firewall. It is important to place them in the correct order.
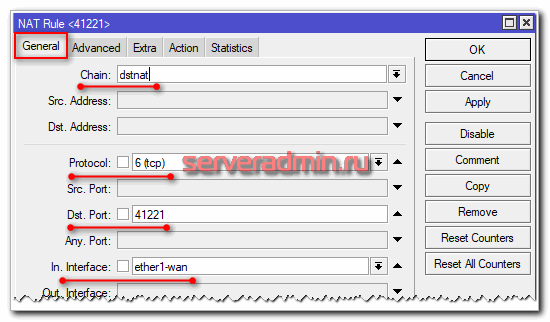
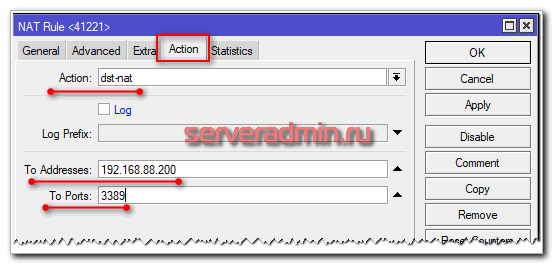
Using a simple example, I will show you how to perform port forwarding in mikrotik with a configured NAT and enabled firewall to access the service on the local network. You can forward the port in the same NAT tab in the Firewall settings.
For example, let’s forward the rdp port from the Internet via Mikrotik. From the outside, port 41221 will be opened, and forwarding will go to the local address 192.168.88.200 and port 3389.
add action=dst-nat chain=dstnat dst-port=41221 in-interface=ether1-wan protocol=tcp to-addresses=192.168.88.200 to-ports=3389
If you have the rest of Mikrotik’s firewall configured as described above, then port forwarding will already work and you don’t need to do anything else. Since we have a rule to block requests from outside to the local network, taking into account the exclusion of the dstnat chain, everything will work right away. I remember this rule.
If you configured the firewall earlier on some other material, there could be another rule, without taking into account dstnat, for example like this:
To such a rule, it is necessary to add a permissive rule above, something like this:
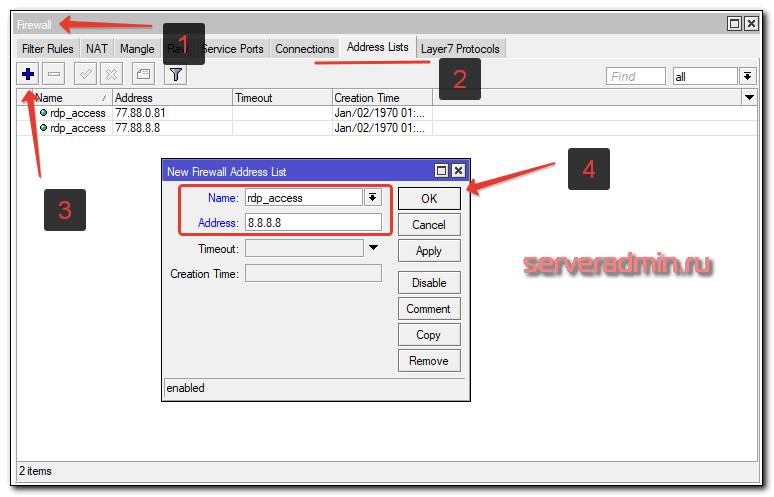
I strongly recommend not to open access to the rdp port for the entire Internet. I personally had a bad experience in this situation. Be sure to configure access restriction by ip to this port, if possible. If it is not possible, then do not forward the port, but make access via vpn. Restriction on ip becomes simply. We add one more parameter Src. Address to a port forwarding rule.

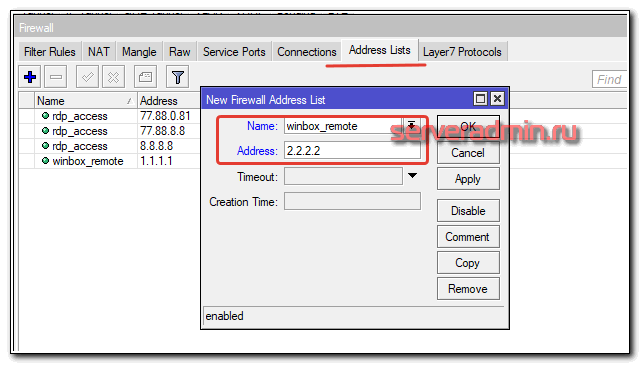
If you use a list of ip addresses that will change, it’s easier to immediately point to the list in the forwarding rule, and then edit the list itself. To do this, you need to create it. You can create an ip list on the Address List tab. Add a list:
We return to the port forwarding rule, go to the Advanced tab and add the specified list to Src. Address List
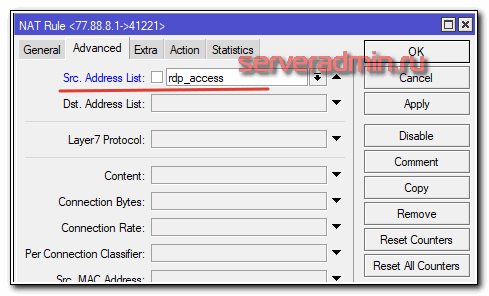
Now, to change the access list for a forwarded port, you do not need to touch the rule itself. It is enough to edit the list.
That’s all for setting up NAT and port forwarding on Mikrotik. I hope I managed to explain in detail and clearly the main points and some nuances.
Protection of connection via winbox
I’ll tell you separately about how to protect the winbox connection using a firewall. Critical vulnerabilities are occasionally found in Mikrotiks. The only way to reliably protect yourself from them is to restrict access to winbox using a firewall. After that, you can sleep peacefully and do system updates not urgently, after the vulnerability is published, but as planned.
In the list of firewall rules discussed earlier, all external connections are completely blocked. This is the safest setting. Sometimes you need access to remote control. If it is impossible to create a static list of ip addresses for which connection will be allowed, then the way out in this case is to set up a vpn server on Mikrotik and connect via vpn. Although this is less safe than direct restriction at the level of the list of ip addresses, it is still much better than leaving access through winbox without restriction via the Internet.
The topic of setting up vpn in mikrotik is beyond the scope of this article. Read a separate article on this subject. Let’s make a simple restriction of access to management at the ip level. First, let’s create a list of IP addresses that will be allowed to connect remotely to winbox.
Adding a rule to the Firewall. It must be above the rule where all incoming connections are blocked.
add action=accept chain=input comment=»accept management for white-list» dst-port=8291 in-interface=ether1-wan protocol=tcp src-address-list=winbox_remote
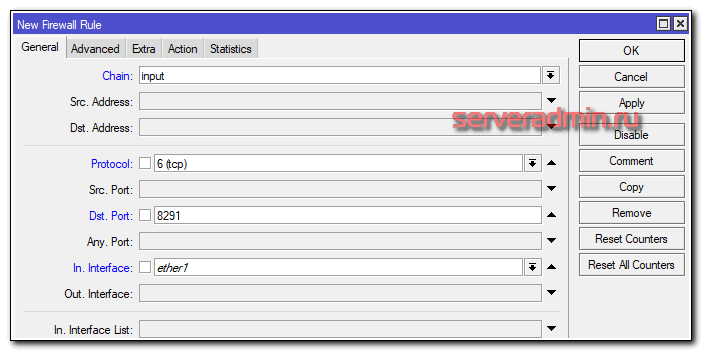
Specify the list in the Advanced tab:

In the action section, put accept. So we secured remote access through winbox. I think this is the easiest and safest way to protect Mikrotik. If there is a possibility of restrictions on ip, always use. This is a universal method, suitable for any case and system, not only in relation to Mikrotik.
In today’s IT world, vulnerabilities are constantly being found. It is impossible to always install updates promptly. Often, these updates can either break the system or contain other vulnerabilities. Only restricting access to services and systems allows you to protect yourself more or less reliably and sleep peacefully, not rushing to update as fast as you can when another critical vulnerability is discovered.
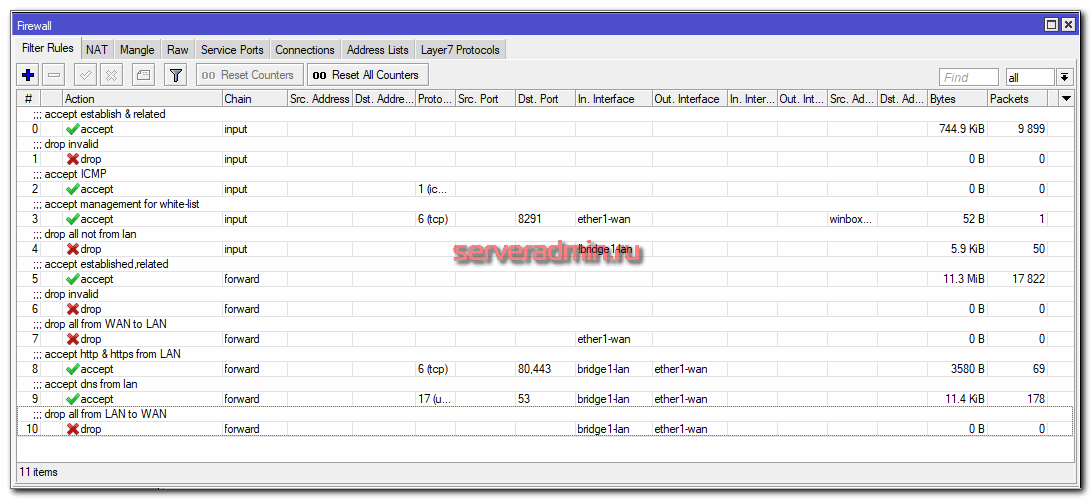
The final list of rules after all our settings in this article should look something like this.
Fasttrack mode is enabled in mikrotik firewall default rule. I usually don’t use it in my rules. I’ll try to explain in my own words what it is. I tried to understand the essence of this technology for a long time when I figured it out.
Fasttrack is Mikrotik’s proprietary technology that allows you to mark ip packets for faster packet filtering. Enabling fasttrack packet tagging is very simple. It is enough to add the following rule first to the forward chain:
/ip firewall filter add action=fasttrack-connection chain=forward comment=fasttrack connection-state=established,related
Then all the same rules remain that I described earlier in the article.
In this mode, packets are moved along a simplified route in the packet filter, so the following packet processing technologies do not work:
Due to the fact that the packet processing route is shorter, it loads the processor less at the expense of functionality. If you do not use any of the above, then you can use fasttrack. However, queues are most often needed, so it has to be abandoned. If you do not use queues and some special rules in the firewall, then you can use the technology.
You can check the Mangle section to make sure the fasttrack mode is working. The counter with tagged packets should increase.

And finally, an important note on fasttrack — it does not work in CHR. I encountered this personally when I tested. My test environment is set to CHR and fasttrack didn’t work there. Moreover, it can be enabled, but all packet counters will be zero. The technology doesn’t really work.
How to turn off the firewall on Mikrotik
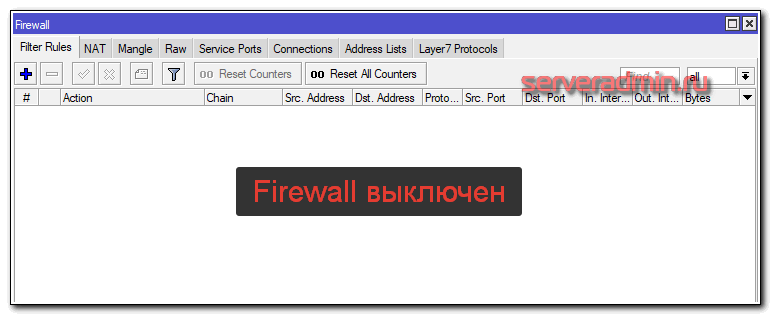
In order to completely disable the Firewall on Mikrotik, simply disable or delete all the rules in the list. By default, mikrotik uses allow rules. Everything that is not forbidden is allowed, that is, the firewall is normally open. If you don’t have any active rules, you can assume that the firewall is disabled, since it allows all connections without restrictions.
Here is an example of disabled firewall on Mikrotik 🙂
The final list of rules configured for this article turned out like this:
/ip firewall address-list
add address=10.20.1.1 list=winbox_remote
/ip firewall filter
add action=accept chain=input comment=»accept establish & related» connection-state=established,related
add action=drop chain=input comment=»drop invalid» connection-state=invalid
add action=accept chain=input comment=»accept ICMP» protocol=icmp
add action=accept chain=input comment=»accept management for white-list» dst-port=8291 in-interface=ether1-wan protocol=tcp src-address-list=winbox_remote
add action=drop chain=input comment=»drop all not from lan» in-interface=!bridge1-lan
add action=accept chain=forward comment=»accept established,related» connection-state=established,related
add action=drop chain=forward comment=»drop invalid» connection-state=invalid
add action=drop chain=forward comment=»drop all from WAN to LAN» connection-nat-state=!dstnat connection-state=new in-interface=ether1-wan
add action=accept chain=forward comment=»accept http & https from LAN» dst-port=80,443 in-interface=bridge1-lan out-interface=ether1-wan protocol=tcp
add action=accept chain=forward comment=»accept dns from lan» dst-port=53 in-interface=bridge1-lan out-interface=ether1-wan protocol=udp
add action=drop chain=forward comment=»drop all from LAN to WAN» in-interface=bridge1-lan out-interface=ether1-wan
/ip firewall nat
add action=masquerade chain=srcnat out-interface=ether1-wan
add action=dst-nat chain=dstnat dst-port=41221 in-interface=ether1-wan protocol=tcp to-addresses=192.168.88.200 to-ports=3389
That’s all for the basic firewall setup on mikrotik. I tried to show in as much detail as possible the basic set of firewall rules to ensure the security and protection of the local network and the router itself.
This topic is extensive, for sure someone has comments and advice on the proposed setting. There are no universal rules for all occasions. Firewall in Mikrotik is based on Linux iptalbes, and this is a limitless field for maneuver.
I remind you that this article is part of a single cycle of articles about Mikrotik.
Mikrotik online courses
If you have a desire to learn how to work with MikroTik routers and become a specialist in this field, I recommend taking courses on a program based on information from the official MikroTik Certified Network Associate course. In addition to the official program, the courses will include laboratory work in which you can test and consolidate your knowledge in practice. All the details on the IT Courses website.
The cost of training is very democratic, a good opportunity to gain new knowledge in the subject area that is relevant today. Course features:
Did the article help? Subscribe to the author’s telegram channel
Announcements of all articles, plus a lot of other useful and interesting information that does not appear on the site.
I continue the story about a wonderful series of devices from Latvia, which have proven themselves to be functional and reliable devices. In this article, I will consider in detail the issue of basic configuration of mikrotik routers using the example of the budget and most popular model RB951G-2HnD. This manual is suitable for almost any model, since they are all made on the basis of the same operating system.
Mikrotik routerboard routers have appeared on the market for a long time, but they still have not gained much popularity. Although they have occupied their niche. Personally, I think that this is an excellent router for the home, it has no competitors in terms of reliability. This is truly a router that you can set up and forget once. Personally, I have never come across a device that would have to be forced to reboot in order to bring it out of a coma, as is often the case with other budget pieces of iron.
Distribution to home users is primarily constrained by the difficulty of customization. And although it may seem to a more or less advanced user that there is nothing complicated here. But actually there is. And I often encountered requests to set up a router at home for distributing the Internet via wifi, since users who bought on someone’s recommendation themselves could not fully configure the necessary functionality, although there are enough instructions on the Internet.
I want to fill this gap and write a detailed step-by-step instruction for setting up a microtic from scratch for dummies using the example of the RB951G-2HnD model most suitable for home. I have long prepared a personal cheat sheet in the form of a text file. Using it, I literally set up the router in 10 minutes and give it to the user. That is really nothing complicated if you know what you are doing. Based on this cheat sheet, I will write the material.
Next, I offer a short list of what we will do in the article, so that you understand what will be discussed.
Short list of actions
Mikrotik router setup.
Description Mikrotik RB951G-2HnD
Here it is, the hero of today’s article — Mikrotik RB951G-2HnD. Its description, reviews and cost can be quickly checked on Yandex. Market. By the number of reviews, it is already possible to conclude that this router has a certain popularity.
Appearance of the device.
An important feature of this router, which I personally actively use, is the ability to power it using a special poe adapter.
He is on the right in the image. A standard power supply is taken from the router and a poe adapter. The power supply is connected to the adapter, and a patch cord is already going from the adapter to the first port of the routerboard. The router can be hung on the wall anywhere, no need to be tied to a power outlet. I’ll note right away that you can only power the router with a Mikrotik poe adapter. It has a different standard and the usual 802.3af poe switches will not work.
There is a similar model RB951Ui-2HnD. It differs from the one described by me only in that it has a 100Mb port, while RB951G-2HnD has 1Gb. If these differences are not fundamental for you, then you can buy a cheaper model. Otherwise they are identical.
We will slowly move on. What is the easiest way to set up Mikrotik? I use the standard winbox utility for this. You can also use the web interface, but personally winbox is much more convenient for me. So to continue the setup, download it to your computer.
Reset router settings
We connect the router to the network, supply power and start winbox on the computer. Go to the Neighbors tab and wait for the utility to find our Mikrotik. This may take some time. Just in case, you can click Refresh if the router is not detected for a long time.
Here you can either leave them or delete them. I always delete, as the default settings most often do not fit the specific situation. Here are a few examples of why this is so:
So we click Remove Configuration to remove the settings. After that, the router will reboot. We wait about a minute and connect to it again.
If for some reason you did not immediately delete the presets, then you can reset the settings in mikrotik to factory settings later. To do this, first type system in the terminal, and then reset. You will be asked for confirmation and after that the routerboard will reboot with factory settings.
After clearing the settings, I recommend immediately updating the firmware of the Mikrotik router. To do this, go to the Download section of the official website and download the required file. In this case, this is the mipsbe platform, the Main package to download. We download it to the computer and connect to the router using winbox. Select the Files section on the left. Then we open two windows side by side — one with the firmware file, the second with winbox and drag the file from the folder in winbox to the list of files with the mouse.
You can check the installed firmware version in the System — Packages section.
In my case, the firmware version is 6.43.4. In the future, when the Internet is configured on the router, you can update automatically in this section by clicking on Check For Updates.
The firmware has been updated, you can start setting up.
Combining ports into a bridge
One of the features of mikrotik routerboard routers is the lack of preset port settings. I explain on my fingers what it is. When buying a regular budget router, you will see port signatures. WAN will be written on one of them, on the other, either nothing will be written, or LAN. That is, you will already have one port configured in a certain way to connect to the Internet and the rest of the ports will be combined into a switch for the convenience of connecting equipment.
Not so in Mikrotik. There, all ports are equivalent and absolutely anyone you want can become a WAN port. Since I use the 1st port to connect power, I will have the 5th port as the WAN. And I will combine all the rest into a single network using a bridge and add a wifi interface to them. To do this, go to the Bridge section and create a new bridge1.
All settings are left default. We have bridge1. Go to the ports tab and click the plus sign. Add all ports to brdige1 except WAN. In my case, this is the 5th port.
We have combined all the necessary interfaces into a bridge to organize a single space for all connected devices.
Static IP Setting
Specify any subnet in the Address section. I chose 192.168.9.0. Accordingly, we assign the address 192.168.9.1/24 to Mikrotik. Select bridge1 as the interface. The Network field can be left blank, it will be filled in automatically. Now our router is available both via local interfaces and via wifi (which has yet to be configured) at 192.168.9.1.
Internet setup in Mikrotik
Now is the time to connect to the provider and set up the Internet. It is difficult to cover all possible connection options. There may be many. I will consider the two most popular ways:
As I wrote earlier, we will use the 5th port to connect to the provider. Connect the provider wire.
Consider the option when the provider gave all the settings and you need to set them yourself. Let’s assume that our Internet settings are as follows:
First, specify the IP address. We do everything the same as in the previous paragraph when setting up a static IP. Only now, instead of the bridge1 interface, we specify ether5 and enter the corresponding address — 192.168.1.104/24. Here we immediately indicated both the address and the subnet mask.
Already now the Internet should work, but without specifying a DNS server, you can only access direct ip addresses. For example, you can ping the ip address of Google servers. Open New Terminal and check.
If you have an external IP address and you have allowed remote DNS queries, be sure to configure the firewall and block all incoming connections. If this is not done, then your router may become a victim of fake dns requests that are used for ddos attacks.
That’s all, we have completely set the Internet provider settings. You can check and ping the usual site address.
The router itself already has Internet access. On we need to configure it for users. To do this, we continue setting up mikrotik.
Setting up a dhcp server
Click next. Now you need to select the address space from which ip addresses will be issued. By default, the subnet is specified, which includes the ip address of the router. This is suitable, we leave the default value 192.168.9.0/24.
Next, you need to specify the gateway address that clients will receive. Since Mikrotik itself will act as a gateway for them, we leave its address, which has already been proposed.
Now you need to specify the range of addresses that will be issued to clients. If it doesn’t matter to you and you don’t know why you need to change it, then leave it as it is. All available subnet addresses will be used.
At the last stage, we enter the address of the dns server, which will be issued to clients. It can be either the Mikrotik itself or the provider’s dns server. This is not important, but it is better to specify the router itself. So we write the local address 192.168.9.1 there.
Leave the next parameter as default and click Next. This completes the dhcp server setup for the local network.
If we now connect any client to mikrotik by wire, he will receive network settings, but he will not be able to access the Internet. Another important setting is missing — NAT.
NAT is translation, or as they say, network address translation. I will not tell you what it is, you can read it yourself on the Internet. All modern routers have a NAT function to provide subscribers with access to the Internet. So we will also configure NAT in mikrotik.
Go to the Action tab, select masquerade from the drop-down list. Leave the rest untouched and click OK.
That’s it, NAT is set up. Now if you connect a client with a wire to one of the ports, then he will receive network settings via DHCP and will have access to the Internet. We are left with the smallest thing — to configure wifi to connect wireless clients.
Setting up a wifi hotspot in mikrotik
Our router is almost ready to go. It remains only to set up a wi fi access point and you can forget about it :). Setting up wifi in Mikrotik deserves a separate article. There are a lot of nuances and possibilities. We will now make the simplest setting that will fit and fully satisfy the needs of a home wifi router. And for deeper knowledge, it will be possible to use a separate material on this topic.
First of all, activate the wireless interface. It is disabled by default. Go to the Wireless section, select wlan1 and click the blue checkmark.
Save the settings. We return to the Interfaces tab and double-click on wlan1, the wifi settings of the Mikrotik interface open. Go to the Wireless tab. We set the settings as in my screenshot.
Pay attention to the following settings:
Save the settings by pressing OK. Everything, the wifi access point on mikrotik is configured, you can check it. Start any device, search for your network, enter the access password and check the Internet. Everything should work.
This completes the basic setup of the Mikrotik, but I recommend doing a few more settings for convenience and security.
Change default administrator password
Now the router clock will always have the current time.
This completes the basic setup of the mikrotik router for home use. You can set it up and use it. Just in case, I recommend looking at an article with an analysis of the main mistakes in Mikrotik.
Frequently asked questions on the topic of the article (FAQ)
Is Mikrotik suitable for home use?
I think that Mikrotik should be used only by those who can set it up themselves. If you are not a system administrator, do not understand network technologies, it is better to install some simpler router. I have come across situations where a user contacts an ISP with problems accessing the Internet. And when he tells the provider that he has a Mikrotik device, tech. ISP support says that we cannot help with such a device. Understand yourself.
Which firmware branch do you recommend to use?
If you are not interested in the innovations that appear in new firmware versions, I recommend using the long-term branch. This is the most stable version, where all security updates are promptly added.
Can Mikrotik devices be powered through a standard 802.3af poe adapter?
No, Mikrotik has its own standard of poe adapters, which are suitable only for devices of the same company. It differs from the industry standard 802.3af, so you need to purchase Mikrotik branded poe adapters.
Why do Apple devices and Mikrotik routers often have communication problems?
The root of the problem of connecting apple devices, in particular iphone, to Mikrotiks lies in the mechanism of updating dhcp leases in sleep mode. When an iphone or other apple device goes to sleep, it can’t renew its dhcp lease correctly, so when you wake up from sleep, the wifi network is unavailable. A partial solution to this problem is to make a large dhcp lease renewal interval — several hours or days.
