

Installing NGINX a web server can be a challenging task. There are many components needed and settings to attend to, depending on what you want you want to use the server for.
For this tutorial we will be setting up Ubuntu within a Virtual Machine. Most of the steps would be same if we would install Ubuntu on a computer directly.
The main difference would be that we need to copy Ubuntu to an USB drive for the installation – in that case we would use the Rufus app from the site https://rufus.ie – a tutorial how to use rufus is our of the scope of this blog post.
I like to connect to the virtual machine using SSH which provides a secure tunnel to my virtual machine. For this instance, I’m using VirtualBox from Oracle. The network connection in the VirtualBox is bridged so the VM can access the network etc.
One important and often overlooked detail is how you can “copy” text in the terminal. This took me a while to figure out 🙂 – the way to copy text, commands etc. in the terminal is with right clicking.
In the past I had problems installing the server correctly and so it would run nicely, so I decided to make a tutorial with all the steps necessary to make the server work with different websites.
For this project we will be setting up a NGINX server with PHP-FPM 7.4.
Nginx is a open source project that is used world wide. Its capable of loading different CMS systems or web shops as Magento 2, WordPress, Joomla etc.
We will be focusing on setting up the server for a Magento 2 installation, but it should basically work with most CMS.
- In this tutorial you will learn
- Setup PHP 7. 4-FPM with Nginx HTTP server
- Install PHP 7. 4-FPM for Nginx
- Configure PHP 7. 4-FPM for Nginx
- Enable firewall and allow connections
- Testing our progress
- Setting up MariaDB
- Installing Composer
- Download and install Magento 2
- Generating SSL Let`s Encrypt certificate
- Setting up NGINX Virtualhost to work with Magento 2
- Installing and Configuring Elasticsearch for our Ubuntu system
- Lets configure Elasticsearch
- Securing Elasticsearch
- Testing Elasticsearch
- Magento finishing up the installation
- Adding Magento sample data
- Installing Varnish
- Configuring Varnish for Magento 2
- Conclusion
- Подключение репозитория, обновление сервера
- Установка и настройка веб-сервера Nginx
- Установка php-fpm и дополнительных модулей php
- Установка Let’s Encrypt и подключение сертификата
- Установка MySQL/MariaDB на веб сервере
- Настройка Nginx и PHP-FPM для высоконагруженных проектов
- Настройка nginx
- Настройка php-fpm
- Prerequisites
- Install Nginx
- Firewall
- Fail2ban
- Configure Nginx
- Install PHP 7.4
- Install and Configure MySQL
- Conclusion
In this tutorial you will learn
- How to install and configure a Nginx, PHP, MariaDB, Varnish, SSL certificate
- A working Ubuntu server 20 system
- net-tools (can be installed with sudo apt install net-tools)
Setup PHP 7. 4-FPM with Nginx HTTP server
As with all dealings with linux distributions, it is always recommended to first update and upgrade the system.
sudo apt update
sudo apt upgrade

sudo apt install nginx
After installing Nginx, the commands below can be used to stop, start and enable Nginx service to always startup when the server boots up.
sudo systemctl stop nginx.service
sudo systemctl start nginx.service
sudo systemctl enable nginx.service
To check your current status of the Nginx server type:
sudo systemctl status nginx.service
If working correctly you will get a green active status response:

Install PHP 7. 4-FPM for Nginx
sudo apt install php7.4-fpm php7.4-common php7.4-curl php7.4-cli php7.4-mysql php7.4-gd php7.4-xml php7.4-json php7.4-intl php-pear php7.4-dev php7.4-common php7.4-mbstring php7.4-zip php7.4-soap php7.4-bcmath php7.4-opcache php7.4-imagick php7.4-recode php7.4-tidy php7.4-xmlrpc

You can verify the installed modules with the command:
php -m

Configure PHP 7. 4-FPM for Nginx
Now that Nginx and PHP 7.4-FPM are installed, you need to configure Nginx to use PHP 7.4-FPM like intended. The default Nginx PHP-FPM configuration file should be located at /etc/php/7.4/fpm/php.ini
Open PHP configuration file by running the commands below and then edit the file accordingly.
sudo nano /etc/php/7.4/fpm/php.ini
Edit the file to suit your environment. Some important lines to consider are written below. You can use the search function with the shortcut CTRL + W.
file_uploads = On
allow_url_fopen = On
memory_limit = 512M
upload_max_filesize = 2000M
cgi.fix_pathinfo = 0
max_execution_time = 720
date.timezone = Europe/Ljubljana
zlib.output_compression = On
realpath_cache_size = 10M
realpath_cache_ttl = 7200
opcache.save_comments = 1
It is recommended also to tune bellow options in same files, specifically for Magento 2:
opcache.enable=1
opcache.enable_cli=1
opcache.memory_consumption=128
opcache.interned_strings_buffer=8
opcache.max_accelerated_files=4000
opcache.revalidate_freq=60
Save the file with the shortcut CTRL + S and confirm with Y.
sudo nano /etc/php/7.4/cli/php.ini

Just in case we can input the code bellow so every time the server reboots, the system gets back on its feet automatically.
sudo systemctl enable nginx.service
sudo systemctl enable php7.4-fpm
You should also stop and start the service with bellow commands, so the changes in the files become live.
sudo systemctl stop nginx.service
sudo systemctl stop php7.4-fpm
sudo systemctl start nginx.service
sudo systemctl start php7.4-fpm
Just to double check our progress we can check the PHP service status:
sudo systemctl status php7.4-fpm

Enable firewall and allow connections
We should also enable UFW and add exceptions, so you are able to access your server from the internet by typing the bellow code:
sudo ufw enable
Also, we can allow http and https with:
sudo ufw allow http
sudo ufw allow https
Check firewall status by typing:
sudo ufw status

Testing our progress
There is one more file we need to edit before going forward. That is:
sudo nano /etc/nginx/sites-available/default
Change the “index” part:
After all files are edited and saved, reset both NGINX and PHP.
sudo systemctl restart nginx.service
sudo systemctl restart php7.4-fpm
At this point Nginx with PHP-FPM should be installed and ready to use. We can double check if the system work by making a blank php file and putting in it the bellow code:
sudo nano /var/www/html/phpinfo.php
In the file we paste the bellow code:
<?php
phpinfo();
?>

ifconfig

Now use your browser to access your server. If you type only your IP address, the NGINX logo should pop up:


Setting up MariaDB
For our project we will choose to install MariaDB server, but many other distributions could be used instead of our choice. We will be setting up root password and create a database for Magento to use.
sudo apt install mariadb-server

After the installation completes we should start the server and enable the services.
sudo systemctl start mariadb
sudo systemctl enable mariadb
Sometimes we need to be able to stop or check the status of the MariaDB server service – we can use bellow command in the terminal:
sudo systemctl stop mariadb
sudo systemctl status mariadb

We can see that MariaDB is up and running. Next we should set up MariaDB configurations.
We run the installation with the command bellow:
sudo mysql_secure_installation

We are now able to create databases – let`s make one for Magento.
Log in to your MariaDB server by using the bellow command:
sudo mysql -u root -p
create database magDBtest;
create user magentouser@'localhost' identified by 'dbpass';
grant all privileges on magDBtest.* to magentouser@'localhost';
flush privileges;
After you are done type “exit” and press enter. You will be returned to your terminal window.

Now we have a working database to install Magento to.
Installing Composer
Composer is a dependency manager for PHP. it’s an application-level package manager for PHP that allows you to download additional PHP dependencies and libraries to your PHP project.
We will install Composer PHP in Ubuntu. You can use the below code in the terminal:
sudo apt install composer

When the installation is finished we can double check the version by typing:
composer –version
You should get a response similar to the bellow image:

The version we got is 1.10.1, dated 2020-03-13.
Download and install Magento 2
We are finally ready to download and install Magento 2. All needed PHP packages will be fetched by Composer.
You can double check GitHubs magento2 repository for the latest release. In our example the current release is 2.4.2. You can copy the link by right clicking on the “tar.gz” file and choosing copy the URL address.

Switch to the directory as shown bellow and then run the wget command with the link (double check the version):
cd /var/www
sudo wget -q https://github.com/magento/magento2/archive/refs/tags/2.4.2.tar.gz
When the download completes you can move the file to a folder we will be creating and extract it to get the source code.
sudo tar -xf 2.4.2.tar.gz
sudo mv magento2-*/ magento2test/
If needed we can delete the tar.gz file with the command:
sudo rm 2.4.2.tar.gz
We can now switch to the new folder and install PHP packages dependencies for Magento 2 using the Composer:
cd magento2test
sudo composer install

We can run the update process for the dependencies in Magento 2:
sudo composer update
sudo chown -R lain818:www-data /var/www/magento2test/
Now we should have a fresh and updated copy of the Magento2 source files with all needed dependencies.
Generating SSL Let`s Encrypt certificate
For this step you will be needing a domain pointed to your server. Setting up that part is out of the scope of the current tutorial as it depends on the registrar website and/or your modem-router brand, but it shouldn’t be too difficult.
Basically, you need to log in to your domain registrar and route your “type A” to your public IP address.
In our CPanel access zone it looks something like the bellow image:

Also, you need your router/modem to have port forwarding set up for ports 80 and 443 to route to your local IP address – in our example it was 192.168.64.108 (shown in step 4).
The bellow example is from a TP-Link router from this web link:

If we satisfy the above requirements, we can install SSL Letsencrypt and generate a SSL certificate.
sudo apt install certbot

Once this step is completed, we need to stop the NGINX service.
sudo systemctl stop nginx
Now we need to issue the bellow command, but you need to change the e-mail address and web address to correspond your data and domain name:
sudo certbot certonly --standalone --agree-tos --no-eff-email --email info@coffee-mail.eu -d coffee-mail.eu

We can see that after the process is complete your SSL certificate is stored in the directory:
At this point we will generate the dhparam.
openssl dhparam -out /etc/nginx/ssl/dhparam.pem 2048
We can now go to the next step as the SSL certificate was successfully generated.
Setting up NGINX Virtualhost to work with Magento 2
Let`s add a new NGINX virtual configuration file.
Switch to the directory “sites-available” and create a new configuration file for our test magento store.
cd /etc/nginx/sites-available/
sudo nano magento2test
upstream fastcgi_backend { server unix:/run/php/php7.4-fpm.sock;
}
server { listen 80; listen [::]:80; server_name coffee-mail.eu; return 301 https://$server_name$request_uri;
}
server { listen 443 ssl http2; server_name coffee-mail.eu; ssl_certificate /etc/letsencrypt/live/coffee-mail.eu/fullchain.pem; ssl_certificate_key /etc/letsencrypt/live/coffee-mail.eu/privkey.pem; set $MAGE_ROOT /var/www/magento2test; set $MAGE_MODE developer; include /var/www/magento2test/nginx.conf.sample;
}
Now we need to activate the NGINX Virtualhost and test if the configuration file is written up correctly and has no errors.
sudo ln -s /etc/nginx/sites-available/magento /etc/nginx/sites-enabled/
sudo nginx -t

sudo systemctl restart nginx
Now the NGINX virtual host configuration for test Magento 2 has been created and enabled.
Installing and Configuring Elasticsearch for our Ubuntu system
The Elasticsearch components are not available in Ubuntu’s default package repositories. They can, however, be installed with APT after adding Elastic’s package source list.
All of the packages are signed with the Elasticsearch signing key in order to protect your system from package spoofing. Packages which have been authenticated using the key will be considered trusted by your package manager. In this step, you will import the Elasticsearch public GPG key and add the Elastic package source list in order to install Elasticsearch.
To begin, use cURL, the command line tool for transferring data with URLs, to import the Elasticsearch public GPG key into APT. Note that we are using the arguments -fsSL to silence all progress and possible errors (except for a server failure) and to allow cURL to make a request on a new location if redirected. Pipe the output of the cURL command into the apt-key program, which adds the public GPG key to APT.
We will start with importing Elasticsearch public:
curl -fsSL https://artifacts.elastic.co/GPG-KEY-elasticsearch | sudo apt-key add –

Next, we will be adding the Elastic source list to the sources.list.d directory, where APT will search for new sources:
sudo echo "deb https://artifacts.elastic.co/packages/7.x/apt stable main" | sudo tee -a /etc/apt/sources.list.d/elastic-7.x.list

Next, we will be updating our package lists so APT will read the new Elastic source:
sudo apt update
Now we can install Elasticsearch with the bellow command input in the terminal:
sudo apt install elasticsearch
Elasticsearch is now installed and ready to be configured on our ubuntu system.
Lets configure Elasticsearch
To configure Elasticsearch, we will edit its main configuration file elasticsearch.yml where most of its configuration options are stored. This file is located in the /etc/elasticsearch directory.
Use your preferred text editor to edit Elasticsearch’s configuration file. Here, we’ll use nano:
sudo nano /etc/elasticsearch/elasticsearch.yml
Note: Elasticsearch’s configuration file is in YAML format, which means that we need to maintain the indentation format. Be sure that you do not add any extra spaces as you edit this file.
The elasticsearch.yml file provides configuration options for your cluster, node, paths, memory, network, discovery, and gateway. Most of these options are preconfigured in the file but you can change them according to your needs. For the purposes of our demonstration of a single-server configuration, we will only adjust the settings for the network host.
Elasticsearch listens for traffic from everywhere on port 9200. You will want to restrict outside access to your Elasticsearch instance to prevent outsiders from reading your data or shutting down your Elasticsearch cluster through its REST API. To restrict access and therefore increase security, find the line that specifies network.host, uncomment it, and replace its value with localhost so it reads like this:
Elasticsearch.yml file:

These are the minimum settings you can start with to use Elasticsearch. Now you can start Elasticsearch for the first time.
Start the Elasticsearch service with systemctl. Give Elasticsearch a few moments to start up. Otherwise, you may get errors about not being able to connect.
sudo systemctl start elasticsearch
sudo systemctl enable elasticsearch
By typing the bellow command we can see that the service is working:
sudo systemctl status elasticsearch

With Elasticsearch enabled upon startup, let’s move on to the next step to discuss security.
Securing Elasticsearch
sudo ufw allow from 192.168.64.108 to any port 9200
Next we can double check the status of our Firewall to see if our IP wass added to the exception along with the 9200 port:
sudo ufw status

Testing Elasticsearch
Now we can double check if Elasticsearch is running on port 9200. We can test this with cURL and a GET request.
curl -X GET 'http://localhost:9200'

curl -XGET 'http://localhost:9200/_nodes?pretty'
In the output from the above command you can verify all the current settings for the node, cluster, application paths, modules, and more.
Magento finishing up the installation
We are now ready to open the browser and type in your domain name in the address bar.
For us the address is: https://coffee-mail.eu
sudo php bin/magento setup:install
--base-url=http://coffee-mail.eu/ \
--base-url-secure=https://coffee-mail.eu/ \
--use-secure-admin=1 \
--db-host=localhost \
--db-name=magDBtest \
--db-user=magentouser \
--db-password=dbpass \
--admin-firstname=Magento \
--admin-lastname=User \
--admin-email=info@coffee-mail.eu \
--admin-user=admin \
--admin-password=admin123 \
--language=en_US \
--currency=EUR \
--timezone=Europe/Ljubljana \
--cleanup-database \
--session-save=db --use-rewrites=1 \
After the system finishes it should show output like bellow:

As suggested by the installation we should set up correct permissions of our folder of the Magento installation:
cd /var/www/html/<magento install directory>
sudo find var generated vendor pub/static pub/media app/etc -type f -exec chmod g+w {} +
sudo find var generated vendor pub/static pub/media app/etc -type d -exec chmod g+ws {} +
sudo chown -R www-data:www-data .
sudo chmod u+x bin/magento
At this point both front and back end should be accessible on your browser.
Accessing our domain trough the browser shows the blank Luma theme of Magento 2:


Adding Magento sample data
At this point we will be trying to set up our Magento 2 installation to work with Varnish cache.
We start by ensuring we are in the developer mode:
sudo php bin/magento deploy:mode:set developer
We should get an output as “Enabled developer mode”.
In our example we needed to add a few lines to the composer.json file in the Magento 2 installation folder using nano:
sudo nano composer.json
We add the bellow lines and save the file:
"repositories": [ { "type": "composer", "url": "https://repo.magento.com/" } ],
Now we run the bellow command which will install sample data to our website:
sudo bin/magento sampledata:deploy


At this point we need to upgrade our Magento system and clean and flush the cache:
sudo bin/magento setup:upgrade
sudo bin/magento cache:clean
sudo bin/magento cache:flush
Now when browsing our test Magento 2 installation you should be able to see products etc:

Installing Varnish
Varnish Cache is a web application accelerator also known as a caching HTTP reverse proxy. You install it in front of any server that speaks HTTP and configure it to cache the contents. Varnish Cache is really, really fast. It typically speeds up delivery with a factor of 300 – 1000x, depending on your architecture. A high level overview of what Varnish does can be seen in this video.
Varnish performs really, really well. It is usually bound by the speed of the network, effectively turning performance into a non-issue. We’ve seen Varnish delivering 20 Gbps on regular off-the-shelf hardware.
We start by installing varnish on our system:
sudo apt install varnish

We can double check the varnish version by using:
varnishd -V

At this point we are only left with configuring Varnish to work with correct ports and with Magento 2.
Configuring Varnish for Magento 2
Varnish can be configured in different ways. We can use RAM or a file on the local disk. We will be using 8 GB RAM for this project.
First we will need to change the Magento 2 system to use Varnish instead of its standard cache system.
We can perform this action within the back end or with the terminal code written bellow:
sudo bin/magento config:set --scope=default --scope-code=0 system/full_page_cache/caching_application 2

We can do the same by visiting our backend and changing the configuration there.
Log in Magento back end and then browse to:
Stores > Settings > Configuration > Advanced > System > Full Page Cache.
At this point we can also export the Magento 2 / Varnish configuration file – In our case Varnish 6:

Now we need to start working on the default.vcl file located in /etc/varnish. We will be making a backup from the original file:
File default.vcl.bak2:
sudo cp /etc/varnish/default.vcl /etc/varnish/default.vcl.bak2
At this point we need to copy the exported varnish.vcl file from Magento 2 to the Varnish folder.
We uploaded the varnish.vcl file by Filezilla with SSH connection, then we moved the file to the correct location:
sudo mv /home/lain818/varnish.vcl /etc/varnish/default.vcl
We can now edit the /etc/varnish/default.vcl file and add needed data – we will be pasting the whole file just to be sure:
sudo nano /etc/varnish/default.vcl
Then add the whole bellow text:
File default.vcl:
# VCL version 5.0 is not supported so it should be 4.0 even though actually used Varnish version is 6
vcl 4.0;
include "hit-miss.vcl";
import std;
# The minimal Varnish version is 6.0
# For SSL offloading, pass the following header in your proxy server or load balancer: 'X-Forwarded-Proto: https'
backend default { .host = "localhost"; .port = "8080"; .first_byte_timeout = 600s; .probe = { .url = "/health_check.php"; .timeout = 2s; .interval = 5s; .window = 10; .threshold = 5; }
}
acl purge { "localhost";
}
sub vcl_recv { if (req.method == "PURGE") { if (client.ip !~ purge) { return (synth(405, "Method not allowed")); } # To use the X-Pool header for purging varnish during automated deployments, make sure the X-Pool header # has been added to the response in your backend server config. This is used, for example, by the # capistrano-magento2 gem for purging old content from varnish during it's deploy routine. if (!req.http.X-Magento-Tags-Pattern && !req.http.X-Pool) { return (synth(400, "X-Magento-Tags-Pattern or X-Pool header required")); } if (req.http.X-Magento-Tags-Pattern) { ban("obj.http.X-Magento-Tags ~ " + req.http.X-Magento-Tags-Pattern); } if (req.http.X-Pool) { ban("obj.http.X-Pool ~ " + req.http.X-Pool); } return (synth(200, "Purged")); }
# if (req.url ~ ".xml(.gz)?$") { return (pass); } if (req.method != "GET" && req.method != "HEAD" && req.method != "PUT" && req.method != "POST" && req.method != "TRACE" && req.method != "OPTIONS" && req.method != "DELETE") { /* Non-RFC2616 or CONNECT which is weird. */ return (pipe); } # We only deal with GET and HEAD by default if (req.method != "GET" && req.method != "HEAD") { return (pass); } # Bypass shopping cart, checkout and search requests if (req.url ~ "/checkout" || req.url ~ "/catalogsearch") { return (pass); } if (req.url ~ "^/(sitemapsi/)/") { return (pass); } if (req.http.host ~ "(www\.)?(web-wtp)\.com") { return(pass); } # Bypass health check requests if (req.url ~ "/health_check.php") { return (pass); } # Set initial grace period usage status set req.http.grace = "none"; # normalize url in case of leading HTTP scheme and domain set req.url = regsub(req.url, "^http[s]?://", ""); # collect all cookies std.collect(req.http.Cookie); # Compression filter. See https://www.varnish-cache.org/trac/wiki/FAQ/Compression if (req.http.Accept-Encoding) { if (req.url ~ "\.(jpg|jpeg|png|gif|gz|tgz|bz2|tbz|mp3|ogg|swf|flv)$") { # No point in compressing these unset req.http.Accept-Encoding; } elsif (req.http.Accept-Encoding ~ "gzip") { set req.http.Accept-Encoding = "gzip"; } elsif (req.http.Accept-Encoding ~ "deflate" && req.http.user-agent !~ "MSIE") { set req.http.Accept-Encoding = "deflate"; } else { # unknown algorithm unset req.http.Accept-Encoding; } } # Remove all marketing get parameters to minimize the cache objects if (req.url ~ "(\?|&)(gclid|cx|ie|cof|siteurl|zanpid|origin|fbclid|mc_[a-z]+|utm_[a-z]+|_bta_[a-z]+)=") { set req.url = regsuball(req.url, "(gclid|cx|ie|cof|siteurl|zanpid|origin|fbclid|mc_[a-z]+|utm_[a-z]+|_bta_[a-z]+)=[-_A-z0-9+()%.]+&?", ""); set req.url = regsub(req.url, "[?|&]+$", ""); } # Static files caching if (req.url ~ "^/(pub/)?(media|static)/") { # Static files should not be cached by default return (pass); # But if you use a few locales and don't use CDN you can enable caching static files by commenting previous line (#return (pass);) and uncommenting next 3 lines #unset req.http.Https; #unset req.http.X-Forwarded-Proto; #unset req.http.Cookie; } return (hash);
}
sub vcl_hash { if (req.http.cookie ~ "X-Magento-Vary=") { hash_data(regsub(req.http.cookie, "^.*?X-Magento-Vary=([^;]+);*.*$", "\1")); } # For multi site configurations to not cache each other's content if (req.http.host) { hash_data(req.http.host); } else { hash_data(server.ip); } # To make sure http users don't see ssl warning if (req.http.X-Forwarded-Proto) { hash_data(req.http.X-Forwarded-Proto); } if (req.url ~ "/graphql") { call process_graphql_headers; }
}
sub process_graphql_headers { if (req.http.Store) { hash_data(req.http.Store); } if (req.http.Content-Currency) { hash_data(req.http.Content-Currency); }
}
sub vcl_backend_response { set beresp.grace = 3d; if (beresp.http.content-type ~ "text") { set beresp.do_esi = true; } if (bereq.url ~ "\.js$" || beresp.http.content-type ~ "text") { set beresp.do_gzip = true; } if (beresp.http.X-Magento-Debug) { set beresp.http.X-Magento-Cache-Control = beresp.http.Cache-Control; } # cache only successfully responses and 404s if (beresp.status != 200 && beresp.status != 404) { set beresp.ttl = 0s; set beresp.uncacheable = true; return (deliver); } elsif (beresp.http.Cache-Control ~ "private") { set beresp.uncacheable = true; set beresp.ttl = 86400s; return (deliver); } # validate if we need to cache it and prevent from setting cookie if (beresp.ttl > 0s && (bereq.method == "GET" || bereq.method == "HEAD")) { unset beresp.http.set-cookie; } # If page is not cacheable then bypass varnish for 2 minutes as Hit-For-Pass if (beresp.ttl <= 0s || beresp.http.Surrogate-control ~ "no-store" || (!beresp.http.Surrogate-Control && beresp.http.Cache-Control ~ "no-cache|no-store") || beresp.http.Vary == "*") { # Mark as Hit-For-Pass for the next 2 minutes set beresp.ttl = 120s; set beresp.uncacheable = true; }
return (deliver);
}
sub vcl_deliver { if (resp.http.X-Magento-Debug) { if (resp.http.x-varnish ~ " ") { set resp.http.X-Magento-Cache-Debug = "HIT"; set resp.http.Grace = req.http.grace; } else { set resp.http.X-Magento-Cache-Debug = "MISS"; } } else { unset resp.http.Age; } # Not letting browser to cache non-static files. if (resp.http.Cache-Control !~ "private" && req.url !~ "^/(pub/)?(media|static)/") { set resp.http.Pragma = "no-cache"; set resp.http.Expires = "-1"; set resp.http.Cache-Control = "no-store, no-cache, must-revalidate, max-age=0"; } unset resp.http.X-Magento-Debug; unset resp.http.X-Magento-Tags; unset resp.http.X-Powered-By; unset resp.http.Server; unset resp.http.X-Varnish; unset resp.http.Via; unset resp.http.Link;
}
sub vcl_hit { if (obj.ttl >= 0s) { # Hit within TTL period return (deliver); } if (std.healthy(req.backend_hint)) { if (obj.ttl + 300s > 0s) { # Hit after TTL expiration, but within grace period set req.http.grace = "normal (healthy server)"; return (deliver); } else { # Hit after TTL and grace expiration return (restart); } } else { # server is not healthy, retrieve from cache set req.http.grace = "unlimited (unhealthy server)"; return (deliver); }
}
After we pasted the text, we need to create a new file in the same location (/etc/varnish)
sudo nano hit-miss.vcl
Paste the bellow data in the file and save it.
File hit-miss.vcl:
sub vcl_recv { unset req.http.x-cache;
}
sub vcl_hit { set req.http.x-cache = "hit";
}
sub vcl_miss { set req.http.x-cache = "miss";
}
sub vcl_pass { set req.http.x-cache = "pass";
}
sub vcl_pipe { set req.http.x-cache = "pipe uncacheable";
}
sub vcl_synth { set resp.http.x-cache = "synth synth";
}
sub vcl_deliver { if (obj.uncacheable) { set req.http.x-cache = req.http.x-cache + " uncacheable" ; } else { set req.http.x-cache = req.http.x-cache + " cached" ; } # uncomment the following line to show the information in the response set resp.http.x-cache = req.http.x-cache;
}
We will now set up the varnish.service by editing the file. We will be putting 2 versions – running Varnish with RAM or running with a file on disk – uncomment the “ExecStart” that you want to use for your system.
sudo nano /etc/systemd/system/varnish.service
[Unit]
Description=Varnish HTTP accelerator
Documentation=https://www.varnish-cache.org/docs/6.1/ man:varnishd
[Service]
Type=simple
LimitNOFILE=131072
LimitMEMLOCK=82000
#ExecStart=/usr/sbin/varnishd -j unix,user=vcache -F -a :6081 -T localhost:6082 -f /etc/varnish/default.vcl -S /etc/varnish/secret -p workspace_backend=262144 -p http_resp_size=196608 -p http_resp_hdr_len=131072 -p workspace_client=131072 -p http_req_size=65536 -p http_req_hdr_len=32768 -s malloc,8G
<p>ExecStart=/usr/sbin/varnishd -j unix,user=vcache -F -a :6081 -T localhost:6082 -f /etc/varnish/default.vcl -S /etc/varnish/secret -p workspace_backend=262144 -p http_resp_size=196608 -p http_resp_hdr_len=131072 -p workspace_client=131072 -p http_req_size=65536 -p http_req_hdr_len=32768 -s file,/var/lib/varnish/varnish_storage.bin,120G
ExecReload=/usr/share/varnish/varnishreload
ProtectSystem=full
ProtectHome=true
PrivateTmp=true
PrivateDevices=true
[Install]
WantedBy=multi-user.target

At this point we need to change again the sites-available configuration file for NGINX in order to make everything to work correctly:
sudo nano /etc/nginx/sites-available/magento2test
You need to edit the file so it looks like the code below, of course you need to use your own domain name and installation location:
The file magento2test:
upstream fastcgi_backend {
server unix:/run/php/php7.4-fpm.sock;
keepalive 30;
}
server {
listen 80;
server_name coffee-mail.eu;
return 301 https://$server_name$request_uri;
ssl_certificate /etc/letsencrypt/live/coffee-mail.eu/fullchain.pem;
ssl_certificate_key /etc/letsencrypt/live/coffee-mail.eu/privkey.pem;
ssl_trusted_certificate /etc/letsencrypt/live/coffee-mail.eu/chain.pem;
ssl_dhparam /etc/ssl/certs/dhparam.pem;
if ($host = coffee-mail.eu) { return 301 https://$host$request_uri; } # managed by Certbot
}
proxy_cache_path /tmp/cache keys_zone=cache:50m levels=1:2 inactive=600s max_size=300m;
server {
listen 443 ssl http2;
server_name coffee-mail.eu;
# Enable Gzip
gzip on;
gzip_http_version 1.0;
gzip_comp_level 2;
gzip_min_length 1100;
gzip_buffers 4 8k;
gzip_proxied any;
gzip_types
# text/html is always compressed by HttpGzipModule
text/css
text/javascript
text/xml
text/plain
text/x-component
application/javascript
application/json
application/xml
application/rss+xml
application/x-javascript
font/truetype
font/opentype
application/vnd.ms-fontobject
image/svg+xml svg svgz
gzip_static on;
gzip_proxied expired no-cache no-store private auth;
gzip_disable "MSIE [1-6]\.";
gzip_vary on;
ssl_certificate /etc/letsencrypt/live/coffee-mail.eu/fullchain.pem; # managed by Certbot
ssl_certificate_key /etc/letsencrypt/live/coffee-mail.eu/privkey.pem; # managed by Certbot
ssl_trusted_certificate /etc/letsencrypt/live/coffee-mail.eu/chain.pem;
ssl_dhparam /etc/ssl/certs/dhparam.pem;
ssl_session_timeout 1d;
ssl_session_cache shared:SSL:50m;
ssl_session_tickets off;
ssl_protocols TLSv1 TLSv1.1 TLSv1.2 TLSv1.3;
fastcgi_connect_timeout 60s;
fastcgi_next_upstream_timeout 40s;
fastcgi_next_upstream_tries 10;
fastcgi_read_timeout 60s;
fastcgi_send_timeout 60s;
fastcgi_cache_lock_timeout 60s;
fastcgi_buffers 4 256k;
fastcgi_buffer_size 128k;
client_body_buffer_size 128k;
client_header_buffer_size 128k;
client_max_body_size 512m;
large_client_header_buffers 4 128k;
ssl_ciphers 'ECDHE-ECDSA-CHACHA20-POLY1305:ECDHE-RSA-CHACHA20-POLY1305:ECDHE-ECDSA-AES128-GCM-SHA256:ECDHE-RSA-AES128-GCM-SHA256:ECDHE-ECDSA-AES256-GCM-SHA384:ECDHE-RSA-AES256-GCM-SHA384:DHE-RSA-AES128-GCM-SHA256:DHE-RSA-AES256-GCM-SHA384:ECDHE-ECDSA-AES128-SHA256:ECDHE-RSA-AES128-SHA256:ECDHE-ECDSA-AES128-SHA:ECDHE-RSA-AES256-SHA384:ECDHE-RSA-AES128-SHA:ECDHE-ECDSA-AES256-SHA384:ECDHE-ECDSA-AES256-SHA:ECDHE-RSA-AES256-SHA:DHE-RSA-AES128-SHA256:DHE-RSA-AES128-SHA:DHE-RSA-AES256-SHA256:DHE-RSA-AES256-SHA:ECDHE-ECDSA-DES-CBC3-SHA:ECDHE-RSA-DES-CBC3-SHA:EDH-RSA-DES-CBC3-SHA:AES128-GCM-SHA256:AES256-GCM-SHA384:AES128-SHA256:AES256-SHA256:AES128-SHA:AES256-SHA:DES-CBC3-SHA:!DSS';
ssl_prefer_server_ciphers on;
ssl_stapling on;
ssl_stapling_verify on;
resolver 8.8.8.8 8.8.4.4 valid=300s;
resolver_timeout 30s;
keepalive_timeout 300s;
proxy_cache cache;
proxy_cache_lock on;
proxy_cache_valid 200 1s;
proxy_cache_use_stale updating;
location / {
proxy_pass http://localhost:6081;
proxy_set_header Host $http_host;
proxy_set_header X-Forwarded-Host $http_host;
proxy_set_header X-Real-IP $remote_addr;
proxy_set_header X-Forwarded-For $proxy_add_x_forwarded_for;
proxy_set_header Ssl-Offloaded “1”;
proxy_set_header X-Forwarded-Proto $scheme;
proxy_set_header X-Forwarded-Proto $http_x_forwarded_proto;
proxy_set_header X-Forwarded-Port 443;
proxy_headers_hash_max_size 1024;
proxy_headers_hash_bucket_size 1024;
proxy_buffering on;
proxy_buffer_size 128k;
proxy_buffers 4 256k;
proxy_busy_buffers_size 256k;
proxy_read_timeout 360;
proxy_http_version 1.1;
proxy_set_header Connection "";
proxy_set_header Accept-Encoding "";
#proxy_redirect http://localhost:6081 https://coffee-mail.eu;
#proxy_hide_header X-Varnish;
#proxy_hide_header Via;
#proxy_buffering off;
}
location ~ "\.php$" { fastcgi_index index.php; if (!-f $realpath_root$fastcgi_script_name) { return 404; } include /etc/nginx/fastcgi_params; fastcgi_pass unix:/var/run/php/php-fpm7.4.sock; access_log /var/log/nginx/phpfpmonly-access.log;
}
}
server {
listen 8080;
#add_header Strict-Transport-Security “max-age=15768000; includeSubDomains; preload;”;
add_header Strict-Transport-Security "max-age=31536000; includeSubDomains" always;
add_header X-Frame-Options SAMEORIGIN;
add_header X-Content-Type-Options nosniff;
include snippets/letsencrypt.conf;
ssl_certificate /etc/letsencrypt/live/coffee-mail.eu/fullchain.pem;
ssl_certificate_key /etc/letsencrypt/live/coffee-mail.eu/privkey.pem;
ssl_trusted_certificate /etc/letsencrypt/live/coffee-mail.eu/chain.pem;
ssl_dhparam /etc/ssl/certs/dhparam.pem;
set $MAGE_ROOT /var/www/magento2test;
set $MAGE_MODE developer;
include /var/www/magento2test/nginx.conf.sample;
}
Save the file and restart the NGINX and Varnish services:
sudo service varnish restart
sudo service nginx restart
Now if we visit the website with Chrome, we can check if Varnish caches the site correctly.
Lets start by visiting the domain coffee-mail.eu in Chrome. After the loadout, press F12 to enter the viewing mode.
We need to switch to “Network” and then reload the website with F5. You can see in the image bellow that the website starts loading after few ms, which is a good result.
Conclusion
We have successfully set up a new Ubuntu 20 system that serves us as a NGINX webserver, with MariaDB, SSL certificate and Varnish as a caching system. There are many more things that can be done in order to improve the speed and reliability of the system, but with this tutorial a nice foundation is made.
PHP-FPM (Fast Process Manager) – это отдельная реализация обработчика FastCGI для выполнения PHP скриптов. На базе связки веб-сервера NGINX (который обрабатывает статику) и PHP-FPM вы можете построить более быстрый и производительный веб-сервер для своих веб-проектов по сравнению с использованием «классической» связки NGINX, Apache и модуль mod_php (стек LAMP).
LEMP – набор программного обеспечения с открытым исходным кодом, которая обычно устанавливается совместно для запуска на сервере для размещения веб-сайтов и веб-приложений. Этот аббревиатурой обозначающет набор ОС Linux с веб-сервером Nginx (он заменяет Apache в более распространенном стеке LAMP), с БД MySQL (MariaDB) и c php для обработки динамических данных.
В данной статье мы рассмотрим установку и оптимизацию стека LEMP для размещения нагруженного веб-проекта на сервере с CentOS 7 на базе связки NGINX+ PHP-FPM + MariaDB/MySQL + установим для сайта SSL сертификата Let’s Encrypt .
Подключение репозитория, обновление сервера
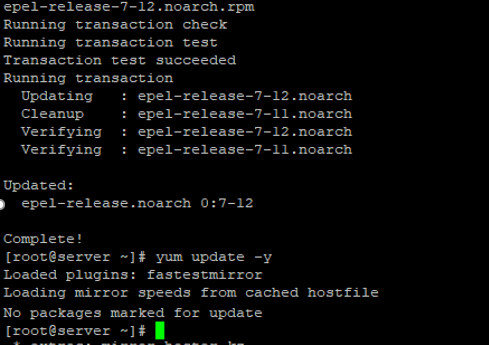
Так как установка производится на вновь установленном сервере с CentOS, нужно подключить популярный репозиторий EPEL и обновить на сервере все пакеты.
# yum install epel-release -y
# yum update -y
Репозиторий установился, но пакетов для обновлений не найдено, так как установлен свежий образ CentOS.
Установка и настройка веб-сервера Nginx
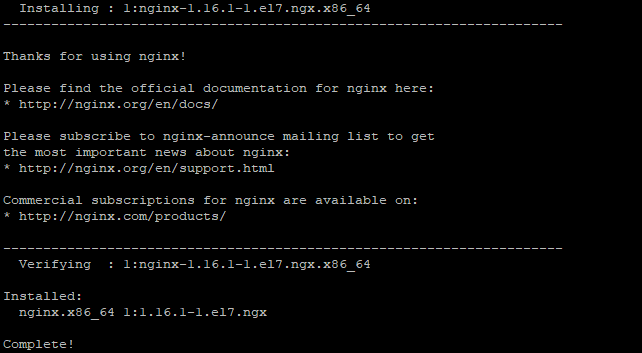
Для установки свежей версии Nginx, подключим репозиторий разработчика, выполнив команду:
# rpm -Uvh http://nginx.org/packages/centos/7/noarch/RPMS/nginx-release-centos-7-0.el7.ngx.noarch.rpm
Или создав конфигурационный файл репозитория /etc/yum.repos.d/nginx.repo со следующим содержимым:
[nginx]
name=nginx repo baseurl=http://nginx.org/packages/centos/7/$basearch/ gpgcheck=0 enabled=1
Если вы используете CentOS 8, измените версию в URL.
Установите пакет веб-сервера Nginx с помощью менеджера пакетов yum (или dnf):
# yum install nginx -y
Теперь можно запустить nginx и добавить его в автозагрузку с помощью systemctl:
# systemctl start nginx
# systemctl enable nginx
Created symlink from /etc/systemd/system/multi-user.target.wants/nginx.service to /usr/lib/systemd/system/nginx.service.
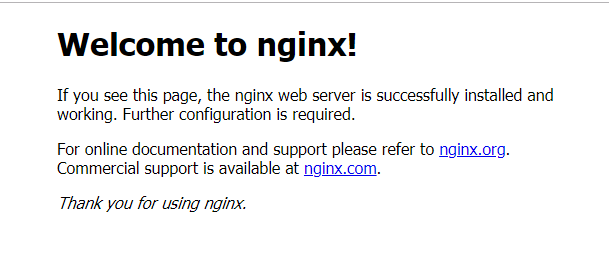
Если у вас тестовая страница не открылась, проверьте настройки разрешенных служб, портов, зон в firewalld на своем сервере.
Настроим конфигурационный файл для отдельного домена build-centos.info. Создадим для сайта отдельную директорию и сам конфигурационный файл:
# mkdir -p /var/www/build-centos.info && mkdir -p /var/www/build-centos.info/log
Откроем файл конфигурации:
# nano /etc/nginx/conf.d/build-centos.info.conf
И добавим в него следующее содержимое:
server { listen 80; server_name build-centos.info; root /var/www/build-centos.info; index index.php index.html index.htm; access_log /var/www/build-centos.info/log/access.log main; error_log /var/www/build-centos.info/log/error.log; location / { return 301 https://build-centos.info$request_uri; } location ~* ^.+.(js|css|png|jpg|jpeg|gif|ico|woff)$ { return 301 https://build-centos.info$request_uri; } location ~ \.php$ { return 301 https://build-centos.info$request_uri; } location = /favicon.ico { log_not_found off; access_log off; } location = /robots.txt { rewrite ^ /robots.txt break; allow all; log_not_found off; access_log off; } location ~ /\.ht { deny all; }
}
server { listen 80; server_name www.build-centos.info; rewrite ^ https://build-centos.info$request_uri? permanent;
}
server { listen 443 ssl http2; server_name build-centos.info; root /var/www/build-centos.info; index index.php index.html index.htm; access_log /var/www/build-centos.info/log/ssl-access.log main; error_log /var/www/build-centos.info/log/ssl-error.log; keepalive_timeout 60; ssl_certificate /etc/letsencrypt/live/build-centos.info/fullchain.pem; ssl_certificate_key /etc/letsencrypt/live/build-centos.info/privkey.pem; ssl_protocols TLSv1 TLSv1.1 TLSv1.2; ssl_ciphers 'ECDHE-RSA-AES128-GCM-SHA256:ECDHE-ECDSA-AES128-GCM-SHA256:ECDHE-RSA-AES256-GCM-SHA384:ECDHE-ECDSA-AES256-GCM-SHA384:DHE-RSA-AES128-GCM-SHA256:DHE-DSS-AES128-GCM-SHA256:kEDH+AESGCM:ECDHE-RSA-AES128-SHA256:ECDHE-ECDSA-AES128-SHA256:ECDHE-RSA-AES128-SHA:ECDHE-ECDSA-AES128-SHA:ECDHE-RSA-AES256-SHA384:ECDHE-ECDSA-AES256-SHA384:ECDHE-RSA-AES256-SHA:ECDHE-ECDSA-AES256-SHA:DHE-RSA-AES128-SHA256:DHE-RSA-AES128-SHA:DHE-DSS-AES128-SHA256:DHE-RSA-AES256-SHA256:DHE-DSS-AES256-SHA:DHE-RSA-AES256-SHA:AES128-GCM-SHA256:AES256-GCM-SHA384:AES128-SHA256:AES256-SHA256:AES128-SHA:AES256-SHA:AES:CAMELLIA:DES-CBC3-SHA:!aNULL:!eNULL:!EXPORT:!DES:!RC4:!MD5:!PSK:!aECDH:!EDH-DSS-DES-CBC3-SHA:!EDH-RSA-DES-CBC3-SHA:!KRB5-DES-CBC3-SHA'; add_header Strict-Transport-Security 'max-age=604800'; location / { try_files $uri $uri/ /index.php?$args; } location ~* ^.+.(js|css|png|jpg|jpeg|gif|ico|woff)$ { access_log off; expires max; } location ~ \.php$ { try_files $uri =404; fastcgi_pass unix:/var/run/php-fpm/php-fpm.sock; fastcgi_index index.php; fastcgi_param DOCUMENT_ROOT /var/www/build-centos.info; fastcgi_param SCRIPT_FILENAME /var/www/build-centos.info/$fastcgi_script_name; fastcgi_param PATH_TRANSLATED /var/www/build-centos.info/$fastcgi_script_name; include fastcgi_params; fastcgi_param QUERY_STRING $query_string; fastcgi_param REQUEST_METHOD $request_method; fastcgi_param CONTENT_TYPE $content_type; fastcgi_param CONTENT_LENGTH $content_length; fastcgi_param HTTPS on; fastcgi_intercept_errors on; fastcgi_ignore_client_abort off; fastcgi_connect_timeout 60; fastcgi_send_timeout 180; fastcgi_read_timeout 180; fastcgi_buffer_size 128k; fastcgi_buffers 4 256k; fastcgi_busy_buffers_size 256k; fastcgi_temp_file_write_size 256k; } location = /favicon.ico { log_not_found off; access_log off; } location = /robots.txt { allow all; log_not_found off; access_log off; } location ~ /\.ht { deny all; }
}
server { listen 443 ssl http2; server_name www.build-centos.info; rewrite ^ https://build-centos.info$request_uri? permanent;
}
Конфигурационный файл содержит настройки для доступа по защищенному протоколу https, так как многие популярные CMS в данный момент по умолчанию работают через него. В дальнейшем мы установим и настроим бесплатный SSL сертификат Let’s Encrypt (по аналогии с установкой Let’s Encrypt сертификата на IIS сайта в Windows Server).
Установка php-fpm и дополнительных модулей php
В Nginx нет встроенного обработчика PHP, поэтому мы должны установить php-fpm и ряд модулей php, которые будут использоваться для обработки PHP скриптов.
Php-fpm это очень легкий и быстрый менеджер процессов PHP. Он не использует HTTP протокол (как apache), и работает со специальным протоколом FastCGI. За счет легковесности и простоты FPM позволяет намного быстрее обрабатывать PHP запросы. При этом, в сравнении с аналогичной конфигурацией с apache, памяти будет использоваться намного меньше.
Nginx в свою очередь дает существенный выигрыш при отдаче статики. В нашей конфигурации ngnix будет выступать прокси-сервером (кэширующим и front-end сервером), а в качестве бэкенда будет работать php-fpm.
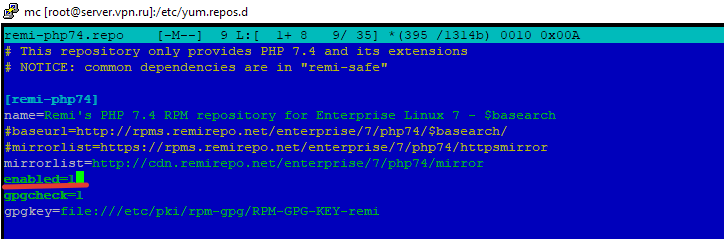
Для установки свежих версий php, используем репозиторий REMI:
# rpm -ivh http://rpms.famillecollet.com/enterprise/remi-release-7.rpm
После установки, отредактируйте файл /etc/yum.repos.d/remi-php74.repo:
Запустите установку php-fpm и популярных модулей php:
# yum install php-fpm php-cli php-mysql php-gd php-ldap php-odbc php-pdo php-opcache php-pear php-xml php-xmlrpc php-mbstring php-snmp php-soap php-zip
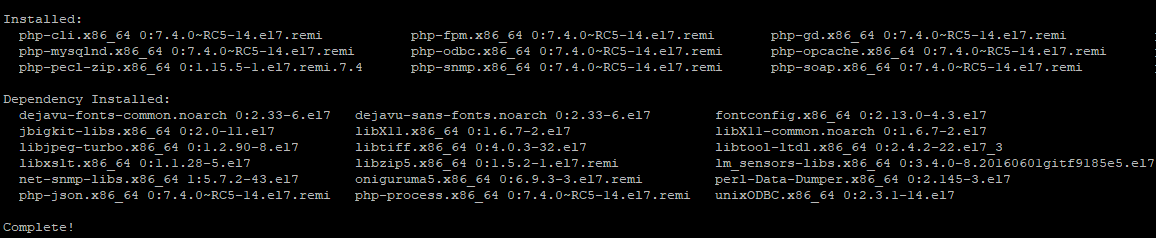
Запустите сервис php-fpm и добавитье его в автозагрузку:
# systemctl start php-fpm
# systemctl enable php-fpm
Created symlink from /etc/systemd/system/multi-user.target.wants/php-fpm.service to /usr/lib/systemd/system/php-fpm.service.
Чтобы проверить, запустился ли сервис, можно выполнить команду:
# lsof -i:9000
COMMAND PID USER FD TYPE DEVICE SIZE/OFF NODE NAME
php-fpm 1551 root 7u IPv4 2078435 0t0 TCP localhost:cslistener (LISTEN)
php-fpm 1552 apache 9u IPv4 2078435 0t0 TCP localhost:cslistener (LISTEN)
php-fpm 1553 apache 9u IPv4 2078435 0t0 TCP localhost:cslistener (LISTEN)
php-fpm 1554 apache 9u IPv4 2078435 0t0 TCP localhost:cslistener (LISTEN)
php-fpm 1555 apache 9u IPv4 2078435 0t0 TCP localhost:cslistener (LISTEN)
php-fpm 1556 apache 9u IPv4 2078435 0t0 TCP localhost:cslistener (LISTEN)
Сервис php-fpm нужно запустить через unix-сокет. В конфигурационном файле /etc/php-fpm.d/www.conf удалите строку listen = 127.0.0.1:9000 и добавьте:
listen = /var/run/php-fpm/php-fpm.sock
listen.mode = 0660
listen.owner = nginx
listen.group = nginx
Чтобы запускать php-fpm не от пользователя apache (по-умолчанию), укажите следующие параметры в конфигурационном файле:
user = nginx
group = nginx
После изменения конфигурационного php-fpm нужно перезапустить сервис:
# systemctl restart php-fpm
Установка Let’s Encrypt и подключение сертификата
Чтобы выпустить бесплатный сертификат Let’s Encrypt, нужно установить нужное certbot.
# yum install certbot
# certbot certonly
После запуска команды, вам нужно будет заполнить все данные, указав почтовый ящик, домен и так далее:
# certbot certonly
Saving debug log to /var/log/letsencrypt/letsencrypt.log
How would you like to authenticate with the ACME CA?
-------------------------------------------------------------------------------
1: Spin up a temporary webserver (standalone)
2: Place files in webroot directory (webroot)
-------------------------------------------------------------------------------
Select the appropriate number [1-2] then [enter] (press 'c' to cancel): 1
Plugins selected: Authenticator standalone, Installer None
Enter email address (used for urgent renewal and security notices) (Enter 'c' to cancel): [email protected]Starting new HTTPS connection (1): acme-v01.api.letsencrypt.org
-------------------------------------------------------------------------------
Please read the Terms of Service at
https://letsencrypt.org/documents/LE-SA-v1.1.1-August-1-2016.pdf. You must agree in order to register with the ACME server at https://acme-v01.api.letsencrypt.org/directory
-------------------------------------------------------------------------------
(A)gree/(C)ancel: A
-------------------------------------------------------------------------------
Would you be willing to share your email address with the Electronic Frontier Foundation, a founding partner of the Let's Encrypt project and the non-profit organization that develops Certbot? We'd like to send you email about EFF and our work to encrypt the web, protect its users and defend digital rights.
-------------------------------------------------------------------------------
(Y)es/(N)o: N
Please enter in your domain name(s) (comma and/or space separated) (Enter 'c' to cancel): build-centos.info
Obtaining a new certificate
Performing the following challenges:
tls-sni-01 challenge for build-centos.info
Waiting for verification...
Cleaning up challenges
IMPORTANT NOTES:
- Congratulations! Your certificate and chain have been saved at:
/etc/letsencrypt/live/build-centos.info/fullchain.pem
Your key file has been saved at:
/etc/letsencrypt/live/build-centos.info/privkey.pem
Your cert will expire on 2018-01-24. To obtain a new or tweaked version of this certificate in the future, simply run certbot again. To non-interactively renew *all* of your certificates, run "certbot renew"
- Your account credentials have been saved in your Certbot configuration directory at /etc/letsencrypt. You should make a secure backup of this folder now. This configuration directory will also contain certificates and private keys obtained by Certbot so making regular backups of this folder is ideal.
Чтобы сертификат был корректно выпущен, ваш домен должен быть существующим и направлен на соответствующий веб-сервер.
После выпуска сертификата, выполните перезагрузку веб-сервера nginx и проверье результат.
# systemctl restart nginx
Соединение в браузере защищено!
Для автоматического продление сертификатов измените конфигурационный файл /etc/letsencrypt/renewal/build-centos.info.conf следующим образом:
# renew_before_expiry = 30 days
version = 0.18.1
archive_dir = /etc/letsencrypt/archive/ build-centos.info
cert = /etc/letsencrypt/live/build-centos.info/cert.pem
privkey = /etc/letsencrypt/live/build-centos.info/privkey.pem
chain = /etc/letsencrypt/live/build-centos.info/chain.pem
fullchain = /etc/letsencrypt/live/build-centos.info/fullchain.pem
После изменения файла, добавьте в крон задание:
30 2 * * * root /usr/bin/certbot renew --post-hook "nginx -s reload"
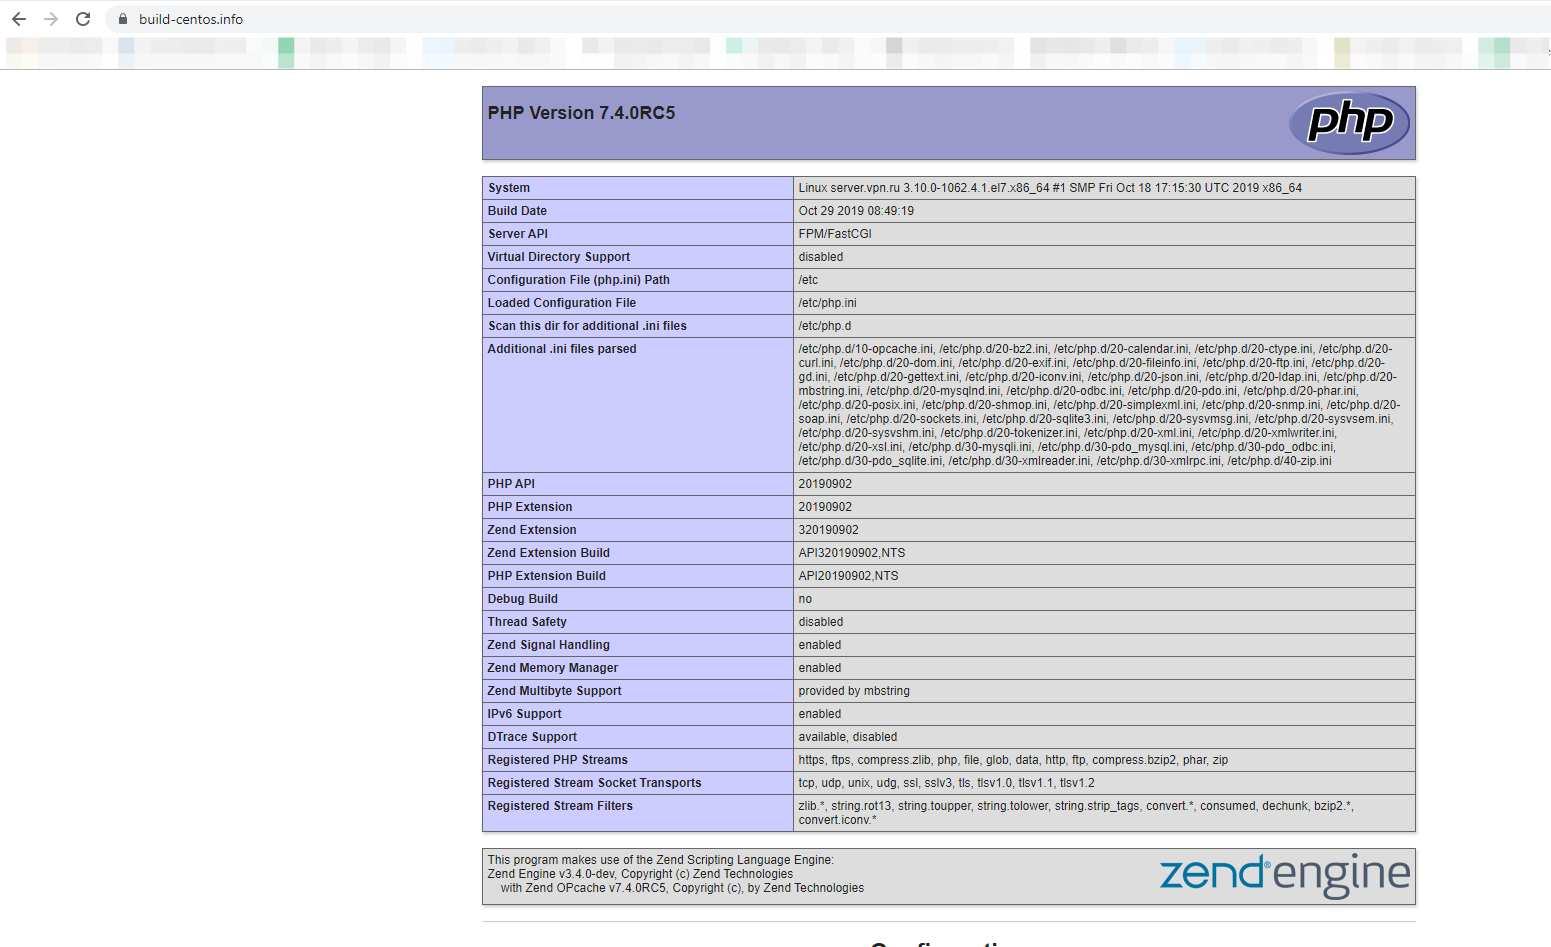
Чтобы проверить, что nginx работает с php, я создал файл index.php и добавил в него:
<?php phpinfo(); ?>
Установка MySQL/MariaDB на веб сервере
Данный шаг мы полностью пропустим, так как на сайте уже есть статья по установке и тюнингу MariaDB. Воспользуйтесь ей.
Настройка Nginx и PHP-FPM для высоконагруженных проектов
Чтобы ваш веб-сервер работал с высокой производительностью и мог обработать большое количество запросов от клиентов, одного железа недостаточно. Важно правильно настроить работу связки nginx и php-fpm.
Настройка nginx
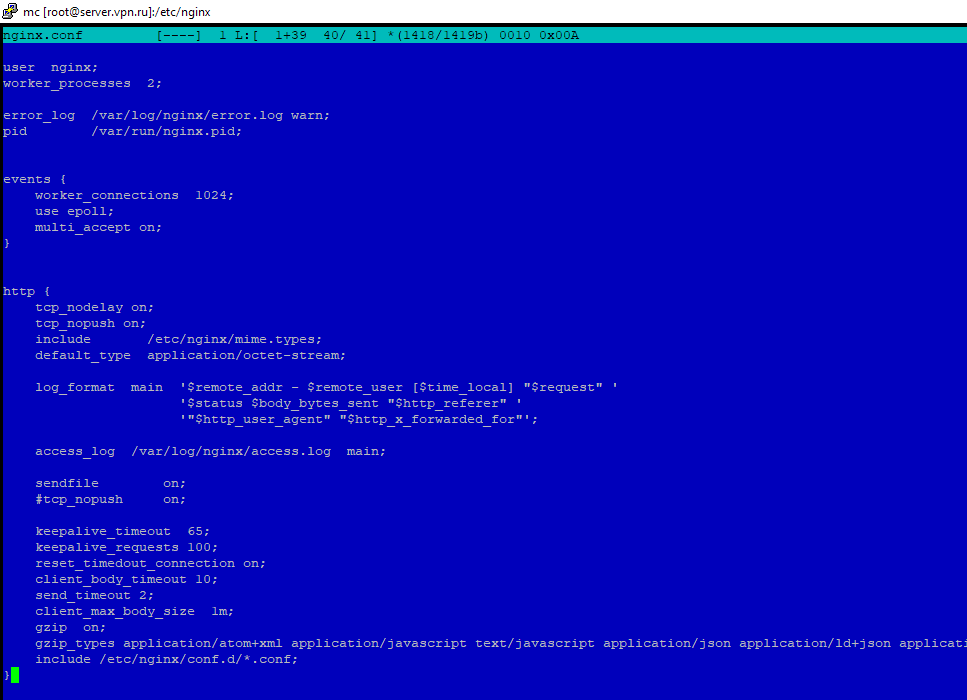
Откройте файл /etc/nginx/nginx.conf и изменит конфигурацию Nginx следующим образом:
-
worker_processes 2;
— уставите количество рабочих процессов равным количеству ядер на сервере. -
worker_connections 1024;
— определяет количество соединений одного рабочего процесса. Выставляйте значения от 1024 до 4096. -
use epoll;
— оптимальный вариант метода соединений для Linux. -
multi_accept on;
— nginx будет принимать максимальное количество соединений.
-
tcp_nodelay on;
— отправляет заголовки и начало файла в одном пакете. -
tcp_nopush on;
Для проектов в которых содержится большое количество статических файлов, обязательно включайте gzip сжатие:
Добавьте большое количество типов файлов, чтобы все проверки на googlespeed проходили:
gzip_types application/atom+xml application/javascript text/javascript application/json application/ld+json application/manifest+json application/rss+xml application/vnd.geo+json font/ttf application/x-font-ttf application/vnd.ms-fontobject application/font-woff application/font-woff2 application/x-web-app-manifest+json application/xhtml+xml application/xml font/opentype image/bmp image/svg+xml image/x-icon text/cache-manifest text/css text/plain text/vcard text/vnd.rim.location.xloc text/vnd.wap.wml text/vtt text/x-component text/x-cross-domain-policy;
Настройка сжатия позволит ускорить ваш проект.
-
keepalive_timeout 30;
— веб-сервер будет ожидать 30 секунд, прежде чем закрыть keepalive соединения -
keepalive_requests 100;
— максимальное количество keepalive запросов от одного клиента -
reset_timedout_connection on;
— включите данный параметр, если не хотите, чтобы соединение от клиента, который перестал отвечать, сбрасывались. -
client_body_timeout 10;
— веб-сервер будет ждать 10 секунд подтверждение запроса от клиента, по истечению этого времени, соединение сбросится. -
send_timeout 2;
— если клиент прекращает чтение ответа от веб-сервера, nginx сбросит соединение с ним.
Если на вашем сайте не предусмотрена загрузка больших файлов, ограничьте это с помощью nginx:
-
client_max_body_size 2m;
— сервер не примет запросы больше 2 Мб.
Если контент на вашем проекте меняется не так часто, вы можете использовать кеширование «expires max;» Либо добавьте соответствующую опцию в конфигурационный файл вашего хоста для нужного типа файлов, например:
Кеш для указанных типов файлов будет хранится 7 дней. Вы можете управлять кешем с помощью данной функции. После всех модификаций, не забывайте выполнять перезапуск nginx:
# systemctl restart nginx
Настройка php-fpm
При установке php-fpm вы сразу перевели его на unix-сокет. Это дает существенных прирост в производительности. По оценкам производительность вырастает в 2-3 раза. Остальные же параметры php-fpm нужно настраивать под каждый проект отдельно, рассмотрим пример настройки для сервера с 1024 Мб памяти.
Для php-fpm мы можем выделить примерно 512 мб, оставив остальное под БД и nginx.
В конфигурационный файл /etc/php-fpm/www.conf, добавим:
-
pm.max_children = 18
— максимальное число дочерних процессов -
pm.start_servers = 6
— число дочерних процессов, создаваемых при запуске -
pm.min_spare_servers = 4
— минимальное число неактивных процессов сервера -
pm.max_spare_servers = 16
— максимальное число неактивных процессов сервера -
pm.max_requests = 400
— число запросов дочернего процесса, после которого процесс будет перезапущен.
Все параметры нужно изменять при анализе нагрузки на ваш проект, данные значения теоретические.
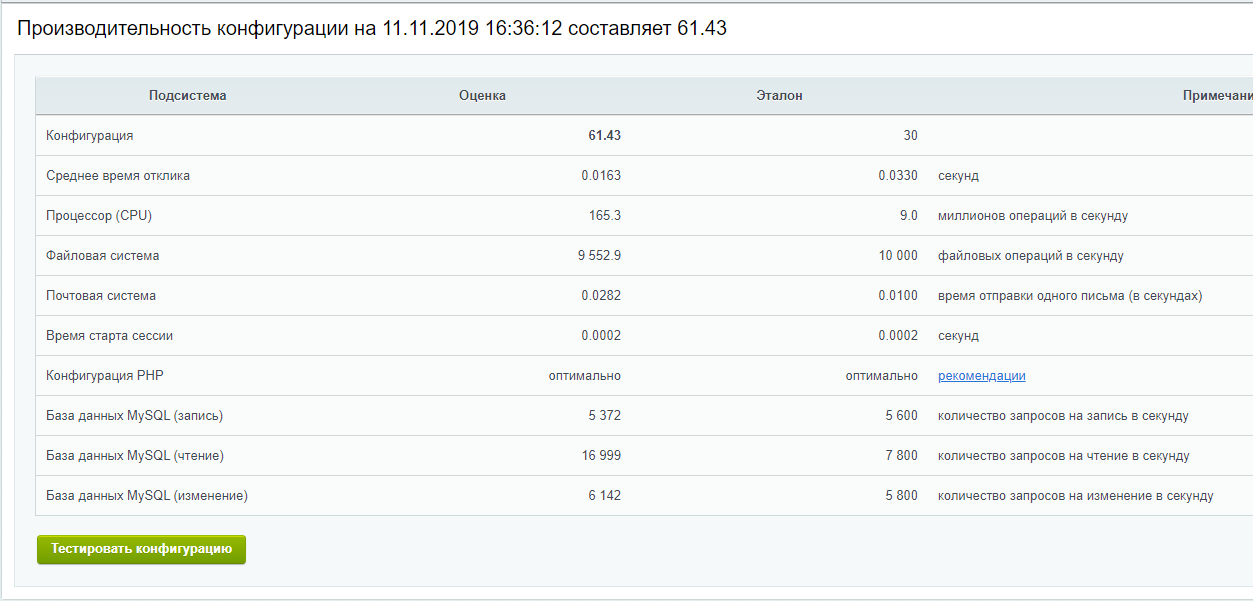
На текущий сервер я сразу же установил последнюю версию CMS Bitrix, для проверки производительности. На мой взгляд это самая ресурсоемкая CMS и результаты получились неплохие, если учитывать, что это виртуальная машина на KVM с одним ядром (vCPU) и 1024 ОЗУ:
Оптимизацию настроек MariaDB я не расписывал, так как есть соответствующая статья на сайте. Я сформировал параметры для my.cnf по статье и база показала отличный результат.
При запуске сайте вы заметите невооруженным взглядом, что nginx + php-fpm будет намного быстрее обрабатывать ваши запросы и возвращать страницы, чем apache2 + mod_php. Если у вас есть возможность провести нагрузочные тесты во время настройки сервера, то это несомненно будет плюсом, если же такой возможности нет, вы можете изменить параметры для своих ресурсов исходя из нашего мануала.
How to install Nginx, PHP 7.4 LEMP Stack on Ubuntu 18.04 LTS with Google Compute Engine and connect with Cloud SQL for MySQL database.
This setup is tested on Google Cloud and confirmed to be working fine. So this setup will work on all cloud hosting services like AWS, DigitalOcean, Azure, etc and on any VPS or Dedicated servers running Ubuntu 18.04.
The installation is mostly done via command line (SSH) so I assume you are comfortable using command line interface.
Prerequisites
- For setting up Compute Engine, see the Setting up Compute Engine Instance
- Domain name is pointed to your virtual machine.
- For setting up Cloud DNS, see the Setting up Google Cloud DNS for your domain
Install Nginx
Although you have just created your new instance, it is likely that some software packages are out of date. Let’s make sure that you are using the latest software packages.
sudo apt update
Once completed let’s update all the installed packages. You will be prompted with the selection to start the update. Hitting Y and Enter will begin the process.
sudo apt upgrade
Once the upgrade is completed you can proceed to install Nginx
sudo apt install nginx
Once complete, you can confirm that Nginx has been installed by issuing this command
nginx -v
Visit your domain in your browser, you will see the Nginx welcome page.
Now you can secure your instance by setting up firewall and Fail2ban.
Firewall
sudo ufw allow OpenSSH
sudo ufw allow 'Nginx HTTP'
sudo ufw allow 'Nginx HTTPS'
sudo ufw enable
Fail2ban
sudo apt install fail2ban
sudo service fail2ban start
Configure Nginx
Next, open the Nginx configuration file, which can be found at /etc/nginx/nginx.conf
sudo nano /etc/nginx/nginx.conf
The worker_processes directive is the amount of CPU cores your instance. In my case, this is 1.
Uncomment the multi_accept directive and set it to on.
Lower the keepalive_timeout directive to 15.
For security reasons, you should uncomment the server_tokens directive and ensure it is set to off.
Add the new client_max_body_size directive below the server_tokens and set the value to 64m.
Uncomment the gzip_proxied directive and set it to any, uncomment the gzip_comp_level directive and set it to the value of 2 and finally uncomment the gzip_types directive.
In order for Nginx to correctly serve PHP you also need to ensure the fastcgi_param SCRIPT_FILENAME directive is set, otherwise, you will receive a blank white screen when accessing any PHP scripts. So open fastcgi_params file by issuing
sudo nano /etc/nginx/fastcgi_params
fastcgi_param SCRIPT_FILENAME $document_root$fastcgi_script_name;
sudo nginx -t
sudo service nginx restart
sudo rm /etc/nginx/sites-available/default
sudo rm /etc/nginx/sites-enabled/default
sudo nano /etc/nginx/nginx.conf
Find the line with include /etc/nginx/sites-enabled/*;
server {
 listen 80 default_server;
 listen [::]:80 default_server;
 server_name _;
 return 444;
}
sudo nginx -t
sudo service nginx restart
Now when you visit the domain name you should receive an error.
Install PHP 7.4
sudo apt install software-properties-common
sudo add-apt-repository ppa:ondrej/php
sudo apt update
sudo apt install php7.4-fpm php7.4-common php7.4-mysql php7.4-xml php7.4-xmlrpc php7.4-curl php7.4-gd php7.4-imagick php7.4-cli php7.4-dev php7.4-imap php7.4-mbstring php7.4-opcache php7.4-soap php7.4-zip unzip -y
After the installation has completed, confirm that PHP 7.4 has installed correctly with this command
php-fpm7.4 -v
sudo nano /etc/php/7.4/fpm/pool.d/www.conf
user =
group =
listen.owner =
listen.group =
Now we configure PHP for WordPress by changing some values in php.ini.
sudo nano /etc/php/7.4/fpm/php.ini
upload_max_filesize = 32M
post_max_size = 48M
memory_limit = 256M
max_execution_time = 600
max_input_vars = 3000
max_input_time = 1000
Hit CTRL+X and Y to save the configuration and check if the configuration is correct and restart PHP
sudo php-fpm7.4 -t
sudo service php7.4-fpm restart
Prepare yourself for a role working as an Information Technology Professional with Linux operating system
Install and Configure MySQL
Conclusion
Now you have learned how to install Nginx, PHP 7.4 and configure MySQL or CloudSQL in your Ubuntu 18.04.
Thanks for your time. If you face any problem or any feedback, please leave a comment below.
Now you can create Nginx configurations for different web applications
Now we have completed NGINX and PHP 7.4 in Ubuntu 18.04 LTS.
