

- See also
- Настройка PageSpeed
- What we have learn so far …
- Tips and tricks
- Running unprivileged using systemd
- Alternative script for systemd
- Compiling with additional modules
- Get Familiar with Important NGINX Files and Directories
- Настройка сжатия Gzip
- Configure NGINX to serve your website
- Удаление Nginx и PHP-FPM с Ubuntu
- Configuration
- Processes and connections
- Установка компонентов
- Installation in a chroot
- Create necessary devices
- Create necessary directories
- Populate the chroot
- Modify nginx.service to start chroot
- Install nginx
- Базовая настройка MySQL.
- Запуск
- Установка
- Установка PHP-FPM в Ubuntu
- Подключение Nginx к PHP-FPM
- Настройка PHP-FPM для прослушивания на сокете UNIX
- Настройка PHP-FPM для прослушивания через сокет TCP/IP
- Настройка Nginx для работы php-fpm
See also
- WebDAV with nginx
- nginx configuration pitfalls
- Very good in-depth 2014 look at nginx security and Reverse Proxying
- Installing LEMP (nginx, PHP, MySQL with MariaDB engine and PhpMyAdmin) in Arch Linux
- Using SSL certificates generated with Let’s Encrypt
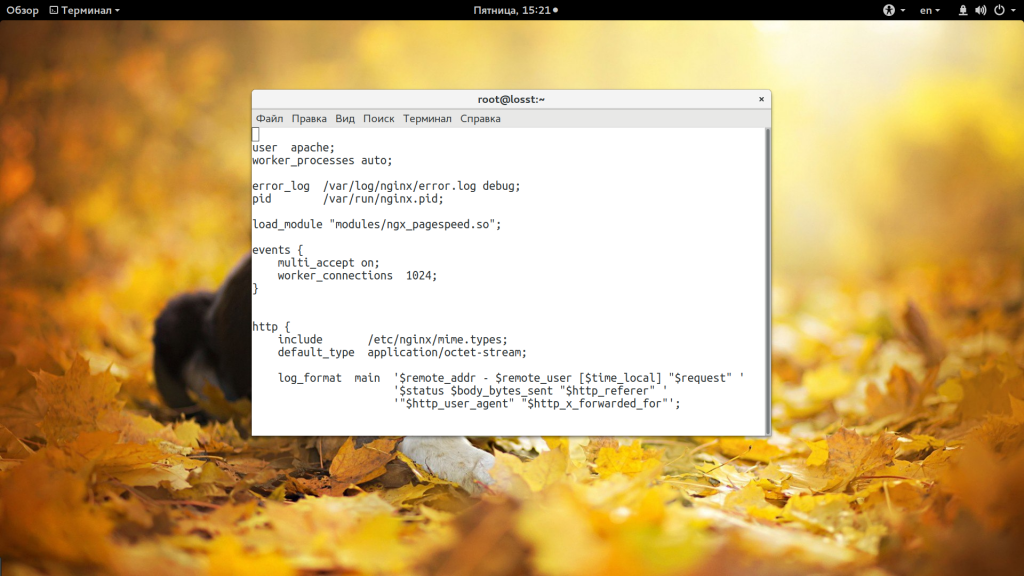
Настройка PageSpeed
Google Pagespeed — это модуль Nginx, который выполняет различные оптимизации для того, чтобы страницы грузились быстрее, веб-сервер работал эффективнее, а пользователи не чувствовали дискомфорта. Сюда входит кэширование, оптимизация html кода, оптимизация картинок, объединение javascript и css кода и многое другое. Все это выполняется на уровне Nginx, поэтому эффективнее, чем если бы вы это делали в php. Но тут есть один недостаток, модуль удаляет заголовок Last Modified.
Дело в том, что PageSpeed устанавливает очень долгий строк кэширования для всех файлов, а в имя файла добавляет его хэш. Так скорость загрузки ресурсов выходит намного выше, поскольку браузер будет запрашивать файлы только с новым хэшем, а LastModified удаляется чтобы пользователи смогли увидеть изменения в случае если какой-либо файл будет изменен. А теперь рассмотрим как установить модуль. Нам придется собрать его из исходных кодов.
Сначала установите инструменты для сборки, очень важно, если не установите, потом получите ошибку и не будете знать что делать:
yum install wget gcc cmake unzip gcc-c++ pcre-devel zlib-devel
 wget -c https://nginx.org/download/nginx-1.13.3.tar.gz
 # tar -xzvf nginx-1.13.3.tar.gz
 wget -c https://github.com/pagespeed/ngx_pagespeed/archive/v1.12.34.2-stable.zip
 # unzip v1.12.34.2-stable.zip
 cd ngx_pagespeed-1.12.34.2-stable/
 # wget -c https://dl.google.com/dl/page-speed/psol/1.12.34.2-x64.tar.gz
 # tar -xvzf 1.12.34.2-x64.tar.gz
 wget -c https://www.openssl.org/source/openssl-1.0.2k.tar.gz -O /opt/lib/$OPENSSL.tar.gz
 # tar xvpzf openssl-1.0.2k.tar.gz
Теперь нам нужно собрать модуль. Сначала смотрим опции, с которыми собран текущий Nginx:
А теперь переходим в папку с Nginx, подставляем все полученные опции, опцию —add-dynamic-module для PageSpeed, OpenSSL и пробуем собрать:
Если все было сделано правильно, то на выходе вы получите модуль ngx_pagespeed.so в папке obj, его нужно скопировать в папку /etc/nginx/modules:
Создаем папку для кэша:
 mkdir -p /var/ngx_pagespeed_cache
 # chown -R nginx:nginx /var/ngx_pagespeed_cache
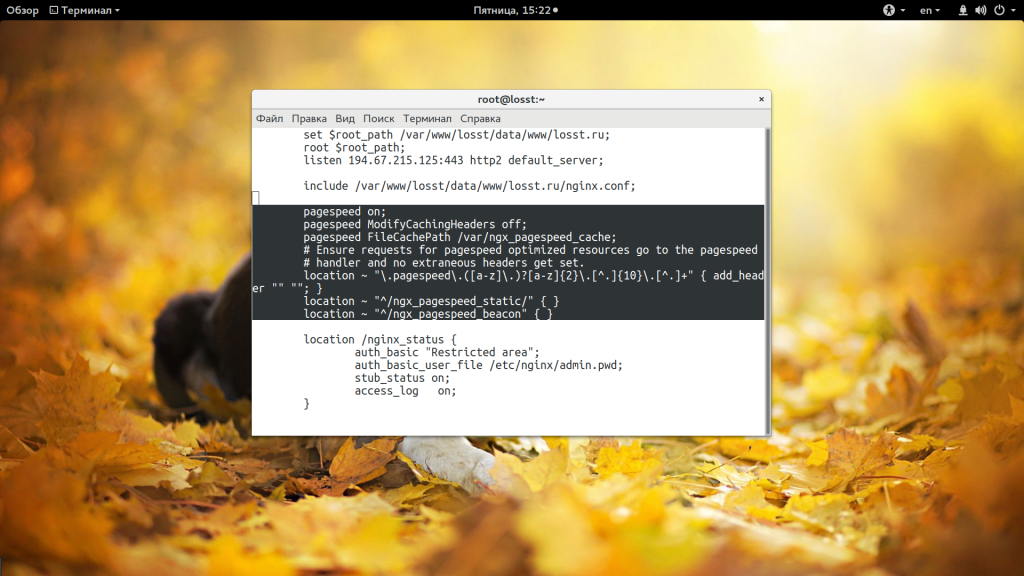
Теперь добавьте такую строчку для включения модуля в /etc/nginx/nginx.conf:
Затем, в секцию сервер достаточно добавить:
Теперь вам достаточно перезапустить nginx чтобы изменения вступили в силу:
 nginx -t
 # systemctl restart nginx
What we have learn so far …
Now that you have your web server installed, you have many options for the type of content to serve and the technologies you want to use to create a richer experience. To verify hit your public address on the browser and screen should look like this.
Tips and tricks
Running unprivileged using systemd
/etc/systemd/system/nginx.service.d/user.conf
[Service]
User=userGroup=group
We can harden the service against ever elevating privileges:
/etc/systemd/system/nginx.service.d/user.conf
[Service]
...
NoNewPrivileges=yes
Tip: The same setup may be desirable for your FastCGI server as well.
Linux does not permit non-root processes to bind to ports below 1024 by default. A port above 1024 can be used:
/etc/nginx/nginx.conf
server { listen 8080;
}
Tip: If you want nginx accessible on port 80 or 443, configure your firewall to redirect requests from 80 or 443 to the ports nginx listens to.
Or you may grant the nginx process the CAP_NET_BIND_SERVICE capability which will allow it to bind to ports below 1024:
/etc/systemd/system/nginx.service.d/user.conf
[Service]
...
CapabilityBoundingSet=
CapabilityBoundingSet=CAP_NET_BIND_SERVICE
AmbientCapabilities=
AmbientCapabilities=CAP_NET_BIND_SERVICE
/etc/systemd/system/nginx.service.d/user.conf
[Service]
...
Environment=NGINX=3:4;
There will be one socket per listening port starting at file descriptor 3, so in this example we are telling nginx to expect two sockets. Now create a nginx.socket unit specifying what ports to listen on:
/etc/systemd/system/nginx.socket
[Socket]
ListenStream=0.0.0.0:80
ListenStream=0.0.0.0:443
After=network.target
Requires=network.target
[Install]
WantedBy=sockets.target
Edit nginx.service to configure the PID file:
/etc/systemd/system/nginx.service.d/user.conf
[Service]
...
RuntimeDirectory=nginx
PIDFile=/run/nginx/nginx.pid
ExecStart=
ExecStart=/usr/bin/nginx -g 'pid /run/nginx/nginx.pid; error_log stderr;'
ExecReload=
ExecReload=/usr/bin/nginx -s reload -g 'pid /run/nginx/nginx.pid; error_log stderr;'
is compiled to store temp files in /var/lib/nginx by default.
Tip: See all compiled-in options by running $ nginx -V
/etc/systemd/system/nginx.service.d/user.conf
[Service]
...
StateDirectory=nginx
is compiled to store access logs in /var/log/nginx by default.
/etc/systemd/system/nginx.service.d/user.conf
[Service]
...
LogsDirectory=nginx
Alternative script for systemd
/etc/nginx/nginx.conf
user http;
pid /run/nginx.pid;
the absolute path of the file is /srv/http/etc/nginx/nginx.conf.
/etc/systemd/system/nginx.service
[Unit]
Description=nginx (Chroot)
After=syslog.target network.target
[Service]
Type=forking
PIDFile=/srv/http/run/nginx.pid
RootDirectory=/srv/http
ExecStartPre=/usr/bin/nginx -t -c /etc/nginx/nginx.conf
ExecStart=/usr/bin/nginx -c /etc/nginx/nginx.conf
ExecReload=/usr/bin/nginx -c /etc/nginx/nginx.conf -s reload
ExecStop=/usr/bin/nginx -c /etc/nginx/nginx.conf -s stop
[Install]
WantedBy=multi-user.target
It is not necessary to set the default location, nginx loads at default -c /etc/nginx/nginx.conf, but it is a good idea.
Alternatively you can run only ExecStart as chroot with parameter RootDirectoryStartOnly set as yes (see ) or start it before mount point as effective or a systemd path (see ) is available.
/etc/systemd/system/nginx.path
[Unit]
Description=nginx (Chroot) path
[Path]
PathExists=/srv/http/site/Public_html
[Install]
WantedBy=default.target
Enable the created nginx.path and change the WantedBy=default.target to WantedBy=nginx.path in /etc/systemd/system/nginx.service.
The PIDFile in unit file allows systemd to monitor process (absolute path required). If it is undesired, you can change to default one-shot type, and delete the reference from the unit file.
AUR is a commandline tool used to beautify and format nginx configuration files.
Nginx has a rather unintuitive header management system where headers can only be defined in one context, any other headers are ignored. To remedy this we can install the headers-more-nginx module.
Install the package package. This will install the module to /usr/lib/nginx/modules directory.
/etc/nginx/nginx.conf
load_module "/usr/lib/nginx/modules/ngx_http_headers_more_filter_module.so";
...
Compiling with additional modules
 The factual accuracy of this article or section is disputed.
Reason: If this compiles and itself nginx itself (rather than just a module}, then wouldn’t the locally built files conflict with the binary package that the instructions say to install? (Discuss in Talk:Nginx)
There are some nginx modules (such as ngx_http_random_index_module) that do not have associated packages in the official repositories or the AUR. Therefore, it is sometimes necessary to compile nginx yourself.
Install the packages and , and then change directories to the downloaded source code cd /usr/src/nginx. As explained in the official documentation, the configure script should be run to determine which modules are compiled. However, the upstream default configuration does not match that of . Run nginx -V to find the default configuration arguments, and then append any required configuration arguments to compile the desired modules.
# configure default_configuration_arguments additional_configuration_arguments# make
# make install
Basic authentication requires creation of a password file. The password file can be managed using htpasswd program provided by the package or using AUR which provides nginx-passwd — details available on github source
Get Familiar with Important NGINX Files and Directories
So once you get to know how to manage the service itself, you should take a few minutes to familiarize yourself with a few important directories and files.
- /var/www/html: The actual web content, which by default only consists of the default Nginx page you saw earlier, is served out of the /var/www/html directory. This can be changed by altering NGINX configuration files.
- /etc/nginx: The NGINX configuration directory. All of the Nginx configuration files reside here.
- /etc/nginx/nginx.conf: The main NGINX configuration file. This can be modified to make changes to the NGINX global configuration.
- /etc/nginx/sites-available/: The directory where per-site “server blocks” can be stored. NGINX will not use the configuration files found in this directory unless they are linked to the sites-enabled directory (see below). Typically, all server block configuration is done in this directory, and then enabled by linking to the other directory.
- /etc/nginx/sites-enabled/: The directory where enabled per-site “server blocks” are stored. Typically, these are created by linking to configuration files found in the sites-available directory.
- /etc/nginx/snippets: This directory contains configuration fragments that can be included elsewhere in the NGINX configuration. Potentially repeatable configuration segments are good candidates for refactoring into snippets.
- /var/log/nginx/access.log: Every request to your web server is recorded in this log fil unless and until NGINX is configured to do otherwise.
- /var/log/nginx/error.log: Every NGINX error will be recorded in this log only.
Настройка сжатия Gzip
Сжатие контента необходимо, чтобы уменьшить размер загружаемых браузером данных. Это ускоряет загрузку сайта, но добавляет дополнительную нагрузку на процессор сервера. Чтобы включить сжатие в секции http нужно добавить параметр:
Эту директиву можно использовать также в секции server, тогда она будет работать только для указного виртуального домена. Дальше настраиваем параметры сжатия настраиваются с помощью следующих опций:
- gzip_min_length — минимальная длина страницы в байтах, при которой нужно использовать сжатие, например, 1000 (1 кб)
- gzip_proxied — нужно ли сжимать проксированые запросы, any говорит, что нужно сжимать все.
- gzip_types — типы файлов, которые нужно сжимать, например: text/plain application/xml application/x-javascript text/javascript text/css text/json;
- gzip_disable «msie6» — в IE 6 сжатие не поддерживается, поэтому отключаем.
- gzip_comp_level — уровень сжатия, доступны варианты от 1 до 10. 1 — минимальное, 10 — максимальное сжатие.
Configure NGINX to serve your website
You’ll need to tell NGINX about your website and how to serve it.
cd into /etc/nginx/. This is where the NGINX configuration files are located.
The two directories we are interested in are sites-available and sites-enabled.
- sites-available contains individual configuration files for all of your possible static websites.
- sites-enabled contains links to the configuration files that NGINX will actually read and run.
The above code is for:
- Deliver files from the folder /var/www/html or this can be path to your index.html.
- The main index page is called index.html.
- Requests that are requesting should be served by this server block.
Now, if you are about to restart NGINX you should see your site!
sudo systemctl restart nginxУдаление Nginx и PHP-FPM с Ubuntu
Чтобы полностью удалить Nginx и PHP-FPM из системы, достаточно удалить все пакеты, которые вы установили ранее:
sudo apt -y purge nginx php7.4 php7.4-cli php7.4-fpm php7.4-json php7.4-pdo php7.4-mysql php7.4-zip php7.4-gd php7.4-mbstring php7.4-curl php7.4-xml php-pear php7.4-bcmath
Команда purge позволяет удалить не только пакеты, но и их конфигурационные файлы. Если вы хотите оставить конфигурационные файлы, используйте команду remove.
Configuration
First steps with nginx are described in the Beginner’s Guide. You can modify the configuration by editing the files in /etc/nginx/ The main configuration file is located at /etc/nginx/nginx.conf.
More details and examples can be found in https://wiki.nginx.org/Configuration and the official documentation.
/etc/nginx/nginx.conf
user http;
worker_processes auto;
worker_cpu_affinity auto;
events { multi_accept on; worker_connections 1024;
}
http { charset utf-8; sendfile on; tcp_nopush on; tcp_nodelay on; server_tokens off; log_not_found off; types_hash_max_size 4096; client_max_body_size 16M; # MIME include mime.types; default_type application/octet-stream; # logging access_log /var/log/nginx/access.log; error_log /var/log/nginx/error.log warn; # load configs include /etc/nginx/conf.d/*.conf; include /etc/nginx/sites-enabled/*;
}
Processes and connections
You should choose a fitting value for worker_processes. This setting ultimately defines how many connections nginx will accept and how many processors it will be able to make use of. Generally, making it the number of hardware threads in your system is a good start. Alternatively, worker_processes accepts the auto value since versions 1.3.8 and 1.2.5, which will try to autodetect the optimal value (source).
The maximum connections nginx will accept is given by max_clients = worker_processes * worker_connections.
/etc/nginx/nginx.conf
user user [group];
In the example below the server listens for incoming connections on IPv4 and IPv6 ports 80 for two domains, domainname1.tld and domainname2.tld:
/etc/nginx/nginx.conf
...
server { listen 80; listen [::]:80; server_name domainname1.tld; root /usr/share/nginx/domainname1.tld/html; location / { index index.php index.html index.htm; }
}
server { listen 80; listen [::]:80; server_name domainname2.tld; root /usr/share/nginx/domainname2.tld/html; ...
}
Restart nginx.service to apply any changes.
Managing server entries
# mkdir /etc/nginx/sites-available
# mkdir /etc/nginx/sites-enabled
/etc/nginx/sites-available/example.conf
server { listen 443 ssl http2; listen [::]:443 ssl http2; ...
}
/etc/nginx/nginx.conf
http { ... include sites-enabled/*;
}
To enable a site, simply create a symlink:
# ln -s /etc/nginx/sites-available/example.conf /etc/nginx/sites-enabled/example.conf
To disable a site, unlink the active symlink:
# unlink /etc/nginx/sites-enabled/example.conf
Reload/restart nginx.service to enable changes to the sites configuration.
 This article or section needs language, wiki syntax or style improvements. See Help:Style for reference.
OpenSSL provides TLS support and is installed by default on Arch installations.
- You may want to read the ngx_http_ssl_module documentation first before configuring SSL.
- Let’s Encrypt is a free, automated, and open certificate authority. A plugin is available to request valid SSL certificates straight from the command line and automatic configuration.
- Mozilla has a useful TLS article as well as an automated tool to help create a more secure configuration.
Create a private key and self-signed certificate. This is adequate for most installations that do not require a CSR:
# mkdir /etc/nginx/ssl
# cd /etc/nginx/ssl
# openssl req -new -x509 -nodes -newkey rsa:4096 -keyout server.key -out server.crt -days 1095
# chmod 400 server.key
# chmod 444 server.crt
Note: The -days switch is optional and RSA keysize can be as low as 2048 (default).
# mkdir /etc/nginx/ssl
# cd /etc/nginx/ssl
# openssl genpkey -algorithm RSA -pkeyopt rsa_keygen_bits:4096 -out server.key
# chmod 400 server.key
# openssl req -new -sha256 -key server.key -out server.csr
# openssl x509 -req -days 1095 -in server.csr -signkey server.key -out server.crt
A starting point for a /etc/nginx/nginx.conf with TLS is Mozilla’s SSL Configuration Generator.
Restart nginx.service to apply any changes.
/etc/nginx/nginx.conf
...
server { ... # PHP in user directories, e.g. http://example.com/~user/test.php location ~ ^/~(.+?)(/.+\.php)$ { alias /home/$1/public_html$2; fastcgi_pass unix:/run/php-fpm/php-fpm.sock; fastcgi_index index.php; include fastcgi.conf; } # User directories, e.g. http://example.com/~user/ location ~ ^/~(.+?)(/.*)?$ { alias /home/$1/public_html$2; index index.html index.htm; autoindex on; } ...
}
...
Restart nginx.service to enable the new configuration.
FastCGI, also FCGI, is a protocol for interfacing interactive programs with a web server. FastCGI is a variation on the earlier Common Gateway Interface (CGI); FastCGI’s main aim is to reduce the overhead associated with interfacing the web server and CGI programs, allowing servers to handle more web page requests at once.
FastCGI technology is introduced into nginx to work with many external tools, e.g. Perl, PHP and Python.
PHP-FPM is the recommended solution to run as FastCGI server for PHP.
Install and make sure PHP has been installed and configured correctly. The main configuration file of PHP-FPM is /etc/php/php-fpm.conf. For basic usage the default configuration should be sufficient.
Finally, enable and start php-fpm.service.
- If you run nginx under a different user, make sure that the PHP-FPM socket file is accessible by this user, or use a TCP socket.
- If you run nginx in chrooted environment (chroot is
/srv/nginx-jail, web pages are served at/srv/nginx-jail/www), you must modify the file/etc/php/php-fpm.confto include thechroot = /srv/nginx-jailandlisten = /srv/nginx-jail/run/php-fpm/php-fpm.sockdirectives within the pool section (a default one is[www]). Create the directory for the socket file, if missing. Moreover, for modules that are dynamically linked to dependencies, you will need to copy those dependencies to the chroot (e.g. for php-imagick, you will need to copy the ImageMagick libraries to the chroot, but not imagick.so itself).
/etc/nginx/sites-available/example.conf
server { root /usr/share/nginx/html; location / { index index.html index.htm index.php; } location ~ \.php$ { # 404 try_files $fastcgi_script_name =404; # default fastcgi_params include fastcgi_params; # fastcgi settings fastcgi_pass	unix:/run/php-fpm/php-fpm.sock; fastcgi_index	index.php; fastcgi_buffers	8 16k; fastcgi_buffer_size	32k; # fastcgi params fastcgi_param DOCUMENT_ROOT	$realpath_root; fastcgi_param SCRIPT_FILENAME	$realpath_root$fastcgi_script_name; #fastcgi_param PHP_ADMIN_VALUE	"open_basedir=$base/:/usr/lib/php/:/tmp/"; }
}
If it is needed to process other extensions with PHP (e.g. .html and .htm):
location ~ [^/]\.(php|html|htm)(/|$) { ...
}
Non .php extension processing in PHP-FPM should also be explicitly added in /etc/php/php-fpm.d/www.conf:
security.limit_extensions = .php .html .htm
Note: Pay attention to the fastcgi_pass argument, as it must be the TCP or Unix socket defined by the chosen FastCGI server in its configuration file. The default (Unix) socket for php-fpm is:
fastcgi_pass unix:/run/php-fpm/php-fpm.sock;
You might use the common TCP socket, not default,
fastcgi_pass 127.0.0.1:9000;
Unix domain sockets should however be faster.
/etc/nginx/php_fastcgi.conf
location ~ \.php$ { # 404 try_files $fastcgi_script_name =404; # default fastcgi_params include fastcgi_params; # fastcgi settings ...
}
To enable PHP support for a particular server, simply include the php_fastcgi.conf configuration file:
/etc/nginx/sites-available/example.conf
server { server_name example.com; ... include /etc/nginx/php_fastcgi.conf;
}
You need to restart the php-fpm.service and nginx.service units if the configuration has been changed in order to apply changes.
To test the FastCGI implementation, create a new PHP file inside the root folder containing:
<?php phpinfo(); ?>
Navigate this file inside a browser and you should see the informational page with the current PHP configuration.
This implementation is needed for CGI applications.
Install . The configuration is done by editing fcgiwrap.socket. Enable and start fcgiwrap.socket.
Multiple worker threads
If you want to spawn multiple worker threads, it is recommended that you use AUR, which will take care of restarting crashed children. You will need to use spawn-fcgi to create the unix socket, as multiwatch seems unable to handle the systemd-created socket, even though fcgiwrap itself does not have any trouble if invoked directly in the unit file.
Override the unit fcgiwrap.service (and the fcgiwrap.socket unit, if present), and modify the ExecStart line to suit your needs. Here is a unit file that uses AUR. Make sure fcgiwrap.socket is not started or enabled, because it will conflict with this unit:
/etc/systemd/system/fcgiwrap.service
[Unit]
Description=Simple CGI Server
After=nss-user-lookup.target
[Service]
ExecStartPre=/bin/rm -f /run/fcgiwrap.socket
ExecStart=/usr/bin/spawn-fcgi -u http -g http -s /run/fcgiwrap.sock -n -- /usr/bin/multiwatch -f 10 -- /usr/sbin/fcgiwrap
ExecStartPost=/usr/bin/chmod 660 /run/fcgiwrap.sock
PrivateTmp=true
Restart=on-failure
[Install]
WantedBy=multi-user.target
Tweak -f 10 to change the number of children that are spawned.
Warning: The ExecStartPost line is required because of strange behaviour I’m seeing when I use the -M 660 option for spawn-fcgi. The wrong mode is set. This may be a bug?
In /etc/nginx, copy the file fastcgi_params to fcgiwrap_params. In fcgiwrap_params, comment or delete the lines which set SCRIPT_NAME and DOCUMENT_ROOT.
location ~ \.cgi$ { include fcgiwrap_params; fastcgi_param DOCUMENT_ROOT /srv/www/cgi-bin/; fastcgi_param SCRIPT_NAME myscript.cgi; fastcgi_pass unix:/run/fcgiwrap.sock;
}
The default socket file for fcgiwrap is /run/fcgiwrap.sock.
Using fastcgi_param SCRIPT_FILENAME /srv/www/cgi-bin/myscript.cgi is a shortcut alternative to setting DOCUMENT_ROOT and SCRIPT_NAME. If you use SCRIPT_FILENAME, you also will not need to copy fastcgi_params to fcgiwrap_params and comment out the DOCUMENT_ROOT and SCRIPT_NAME lines.
Warning: If SCRIPT_NAME and DOCUMENT_ROOT are used, fcgiwrap will discard any other fastcgi_params set in nginx. You must use SCRIPT_FILENAME in order for other params (like PATH_INFO) to be settable through the Nginx configuration. See this GitHub issue.
Установка компонентов
Первым делом нужно установить сам веб-сервер в систему. Программа есть в официальных репозиториях, но ее версия уже немного устарела, поэтому если хотите самую новую версию, нужно добавить PPA:
Сейчас в официальных репозиториях доступна версия 1.10.0, а в стабильной PPA уже доступна 1.10.1. Если для вас версия не нужна можно обойтись и без PPA. Дальше обновите списки пакетов из репозиториев:
sudo apt update
И устанавливаем ngnix:
sudo apt install nginx
После того как установка сервера Nginx будет завершена добавим программу в автозагрузку, чтобы она запускалась автоматически:
sudo systemctl enable nginx
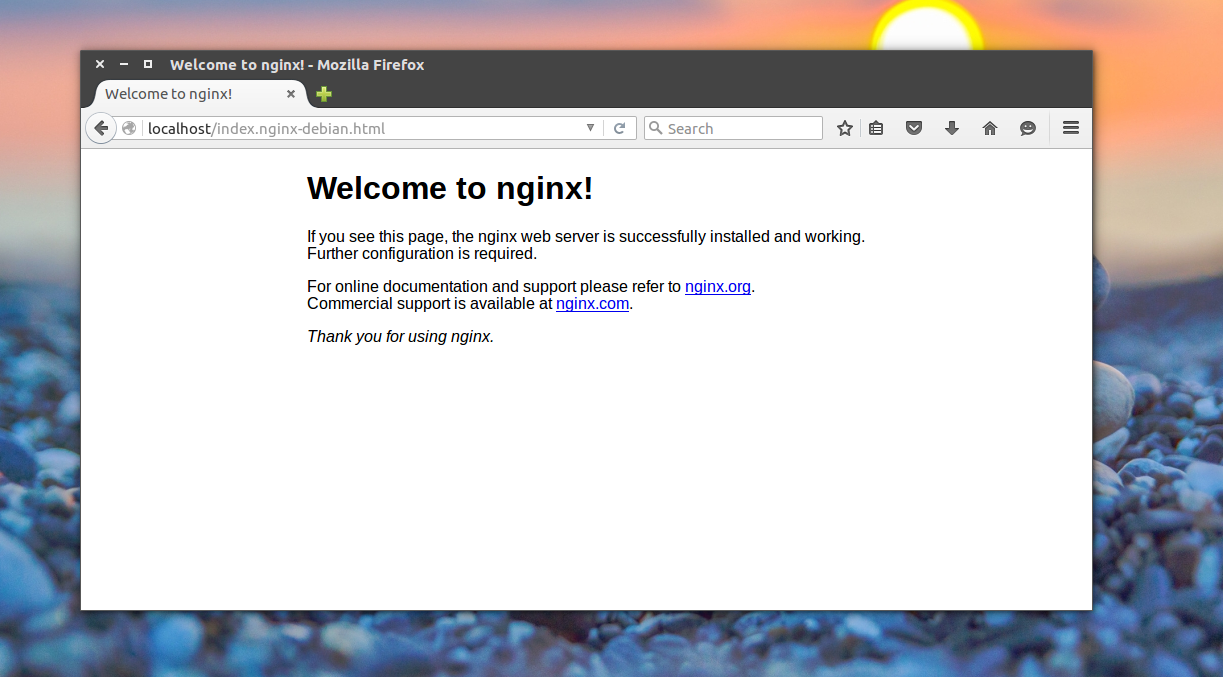
Если вы уже сейчас откроете браузер, то увидите работающий nginx, но нам предстоит его еще настроить.
Настройка Nginx Ubuntu намного сложнее чем Apache. Здесь мы не будем рассматривать все опции и возможности программы, а поговорим только об основном. Есть различные конфигурации, в которых Nginx используется в качестве прокси сервера, а основной сервер Apache, но нас это интересовать не будет. Нам нужна установка Nginx как самостоятельного веб-сервера.
Настройки Nginx сильно отличаются здесь есть только один основной файл конфигурации и файлы для виртуальных хостов. Настройка из каждой директории, как в Apache не поддерживается.
- /etc/nginx/nginx.conf — главный файл конфигурации
- /etc/nginx/sites-available/* — файлы конфигурации для виртуальных хостов, проще говоря для каждого сайта.
- /etc/nginx/sites-enabled/* — файлы конфигурации активированных сайтов.
На самом деле файлы конфигурации для виртуальных хостов читаются только из директории sites-enabled, но здесь содержаться ссылки на sites-available. Такая система была придумана, чтобы дать возможность отключать на время те или иные сайты, не стирая их конфигурацию. Все остальные файлы содержат только объявления переменных и стандартные настройки, которые изменять не нужно. Что же касается nginx.conf, то в него включаются все файлы из sites-enables, а поэтому они могут содержать все точно такие же инструкции. А теперь давайте рассмотрим главный файл конфигурации:
sudo vi /etc/nginx/nginx.conf
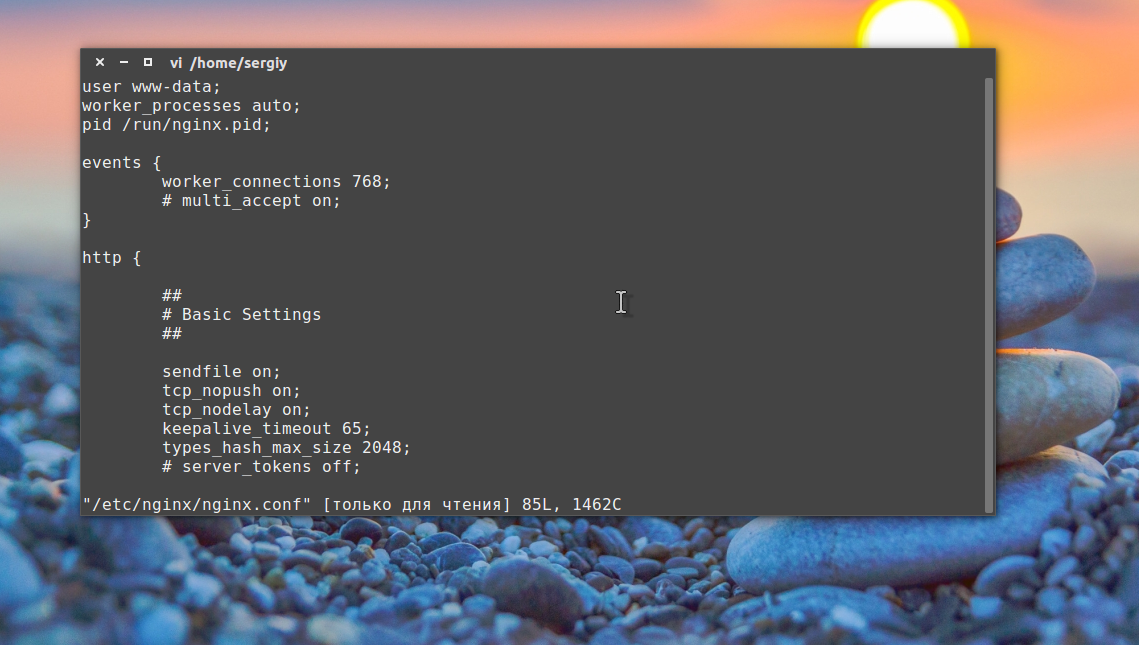
Как видите файл разделен на секции. Общая структура такова:
- глобальные опции отвечают за работу всей программы.
- events — эта секция содержит настройки для работы с сетью.
- http — содержит настройки веб-сервера. Должна содержать секцию servier для тонкой настройки каждого сайта.
- server — в этой секции содержится настройка каждого размещенного на веб-сервере сайта.
- location — секция location может находиться только внутри секции server и содержит настройки только для определенного запроса.
- mail — содержит настройки почтового прокси.
Теперь, когда вы немного изучили глобальную структуру, можно переходить к рассмотрению самих параметров. Глобальных опций не так уж много:
- user — пользователь, от имени которого будет работать программа.
- worker_processes — устанавливает сколько процессов нужно запускать для параллелизации работы программы, нужно запускать не больше процессов, чем у вас есть ядер. Можно установить параметр auto и тогда программа определит это число сама.
- pid = файл pid программы.
- worker_rlimit_nofile — указывает максимальное количество файлов, которые может открыть программа. Рассчитывается как worker_processes * worker_connections* 2.
С глобальными опциями закончили, их было не так много и они не такие интереснее. Куда интереснее в плане оптимизации опции с секции events:
- worker_connections — количество соединений, которые программа может обрабатывать одновременно на одном процессе. Если умножить worker_process на этот параметр, то мы получим максимальное количество пользователей, которые могут подключиться к серверу одновременно. Рекомендуется устанавливать значение от 1024 до 4048.
- multi_accept — разрешить принимать много подключений одновременно, установите параметр on или off.
- use — способ работы с сетевым стеком. По умолчанию используется poll, но для Linux эффективнее использовать epoll.
Дальше переходим самой главной секции — http. Здесь опций намного больше:
- sendfile — использовать метод отправки данных sendfile. Значение on.
- tcp_nodelay, tcp_nopush — отправлять заголовки и начало файла одним пакетом. Значение on.
- keepalive_timeout — таймаут ожидания, перед тем как keepalive соединение будет разорвано, по умолчанию 65, но можно уменьшить до 10 секунд.
- keepalive_requests — максимальное количество keepalive соединений от одного клиента, рекомендовано 100.
- reset_timedout_connection — разрывать соединения после таймаута. Значение on.
- open_file_cache — кэшировать информацию об открытых файлах. Строчка настройки выглядит вот так: open_file_cache max=200000 inactive=20s; max — максимальное количество файлов в кэше, время кэширования.
- open_file_cache_valid — указывает по истечении какого времени нужно удалить информацию из кэша. Например: open_file_cache_valid 30s;
- open_file_cache_min_uses — кэшировать информацию о файлах, которые были открыты как минимум указанное количество раз.
- open_file_cache_errors — кэшировать информацию об отсутствующих файлах, значение on.
Основные параметры рассмотрели. Эти настройки помогут вам получить большую производительность от nginx. Секцию server и location мы рассмотрим в настройке виртуальных хостов.
Installation in a chroot
The factual accuracy of this article or section is disputed.
Reason: This section is from 2013. systemd has since been introduced and can be used instead, at much greater efficiency and without much hassle. (Discuss in Talk:Nginx)
Installing nginx in a chroot adds an additional layer of security. For maximum security the chroot should include only the files needed to run the nginx server and all files should have the most restrictive permissions possible, e.g., as much as possible should be owned by root, directories such as /usr/bin should be unreadable and unwriteable, etc.
Create necessary devices
nginx needs /dev/null, /dev/random, and /dev/urandom. To install these in the chroot create the /dev/ directory and add the devices with mknod. Avoid mounting all of /dev/ to ensure that, even if the chroot is compromised, an attacker must break out of the chroot to access important devices like /dev/sda1.
- Be sure that
/srv/httpis mounted without the nodev option - See and
ls -l /dev/{null,random,urandom}to better understand the mknod options.
# export JAIL=/srv/http
# mkdir $JAIL/dev
# mknod -m 0666 $JAIL/dev/null c 1 3
# mknod -m 0666 $JAIL/dev/random c 1 8
# mknod -m 0444 $JAIL/dev/urandom c 1 9
Create necessary directories
nginx requires a bunch of files to run properly. Before copying them over, create the folders to store them. This assumes your nginx document root will be /srv/http/www.
# mkdir -p $JAIL/etc/nginx/logs
# mkdir -p $JAIL/usr/{lib,bin}
# mkdir -p $JAIL/usr/share/nginx
# mkdir -p $JAIL/var/{log,lib}/nginx
# mkdir -p $JAIL/www/cgi-bin
# mkdir -p $JAIL/{run,tmp}
# cd $JAIL; ln -s usr/lib lib
# cd $JAIL; ln -s usr/lib lib64
# cd $JAIL/usr; ln -s lib lib64
Then mount $JAIL/tmp and $JAIL/run as tmpfs’s. The size should be limited to ensure an attacker cannot eat all the RAM.
# mount -t tmpfs none $JAIL/run -o 'noexec,size=1M'
# mount -t tmpfs none $JAIL/tmp -o 'noexec,size=100M'
/etc/fstab
tmpfs /srv/http/run tmpfs rw,noexec,relatime,size=1024k 0 0
tmpfs /srv/http/tmp tmpfs rw,noexec,relatime,size=102400k 0 0
Populate the chroot
First copy over the easy files.
# cp -r /usr/share/nginx/* $JAIL/usr/share/nginx
# cp -r /usr/share/nginx/html/* $JAIL/www
# cp /usr/bin/nginx $JAIL/usr/bin/
# cp -r /var/lib/nginx $JAIL/var/lib/nginx
Now copy over required libraries. Use ldd to list them and then copy them all to the correct location. Copying is preferred over hardlinks to ensure that even if an attacker gains write access to the files they cannot destroy or alter the true system files.
$ ldd /usr/bin/nginx
linux-vdso.so.1 (0x00007fffc41fe000)
libpthread.so.0 => /usr/lib/libpthread.so.0 (0x00007f57ec3e8000)
libcrypt.so.1 => /usr/lib/libcrypt.so.1 (0x00007f57ec1b1000)
libstdc++.so.6 => /usr/lib/libstdc++.so.6 (0x00007f57ebead000)
libm.so.6 => /usr/lib/libm.so.6 (0x00007f57ebbaf000)
libpcre.so.1 => /usr/lib/libpcre.so.1 (0x00007f57eb94c000)
libssl.so.1.0.0 => /usr/lib/libssl.so.1.0.0 (0x00007f57eb6e0000)
libcrypto.so.1.0.0 => /usr/lib/libcrypto.so.1.0.0 (0x00007f57eb2d6000)
libdl.so.2 => /usr/lib/libdl.so.2 (0x00007f57eb0d2000)
libz.so.1 => /usr/lib/libz.so.1 (0x00007f57eaebc000)
libGeoIP.so.1 => /usr/lib/libGeoIP.so.1 (0x00007f57eac8d000)
libgcc_s.so.1 => /usr/lib/libgcc_s.so.1 (0x00007f57eaa77000)
libc.so.6 => /usr/lib/libc.so.6 (0x00007f57ea6ca000)
/lib64/ld-linux-x86-64.so.2 (0x00007f57ec604000)
# cp $(ldd /usr/bin/nginx | grep /usr/lib/ | sed -sre 's/(.+)(\/usr\/lib\/\S+).+/\2/g') $JAIL/usr/lib
# cp /lib64/ld-linux-x86-64.so.2 $JAIL/lib
Note: Do not try to copy linux-vdso.so: it is not a real library and does not exist in /usr/lib.
Copy over some miscellaneous but necessary libraries and system files.
# cp /usr/lib/libnss_* $JAIL/usr/lib
# cp -rfvL /etc/{services,localtime,nsswitch.conf,nscd.conf,protocols,hosts,ld.so.cache,ld.so.conf,resolv.conf,host.conf,nginx} $JAIL/etc
$JAIL/etc/group
http:x:33:
nobody:x:99:
$JAIL/etc/passwd
http:x:33:33:http:/:/bin/false
nobody:x:99:99:nobody:/:/bin/false
$JAIL/etc/shadow
http:x:14871::::::
nobody:x:14871::::::
$JAIL/etc/gshadow
http:::
nobody:::
# touch $JAIL/etc/shells
# touch $JAIL/run/nginx.pid
Finally make set very restrictive permissions. As much as possible should be owned by root and set unwritable.
# chown -R root:root $JAIL/
# chown -R http:http $JAIL/www
# chown -R http:http $JAIL/etc/nginx
# chown -R http:http $JAIL/var/{log,lib}/nginx
# chown http:http $JAIL/run/nginx.pid
# find $JAIL/ -gid 0 -uid 0 -type d -print | xargs chmod -rw
# find $JAIL/ -gid 0 -uid 0 -type d -print | xargs chmod +x
# find $JAIL/etc -gid 0 -uid 0 -type f -print | xargs chmod -x
# find $JAIL/usr/bin -type f -print | xargs chmod ug+rx
# find $JAIL/ -group http -user http -print | xargs chmod o-rwx
# chmod +rw $JAIL/tmp
# chmod +rw $JAIL/run
# setcap 'cap_net_bind_service=+ep' $JAIL/usr/bin/nginx
Modify nginx.service to start chroot
Override the unit nginx.service. Upgrading nginx will not modify your custom .service file.
Note: I’m not sure if the pid file needs to be stored in the chroot jail.
/etc/systemd/system/nginx.service
[Unit]
Description=A high performance web server and a reverse proxy server
After=syslog.target network.target
[Service]
Type=forking
PIDFile=/srv/http/run/nginx.pid
ExecStartPre=/usr/bin/chroot --userspec=http:http /srv/http /usr/bin/nginx -t -q -g 'pid /run/nginx.pid; daemon on; master_process on;'
ExecStart=/usr/bin/chroot --userspec=http:http /srv/http /usr/bin/nginx -g 'pid /run/nginx.pid; daemon on; master_process on;'
ExecReload=/usr/bin/chroot --userspec=http:http /srv/http /usr/bin/nginx -g 'pid /run/nginx.pid; daemon on; master_process on;' -s reload
ExecStop=/usr/bin/chroot --userspec=http:http /srv/http /usr/bin/nginx -g 'pid /run/nginx.pid;' -s quit
[Install]
WantedBy=multi-user.target
Note: Upgrading nginx with pacman will not upgrade the chrooted nginx installation. You have to take care of the updates manually by repeating some of the steps above. Do not forget to also update the libraries it links against.
You can now safely get rid of the non-chrooted nginx installation.
# pacman -Rsc nginx
If you do not remove the non-chrooted nginx installation, you may want to make sure that the running nginx process is in fact the chrooted one. You can do so by checking where /proc/PID/root symmlinks to. It should link to /srv/http instead of /.
# ps -C nginx | awk '{print $1}' | sed 1d | while read -r PID; do ls -l /proc/$PID/root; doneInstall nginx
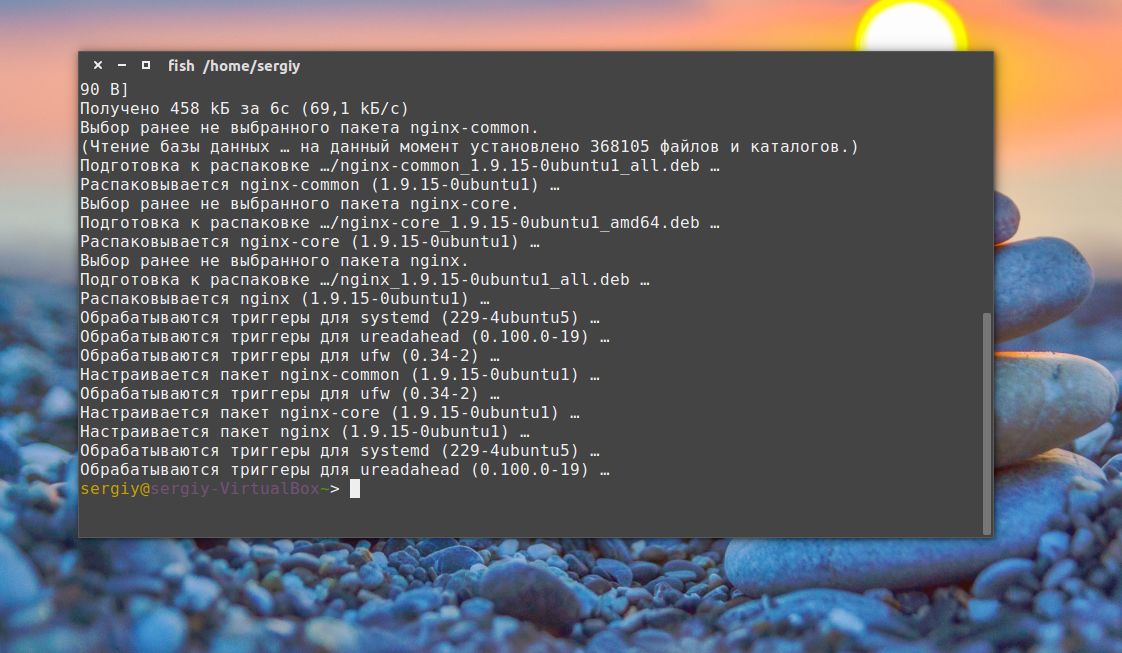
Nginx is available in Ubuntu’s default repositories, so the installation is rather straightforward.
This would be our first interaction with the apt packaging system in this session. We would update our local package index; so that, we have access to the most recent package listings.
sudo apt-get update
sudo apt-get install nginx
After accepting the procedure, apt-get will install Nginx and any required dependencies to your server.
Базовая настройка MySQL.
Переходим к установке и настройке MySQL, в нашем случае это будет версия 5.7. Перед началом установки добавляем ключ репозитория командой:
wget -q -O- http://repo.mysql.com/RPM-GPG-KEY-mysql | apt-key add -После добавляем нужный репозиторий в пакетный менеджер apt, для этого в конец файла /etc/apt/sources.list дописываем строки вида
deb http://repo.mysql.com/apt/debian/ buster mysql-5.7
deb-src http://repo.mysql.com/apt/debian/ buster mysql-5.7
Обратите внимание на то, что наш сервер базируется на системе Debian 10 (buster), в случае если вы устанавливаете MySQL на другую версию дистрибутива Debian или Ubuntu, то потребуется учесть название дистрибутива в списке репозиториев.
После выполняем обновление доступных пакетов в репозиториях и устанавливаем MySQL:
apt update
apt install mysql-server
Установка запросит дважды ввести пароль от пользователя root.
Возможно потребуется модуль для работы с python, устанавливаем его командой:
apt install python-mysqldbПосле установки приступаем к базовой настройке. По умолчанию ulimit (максимальное) ограничение для открытых файлов в системе для процесса составляет 1024, что очень мало, особенно для работы СУБД, увеличим лимит файлов до 8192 через systemctl:
systemctl edit mysqlВставляем следующий текст:
[Service]
LimitNOFILE = 8192
Перечитываем лимиты и перезагружаем MySQL:
systemctl daemon-reload
systemctl restart mysql
Указываем кодировку СУБД по умолчанию, в нашем случае это UTF8, для этого вносим изменения в файл /etc/mysql/my.cnf:
diff --git a/mysql/my.cnf b/mysql/my.cnf
[mysqld]
+character-set-server = utf8
+collation-server = utf8_unicode_ci
По умолчанию MySQL слушает только локальный IP адрес 127.0.0.1. В случае если необходимы подключения к СУБД извне, потребуется открыть порт 3306 на уровне фаервола сервера, а также указать MySQL слушать все интерфейсы сервера Для этого параметру bind-address указываем следующее значение:
bind-address = 0.0.0.0Здесь же в файле my.cnf указываем базовые параметры для работы СУБД:
max_allowed_packet 	= 32M
thread_stack       	= 512K
thread_cache_size  	= 64
open_files_limit   	= 8192
max_connections    	= 100
query_cache_limit  	= 4M
query_cache_size   	= 16M
Данные параметры могут быть скорректированы под нужды проекта.
Для таблиц innodb задаем хранение в отдельных файлах, чтобы избежать возможных проблем, связанных с ростом файла ibdata1:
innodb_file_per_tableИ задаем буфер для innodb обычно он равен 60-80% оперативной памяти сервера. Например, для сервера с количеством оперативной памяти 4GB можем выделить на буфер 3GB оперативной памяти:
innodb_buffer_pool_size = 3GBЗначение также можно скорректировать по мере необходимости.
В качестве безопасности, ограничиваем доступ к MySQL для пользователей системы:
chmod 750 /etc/mysql
chown root:mysql /etc/mysql
Перезапускаем СУБД и проверяем статус работы:
service mysql restart
service mysql status
Для того, чтобы каждый раз при входе в консоль MySQL не указывать пароль от root пользователя, создаем файл в домашней директории root и задаем ему права безопасности:
touch /root/.my.cnf
chmod 600 /root/.my.cnf
[client]
password = MYSQL_ROOT_PASSWORDГде MYSQL_ROOT_PASSWORD, это пароль от пользователя root.
Теперь для подключения к консоли MySQL от root достаточно просто ввести команду mysql:
mysql
Welcome to the MySQL monitor.  Commands end with ; or \g.
Your MySQL connection id is 40559777
Server version: 5.7.31-34 Percona Server (GPL), Release '34', Revision '2e68637'
Copyright (c) 2009-2020 Percona LLC and/or its affiliates
Copyright (c) 2000, 2020, Oracle and/or its affiliates. All rights reserved.
Oracle is a registered trademark of Oracle Corporation and/or its
affiliates. Other names may be trademarks of their respective
owners.
Type 'help;' or '\h' for help. Type '\c' to clear the current input statement.
mysql>
На этом базовую настройку MySQL можно считать завершенной.
Для оптимизации mysql вы можете использовать утилиту mysqltuner. Она есть в стандартных репозиториях. Суть ее в том, что с помощью скриптов анализируются параметры и текущие показатели mysql. В случае, если наблюдаются неоптимизированные параметры, утилита предложит изменить их. Ниже пример вывода анализа mysqltuner:
-------- Recommendations -----------------------------------------------------
General recommendations:
    Run OPTIMIZE TABLE to defragment tables for better performance
    Reduce your overall MySQL memory footprint for system stability
    Adjust your join queries to always utilize indexes
    When making adjustments, make tmp_table_size/max_heap_table_size equal
    Reduce your SELECT DISTINCT queries without LIMIT clauses
Variables to adjust:
  *** MySQL's maximum memory usage is dangerously high ***
  *** Add RAM before increasing MySQL buffer variables ***
    query_cache_size (> 16M)
    join_buffer_size (> 16.0M, or always use indexes with joins)
    tmp_table_size (> 128M)
    max_heap_table_size (> 128M)
    innodb_buffer_pool_size (>= 11G)
Запуск
Запустите/включите службу nginx.service.
Установка
Установите пакет (основная ветка: новые возможности, обновления и исправления ошибок) или (стабильная ветка; только исправления серьёзных ошибок).
Рекомендуется использовать основную (mainline) ветку. Основная причина для использования стабильной ветки — возможная несовместимость со сторонними модулями или непреднамеренное появление ошибок при реализации новых функций.
Примечание: Все модули nginx, доступные в официальных репозиториях, в качестве зависимости требуют пакет nginx (а не nginx-mainline). Возможно, стоит просмотреть список модулей на наличие тех, которые вам могут понадобиться, прежде чем принимать решение о выборе между nginx и nginx-mainline. Модули для nginx-mainline можно найти в пользовательском репозитории Arch.
Если для обеспечения дополнительной безопасности вы хотите установить nginx в chroot-окружении, смотрите раздел #Установка в chroot.
Установка PHP-FPM в Ubuntu
Следующим шагом будет установка интерпретатора языка программирования PHP и всех необходимых модулей для работы с PHP-FPM. Для установки всех необходимых модулей выполните команду:
sudo apt -y install php7.4 php7.4-cli php7.4-fpm php7.4-json php7.4-pdo php7.4-mysql php7.4-zip php7.4-gd php7.4-mbstring php7.4-curl php7.4-xml php-pear php7.4-bcmath
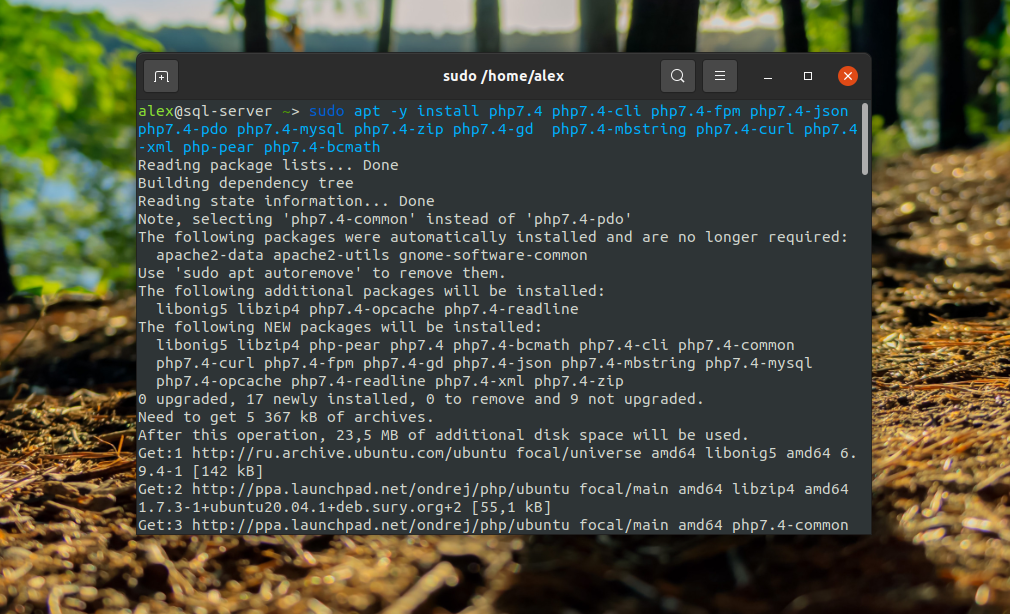
На момент написания статьи (1 августа 2021) актуальной версией PHP в официальных репозиториях Ubuntu считалась версия 7.4. Самая же последняя официальная версия PHP от разработчиков 8.0.9 (по состоянию на 29 июля 2021 года). После установки всех необходимых пакетов проверяем статус PHP-FPM:
systemctl status php7.4-fpm.service
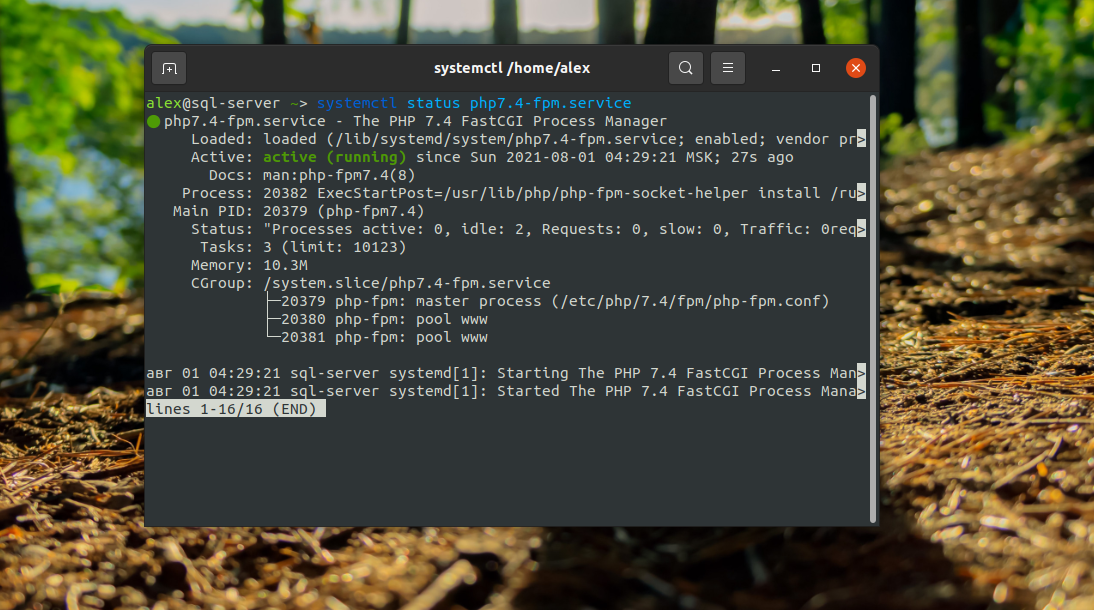
Если в статусе вместо active будет inactive (dead), то сервис необходимо запустить вручную при помощи команды:
sudo systemctl start php7.4-fpm.service
После того, как сервис запустился, установка будет считаться выполненной.
Подключение Nginx к PHP-FPM
Чтобы принимать запросы FastCGI от Nginx, PHP-FPM может прослушивать сокет TCP/IP или UNIX сокет. Сокеты UNIX являются средством межпроцессного взаимодействия, которое обеспечивает эффективный обмен данными между процессами, работающими в одной и той же операционной системе, в то время как сокеты TCP/IP позволяют процессам обмениваться данными по сети.
Сокет UNIX — это особый тип файла — к нему применяются разрешения на доступ к файлам и каталогам (как в случае с любым другим типом файла UNIX), и его можно использовать для ограничения того, какие процессы на хосте могут читать и записывать в файл, (и, таким образом, общаться с внутренним сервером).
Таким образом, сокет UNIX является безопасным, поскольку его могут использовать только процессы на локальном хосте. Сокет TCP/IP может быть доступен из Интернета, и это может представлять угрозу безопасности, если не будут приняты дополнительные меры безопасности, такие как настройка брандмауэра.
Настройка PHP-FPM для прослушивания на сокете UNIX
Чтобы настроить PHP-FPM на прослушивание сокета UNIX, откройте файл конфигурации пула PHP-FPM по умолчанию, используя свой любимый текстовый редактор при помощи команды:
sudo nano /etc/php/7.4/fpm/pool.d/www.conf
Затем найдите директиву listen и задайте для нее путь к файлу сокета UNIX следующим образом — listen = /run/php/php7.4-fpm.sock
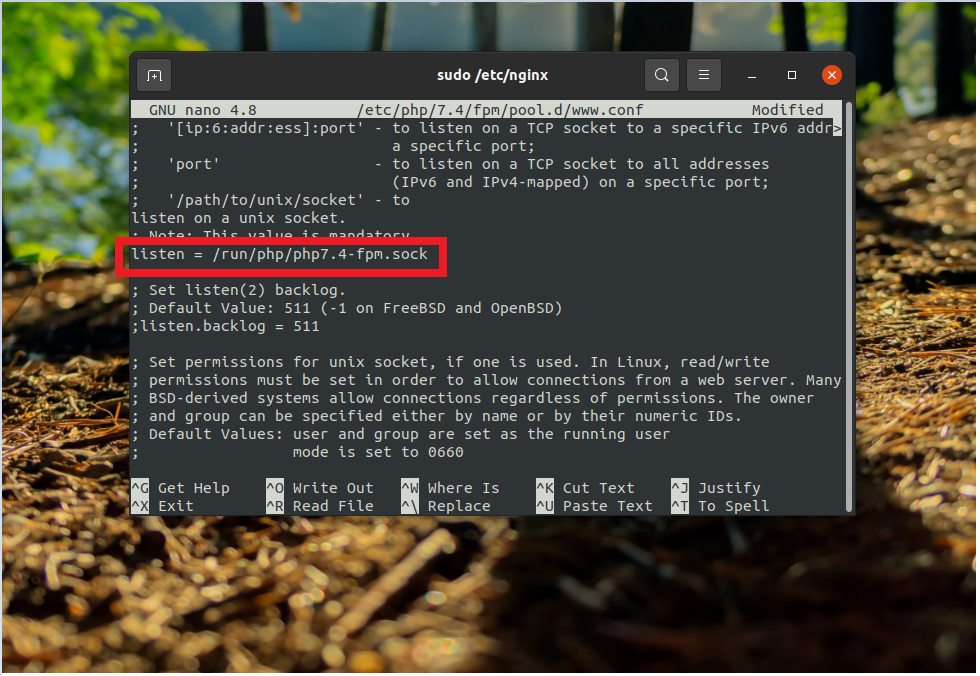
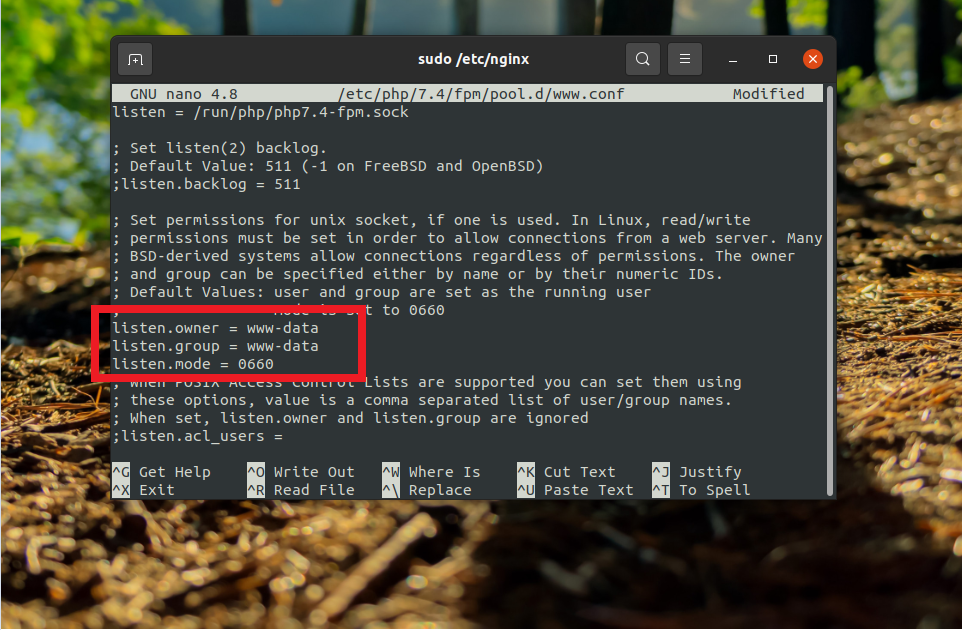
Если вы используете сокет UNIX, вам также необходимо установить соответствующие разрешения на чтение/запись для файла, чтобы разрешить подключения с веб-сервера NGINX. По умолчанию Nginx работает как пользователь www-data в Ubuntu.
Найдите параметры listen.owner и listen.group и задайте им значение www-data. Также установите режим на 0660, для параметра listen.mode.
Настройка PHP-FPM для прослушивания через сокет TCP/IP
Хотя сокет UNIX быстрее сокета TCP/IP, он менее масштабируем, поскольку он может поддерживать межпроцессное взаимодействие только в одной и той же ОС. Если Nginx и внутренний сервер приложений (PHP-FPM) работают в разных системах, вам придется настроить php-fpm для прослушивания сокетов TCP/IP для удаленного подключения.
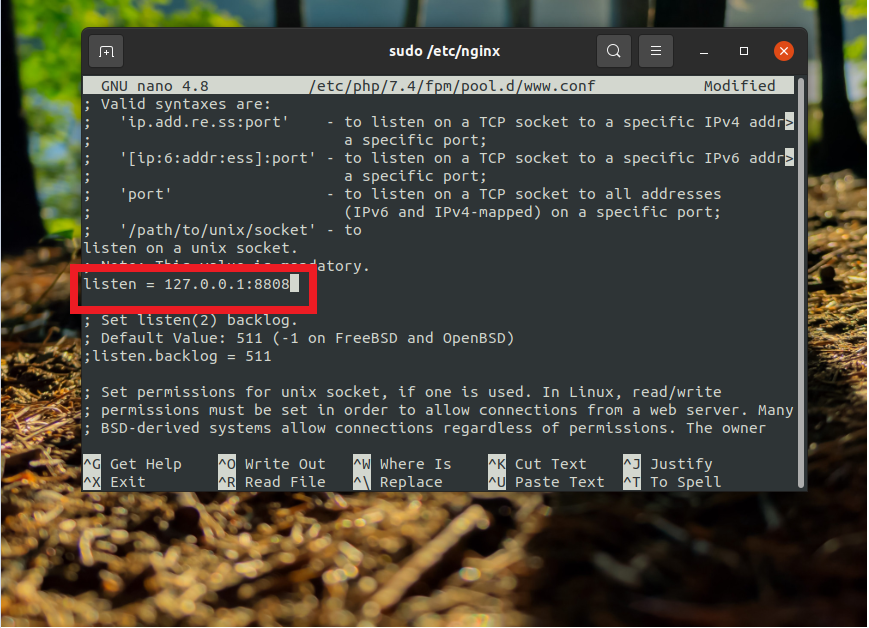
В файле конфигурации пула php-fpm установите адрес прослушивания, например: 127.0.0.1:9000. Убедитесь, что выбранный вами порт не используется другим процессом или службой в той же системе.
sudo nano /etc/php/7.4/fpm/pool.d/www.conf
Найдите параметр listen и пропишите адрес — 127.0.0.1:9000:
Сохраните изменения и закройте файл. Установка Nginx php fpm практически завершена.
Настройка Nginx для работы php-fpm
После того, как вы настроили адрес, который прослушивает PHP-FPM, вам нужно настроить Nginx для запроса прокси к нему через этот адрес, используя параметр конфигурации fastcgi_pass, который располагается в файле конфигурации блока виртуального хоста.
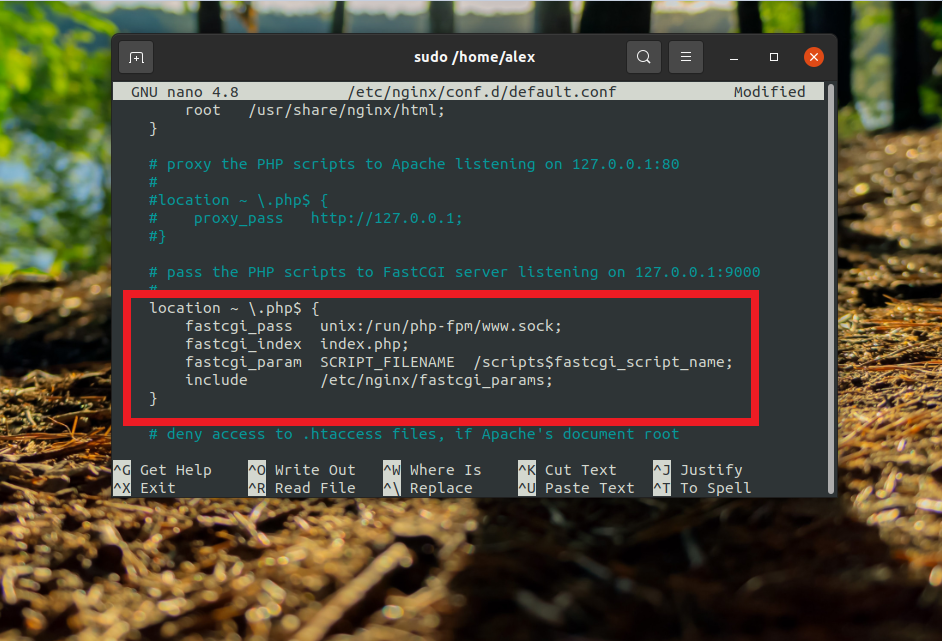
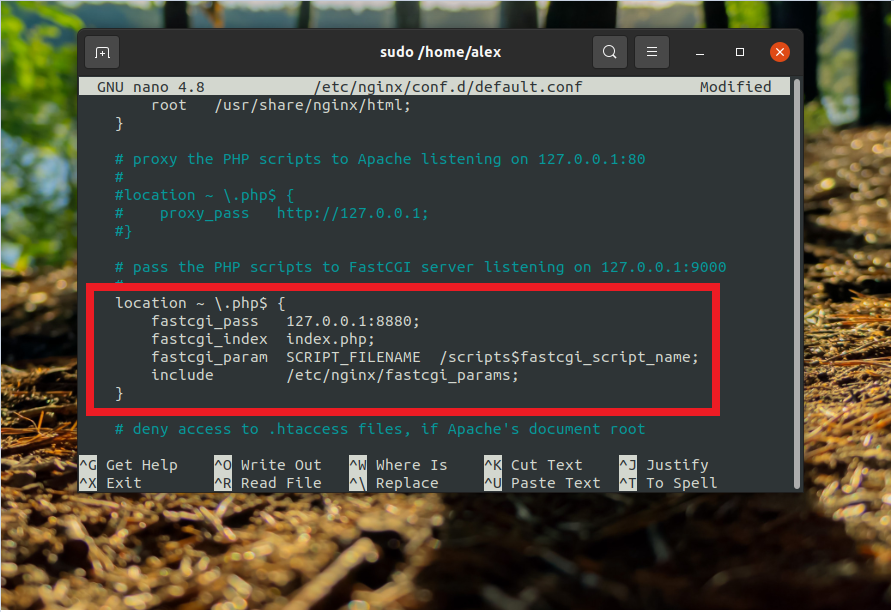
Для примера, возьмем файл конфигурации стандартной странички сайта nginx которая открывается при первом запуске nginx, расположенный по следующему пути — /etc/nginx/conf.d/default.conf, откроем его для редактирования:
sudo nano /etc/nginx/conf.d/default.conf
Если вы настроили PHP-FPM для прослушивания на сокете UNIX, найдите блок местоположения для обработки файлов .php и установите следующие параметры для fastcgi:
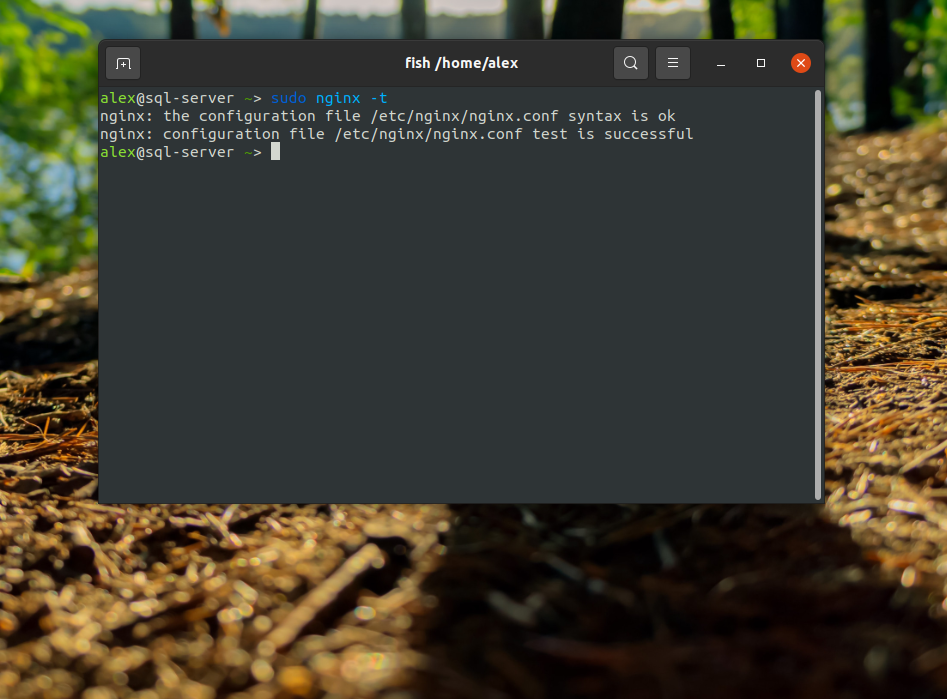
После внесения изменений в конфигурации Nginx проверьте правильность синтаксиса при помощи команды:
sudo nginx -t
Далее вам необходимо перезапустить службы, чтобы применить изменения, используя для этого команды:
sudo systemctl restart nginx
sudo systemctl restart php7.4-fpm
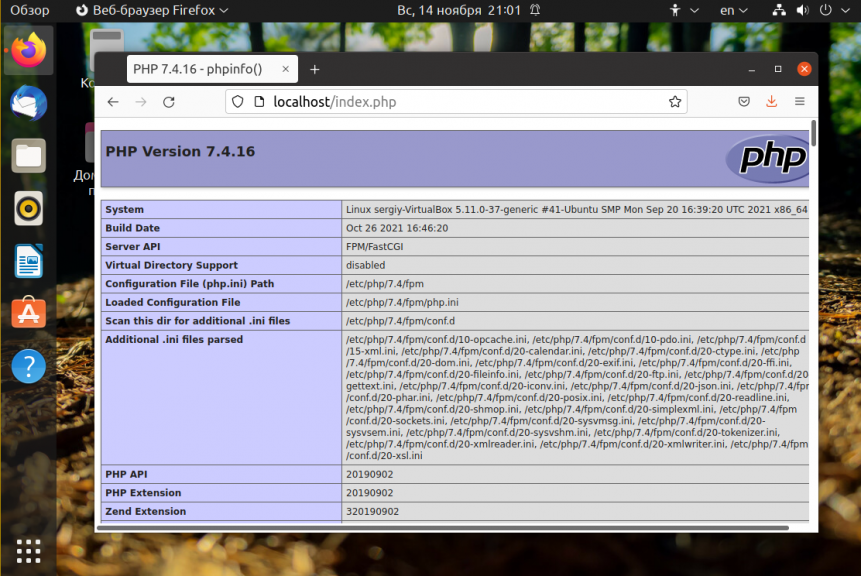
После перезапуска служб, подключение считается выполненным успешно. Можно создать файл index.php со следующим содержимым:
sudo vi /var/www/html
<?php phpinfo() ?>
Затем можно попытаться открыть эту страницу в браузере. Для этого в адресную строку надо ввести http://localhost/index.php. Если всё было настроено верно, перед вами откроется такая страница:
Для дальнейшей настройки PHP-FPM воспользуйтесь статьей по настройке PHP-FPM на Ubuntu 20.04 – Настройка PHP-FPM
