

- Specifications
- Технические данные Mikrotik SXT SA ac
- Настройка роутера
- Подключение кабеля
- Анализ параметров подключения
- Настройка точки доступа WiFi MikroTik SXTsq 5 ac
- Результаты теста производительности
- Настройка доступа в интернет
- DHCP клиент
- Шлюз по умолчанию
- Доменные имена
- SNTP-клиент
- Настройка беспроводной сети
- Настройки безопасности
- Сетевые настройки
- Bridge-LAN c беспроводной сетью
- Поиск неисправностей и продвинутая конфигурация
- Проверка ip адреса
- Отсутствие подключения к интернету
- Проверка соединения
- Беспроводная сеть
- Частота и ширина канала
- Частота беспроводной сети
- Изменение региональных настроек
- Проброс портов
- Статические настройки
- Динамические настройки
- Ограничение доступа к веб-страницам
- Настройка правил доступа
- Стратегии ограничения
- Сброс Mikrotik на заводские настройки
- Included parts
- Core Configuration
- Grab a Backup of Your Old Router
- Make You Old Router Into a Modem
- Unboxing a Mikrotik
- 2a — Power it up and login
- 2b — Download Winbox
- 2c — Login
- 3a — Local Network
- 3b — System Password
- 3c — Wireless
- 3d — Internet
- 3e — Updates
- 3f — Guest Wireless (optional)
- 3g — VPN (optional)
- Other Features
- Firewall
- 5a — Drop All Rule
- 5c — Allow Rule for Local Network
- 5d — Other Allow Rules
- 5e — Our Final Rules
- 5f — Basic Firewall Concepts
- IPv6
- 6a — Enable IPv6 on Mikrotik
- 6b — Obtain an IPv6 Address Range
- 6c — IPv6 Router Addresses
- 6d — IPv6 Firewall
- 6e — IPv6 Addresses on devices
- 6f — Another Pool Address for Another Network
- Port Forwarding
- Isolated Networks
- File Sharing
- Dynamic DNS
- Queues / Shaping
Specifications
Dimensions
129 x 129 x 34 mm
Operating System
RouterOS
Size of RAM
64 MB
Storage size
16 MB
Tested ambient temperature
-40°C to 50°C
Технические данные Mikrotik SXT SA ac
Новинка обладает достаточно незаурядными техническими данными. Ее рабочий частотный диапазон – 5 GHz, а максимальная выходная мощность составляет 1300 mW. Коэффициент усиления антенны составляет 13 dBi при ширине луча – 90⁰.
Чтобы справляться с высокой пропускной способностью, инженеры компании производителя построили RBSXTG-5HPacD-SA на базе мощного и нового сетевого процессора QCA9557 с тактовой частотой в 720MHz, и снабдили устройство 128 MB оперативной DDR2 памяти.
Как и большинство точек доступа серии SXTG, Routerboard SXTG-5HPacD-SA имеет 10/100/1000Mbit/s Gigabit Ethernet порт для связи с проводными сетями, и дополнительно – датчики температуры и напряжения, звуковой индикатор и ряд светодиодных индикаторов.
Настройка роутера
- Configure your old ADSL router to bridge mode
- RouterOS and Firmware updates
- Local IP address
- DHCP
- Internet access
- Firewall
- IPv6
- DNS
- WiFi
I’ll list some other features at the end, but the above is enough to get you off the ground.
Mikrotik have a rather limited selection of routers with integrated WiFi.
It is actually very common in commercial grade gear to have a separate router and access point.
Going down this road with Mikrotik is possible (eg: hEX plus BaseBox or wAP), but a bit too complex for this article.
Подключение кабеля
Начальная схема подключения должна подойти для большинства случаев. Описание — на обратной стороне роутера, а также в онлайн-руководстве.
- Подключите Ethernet-кабель, предоставленный вашим интернет-провайдером, в порт ether1. Остальные порты предназначены для подключения локальной сети (LAN). В этот момент ваш роутер по умолчанию защищен конфигурацией брандмауера.
- В остальные порты подключите кабели локальной сети.
Анализ параметров подключения
В настройках wifi интерфейса wlan1 на вкладке Status отображаются параметры подключения, которые помогут оценить качество работы соединения «точка-точка», и сделать корректировки в настройке при необходимости.
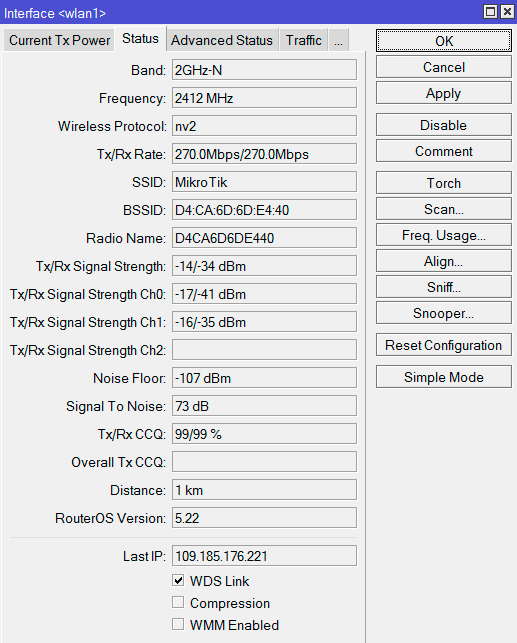
Значения параметров подключения:
Настройка точки доступа WiFi MikroTik SXTsq 5 ac
Для настройки точки доступа WiFi MikroTik SXTsq 5 ac воспользуйтесь инструкциями:
Результаты теста производительности
Чтобы никто посторонний не смог получить доступ к управлению роутером, необходимо задать пароль к учетной записи администратора или создать нового пользователя с паролем.
Вы увидите меню управления пользователями роутера. Здесь можно добавлять и редактировать учетные записи (Рисунок 3):
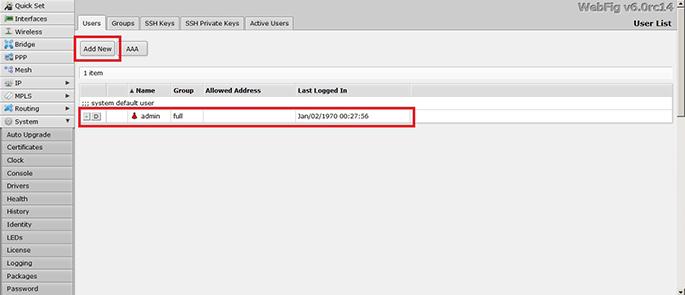
- Для редактирования уже существующего профиля пользователя кликните по нему один раз;
- Для создания нового пользователя нажмите «Add new»;
И в том, и в другом случае откроется меню редактирования (создания нового) пользователя (Рисунок 4).
После изменения пользовательских настроек нажмите «ОК» (чтобы сохранить настройки) или «cancel» (для их отмены). Снова откроется заглавное окно меню управления пользователями.
Настройка доступа в интернет
Если настройки «по умолчанию» не позволяют получить доступ в интернет (ваш провайдер не поддерживает выдачу настроек по DHCP), придется указать сетевые настройки вручную. Они должны включать:
- Ip адрес (IP address);
- Маску сети (Network mask);
- Адрес шлюза (Gateway address);
- DNS-адрес (DNS address).
Возможно, также потребуются:
- NTP-сервер (NTP server);
- MAC адрес (MAC address).
DHCP клиент
Существенные значение полей для корректной работы:
- Проверьте, включена ли служба;
- Значение в поле chain – должно быть srcnat;
- Интерфейс, через который осуществляется подключение к провайдеру. В данном руководстве ether1;
- Значение в поле action – должно быть masquerade;
На скриншоте представлено корректное правило. Обратите внимание, что некоторые настройки, у которых не должно быть значения, скрыты (и могут быть проигнорированы) (Рисунок 9).
Шлюз по умолчанию
Далее вы увидите следующее окно (Рисунок 11):
Здесь необходимо нажать кнопку, ввести настройки «по умолчанию» или выданные провайдером. После ввода данных нажмите кнопку «ОК».
Чтобы проверить, какой вариант (по умолчанию или провайдера) работоспособен, используйте команду ping в поле Tools.
Доменные имена
Чтобы открывать web-страницы, или получить доступ на иные ресурсы в сети Интернет, необходимо настроить DNS — или на Вашем компьютере, или на роутере. В рамках этого руководства предлагаем настроить DNS только на роутере. А компьютер, в свою очередь, будет получать настройки по DHCP от роутера.
Примечание: при вводе корректного значения слово «Servers» станет синим, в ином случае — красным.
SNTP-клиент
Роутер MikroTik не сохраняет настройки времени во время отключения питания или при перезагрузках. Чтобы постоянно иметь корректное время, необходимо настроить SNTP-клиент.
- Enabled – должна стоять галочка;
- Параметр Mode должен быть unicast;
Настройка беспроводной сети
Для использования беспроводной сети в одном адресном пространстве с проводной сетью, необходимо настроить сетевой мост (bridge). Также необходимо проверить настройку внутреннего коммутатора.
- Беспроводной интерфейс устанавливается в режим ap-bridge (в случае, если роутер имеет уровень лицензии 4 или выше), в противном случае устанавливается режим bridge: только один клиент сможет подключаться к роутеру, используя беспроводную сеть.
- Соответствующий профиль безопасности создан и применен в настройках интерфейса.
- Проверьте состояние интерфейса.
Предупреждение: Изменение настроек может повлиять на подключение — вы можете оказаться отключены от роутера. Используйте Безопасный режим, чтобы в случае отключения, настройки вернулись в первоначальное состояние.
В данном руководстве порты ether3, ether4 и ether5 используются как подчиненные (slave) относительно мастер-порта ether1. Посмотреть данную настройку можно, открыв меню «Interface» (Рисунки 14,15)
Обычно ether1 используется как WAN порт, а остальные порты — как подчиненные к порту ether2.
Убедитесь, что все порты, предназначенные для локальной сети, действительно установлены как подчиненные. Например, если ether2, ether3, ether4, ether5 определены как LAN-порты, то порты ether3, ether4, ether5 подчиняются мастер-порту ether2.
Настройки безопасности
- Используйте Add new для создания нового профиля;
- Или редактируйте уже существующий профиль.
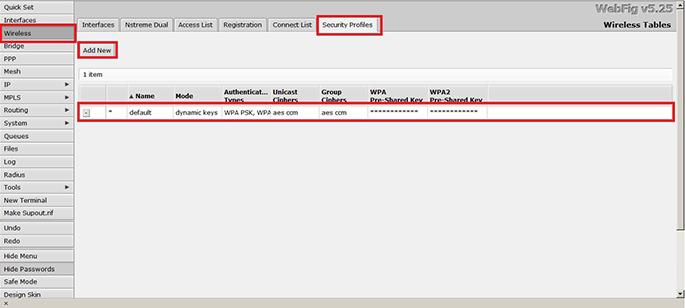
В данном примере будет создан новый профиль безопасности, редактирование профиля выполняется аналогично. Ниже на скриншоте красным выделены рекомендуемые настройки для беспроводной сети.
Сетевые настройки
Настройка параметров беспроводной сети (Рисунок 19).
Режим интерфейса должен быть установлен в ap-bridge, если это недопустимо (ограничение лицензии), то только один клиент сможет подключаться к устройству.
Обычно WiFi устройства разрабатываются для работы на частоте 2.4GHz. Установите параметр «band» в 2GHz-b/g/n, это позволит подключаться по протоколам 802.11b, 802.11g и 802.11n.
Настройте ширину канала таким образом, чтобы наибольшая скорость передачи данных обеспечивалась по протоколу 802.11n. В примере используется канал 6, как результат, могут быть использованы 20/40MHz HT above или 20/40 МГц HT below. Выберите любой из них.
В поле «SSID» введите название беспроводной сети (Рисунки 20, 21).
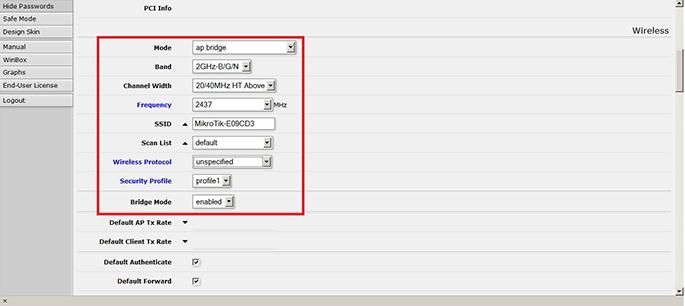
После активации всех настроек можно включить точку доступа (Рисунок 22).
Bridge-LAN c беспроводной сетью
Откройте меню Bridge и проверьте, доступны ли какие-нибудь интерфейсы. Если нет, нажмите add new. В открывшемся окне введите параметры по умолчанию и нажмите «создать интерфейс». Далее выберите закладку Ports , где уже будут отображены LAN и WiFi интерфейсы (Рисунок 23).
Когда новый порт моста будет добавлен, зайдите в его настройки, поставьте галочку напротив параметра enabled, выберете корректный интерфейс порта (В данном руководстве это ether2), LAN-мастер, порт LAN и Wifi (Рисунок 24).
Так должен выглядеть мост (Рисунок 25).
Поиск неисправностей и продвинутая конфигурация
В данном разделе допускаются отклонения от конфигурации, описанной в первой части. Расширенное понимание организации сети будет вашим преимуществом.
Проверка ip адреса
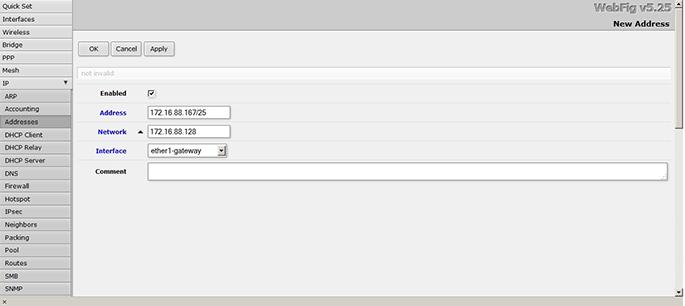
Изменение пароля текущего пользователя:
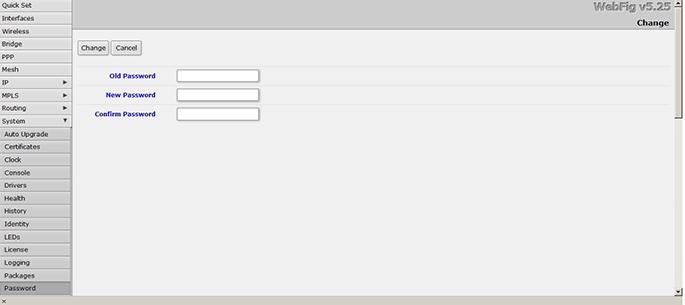
Изменение пароля существующего пользователя:
- Выберите пользователя.
- Введите пароль и повторите его дабы избежать ошибки.
Отсутствие подключения к интернету
Если вы следовали данному руководству, а работает только доступ в локальную сеть, и доступ в интернет отсутствует, проверьте следующие настройки:
Проверьте настройки masquerade Проверьте настройки MAC адреса. Соответственно, есть несколько способов, как решить проблему, первый — проверить конфигурацию, не пропущена какая-нибудь настройка, второй — установить MAC-адрес.
Изменение MAC-адреса доступно только из командной строки – «New Terminal» из меню слева. Если новое окно не открывается, проверьте, позволяет ли ваш браузер открывать всплывающие окна.
/interface ethernet set ether1 mac-address=XX:XX:XX:XX:XX:XX
Или свяжитесь с Вашим провайдером и сообщите, что Вы заменили устройство.
Проверка соединения
Есть определенные условия, которые необходимы для работы Ethernet-соединения:
- Должна гореть лампочка соответствующего порта при подключении к нему кабеля.
- Правильный ip адрес на интерфейсе.
- Правильная маршрутизация на роутере.
На что обратить внимание при использовании инструмента ping:
- Нет потерянных пакетов.
- Все пакеты имеют примерно одинаковое время прохождения (RTT) по неперегруженным ссылкам.
Беспроводная сеть
Настройки конфигурации, которые не были упомянуты в руководстве, но о которых стоит знать.
Частота и ширина канала
Параметры канала могут быть самыми разными. Ниже предлагаем частоты, которые могут использоваться, и параметры настройки ширины канала, чтобы использовать канал HT на 40 МГц (для 802.11n). Например, использование частоты канала 1 или частоты 2412MHz, устанавливающей 20/40MHz HT below, не даст результатов, так как нет каналов на 20 МГц, доступных ниже частоты набора.
Предупреждение: проверьте, какие частотные каналы разрешает использовать местное законодательство.
Частота беспроводной сети
Если беспроводная сеть работает со сбоями, несмотря на удовлетворительную скорость передачи, следует проверить, не используют ли ваши соседи тот же беспроводной канал. Для этого:
Откройте инструмент мониторинга использования частот «Freq. Usage».
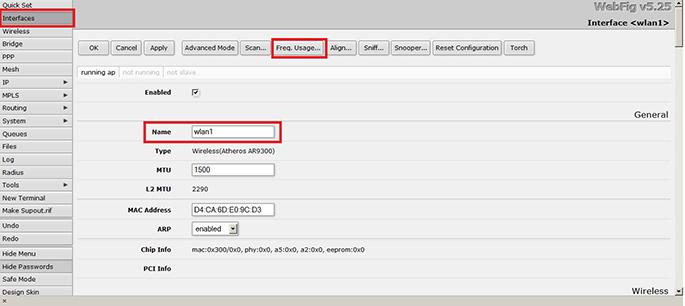
Подождите некоторое время, пока не отобразятся результаты сканирования (около двух минут). Чем меньше значения в колонке «Usage», тем меньше загружен соответствующий канал.
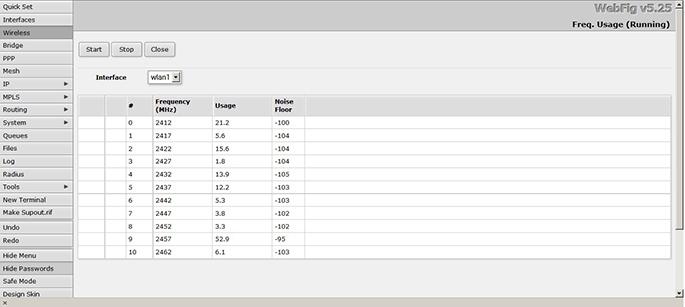
Примечание: Мониторинг осуществляется по каналам, установленным по умолчанию для выбранной страны.
Изменение региональных настроек
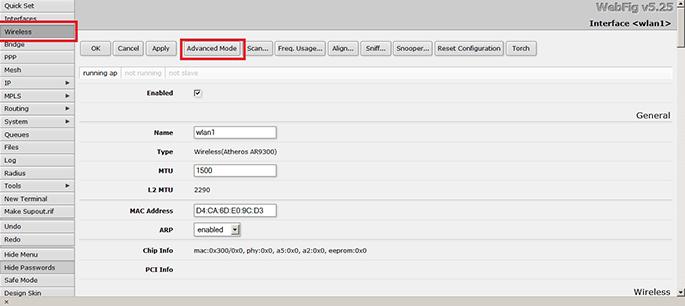
По умолчанию страна не указана. Вы можете указать страну, в которой находитесь. Для этого:
Откройте меню «wireless» и выберите «Advanced mode».
Выберите страну из списка.
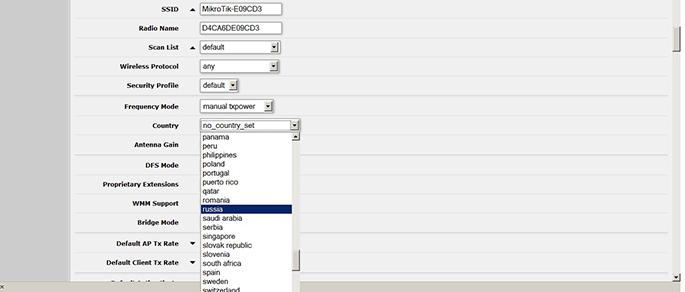
Примечание: Расширенный режим включается кнопкой Advanced mode, для отключения расширенного режима нажмите ее повторно.
Проброс портов
Чтобы сервисы на Ваших локальных серверах/рабочих станция были доступны широкой общественности, необходимо направить порты снаружи внутрь вашей сети. Это делается из меню /ip firewall nat.
Статические настройки
Многие пользователи предпочитают настроить эти правила статически, чтобы контролировать, какие услуги доступны из вне, а какие нет. Также такой метод подойдет, если сервис, который вы используете, не поддерживает динамические настройки.
Если вы хотите сделать иные сервисы доступными, вы можете изменить протокол, как правило, используется TCP и Dst-port. Если изменение порта не требуется, например, порт на роутере и локальной машине совпадает — 22, параметр может остаться незаданным.
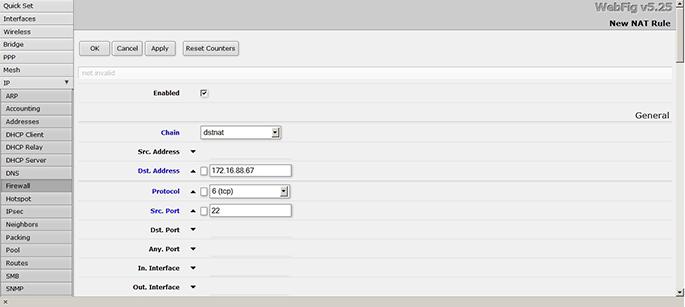
Проброс портов с использованием командной строки:
/ip firewall nat add chain=dstnat dst-address=172.16.88.67 protocol=tcp dst-port=22 action=dst-nat to-address=192.168.88.22 to-ports=86
Динамические настройки
UPnP используется динамической переадресации портов.
Предупреждение: Сервисы, о которых вы не знаете, могут использовать переадресацию портов, что в свою очередь, может подвергнуть опасности локальную сеть.
Настройка uPnP сервиса на роутере:
Настройте, какие интерфейсы должны считаться внутренними, а какие — внешними.
/ip upnp interface add interface=ether1 type=external /ip upnp interface add interface=ether2 type=internal
/ip upnp set allow-disable-external-interface=no show-dummy-rule=no enabled=yes
Ограничение доступа к веб-страницам
Когда необходимые изменения будут сделаны, нажмите apply, чтобы вернуться в меню Access.
Настройка правил доступа
Этот список будет содержать все правила, необходимые для ограничения доступа к сайтам в Интернете.
Чтобы добавить правило, запрещающее доступ к любому хосту, в названии которого присутствует example.com, сделайте следующие действия:
С этим правилом любой хост, содержащий в названии example.com, будет недоступен.
Стратегии ограничения
Существует два подхода к данной проблеме:
- Запрещать только конкретные страницы, а остальные разрешать. Каждый сайт доступ к которому должен быть ограничен указывается значение Deny.
- Разрешать только конкретные страницы, а остальные блокировать. Каждый сайт, доступ к которому должен быть разрешен, указывается значение Allow. В конце создается правило, которое запрещает доступ ко всем сайтам.
По материалам официального сайта производителя MikroTik.
Сброс Mikrotik на заводские настройки
1. Если вы подключились к устройству первый раз, то соответствующее окно с заголовком RouterOS Default Configuration появится сразу при входе, для сброса настроек нужно нажать на кнопку Remove Configuration.
2. Если на устройство уже заходили, то такое окно по умолчанию не появляется. Заходим в меню New Terminal и с помощью команды system reset-configuration перезагружаем устройство (после перезагрузки появляется окно сброса настроек).
Или же идем в меню System, потом — в Reset Configuration. В окне выставляем галочку в пункте No Default Configuration и жмем на Reset Configuration. Заводская конфигурация сброшена, начинаем настраивать.
Included parts
- 24V 0.38A power adapter
- Metal ring (one)
RouterOS current releaseDownload
Selection guide for PtP linksOpen
Selection guide for PtMP linksOpen
RouterOS software manualOpen
Declaration of conformity
Declaration of conformityOpen
(FCC)
- All tests are done with Xena Networks specialized test equipment (XenaBay),and done according to RFC2544 (Xena2544)
- Max throughput is determined with 30+ second attempts with 0,1% packet loss tolerance in 64, 512, 1518 byte packet sizes
- Test results show device maximum performance, and are reached using mentioned hardware and software configuration, different configurations most likely will result in lower results
Core Configuration
The main thing to remember with a Mikrotik is that all your configuration is more verbose.
For example, a regular home router may configure LAN settings as IP Address, Netmask, DHCP ON / OFF and DHCP Range.
Mikrotik splits these across Addresses (3 fields per address (no limit to addresses)), Pools (3 fields per pool), and DHCP Server (3 tabs, ~10 fields in total).
(As a side effect of using a Mikrotik router, your networking skills and knowledge are likely to increase)!
You will not have Internet connectivity in steps 1 to 3.
Please make a note of any passwords you need to connect to the Internet, ensure you have new connection details from your ISP handy, and have a mobile phone ready in case you to ask the Internet for help.
It’s probably worth having your ISP’s support number handy.
Indeed, if you’re really paranoid, give them a call before hand and ask if there’s anything special you should know (and to double check you have the right phone number).
END IMPORTANT WARNING
Lets get started.
Grab a Backup of Your Old Router
Seriously.
Do it now.
Save it on your laptop.
And make a second copy on a USB or desktop or phone.
If things go really bad, you can always restore your backup and be no worse off.
Make You Old Router Into a Modem
This article assumes you have an ADSL connection.
Essentially, we will change your old router to just be an ADSL modem using what is called bridge mode.
Connect to your old router and search through the configuration.
Turn off WiFi.
Turn off DHCP.
Set your LAN IP address to 192.168.88.2 (such that your modem remains accessible; your Mikrotik will be 192.168.88.1).
Once you change your LAN IP address, your router will likely reboot.
If you have added any port forwarding, now is a good time to make a note of it.
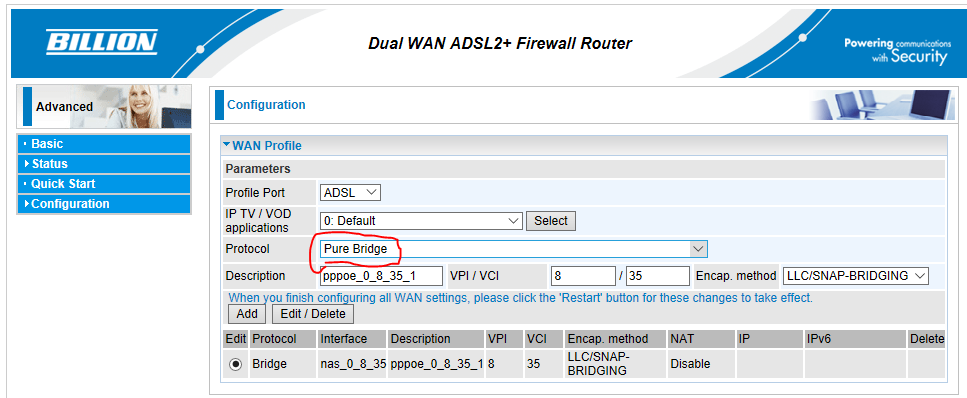
Things to watch out for:
- VPI / VCI settings: I have needed to make slight changes to these in some ADSL modems in bridge mode. Your ISP’s configuration page should tell you what they need to be set to.
- MAC Address: some ISPs (particularly cable providers) require a certain MAC address on your router. If you called support they should have told you this, otherwise, the Mikrotik has an option for you to enter a MAC address.
(I’ve never used a fibre, ethernet or wireless ISP in the past, so I don’t know what their particular gotchas are).
Unboxing a Mikrotik
Mikrotik hardware comes with the bare minimum.
The device, a power pack, and a piece of paper with very basic getting started instructions.
2a — Power it up and login
Plug it into power, and you should hear some beeps as it boots up.
Connect port 1 of the Mikrotik to a LAN port on your old router.
This will be your Internet connection.
Connect your computer to another port on the Mikrotik (port 2 sounds good).
2b — Download Winbox
Why use Winbox over a browser?
- Winbox can auto discover Mikrotik devices on your LAN
- Winbox can connect via IPv6 or MAC address (making it easier to change IPv4 addresses)
- Winbox shows statistics, packet flow and graphs in real time (in fairness, the web interface does this too)
- Winbox lets you have multiple windows for different parts of your configuration (yes, I know that web browsers have tabs too)
- Winbox lets you do drag & drop file transfers (good for manual updates)
- Winbox remembers a list of connections and passwords
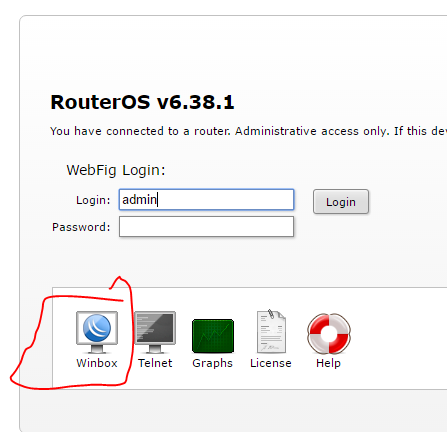
If you don’t have a Windows device handy, the web interface is more than enough to get going, if slightly less polished.
2c — Login
When you first connect with Winbox to your router, you will receive a new setting notification.
If you understand what it says, that’s great.
If not, don’t worry.
There are a list of menu items down the left side of the screen.
The very top one should be Quick Set.
Click it, and you’ll get Mikrotik’s simplified setup.
Which, for a home router / access point, is 80% of what you need.
We’ll tour through all the parts of this screen so you’re all setup and on the Internet.
After each section, you should click Apply to save your changes.
3a — Local Network
Although our priority is to get on the Internet, we need to check our LAN settings first.
If you change these later it causes much pain, so best do it up front.
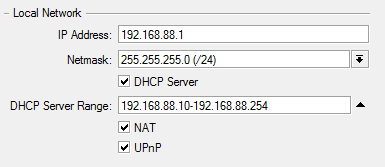
If you need extra static addresses, you can change the DHCP Server Range.
The default of 10 non-DHCP addresses is fine (minus one for your Mikrotik router and one for your old router), unless you have lots of servers.
Keep NAT ticked.
It’s the thing that lets your devices access the Internet!
If there’s an option to Bridge all LAN Ports, it should be unticked.
All bar one of your LAN ports will be bridged.
Port 1, your Internet port, is the exception.
And it’s a very, very important exception!
3b — System Password
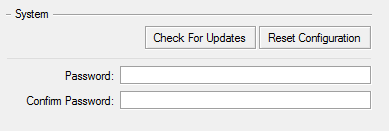
Before you go trying to connect your brand new router to the Internet, make sure it has a password!
Enter it twice.
Then disconnect and check your new password is required.
We’ll get to checking for updates once the Internet works.
3c — Wireless
Your WiFi is currently configured as open access, no password required.
Again, before we hop on the Internet, we need to add a password, and set a few other options.
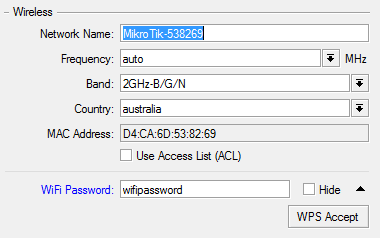
Frequency is what most home routers call channels.
Mikrotik shows the actual radio frequency of each WiFi channel.
You’ll need to count from one to work out which MHz corresponds to which channel.
Band lets you enable / disable 2 GHz or 5 GHz, and the various WiFi protocols.
The default is fine.
WiFi Password is where you enter your WiFi password.
8 to 63 characters (and yes, my WiFi password really is 63 characters long).
3d — Internet
OK, with our LAN configured and passwords enabled, time to connect to the Internet!
This is where you should refer to your ISP’s initial setup details, or call tech support if you get stuck.
Before we start with this, make sure the Firewall Router option is ticked.
That stops nasty people connecting to your router from the big bad Internet.
Most ADSL services use PPPoE to establish an Internet connection.
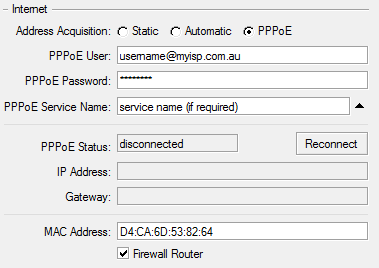
Click Apply and you should see PPPoE Status change to connected.
And you’re on the Internet again!
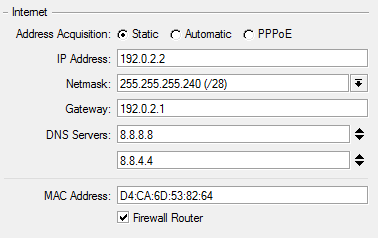
Access Your Modem
To access your modem via your browser, you’ll need to connect it with another ethernet cable.
Simply connect an extra ethernet port from your Mikrotik to your old router.
Then you can browse to 192.168.88.2, as you configured it in step 1.
(I’m sure there is a way to do this without the extra cable, but I’ve tried several times and never managed to get it working).
3e — Updates
Instead, click the Check for Updates button.
There almost certainly will be updates.
Go install them and reboot your router.
Regular updates is a major feature of Mikrotik over any home router.
They actually fix bugs, problems and security holes.
And deliver new features!
Crazy talk, I know.
3f — Guest Wireless (optional)
If you want to configure a guest WiFi access point, you can do that.
However, all this does is create a second virtual access point with a different password.
Guests are still part of your main LAN network and can access other computers and devices on it.
It would be nice if this created a second isolated subnet to keep guests away from your main network, but alas it does not.
3g — VPN (optional)
If you want to be able to connect to your home network from the road (via mobile data, work, someone else’s house, when travelling, etc), you can enable a Virtual Private Network.
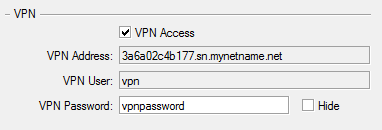
All you need to do is add a VPN Password (please make it better than this example).
This supports PPTP, L2TP and SSTP based VPNs.
At least one of which should work with most devices and computers out there.
And you connect using the address shown above (free dynamic DNS).
But be aware that PPTP is fundamentally flawed and not supported on modern devices (from 2016, iOS and Android refuse to connect to them).
(Note, I don’t have this kind of VPN configured on my router, so my experience is rather limited).
Other Features
Lets venture out of the Quick Set menu to see other features.
Generally, clicking through the menus on the left is pretty harmless, as long as you don’t change things.
And the defaults from Quick Set are a good template to start from (so you can see how all the pieces fit together).
This is a very good default screen to look at to get an overall picture of what’s going on.
It shows network usage in real time (updating every second or so) for each physical or logical interface in your router.
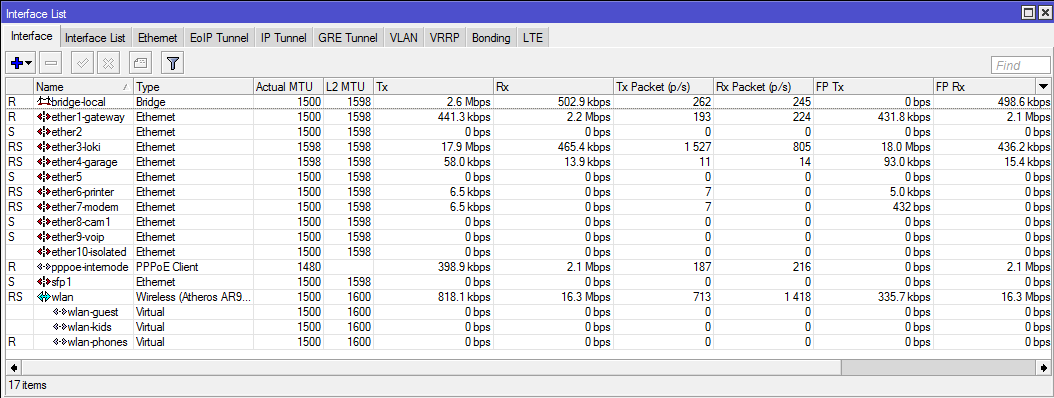
There isn’t much to see on a router with no devices, so the screenshot is from my router.
Two highlights from this moment in time: something is downloading at 2.1Mbps over my ISP’s PPPoE connection, and something on WiFi is receiving at 17Mbps from my home server.
Drilling into an interface gives more configuration details, statistics and the very powerful torch function.
You can use torch to work out exactly what device is consuming bandwidth (and when you have a rather poor ADSL connection like me, that is very useful to know).
Drilling into Wireless will show you any number of options and settings for your Router’s WiFi interface(s).
I won’t go into details here; reading the Mikrotik documentation and Wikipedia is a good way to work out what it all means.
One highlight is that you can see the signal strength of connected devices in real time (also visible on Quick Set).
This shows the signal strength of the device as seen by your router, also known as the return signal.
The signal strength bars on your phone, laptop or device only shows the strength of the router’s signal, but phones are much lower powered and have poorer antennas than your router does, so the signal the router sees is often the weakest link.
This is where you add IP addresses for your router.
Typically, this is where you change your LAN address, but you should see your public IP address in here as well.
Pools are where ranges of IP addresses are defined, which are most commonly used in DHCP configuration.
As I alluded to near the beginning, DHCP configuration is more complex in a Mikrotik, as compared to home routers.
Looking at the default configuration will help you make sense of it.
Leases shows the devices currently assigned IP addresses from your router.
If you want to assign your devices a fixed IP address via DHCP, you can do that on the Leases tab.
Either wait until a device connects, drill into it and click Make Static.
Or you can create a new lease and manually enter the MAC address.
Mikrotik routers run a small DNS server.
Mostly this just caches DNS queries so they are a bit faster for your local devices.
Two highlights:
you can clear the DNS cache if you need to start fresh (note that this does not clear your ISP’s DNS cache),
and you can add static DNS names for local devices (eg: my-server.ligos.local).
Mikrotik routers run various network services.
If you aren’t using them, its best to turn them off so nasty hackers have less options to break into your device.
You can safely turn off:
- api
- api-ssl
- ftp
- telnet
A Mikrotik router is made up of a large core package with most functionality, and several smaller packages which add extra features.
The packages screen shows what is currently installed.
This is also where you can Check for Updates from the Internet and view release notes of newer packages.
Note: other manufacturers allow 3rd parties to develop and distribute packages or add-ons for their routers or NAS devices.
This is not the case with Mikrotik.
All packages are exclusively developed and distributed by Mikrotik, and are available through their download page.
Your WiFi and ethernet ports are not, by default, part of the same local network.
But usually you want them to be.
A network bridge is how that happens.
Bridging networks means devices can discover each other automatically, and your Mikrotik will optimise for fastest possible performance.
If you remove a port from the bridge, you can begin to isolate it from your LAN.
(Other ways of linking ports together on a local network include a hardware ethernet switch (ethernet ports only), and routing).
Many articles on the Internet about Mikrotik routers will give their configuration as text commands for a console.
This is a very concise way to record configuration unambiguously.
You can generate or replay these commands in a New Terminal in winbox.
Most console areas have a print command, which lists information / configuration:
Flags: D — dynamic, X — disabled, R — running, S — slave # NAME TYPE ACTUAL-MTU L2MTU MAX-L2MTU 0 ether1 ether 1500 1600 4076 1 RS ether2-master ether 1500 1598 2028 2 S ether3 ether 1500 1598 2028 3 RS ether4 ether 1500 1598 2028 4 S ether5 ether 1500 1598 2028 5 S wlan1 wlan 1500 1600 2290 6 S wlan2 wlan 1500 1600 2290 7 R ;;; defconf bridge bridge 1500 1598 8 X pppoe-out1 pppoe-out
Firewall
The firewall is the core business of any router.
And it’s well worth reading the documentation, as well as experimenting with various firewall rules (always being careful you don’t end up locking yourself out of your own router, of course)!
But for now, let just make sure we have a safe default for home use.
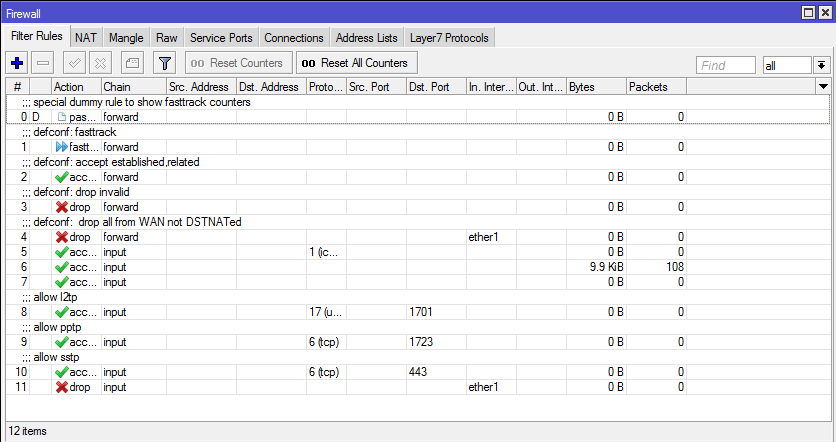
There are a list of default rules, created with Quick Set.
Which are a very good place to start.
(Something else worth doing is adding a comment after each rule, so make it easier to understand what’s going on).
5a — Drop All Rule
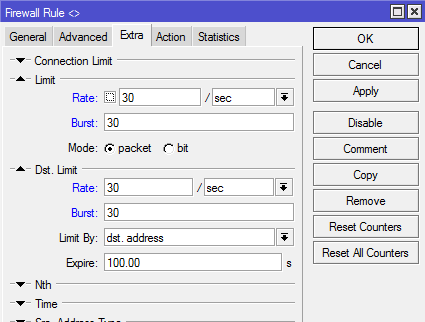
Near the top is a rule to allow ICMP.
It is good practice to rate limit the number of ICMP packets, so nasty people don’t overload your network.
You need to edit that rule and pop over to the Extra tab, and add a limit and a dst. limit.
30 packets each second is a reasonable place to start (not too big, not too small).
5c — Allow Rule for Local Network
Its good to explicitly allow connections to your router from your local network, to make sure you don’t accidentally lock yourself out of your own router.
Add a rule for chain input, with src-address=192.168.88.0/24, and set the action to accept.
Then drag it up to near the top (after the ICMP rule is a good place).
5d — Other Allow Rules
If you enabled VPN access, you may notice some other rules to allow your VPN to connect.
These are a good template if you want to allow other traffic.
But you more commonly will be port forwarding traffic to an internal device.
And you do not need an allow rule for port forwarded traffic (the very top rule allows port forwards).
5e — Our Final Rules
Here’s a dump of all our firewall rules.
Other than a few tweaks, the LAN access rule and some additional comments, they are the same as the default config.
Flags: X — disabled, I — invalid, D — dynamic 0 D ;;; special dummy rule to show fasttrack counters 1 ;;; defconf: fasttrack 2 ;;; defconf: accept established,related chain=forward action=accept connection-state=established,related 3 ;;; defconf: drop invalid chain=forward action=drop connection-state=invalid 4 ;;; defconf: drop all from WAN not DSTNATed chain=forward action=drop connection-state=new 5 ;;; Allow ICMP (rate limited) chain=input action=accept protocol=icmp log=no log-prefix=»» 6 ;;; Allow router access from LAN chain=input action=accept src-address=192.168.88.0/24 log=no 7 ;;; Allow established chain=input action=accept connection-state=established log=no 8 ;;; Allow related chain=input action=accept connection-state=related log=no log-prefix=»» 9 ;;; allow l2tp chain=input action=accept protocol=udp dst-port=1701 10 ;;; allow pptp chain=input action=accept protocol=tcp dst-port=1723 11 ;;; allow sstp chain=input action=accept protocol=tcp dst-port=443 12 ;;; Drop all external access chain=input action=drop in-interface=ether1 log=no log-prefix=»»
5f — Basic Firewall Concepts
A firewall is a list of rules, each with a set of criteria (eg: port numbers, source or destination IP addresses, etc) and an action (eg: accept, drop, etc).
The rules are divided in chains, which are group of rules.
There are some core chains which have special meaning, but you can make your own if you you have sufficiently complex rules.
Every network packet passes from the top of the rules down to the bottom.
As soon as it matches any rule, it stops, applies the action for that rule, and exits the list.
So you tend to have more specific rules at the top, and then more general “catch-all” rules at the bottom.
I struggled to understand what a chain was, so I’ll add a little more information.
There are three core chains (of which we’re usually only interested in the first two):
- input — traffic destined for the router itself
- forward — traffic which crosses the router to other devices (usually to / from the Internet / your computer, depending on the src / dest addresses)
- output — traffic from the router itself
IPv6
In 2017, IPv6 support is an essential requirement, in my mind.
The Internet has run out of addresses and IPv6 is “Internet version 2”, which supports more addresses than atoms in the Earth.
Many major website and companies are accessible via IPv6, and traffic is steadily rising.
As long as your ISP supports IPv6, its actually easier to get running than IPv4, because IPv6 auto-configures itself much better.
(An alternative guide to getting going with IPv6 can be found here: http://into6.com.au/?p=214)
6a — Enable IPv6 on Mikrotik
Mikrotik routers support IPv6, but it is disabled by default: you need to enable it in Packages first.
Once enabled, you’ll need to reboot your router.
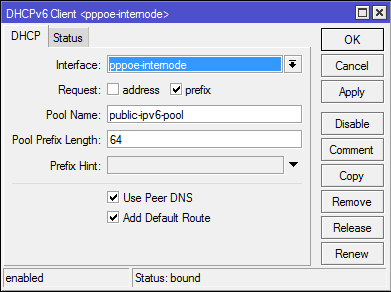
You’ll then have a new top level menu item IPv6.
6b — Obtain an IPv6 Address Range
You never get a single IPv6 address.
All ISPs will issue you, at minimum, a /64 subnet (which is the standard size of IPv6 subnets; that is, one local network).
(To give you some perspective of how be a /64 is, it has enough addresses to fit the entire IPv4 Internet in it, millions of times over).
Most will issue a /56 (which lets you create 256 sub-networks) or even a /48 (65536 sub-networks).
Obtaining IPv6 addresses can be done via DHCP or router advertisements.
ISPs tend to use the former, and we will use the later to let our devices get addresses.
6c — IPv6 Router Addresses
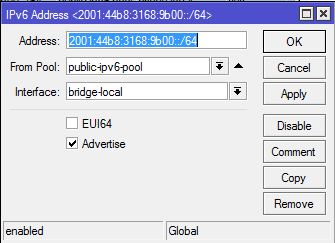
Next step is to assign a public IPv6 address to your router.
(Note that your router will already have link local IPv6 addresses starting with fe80, that is normal).
6d — IPv6 Firewall
Something very important to remember about IPv6 is that every device can be directly contacted by anyone out there on the Internet.
That’s by design.
(It is worth doing an IPv6 port scan of different devices on your network to see what is enabled by default.
I got a shock when I found that remote desktop was available on my computers; anyone on the IPv6 Internet with my address could connect — fortunately, I have a strong password).
I’ll leave it as an exercise for the reader to configure your IPv6 firewall, based on the IPv4 one.
Here is another guide if you get stuck.
6e — IPv6 Addresses on devices
By the time you’ve finished mucking about with your firewall, it possible some of your devices may have obtained an IPv6 address already.
If not, disconnect and reconnect them, and they should pick up an address.
On a Windows command prompt, you can run the ipconfig command to show your current address.
Here’s an example of mine:
Wireless LAN adapter Wi-Fi 2: Connection-specific DNS Suffix . : ligos.local IPv6 Address. . . . . . . . . . . : 2001:44b8:3168:9b00:abcd:1234:5678:0001 Temporary IPv6 Address. . . . . . : 2001:44b8:3168:9b00:5587:f3d3:3f92:36c5 Link-local IPv6 Address . . . . . : fe80::abcd:1234:5678:0001%7 IPv4 Address. . . . . . . . . . . : 10.46.1.31 Subnet Mask . . . . . . . . . . . : 255.255.255.0 Default Gateway . . . . . . . . . : fe80::4e5e:4d5d:4c5c:4b5b%7
There are websites which test if your computer is using IPv6.
6f — Another Pool Address for Another Network
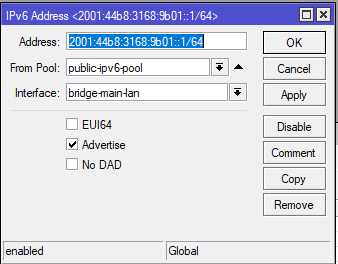
Update 2018-11-10: Mikrotik now validates overlapping address pools, so you should just add new addresses which use the public pool.
If you want IPv6 support on a separate network, just give that interface a new IPv6 address from the public pool.
And tick the advertise box.
Eg: 2001:44b8:3168:9b01::1/64
Note, RouterOS version 6.43.4 seems to ignore whatever prefix you type in (the bit between the /56 your ISP assigns you and the ::1/64) and assign the next highest one.
I’m not sure if that’s by design or a bug, but its a little annoying.
Mikrotik routers are full of functionality at a low cost.
If I go into all these in detail, I’ll be here forever (and this article is already long enough).
So just a few basic pointers and reference Mikrotik documentation.
Port Forwarding
Although port forwarding isn’t on my list of “core router functions”, the kind of people who might take the plunge with Mikrotik (nerds) are pretty likely to use it.
Here’s someone else’s port forwarding guide
A Mikrotik router can also do the opposite of port forwarding.
That is, making an internal connection to a public IP redirect to an internal server.
In my network, home.ligos.net resolves to my public IP address, but connections from my internal network get redirected to my server (instead of not working at all).
This is a very important feature if you are hosting HTTPS websites (like me), because the site DNS address must match the certificate.
This is not a normal feature of home routers.
I’ve heard it called reflection and hair pin NAT.
It’s implemented as a special srcnat rule.
Isolated Networks
I said above that Mikrotik’s guest WiFi password is just a second password for your main network.
In my mind, guests are to be viewed with extreme suspicion (who knows what kind of crypto ransomware may be on their devices).
So they need to live on their own isolated network, without easy access to your main LAN.
You can make your own virtual WiFi interface, or use the Quick Set template.
Next steps are:
- Make sure the guest WiFi interface is not part of your main LAN bridge.
- Assign a new address to this interface for your router (eg: 192.168.89.1).
- Create a new DCHP server for the guest WiFi interface.
- Create a new pool for your new subnet.
- Create and configure a new DCHP scope for the new subnet.
IPSec is a much stronger VPN than the ones created on the Quick Set page.
It’s also mostly used for permanent VPN links between sites, rather than occasional “dial-in” style access.
And it’s a real pain to configure correctly.
(I’ve struggled to get it working in the past, and simply don’t touch the config any more — I fear I will break it).
If you feel brave, the link above will get you started.
File Sharing
(Note that Mikrotik routers don’t do this very well. Heck, most home routers do this pretty poorly too. It’s really the domain of NAS devices, so if you want to do it properly, go buy a NAS.)
Dynamic DNS
Mikrotik routers come with a free dynamic DNS service, which updates whenever your dynamic IP address changes.
If you enabled VPN in Quick Set, dynamic DNS is already enabled.
Fun fact: if you own your own domain (eg: ligos.net), you can create a DNS CNAME record (say home.ligos.net) which points to the long dynamic DNS address for an easier to remember name.
Queues / Shaping
Queues are how Mikrotik routers provide quality of service.
That is, they can shape, prioritise and limit bandwidth to different networks or devices.
For example, you could restrict the bandwidth allowed by particular devices.
Configuring queues and QoS is really hard, and I’ve never managed to understand it properly.
In the end, I’ve just created a few simple queues which make sure no single network can use all my (terribly limited) Internet bandwidth.
I’m sure there are better solutions, but this is good enough for me.
One helpful tip though: create a new queue type with a larger queue size (I’m using 200, instead of the default of 10), this will not drop as many packets while still restricting bandwidth.
Update (1/Apr/2017): A more helpful tip is not to use fifo queues when you have limited bandwidth; that causes buffer bloat and dramatically increases latency.
Instead, use the sfq or pcq kinds.
You’ll need to create new queue types for these as they aren’t configured out of the box.
The sfq and pcq algorithms still restrict bandwidth, but do it in a fairer way, so the latency of individual connections isn’t completely terrible.
