

icmp 113 bytes (random data)+8 bytes (icmp header)+ 20 bytes (ip header) ttl for packet over 88 sec.
Packet exchange from 192.168.2.5 to 113 bytes of data: Request timed out. Ping stats for 192.168.2.5: Packets: Sent = 1, Received = 0, Lost = 1
pings generated by the recent module from iptables are not saved across reboots and are stored in the /proc/net/xt_recent/* folder (see man iptables)
Mikrotik
http://habrahabr.ru/post/186488/
This option differs from the classic Port Knocking in that instead of certain ports, we will use ICMP packets of various sizes. This is easier to do with standard OS tools and is more difficult to analyze when intercepting traffic, since it is not so conspicuous.
Despite the standard MTU size of 1500 bytes, this value can be reduced when using VLAN, VPN, etc., so we do not recommend using packets larger than 1000 bytes, also consider the size of ICMP packet headers of 28 bytes .
Just select two (or more) arbitrary numbers up to 1000, which will be your keys for Port Knocking, in our case they will be 250 and 209. Just like in the previous method, the rules will be built relative to the permission for already installed connections.
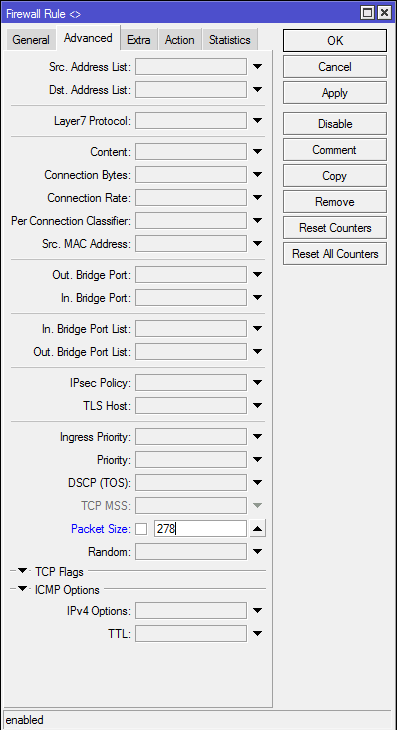
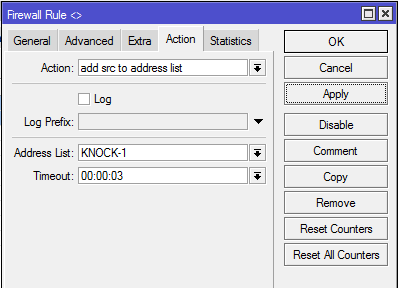
We again need to create two rules to add the source address to the corresponding sheets. In the first rule, we point to General: Chain — input, Protocol — icmp, and to Advanced: Packet Size — 278 (250 + 28) — the size of our first packet, to Action: Action — add src to address list, Address List — KNOCK- 1, Timeout — 00:00:30.
In the second one, set the following values: General: Chain — input, Protocol — icmp, Advanced: Src. Address List — KNOCK-1, Packet Size — 237 (209 + 28) — size of the second packet, on Action: Action — add src to address list, Address List — KNOCK-ACCEPT, Timeout — 00:01:00.
Or execute in the terminal:
/ip firewall filteradd action=add-src-to-address-list address-list=KNOCK-1 address-list-timeout=30s chain=input packet-size=278 protocol=icmpadd action=add-src- to-address-list address-list=KNOCK-ACCEPT address-list-timeout=1m chain=input packet-size=237 protocol=icmp src-address-list=KNOCK-1
These rules should be placed above the rule allowing established and related connections. The remaining settings completely repeat the previous method.
To knock in this way from Linux run:
ping XXX. XXX. XXX. XXX -s 250 -c 1ping XXX. XXX. XXX. XXX -s 209 -c 1
Where the -s switch specifies the packet size (excluding the header), and the -c switch specifies the number of packets to be sent, in our case one.
On Windows, the syntax will be slightly different:
ping XXX. XXX. XXX. XXX -l 250 -n 1ping XXX. XXX. XXX. XXX -l 209 -n 1
Here the -l key is responsible for the packet size, and -n for the number of packets.
On Windows, you can simply create *.cmd and *.bat files with this content.
The principle of operation does not differ from the previous method, upon receiving an ICMP packet of 250 bytes in size, the source address will be entered in the first list. Then, within 30 seconds, we must send a second packet of 209 bytes, in which case the address will be entered in the KNOCK-ACCEPT list and within a minute a connection can be established with the device.
In our opinion, this method is more convenient, since it allows you to use only standard tools of operating systems and is more difficult to detect when analyzing traffic. You can also combine both methods at once, say, first knock on the selected port, and then send an ICMP packet of the desired size. In any case, the choice is yours and only your imagination and common sense limits you.
While writing the article, the current RouterOS: 6.44.5 (long-term)
In one of the articles I talked about setting up the protection of my network through the Firewall
Here is this article: Creating a home network based on MikroTik devices: Part 6 — Firewall access protection
What if we don’t have time to control every sneeze outside? Maybe there is some way?
Yes, there is such a method and it is called «Port Knocking» or in our «Port Tapping». In principle, there are already quite a lot of articles on this topic on the Internet and I would like to add my spoonful of practical application to this mess 🙂
If you want to learn MikroTik, then this can be done with the help of a special online course «Setting up MikroTik equipment». The course covers all topics from the official MTCNA program, and the author of the course is the official trainer of MikroTik. The material is suitable for those who have been working with MikroTik equipment for a long time, and for those who have not even held it in their hands. The course includes 162 video lessons, 45 labs, and self-assessment questions with notes. By the way, I got the MTCNA certificate right here!
This method consists in a simple port enumeration at specified intervals, or if you use the characteristics of the same ICMP, then with different packet sizes.
Adding an IP address with a timeout, from which we are knocking, to the list of IP addresses «Access List», from which, in turn, the Firewall Filter has the necessary permissions.
Thus, we give access for a limited time to only one IP address under which we (or our remote device) are sitting.
I chose the simplest path for myself, namely the “ICMP Knocking” option, below there will be an addition on how to do it on various ports, the essence does not change much.
Basic Firewall setup
Before proceeding directly to the description of ICMP Knocking, I want to show what happened in the end.
Before proceeding directly to the description of ICMP Knocking, I want to show what happened in the end.
For the entire time I have had Mikrotik products, and this is almost 5 years (since 2014) I have tried quite a lot of different configurations, one of them is described in the article Creating a home network based on MikroTik devices: Part 6 — Firewall access protection
My main router has already become hEX S, and hAP ac has already become a simple Wi-Fi access point connected to hEX S via PoE-out on port 5.
In this block, I will introduce you to my current Firewall on the hEX S router
Actually the “Firewall Filter” config itself:
“Firewall NAT” config (I cut out the redirects so as not to confuse):
Firewall Mangle config is almost empty, except that there are dynamic rules from fasttrack connection.
Firewall Raw config:
As you can see, I don’t have any cumbersome designs, I don’t use IPsec, DualWAN or anything else that usually entails footcloths of rules.
If you plan to forward ports without an Access IP list in this configuration, you will encounter the fact that the connection will be blocked in the Firewall Filter by the last rule action=drop chain=forward in-interface-list=Internet
This is due to the fact that the NAT table works before the FILTER table (and the RAW table before NAT) according to the Connaction Tracker. And accordingly chain, dst-address and dst-port change.
In order for forwarding to work correctly, you must either add rules to the Firewall Filter by type: chain=forward action=accept protocol=tcp dst-address=192.168.88.100 dst-port=22
Or disable the last rule in the Firewall Filter: action=drop chain=forward in-interface-list=Internet
Parsing ICMP Knocking in Firewall Filter configuration
Let’s take a look at the set of rules for the ICMP knocker:
All further descriptions refer to the interfaces added to the interface sheet — Internet. You can see it in the rules. Be careful!
As you can see, the first rule is the jump (action=jump) of packets in the icmpv4 protocol (protocol=icmp) to another chain (jump-target=port-knocking). This will make it easier to process icmp packets.
The next rule should already work on the ICMP packet size (packet-size = 255) and add the source IP address (Src. Address — for example, the IP of our mobile or laptop) to a separate Address List at stage 1 (address-list = «Access IP Gate 1 ″) with a timeout of 30 seconds before being removed from the list (address-list-timeout=30s). You can make a whole bunch of such steps, complicating the whole chain. I only have 3 of them.
Next comes a similar rule, only the packet size and Address List are slightly different — (address-list=”Access IP Gate 2″) (packet-size=350). In this case, the presence of the source IP address (Src. Address) in the first Address List must be a prerequisite. Those. less than 30 seconds should elapse between submission of requests (you can adjust this time, at least from 1 second).
The last two rules are for RouterOS and Windows systems. I’ve noticed that some Windows PCs don’t send packets smaller than 200(Some!), my laptop is Windows.
I was too lazy to reconfigure clients and I just added a separate rule. By the way, this shows that you can turn on the log and track where and who passes the request 🙂
And the penultimate rule, when passing, sends the source IP address (Src. Address) to the Access Address List (address-list=»Access IP»). I P will be removed from the Address List after 8 hours (address-list-timeout = 8h), this is usually enough for me.
At the very end, we need to return the ICMP request to the main chain (add action=return chain=port-knocking), where it will already receive a drop on chain=input.
Just adding this set of rules is not enough. It is necessary to arrange them correctly in the filter, among other rules, and do not forget to give the necessary access to our Address List (address-list = «Access IP»).
We place the port-knocking rules immediately above the blocking ones.
But the access rules for address-list=»Access IP» should be placed closer to the beginning, under the allowing rules for established and related connections.
Access from a remote Mikrotik RouterOS client
Everyone, after adding the task to the scheduler, we can watch how our remote router knocks on the main router every minute, if there is no ping, then it goes through all the address lists and gets into the last “Access IP” with a lifetime of 8 hours. Further, this script simply pings the remote router and while our IP is allowed, we have the necessary access.
Access from a remote Windows client
In order to get access from Windows, we create a regular BAT file. It can be created with the simplest notepad and saved as a .bat file
I.e. if our router expects a packet of 255 bytes, then we must send 227 bytes, and 28 bytes will stick to it themselves.
Access from a remote Android/iOS client
Here, in principle, everything is also simple — we install an application that allows you to “tap” ports and use the icmp protocol.
I use the «Knock on Ports» app. I tried different ones and only in this everything suited me in terms of ICMP and various parameters.
When opening the application, it is empty, press the plus button to add a new action
Enter the name, IP address issued by the provider, select the ICMP protocol. Settings change
Separately, I would like to dwell on the “ICMP packet size” setting, for some reason it is inverse here. Whether it is translated not correctly, whether it is programmed initially. I hope they will correct it, but by experience I found out that the option “with ICMP and IP headers” is just sending a request without them! Be careful.
Thanks to the commenter Alex. Small edits!
Separately, I would like to dwell on the “ICMP Packet Size” setting, it is a little misleading here.
Therefore, for a simpler interaction, it is better to focus on the option “with IP and ICMP headers”.
This is how the final result of the main adjustment looks like
This is how the final result of additional tuning looks like
Well, to check, click on the word “Knock”
An alternative to ICMP Knocking, this is Port Knocking itself
That’s basically all I wanted to show you on this topic. I hope this article was helpful and informative. Of course, there is already a lot of material on the network on Port Knocking on MikroTik, but I could not get around this topic. many do not show in what order they use these rules and how it can be put into practice even at home!
Ask questions, share opinions, discuss 🙂 I will participate to the best of my ability.
Thank you for your time!
All the best on the Internet 😉
UPD: 11/06/2019
Added a note to the Basic Firewall setting on port forwarding without the «Access IP» address sheet.
Express gratitude to the author
If you are not indifferent to the fate of the blog or you just want to thank the Author for his work, feel free to go to the Support page, all the information on how to do it is described there. Thank you in advance for this initiative!
