

- Mikrotik winbox, где скачать и как использовать
- Как подключиться к Микротик через winbox
- Рабочее окно winbox
- Вопросы, проблемы и их решения
- Микротик приложение для настройки
- Try RouterOS now by using our online demo routers
- Installing RouterOS on an x86 machine is very simple
- Virtual environments now have special treatment
- Learning more about our software
- Purchasing a license for RouterOS
- Starting Winbox
- Simple mode
- Buttons/check-boxes and Other Fields
- Advanced mode
- Command Line
- IPv6 connectivity
- Run Winbox on macOS
- Run Winbox on Linux
- Interface Overview
- Work Area and Child Windows
- Sorting out displayed items
- Customizing list of displayed columns
- Detail mode
- Category view
- Drag & Drop
- Traffic monitoring
- Item copy
- Transferring Settings
- First time startup
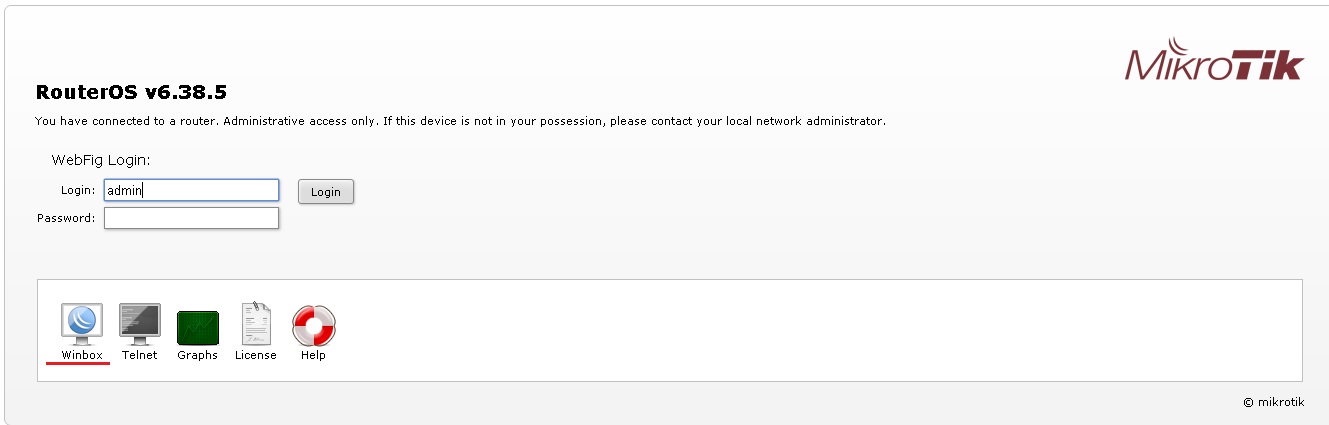
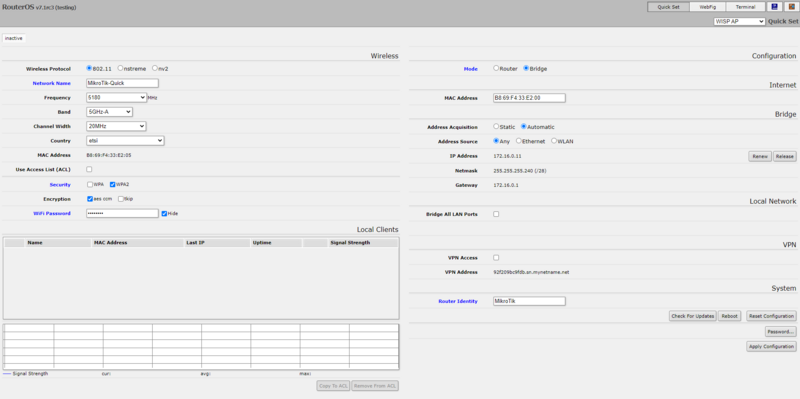
- QuickSet and WebFig
- Serial Cable
- Monitor and Keyboard
- Summary
- Wine bottler
- Homebrew
Mikrotik winbox, где скачать и как использовать
Нужно разобраться с MikroTik, но не определились с чего начать? В курсе «Настройка оборудования MikroTik» все по порядку. Подойдет и для начала работы с этим оборудованием, и для того, чтобы систематизировать знания. Это видеокурс из 162 уроков и 45 лабораторных работ, построен на официальной программе MTCNA. Проходить можно, когда удобно и пересматривать по необходимости – материалы курса выдаются бессрочно. Также есть 30 дней на личные консультации с автором. На пробу выдают 25 уроков бесплатно, заказать их можно на странице курса.
К сожалению, русского языка у приложения нет, но интерфейс интуитивно понятен, сложностей в работе не возникает. Так же работает winbox только в windows, если захотите запустить его, например под Ubuntu, то придется делать это только через wine. Для Linux утилиты winbox нет.
Как подключиться к Микротик через winbox
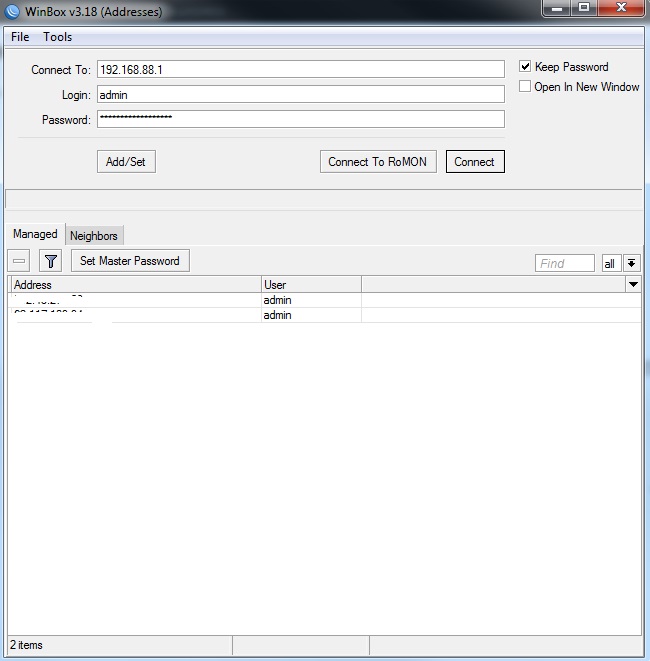
Еще одна интересная вкладка Neighbors, поиск доступных маршрутизаторов Mikrotik, при переходе на нее открывается список всех доступных в сети роутеров Микротик.

Рабочее окно winbox
После подключения к маршрутизатору, мы попадаем в рабочее окно утилиты винбокс
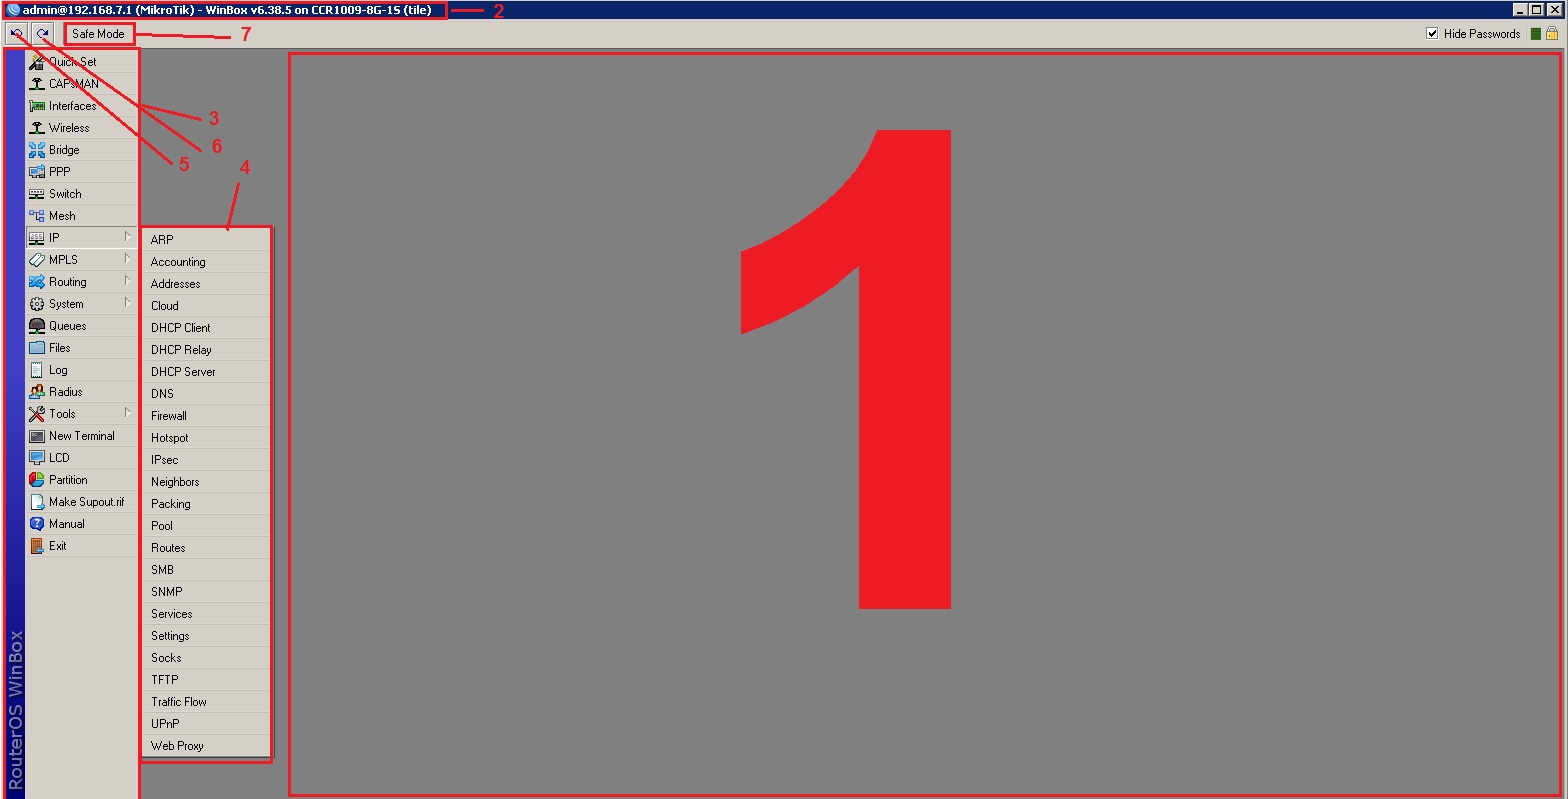
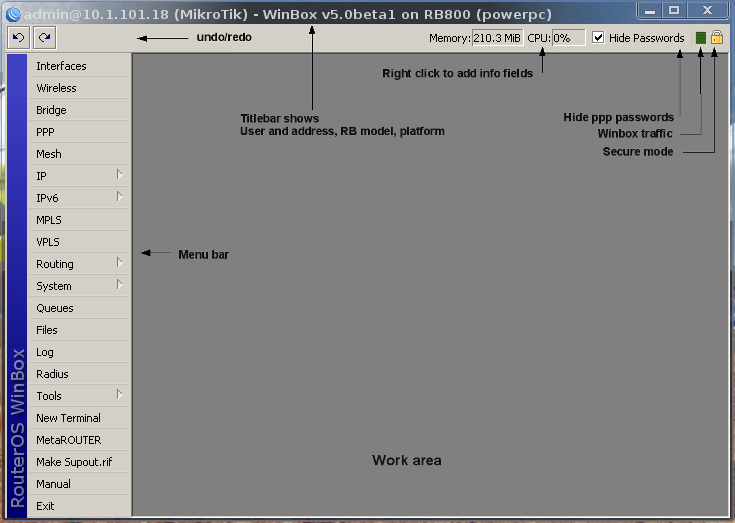
Рассмотрим основные области
1.Главное рабочее окно, здесь открываются все окна настроек. 2. информация о подключении, адрес и модель маршрутизатора 3. Основное меню 4. Подменю 5. Кнопка «назад» отменяет предыдущий шаг настройки 6. Кнопка «вперед» возвращает отмененную настройку 7. Кнопка Safe Mode безопасный режим
Safe Mode-очень полезная функция winbox для включения нажмите на кнопку «Safe Mode». Функция этой кнопки заключается в том, что при потери связи между маршрутизатором Mikrotik и программой winbox, все настройки возвращаются к настройкам до нажатия на эту кнопку. Это полезно если идет удаленная настройка роутера через интернет, если в результате настройки, имеется возможность потерять связь с маршрутизатором, тогда при потери связи настройки вернуться к исходным и можно будет подключиться к Микротику заново. Не забудьте после всех манипуляций отжать кнопку Safe Mode, иначе после отключения от роутера все сделанные настройки будут сброшены.
Вопросы, проблемы и их решения
Какой порт используется для подключения к роутеру?
Для подключения к маршрутизатору Микротик винбокс использует по умолчанию порт 8291. Этот порт можно сменить в настройках, зайдите в меню ip-services, выберите winbox,
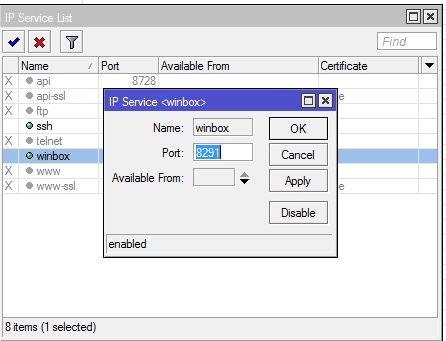
Так же можно изменить другие сервисные порты ssh, telnet, web.
Winbox не подключается к маршрутизатору.
1.Если программа не видит Микротик, проверьте не закрыт ли порт 8291, можно подключиться через web интерфейс по ssh или telnet, при подключении по ssh или telnet в консоли даем команду
и ищем строку наподобие
если такая строка имеется то даем команду
В открывшемся окне измените «drop» на «accept» и нажмите ctr^o
Цифра 2 берется из номера строки по первой команде.
2.проверьте настройку порта для винбокс, зайдите телнетом, ssh, через web интерфейс на Микротик и в ip-services проверьте настройку порта и включен ли сервис винбокс.
Телнет, ssh команда выглядет так
Что бы прописать порт 8291 введите команду
3.Попробуйте отключить все запрещающие правила в firewall. Зайдите через web интерфейс, ip-firewall, напротив каждого правила, где action=drop нажмите значок « — « удалить, или нажмите на это правило и снимите галочку enable.
Ошибка ERROR: router requires newer winbox, please upgrade
Обучающий курс по настройке MikroTik
Если вы нашли ошибку, пожалуйста, выделите фрагмент текста и нажмите Ctrl+Enter.
Микротик приложение для настройки
It can also be installed on a PC and will turn it into a router with all the necessary features — routing, firewall, bandwidth management, wireless access point, backhaul link, hotspot gateway, VPN server and more.
You can compare the different license Level features on this page in our manual.
Try RouterOS now by using our online demo routers
You can also open the web configuration interface in your web browser: demo.mt.lv and demo2.mt.lv

Installing RouterOS on an x86 machine is very simple
PC: Download the ISO image, burn it to CD and boot from it. Your new router will run for 24 hours without a license (turn it off to stop the timer). During this time you can try all the features of RouterOS.
Other x86: Netinstall will write RouterOS to any secondary drive you have attached to your Windows PC. Move the drive to your Router PC and boot it.
Both installation methods, plus upgrade files and more — on our download page.

Virtual environments now have special treatment
CHR, short for Cloud Hosted Router, is a new approach specifically made for Virtual Machines both locally and in the cloud. Optimised drivers, a new and more affordable licensing scheme, transferable licenses and more.

Learning more about our software
Also our technical support team will try to answer your questions, and our trained consultants will help you configure your routers.

Purchasing a license for RouterOS
To use RouterOS after the free trial, a license key is required. You can obtain license keys in the MikroTik Account server. If you don’t have an account yet, click on «New Account» there in the top-right corner of this page.
When purchasing the license, a SoftID number will be asked — this can be copied from the router’s License menu.
To view license key level differences, see the comparison table.
Программа может похвастаться следующими функциями и особенностями:
Уже было упомянуто про недружелюбность интерфейса, но теперь взглянем на это с другой стороны. Множество разных строчек и таблиц с изменяемыми (просто вдумайтесь) данными. Настройку можно без преувеличения назвать ювелирной. Работе с этой программой сперва нужно научиться. Хорошо, что разработчики предоставили возможность обучения на бесплатной основе. Однако пользователи редко нуждаются в столь точной настройке своих беспроводных сетей. И напомню, Winbox подходит только для маршрутизаторов от компании MikroTik. Обучение вовсе не универсально, а в современных реалиях, компании создают свои аналоги программного обеспечения для своих роутеров, которые могут быть и в разы проще или же работать по иным, сложным схемам.
Категория Администрирование сетей
Скачиваний 769 раз
- Winbox.exe is signed with an Extended Validation certificate, issued by SIA Mikrotīkls (MikroTik).
- WinBox uses ECSRP for key exchange and authentication (requires a new Winbox version).
- Both sides verify that the other side knows the password (no man in the middle attack is possible).
- Winbox in RoMON mode requires that the agent is the latest version to be able to connect to the latest version routers.
- Winbox uses AES128-CBC-SHA as an encryption algorithm (requires Winbox version 3.14 or above).
Starting Winbox
Winbox loader can be downloaded from the MikroTik download page. When winbox.exe is downloaded, double click on it, and the Winbox loader window will pop up. There are two Winbox loader modes: simple which is enabled by default and advanced.
Simple mode
When you open Winbox loader for the first time simple mode layout will be used:
It is recommended to use an IP address whenever possible. MAC session uses network broadcasts and is not 100% reliable.
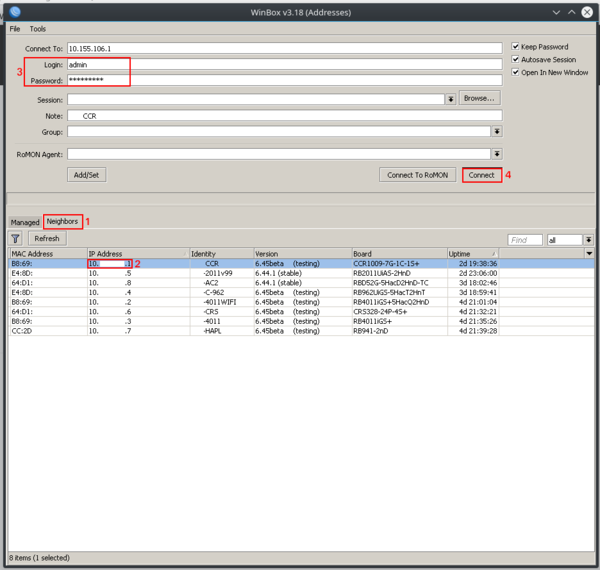
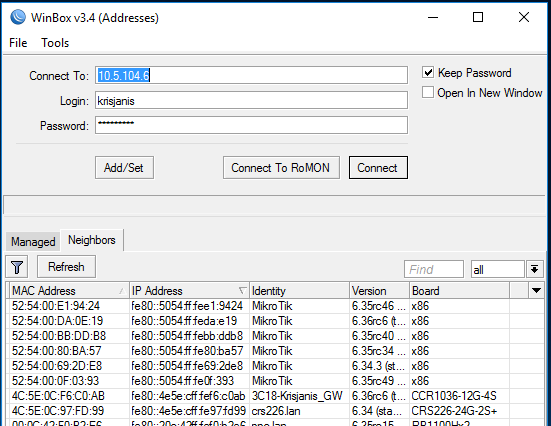
You can also use neighbor discovery, to list available routers use the Neighbors tab:
From the list of discovered routers, you can click on the IP or MAC address column to connect to that router. If you click on IP address then IP will be used to connect, but if you click on MAC Address then the MAC address will be used to connect to the router.
Buttons/check-boxes and Other Fields
- Connect — Connect to the router
- Connect To RoMON — Connect to RoMON Agent
- Open In New Window — Leaves loader open in the background and opens new windows for each device to which connection is made.
- Connect To: — destination IP or MAC address of the router
- Password — password used for authentication
- Keep Password — if unchecked, the password is not saved to the list
- File New — Create a new managed router list in a specified locationOpen — Open managed router list fileSave As — Save current managed router list to fileExit — Exit Winbox loader
- New — Create a new managed router list in a specified location
- Open — Open managed router list file
- Save As — Save current managed router list to file
- Exit — Exit Winbox loader
- Tools Advanced Mode — Enables/Disables advanced mode viewImport — Imports saved session fileExport — Exports saved session fileMove Session Folder — Change path where session files are storedClear cache — Clear Winbox cacheCheck For Updates — Check for updates for Winbox loader
- Advanced Mode — Enables/Disables advanced mode view
- Import — Imports saved session file
- Export — Exports saved session file
- Move Session Folder — Change path where session files are stored
- Clear cache — Clear Winbox cache
- Check For Updates — Check for updates for Winbox loader
Advanced mode
- Browse — Browse file directory for some specific session
- Keep Password — if unchecked, the password is not saved to the list
- Secure mode — if checked, Winbox will use DH-1984 for key exchange and modified and hardened RC4-drop3072 encryption to secure the session.
- Autosave session — Saves sessions automatically for devices to which connections are made.
- Session — Saved router session.
- Note — Note that is assigned to save router entry.
- Group — Group to which saved router entry is assigned.
- RoMON Agent — Select RoMON Agent from the available device list
Managed routers list is encrypted, but it can still be loaded in other Winbox without problems IF the master password is not set for it!
Command Line
For example (with no password):
IPv6 connectivity
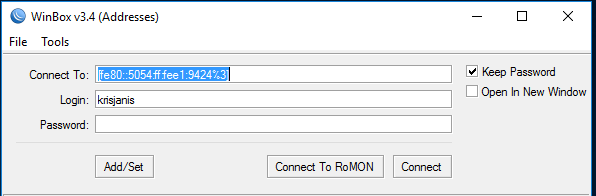
Winbox supports IPv6 connectivity. To connect to the router’s IPv6 address, it must be placed in square braces the same as in web browsers when connecting to the IPv6 server. Example:
when connecting to the link-local address interface index must be entered after the %:
Port number is set after the square brace when it is necessary to connect Winbox to other port than the default:
Winbox neighbor discovery is capable of discovering IPv6 enabled routers. There are two entries for each IPv6 enabled router, one entry is with IPv4 address and another one with IPv6 link-local address. You can easily choose which one you want to connect to.
Run Winbox on macOS
Starting with macOS 10.15 Catalina, Apple has removed support for 32bit applications, meaning it is no longer possible to use regular Wine and regular Winbox in this OS. Wine has made available a 64bit version for macOS, and MikroTik has released a special Winbox64.exe version as well.
Run Winbox on Linux
It is possible to run Winbox on Linux by using Wine emulation software. Make sure that the Microsoft font pack is installed, otherwise, you may see distortions.
Interface Overview
- The menu bar on the left — list of all available menus and sub-menus. This list changes depending on what packages are installed. For example, if the IPv6 package is disabled, then the IPv6 menu and all its sub-menus will not be displayed.
- Work area — an area where all menu windows are opened.

On the Main toolbar’s left side is located:
- undo
- redo
- Safe Mode
- Currently loaded session
More about Safe mode and undoing performed actions read in this article.
On the right side is located:
- an indicator that shows whether the Winbox session uses encryption
- Winbox traffic indicator displayed as a green bar,
Work Area and Child Windows
Winbox has an MDI interface meaning that all menu configuration (child) widows are attached to the main (parent) Winbox window and is showed in the work area.

Child windows can not be dragged out of the working area. Notice in the screenshot above that the Interface window is dragged out of the visible working area and a horizontal scroll bar appeared at the bottom. If any window is outside visible work area boundaries the vertical or/and horizontal scrollbars will appear.
Each child window has its own toolbar. Most of the windows have the same set of toolbar buttons:
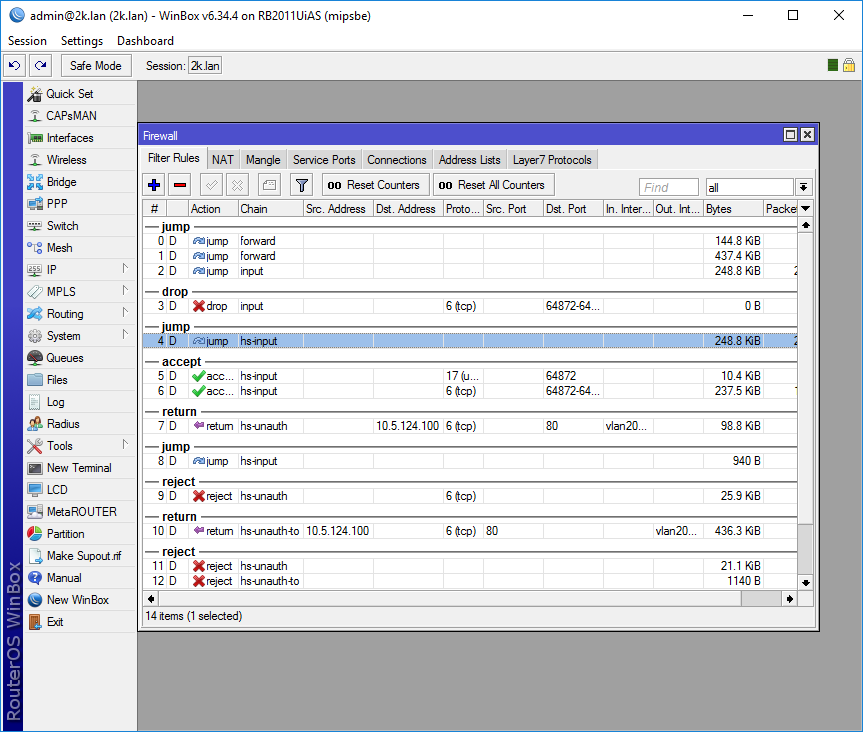
Almost all windows have a quick search input field on the right side of the toolbar. Any text entered in this field is searched through all the items and highlighted as illustrated in the screenshot below

Notice that on the right side next to the quick find input filed there is a drop-down box. For the currently opened (IP Route) window, this drop-down box allows to quickly sort out items by routing tables. For example, if the main is selected, then only routes from the main routing table will be listed. A similar drop-down box is also in all firewall windows to quickly sort out rules by chains.
Sorting out displayed items
Almost every window has a Sort button. When clicking on this button several options appear as illustrated in the screenshot below

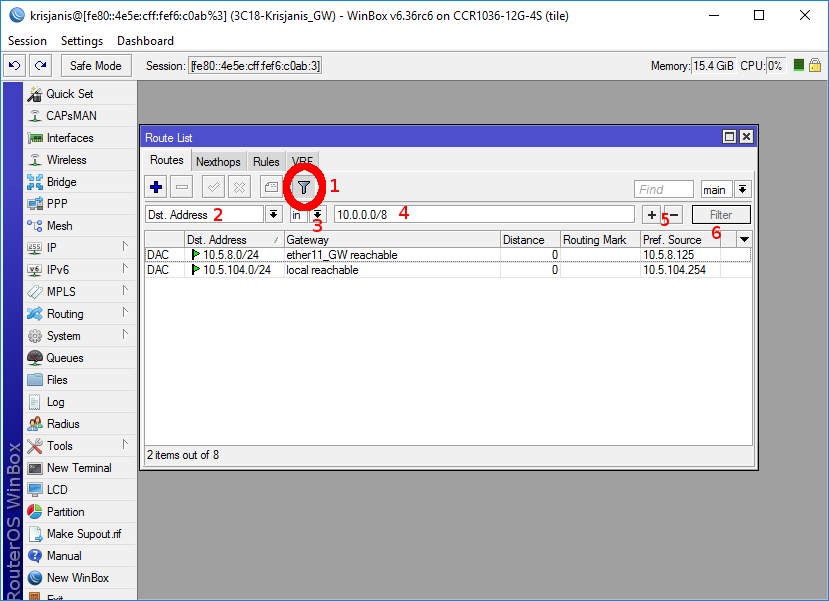
The example shows how to quickly filter out routes that are in the 10.0.0.0/8 range
- Press Sort button
- Chose Dst.Address from the first drop-down box.
- Chose in form the second drop-down box. «in» means that filter will check if DST address value is in range of the specified network.
- Enter the network against which values will be compared (in our example enter «10.0.0.0/8»)
- These buttons are to add or remove another filter to the stack.
- Press the Filter button to apply our filter.
As you can see from the screenshot Winbox sorted out only routes that are within the 10.0.0.0/8 range.
Comparison operators (Number 3 in the screenshot) may be different for each window. For example «Ip Route» window has only two is and in. Other windows may have operators such as «is not», «contains», «contains not».
Winbox allows building a stack of filters. For example, if there is a need to filter by destination address and gateway, then
- set the first filter as described in the example above,
- set up a second filter to filter by the gateway
- press the Filter button to apply filters.
Customizing list of displayed columns
By default, Winbox shows the most commonly used parameters. However sometimes it is needed to see other parameters, for example, «BGP AS Path» or other BGP attributes to monitor if routes are selected properly.
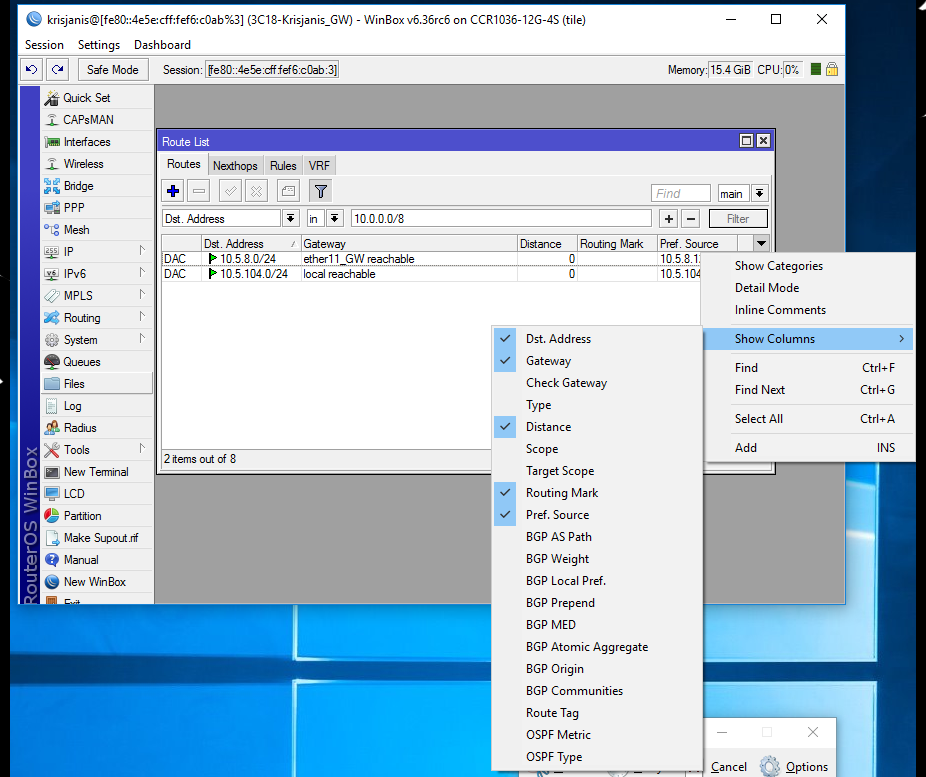
Winbox allows to customize displayed columns for each individual window. For example to add BGP AS path column:
- Click on the little arrow button (1) on the right side of the column titles or right mouse click on the route list.
- From popped up menu move to Show Columns (2) and from the sub-menu pick the desired column, in our case click on BGP AS Path (3)

Changes made to window layout are saved and next time when Winbox is opened the same column order and size are applied.
Detail mode
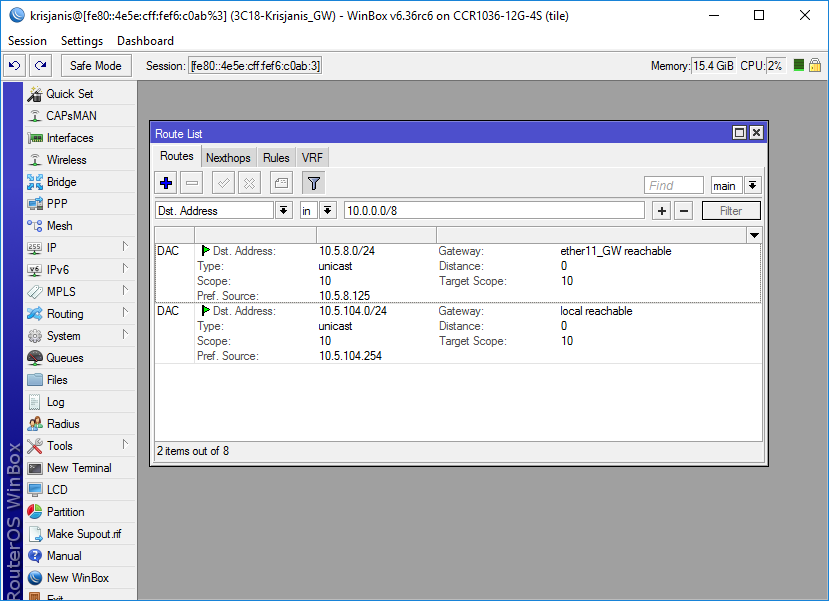
It is also possible to enable Detail mode. In this mode all parameters are displayed in columns, the first column is the parameter name, the second column is the parameter’s value.
To enable detail mode right mouse click on the item list and from the popup menu pick Detail mode

Category view
It is possible to list items by categories. In this mode, all items will be grouped alphabetically or by another category. For example, items may be categorized alphabetically if sorted by name, items can also be categorized by type like in the screenshot below.
To enable Category view, right mouse click on the item list and from the popup menu pick Show Categories

Drag & Drop
It is possible to upload and download files to/from the router using Winbox drag & drop functionality. You can also download the file by pressing the right mouse button on it and selecting «Download».
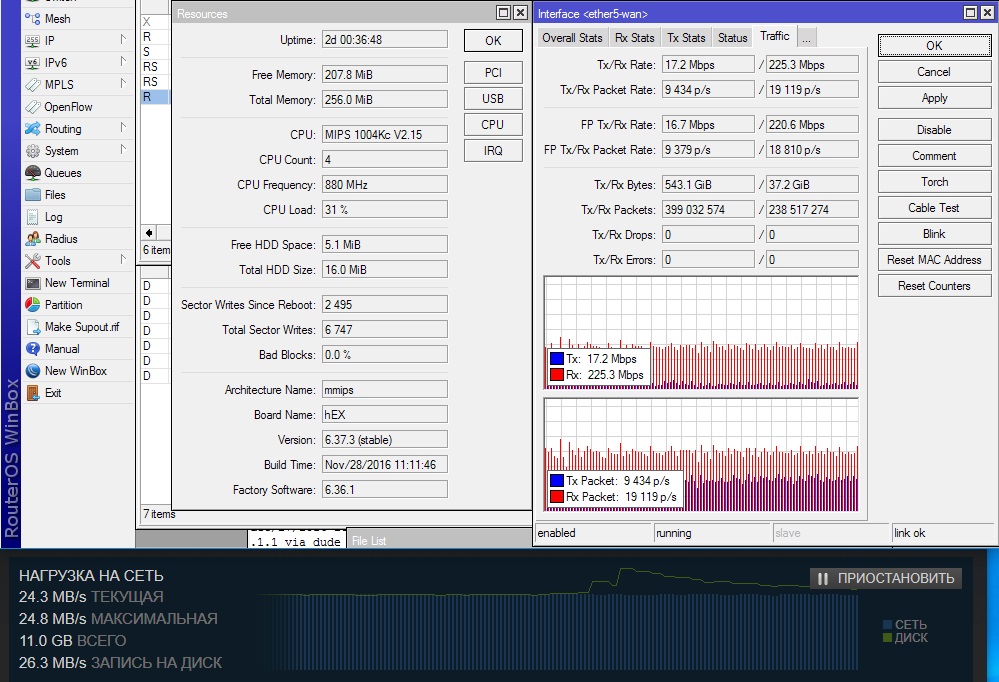
Traffic monitoring
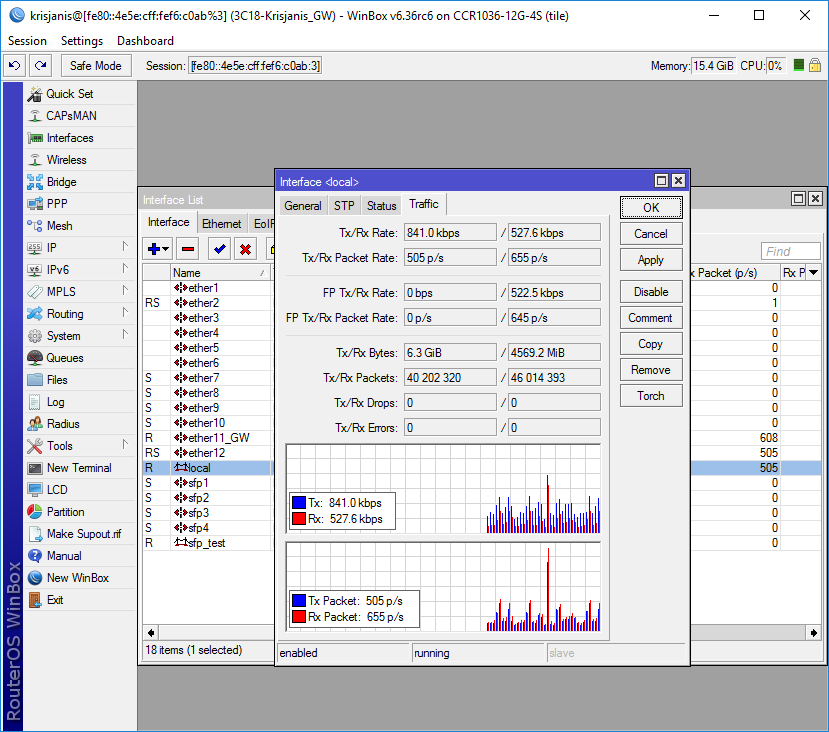
Winbox can be used as a tool to monitor the traffic of every interface, queue, or firewall rule in real-time. The screenshot below shows Ethernet traffic monitoring graphs.

Item copy
This shows how easy it is to copy an item in Winbox. In this example, we will use the COPY button to make a Dynamic PPPoE server interface into a Static interface.
This image shows us the initial state, as you see DR indicates «D» which means Dynamic:

Double-Click on the interface and click on COPY:

A new interface window will appear, a new name will be created automatically (in this case pppoe-in1)

After this Down/Up event this interface will be Static:

Transferring Settings
Make sure that the Windows firewall is set to allow Winbox connections or disable the windows firewall.
Windows (7/8) does not allow mac connection if file and print sharing is disabled.
Most of the network drivers will not enable IP stack unless your host device has an IP configuration. Set IPv4 configuration on your host device.
Sometimes the device will be discovered due to caching, but MAC connection will still fail with «ERROR: could not connect to XX:XX:XX:XX:XX:XX
First time startup

Applies to RouterOS: All
After you have installed the RouterOS software, or turned on the Router for the first time, there are various ways how to connect to it:
- Accessing Command Line Interface (CLI) via Telnet, SSH, serial cable or even keyboard and monitor if your router has a VGA card.
- Accessing Web based GUI (WebFig)
- Using the WinBox configuration utility (Windows app, compatible with Wine)
Additional configuration may be set depending on RouterBOARD model. Most models have the ether1 configured as a WAN port and any communication with the router through that port is not possible, since it is firewalled to protect from any outside access. List of RouterBOARD models and their default configurations can be found in this article.
Winbox is a configuration utility that can connect to the router via MAC or IP protocol. Latest winbox version can be downloaded from our download page.
Connecting to a device
1) Run the Winbox utility
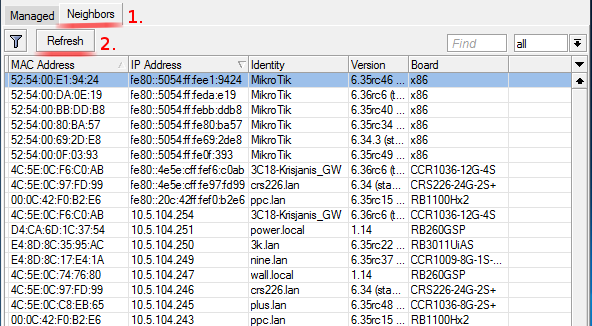
2) Navigate to «Neighbors»
3) See if Winbox finds your Router and it’s MAC address
Info: Winbox neighbor discovery will discover all routers on the broadcast network
4) If you see your router on the list, connect to it by clicking on IP/MAC address and pressing Connect button
Winbox will try download plugins from the router, if it is connecting for the first time to the router with current version.
Note that it may take up to one minute to download all plugins if winbox is connected with MAC protocol
5) After winbox have successfully downloaded plugins and authenticated, main window will be displayed:
If winbox cannot find any routers, make sure that:
- ) Your Windows computer is directly connected to the router with an Ethernet cable or they are in the same broadcast domain
- ) As MAC connection works on Layer2, it is possible to connect to the router even without proper IP address configuration, but might be required due to most driver not enabling IP stack if there is no IPv4 configuration.
Due to the use of broadcasting MAC connection is not stable enough to use continuously, therefore it is not wise to use it on a real production / live network!. MAC connection should be used only for initial configuration.
QuickSet and WebFig
There are several ways how to access CLI:
- Winbox terminal menu
- Telnet
- SSH
- serial cable etc.
Serial Cable
If your device has a Serial port, you can use a console cable (or Null modem cable)
RouterBOARD 230 parameters are:
Detailed description of CLI login is in login process section.
Monitor and Keyboard
If your device has a graphics card (ie. regular PC) simply attach a monitor to the video card connector of the computer (note: RouterBOARD products don’t have this, so use Method 1 or 2) and see what happens on the screen. You should see a login promt like this:
Now you can start configuring the router, by issuing the setup command.
This method works with any device that has a video card and keyboard connector
Summary
- Winbox.exe is signed with an Extended Validation certificate, issued by SIA Mikrotīkls (MikroTik).
- WinBox uses ECSRP for key exchange and authentication (requires new winbox version).
- Both sides verify that other side knows password (no man in the middle attack is possible).
- Winbox in RoMON mode requires that agent is the latest version to be able to connect to latest version routers.
- Winbox uses AES128-CBC-SHA as encryption algorithm (requires winbox version 3.14 or above).
Winbox loader can be downloaded from the mikrotik download page. When winbox.exe is downloaded, double click on it and winbox loader window will pop up:
Note: It is recommended to use IP address whenever possible. MAC session uses network broadcasts and is not 100% reliable.
You can also use neighbor discovery, to list available routers use Neighbors tab:
From list of discovered routers you can click on IP or MAC address column to connect to that router. If you click on IP address then IP will be used to connect, but if you click on MAC Address then MAC address will be used to connect to the router.
Note: Neighbor discovery will show also devices which are not compatible with Winbox, like Cisco routers or any other device that uses CDP (Cisco Discovery Protocol). If you will try to connect to SwOS device, then connection will be established through web browser
Description of buttons and fields of loader screen
- Connect — Connect to the router
- Connect To RoMON — Connect to RoMON Agent
- Open In New Window — Leaves loader open in background and opens new windows for each device to which connection is made.
- Connect To: — destination IP or MAC address of the router
- Password — password used for authentication
- Keep Password — if unchecked, password is not saved to the list
- Browse — Browse file directory for some specific session
- Keep Password — if unchecked, password is not saved to the list
- Secure mode — if checked, winbox will use DH-1984 for key exchange and modified and hardened RC4-drop3072 encryption to secure session.
- Autosave session — Saves sessions automatically for devices to which connection are made.
- Session — Saved router session.
- Note — Note that is assigned to save router entry.
- Group — Group to which saved router entry is assigned.
- RoMON Agent — Select RoMON Agent from available device list
Description of menu items in loader screen
- New — Create new managed router list in specified location
- Open — Open managed router list file
- Save As — Save current managed router list to file
- Exit — Exit Winbox loader
- Advanced Mode — Enables/Disables advanced mode view
- Import — Imports saved session file
- Export — Exports saved session file
- Move Session Folder — Change path where session files are stored
- Clear cache — Clear winbox cache
- Check For Updates — Check for updates for Winbox loader
Warning: Managed routers list is not encrypted by default. To encrypt it, set the master password!
Winbox supports IPv6 connectivity. To connect to the routers IPv6 address, it must be placed in square braces the same as in web browsers when connecting to IPv6 server. Example:
Winbox neighbor discovery is now capable of discovering IPv6 enabled routers. As you can see from the image below, there are two entries for each IPv6 enabled router, one entry is with IPv4 address and another one with IPv6 link-local address. You can easily choose to which one you want to connect:
Wine is a software that allows you to run Windows executable files on macOS. Install latest Wine software from the official Wine HQ homepage, during installation you must check the «64 bit» checkbox, so that it can operate in macOS Catalina and newer. Then, you will have to launch Winbox 64bit version using this command line:
Change the command according to where you installed Wine and where you have put the Winbox64 executable. This is the easiest and most reliable way to run Winbox on new macOS versions.
Wine bottler
For older macOS versions, It is possible to use Winbox in Apple macOS operating system by using Wine emulation software. For easier use it can be combined with WineBottler software to create a more convenient executable.
Homebrew
Also for older macOS versions, If the bottled version does not work, you can use Homebrew to install Wine and then launch the regular Winbox.exe file from our download page
- Xcode latest version. If you have Xcode 9-beta, delete Xcode 8 first, then rename the Beta to «Xcode».
- Homebrew
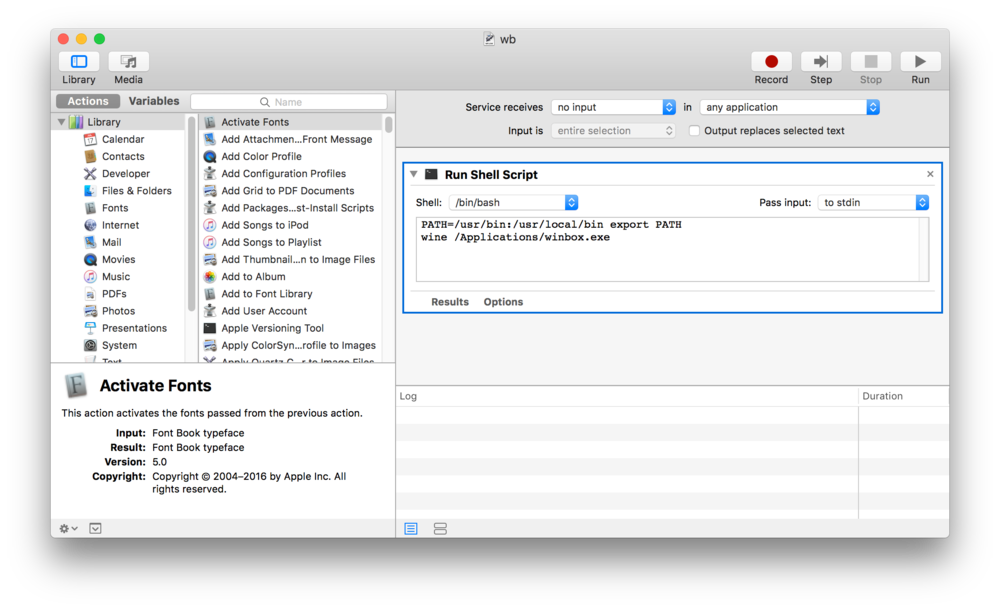
If you’d like to create a launcher in MacOS, to avoid launching Wine from the Terminal, you can do it with Automator and save the result as a service or as an app. This is an example setup:
- Menu bar on the left — list of all available menus and sub-menus. This list changes depending on what packages are installed. For example if IPv6 package is disabled, then IPv6 menu and all it’s sub-menus will not be displayed.
- Work area — area where all menu windows are opened.
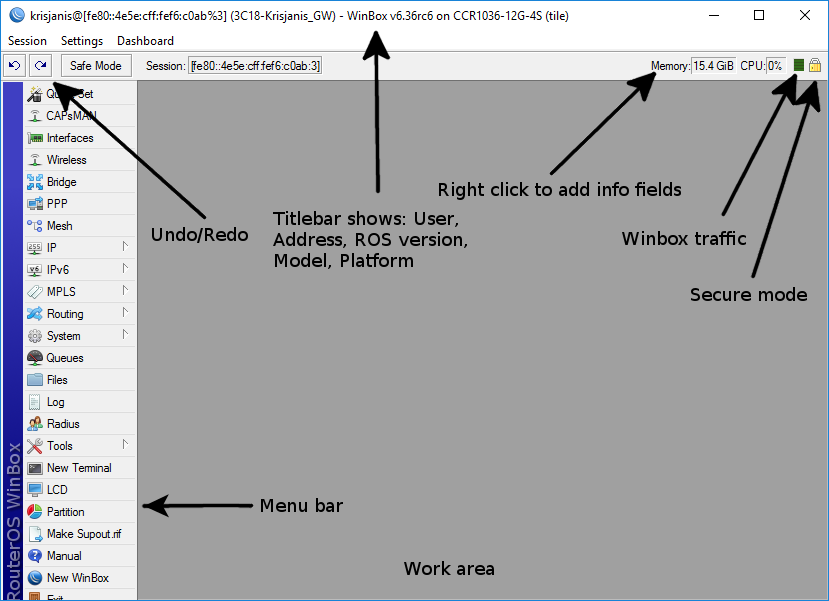
On the Main toolbar’s left side is located undo and redo buttons to quickly undo any changes made to configuration. On the right side is located:
- winbox traffic indicator displayed as a green bar,
- indicator that shows whether winbox session uses encryption
Winbox has MDI interface meaning that all menu configuration (child) widows are attached to main (parent) Winbox window and are showed in work area.
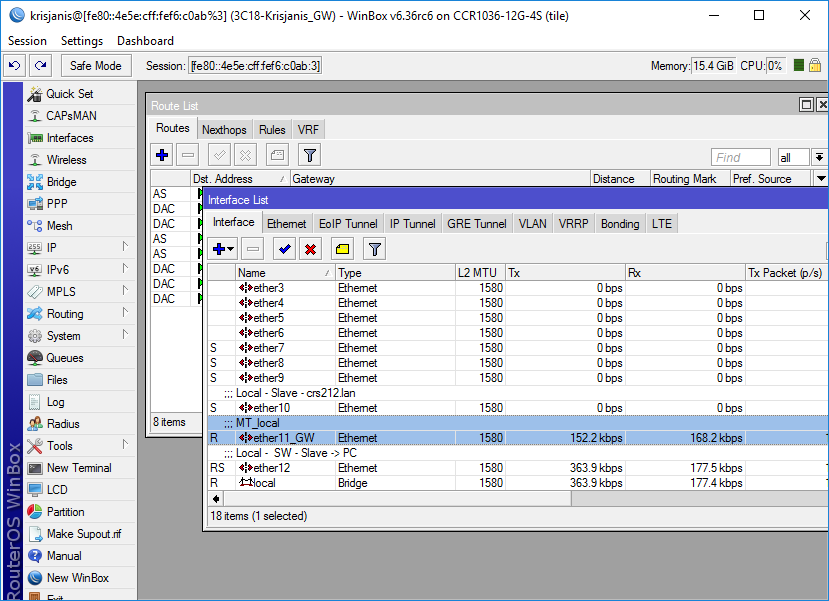
Child windows can not be dragged out of working area. Notice in screenshot above that Interface window is dragged out of visible working area and horizontal scroll bar appeared at the bottom. If any window is outside visible work area boundaries the vertical or/and horizontal scrollbars will appear.
Almost all windows have quick search input field at the right side of the toolbar. Any text entered in this field is searched through all the items and highlighted as illustrated in screenshot below
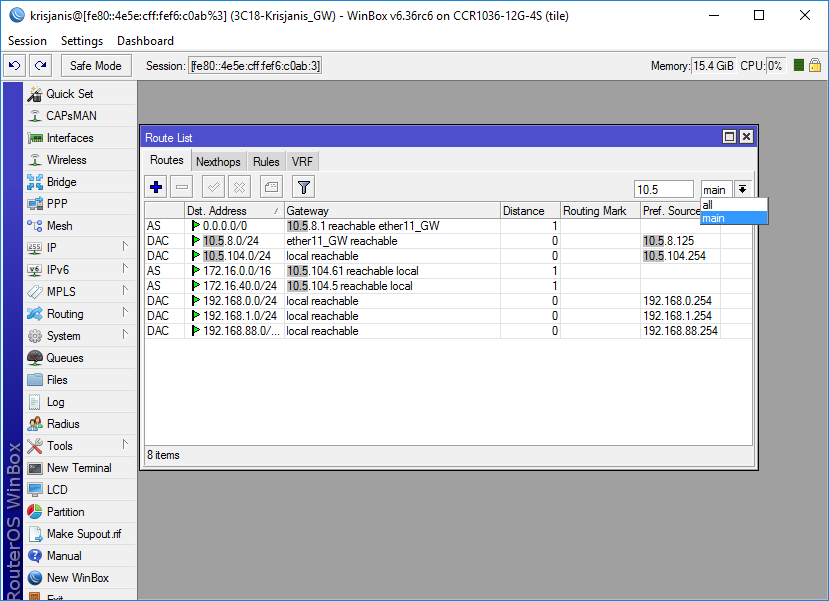
Notice that at the right side next to quick find input filed there is a dropdown box. For currently opened (IP Route) window this dropdown box allows to quickly sort out items by routing tables. For example if main is selected, then only routes from main routing table will be listed. Similar dropdown box is also in all firewall windows to quickly sort out rules by chains.
Almost every window has a Sort button. When clicking on this button several options appear as illustrated in screenshot below
Example shows how to quickly filter out routes that are in 10.0.0.0/8 range
- Press Sort button
- Chose Dst.Address from the first dropdown box.
- Chose in form the second dropdown box. «in» means that filter will check if dst address value is in range of specified network.
- Enter network against which values will be compared (in our example enter «10.0.0.0/8»)
- These buttons are to add or remove another filter to the stack.
- Press Filter button to apply our filter.
As you can see from screenshot winbox sorted out only routes that are within 10.0.0.0/8 range.
Comparison operators (Number 3 in screenshot) may be different for each window. For example «Ip Route» window has only two is and in. Other windows may have operators such as «is not», «contains», «contains not».
Winbox allows to build stack of filters. For example if there is a need to filter by destination address and gateway, then
- set first filter as described in example above,
- set up seconf filter to filter by gateway
- press Filter button to apply filters.
By default winbox shows most commonly used parameters. However sometimes it is needed to see another parameters, for example «BGP AS Path» or other BGP attributes to monitor if routes are selected properly.
- Click on little arrow button (1) on the right side of the column titles or right mouse click on the route list.
- From popped up menu move to Show Columns (2) and from the sub-menu pick desired column, in our case click on BGP AS Path (3)
Changes made to window layout are saved and next time when winbox is opened the same column order and size is applied.
It is also possible to enable Detail mode. In this mode all parameters are displayed in columns, first column is parameter name, second column is parameter’s value.
To enable detail mode right mouse click on the item list and from the popupmenu pick Detail mode
It is possible to list items by categories. In tis mode all items will be grouped alphabetically or by other category. For example items may be categorized alphabetically if sorted by name, items can also be categorized by type like in screenshot below.
To enable Category view, right mouse click on the item list and from the popupmenu pick Show Categories
It is possible to upload and download files to/from router using winbox drag & drop functionality. You can also download file by pressing right mouse button on it and selecting «Download».
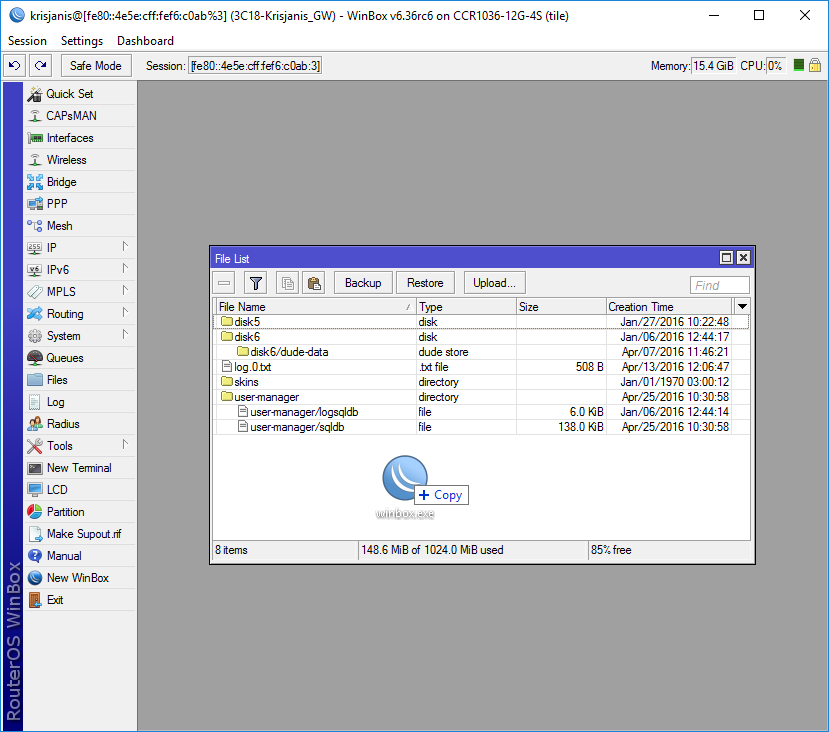
Note: Drag & Drop does not work if winbox is running on Linux using wine. This is not a winbox problem, wine does not support drag & drop.
Winbox can be used as a tool to monitor traffic of every interface, queue or firewall rule in real-time. Screenshot below shows ethernet traffic monitoring graphs.

Всепогодная точка доступа BaseBox 2 с установленной радиокартой на борту, при необходимости можно установить ещё одну через разъем miniPCIe. Высокопроизводительный процессор Atheros AR9342 модели работает на частоте 600 МГц и в связке с 64 МБ ОЗУ типа DDR2.
Чтобы раскрыть возможности стандарта 802.11n, сетевой интерфейс точки доступа содержит гигабитный ethernet порт защищённый от ESD до 16 кВ, так и мощный WiFi модуль.
В случае установки дополнительного модуля, в точке доступа есть 3 продуманных отверстия для выходов кабелей. В этом случае позволит работать точке доступа сразу в 2-х диапазонах, в разъем miniPCIe можно вставить дополнительный WiFi модуль или 3G/4G радиокарту. Крепкий корпус можно открыть без инструментов, а внутренние абсолютно компоненты защищены. Все порты точки доступа расположены в нижней части корпуса.
Фирменная операционная система RouterOS с лицензией Level 4 позволяет использовать устройство в качестве:
- точки доступа (в режиме PtMP)
- клиентского устройства (в режиме PtMP)
- любой из двух сторон в беспроводном мосте (в режиме PtP).
