
- Overview
- Overview
- Background
- Overview
- Systems / Architecture Diagram
- Навигация по записям
- Why?
- Proxmox
- Terraform
- Puppet
- Kubernetes
- What this will be running on
- Setting up Proxmox and cloud-init
- Setup cloud-init template
- Download your preferred Linux Cloud image
- Create Virtual Machine, then configuring to use as template
- Test it (optional)
- Next Steps
- Resources
- Usage
- Verify
- Добавляем новое хранилище в Proxmox
- Download a base Debian cloud image
- Create a Proxmox VM using the image
- Youtube Video Link
- #1 – Install Terraform
- #2 – Determine Authentication Method (use API keys)
- 3 – Terraform basic information and provider installation
- 4 – Develop Terraform plan
- 5 – Terraform plan (official term for “what will Terraform do next”)
- Troubleshooting
- Check the Proxmox API
- Proxmox: VM wont stop
- Last – Removing the test VM
- Youtube Video Link
- #1 – Downloading the base Ubuntu image
- #2 – Install packages
- #3 – Create a Proxmox virtual machine using the newly modified image
- #4 – Convert VM to a template
- #5 – Clone the template into a full VM and set some parameters
- #6 – automating the process
- #6.5 – Shell script to create template
- #7-8 – Using this template with Terraform to automate VM creation
- References
- My original notes
- Создаём виртуальную машину
- 6 – Execute the Terraform plan and watch the VMs appear!
- Настраиваем автозапуск
- Proxmox Host Setup
- User API Token
- Cloud image + Customizations
- How to get the latest link to use with wget
- How to download an image directly to ProxMox server
- Table of Contents
- Настройка дисковых накопителей
- Create VMs from cloud-init template
- Ansible Playbooks
- Run Playbooks
- Background for why I wanted to make a Proxmox Ubuntu cloud-init image
- Conclusion
Overview
- Install Terraform
- Determine authentication method for Terraform to interact with Proxmox (user/pass vs API keys)
- Terraform basic initialization and provider installation
- Develop Terraform plan
- Terraform plan
- Run Terraform plan and watch the VMs appear!
Overview
The quick summary for this tutorial is:
- Download a base Ubuntu cloud image
- Install some packages into the image
- Create a Proxmox VM using the image
- Convert it to a template
- Clone the template into a full VM and set some parameters
- Automate it so it runs on a regular basis (extra credit)?
- ???
- Profit!
Background
I’d like to learn Kubernetes and DevOps. A Kubernetes cluster requires at least 3 VMs/bare metal machines. In my last post, I wrote about how to create a Ubuntu cloud-init template for Proxmox. In this post, we’ll take that template and use it to deploy a couple VMs via automation using Terraform. If you don’t have a template, you need one before proceeding.
В предыдущей статье мы выполняли установку системы виртуализации Proxmox Virtual Environment. Теперь сделаем необходимые настройки и создадим виртуальную машину.

Забегая вперёд, скажем, что Proxmox готов к созданию новых ВМ сразу же после установки. Но, несмотря на это, рекомендуется выполнить ряд предварительных настроек. Если вы это сделаете, управлять системой будет легче. На самом деле, практика показывает, что виртуальные машины и гипервизор лучше разнести по разным физическим носителям. Об этом и поговорим.
Overview
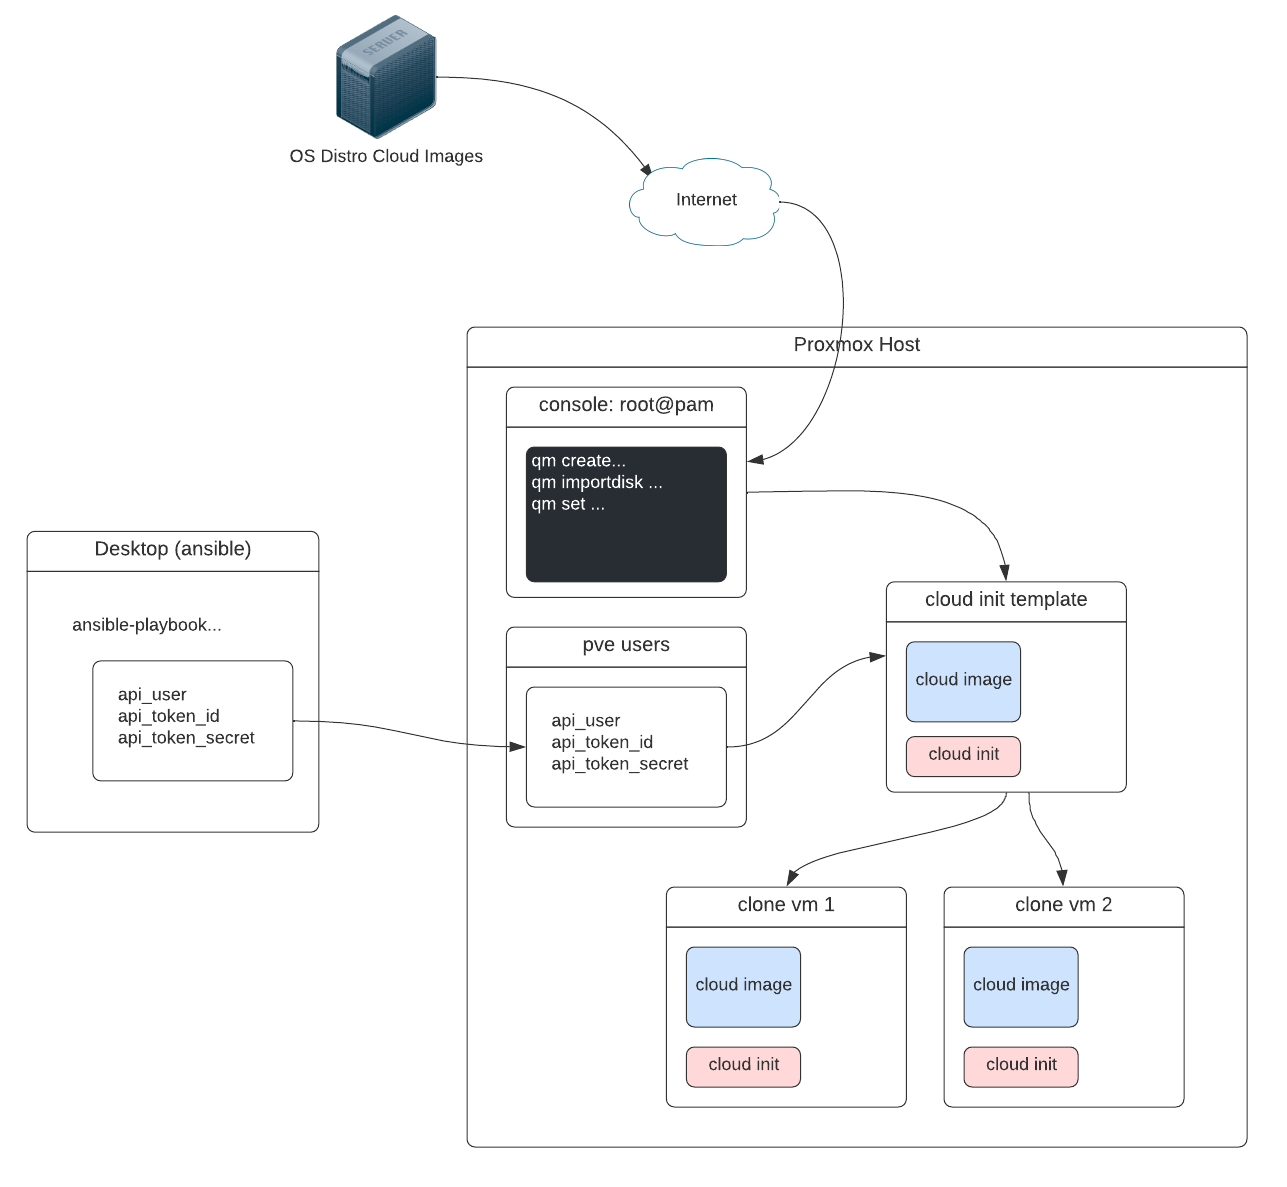
Basically what we’re trying to setup is a Proxmox Host that can run Ansible playbooks against to create cloud-init enabled virtual machines from a pre-made template we source from official cloud sources.
Systems / Architecture Diagram
- Ansible desktop client running
ansible-playbookwith proxmox user api token credentials - a console session as
[email protected]user which sources an official cloud image and create a cloud-init enabled template from it - the playbook successfully creates
clone vm 1andclone vm 2from the template.
Cloud-Init is the de facto multi-distribution package that handles early initialization of a virtual machine instance. When the VM starts for the first time, the Cloud-Init software inside the VM will apply those settings.
Debian doesn’t provide a special image for this use case, but the Debian images designed for OpenStack/Cloud come with Cloud-Init support. Check out the Proxmox’s documentation for details on how Proxmox’s Cloud-Init support works.
Как быстро разворачивать машины в Proxmox на примере Ubuntu
Переходим на сайт https://cloud-images.ubuntu.com/, откуда копируем ссылку на нужный дистрибутив в формате *amd64.img и скачиваем на proxmox
cd /tmp
wget https://cloud-images.ubuntu.com/focal/current/focal-server-cloudimg-amd64.img
Создаем машину без диска
qm create 9000 --memory 2048 --net0 virtio,bridge=vmbr0 --agent 1Конвертируем образ дистрибутива в диск
qm importdisk 9000 focal-server-cloudimg-amd64.img local-lvmПрикрепляем на созданную машину
qm set 9000 --scsihw virtio-scsi-pci --scsi0 local-lvm:vm-9000-disk-0qm set 9000 --ide2 local-lvm:cloudinitСтавим загрузку с scsi0
qm set 9000 --boot c --bootdisk scsi0Теперь внесем настройки и запустим
Установим qemu-guest-agent и выключим машину. Если вы скачали свежий образ, apt update && apt upgrade можно не делать.
apt-get install qemu-guest-agent
shutdown -h now
Делаем из машины шаблон
qm template 9000Теперь ее можно клонировать и изменять параметры до и после запуска. Обратите внимание на имя, оно прописывается в hostname клонированной машины.
qm clone 9000 123 --name ubuntu2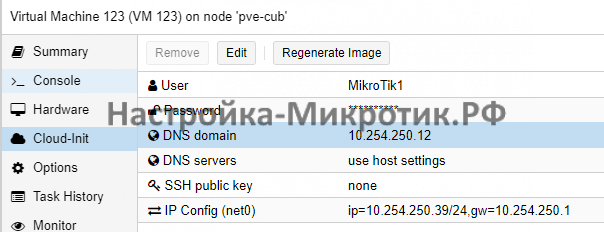
Меняем IP, пользователя и и.д. Пользователь из шаблона останется, его нужно удалять вручную.
По паролю можно авторизоваться только локально, по этому добавляйте SSH ключ.
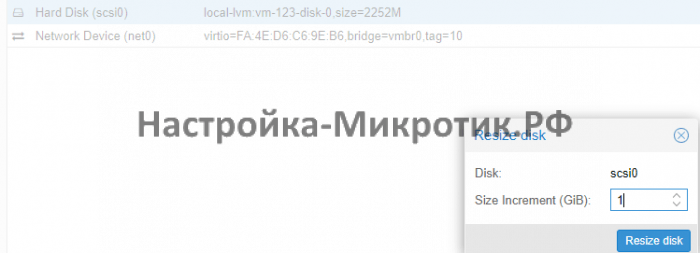
Так же сразу добавьте места на диске:
Not too long ago I wrote about using Packer to build VM templates for Proxmox and created a Github project with the files. In the end I provided basic information on how to setup cloud-init within the Proxmox GUI. This time we’re going to dive a bit deeper into using cloud-init within Proxmox and customize it as needed.
To start, I am using a VM template created from the tools uploaded to Github. No matter what you do, you must start with a base OS or image that has cloud-init installed into it and has not been initialized previously. If you are manually creating your OS images and are not sure if cloud-init has run you can reset it by issuing cloud-init clean -l. This will reset the cloud-init system and remove all of the logs. The next time the system boots it will run again.
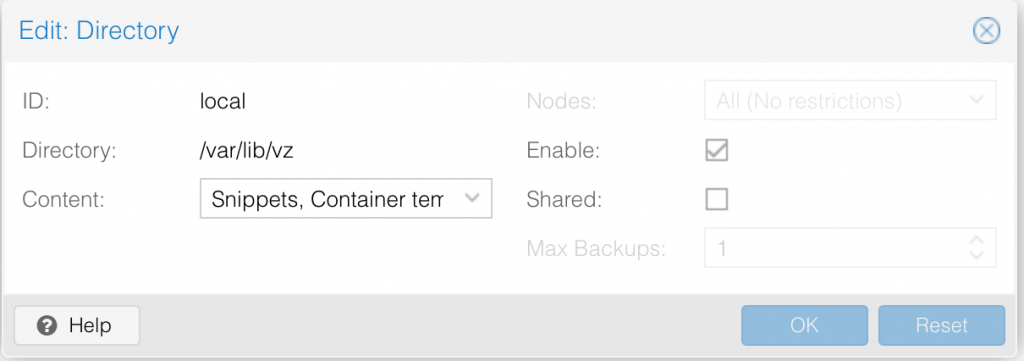
Next, ensure you are running the latest version of Proxmox and have enabled the “snippets” option on the storage pool you use for container templates and ISO images in Proxmox. If you have been running Proxmox for awhile you may not have it enabled. You will find the option under the datacenter view and then by clicking on storage. Double click the storage pool you normally use for image storage and select Snippets from the drop down.
#cloud-config
hostname: CentOS7-Template
manage_etc_hosts: true
user: centos
ssh_authorized_keys: - <your public ssh key>
chpasswd: expire: False
users: - default
package_upgrade: true
#cloud-config
hostname: CentOS7-Template
manage_etc_hosts: true
user: centos
ssh_authorized_keys: - <your public ssh key>
chpasswd: expire: False
users: - default
package_upgrade: true
rundcmd: - echo "Hello World!" > /run/outputqm set <vmid> --cicustom "user=local:snippets/user-data.yml"#cloud-config
hostname: rancher-worker.lan
manage_etc_hosts: true
user: centos
ssh_authorized_keys: - <public ssh key>
chpasswd: expire: False
users: - default
package_upgrade: false
runcmd: - yum install -y docker - systemctl enable docker - systemctl start docker - sleep 10 - docker run -d --privileged --restart=unless-stopped --net=host -v /etc/kubernetes:/etc/kubernetes -v /var/run:/var/run rancher/rancher-agent:v2.3.5 --server https://<rancher-server> --token <token> --workerThis cloud-init file will result in the system automatically joining the Kubernetes cluster as a worker node.
This post will be the first of a few explaining how I set up my home lab setup to run a Kubernetes cluster on a Proxmox hypervisor using Infrastructure-as-code tools like Terraform and Puppet.
Why?
To me, a home lab is an essential for any IT professional. It is a domain you have full control over and can try what you want to gain real experience. This might comprise of random hardware either of enterprise of DIY quality, or perhaps be hybrid including cloud services. For this series I’ll be covering my physical setup.
In particular I’m going to briefly cover the technology choices I’ll be using; Proxmox for Virtualization, Terraform for provisioning the environment (with Puppet Bolt to bootstrap process), Puppet to manage the configuration of the environment including Kubernetes which will be the end platform.
Proxmox
Proxmox is an open source virtualization software that I personally like for it’s ease of use via web interface & command-line, with native support of LXC (Linux Containers), ZFS (battle-tested filesystem) and cloud-init (cloud templates) which we’ll be using — among other comparable features to other similar software.
In my work life, the go-to is VMWare’s vSphere or Microsoft’s Hyper-V. Both of these offer free-tiers and could be substituted here (although note last time I checked there were various limits of what you can and can’t do, as well as features that may be missing with their free tiers so be sure to investigate).
Terraform
Terraform is an Infrastructure as Code toolset that assists in defining and managing infrastructure. It integrates with a large number of other software via what it calls providers. Some of these are officially supported by Hashicorp, the company behind Terraform (and other great tools), but a number are community made. In fact in the next post we’ll be using Telmate’s Proxmox provider to have Terraform contain the logic that provisions our VM’s.
Puppet
Puppet is a configuration management tool, sort of similar to Terraform, that manages the OS layer based on code. For best functionality like enterprise implementations a Puppet master is required to ensure desired state via routine check-in. In a future post we’ll be combining Puppet with Puppet Bolt, a fairly new agent-less tool similar to Ansible, that we’ll be using to perform the Terraform bootstrapping with Proxmox and then having it setup Puppet to configure and manage a Kubernetes cluster.
Kubernetes
Kubernetes is a type of platform as a service tool-set that enables orchestration, clustering and automation of application deployments via containers. It effectively enables developers to deploy applications and associated business logic ignorant of the infrastructure, which aligns with methodologies like agile development and continuous integration and deployment. We’ll be using this in a later post to run a handful of “essential” applications like Gitlab, and later my own applications.
What this will be running on
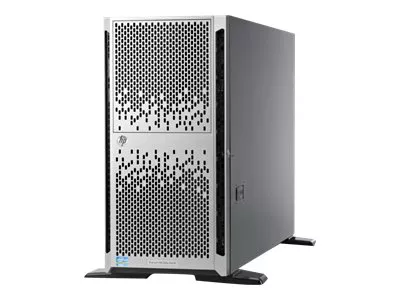
A few years ago I acquired a HP ProLiant ML350p Gen8 which while it may be a little dated now, it is more than capable for a home lab. In order to replicate this guide, you can pick something similar, or may simply wish to reduce the allocated CPU/memory to the Kubernetes cluster noted later.
- CPU: 6 Core, 12 Thread 2GHZ Xeon E5-2620
- Memory: 64GB ECC
- Storage: 200 GB (via hardware RAID)
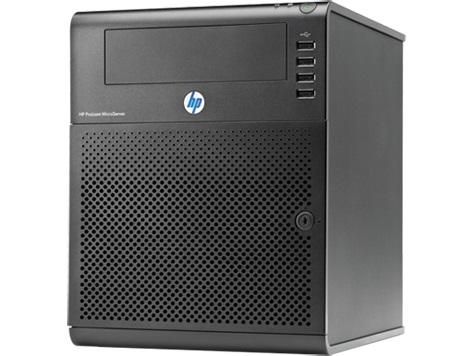
Additionally, while it won’t be discussed as part of this series, I have an older HP ProLiant MicroServer, G7 N54L that I simply using as a network storage server via Samba (4TB mirrored disks using ZFS). Part of this will be used later to mount as a persistent volume for Kubernetes
Setting up Proxmox and cloud-init
This first part of the series will talk about the initial bare metal setup of the system using Proxmox, and creation of a VM template using cloud-init. Some sections will not go into detail as it is assumed you have some IT background to even want to setup something similar!
Be sure to upgrade any available packages released via the mirrors but possibly not packaged with the ISO (which may require a reboot).
apt update && apt -y upgradeSetup cloud-init template
At this point you presumably have a working and updated Proxmox install. Next we will be creating a custom cloud-init template that Terraform will use (including passing in an SSH key that will later be used by Puppet Bolt)
Download your preferred Linux Cloud image
I’m most familiar with CentOS (and RHEL), so I will be downloading the latest version.
wget https://cloud.centos.org/centos/8/x86_64/images/CentOS-8-GenericCloud-8.1.1911-20200113.3.x86_64.qcow2Note: It was reported in below resources that Proxmox may have issues with .img extensions with the Ubuntu image, with the solution being renaming the file to use .qcow2
Create Virtual Machine, then configuring to use as template
Next using the command line (or web UI) we will create a VM with an arbitrary unused ID (9000) that we will later use as our cloud-init template.
qm create 9000 --name "centos8-cloudinit-template" --memory 2048 --net0 virtio,bridge=vmbr0Next import the cloud image we downloaded earlier to the Proxmox storage (which if setup as default will be named local-lvm) using the same ID.
qm importdisk 9000 CentOS-8-GenericCloud-8.1.1911-20200113.3.x86_64.qcow2 local-lvmThis upload will name this in format “vm--disk-” which for us will be vm-9000-disk-0, so we can then attach this disk via SCSI to our VM and ensure this is the bootdisk.
qm set 9000 --scsihw virtio-scsi-pci --scsi0 local-lvm:vm-9000-disk-0
qm set 9000 --boot c --bootdisk scsi0
Then in order to allow us to later pass in supported cloud-init values, we must attach the Proxmox cloudinit image as a CDROM.
qm set 9000 --ide2 local-lvm:cloudinitSome cloud-init functionality requires a serial console, so we also add that.
qm set 9000 --serial0 socket --vga serial0Finally we can convert this VM image of our cloud-init image to be a template for future provisioning use.
qm template 9000Test it (optional)
qm clone 9000 100 --name test-box
qm set 100 --sshkey ~/.ssh/id_rsa.pub
qm set 100 --ipconfig0 ip=192.168.0.100/24,gw=192.168.0.1
qm start 100
ssh -i ~/.ssh/id_rsa [email protected]Note: we stopped/deleted this VM after testing
Next Steps
This first part just explains the end goal of this home lab project. In the next part (Part 2) we will define our Terraform logic of our required VM’s and their specs, and a base Puppet Bolt plan that drives the provisioning process. Hopefully this provides similar inspiration to you.
Resources
The cloud-init related steps were based off norocketscience’s post who has a similar goal but used the Ubuntu images.
Usage
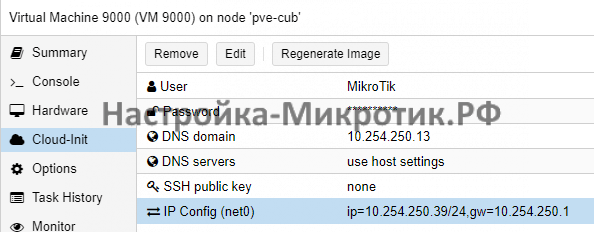
- In the Cloud-Init tab of the VM, configure the name of the default user and the public SSH key you want to use for authentication.
- In the Options tab, enable the QEMU Guest Agent if you did not from the commands above.
- In the Hardware tab, select the
scsi0hard disk and click Resize disk. The default size of the Debian image is 2 GiB. Specify the amount you want the disk to be increased by (e.g. 30 GiB for a total size of 32 GiB).
Everything is ready to go! Start the VM, run a system upgrade, and install the QEMU guest agent:
Verify
If everything was setup correctly and more importantly, that cloud init actually did its magic, you will see
- each cloned VM has a hostname of the vm name you specified in the playbook e.g.
cloud-1 - each cloned VM has a unique IP address and a unique
/etc/machine-idnumber.
Добавляем новое хранилище в Proxmox
Далее авторизуемся в панели управления, а также заходим в разделы «Датацентр» ➝ «Хранилище» ➝ «Добавить» ➝ «Директория».
Откроется окно, где надо будет заполнить следующие поля:
• ID — это название вашего будущего хранилища;
• директория — /mnt/storage;
• содержимое — следует выделить все варианты, поочередно щёлкая по каждому.
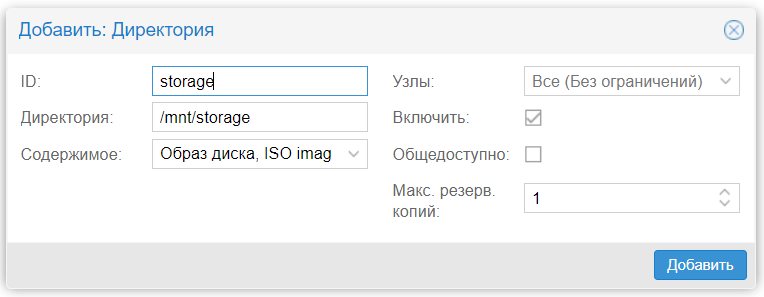
Потом нажимаем «Добавить», и с настройкой всё.
Download a base Debian cloud image
Create a Proxmox VM using the image
The commands here should be relatively self explanatory but in general we are creating a VM (VMID=9500) with basic resources (2 cores, 2048MB), assigning networking to a virtio adapter on vmbr0, importing the image to storage (either local or local-lvm), setting disk 0 to use the image, setting boot drive to disk, setting the cloud init stuff to ide2 (which apparently appears as a CD-ROM to the VM, at least upon inital boot), and adding a virtual serial port.
Here are the details to the command as they appear:
- Create a new VM with ID 900 using VirtIO networking drivers.
- Import the qcow Debian image as a disk to the new VM. The disk will be called
local-lvm:vm-9500-disk-0. - Attach the imported disk as a VirtIO SCSI device to the VM.
- Attach a drive for the Cloud-Init config to the VM.
- Set the VM to boot from the imported disk image.
- Add a serial console to the VM, which is needed by OpenStack/ProxMox.
- Enable the qemu-guest-agent for the VM – this is an optional setting, but I do recommend it because it will be useful if you are going to be using this for something like Terraform later on to automate the creation of VMs.
- Convert the VM into a template.
Youtube Video Link
#1 – Install Terraform
curl -fsSL https://apt.releases.hashicorp.com/gpg | sudo apt-key add -
sudo apt-add-repository "deb [arch=$(dpkg --print-architecture)] https://apt.releases.hashicorp.com $(lsb_release -cs) main"
sudo apt update
sudo apt install terraform
#2 – Determine Authentication Method (use API keys)
You have two options here:
- Username/password – you can use the existing default root user and root password here to make things easy… or
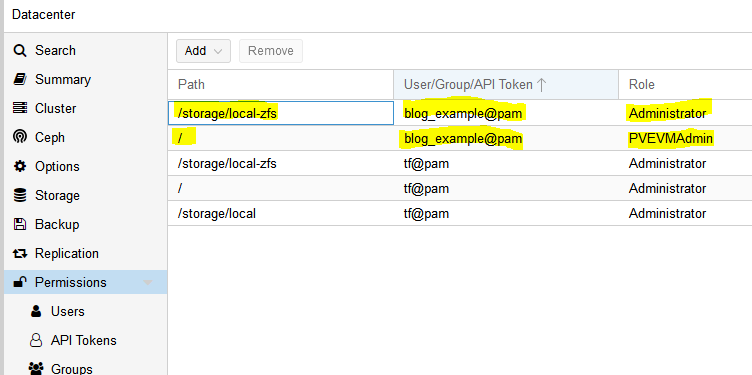
- API keys – this involves setting up a new user, giving that new user the required permissions, and then setting up API keys so that user doesn’t have to type in a password to perform actions

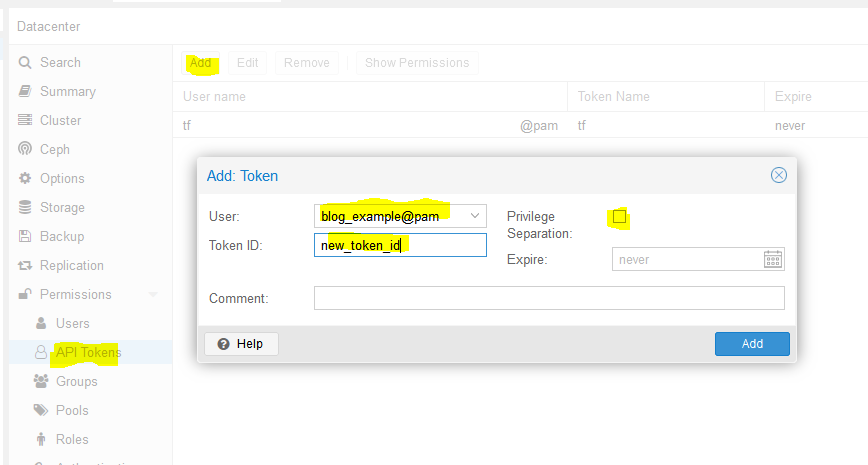
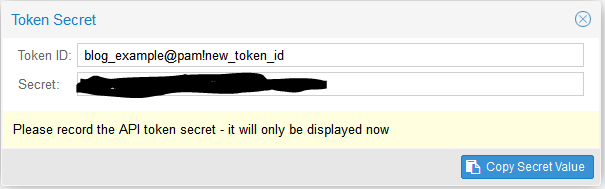
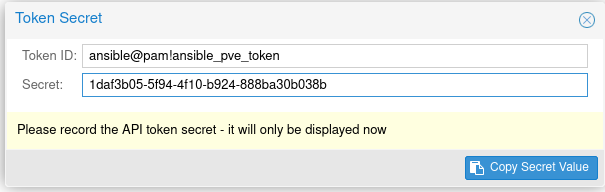
When you click Add it will show you the key. Save this key. It will never be displayed again!
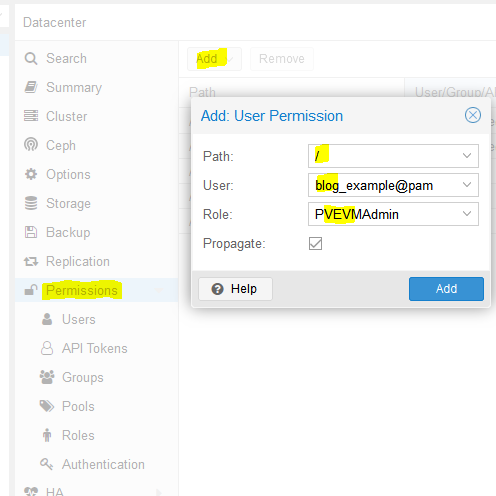
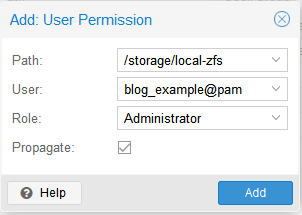
At this point we are done with the permissions:
It is time to turn to Terraform.
3 – Terraform basic information and provider installation
Terraform has three main stages: init, plan, and apply. We will start with describing the plans, which can be thought of a a type of configuration file for what you want to do. Plans are files stored in directories. Make a new directory (terraform-blog), and create two files: main.tf and vars.tf:
cd ~
mkdir terraform-blog && cd terraform-blog
touch main.tf vars.tf
The two files are hopefully reasonably named. The main content will be in main.tf and we will put a few variables in vars.tf. Everything could go in main.tf but it is a good practice to start splitting things out early. I actually don’t have as much in vars.tf as I should but we all gotta start somewhere
Ok so in main.tf let’s add the bare minimum. We need to tell Terraform to use a provider, which is the term they use for the connector to the entity Terraform will be interacting with. Since we are using Proxmox, we need to use a Proxmox provider. This is actually super easy – we just need to specify the name and version and Terraform goes out and grabs it from github and installs it. I used the Telmate Proxmox provider.
terraform { required_providers { proxmox = { source = "telmate/proxmox" version = "2.7.4" } }
}
Save the file. Now we’ll initialize Terraform with our barebones plan (terraform init), which will force it to go out and grab the provider. If all goes well, we will be informed that the provider was installed and that Terraform has been initialized. Terraform is also really nice in that it tells you the next step towards the bottom of the output (“try running ‘terraform plan’ next”).
[email protected]:/mnt/c/Users/Austin/terraform-blog$ terraform init
Initializing the backend...
Initializing provider plugins...
- Finding telmate/proxmox versions matching "2.7.4"...
- Installing telmate/proxmox v2.7.4...
- Installed telmate/proxmox v2.7.4 (self-signed, key ID A9EBBE091B35AFCE)
Partner and community providers are signed by their developers.
If you'd like to know more about provider signing, you can read about it here:
https://www.terraform.io/docs/cli/plugins/signing.html
Terraform has created a lock file .terraform.lock.hcl to record the provider
selections it made above. Include this file in your version control repository
so that Terraform can guarantee to make the same selections by default when
you run "terraform init" in the future.
Terraform has been successfully initialized!
You may now begin working with Terraform. Try running "terraform plan" to see
any changes that are required for your infrastructure. All Terraform commands
should now work.
If you ever set or change modules or backend configuration for Terraform,
rerun this command to reinitialize your working directory. If you forget, other
commands will detect it and remind you to do so if necessary.
4 – Develop Terraform plan
terraform { required_providers { proxmox = { source = "telmate/proxmox" version = "2.7.4" } }
}
provider "proxmox" { # url is the hostname (FQDN if you have one) for the proxmox host you'd like to connect to to issue the commands. my proxmox host is 'prox-1u'. Add /api2/json at the end for the API pm_api_url = "https://prox-1u:8006/api2/json" # api token id is in the form of: <username>@pam!<tokenId> pm_api_token_id = "[email protected]!new_token_id" # this is the full secret wrapped in quotes. don't worry, I've already deleted this from my proxmox cluster by the time you read this post pm_api_token_secret = "9ec8e608-d834-4ce5-91d2-15dd59f9a8c1" # leave tls_insecure set to true unless you have your proxmox SSL certificate situation fully sorted out (if you do, you will know) pm_tls_insecure = true
}
# resource is formatted to be "[type]" "[entity_name]" so in this case
# we are looking to create a proxmox_vm_qemu entity named test_server
resource "proxmox_vm_qemu" "test_server" { count = 1 # just want 1 for now, set to 0 and apply to destroy VM name = "test-vm-${count.index + 1}" #count.index starts at 0, so + 1 means this VM will be named test-vm-1 in proxmox # this now reaches out to the vars file. I could've also used this var above in the pm_api_url setting but wanted to spell it out up there. target_node is different than api_url. target_node is which node hosts the template and thus also which node will host the new VM. it can be different than the host you use to communicate with the API. the variable contains the contents "prox-1u" target_node = var.proxmox_host # another variable with contents "ubuntu-2004-cloudinit-template" clone = var.template_name # basic VM settings here. agent refers to guest agent agent = 1 os_type = "cloud-init" cores = 2 sockets = 1 cpu = "host" memory = 2048 scsihw = "virtio-scsi-pci" bootdisk = "scsi0" disk { slot = 0 # set disk size here. leave it small for testing because expanding the disk takes time. size = "10G" type = "scsi" storage = "local-zfs" iothread = 1 } # if you want two NICs, just copy this whole network section and duplicate it network { model = "virtio" bridge = "vmbr0" } # not sure exactly what this is for. presumably something about MAC addresses and ignore network changes during the life of the VM lifecycle { ignore_changes = [ network, ] } # the ${count.index + 1} thing appends text to the end of the ip address # in this case, since we are only adding a single VM, the IP will # be 10.98.1.91 since count.index starts at 0. this is how you can create # multiple VMs and have an IP assigned to each (.91, .92, .93, etc.) ipconfig0 = "ip=10.98.1.9${count.index + 1}/24,gw=10.98.1.1" # sshkeys set using variables. the variable contains the text of the key. sshkeys = <<EOF ${var.ssh_key} EOF
}
There is a good amount going on in here. Hopefully the embedded comments explain everything. If not, let me know in the comments or on Reddit (u/Nerdy-Austin).
Now for the vars.tf file. This is a bit easier to understand. Just declare a variable, give it a name, and a default value. That’s all I know at this point and it works.
variable "ssh_key" { default = "ssh-rsa AAAAB3NzaC1yc2EAAAADAQABAAABAQDcwZAOfqf6E6p8IkrurF2vR3NccPbMlXFPaFe2+Eh/8QnQCJVTL6PKduXjXynuLziC9cubXIDzQA+4OpFYUV2u0fAkXLOXRIwgEmOrnsGAqJTqIsMC3XwGRhR9M84c4XPAX5sYpOsvZX/qwFE95GAdExCUkS3H39rpmSCnZG9AY4nPsVRlIIDP+/6YSy9KWp2YVYe5bDaMKRtwKSq3EOUhl3Mm8Ykzd35Z0Cysgm2hR2poN+EB7GD67fyi+6ohpdJHVhinHi7cQI4DUp+37nVZG4ofYFL9yRdULlHcFa9MocESvFVlVW0FCvwFKXDty6askpg9yf4FnM0OSbhgqXzD [email protected]"
}
variable "proxmox_host" {	default = "prox-1u"
}
variable "template_name" {	default = "ubuntu-2004-cloudinit-template"
}
5 – Terraform plan (official term for “what will Terraform do next”)
Now with the .tf files completed, we can run the plan (terraform plan). We defined a count=1 resource, so we would expect Terraform to create a single VM. Let’s have Terraform run through the plan and tell us what it intends to do. It tells us a lot.
[email protected]:/mnt/c/Users/Austin/terraform-blog$ terraform plan
Terraform used the selected providers to generate the following execution plan. Resource actions
are indicated with the following symbols: + create
Terraform will perform the following actions: # proxmox_vm_qemu.test_server[0] will be created + resource "proxmox_vm_qemu" "test_server" { + additional_wait = 15 + agent = 1 + balloon = 0 + bios = "seabios" + boot = "cdn" + bootdisk = "scsi0" + clone = "ubuntu-2004-cloudinit-template" + clone_wait = 15 + cores = 2 + cpu = "host" + default_ipv4_address = (known after apply) + define_connection_info = true + force_create = false + full_clone = true + guest_agent_ready_timeout = 600 + hotplug = "network,disk,usb" + id = (known after apply) + ipconfig0 = "ip=10.98.1.91/24,gw=10.98.1.1" + kvm = true + memory = 2048 + name = "test-vm-1" + nameserver = (known after apply) + numa = false + onboot = true + os_type = "cloud-init" + preprovision = true + reboot_required = (known after apply) + scsihw = "virtio-scsi-pci" + searchdomain = (known after apply) + sockets = 1 + ssh_host = (known after apply) + ssh_port = (known after apply) + sshkeys = <<-EOT ssh-rsa AAAAB3NzaC1yc2EAAAADAQABAAABAQDcwZAOfqf6E6p8IkrurF2vR3NccPbMlXFPaFe2+Eh/8QnQCJVTL6PKduXjXynuLziC9cubXIDzQA+4OpFYUV2u0fAkXLOXRIwgEmOrnsGAqJTqIsMC3XwGRhR9M84c4XPAX5sYpOsvZX/qwFE95GAdExCUkS3H39rpmSCnZG9AY4nPsVRlIIDP+/6YSy9KWp2YVYe5bDaMKRtwKSq3EOUhl3Mm8Ykzd35Z0Cysgm2hR2poN+EB7GD67fyi+6ohpdJHVhinHi7cQI4DUp+37nVZG4ofYFL9yRdULlHcFa9MocESvFVlVW0FCvwFKXDty6askpg9yf4FnM0OSbhgqXzD [email protected] EOT + target_node = "prox-1u" + unused_disk = (known after apply) + vcpus = 0 + vlan = -1 + vmid = (known after apply) + disk { + backup = 0 + cache = "none" + file = (known after apply) + format = (known after apply) + iothread = 1 + mbps = 0 + mbps_rd = 0 + mbps_rd_max = 0 + mbps_wr = 0 + mbps_wr_max = 0 + media = (known after apply) + replicate = 0 + size = "10G" + slot = 0 + ssd = 0 + storage = "local-zfs" + storage_type = (known after apply) + type = "scsi" + volume = (known after apply) } + network { + bridge = "vmbr0" + firewall = false + link_down = false + macaddr = (known after apply) + model = "virtio" + queues = (known after apply) + rate = (known after apply) + tag = -1 } }
Plan: 1 to add, 0 to change, 0 to destroy.
────────────────────────────────────────────────────────────────────────────────────────────────
Note: You didn't use the -out option to save this plan, so Terraform can't guarantee to take
exactly these actions if you run "terraform apply" now.
Troubleshooting
Just some random troubleshooting notes:
Check the Proxmox API
Proxmox: VM wont stop
- console into the proxmox server
- try
qemu stop <VMID> - if it says «can’t lock file ‘/var/lock/…» do
rm -f /var/lock/....whatever that file is - do
qm stop <VIMID>again.
One other place to look for the lock file is /run/lock/qemu-server/*
Last – Removing the test VM
I just set the count to 0 for the resource in the main.tf file and apply and the VM is stopped and destroyed.

Youtube Video Link
#1 – Downloading the base Ubuntu image
Luckily, Ubuntu (my preferred distro, guessing others do the same) provides base images that are updated on a regular basis – https://cloud-images.ubuntu.com/. We are interested in the “current” release of Ubuntu 20.04 Focal, which is the current Long Term Support version. Further, since Proxmox uses KVM, we will be pulling that image:
wget https://cloud-images.ubuntu.com/focal/current/focal-server-cloudimg-amd64.img
#2 – Install packages
It took me quite a while into my Terraform debugging process to determine that qemu-guest-agent wasn’t included in the cloud-init image. Why it isn’t, I have no idea. Luckily there is a very cool tool that I just learned about that enables installing packages directly into a image. The tool is called virt-customize and it comes in the libguestfs-tools package (“libguestfs is a set of tools for accessing and modifying virtual machine (VM) disk images” – https://www.libguestfs.org/).
Install the tools:
sudo apt update -y && sudo apt install libguestfs-tools -y
Then install qemu-guest-agent into the newly downloaded image:
sudo virt-customize -a focal-server-cloudimg-amd64.img --install qemu-guest-agent
At this point you can presumably install whatever else you want into the image but I haven’t tested installing other packages. qemu-guest-agent was what I needed to get the VM recognized by Terraform and accessible.
# not quite working yet. skip this and continue
#sudo virt-customize -a focal-server-cloudimg-amd64.img --run-command 'useradd austin'
#sudo virt-customize -a focal-server-cloudimg-amd64.img --run-command 'mkdir -p /home/austin/.ssh'
#sudo virt-customize -a focal-server-cloudimg-amd64.img --ssh-inject austin:file:/home/austin/.ssh/id_rsa.pub
#sudo virt-customize -a focal-server-cloudimg-amd64.img --run-command 'chown -R austin:austin /home/austin'
#3 – Create a Proxmox virtual machine using the newly modified image
The commands here should be relatively self explanatory but in general we are creating a VM (VMID=9000, basically every other resource I saw used this ID so we will too) with basic resources (2 cores, 2048MB), assigning networking to a virtio adapter on vmbr0, importing the image to storage (your storage here will be different if you’re not using ZFS, probably either ‘local’ or ‘local-lvm’), setting disk 0 to use the image, setting boot drive to disk, setting the cloud init stuff to ide2 (which is apparently appears as a CD-ROM to the VM, at least upon inital boot), and adding a virtual serial port. I had only used qm to force stop VMs before this but it’s pretty useful.
sudo qm create 9000 --name "ubuntu-2004-cloudinit-template" --memory 2048 --cores 2 --net0 virtio,bridge=vmbr0
sudo qm importdisk 9000 focal-server-cloudimg-amd64.img local-zfs
sudo qm set 9000 --scsihw virtio-scsi-pci --scsi0 local-zfs:vm-9000-disk-0
sudo qm set 9000 --boot c --bootdisk scsi0
sudo qm set 9000 --ide2 local-zfs:cloudinit
sudo qm set 9000 --serial0 socket --vga serial0
sudo qm set 9000 --agent enabled=1
You can start the VM up at this point if you’d like and make any other changes you want because the next step is converting it to a template. If you do boot it, I will be completely honest I have no idea how to log into it. I actually just googled this because I don’t want to leave you without an answer – looks like you can use the same virt-customize we used before to set a root password according to stackoverflow (https://stackoverflow.com/questions/29137679/login-credentials-of-ubuntu-cloud-server-image). Not going to put that into a command window here because cloud-init is really meant for public/private key authentication (see post here for a quick SSH tutorial).
#4 – Convert VM to a template
Ok if you made any changes, shut down the VM. If you didn’t boot the VM, that’s perfectly fine also. We need to convert it to a template:
sudo qm template 9000
And now we have a functioning template!
#5 – Clone the template into a full VM and set some parameters
From this point you can clone the template as much as you want. But, each time you do so it makes sense to set some parameters, namely the SSH keys present in the VM as well as the IP address for the main interface. You could also add the SSH keys with virt-customize but I like doing it here.
First, clone the VM (here we are cloning the template with ID 9000 to a new VM with ID 999):
sudo qm clone 9000 999 --name test-clone-cloud-init
Next, set the SSH keys and IP address:
sudo qm set 999 --sshkey ~/.ssh/id_rsa.pub
sudo qm set 999 --ipconfig0 ip=10.98.1.96/24,gw=10.98.1.1
It’s now ready to start up!
sudo qm start 999
ssh [email protected]Once you’re happy with how things worked, you can stop the VM and clean up the resources:
sudo qm stop 999 && sudo qm destroy 999
rm focal-server-cloudimg-amd64.img
#6 – automating the process
I have not done so yet, but if you create VMs on a somewhat regular basis, it wouldn’t be hard to stick all of the above into a simple shell script (update 2022-04-19: simple shell script below) and run it via cron on a weekly basis or whatever frequency you prefer. I can’t tell you how many times I make a new VM from whatever .iso I downloaded and the first task is apt upgrade taking forever to run (‘sudo apt update’ –> “176 packages can be upgraded”). Having a nice template always ready to go would solve that issue and would frankly save me a ton of time.
#6.5 – Shell script to create template
# installing libguestfs-tools only required once, prior to first run
sudo apt update -y
sudo apt install libguestfs-tools -y
# remove existing image in case last execution did not complete successfully
rm focal-server-cloudimg-amd64.img
wget https://cloud-images.ubuntu.com/focal/current/focal-server-cloudimg-amd64.img
sudo virt-customize -a focal-server-cloudimg-amd64.img --install qemu-guest-agent
sudo qm create 9000 --name "ubuntu-2004-cloudinit-template" --memory 2048 --cores 2 --net0 virtio,bridge=vmbr0
sudo qm importdisk 9000 focal-server-cloudimg-amd64.img local-zfs
sudo qm set 9000 --scsihw virtio-scsi-pci --scsi0 local-zfs:vm-9000-disk-0
sudo qm set 9000 --boot c --bootdisk scsi0
sudo qm set 9000 --ide2 local-zfs:cloudinit
sudo qm set 9000 --serial0 socket --vga serial0
sudo qm set 9000 --agent enabled=1
sudo qm template 9000
rm focal-server-cloudimg-amd64.img
echo "next up, clone VM, then expand the disk"
echo "you also still need to copy ssh keys to the newly cloned VM"
#7-8 – Using this template with Terraform to automate VM creation
Next post – How to deploy VMs in Proxmox with Terraform
References
My original notes
https://matthewkalnins.com/posts/home-lab-setup-part-1-proxmox-cloud-init/
https://registry.terraform.io/modules/sdhibit/cloud-init-vm/proxmox/latest/examples/ubuntu_single_vm
# create cloud image VM
wget https://cloud-images.ubuntu.com/focal/20210824/focal-server-cloudimg-amd64.img
sudo qm create 9000 --name "ubuntu-2004-cloudinit-template" --memory 2048 --cores 2 --net0 virtio,bridge=vmbr0
# to install qemu-guest-agent or whatever into the guest image
#sudo apt-get install libguestfs-tools
#virt-customize -a focal-server-cloudimg-amd64.img --install qemu-guest-agent
sudo qm importdisk 9000 focal-server-cloudimg-amd64.img local-zfs
sudo qm set 9000 --scsihw virtio-scsi-pci --scsi0 local-zfs:vm-9000-disk-0
sudo qm set 9000 --boot c --bootdisk scsi0
sudo qm set 9000 --ide2 local-zfs:cloudinit
sudo qm set 9000 --serial0 socket --vga serial0
sudo qm template 9000
# clone cloud image to new VM
sudo qm clone 9000 999 --name test-clone-cloud-init
sudo qm set 999 --sshkey ~/.ssh/id_rsa.pub
sudo qm set 999 --ipconfig0 ip=10.98.1.96/24,gw=10.98.1.1
sudo qm start 999
# remove known host because SSH key changed
ssh-keygen -f "/home/austin/.ssh/known_hosts" -R "10.98.1.96"
# ssh in
ssh -i ~/.ssh/id_rsa [email protected]# stop and destroy VM
sudo qm stop 999 && sudo qm destroy 999
Создаём виртуальную машину
Чтобы создать ВМ:
1. Определяемся с версией ОС.
2. Закачиваем ISO-образ (заранее).
3. Выбираем в меню «Хранилище» только что вами созданное.
4. Нажимаем «Содержимое» ➝ «Загрузить».
5. Выбираем ISO-образ из списка, потом подтверждаем выбор кнопкой «Загрузить».
В итоге образ отобразится в списке доступных.
Теперь создадим первую виртуальную машину:
1. Следует нажать «Создать VM».
2. Потом необходимо заполнить поочередно параметры: «Имя» ➝ «ISO-Image» ➝ Размер и тип жесткого диска ➝ Количество процессоров ➝ Объем оперативной памяти ➝ Сетевой адаптер.
3. Выбираем желаемые параметры и нажимаем «Завершить». Созданная виртуальная машина отобразится в меню панели управления.
4. Выбираем эту машину и запускаем её соответствующей кнопкой.
5. Переходим в «Консоль» и устанавливаем ОС так же, как и на любой физический сервер.
Если нужно создать ещё одну ВМ, следует повторить вышеописанные операции.
6 – Execute the Terraform plan and watch the VMs appear!
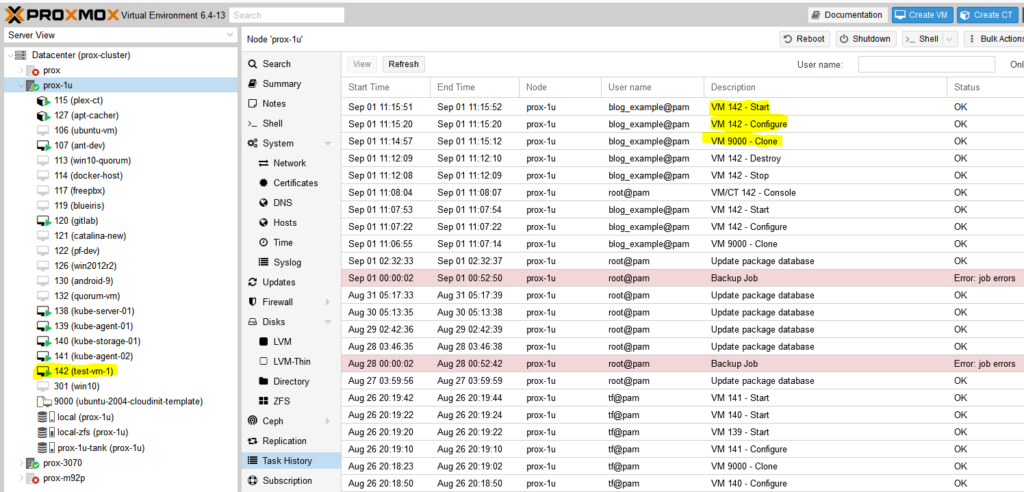
With the summary stating what we want, we can now apply the plan (terraform apply). Note that it prompts you to type in ‘yes’ to apply the changes after it determines what the changes are. It typically takes 1m15s +/- 15s for my VMs to get created.
If all goes well, you will be informed that 1 resource was added!

Command and full output:
[email protected]:/mnt/c/Users/Austin/terraform-blog$ terraform apply
Terraform used the selected providers to generate the following execution plan. Resource actions are indicated with the following symbols: + create
Terraform will perform the following actions: # proxmox_vm_qemu.test_server[0] will be created + resource "proxmox_vm_qemu" "test_server" { + additional_wait = 15 + agent = 1 + balloon = 0 + bios = "seabios" + boot = "cdn" + bootdisk = "scsi0" + clone = "ubuntu-2004-cloudinit-template" + clone_wait = 15 + cores = 2 + cpu = "host" + default_ipv4_address = (known after apply) + define_connection_info = true + force_create = false + full_clone = true + guest_agent_ready_timeout = 600 + hotplug = "network,disk,usb" + id = (known after apply) + ipconfig0 = "ip=10.98.1.91/24,gw=10.98.1.1" + kvm = true + memory = 2048 + name = "test-vm-1" + nameserver = (known after apply) + numa = false + onboot = true + os_type = "cloud-init" + preprovision = true + reboot_required = (known after apply) + scsihw = "virtio-scsi-pci" + searchdomain = (known after apply) + sockets = 1 + ssh_host = (known after apply) + ssh_port = (known after apply) + sshkeys = <<-EOT ssh-rsa AAAAB3NzaC1yc2EAAAADAQABAAABAQDcwZAOfqf6E6p8IkrurF2vR3NccPbMlXFPaFe2+Eh/8QnQCJVTL6PKduXjXynuLziC9cubXIDzQA+4OpFYUV2u0fAkXLOXRIwgEmOrnsGAqJTqIsMC3XwGRhR9M84c4XPAX5sYpOsvZX/qwFE95GAdExCUkS3H39rpmSCnZG9AY4nPsVRlIIDP+/6YSy9KWp2YVYe5bDaMKRtwKSq3EOUhl3Mm8Ykzd35Z0Cysgm2hR2poN+EB7GD67fyi+6ohpdJHVhinHi7cQI4DUp+37nVZG4ofYFL9yRdULlHcFa9MocESvFVlVW0FCvwFKXDty6askpg9yf4FnM0OSbhgqXzD [email protected] EOT + target_node = "prox-1u" + unused_disk = (known after apply) + vcpus = 0 + vlan = -1 + vmid = (known after apply) + disk { + backup = 0 + cache = "none" + file = (known after apply) + format = (known after apply) + iothread = 1 + mbps = 0 + mbps_rd = 0 + mbps_rd_max = 0 + mbps_wr = 0 + mbps_wr_max = 0 + media = (known after apply) + replicate = 0 + size = "10G" + slot = 0 + ssd = 0 + storage = "local-zfs" + storage_type = (known after apply) + type = "scsi" + volume = (known after apply) } + network { + bridge = "vmbr0" + firewall = false + link_down = false + macaddr = (known after apply) + model = "virtio" + queues = (known after apply) + rate = (known after apply) + tag = -1 } }
Plan: 1 to add, 0 to change, 0 to destroy.
Do you want to perform these actions? Terraform will perform the actions described above. Only 'yes' will be accepted to approve. Enter a value: yes
proxmox_vm_qemu.test_server[0]: Creating...
proxmox_vm_qemu.test_server[0]: Still creating... [10s elapsed]
proxmox_vm_qemu.test_server[0]: Still creating... [20s elapsed]
proxmox_vm_qemu.test_server[0]: Still creating... [30s elapsed]
proxmox_vm_qemu.test_server[0]: Still creating... [40s elapsed]
proxmox_vm_qemu.test_server[0]: Still creating... [50s elapsed]
proxmox_vm_qemu.test_server[0]: Still creating... [1m0s elapsed]
proxmox_vm_qemu.test_server[0]: Creation complete after 1m9s [id=prox-1u/qemu/142]
Apply complete! Resources: 1 added, 0 changed, 0 destroyed.
Now go check Proxmox and see if your VM was created:

Настраиваем автозапуск
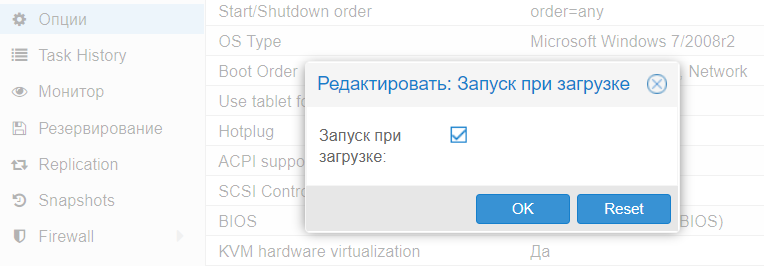
По умолчанию Proxmox не запускает машины автоматически. Однако это решается довольно просто:
1. Щелкаем по названию интересующей машины.
2. Выбираем вкладку «Опции» ➝ «Запуск при загрузке».
3. Отмечаем галочкой одноимённую надпись.
В итоге, при перезагрузке физического сервера, машина запустится автоматически.
Кроме того, продвинутый администратор может указать дополнительные параметры запуска (они находятся в разделе «Start/Shutdown order»). Вы можете явно указать, в каком порядке надо запускать машины. Вдобавок к этому, вы можете указать время, которое должно пройти до старта следующей машины, плюс время задержки выключения (когда ОС не успевает завершить работу, гипервизор выключит её принудительно через определенное число секунд).
Источник — блог компании Selectel.
Proxmox Host Setup
apt install -y python-pip3 python3-dev build-essential libguestfs-tools
pip3 install virtualenv
pip3 install proxmoxer requests
tbh I don’t know if proxmoxer or requests actually do anything with my setup, so ymmv.
User API Token
On your proxmox host, go to Datacenter-> API Tokens:
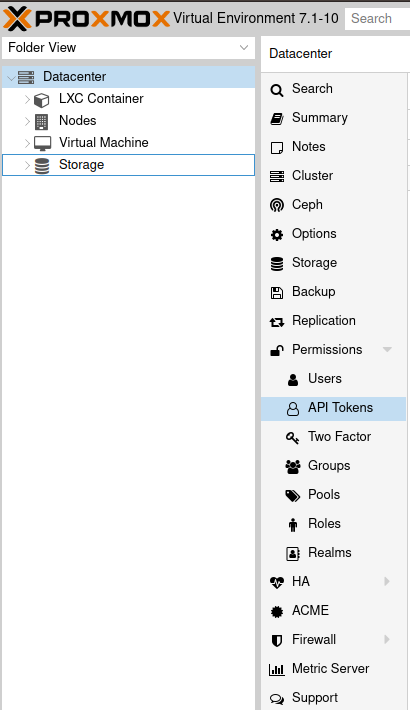
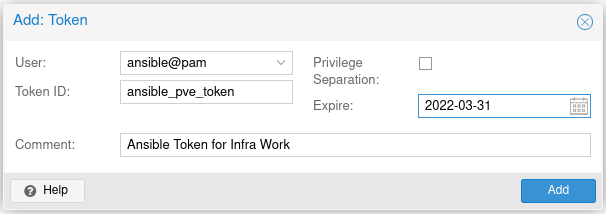
here are your token id and secret, make a note as you’ll need them later on in our ansible playbooks:
Cloud image + Customizations
You will download and customize a cloud image on the proxmox host, that’s the easiest most straight-forward way until this step gets automated.
/root/keys/id_mykeys.pubwith the public key you allow to ssh to this image/root/ansibleis just a file with the ansible users sudo permissions i.e. just a file with this text:ansible ALL=(ALL) NOPASSWD: ALL
Important note on the machine-id inside the cloud image: the file /etc/machine-id has an ID in it, if you don’t delete it and leave the file blank before you convert the image to template, the clones you create from the template will all have the same machine-id and be assigned the same network details.
I added in the >/etc/machine-id command making the machine-id file blank.
Run these commands on your Proxmox Host:
# download cloud-init enabled cloud image -- Ubuntu
We use virt-customize to modify the disk image in place and add our customizations without needing the image to be running.
Does not have to be run as root, preferrably not according to the authors of the tool.
# customize the image using `virt-customize` provided by libguestfs-tools package.
virt-customize -a impish-server-cloudimg-amd64.img --update
virt-customize -a impish-server-cloudimg-amd64.img --install qemu-guest-agent
virt-customize -a impish-server-cloudimg-amd64.img --run-command 'mkdir -p /home/ansible/.ssh'
virt-customize -a impish-server-cloudimg-amd64.img --ssh-inject ansible:file:/root/keys/id_mykeys.pub
virt-customize -a impish-server-cloudimg-amd64.img --run-command 'chown -R ansible:ansible /home/ansible'
virt-customize -a impish-server-cloudimg-amd64.img --upload /root/ansible:/etc/sudoers.d/ansible
virt-customize -a impish-server-cloudimg-amd64.img --run-command 'chmod 0440 /etc/sudoers.d/ansible'
virt-customize -a impish-server-cloudimg-amd64.img --run-command 'chown root:root /etc/sudoers.d/ansible'
virt-customize -a impish-server-cloudimg-amd64.img --run-command '>/etc/machine-id' # important step so your clones get unique mac address / network details.
Now we create a VM in proxmox and use our customized, cloud-init enabled image as the disk image for the VM:
#create vm + customize
qm create 9000 --name "ubuntu-impish-cloudinit-template" --memory 2048 --cores 2 --net0 virtio,bridge=vmbr0
qm importdisk 9000 impish-server-cloudimg-amd64.img ZFS01
qm set 9000 --scsihw virtio-scsi-pci --scsi0 ZFS01:vm-9000-disk-0
qm set 9000 --boot c --bootdisk scsi0
qm set 9000 --ide2 ZFS01:cloudinit
qm set 9000 --serial0 socket --vga serial0
qm set 9000 --agent enabled=1
Finally, convert to template:
# convert vm to template
qm template 9000
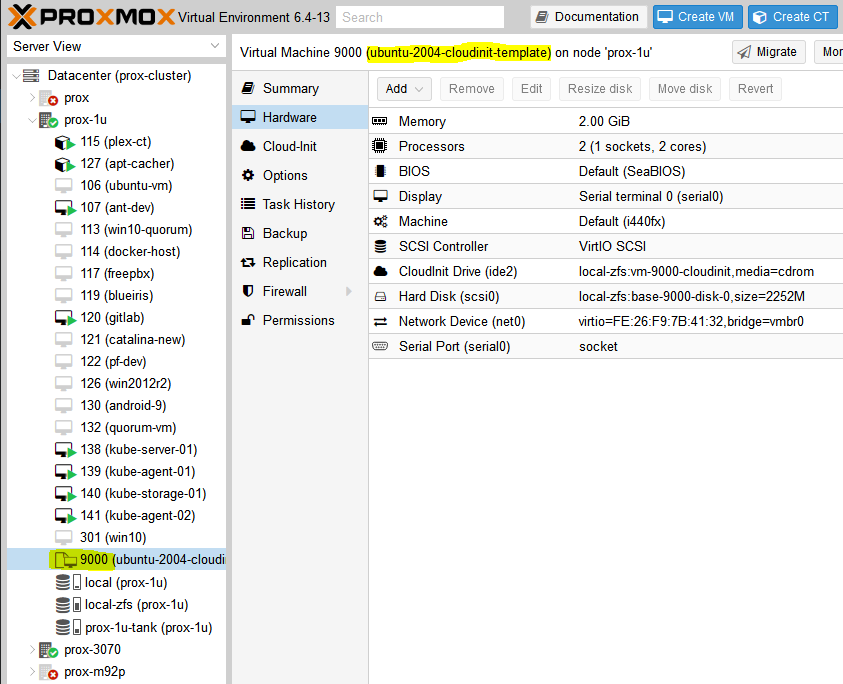
You should now have a template in your GUI that looks like this:
How to get the latest link to use with wget
To be more specific on how we got the command to use from above, I will show you how to find the latest version of the Debian Cloud Image to use.
Start by visiting the Debian Official Cloud Images page. The version I want to work with is Bullseye because this is the Debian 11 version and most current.

Next click on the current version of the images which for me is 20220613-1045/

Then choose the .qcow2 image and copy the link address by right clicking it. Paste that after the wget command in your ProxMox host.

How to download an image directly to ProxMox server
Additionally you can also use a feature in newer versions of ProxMox that will download from a link directly and then automatically add that image to the correct (/var/lib/vz/template/iso/) directory ProxMox checks in with during creation of a VM so will it appear on the list of image options. This is not strictly for the process we are working on right now, and can be used for simple regular Debian base images, or etc.

Table of Contents
- Download a base Debian cloud image
- Create a Proxmox VM using the image
- Usage
Настройка дисковых накопителей
В первую очередь, следует настроить хранилище, которое пригодится для сохранения данных ВМ и резервных копий. Далее приведём пример дисковой разметки, который в реальности подходит лишь для тестовых целей. Если речь идёт о реальных условиях, следует применять программный либо аппаратный RAID-массив, что позволит исключить утерю данных при выходе дисков из строя.
Итак, предположим, что физический сервер имеет 2 диска — /dev/sda, где установлен гипервизор, и пустой диск /dev/sdb, планируемый к использованию для хранения данных ВМ. Дабы система увидела новое хранилище, следует воспользоваться наиболее простым и эффективным способом — подключить его, как обычную директорию. Однако перед этим надо выполнить ряд подготовительных действий. Давайте рассмотрим, каким образом подключить новый диск /dev/sdb любого размера, отформатировав его в файловую систему ext4.
1.Первым делом размечаем диск, создавая новый раздел:
2.Потом нажимаем o или g (разметить диск в MBR или GPT).
3.Далее жмём клавишу n (создаём новый раздел).
4.Потом клавишу w (чтобы сохранить изменения).
5.Тепeрь файловую систему ext4:
6.Пришло время создать директорию, где будем монтировать раздел:
7.Откроем конфигурационный файл для редактирования:
8.Добавим туда новую строку:
/dev/sdb1 /mnt/storage ext4 defaults 0 09.После внесения изменений сохраним их сочетанием Ctrl + X.
10.И проверим, что всё работает, отправив сервер в перезагрузку:11.Потом проверим смонтированные разделы:
По идее, вывод команды покажет, что /dev/sdb1 смонтирован в директорию /mnt/storage. Таким образом, наш накопитель к работе готов.
Create VMs from cloud-init template
Ansible Playbooks
I have ansible installed on my desktop and will run the playbooks on my local machine which will call my Proxmox Host/Server, and the proxmoxer module will execute the request and create our vms.
First, simple hosts file setup, in a folder called
playbook/, a file namedhosts:And then, a very simple playbook, let’s call it
playbook/create-cloud-vm.yml
'Deploy our Cloud-init VMs'
DON’T hard code your creds like this and DO look into an
ansible-vaultsetup for fetching/injecting creds at runtime so you don’t have them lying around or accidentally commit to source. Version 2 of this write-up will have a security section at a later date. These are just general notes for now.Run Playbooks
Right, there’s nothing left to it but to do it, from your local desktop ansible setup, run:
ansible-playbook -i hosts playbooks/create-cloud-vm.ymlBackground for why I wanted to make a Proxmox Ubuntu cloud-init image
It is so much easier to just have a LXC get an IP via DHCP and then it’s accessible from hostname right off the bat (I use pfSense for DHCP/DNS – all DHCP leases are entered right into DNS). Regardless, I know Kubernetes is the new hotness so I figured I need to learn it. Every tutorial says you need a master and at least two worker nodes. No sense making three separate virtual machines – let’s use the magic of virtualization and clone some images! I plan on using Terraform to deploy the virtual machines for my Kubernetes cluster (as in, I’ve already used this Proxmox Ubuntu cloud-init image to make my own Kubernetes nodes but haven’t documented it yet).
Conclusion
This felt like a quick-n-dirty tutorial for how to use Terraform to deploy virtual machines in Proxmox but looking back, there is a decent amount of detail. It took me quite a while to work through permission issues, hostnames being invalid (turns out you can’t have underscores (_) in hostnames, duh, that took an hour to find), assigning roles to users vs the associated API keys, etc. but I’m glad I worked through everything and can pass it along. Check back soon for my next post on using Terraform to deploy a full set of Kubernetes machines to a Proxmox cluster (and thrilling sequel to that post, Using Ansible to bootstrap a Kubernetes Cluster)!
