

После установки гостевой системы на Proxmox для того чтобы не было проблем с производительностью и резервным копированием необходимо произвести некоторые действия.
- 1. Ballooning
- 2. QEMU Guest agent
- Guest VM: Install QEMU guest agent
- Proxmox: enable QEMU guest agent for the guest VM
- Setup QEMU guest agent service
- Proxmox : Validate configuration
- Table of Contents
- Proxmox VE VM Config
- Execute Command
- Enable
- CentOS / RHEL
- Use
- Installation on Windows
- Installation on Linux
- Troubleshooting
- Timed out waiting for device
- Agent on Windows is started but doesn’t work
- Intro
- Image Prep
- Proxmox Host
- Create VM
- Clean Up
- Outro
- Intro
- Pre-Flight Check
- Proxmox Host
- Dev Machine
- Terraform Credentials
- Terraform Configuration
- Proxmox Provider Install
- Terraform Usage
- Outro
1. Ballooning
Для эффективного использования ресурсов Proxmox поддерживает технологию ballooning.
Ballooning – это динамическое управление памятью. Другими словами, вы прописываете в настройках виртуальной машины минимальный и максимальный объем памяти, выделяемой этой машине, а далее Proxmox сам распределяет необходимые ресурсы. Таким образом уменьшается влияние гостевой системы на весь хост.
Для начала выставим желательные параметры в настройках машины.
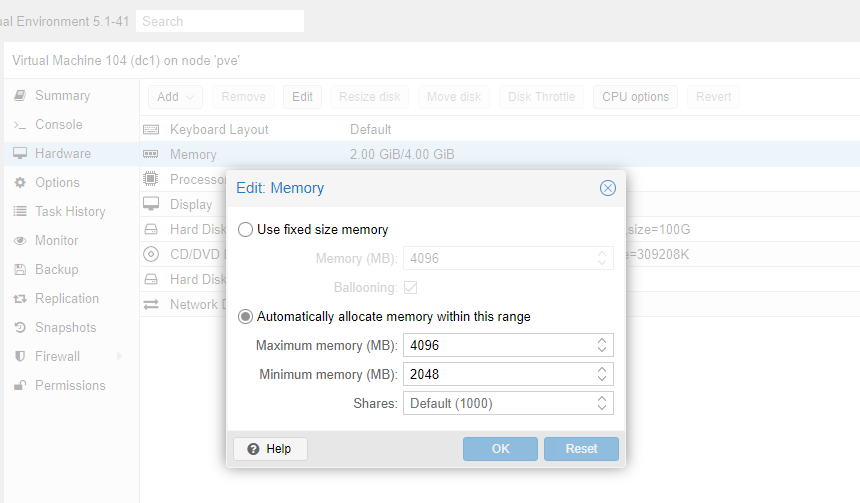
Чтобы их применить, машину нужно выключить и включить обратно.
Стабильная версия драйверов: https://fedorapeople.org/groups/virt/virtio-win/direct-downloads/stable-virtio/virtio-win.iso
Перейдем на гостевую систему и создадим каталог Balloon в папке Program files (c:/ Program files /Balloon). В эту папку со скачанного диска нужно скопировать драйвера для вашей операционной системы.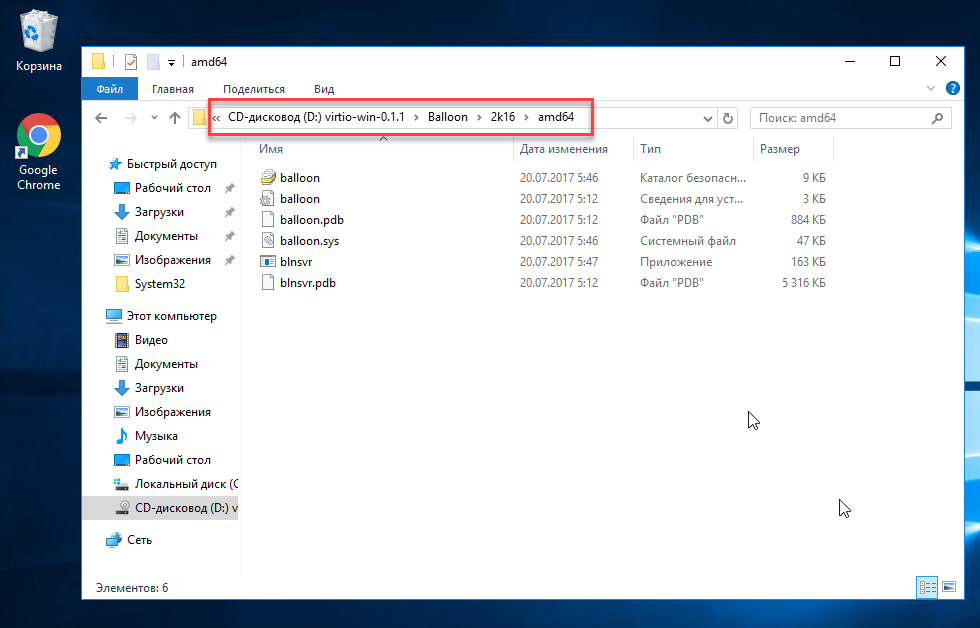
В диспетчере устройств появится новое оборудование и на него нужно установить эти драйверы.
После этого необходимо установить ballooning как службу.
Win + X, Выполнить, cmd
cd /
cd Program Files/Balloon
blnsrv -i
Win + X, Выполнить, services.msc
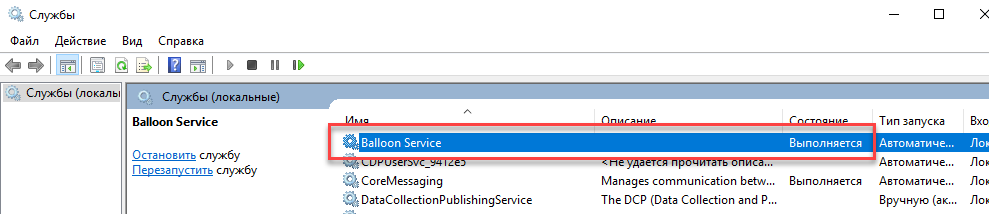
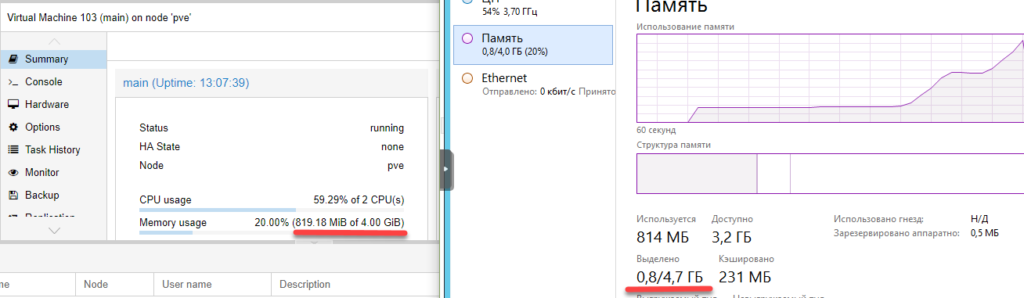
Выделение памяти теперь работает коректно.
2. QEMU Guest agent
Следующее что нужно сделать – установить QEMU Guest agent. Без этого не будет работать поддержка VSS (Volume Shadow Copy Service) т.е. служба теневого копирования тома.
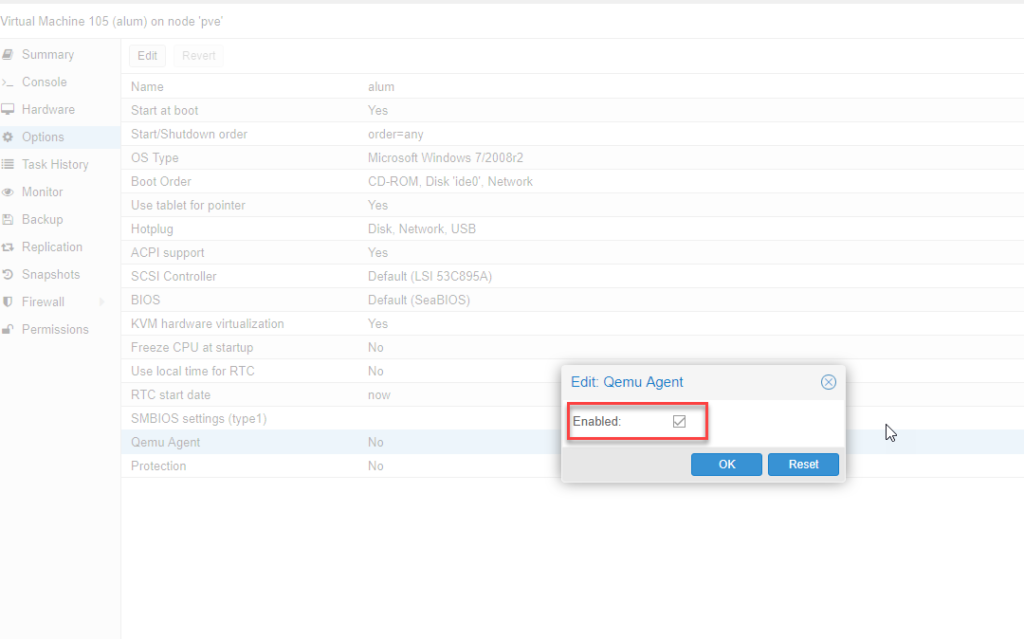
В настройках виртуальной машины включим агента. Чтобы настройки применились – выключим и включим снова данную виртуальную машину.
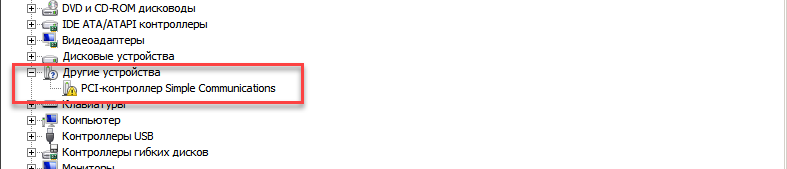
У нас появилось новое устройство:
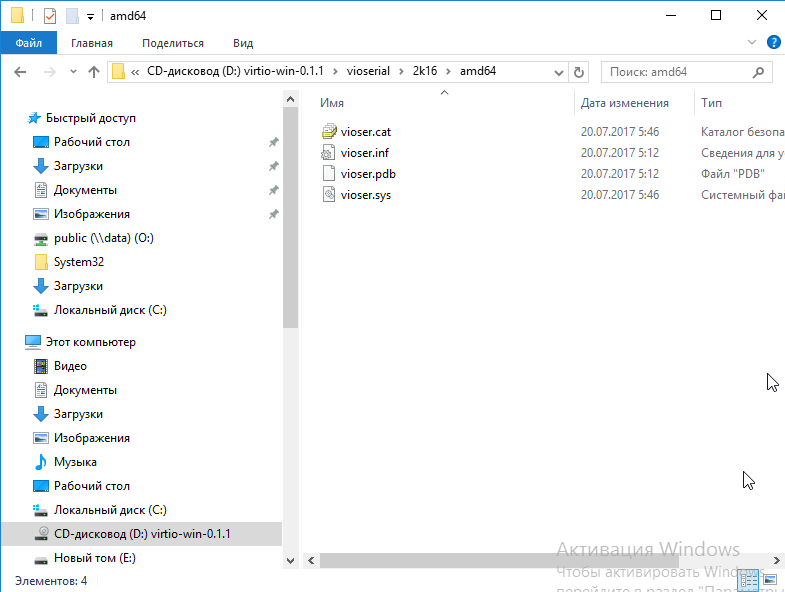
Драйверы находятся на том же диске в папке vioserial
Устанавливаем и проверяем, что QEMU Guest agent запущен в сервисах.
I feel really stupid asking this, and I honestly did search all over.
How do I fix a pfsense vm hosted inside Proxmox (qemu/kvm) host so that the guest agent works? Currently it just says under IPs: «Guest Agent not running».
Don’t really mind that the IPs aren’t listed, but in the instance that I want to reboot the host the pfsense box just sits there and does nothing. Doesn’t try to reboot. Kind of a bummer.
Years ago I moved pfsense out of the virtualized environment into real hardware again, but I still like to play with it in the vm for misc experiments.
Have you ACPI support enabled in Proxmox?
There is no Qemu guest agent inside pfSense at this time, but shutdown and reboot works fine with ACPI here.
When you run
dmesg | grep acpiin the pfSense shell, do you get something back?
I’m clearly not bright enough to know what I’m looking for.
dmesg | grep acpi
acpi0: <BOCHS BXPCFACP> on motherboard
acpi0: Power Button (fixed)
cpu0: <ACPI CPU> on acpi0
cpu1: <ACPI CPU> on acpi0
cpu2: <ACPI CPU> on acpi0
atrtc0: <AT realtime clock> port 0x70-0x71,0x72-0x77 irq 8 on acpi0
hpet0: <High Precision Event Timer> iomem 0xfed00000-0xfed003ff on acpi0
acpi_timer0: <24-bit timer at 3.579545MHz> port 0x608-0x60b on acpi0
pcib0: <ACPI Host-PCI bridge> port 0xcf8-0xcff on acpi0
acpi_syscontainer0: <System Container> on acpi0
acpi_syscontainer1: <System Container> port 0xcd8-0xce3 on acpi0
acpi_syscontainer2: <System Container> port 0x620-0x62f on acpi0
atkbdc0: <Keyboard controller (i8042)> port 0x60,0x64 irq 1 on acpi0
At any rate fixed the issue by simply turning off the guest agent item in proxmox. System then responds to normal ACPI.
After installing a new VM guest on Proxmox you may see in the overview page of the host that no guest agent is configured.
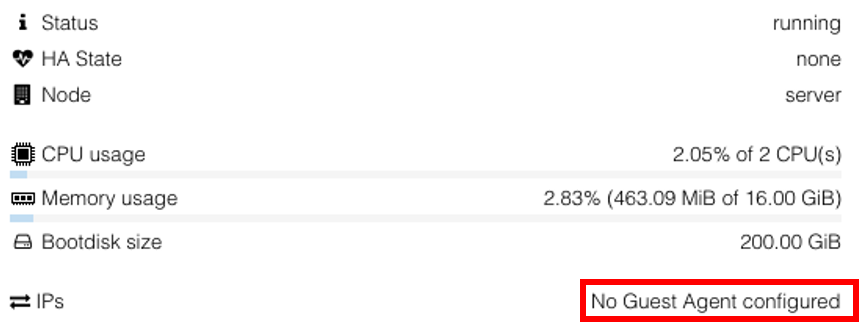
In the options section the guest agent is listed das disabled.
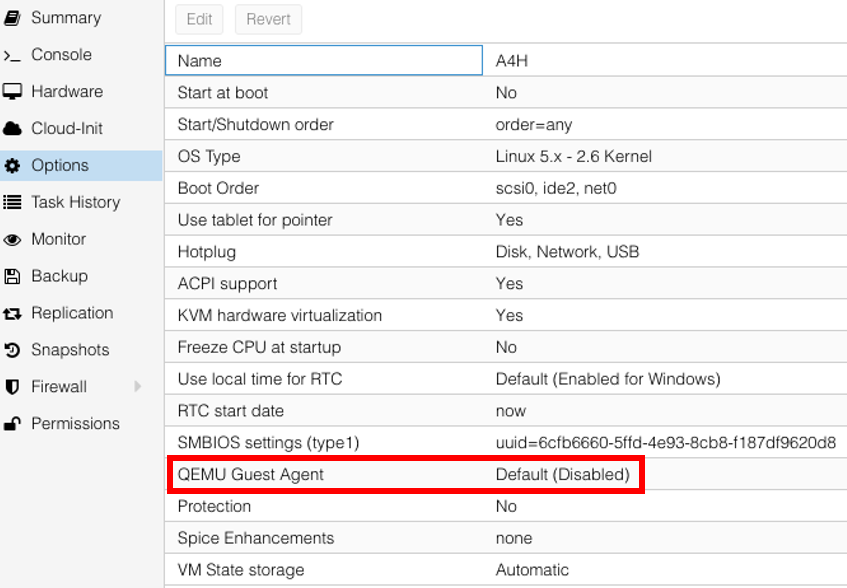
Setting up the guest agent is an optional task. The VM runs perfectly fine without a guest agent. The Proxmox documentation explains why it is a good idea to configure one and what are its benefits. To enable the QEMU guest agent, you have to prepare the VM and install the guest agent application on it.
Guest VM: Install QEMU guest agent
The guest agent is part of most distributions, including OpenSUSE:
Debian: apt-get install qemu-guest-agent
RedHat: yum install qemu-guest-agent
OpenSUSE: zypper install qemu-guest-agent
This should install and configure the agent. You don’t have to do anything more.
Proxmox: enable QEMU guest agent for the guest VM
Shut down the guest VM. Go to options, select the QEMU Guest Agent entry and edit the value. Enable the agent.
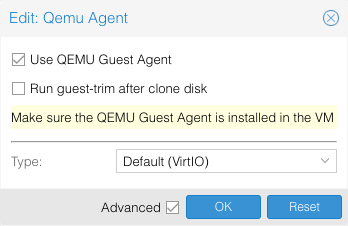

You have to start the guest VM. A reboot is not enough. Shutdown & Start.
Setup QEMU guest agent service
The QEMU guest agent must be running inside the guest VM for Proxmox to use it. After installing the package, the agent is configured to run automatically. Check if the service is running using systemctl. For OpenSUSE, the output should show a running qemu-ga service.
systemctl status show
Proxmox : Validate configuration
After enabling QEMU guest agent support and having the service installed and running inside a guest VM, Proxmox can now communicate with the agent.
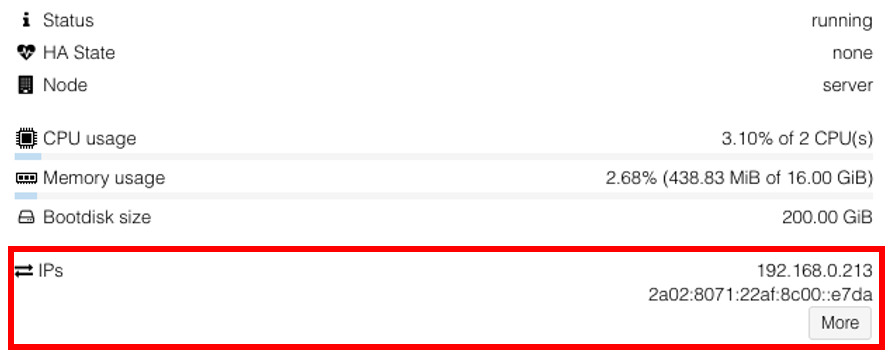
Table of Contents
Proxmox VE VM Config
Open the Proxmox VE UI
Open the vm
QEMU Guest Agent
Check: Use QEMU Guest Agent
Power off the vm and start it again
If this option is set, a new virtual serial device is shown to the vm, which will be accessed by the agent which will be installed in the guest os.
qm set VMID --agent 1
Execute Command
Enable
root@mypve:~# qm guest exec 101 /bin/ls
Agent error: The command guest-exec has been disabled for this instance
CentOS / RHEL
Open the config file.
vi /etc/sysconfig/qemu-ga
Search for the blacklist line.
BLACKLIST_RPC=guest-file-open,guest-file-close,guest-file-read,guest-file-write,guest-file-seek,guest-file-flush,guest-exec,guest-exec-status
Remove guest-exec (and guest-exec-status for async exec calls).
BLACKLIST_RPC=guest-file-open,guest-file-close,guest-file-read,guest-file-write,guest-file-seek,guest-file-flush
Restart the agent.
systemctl restart qemu-guest-agent
Use
qm guest exec <vmid> <command> <arg1> <arg2> ...
root@mypve:~# qm guest exec 101 /bin/ls -- "-la" "/etc/hosts"
{ "exitcode" : 0, "exited" : 1, "out-data" : "-rw-r--r--. 1 root root 158 Sep 10 2018 /etc/hosts\n"
}
Installation on Windows
Mount the ISO to the vm
Open the device manager
Search the device “PCI Simple Communications Controller”
Install the driver for this device from the mounted ISO
Start the Guest Agent installer from the mounted ISO (“X:\guest-agent\qemu-ga-x86_64.msi”)
Reboot the vm
Installation on Linux
For Debian/Ubuntu based systems:
apt install qemu-guest-agent
For RedHat based systems:
yum install qemu-guest-agent
Start the service:
systemctl start qemu-guest-agent
Troubleshooting
Timed out waiting for device
Apr 10 18:14:39 pmg systemd[1]: dev-virtio\x2dports-org.qemu.guest_agent.0.device: Job dev-virtio\x2dports-org.qemu.guest_agent.0.device/start ti
Apr 10 18:14:39 pmg systemd[1]: Timed out waiting for device /dev/virtio-ports/org.qemu.guest_agent.0.
You probably forgot to enable the QEMU Guest Agent setting in the vm settings.
Agent on Windows is started but doesn’t work
If the QEMU Guest Agent service is startet but in the vm overview you see “QEMU Guest Agent not running” then you probably forgot to enable the QEMU Guest Agent setting in the vm settings.
The qemu-guest-agent is a helper daemon, which is installed in the guest. It is used to exchange information between the host and guest, and to execute command in the guest.
In Proxmox VE, the qemu-guest-agent is used for mainly two things:
- To properly shutdown the guest, instead of relying on ACPI commands or windows policies
- To freeze the guest file system when making a backup (on windows, use the volume shadow copy service VSS).
Installation Host
You have to enable the guest-agent per VM, either set it in the GUI to “Yes” under options (see screenshot):
or via CLI:
qm set VMID --agent 1
Guest Linux
On Linux you have to simply install the qemu-guest-agent, please refer to the documentation of your system.
We show here the commands for Debian/Ubuntu and Redhat based systems:
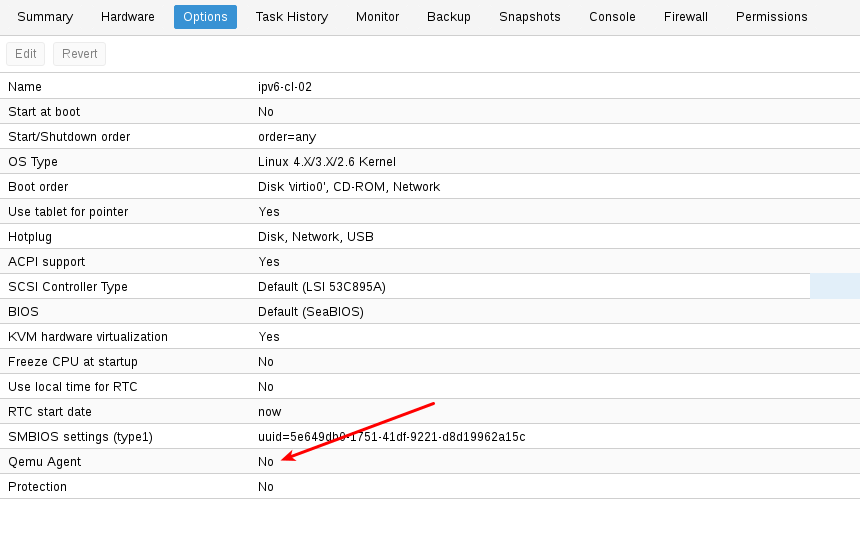
on Debian/Ubuntu based systems (with apt-get) run:
apt-get install qemu-guest-agent
and on Redhat based systems (with yum):
yum install qemu-guest-agent
- First you have to download the virtio-win driver iso.
- Then install the virtio-serial driver:
- Attach the ISO to your windows VM (virtio-*.iso)
- Go to the windows Device Manager
- Look for “PCI Simple Communications Controller”
- Right Click -> Update Driver and select on the mounted iso in DRIVE:\vioserial\<OSVERSION>\ where <OSVERSION> is your Windows Version (e.g. 2k12R2 for Windows 2012 R2)
- After that, you have to install the qemu-guest-agent:
- Go to the mounted ISO in explorer
- Execute the installer with double click (either qemu-ga-x64.msi (64-bit) or qemu-ga-x86.msi (32-bit)
- After that the qemu-guest-agent should be up and running. You can validate this in the list of Window Services, or in a PowerShell with:
PS C:\Users\Administrator> Get-Service QEMU-GA
Status Name DisplayName
------ ---- -----------
Running QEMU-GA QEMU Guest Agent
Testing that the communication with the guest agent is working
The communication with the guest agent takes place over a unix socket located in /var/run/qemu-server/<my_vmid>.qga You can test the communication qm agent:
qm agent <vmid> ping
if the qemu-guest-agent is correctly runnning in the VM, it will return without an error message.
Intro
In this post I will cover the process to import
and use cloud based images in Proxmox. Cloud based
images are handy because they are configurable on
boot via
.
I will use the image created in this post in a future
post on how to deploy VMs in Proxmox via Terraform.
- Proxmox — 7.0-11
- Ubuntu — 20.04
Image Prep
Prior to uploading the cloud images to the Proxmox
host, I will be downloading them to an Ubuntu host
to install the
.
The guest agent allows for introspection into the guest from
the host and better integrations to control the
guest shutdown, restart etc..
The
package allows you to install packages into an image
without booting it up. The
package conflicts with Proxmox. For this reason, I
am using my Ubuntu host to complete this step.
Lets get started by downloading a cloud image.
curl -O http://cloud-images.ubuntu.com/releases/focal/release/ubuntu-20.04-server-cloudimg-amd64.img Now install
.
sudo apt install libguestfs-tools -yInstall the
into the image.
sudo virt-customize -a focal-server-cloudimg-amd64.img --install qemu-guest-agent
# output
[ 0.0] Examining the guest ...
[ 27.1] Setting a random seed
virt-customize: warning: random seed could not be set for this type of guest
[ 27.3] Setting the machine ID in /etc/machine-id
[ 27.4] Installing packages: qemu-guest-agent
[ 130.6] Finishing off
Once the package is installed, copy the image to the
Proxmox host.
scp ubuntu-20.04-server-cloudimg-amd64.img <user>@<host>:/tmp/Proxmox Host
Create a new VM that will be used as the base for
future images.
qm create 9001 \\ --name ubuntu-2004-cloud-init --numa 0 --ostype l26 \\ --cpu cputype=host --cores 2 --sockets 1 \\ --memory 2048 \\ --net0 virtio,bridge=vmbr0Import the cloud image to a storage pool.
qm importdisk 9001 /tmp/ubuntu-20.04-server-cloudimg-amd64.img local-lvm
# output
Successfully imported disk as 'unused0:local-lvm:vm-9001-disk-0'
Attach the disk to the VM as a SCSI drive.
qm set 9001 --scsihw virtio-scsi-pci --scsi0 local-lvm:vm-9001-disk-0
# output
update VM 9001: -scsi0 local-lvm:vm-9001-disk-0 -scsihw virtio-scsi-pci
Create a
CDROM drive. This allows you to
assign configuration to the VM on boot.
qm set 9001 --ide2 local-lvm:cloudinit
# output
update VM 9001: -ide2 local-lvm:cloudinit Logical volume "vm-9001-cloudinit" created.
Make the VM disk bootable.
qm set 9001 --boot c --bootdisk scsi0
# output
update VM 9001: -boot c -bootdisk scsi0
Assign a serial console to the VM. This
required by some
images.
qm set 9001 --serial0 socket --vga serial0
# output
update VM 9001: -serial0 socket -vga serial0
Enable the guest agent.
qm set 9001 --agent enabled=1
# output
update VM 9001: -agent enabled=1
Convert the VM to a template. The template
will be used to clone future VMs.
qm template 9001
# output
Renamed "vm-9001-disk-0" to "base-9001-disk-0" in volume group "pve"
Logical volume pve/base-9001-disk-0 changed.
WARNING: Combining activation change with other commands is not advised.
Create VM
Now that the VM template is built, lets create a
VM from the template.
qm clone 9001 999 \\ --name ubuntu-test \\ --full \\ --storage local-lvm
# output
create full clone of drive ide2 (local-lvm:vm-9001-cloudinit) Logical volume "vm-999-cloudinit" created.
Assign an SSH key to the VM that will be applied
via
on boot.
qm set 999 --sshkey ~/.ssh/id_rsa.pub
# output
update VM 999: -sshkeys ssh-rsa...
For this test I will assign an IP address to the VM
that will be applied via
on boot.
qm set 999 --ipconfig0 ip=192.168.255.60/24,gw=192.168.255.1
# output
update VM 999: -ipconfig0 ip=192.168.255.60/24,gw=192.168.255.1
Start the VM.
qm start 999
# output
generating cloud-init ISO
ssh ubuntu@192.168.255.60
# Accept hostkey
The authenticity of host '192.168.255.60 (192.168.255.60)' cant be established.
ECDSA key fingerprint is SHA256:4iiOYYaI1uS7cH1YqIByhZfTAJSgwtiQtLSMkkUHAdc.
Are you sure you want to continue connecting (yes/no/[fingerprint])? yes
ubuntu@ubuntu-test:~$Clean Up
Shutdown and delete the VM.
qm stop 999 && qm destroy 999Remove the orginal cloud image
rm /tmp/ubuntu-20.04-server-cloudimg-amd64.imgOutro
In this post, I covered the process to import an
Ubuntu cloud image as a VM template, deploy a
VM from the template and configure the VM via
.
Intro
Recently, I have started using Proxmox as a hypervisor in my home
lab. In this post I will show you how to provision Proxmox guest VMs using
Terraform. I use this method to deploy about 20 VMs across 3 Proxmox hosts
in my home lab.
- Proxmox — 7.0-11
- Terraform — 1.0.11
Pre-Flight Check
This post assumes you already have Terraform installed. Installation
instructions can be found in the
docs
for multiple platforms.
In a previous
post I
imported an Ubuntu cloud-init image to Proxmox. I will be using that image
to build the VMs via Terraform in this post.
Proxmox Host
When generating the token, the important part to note is the
flag. Without this, token based auth will not work.
pveum role add terraform-role -privs "VM.Allocate VM.Clone VM.Config.CDROM VM.Config.CPU VM.Config.Cloudinit VM.Config.Disk VM.Config.HWType VM.Config.Memory VM.Config.Network VM.Config.Options VM.Monitor VM.Audit VM.PowerMgmt Datastore.AllocateSpace Datastore.Audit"
pveum user add terraform@pve
pveum aclmod / -user terraform@pve -role terraform-role
pveum user token add terraform@pve terraform-token --privsep=0
# Output
┌──────────────┬──────────────────────────────────────┐
│ key │ value │
╞══════════════╪══════════════════════════════════════╡
│ full-tokenid │ terraform@pve!terraform-token │
├──────────────┼──────────────────────────────────────┤
│ info │ {"privsep":0} │
├──────────────┼──────────────────────────────────────┤
│ value │ 12345abc-a123-4567-b234-1233456789ab │
└──────────────┴──────────────────────────────────────┘
The token must be noted down. It cannot be accessed later.
Dev Machine
Terraform Credentials
# ~/.zshrc
export PM_API_TOKEN_ID="terraform@pve!terraform-token"
export PM_API_TOKEN_SECRET="12345abc-a123-4567-b234-1233456789ab"
Source the environment file, to load in the new variables into your environment.
Terraform Configuration
Create and change to a project directory.
mkdir -p ~/terraform/proxmox/ && cd ~/terraform/proxmox/ tells
Terraform about the providers being used.
# ~/terraform/proxmox/provider.tf
terraform { required_providers { proxmox = { source = "telmate/proxmox" version = "2.9.0" } }
}
is used to store variables used in other Terraform files. In
this file, we also define our VM parameters.
# ~/terraform/proxmox/vars.tf
variable "proxmox_host" { default = "172.31.254.11"
}
variable "ssh_key" { default = "ssh-rsa abc123..."
}
variable "virtual_machines" { default = { "tf-test-01" = { hostname = "tf-test" ip_address = "172.31.255.13/24" gateway = "172.31.255.1", vlan_tag = 100, target_node = "pmx01", cpu_cores = 2, cpu_sockets = 1, memory = "2048", hdd_size = "20G", vm_template = "ubuntu-2004-cloud-init", }, "tf-test-02" = { hostname = "tf-test" ip_address = "172.31.255.14/24" gateway = "172.31.255.1", vlan_tag = 100, target_node = "pmx02", cpu_cores = 2, cpu_sockets = 1, memory = "2048", hdd_size = "20G", vm_template = "ubuntu-2004-cloud-init", }, }
}
is used to define the resources that will be provisioned.
The below file has a
loop that
loops through the
variable
in the
file to
create multiple resources.
# ~/terraform/proxmox/main.tf
provider "proxmox" { pm_api_url = "https://${var.proxmox_host}:8006/api2/json" pm_tls_insecure = true # Uncomment the below for debugging. # pm_log_enable = true # pm_log_file = "terraform-plugin-proxmox.log" # pm_debug = true # pm_log_levels = { # _default = "debug" # _capturelog = "" # }
}
resource "proxmox_vm_qemu" "virtual_machines" { for_each = var.virtual_machines name = each.value.hostname target_node = each.value.target_node clone = each.value.vm_template agent = 1 os_type = "cloud-init" cores = each.value.cpu_cores sockets = each.value.cpu_sockets cpu = "host" memory = each.value.memory scsihw = "virtio-scsi-pci" bootdisk = "scsi0" disk { slot = 0 size = each.value.hdd_size type = "scsi" storage = "local-lvm" iothread = 1 } network { model = "virtio" bridge = "vmbr0" tag = each.value.vlan_tag } # Not sure exactly what this is for. something about # ignoring network changes during the life of the VM. lifecycle { ignore_changes = [ network, ] } # Cloud-init config ipconfig0 = "ip=${each.value.ip_address},gw=${each.value.gateway}" sshkeys = var.ssh_key
}
output "vm_ipv4_addresses" { value = { for instance in proxmox_vm_qemu.virtual_machines: instance.name => instance.default_ipv4_address }
}
Proxmox Provider Install
Install the Proxmox Terraform provider.
Terraform Usage
Ask Terraform to plan the changes that will be deployed. This
is a dry-run and no changes will be applied.
If you are happy with what you see, ship it by applying the changes.
If the stars aligned correctly and the ducks are standing in a row,
you will have 2x new Ubuntu VMs provisioned in Proxmox.
If you made a mistake or no longer need to resources, throw them in
the virtual trash.
Outro
In this post, I showed you how to configure and use the Proxmox
Terraform provider to provision VMs in Proxmox. Terraform is a
fantastic tool and the Proxmox provider works really well. They
make an excellent combination of tools when used together.
