
")
- Introduction
- Prerequisites
- Step 1 — Installing the Dependencies
- Step 2 — Installing GitLab
- Step 3 — Adjusting the Firewall Rules
- Step 4 — Editing the GitLab Configuration File
- Step 5 — Performing Initial Configuration Through the Web Interface
- Logging In for the First Time
- Updating Your Password
- Adjusting your Profile Settings
- Changing Your Account Name
- Adding an SSH Key to your Account
- Step 6 — Restricting or Disabling Public Sign-ups
- Disabling Sign-ups
- Restricting Sign-ups By Domain
- Restricting Project Creation
- Renewing Let’s Encrypt Certificates
- Conclusion
- 1. Установка репозитория
- 2. Installing the software package
- 3. Deploying GitLab
- 4. Deploying a program with Apache installed
- Setting up GitLab on Ubuntu
- 1. Authorization
- 2. Account setup
- 3. Set up an SSH key
- 4. Deregistration
- 5. Create a project
- Conclusions
Introduction
The GitLab project enables you to create a GitLab instance on your own hardware with a minimal installation mechanism. In this guide, you will learn how to install and configure GitLab Community Edition on an Ubuntu 20.04 server.
Prerequisites
- An Ubuntu 20.04 server with a non- root
sudo
user and basic firewall. To set this up, follow our Ubuntu 20.04 initial server setup guide
.
- 4 cores for your CPU
- 4GB of RAM for memory
- A domain name pointed at your server. For more information, read our documentation on how to get started with DNS on DigitalOcean
. This tutorial will useyour_domain
as an example, but be sure to replace this with your actual domain name.
Step 1 — Installing the Dependencies
Before installing GitLab, it is important to install the software that it leverages during installation and on an ongoing basis. The required software can be installed from Ubuntu’s default package repositories.
First, refresh the local package index:
- update
Then install the dependencies by entering this command:
- ca-certificates openssh-server postfix tzdata perl
You will likely have some of this software installed already. For the postfix
installation, select Internet Site
when prompted. On the next screen, enter your server’s domain name to configure how the system will send mail.
Now that you have the dependencies installed, you’re ready to install GitLab.
Step 2 — Installing GitLab
With the dependencies in place, you can install GitLab. This process leverages an installation script to configure your system with the GitLab repositories.
First, move into the /tmp
directory:
- /tmp
Then download the installation script:
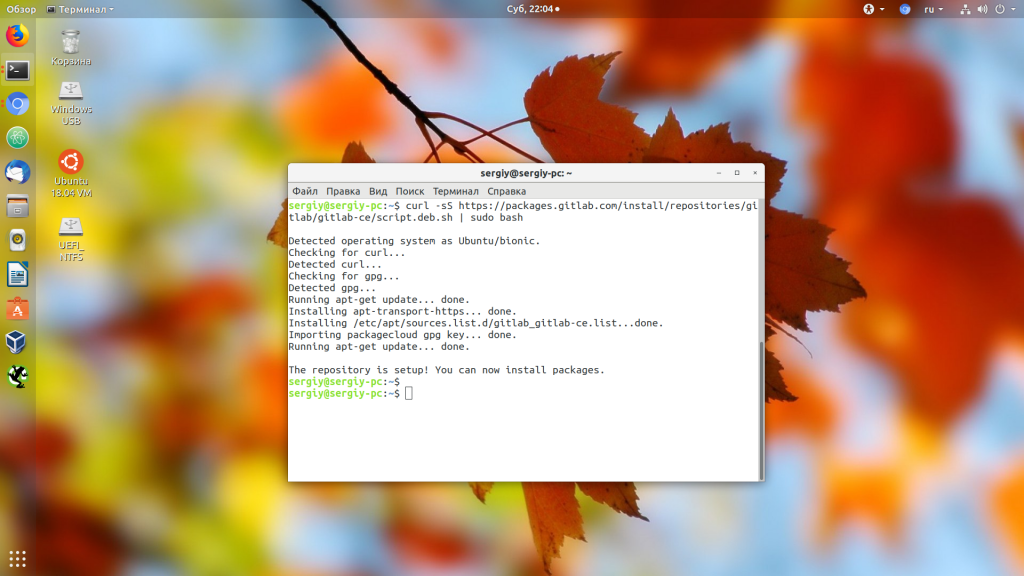
- https://packages.gitlab.com/install/repositories/gitlab/gitlab-ce/script.deb.sh
Feel free to examine the downloaded script to ensure that you are comfortable with the actions it will take. You can also find a hosted version of the script on the GitLab installation instructions
:
- /tmp/script.deb.sh
Once you are satisfied with the safety of the script, run the installer:
- /tmp/script.deb.sh
The script sets up your server to use the GitLab maintained repositories. This lets you manage GitLab with the same package management tools you use for your other system packages. Once this is complete, you can install the actual GitLab application with apt
:
- gitlab-ce
This installs the necessary components on your system and may take some time to complete.
Step 3 — Adjusting the Firewall Rules
View the current status of your active firewall by running:
- ufw status
 Status: active
To Action From
-- ------ ----
OpenSSH ALLOW Anywhere
OpenSSH (v6) ALLOW Anywhere (v6)
The current rules allow SSH traffic through, but access to other services is restricted. Since GitLab is a web application, you need to allow HTTP access. Because you will be taking advantage of GitLab’s ability to request and enable a free TLS/SSL certificate from Let’s Encrypt
, also allow HTTPS access.
The protocol to port mapping for HTTP and HTTPS are available in the /etc/services
file, so you can allow that traffic in by name. If you didn’t already have OpenSSH traffic enabled, you should allow that traffic:
- ufw allow http
- ufw allow https
- ufw allow OpenSSH
You can check the ufw status
again to ensure that you granted access to at least these two services:
- ufw status
 Status: active
To Action From
-- ------ ----
OpenSSH ALLOW Anywhere
80/tcp ALLOW Anywhere
443/tcp ALLOW Anywhere
OpenSSH (v6) ALLOW Anywhere (v6)
80/tcp (v6) ALLOW Anywhere (v6)
443/tcp (v6) ALLOW Anywhere (v6)
This output indicates that the GitLab web interface is now accessible once you configure the application.
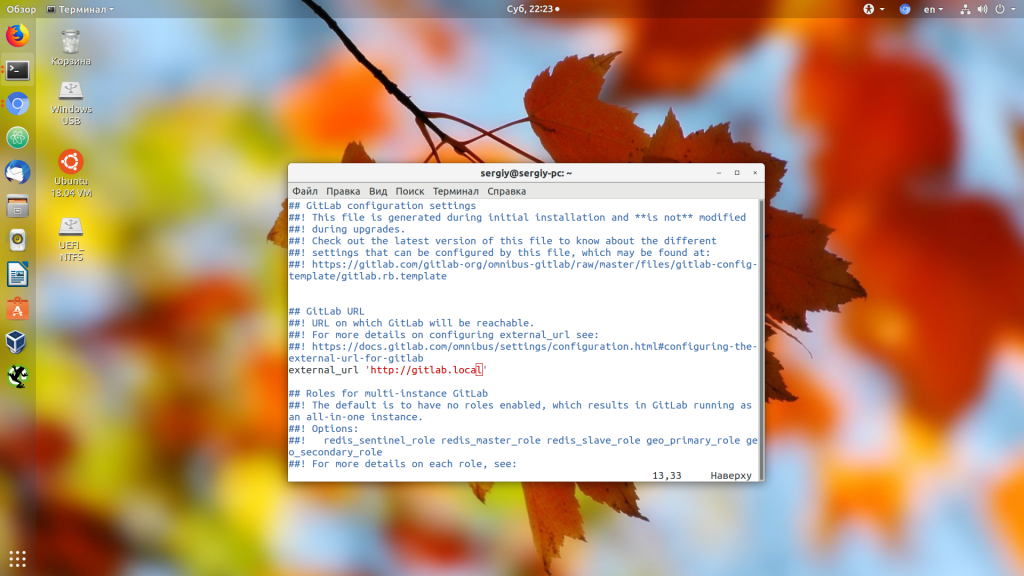
Step 4 — Editing the GitLab Configuration File
Before you can use the application, update the configuration file and run a reconfiguration command. First, open GitLab’s configuration file with your preferred text editor. This example uses nano
:
- /etc/gitlab/gitlab.rb
.
## GitLab URL
##! URL on which GitLab will be reachable.
##! For more details on configuring external_url see:
##! https://docs.gitlab.com/omnibus/settings/configuration.html#configuring-the-external-url-for-gitlab
##!
##! Note: During installation/upgrades, the value of the environment variable
##! EXTERNAL_URL will be used to populate/replace this value.
##! On AWS EC2 instances, we also attempt to fetch the public hostname/IP
##! address from AWS. For more details, see:
##! https://docs.aws.amazon.com/AWSEC2/latest/UserGuide/instancedata-data-retrieval.html
external_url 'http  s
://  your_domain
'
.
letsencrypt['contact_emails'] = ['sammy@example.com'] Once you’re done making changes, save and close the file. If you’re using nano
, you can do this by pressing CTRL+X
, then Y
, then ENTER
.
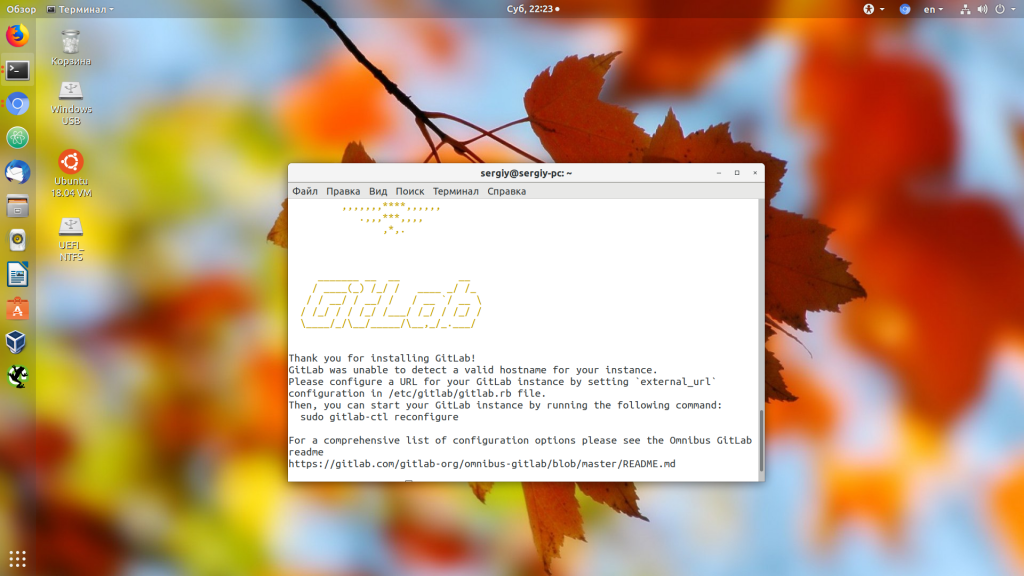
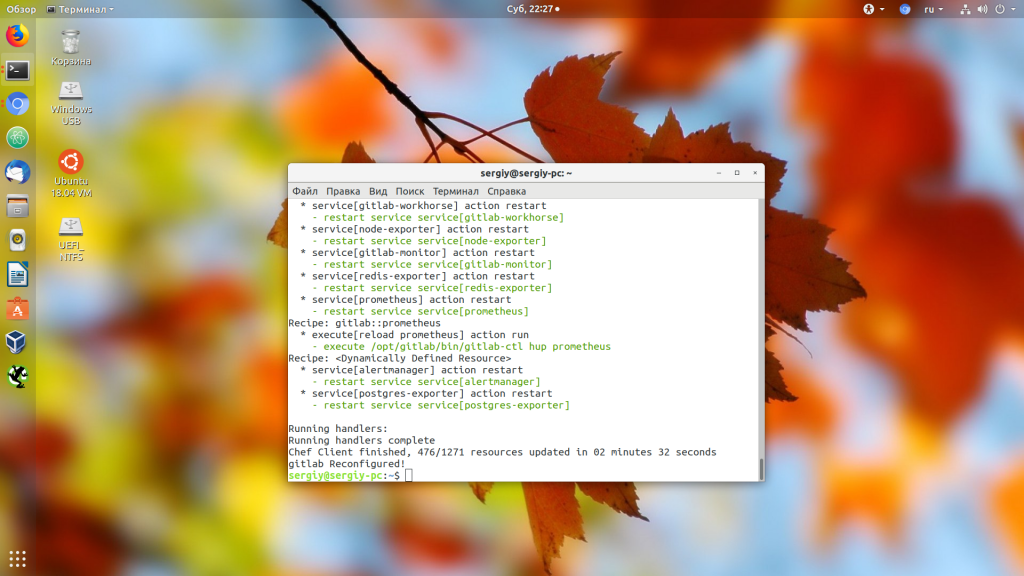
- gitlab-ctl reconfigure
This will initialize GitLab using the information it can find about your server. This is a completely automated process, so you will not have to answer any prompts. The process will also configure a Let’s Encrypt certificate for your domain.
Step 5 — Performing Initial Configuration Through the Web Interface
With GitLab running, you can perform an initial configuration of the application through the web interface.
Logging In for the First Time
Visit the domain name of your GitLab server in your web browser:
https:// your_domain On your first visit, you’ll be greeted with a login page:

- /etc/gitlab/initial_root_password
 # WARNING: This value is valid only in the following conditions
# 1. If provided manually (either via `GITLAB_ROOT_PASSWORD` environment variable or via `gitlab_rails['initial_root_password']` setting in `gitlab.rb`, it was provided before database was seeded for the firs$
# 2. Password hasn't been changed manually, either via UI or via command line.
#
# If the password shown here doesn't work, you must reset the admin password following https://docs.gitlab.com/ee/security/reset_user_password.html#reset-your-root-password.
Password: YOUR_PASSWORD# NOTE: This file will be automatically deleted in the first reconfigure run after 24 hours. - Username: root
- Password: [the password listed on
/etc/gitlab/initial_root_password
]
Enter these values into the fields and click the Sign in
button. You will be signed in to the application and taken to a landing page that prompts you to begin adding projects:

You can now fine tune your GitLab instance.
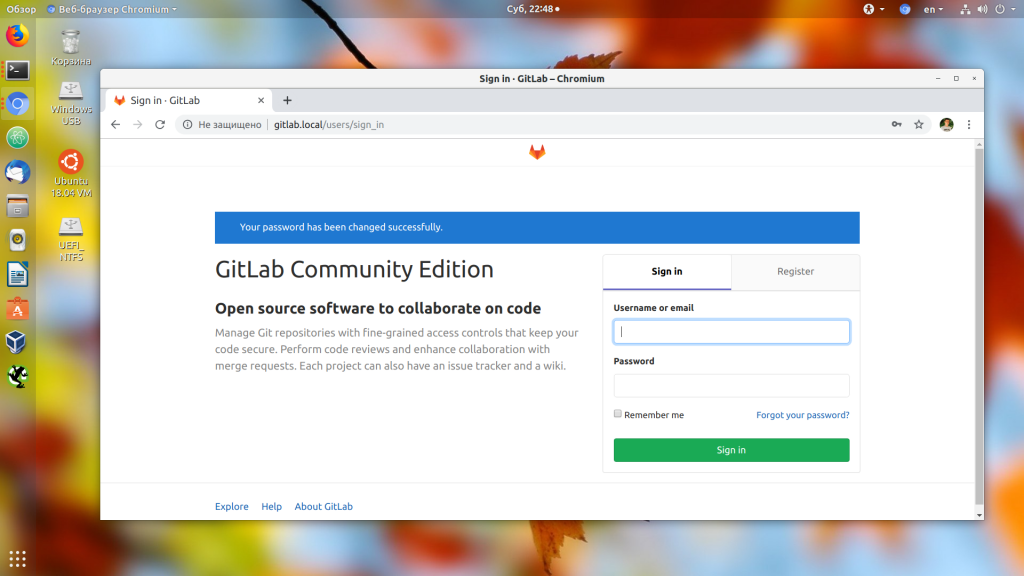
Updating Your Password
One of the first things you should do after logging in, is change your password. To make this change, click on the icon in the upper-right corner of the navigation bar and select Edit Profile
:


You’ll be taken back to the login screen with a notification that your password has been changed. Enter your new password to log back into your GitLab instance:

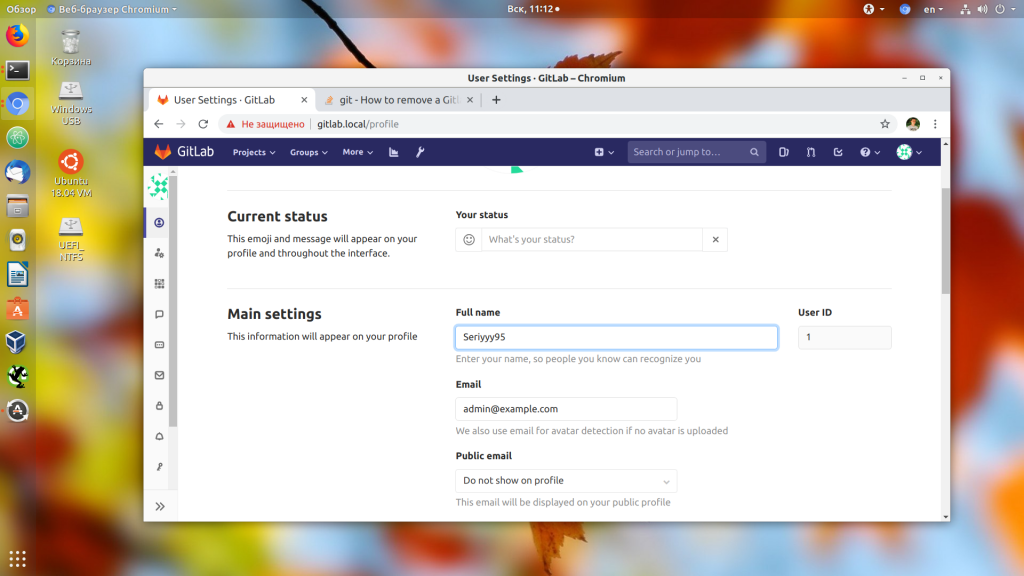
Adjusting your Profile Settings
GitLab selects some reasonable defaults, but these are not usually appropriate once you start using the software.

Click on the Update Profile settings
button at the bottom when you are finished with your updates. You’ll be prompted to enter your password to confirm changes.
Changing Your Account Name
Next, select Account
in the left navigation bar:


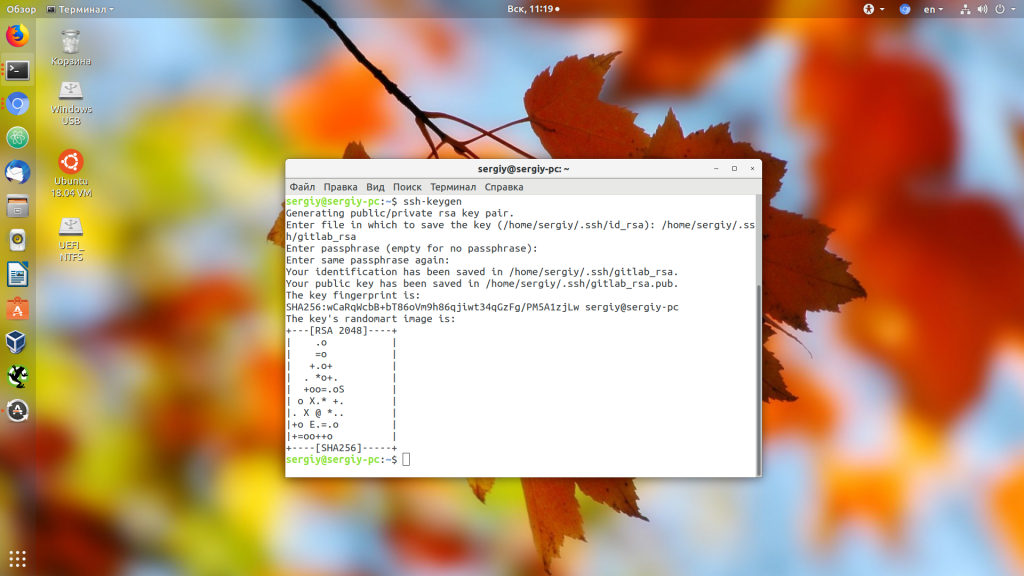
Adding an SSH Key to your Account
You can enable SSH keys with Git to interact with your GitLab projects. To do this, you need to add your SSH public key to your GitLab account.
In the left navigation bar, select SSH Keys
:

If you already have an SSH key pair created on your local computer
, you can view the public key by typing:
- ~/.ssh/id_rsa.pub
ssh-rsa AAAAB3NzaC1yc2EAAAADAQABAAABAQDMuyMtMl6aWwqBCvQx7YXvZd7bCFVDsyln3yh5/8Pu23LW88VXfJgsBvhZZ9W0rPBGYyzE/TDzwwITvVQcKrwQrvQlYxTVbqZQDlmsC41HnwDfGFXg+QouZemQ2YgMeHfBzy+w26/gg480nC2PPNd0OG79+e7gFVrTL79JA/MyePBugvYqOAbl30h7M1a7EHP3IV5DQUQg4YUq49v4d3AvM0aia4EUowJs0P/j83nsZt8yiE2JEYR03kDgT/qziPK7LnVFqpFDSPC3MR3b8B354E9Af4C/JHgvglv2tsxOyvKupyZonbyr68CqSorO2rAwY/jWFEiArIaVuDiR9YM5 sammy@mydesktop Copy this text and enter it into the Key
text box inside your GitLab instance.
If, instead, you get a different message, you do not yet have an SSH key pair configured on your machine:
cat: /home/sammy/.ssh/id_rsa.pub: No such file or directory - ssh-keygen
Accept the defaults and optionally provide a password to secure the key locally:
 Generating public/private rsa key pair.
Enter file in which to save the key (/home/sammy/.ssh/id_rsa):
Enter passphrase (empty for no passphrase):
Enter same passphrase again:
Your identification has been saved in /home/sammy/.ssh/id_rsa.
Your public key has been saved in /home/sammy/.ssh/id_rsa.pub.
The key fingerprint is:
SHA256:I8v5/M5xOicZRZq/XRcSBNxTQV2BZszjlWaIHi5chc0 sammy@gitlab.docsthat.work
The key's randomart image is:
+---[RSA 2048]----+
| ..%o==B|
| *.E =.|
| . ++= B |
| ooo.o . |
| . S .o . .|
| . + .. . o|
| + .o.o ..|
| o .++o . |
| oo=+ |
+----[SHA256]-----+
Once you have this, you can display your public key as the previous example by entering this command:
- ~/.ssh/id_rsa.pub
ssh-rsa AAAAB3NzaC1yc2EAAAADAQABAAABAQDMuyMtMl6aWwqBCvQx7YXvZd7bCFVDsyln3yh5/8Pu23LW88VXfJgsBvhZZ9W0rPBGYyzE/TDzwwITvVQcKrwQrvQlYxTVbqZQDlmsC41HnwDfGFXg+QouZemQ2YgMeHfBzy+w26/gg480nC2PPNd0OG79+e7gFVrTL79JA/MyePBugvYqOAbl30h7M1a7EHP3IV5DQUQg4YUq49v4d3AvM0aia4EUowJs0P/j83nsZt8yiE2JEYR03kDgT/qziPK7LnVFqpFDSPC3MR3b8B354E9Af4C/JHgvglv2tsxOyvKupyZonbyr68CqSorO2rAwY/jWFEiArIaVuDiR9YM5 sammy@mydesktop Now you’re able to manage your GitLab projects and repositories from your local machine without having to provide your GitLab account credentials.
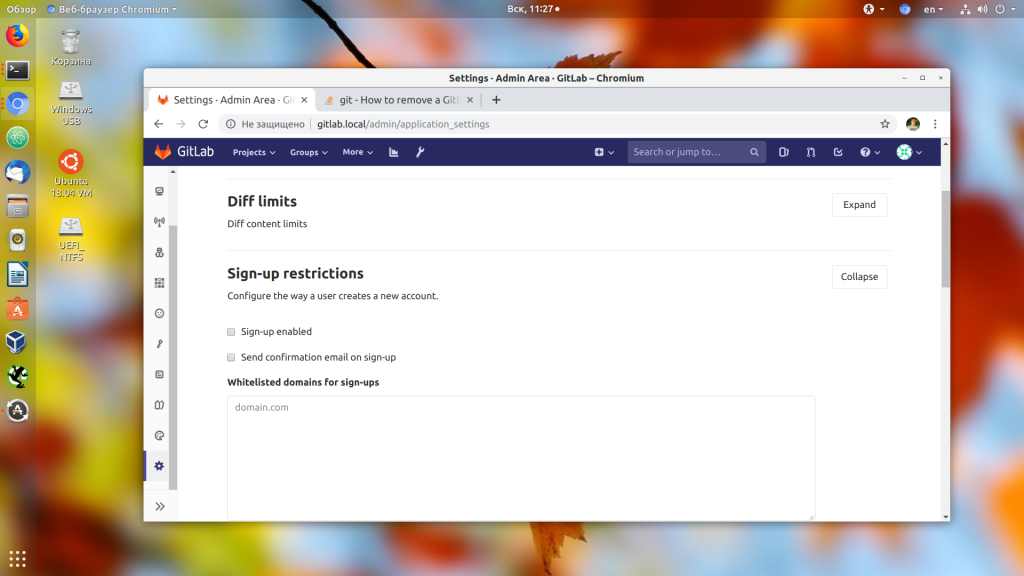
Step 6 — Restricting or Disabling Public Sign-ups
With your current setup, it is possible for anyone to sign up for an account when you visit your GitLab instance’s landing page. This may be what you want if you are seeking to host a public project. However, many times, more restrictive settings are desirable.

Select Settings
from the left navigation bar:

Disabling Sign-ups
If you wish to disable sign-ups completely, scroll to the Sign-up Restrictions
section and press Expand
to view the options.
Then deselect the Sign-up enabled
check box:

Remember to click on the Save changes
button after making your changes.
The sign-up section is now removed from the GitLab landing page.
Restricting Sign-ups By Domain
If you are using GitLab as part of an organization that provides email addresses associated with a domain, you can restrict sign-ups by domain instead of completely disabling them.
Next, add your domain or domains to the Whitelisted domains for sign-ups
box, one domain per line. You can use the asterisk “*” to specify wildcard domains:

When you’re finished, click on the Save changes
button.
The sign-up section is now removed from the GitLab landing page.
Restricting Project Creation

After your updates, remember to click on the Save changes
button.
Renewing Let’s Encrypt Certificates
By default, GitLab has a scheduled task set up to renew Let’s Encrypt certificates after midnight every fourth day, with the exact minute based on your external_url
. You can modify these settings in the /etc/gitlab/gitlab.rb
file.
For example, if you wanted to renew every 7th day at 12:30, you can configure it to do so. First, navigate to the configuration file:
- /etc/gitlab/gitlab.rb
 ...
################################################################################
# Let's Encrypt integration
################################################################################
# letsencrypt['enable'] = nil
letsencrypt['contact_emails'] = ['sammy@digitalocean'] # This should be an array of email addresses to add as contacts
# letsencrypt['group'] = 'root'
# letsencrypt['key_size'] = 2048
# letsencrypt['owner'] = 'root'
# letsencrypt['wwwroot'] = '/var/opt/gitlab/nginx/www'
# See http://docs.gitlab.com/omnibus/settings/ssl.html#automatic-renewal for more on these settingsletsencrypt['auto_renew'] = trueletsencrypt['auto_renew_hour'] = "12"letsencrypt['auto_renew_minute'] = "30"letsencrypt['auto_renew_day_of_month'] = "*/7"...
...
letsencrypt['auto_renew'] = false
... With auto-renewals in place, you don’t need to worry about service interruptions.
Conclusion
You now have a working GitLab instance hosted on your own server. You can begin to import or create new projects and configure the appropriate level of access for a team. GitLab is regularly adding features and making updates to their platform, so be sure to check out the project’s home page to stay up-to-date on any improvements or important notices.
Один из самых популярных репозиториев для хранения и общего доступа к коду — это GitHub, однако после покупки проекта компанией Microsoft популярность стали набирать и другие проекты, один из них — GitLab. Это аналогичный свободный менеджер репозиториев, с помощью которого можно работать с кодом, принимать Pull Request’ы, отслеживать сообщения об ошибках и тестировать свои приложения.
У GitLab есть такие же инструменты, как и у GitHub, есть страница Issue для сообщений об ошибках, есть поддержка код-ревью, wiki, а также вы можете работать с несколькими приватными проектами.
У GitLab есть несколько версий. Кроме онлайн версии, в которую вы можете выгружать свои проекты, доступной на веб-сайте GitLab.com, есть версия Community Edition и платная версия Enterprice Edition, которые можно установить на свой компьютер и создать собственный Git-сервер. В этой инструкции мы рассмотрим, как установить GitLab Ubuntu 18.04 версии Community Edition. Для этого будем использовать официальный репозиторий.
Сначала обновите репозитории до самой последний версии:
sudo apt upgrade
1. Установка репозитория
Затем нужно загрузить установщик репозитори из официального сайта. Этот скрипт загрузит и установит все ключи и инструменты необходимые, чтобы подключить репозиторий Gitlab в систему. Для его загрузки и запуска выполните команду:
2. Installing the software package
Once completed, you can install gitlab-ce with the command:
sudo apt install gitlab-ce
When GitLab Ubuntu 18.04 installation is complete, you will see this message:
3. Deploying GitLab
Now we need to prepare the program for work. First you need to configure the URL that will open the GitLab interface. To do this, open the file /etc/gitlab/gitlab.rb and find the external_url line there. Here you need to specify your domain. On my local computer, I will use the gitlab.local domain:
sudo vi /etc/gitlab/gitlab.rb
Save and close the file. After that, you need to rebuild the program, taking into account the changed configuration:
sudo gitlab-ctl reconfigure
If a firewall is enabled on your server, you need to add ports for http and ssh protocols to exceptions:
sudo ufw allow ssh
sudo ufw allow http
For our local domain to work, we need to add an entry about it to the /etc/hosts file:
sudo vi /etc/hosts
4. Deploying a program with Apache installed
If the Apache web server is already installed on your computer, you can configure the program so that it works through the existing web server. To do this, change the following lines in /etc/gitlab/gitlab.rb:
sudo vi /etc/gitlab/gitlab.rb
Then rebuild the program:
sudo gitlab-ctl reconfigure
Apache needs to add a new virtual host with the following configuration:
sudo vi /etc/apache2/sites-available/gitlab.conf
ServerName gitlab.local
ServerSignature Off
ProxyPreserveHost On
AllowEncodedSlashesNoDecode Require all granted ProxyPassReverse http://127.0.0.1:8080 ProxyPassReverse http://gitlab.local
Rewrite Engine on
RewriteCond %{DOCUMENT_ROOT}/%{REQUEST_FILENAME} !-f
RewriteRule .* http://127.0.0.1:8080%{REQUEST_URI} [P,QSA]
DocumentRoot /opt/gitlab/embedded/service/gitlab-rails/public
ErrorDocument 404 /404.html
ErrorDocument 422/422.html
ErrorDocument 500/500.html
ErrorDocument 503 /deploy.html
LogFormat "%{X-Forwarded-For}i %l %u %t \"%r\" %>s %b" common_forwarded
ErrorLog /var/log/apache2/gitlab_error.log
CustomLog /var/log/apache2/gitlab_forwarded.log common_forwarded
CustomLog /var/log/apache2/gitlab_access.log combined env=!dontlog
CustomLog /var/log/apache2/gitlab.log combined 
Here gitlab.local is the domain that will be used to access gitlab and port 8080 is the port on which the gitlab service listens for connections. You can watch it with the command:
Then activate the Apache modules — rewrite, proxy and proxy_http:
sudo a2enmod rewrite
sudo a2enmod proxy
sudo a2enmod proxy_http
And then activate our virtual host and restart Apache:
sudo a2ensite gitlab
sudo systemctl restart apache2
Setting up GitLab on Ubuntu
1. Authorization

In the first step, you need to enter a password for the superuser.
2. Account setup
Then press the button Update profile settings
.
3. Set up an SSH key
If you already have other ssh keys on your system, you can change the name of the generated key. To do this, when the program asks for the path where you want to save the key, enter the old path and the new name:

The key will be in a file with *.pub extension. If you chose the file name gitlab_rsa, then the public key will be in the gitlab_rsa.pub file. Copy this key. Then open the item SSH Keys in the left menu of the GitLab web interface
, insert the key in the field Key
and press Add key
:
After that, the key will be added and you will be able to use the repository. However, it should be noted that such an operation will not work with the root user on the local machine, and nothing will work if you try to use the same user on behalf of which you are authorized in the system.
4. Deregistration
Click the key icon on the top bar, and then select Settings from the left menu. Here, find the item Sign-up restrictions
and uncheck sign-up enabled
:
Then save the settings.
5. Create a project
Click the Plus button, then select New Project
:
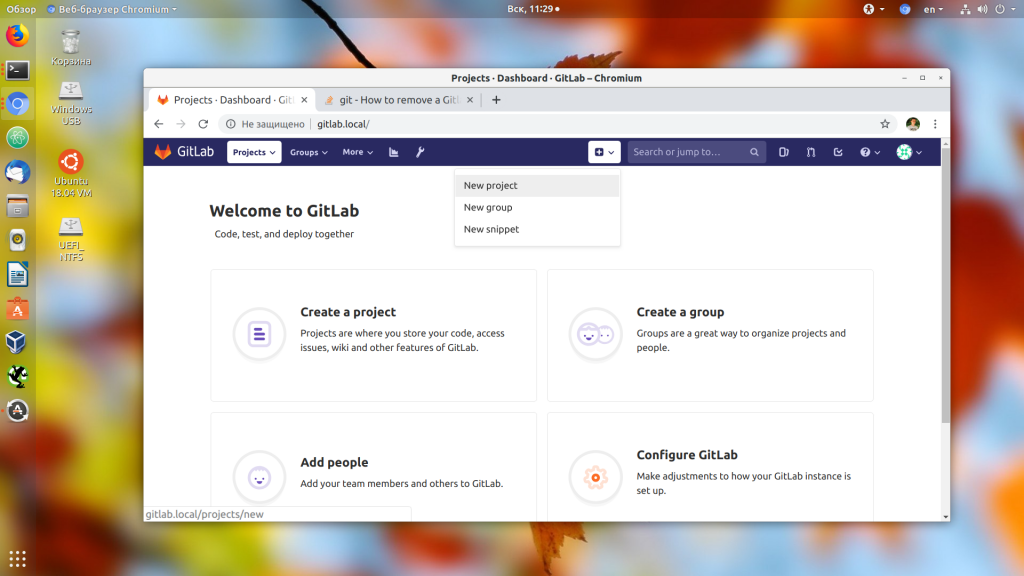
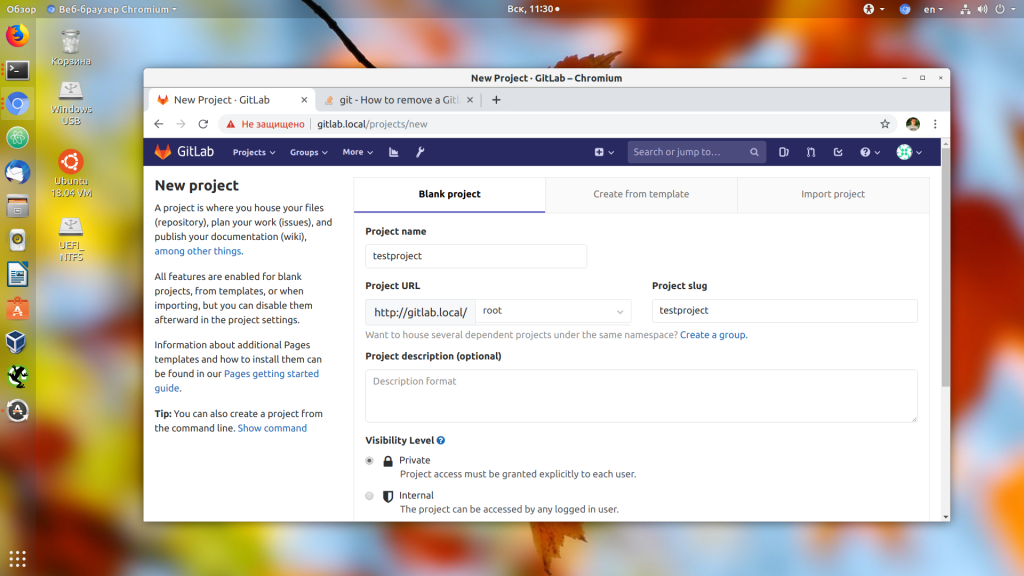
In the window that opens, enter the name of the project, for example testproject,
and press the button Create Project
:
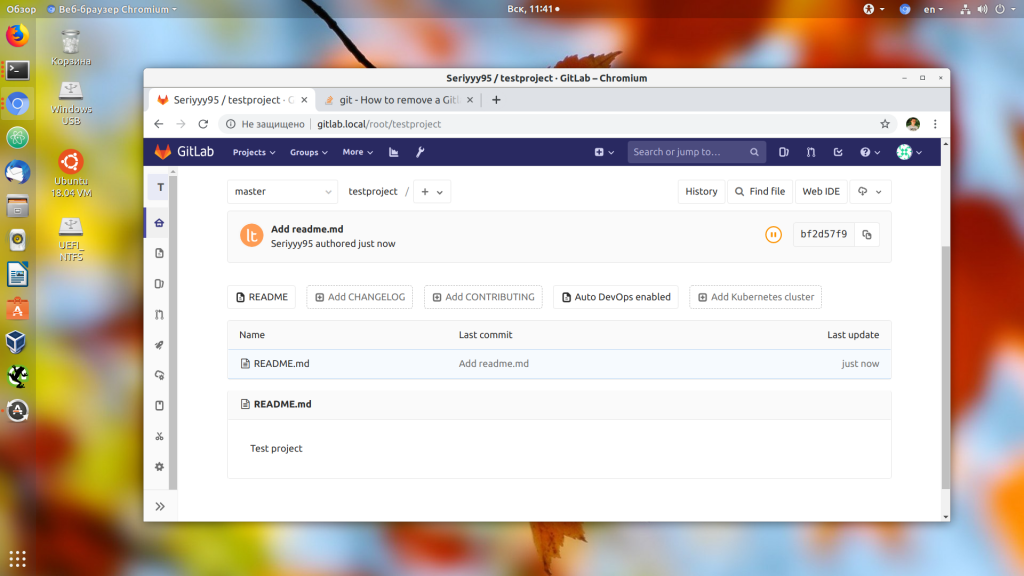
Then open a terminal and clone the resulting repository:
git clone http://gitlab.local/root/testproject.git
Next, add the README.md file:
And send the changes to the server:
git add --all
git commit -m 'Add README.md'
git push origin master

Now in the program interface you will see the newly created commit and the new file:
Conclusions
In this article, we’ve covered how GitLab Server Ubuntu 18.04 is installed. As you can see, it is not as difficult as it might seem at first glance. It is very convenient to track changes in your projects and work in a team without relying on the availability of third-party services.
Found a mistake in the text? Let me know. Select the text with the error and press Ctrl+Enter.
