

Postfix should be preinstalled on CentOS 8 by default. If for some reason you don’t have the service installed, use the below command to install the relevant package:
2. Install SASL plugin
Package cyrus-sasl-plain contains the Cyrus SASL plugins which support PLAIN and LOGIN authentication.
3. Edit the configuration file
I am configuring the service to act as SMTP smart host, sending the mail to OVH mail server (ssl0.ovh.net), which is my ISP mail server, using SASL authentication (login and password).
Edit /etc/postfix/main.cf configuration file and update the below relevant lines:
4. Test the configuration
Test the configuration for any obvious errors. If the configuration is correct, the below command should not give any output:
5. Start and enable Postfix service
Launch and enable Postfix daemon:
6. Test the e-mail delivery
Verify the configuration by sending the test e-mail from the command line.
Prepare test e-mail body:
Send the test e-mail using sendmail script with increased verbosity:
Monitor the system journal to check if the e-mail was successfully relayed to the OVH mail server:
If for some reason the e-mail has not arrived yet, you can display mail queue on your relay host:
This document describes 5 easy steps to setup your Postfix email server as smarthost to relay through DNS Exit mail relay server for all email sending.
The mail relay service from DNSExit.com can be found here
Other notes about postfix:
If the above settings don’t work, you need to make sure the SASL support (smtp authentication) is compiled into Postfix. To do so, you may need to upgrade to latest version of Postfix.
Step 1
# sudo apt-get install postfix
# dnf install postfix
Make sure Cyrus SASL Library is installed. If it is not installed, you can install it as below using yum or apt-get based on your OS:
# dnf install cyrus-sasl-plain
# apt-get install libsasl2-modules
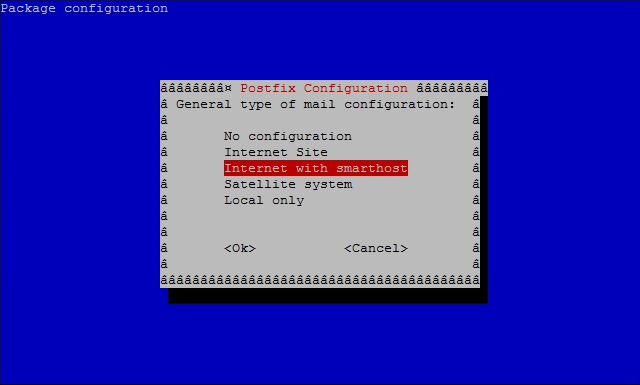
Step 2
Select Internet with smarthost from the General type of mail configuration menu and click ‘Ok’.
Step 3
Enter mail.smtp2go.com into SMTP relay host and click “Ok”.
Note: If postfix has already been installed and you are reconfiguring with dpkg-reconfigure you will be presented with additional steps. Accept the defaults for any additional steps.

Step 4
your SMTP2GOPassword is your SMTP2GO Password
# sudo vi /etc/postfix/main.cf
Note: the last line is important and ensures that your Postfix software doesn’t try to connect with too many concurrent SMTP connections.
Step 5
Restart the Postfix service:
# sudo service postfix restart
Note: If you see an error ‘550 unable to verify sender address’ when trying to send an email after setting up, this means your ‘From’ email address doesn’t have a valid MX record setup yet. All emails must be sent from an email address that has an MX record at its domain name.
March 4, 2018
1 minute read

It was already on my to-do list to move my outgoing mail to my mail provider also to make it easier to move to another ISP or to implement SPF but was not on the top of my to-do list.
My email provider requires authentication, so I needed to reconfigure postfix in my FreeBSD mail jail to use a relay host with authentication.
Install postfix-sasl
To use authentication with postfix the postfix-sasl package is required.
If postfix is already installed it’ll be replace by postfix-sasl.
Configuration
The credentials are in the relay_pass file the password is in the file as plain-text so we
it with the correct file permissions.
Create the hash file.
We replaced postfix with postfix-sasl a restart is required.
** Have fun **
This document describes 3 possible configurations:
Debian provides other configuration templates when installing
package (or through ), like Satellite system and
Internet with smarthost.
Local mail server
Here are config files for a server named in domain .
# Some straightforward configuration
ESMTP
no
no
# Appending .domain is the MUA’s job.
no
# Uncomment the next line to generate «delayed mail» warnings
#delay_warning_time = 4h
# TLS parameters
/etc/ssl/certs/ssl-cert-snakeoil.pem
/etc/ssl/private/ssl-cert-snakeoil.key
yes
btree:/smtpd_scache
btree:/smtp_scache
# Exclude some protocols to mitigate SSL attacks
!SSLv2,!SSLv3
!SSLv2,!SSLv3
!SSLv2,!SSLv3
!SSLv2,!SSLv3
aNULL, eNULL, EXPORT, DES, RC4, MD5, PSK, aECDH, EDH-DSS-DES-CBC3-SHA, EDH-RSA-DES-CDC3-SHA, KRB5-DE5, CBC3-SHA
# The Diffie-Hellman parameters file can be generated with:
# openssl dhparam -out /etc/postfix/ssl/dh_2048.pem 2048
/ssl/dh_2048.pem
# Fully-qualified domain name of the machine
examplehost.example.com
# The domain associated with the mailing system
# By default is it $myhostname without the first prefix
#mydomain = example.com
# Mail addresses without a domain will use this one
# Networks for which the host should relay mail
.0.0.0/8 ::ffff:127.0.0.0/104 ::1/128
host
# Domains for which a local lookup needs to be performed
# By default, relay_domains = $mydestination so no need to write it down
, localhost., localhost
# Only support local delivery
error: Local delivery only!
# Define alias databases
hash:/etc/aliases
hash:/etc/aliases
# «smarthost» to send messages to
# For relaying messages, when submission is enabled
permit_mynetworks permit_sasl_authenticated defer_unauth_destination
# Character which is used to define a local address extension
+
# Only listen to the loopback interface
loopback-only
# If this becomes misconfigured, reject all clients not in mynetworks
permit_mynetworks, reject
# Use IPv4 and IPv6
all
File does not need to be changed relatively to the default one:
# Postfix master process configuration file. For details on the format
# of the file, see the master(5) manual page (command: «man 5 master»).
# Do not forget to execute «postfix reload» after editing this file.
# service type private unpriv chroot wakeup maxproc command + args
# (yes) (yes) (yes) (never) (100)
smtp inet n — — — — smtpd
pickup fifo n — — pickup
cleanup unix n — — — cleanup
qmgr fifo n — n qmgr
tlsmgr unix — — — ? tlsmgr
rewrite unix — — — — — trivial-rewrite
bounce unix — — — — bounce
defer unix — — — — bounce
trace unix — — — — bounce
verify unix — — — — verify
flush unix n — — ? flush
proxymap unix — — n — — proxymap
proxywrite unix — — n — proxymap
smtp unix — — — — — smtp
relay unix — — — — — smtp
showq unix n — — — — showq
error unix — — — — — error
retry unix — — — — — error
discard unix — — — — — discard
unix — n n — —
virtual unix — n n — — virtual
lmtp unix — — — — — lmtp
anvil unix — — — — anvil
scache unix — — — — scache
# Interfaces to non-Postfix software. Be sure to examine the manual
# pages of the non-Postfix software to find out what options it wants.
# and other message envelope options.
# maildrop. See the Postfix MAILDROP_README file for details.
# Also specify in main.cf: maildrop_destination_recipient_limit=1
maildrop unix — n n — — pipe
DRhu vmail /usr/bin/maildrop -d
Run every time this file is updated.
To validate the configuration, run .
Relay-mode configuration
This section describes a Postfix configuration for a relay domain, which
transmits e-mails to addresses behind aliases. To set-up such a server,
it is possible to use the same configuration as the local mail server, with
a modification to to allow connections from all
network interfaces:
The aliases can then be configured in , or more generally to
the file configured in and variables
postconf grep
alias_database = hash:/etc/aliases
alias_maps = hash:/etc/aliases
In this configuration disables
so that relaying over SMTPS works.
On the firewall, TCP ports 25 and 587 need to be opened for SMTP and SMTPS, and
143 and 993 for IMAP (with STARTTLS) and IMAPS. With iptables, the commands
are:
Mailbox mail server
To setup a mail server with mailboxes, the first step is to setup the relay-mode
configuration, and then add local accounts and configure dovecot to serve the
mailbox of these accounts over IMAP.
To install dovecot on Debian, two packages need to be installed:
Then the default configuration is available through command.
This can be use as a source of inspiration, but customizations are simpler when
everything lies in a single file. By default, includes every
file matched by glob pattern and tries to include
with:
To fully control the configuration, it is possible to comment
and write in :
Also configure Postfix to use qmail-style delivery, with this in
:
# Deliver mails in ~/Maildir/ (the trailing / is required)
Maildir/
The dovecot authentication can then be activated in Postfix by updating the
entry for SMTPS service in :
Moreover in Postfix configuration, local delivery is configured with
which has a default value which is correct:
# postconf local_recipient_maps
proxy:unix:passwd.byname
