
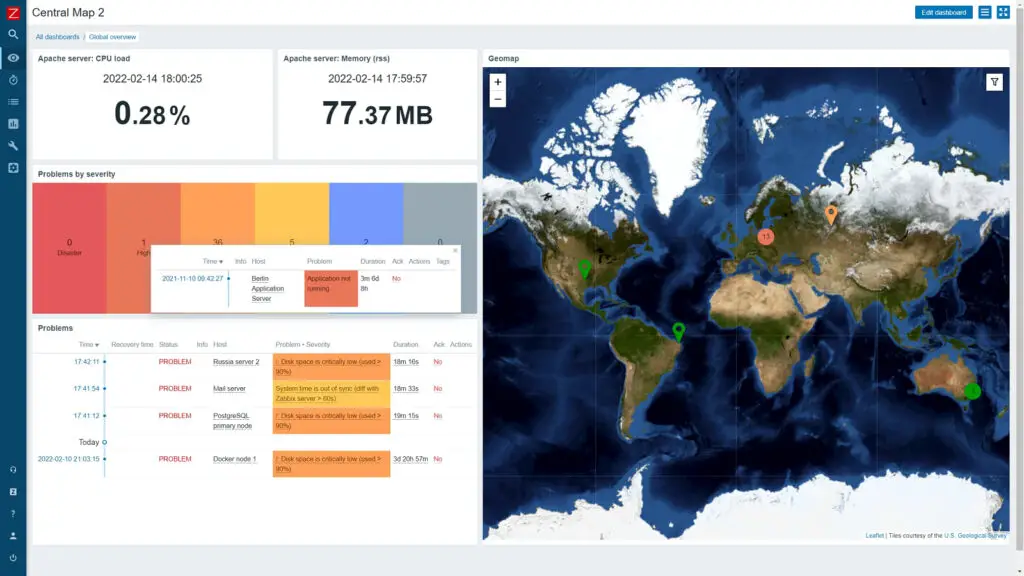
![Upgrade Zabbix (5.0, 5.2, 5.4) to 6.0 like a Pro [+6.0 to 6.4 guide]](https://shhost.ru/wp-content/uploads/2023/08/zabbix_6.0_dashboard_1_f-1024x576-870x400.jpg "Upgrade Zabbix (5.0, 5.2, 5.4) to 6.0 like a Pro [+6.0 to 6.4 guide]")
In this tutorial I will show you how to upgrade almost any Zabbix version (3.0, 3.2, 3.4, 4.0, 4.2, 4.4, 5.0, 5.2, 5.4) to 6.0
LTS or 6.
4 Standard version using official packages from repo.zabbix.com
. This is all-in-one Zabbix upgrade guide for Ubuntu, CentOS, RHEL, Oracle/Rocky/Alma Linux, Debian, and Rasbian (Raspberry Pi) that takes into consideration any webserver (Apache or NGINX) and database (MySQL, MariaDB, or PostgreSQL).
Already on Zabbix 6.0 or 6.2?
Jump to Step 10: How to upgrade Zabbix to 6.4?
Zabbix 6 brings a lot of new features, you can read about them on the official site
so I won’t write about it. However, I have to mention the new changes in PHP and database requirements that should be taken into account.
Zabbix 6.0 will no longer support PHP versions older than 7.2.5. Newer operating systems support PHP 7.2.5 so you can upgrade to 6.0 without any difficulties on these Linux distributions:
- Ubuntu
22.04 LTS (Jammy Jellyfish)
/ Ubuntu 20.04 (Focal)
- CentOS 8 or 9 / RHEL 8 or 9
/ Oracle Linux 8 or 9
/ Alma Linux 8 or 9
/ Rocky Linux 8 or 9
- Debian 11 (Bullseye) / Debian 10 (Buster)
- Rasberry Pi OS (Debian 11 / 10
)
In addition to dropping support for older PHP versions, Zabbix 6.0 has tightened requirements for the database. Here are the minimum
database versions that new Zabbix supports:
- MySQL/Percona 8.0+
- MariaDB 10.5+
- PostgreSQL 13+
- Oracle 19c+
- TimescaleDB 2.0.1+
- SQLite 3.3.5+
Check your database version and if it does not meet the requirements, you will first need to upgrade it before continuing with this guide or use override by setting AllowUnsupportedDBVersions=1
in Zabbix server configuration file at your own risk.
Note, this guide is for upgrading Zabbix
while guides for installing Zabbix 6.0 or 6.4
from scratch on various Linux distribution can be found on these links: CentOS, RHEL, Oracle/Alma/Rocky Linux
, Ubuntu
, Debian
, Rasbian (Raspberry Pi)
.
- Step 1: Stop Zabbix Server
- Step 2: Backup Zabbix components
- a) Create directories for backup files
- b) Backup Zabbix binary, doc and conf files
- c) Backup Zabbix web files (frontend)
- d) Backup Zabbix database
- Step 3: Upgrade Zabbix Server and Frontend
- a) Ubuntu 22.04 & Ubuntu 20.04
- b) RHEL 8/9 & CentOS 8/9 & Oracle/Alma/Rocky Linux 8/9
- c) Debian 11 & Debian 10
- d) Rasbian 11 & Rasbian 10
- Step 4: Start Zabbix service and database upgrade
- Step 5: Clear browser cache and check Zabbix version
- Step 6: Database upgrade to primary keys
- a. Create new history tables and rename old ones
- b. Migrate data from old history tables to new ones
- Step 7: Upgrade between minor versions
- b) CentOS / RHEL / Oracle / Alma/ Rocky Linux
- Step 8: Upgrade Zabbix-Proxy or Zabbix-Agent
- Step 9: Restore procedure (if Zabbix upgrade fails)
- a) Stop Zabbix server
- b) Delete database and create a new one with the right permissions
- c) Import database from the backup
- d) Remove Zabbix web and bin files
- e) Restore files from the backup
- f) Start Zabbix server
- Step 10: How to upgrade Zabbix 6.0 to 6.4?
- a) Upgrade Zabbix to 6.4 using a bash script
- b) Restart Zabbix server and upgrade the database
- Step 11: Learn about common upgrade errors
- How to fix error “ Unable to start Zabbix server due to unsupported XY database server version “
- a) Disable innodb strict mode:
- b) Restart Zabbix server:
- c) Enable innodb strick mode back:
- How to fix error “ The frontend does not match Zabbix database “
- a) Zabbix frontend is upgraded but Zabbix database is not
- b) Zabbix database is upgraded but Zabbix frontend is not
- How to fix error “database is not upgraded to use double precision values “
- How to fix error “ cannot start HA manager: timeout while waiting for HA manager registration “
- Step 1: Download SQL script for partitioning
- Step 2: Create partitioning procedures with the SQL script
- Step 3: Run partitioning procedures automatically
- Option 1: Manage partitions automatically using MySQL event scheduler (recommended)
- Option 2: Manage partitions automatically using Crontab
- Step 4: Configure Housekeeping on Zabbix frontend
- Step 5: Change partitioning settings (days for history and trends)
- a) Create a new partitioning procedure
- b) Update MySQL event scheduler or Crontab
- Option 1: Update MySQL event scheduler
- Option 2: Update Crontab
- zabbixDBpass
- Step 6: Solution for some common errors
- Duplicate partition name
- Waiting for table metadata lock (graphs with no data)
- Содержание
- Настройка
- GSM-модем
- Проверка отправки SMS в терминале
- Агенты
- Zabbix agent 2
- Zabbix agent
- CentOS, RedHat
- Debian, Ubuntu
- curl # На очень старых системах типа Ubuntu 8.04, Debian 5 Lenny последняя рабочая версия агента - 1.8.3. http:old-releases.ubuntu.comubuntupooluniversezzabbixzabbix-agent_1.8.3-2ubuntu1_i386.deb
- Notification in Telegram
- Information about packages installed on a Linux system
- Update
- You do not have the SUPER privilege and binary logging is enabled
- Moving to another sideboard
- Wi-Fi Monitoring
- Items in Zabbix
- MySQL Monitoring
- Fail2ban monitoring
- EventLog Monitoring
- Ping from agent
- SNMP
- Macros
- Problem solving
- Zabbix icmp pinger processes more than 75% busy
- SSL web checks not working: SSL routines:tls12_check_peer_sigalg:wrong signature type
- Step 7: Info about Zabbix partitioning script
- Content
- Settings
- GSM modem
- Checking sending SMS in_terminal
- Агенты
- Zabbix agent 2
- Zabbix agent
- CentOS, RedHat
- Debian, Ubuntu
- Оповещение в Telegram
- Информация о пакетах, установленных в системе Linux
- Обновление
- You do not have the SUPER privilege and binary logging is enabled
- Переезд на другой сервант
- Мониторинг Wi-Fi
- Items в Zabbix
- Мониторинг MySQL
- Monitoring fail2ban
- Monitoring EventLog
- Ping from agent
- SNMP
- Macros
- Troubleshooting
- Zabbix icmp pinger processes more than 75% busy
- SSL web checks not working: SSL routines:tls12_check_peer_sigalg:wrong signature type
Step 1: Stop Zabbix Server
We must first stop the Zabbix server so that the database does not receive any data as we perform the upgrade:
systemctl stop zabbix-server
Step 2: Backup Zabbix components
Zabbix upgrade should go smoothly with no problems but there is that famous saying “ better safe than sorry
” or how I like to put it “better backup than spend all day in a linux terminal”.
Therefore, back up your data and copy all relevant Zabbix files to your backup directory! This will give you the option to restore the old version of Zabbix if something goes wrong with the upgrade. The procedure for restoration is described in Step 9: Restore procedure (if Zabbix upgrade fails)
.
a) Create directories for backup files
Create backup directories for binary, configuration, doc, web and database files.
 mkdir -p /opt/zabbix_backup/bin_files /opt/zabbix_backup/conf_files /opt/zabbix_backup/doc_files
mkdir -p /opt/zabbix_backup/web_files /opt/zabbix_backup/db_files
b) Backup Zabbix binary, doc and conf files
Next, copy Zabbix binary, doc and configuration files. Some files will not exits, depending on what webserver you are using (Apache or NGINX), so I will use “ 2>/dev/null
” to ignore copy errors.
 cp -rp /etc/zabbix/zabbix_server.conf /opt/zabbix_backup/conf_files
cp -rp /usr/sbin/zabbix_server /opt/zabbix_backup/bin_files
cp -rp /usr/share/doc/zabbix-* /opt/zabbix_backup/doc_files
cp -rp /etc/httpd/conf.d/zabbix.conf /opt/zabbix_backup/conf_files 2>/dev/null
cp -rp /etc/apache2/conf-enabled/zabbix.conf /opt/zabbix_backup/conf_files 2>/dev/null
cp -rp /etc/zabbix/php-fpm.conf /opt/zabbix_backup/conf_files 2>/dev/null
c) Backup Zabbix web files (frontend)
Backup Zabbix frontend files.
cp -rp /usr/share/zabbix/ /opt/zabbix_backup/web_files
d) Backup Zabbix database
Note: This guide is tailored for Zabbix installation in combination with MySQL / MariaDB, and if you are using PostgreSQL, please google how to backup PostgreSQL!
Make sure you have enough free disk space on “ /opt
” or use another dictionary path for database backup.
mysqldump -h -u'' -p'' --single-transaction '' | gzip > /opt/zabbix_backup/db_files/zabbix_backup.sql.gz
Note that this backup process can take anywhere from few minutes to hours, depending on the database size.
Step 3: Upgrade Zabbix Server and Frontend
Select the appropriate OS repository and upgrade the Zabbix server and frontend using the provided instructions.
Note: If using PostgreSQL, replace “ mysql
” with “ pgsql
” in the upgrade command.
a) Ubuntu 22.04 & Ubuntu 20.04
Please delete old Zabbix repository so that we can install the new one:
dpkg --purge zabbix-release
Upgrade Zabbix and when prompted what to do with Zabbix configuration file, just press enter to keep the current version of “ zabbix_server.conf
“:
 wget https://repo.zabbix.com/zabbix/6.0/ubuntu/pool/main/z/zabbix-release/zabbix-release_6.0-4+ubuntu$(lsb_release -rs)_all.deb
sudo dpkg -i zabbix-release_6.0-4+ubuntu$(lsb_release -rs)_all.deb
apt update
apt install -y --only-upgrade zabbix-server-mysql zabbix-frontend-php
And if you are using Apache server (httpd) install “ zabbix-apache-conf
“:
apt-get install -y zabbix-apache-conf
b) RHEL 8/9 & CentOS 8/9
& Oracle/Alma/Rocky Linux 8/9
Upgrade Zabbix and when prompted what to do with Zabbix configuration file, just press enter to keep the current version of “ zabbix_server.conf
“
 rpm -Uvh https://repo.zabbix.com/zabbix/6.0/rhel/$(rpm -E %{rhel})/x86_64/zabbix-release-6.0-4.el$(rpm -E %{rhel}).noarch.rpm
dnf clean all
dnf upgrade -y zabbix-server-mysql zabbix-web-mysql
And if you are using Apache server (httpd) install “ zabbix-apache-conf
“:
dnf install -y zabbix-apache-conf
c) Debian 11 & Debian 10
Please delete old Zabbix repository so that we can install the new one:
dpkg --purge zabbix-release
Upgrade Zabbix and when prompted what to do with Zabbix configuration file, just press enter to keep the current version of “ zabbix_server.conf
“:
 wget https://repo.zabbix.com/zabbix/6.0/debian/pool/main/z/zabbix-release/zabbix-release_6.0-4+debian$(cut -d"." -f1 /etc/debian_version)_all.deb
dpkg -i zabbix-release_6.0-4+debian$(cut -d"." -f1 /etc/debian_version)_all.deb
apt update
apt install -y --only-upgrade zabbix-server-mysql zabbix-frontend-php
And if you are using Apache server (httpd) install “ zabbix-apache-conf
“:
apt-get install -y zabbix-apache-conf
d) Rasbian 11 & Rasbian 10
Please delete old Zabbix repository so that we can install the new one:
dpkg --purge zabbix-release
Upgrade Zabbix and when prompted for Zabbix configuration file, just press enter to keep the current version of “ zabbix_server.conf
“:
 wget https://repo.zabbix.com/zabbix/6.0/raspbian/pool/main/z/zabbix-release/zabbix-release_6.0-4+debian$(cut -d"." -f1 /etc/debian_version)_all.deb
dpkg -i zabbix-release_6.0-4+debian$(cut -d"." -f1 /etc/debian_version)_all.deb
apt update
apt install -y --only-upgrade zabbix-server-mysql zabbix-frontend-php
And if you are using Apache server (httpd) install “ zabbix-apache-conf
“:
apt-get install -y zabbix-apache-conf
Step 4: Start Zabbix service and database upgrade
Great job! Zabbix server and frontend are successfully upgraded! However, the Zabbix database is still on the old version because we didn’t upgrade it. This is especially evident when connecting to a frontend because you would be greeted with the message “ The frontend does not match Zabbix database
“.
Luckily, upgrade of the Zabbix database is the easy part, just start the Zabbix service and it will automatically do the upgrade:
systemctl start zabbix-server
 #  cat /var/log/zabbix/zabbix_server.log | grep database
1794:20200408:200607.700 current database version (mandatory/optional): 05040000/05040002
1794:20200408:200607.700 starting automatic database upgrade
1794:20200408:200607.706 completed 1% of database upgrade
1794:20200408:200608.804 completed 10% of database upgrade .
1794:20200408:200613.111 completed 98% of database upgrade
1794:20200408:200613.123 completed 100% of database upgrade
1794:20200408:200613.123  database upgrade fully completed
1794:20200408:200613.136 database could be upgraded to use primary keys in history tables
Database upgrade is completed successfully when you receive the message “ database upgrade fully completed
” in the Zabbix server log file.
Step 5: Clear browser cache and check Zabbix version
NOTE:
If you get an error saying that the minimum required version of php is 7.4
, upgrade your PHP using these commands:
sudo dnf -y install https://dl.fedoraproject.org/pub/epel/epel-release-latest-8.noarch.rpm
sudo dnf -y install https://rpms.remirepo.net/enterprise/remi-release-8.rpm
sudo dnf module reset php -y
sudo dnf module install php:remi-7.4 -y
Zabbix frontend may look pretty weird after the upgrade because you haven’t deleted the cache on your browser! Clear the browser cache and log in to the Zabbix.
And if you still receive the error “ The frontend does not match Zabbix database
” check out step 11: Learn about common upgrade errors
One more thing to do! On the server, check if the upgrade was successful with the command “ zabbix_server -V
“:
  # zabbix_server -V
zabbix_server (Zabbix) 6.0.0
And on the frontend, check if the correct Zabbix version (6.0.x) is displayed on the bottom of the page:

Step 6: Database upgrade to primary keys
As of Zabbix 6.0, primary keys are used for all tables in new installations. Unfortunately there is no automation here, we have to manually upgrade the history tables in existing installations to primary keys.
Before proceeding, make sure to backup your database using Step 2
!
I will run the demonstration on MariaDB 10.6, and if you are using another type of database (MySQL, PostGreSQL, TimeScaleDB, Oracle) then check out the official Zabbix guide
.
a. Create new history tables and rename old ones
First, install “ zabbix-sql-scripts
” package:
  CentOS, REHEL, Oracle/Alma/Rocky Linux
dnf install -y zabbix-sql-scripts  OR   Ubuntu/Debian/Rasperry Pi OS
apt-get install -y zabbix-sql-scripts
Then run “history_pk_prepare.sql” script to rename old history tables and create new ones with the new primary key:
mysql -u root -p rootDBpass zabbix < /usr/share/zabbix-sql-scripts/mysql/history_pk_prepare.sql
b. Migrate data from old history tables to new ones
Note that this step is optional if you do not need the old data from the history tables (you always have data from the trends tables).
Create a temporary directory to use to export and import history data (delete it after the import):
mkdir /var/lib/mysql-files && chmod 777 /var/lib/mysql-files
Connect to the MySQL/MariaDB server:
mysql -u root -p rootDBpass zabbix
Tweak DB performance to speed up data migration and avoid timeout errors:
SET SESSION SQL_LOG_BIN=0;SET SESSION bulk_insert_buffer_size= 1024 * 1024 * 256;SET MAX_STATEMENT_TIME=0;
Migrate history data from old tables to new ones:
 SELECT * INTO OUTFILE '/var/lib/mysql-files/history.csv' FIELDS TERMINATED BY ',' ESCAPED BY '"' LINES TERMINATED BY '\n' FROM history_old;
LOAD DATA INFILE '/var/lib/mysql-files/history.csv' IGNORE INTO TABLE history FIELDS TERMINATED BY ',' ESCAPED BY '"' LINES TERMINATED BY '\n';
SELECT * INTO OUTFILE '/var/lib/mysql-files/history_uint.csv' FIELDS TERMINATED BY ',' ESCAPED BY '"' LINES TERMINATED BY '\n' FROM history_uint_old;
LOAD DATA INFILE '/var/lib/mysql-files/history_uint.csv' IGNORE INTO TABLE history_uint FIELDS TERMINATED BY ',' ESCAPED BY '"' LINES TERMINATED BY '\n';
SELECT * INTO OUTFILE '/var/lib/mysql-files/history_str.csv' FIELDS TERMINATED BY ',' ESCAPED BY '"' LINES TERMINATED BY '\n' FROM history_str_old;
LOAD DATA INFILE '/var/lib/mysql-files/history_str.csv' IGNORE INTO TABLE history_str FIELDS TERMINATED BY ',' ESCAPED BY '"' LINES TERMINATED BY '\n';
SELECT * INTO OUTFILE '/var/lib/mysql-files/history_log.csv' FIELDS TERMINATED BY ',' ESCAPED BY '"' LINES TERMINATED BY '\n' FROM history_log_old;
LOAD DATA INFILE '/var/lib/mysql-files/history_log.csv' IGNORE INTO TABLE history_log FIELDS TERMINATED BY ',' ESCAPED BY '"' LINES TERMINATED BY '\n';
SELECT * INTO OUTFILE '/var/lib/mysql-files/history_text.csv' FIELDS TERMINATED BY ',' ESCAPED BY '"' LINES TERMINATED BY '\n' FROM history_text_old;
LOAD DATA INFILE '/var/lib/mysql-files/history_text.csv' IGNORE INTO TABLE history_text FIELDS TERMINATED BY ',' ESCAPED BY '"' LINES TERMINATED BY '\n';
If everything works correctly, then delete the old history tables from the Zabbix database:
DROP TABLE history_old; DROP TABLE history_uint_old; DROP TABLE history_str_old; DROP TABLE history_log_old; DROP TABLE history_text_old;
CONGRATULATIONS!
You have successfully upgraded Zabbix to version 6!
No need to change anything else as other steps are optional.
Step 7: Upgrade between minor versions
Zabbix team works non-stop like a bee and every couple of weeks it releases a smaller upgrade that fixes bugs and brings new functionalities, so it is necessary to do the minor upgrade at least once a month. A minor upgrade is pretty safe, no need for backup, because you can easily upgrade minor versions of 6.0.x (for example, from 6.0.0 to 6.0.4) with this commands:
apt install --only-upgrade 'zabbix.*'
b) CentOS / RHEL
/ Oracle / Alma/ Rocky Linux
dnf upgrade 'zabbix-*'
Restart Zabbix server afterward:
systemctl restart zabbix-server
Step 8: Upgrade Zabbix-Proxy or Zabbix-Agent
If you need to upgrade
the proxy server
, just repeat steps from “ Step 3: Upgrade Zabbix Server, Frontend
” but use “ apt install -y --only-upgrade zabbix-proxy
” for Ubuntu/Debian/Rasbian or “ dnf upgrade -y zabbix-proxy
” on RHEL insted of “ zabbix-server-mysql zabbix-frontend-php
” and restart service afterward with “ systemctl restart zabbix-proxy
“.
Procedure for Zabbix-Agent
upgrade is similar – repeat the instruction for proxy, but replace “ zabbix-proxy
” with “ zabbix-agent
“.
Step 9:
Restore procedure (if Zabbix upgrade fails)
a) Stop Zabbix server
systemctl stop zabbix-server
b) Delete database and create a new one with the right permissions
 mysql -u'  root
' -p'  rootDBpass
' -e "drop database  zabbix
"
mysql -u'  root
' -p'  rootDBpass
' -e "create database  zabbix  character set utf8mb4 collate utf8mb4_bin;"
mysql -u'  root
' -p'  rootDBpass
' -e "grant all privileges on  zabbix
.* to  zabbix   @   localhost  identified by '  zabbixDBpass
';"
c) Import database from the backup
 zcat /opt/zabbix_backup/db_files/zabbix_backup.sql.gz | mysql -h  localhost  -u'  root
' -p'  rootDBpass
' '  zabbix
'
d) Remove Zabbix web and bin files
rm -rf /usr/sbin/zabbix_server /usr/share/zabbix
e) Restore files from the backup
 cp -rp /opt/zabbix_backup/conf_files/zabbix_server.conf /etc/zabbix/zabbix_server.conf
cp -rp /opt/zabbix_backup/bin_files/zabbix_server /usr/sbin/zabbix_server
cp -rp /opt/zabbix_backup/doc_files/zabbix-* /usr/share/doc/
cp -rp /opt/zabbix_backup/web_files/zabbix /usr/share/zabbix
cp -rp /opt/zabbix_backup/conf_files/zabbix.conf /etc/httpd/conf.d/zabbix.conf 2>/dev/null
cp -rp /opt/zabbix_backup/conf_files/zabbix.conf /etc/apache2/conf-enabled/zabbix.conf 2>/dev/null
cp -rp /opt/zabbix_backup/conf_files/php-fpm.conf /etc/zabbix/php-fpm.conf 2>/dev/null
f) Start Zabbix server
systemctl start zabbix-server
Delete your browser cache and you are done! Zabbix is now on an old version.
Step 10: How to upgrade Zabbix 6.0 to 6.4?
You’re probably wondering why I didn’t write about the Zabbix 6.4
upgrade instructions at the beginning of this tutorial? The answer is simple, I m not fond of the Zabbix standard release!
a) Upgrade Zabbix to 6.4 using a bash script
Download the script “ upgrade_zabbix.sh
” from my site and set executable permissions:
 wget https://bestmonitoringtools.com/dl/upgrade_zabbix.sh
chmod +x upgrade_zabbix.sh
Upgrade Zabbix 6.0 or 6.2 to 6.4 using the script and when prompted what to do with the Zabbix configuration file, just press enter to keep the current version of “zabbix_server.conf“.
sudo ./upgrade_zabbix.sh mysql 6.4 1
As you may have noticed, the script has 3 arguments: type of database
, upgrade version
, and packet version
. Those arguments enable us to use the same script for various Zabbix upgrades (6.0 to 6.4, and some day 7.0 to 7.2 or 7.0 to 7.4). In the case of PostgreSQL, just replace mysql
input parameter with pgsql
.
b) Restart Zabbix server and upgrade the database
Upgrade of the Zabbix database is the easy part, just start the Zabbix service and it will automatically do the upgrade:
systemctl restart zabbix-server
# cat /var/log/zabbix/zabbix_server.log | grep database 1869:20220705:142803.646 current database version (mandatory/optional): 06000000/06000000 2144:20220705:144215.172 current database version (mandatory/optional): 06000000/06000000 2144:20220705:144215.173 starting automatic database upgrade 2144:20220705:144215.200 completed 1% of database upgrade 2144:20220705:144215.221 completed 2% of database upgrade . 2144:20220705:144223.158 completed 98% of database upgrade 2144:20220705:144223.159 completed 100% of database upgrade 2144:20220705:144223.160 database upgrade fully completed 13760:20220705:144235.266 current database version (mandatory/optional): 06020000/06020000
Database upgrade is completed successfully when you receive the message “ database upgrade fully completed
” in the Zabbix server log file.
Zabbix frontend may act weird after the upgrade if you don’t delete the cache on your browser. Clear the browser cache and log in to the Zabbix and you are done with the Zabbix upgrade!
Step 11: Learn about common upgrade errors
How to fix error “ Unable to start Zabbix server due to unsupported XY database server version
“
Zabbix does not support some older versions of the database, you may recive a error like this:
Unable to start zabbix server due to unsupported mariadb database server version
Don’t worry, you have two options to resolve this problem:
- Upgrade you database
- Ignore this error by override by setting “AllowUnsupportedDBVersions=1” in Zabbix server configuration file /etc/zabbix/zabbix_server.conf
[Z3005] query failed: [1118] Row size too large. The maximum row size for the used table type, not counting BLOBs, is 8126. This includes storage overhead, check the manual. You have to change some columns to TEXT or BLOBs .
If you recive error above try to disable “ innodb_strict_mode
“.
a) Disable innodb strict mode:
mysql -u -p'' -e "set global innodb_strict_mode='OFF';"
b) Restart Zabbix server:
systemctl restart zabbix-server
c) Enable innodb strick mode back:
mysql -u -p'' -e "set global innodb_strict_mode='ON';"
How to fix error “ The frontend does not match Zabbix database
“
Error “The frontend does not match Zabbix database” can happen because of two reasons.
a) Zabbix frontend is upgraded but Zabbix database is not
This happens when you upgrade the frontend but not the Zabbix database. Error messages on frontend may look something like this:
The zabbix database version does not match current requirements. your database version: 5040000. required version: 6000000. please contact your system administrator.
The zabbix database version does not match current requirements. your database version: 5000000. required version: 6000000. please contact your system administrator.
The frontend does not match zabbix database. current database version (mandatory/optional): 5040000/5040002. required mandatory version: 6000000. contact your system administrator.
The frontend does not match Zabbix database. Current database version (mandatory/optional): 6000000/6000001. Required mandatory version: 6020000. Contact your system administrator.
First, check out Zabbix log file because database upgrade may still be in progress, in that case, you just need to wait until the upgrade is finished ( do not restart Zabbix service
):
 #  cat /var/log/zabbix/zabbix_server.log | grep database
1794:20200408:200613.123 completed 3% of database upgrade .
1794:20200408:200613.123 completed 97% of database upgrade
1794:20200408:200613.123 completed 100% of database upgrade
1794:20200408:200613.123  database upgrade fully completed
1794:20200408:200613.136 database is not upgraded to use double precision values
However, if your database is not upgrading then try to start the Zabbix service to initiate database upgrade (check the progress in the log file):
systemctl restart zabbix-server
b) Zabbix database is upgraded but Zabbix frontend is not
This happens when you upgrade the database but not the Zabbix frontend. Error messages may look something like this:
The frontend does not match Zabbix database. Current database version (mandatory/optional): 6000000/6000002. Required mandatory version: 5040000. Contact your system administrator.
Try to upgrade frontend again (Step 3), but upgrade only “ zabbix-frontend-php
” on Ubuntu/Debian/Rasbian or “ zabbix-web-mysql
” if your Zabbix is on CentOS/RHEL/Oracle/Alma/Rocky Linux.
Note, if you have not used the official Zabbix package installation procedure (or my guide), then there is a chance that your frontend files are located elsewhere – in that case, you are on your own.
How to fix error “database is not upgraded to use double precision values
“
You may notices red “ No
” for “ Database history tables upgraded
” status on “ System information
” widget. What is that? If you are upgrading an older Zabbix instance, prior to 5.0 then you must apply database patch.
![Upgrade Zabbix (5.0, 5.2, 5.4) to 6.0 like a Pro [+6.0 to 6.4 guide]](https://bestmonitoringtools.com/wp-content/uploads/dbupgradefloat.png)
With Zabbix 5.0 float data type supports precision of approximately 15 digits and bigger range. This is by default for new installations, but if you are upgrading then a manual database upgrade patch must be applied.
mysql -u'' -p'' -e "show create table history;" | history | CREATE TABLE history ( itemid bigintunsigned NOT NULL, clock int NOT NULL DEFAULT '0', value double(16,4) NOT NULL DEFAULT '0.0000', ns int NOT NULL DEFAULT '0', KEY history_1 (itemid,clock) ) ENGINE=InnoDB DEFAULT CHARSET=utf8 COLLATE=utf8_bin |
 wget https://git.zabbix.com/projects/ZBX/repos/zabbix/raw/database/mysql/double.sql
mysql -u'' -p'' < double.sql
Check the new table description:
mysql -u'zabbix' -p'zabbixDBpass' zabbix -e "show create table history;" history | CREATE TABLE history ( itemid bigintunsigned NOT NULL, clock int NOT NULL DEFAULT '0', value double NOT NULL DEFAULT '0', ns int NOT NULL DEFAULT '0', KEY history_1 (itemid,clock) ) ENGINE=InnoDB DEFAULT CHARSET=utf8 COLLATE=utf8_bin |
Now we need to add the line bellow to “ zabbix.conf.php
” with the text editor (“ nano /etc/zabbix/web/zabbix.conf.php
“) to remove warning message from the frontend:
$DB['DOUBLE_IEEE754'] = 'true';
How to fix error “ cannot start HA manager: timeout while waiting for HA manager registration
“
This error appears on RHEL, CentOS, Oracle/Alma/Rocky Linux and it is SELinux related. You need to install a new SELinux policy:
dnf -y install zabbix-selinux-policy
And enable daemons_enable_cluster_mode with this command
setsebool -P daemons_enable_cluster_mode on
Thank you for reading.
In this tutorial we will learn, step by step, how to partition Zabbix database (history and trends tables) on MySQL or MariaDB using partitioning script.
Zabbix gathers data from hosts and stores them in database using history and trends
tables. Zabbix history keeps raw data (each value that Zabbix has collected) and trends stores consolidated hourly data that is averaged as min,avg, and max.
Zabbix’s housekeeping process is responsible for deleting old trend and history data. Removing old data from the database using SQL delete query can negatively impact database performance. Many of us have received that annoying alarm “ Zabbix housekeeper processes more than 75% busy
” because of that.
That problem can be easily solved with the database partitioning. Partitioning creates tables for each hour or day and drops them when they are not needed anymore. S QL DROP is way more efficient than the DELETE statement.
You can use this tutorial for any Zabbix version after 3.0 (3.2, 3.4, 4.0, 4.2, 4.4, 5.0, 5.2, 5.4, 6.0 etc).
Before we continue please make a backup of the Zabbix database, but if the installation is new than there is no need for backup.
Step 1: Download SQL script for partitioning
Download and uncompress SQL script “ zbx_db_partitiong.sql
” on your database server (use wget or curl tool):
 curl -O https://bestmonitoringtools.com/dl/zbx_db_partitiong.tar.gz
tar -zxvf zbx_db_partitiong.tar.gz
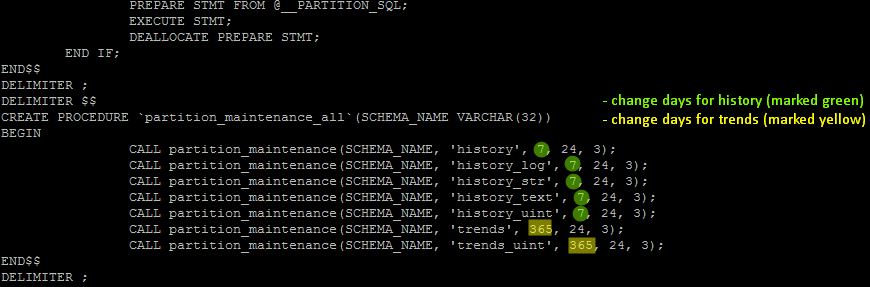
Script “ zbx_db_partitiong.sql
” is configured to keep 7 days of history data and 365 days of trend data – move to step 2 if those settings are acceptable to you.
However, if you want to change days for trends or history then open file “ zbx_db_partitiong.sql
“, change settings as shown in the picture below, and save the file.
Step 2: Create partitioning procedures with the SQL script
mysql -u '' -p'' < zbx_db_partitiong.sql
Script will create MySQL partitioning procedures very quickly on the new Zabbix installation, but on large databases, this may last for hours.
Step 3: Run partitioning procedures
automatically
We’ve created partitioning procedures, but they don’t do anything until we run them!
This step is the most important because the partitions must be deleted and created regularly (every day) using partitioning procedures!
Don’t worry, you don’t have to do that manually. We can use two tools for such tasks: MySQL event scheduler
or Crontab
– choose whatever you prefer.
Option 1: Manage partitions automatically using MySQL event scheduler (recommended)
 [mysqld]
event_scheduler = ON
Don’t know where that file is located? If you used my tutorial for installing and optimizing Zabbix
, then the MySQL configuration file ( 10_my_tweaks.cnf
) should be located at “ /etc/mysql/mariadb.conf.d/
” or “ /etc/my.cnf.d/
“, otherwise try to search for it with the command:
sudo grep --include=*.cnf -irl / -e "\[mysqld\]"
Once you have made the changes restart your MySQL server for the setting to take effect!
sudo systemctl restart mysql
Nice! MySQL event scheduler should be enabled, let’s check that with the command:
  root@dbserver:~ $  mysql -u '' -p'' -e "SHOW VARIABLES LIKE 'event_scheduler';"
+-----------------+-------+
| Variable_name | Value |
+-----------------+-------+
| event_scheduler | |
+-----------------+-------+
Now we can create an event that will run procedure “ partition_maintenance_all
” every 12 hours.
mysql -u '' -p'' -e "CREATE EVENT zbx_partitioning ON SCHEDULE EVERY 12 HOUR DO CALL partition_maintenance_all('zabbix');" After 12 hours, check to see if the event has been using the command below.
 mysql -u '  zabbix
' -p'  zabbixDBpass
'  zabbix  -e "SELECT * FROM INFORMATION_SCHEMA.events\G"
EVENT_CATALOG: def .
CREATED: 2020-10-24 11:01:07
LAST_ALTERED: 2020-10-24 11:01:07  LAST_EXECUTED: 2020-10-24 11:43:07  .
Option 2: Manage partitions automatically using Crontab
Crontab is a good alternative if you are unable to use the MySQL event scheduler. Open crontab file with the command “ sudo crontab -e
” and add a job for partitioning Zabbix MySQL database (every day at 03:30 AM) by adding this line anywhere in the file:
30 03 * * * /usr/bin/mysql -u '' -p'' -e "CALL partition_maintenance_all('');" > /tmp/CronDBpartitiong.log 2>&1 Save and close file.
Cron will execute patitioning every day (drop old tables and create new ones) and log everything in file “ /tmp/CronDBpartitiong.log
“.
However, if you are impatient then run command immediately from the terminal:
  root@dbserver:~ $  mysql -u '' -p'' -e "CALL partition_maintenance_all('');"
+-----------------------------------------------------------+
| msg |
+-----------------------------------------------------------+
| partition_create(zabbix,history,p201910150000,1571180400) |
+-----------------------------------------------------------+
+-----------------------------------------------------------+ .etc.
and check the partitioning status afterward:
root@dbserver:~ $ mysql -u '' -p'' -e "show create table history\G" Table: history Create Table: CREATE TABLE history ( itemid bigintunsigned NOT NULL, clock int NOT NULL DEFAULT '0', value double(16,4) NOT NULL DEFAULT '0.0000', ns int NOT NULL DEFAULT '0', KEY history_1 (itemid,clock) ) ENGINE=InnoDB DEFAULT CHARSET=utf8 COLLATE=utf8_bin /*!50100 PARTITION BY RANGE (clock) ( PARTITION p201910140000 VALUES LESS THAN (1571094000) ENGINE = InnoDB, PARTITION p201910150000 VALUES LESS THAN (1571180400) ENGINE = InnoDB, PARTITION p201910160000 VALUES LESS THAN (1571266800) ENGINE = InnoDB) */
As you can see in the outputs, we have created for the history table.
Step 4: Configure Housekeeping on Zabbix frontend
Configure housekeeping on Zabbix frontend as shown in the picture below.
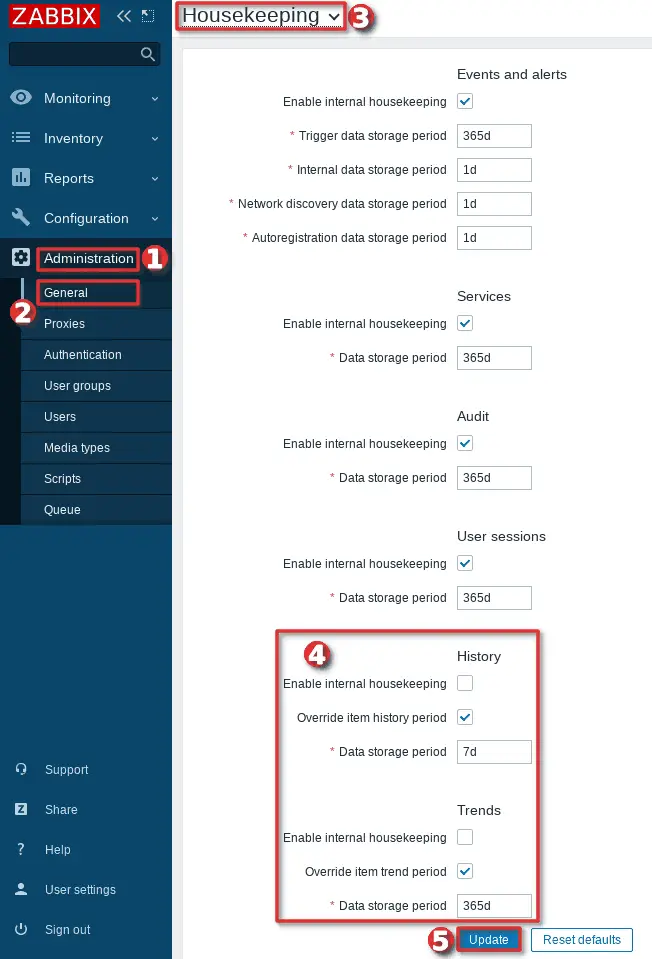
If the picture is not self-explanatory, here are the steps for configuring housekeeping on Zabbix frontend:
- navigate to “ Housekeeping
” section: “ Administration
” → “ General
” → “ Housekeeping
“; - remove the checkmark from “ Enable internal housekeeping
” under History and Trends section; - put a checkmark on “ Override item trend period
” under History and Trends section; - define days for “ data storage period
” for trends and history under the History and Trends section (must be the same as the days configured in database partitioning – that should be 7 days for history and 365 days for trends if you haven’t changed the default settings in the script); - click the “ Update
” button.
And you are done! Keep in mind that the partitioning will delete history and trend tables according to what you have configured in the partitioning procedure. For example, if you have configured to keep 7 days of history, partitioning will start deleting history on the 8th day. After that, it will delete one history table every day so that the database always has 7 days of the history data. The same goes for the trend data, if you configured to keep 365 days of the trend data, only after 365 days it will start deleting old trend tables.
CONGRATULATIONS!
You have successfully partitioned MySQL tables on the Zabbix database!
No need to change anything else as other steps are optional.
Step 5: Change partitioning settings (days for history and trends)
Sometimes it may happen that you initially set too many days for history and trends for the Zabbix database, so the disk space fills up too quickly. Or the opposite happens, you didn’t configure enough days for history or trends. What to do then?
You don’t need to run the script again, just create a new procedure that you will run instead of the old one.
a) Create a new partitioning procedure
Connect to the MySQL/MariaDB server:
mysql -u '' -p''
Create a new procedure but change the number of days for trends and history according to your needs, I will set 30 days for history
and 400 days for trends
:
DELIMITER $
CREATE PROCEDURE (SCHEMA_NAME VARCHAR)
BEGIN
CALL partition_maintenance(SCHEMA_NAME, 'history',
, 24, 3);
CALL partition_maintenance(SCHEMA_NAME, 'history_log',
, 24, 3);
CALL partition_maintenance(SCHEMA_NAME, 'history_str',
, 24, 3);
CALL partition_maintenance(SCHEMA_NAME, 'history_text',
, 24, 3);
CALL partition_maintenance(SCHEMA_NAME, 'history_uint',
, 24, 3);
CALL partition_maintenance(SCHEMA_NAME, 'trends',
, 24, 3);
CALL partition_maintenance(SCHEMA_NAME, 'trends_uint', , 24, 3);
END$
DELIMITER ;
b) Update MySQL event scheduler or Crontab
We have created the partitioning procedure in the previous step, but it is not active yet! Now we must replace the old procedure with the new one that will delete and add partitions regularly. Choose one of the two options below depending on what you have configured on your Zabbix instance.
Option 1: Update MySQL event scheduler
mysql -u '' -p'' -e "ALTER EVENT zbx_partitioning ON SCHEDULE EVERY 12 HOUR DO CALL ('zabbix');" Option 2: Update Crontab
For those using Crontab, open crontab file with the command “ sudo crontab -e
“, comment out the the old procedure job, and add a new one
  # old procedure, still exists in the database so it can be used if needed
# 30 03 * * * /usr/bin/mysql -u 'zabbix' -p'zabbixDBpass' zabbix -e "CALL partition_maintenance_all('zabbix');" > /tmp/CronDBpartitiong.log 2>&1
30 03 * * * /usr/bin/mysql -u '  zabbix
' -p'  zabbixDBpass
'  zabbix  -e "CALL  partition_maintenance_all_30and400
('  zabbix
');" > /tmp/CronDBpartitiong.log 2>&1
Save your changes and exit the Crontab.
Step 6: Solution for some common errors
Duplicate partition name
If you have a different time setting on MySQL compared to your Linux OS, you will receive an error regarding duplicate partition names:
ERROR 1517 (HY000) at line 1: Duplicate partition name p202307100000
Check time on MySQL with command “ SELECT CURRENT_TIMESTAMP ;
” and on OS with command “ timedatectl
“.
If they are different then set your timezone correctly using this guide
, and then restart the MySQL server.
Waiting for table metadata lock (graphs with no data)
At first, you might think this is a fault of the partitioning script. However, upon closer examination, you will probably find some other application or script that is using Zabbix tables, causing the hang and holding that metadata lock.
My recommendation is to fix that other application or script to release the metadata lock. In the meantime, you can terminate those hanging queries by running this command in the crontab, just before you execute the partitioning script:
/usr/bin/mysql -u' root
' -p' MyRootPass2!?
' -e "SELECT GROUP_CONCAT(CONCAT('KILL ', id) SEPARATOR ';') AS kill_commands FROM information_schema.processlist WHERE db = ' zabbix
' AND user IN (' scriptuser
', ' crmapp
') AND command = 'Sleep'" | grep -v '^kill_commands Содержание
Настройка
GSM-модем
В современных системах модем должен сразу определяться правильно (например, в Ubuntu 20.04), но если он виден как CD-ROM и не виден как USB-устройство, необходимо его переопределение.
# Установить пакет usb-modeswitch
apt usb-modeswitch # Узнать ID
lsusb
Bus 004 Device 002: ID 12d1: Huawei Technologies Co., Ltd. Broadband stick modem on
usb_modeswitch 12d1 # Посмотреть, появились ли USB-устройства devttyUSB
Это нужно сделать в любом случае, иначе в интерфейсе будет писать, что нет прав на устройство:
# Включить Заббикс в группу dialout
usermod dialout zabbix # Перезапустить службу
systemctl restart zabbix-server
Далее в интерфейсе Заббикса добавить /dev/ttyUSB0 в SMS Media types.
Проверка отправки SMS в терминале
apt gammu
gammu-config
Прописать порт (здесь: /dev/ttyUSB0
).
![Upgrade Zabbix (5.0, 5.2, 5.4) to 6.0 like a Pro [+6.0 to 6.4 guide]](https://bva.dyndns.info/wiki/_media/service/pasted/20220419-100759.png)
gammu identify
Device : devttyUSB0
Manufacturer : Huawei
Model : E150 E150
Firmware : 11.609.82.02.143
IMEI : 000000000000000
SIM IMSI : 000000000000000
gammu sendsms TEXT
If you want , press Ctrl+C…
Sending SMS …waiting network answer. OK, message =
Агенты
Zabbix agent 2
- zabbix_agent2.conf для Windows
 =monitoring
=monitoring
=system.run
=C:\Program Files\zabbix\zabbix_agent2.log
=system.hostnamehost
=system.uname
Zabbix agent
- zabbix_agentd.conf для Windows
 =C:\Program Files\zabbix\zabbix_agentd.log
=system.run
=monitoring
=monitoring
=system.hostnamehost
=system.uname
- zabbix_agentd.conf для Linux
 =varrunzabbixzabbix_agentd.pid
=varlogzabbixzabbix_agentd.log
=
=
=192.168.1.33
=192.168.1.33
=system.hostname
=etczabbixzabbix_agentd.d
=system.uname
  # Проверка соединения с агентом - на сервере выполнить
nc agent IP address
CentOS, RedHat
Debian, Ubuntu
# Ubuntu 16.04 https:repo.zabbix.comzabbixubuntupoolmainzzabbixzabbix-agent_4.2.4-2Bxenial_amd64.deb # Ubuntu 14.04 https:repo.zabbix.comzabbixubuntupoolmainzzabbixzabbix-agent_4.2.4-2Btrusty_amd64.deb za etczabbixzabbix_agentd.conf etczabbixzabbix_agentd.conf # вставить конфиг для Linux, сохранить файл, перезапустить агента service zabbix-agent restart # Иногда система ругается на отсутствие curl, поставитьcurl # На очень старых системах типа Ubuntu 8.04, Debian 5 Lenny последняя рабочая версия агента - 1.8.3. http:old-releases.ubuntu.comubuntupooluniversezzabbixzabbix-agent_1.8.3-2ubuntu1_i386.deb
Notification in Telegram
Make a bot at https://t.me/BotFather
, add its token in Telegram properties in Zabbix
Find out your ID using the bot https://t.me/myidbot
(team/getid
for the user,/getgroupid
for the group).![Upgrade Zabbix (5.0, 5.2, 5.4) to 6.0 like a Pro [+6.0 to 6.4 guide]](https://bva.dyndns.info/wiki/_media/service/pasted/20221031-100048.png)
Add your ID to the properties of your Zabbix account by adding Telegram there.
In order for the bot to send messages in a personal message, you need to start a chat with it.
Recipient group setting:
Add the received group ID to the properties of the Zabbix account created for group notification
Information about packages installed on a Linux system
Update
# Add repository (in this case version 3.4) rpm http:repo.zabbix.comzabbixrhelx86_64zabbix-release--.el7.centos.noarch.rpm # Updating the repository if the repository of the previous version is already registered: http:repo.zabbix.comzabbixrhelx86_64zabbix-release--.el7.centos.noarch.rpm all # Clear the cache, otherwise the update will not be seen # Update (MySQL version) zabbix-server-mysql zabbix-web-mysql zabbix-agent
You do not have the SUPER privilege and binary logging is enabled
Zabbix after the update swears at the version of the database and does not start. In the logs:
 2606691:20230412:144648.589 starting automatic database upgrade
2606691:20230412:144648.589 [Z3005] query failed: [1419] You do not have the SUPER privilege and binary logging is enabled (you *might* want to use the less safe log_bin_trust_function_creators variable) [create trigger hosts_insert after insert on hosts
for each row
insert into changelog (object,objectid,operation,clock)
values(1,new.hostid,1,unix_timestamp())]
2606691:20230412:144648.589 database upgrade failed on patch 06010049, exiting in 10 seconds
mysql GLOBAL log_bin_trust_function_creators ;
Moving to another sideboard
# On the new server apt php mysql-server language-pack-en mysql zabbix utf8 utf8_bin; @; privileges zabbix@; stop;
# On the old server mysqldump root zabbix zabbix.sql zabbix.sql user192.168.1.10:homeuser # On the new server mysql zabbix zabbix homeuserzabbix.sql
Then install the new version of Zabbix according to the instructions, but do not start it.
First you need:
Match config
/etc/zabbix/zabbix_server.confCreate
/etc/zabbix/web/zabbix.conf.php
by copying the config there from the old server.On file
/etc/zabbix/apache.conf
set the timezone.
 systemctl start zabbix-server
systemctl zabbix-server  # After the launch, the database will be updated   # Check if the database has been updated:  varlogzabbixzabbix_server.log database
 mysql zabbix; trends value_min value_avg value_max ; history;
stop;
Wi-Fi Monitoring
In this case, the agent is installed on Raspbian.
 =varrunzabbixzabbix_agentd.pid
=varlogzabbix-agentzabbix_agentd.log
=
=192.168.1.100
=192.168.1.100  # Link Quality (here the scale is 70 units, it is necessary to check in each case) =wifi.linkquality,iwconfig wlan0 Quality  # Signal level (dBm) =wifi.signallevel,iwconfig wlan0 level  # TX Power (dBm) =wifi.txpower,iwconfig wlan0 Tx-Power  # Access Point MAC-address - without the last sign and colons   # Converted to decimal in Zabbix and configured value mapping "Wi-Fi AP MAC addresses",   # where decimal numbers derived from MAC addresses are mapped to AP names. =wifi.apmac,iwgetid  # SSID (Item in Zabbix - text) =wifi.ssid,iwgetid
=wifi.channel,iwgetid  # Frequency (specify Hz value in Item for automatic conversion to GHz) =wifi.freq,iwgetid  # Site availability - HTTP return code, normally 200 (configure value mapping) =wifi.avail.ya,curl wlan0 https:ya.ru devnull
=wifi.avail.google,curl wlan0 https:www.google.com devnull  # Availability of servers, if 0 - no packet loss, everything is OK (configure value mapping) =wifi.avail.serv4, wlan0 192.168.1.231 packet
=wifi.avail.serv5, wlan0 192.168.1.209 packet
=wifi.avail.serv9, wlan0 192.168.1.210 packet  # Response time (ms) =wifi.avail.serv4.time, wlan0 192.168.1.231 =
=wifi.avail.serv5.time, wlan0 192.168.1.209 =
=wifi.avail.serv9.time, wlan0 192.168.1.210 =
Monitoring the signal strength on the Wi-Fi adapter using Zabbix
Items in Zabbix
It is convenient to combine graphs like this:
Wi-Fi signal (Wi-Fi link quality, Wi-Fi signal level, Wi-Fi TX power, Wi-Fi channel)
Unreachable servers via Wi-Fi (loss of ping) (all Items “Unreachable Server* via wlan0 (loss of ping)”)
Wi-Fi server response time (all Items “Server* response time via wlan0 (ping)”)
Availability of external resources via Wi-Fi (all Items "Availability * via wlan0 (curl https)")
Create a screen in a template with these graphs and display frequency, SSID and AP names there as text.
MySQL Monitoring
 @ ; USAGEREPLICATION CLIENTPROCESS@;
stop;
=mysql.status, "show global status where Variable_name='$1';" =etczabbix mysql # Database may be a database name or "all". Default is "all". # Table may be a table name or "all". Default is "all". # Type may be "data", "index", "free" or "both". Both is a sum of data and index. Default is "both". # Database is mandatory if a table is specified. Type may be specified always. # Returns value in bytes. # 'sum' on data_length or index_length alone needed when we are getting this information for whole database instead of a single table =mysql.size,
 client
=zabbix
=password_here
Restart the agent, bind the Template DB MySQL template to the host on the server.
Fail2ban monitoring
Setting up the target system for monitoring.
Add file /etc/zabbix/zabbix_agentd.d/fail2ban.conf
(for Zabbix agent 2 - /etc/zabbix/zabbix_agentd2.d/fail2ban.conf
):
 UserParameter=fail2ban.status[*],fail2ban-client status '$1' | grep 'Currently banned:' | grep -E -o '[0-9]+'
UserParameter=fail2ban.discovery,fail2ban-client status | grep 'Jail list:' | sed -e 's/^.*:\W\+//' -e 's/\(\(\w\|-\)\+\)/{"{#JAIL}":"\1" }/g' -e 's/.*/{"data":[\0]}/'
Add a group for fail2ban, add the zabbix user there and give this group rights to the socket, since initially only root has rights.
 groupadd fail2ban
usermod fail2ban zabbix root:fail2ban varrunfail2banfail2ban.sock g+rwx varrunfail2banfail2ban.sock zabbix fail2ban-client status  # If a warning is issued warning: cannot change directory to /var/lib/zabbix/: No such file or directory  varlibzabbix zabbix:zabbixvarlibzabbix
systemctl edit fail2ban
Service
=bin
=bin fail2ban runfail2banfail2ban.sock
=bin g+ runfail2banfail2ban.sock
systemctl restart zabbix-agent.service
EventLog Monitoring
Key ( help on key eventlog
)
eventlogSecurity,СUser,,,,,skip
 HOST. NAME - 1CUser has been disabled
logeventidEventLogeventlogSecurity,1CUser,,,,,skip,,=  # Recovery Expression (upon successful login) logeventidEventLogeventlogSecurity,1CUser,,,,,skip,,=
Enable Allow manual close.
IS events MS Windows Server Security Log
Ping from agent
Add to agent config on Windows:
UserParameterremote.ping powershell
On Linux ( Zabbix forum
):
=remote.ping, devnull
SNMP
SNMP agent - documentation
.
Find SNMP under Windows - MIB Browser
.
The MIB Browser shows the SNMP keys as eg hrSystemUptime.0 or, if you go to the properties of this OID, .1.3.6.1.2.1.25.1.1. At the same time, in Linux, the same is displayed as iso.3.6.1.2.1.25.1.1.0, i.e., it is convenient to search for OIDs through the program, but it is better to insert OIDs into Zabbix the way they are displayed in Linux, otherwise item might just not work.
Although, options are possible:
.1.3.6.1.2.1.25.1.1.0
1.3.6.1.2.1.25.1.1.0
Macros
In addition to systemic
, there are custom
, which are convenient for flexible setting of trigger values, etc. The main convenience in inheritance is that the host macro has the first priority, then the directly attached template comes, then the template of the second level, third, etc., and at the end - the global value of the macro, if nothing was found at the previous levels. This gives the flexibility to override values at lower levels of the hierarchy.
Also available low-level discovery macros
, which allow, for example, to set different trigger values for different drives on the computer
.
Problem solving
Zabbix icmp pinger processes more than 75% busy
SSL web checks not working: SSL routines:tls12_check_peer_sigalg:wrong signature type
The reason is the crooked version of openssl (1.1.1f) included in the Ubuntu 20.04 LTS distribution, you need to upgrade it to at least 1.1.1g.
Best package (.deb), but you can also compile:
  # version check openssl version https:www.openssl.orgsourceopenssl-1.1.1k.tar.gz openssl-1.1.1k.tar.gz openssl-1.1.1k
.config  # May need apt install make gcc first  usrbinopenssl ~tmp install. usrlocalbinopenssl usrbinopenssl
ldconfig
| /usr/bin/mysql -u' root
'-p' MyRootPass2!?
'
SELECT performance_schema.threads. PROCESSLIST_ID,performance_schema.threads. THREAD_ID, performance_schema.events_statements_current. SQL_TEXT, information_schema. INNODB_TRX.trx_started FROM performance_schema.threads INNER JOIN information_schema. INNODB_TRX ON performance_schema.threads. PROCESSLIST_ID = information_schema. INNODB_TRX.trx_mysql_thread_id INNER JOIN performance_schema.events_statements_current ON performance_schema.events_statements_current. THREAD_ID = performance_schema.threads. THREAD_ID\G;
Step 7: Info about
Zabbix partitioning script
Zabbix partitioning SQL script that is used in this guide contains these partitioning procedures:
DELIMITER$CREATE PROCEDURE `partition_maintenance_all`(SCHEMA_NAME VARCHAR)
BEGIN CALL partition_maintenance(SCHEMA_NAME, 'history', 7, 24, 3); CALL partition_maintenance(SCHEMA_NAME, 'history_log', 7, 24, 3); CALL partition_maintenance(SCHEMA_NAME, 'history_str', 7, 24, 3); CALL partition_maintenance(SCHEMA_NAME, 'history_text', 7, 24, 3); CALL partition_maintenance(SCHEMA_NAME, 'history_uint', 7, 24, 3); CALL partition_maintenance(SCHEMA_NAME, 'trends', 365, 24, 3); CALL partition_maintenance(SCHEMA_NAME, 'trends_uint', 365, 24, 3);
END$
DELIMITER ;
Need more information ? Watch this video
about MySQL database partitioning for Zabbix.
Content
Settings
GSM modem
On modern systems, the modem should immediately be detected correctly (for example, in Ubuntu 20.04), but if it is visible as a CD-ROM and not visible as a USB device, it must be redefined.
# Install the usb-modeswitch packageapt usb-modeswitch# Get IDlsusb
Bus 004 Device 002: ID 12d1: Huawei Technologies Co., Ltd. Broadband stick modem on
usb_modeswitch 12d1# See if USB devices have appeared devttyUSB
This must be done in any case, otherwise it will write in the interface that there are no rights to the device:
# Include Zabbix in the dialout groupusermod dialout zabbix# Restart servicesystemctl restart zabbix-server
Next, in the Zabbix interface, add /dev/ttyUSB0 to SMS Media types.
Checking sending SMS in_terminal
apt gammu
gammu-config
Set the port (here: /dev/ttyUSB0).
gammu identify

Device : devttyUSB0
Manufacturer : Huawei
Model : E150 E150
Firmware : 11.609.82.02.143
IMEI : 000000000000000
SIM IMSI : 000000000000000

gammu sendsms TEXT

If you want , press Ctrl+C…
Sending SMS …waiting network answer. OK, message =
Агенты
Zabbix agent 2
- zabbix_agent2.conf для Windows
=monitoring
=monitoring
=system.run
=C:\Program Files\zabbix\zabbix_agent2.log
=system.hostnamehost
=system.uname
Zabbix agent
- zabbix_agentd.conf для Windows
=C:\Program Files\zabbix\zabbix_agentd.log
=system.run
=monitoring
=monitoring
=system.hostnamehost
=system.uname
- zabbix_agentd.conf для Linux
=varrunzabbixzabbix_agentd.pid
=varlogzabbixzabbix_agentd.log
=
=
=192.168.1.33
=192.168.1.33
=system.hostname
=etczabbixzabbix_agentd.d
=system.uname
# Проверка соединения с агентом - на сервере выполнитьnc agent IP address CentOS, RedHat
Debian, Ubuntu
# Ubuntu 16.04 https:repo.zabbix.comzabbixubuntupoolmainzzabbixzabbix-agent_4.2.4-2Bxenial_amd64.deb# Ubuntu 14.04 https:repo.zabbix.comzabbixubuntupoolmainzzabbixzabbix-agent_4.2.4-2Btrusty_amd64.deb za etczabbixzabbix_agentd.conf etczabbixzabbix_agentd.conf# вставить конфиг для Linux, сохранить файл, перезапустить агентаservice zabbix-agent restart
 # Иногда система ругается на отсутствие curl, поставить curl
 # На очень старых системах типа Ubuntu 8.04, Debian 5 Lenny последняя рабочая версия агента - 1.8.3. http:old-releases.ubuntu.comubuntupooluniversezzabbixzabbix-agent_1.8.3-2ubuntu1_i386.deb
Оповещение в Telegram
Сделать бота в https://t.me/BotFather, добавить его токен в свойствах Телеграма в Заббиксе
Узнать свой ID, воспользовавшись ботом https://t.me/myidbot (команда
/getidдля пользователя,/getgroupidдля группы).
Добавить свой ID в свойства своей учётки в Заббиксе, добавив туда Телеграм.
Чтобы бот мог слать сообщения в личку, нужно начать с ним чат.
Настройка группы получателей:
Добавить полученный ID группы в свойства учётки в Заббиксе, созданной для оповещения в группу
Информация о пакетах, установленных в системе Linux
Обновление
# Добавить репозиторий (в данном случае версию 3.4)rpm http:repo.zabbix.comzabbixrhelx86_64zabbix-release--.el7.centos.noarch.rpm# Обновление репозитория, если уже прописан репозиторий предыдущей версии: http:repo.zabbix.comzabbixrhelx86_64zabbix-release--.el7.centos.noarch.rpm all # Почистить кэш, иначе обновление не увидится# Обновиться (вариант для MySQL) zabbix-server-mysql zabbix-web-mysql zabbix-agent
You do not have the SUPER privilege and binary logging is enabled
Zabbix после обновления ругается на версию базы и не запускается? В логах:
2606691:20230412:144648.589 starting automatic database upgrade
2606691:20230412:144648.589 [Z3005] query failed: [1419] You do not have the SUPER privilege and binary logging is enabled (you *might* want to use the less safe log_bin_trust_function_creators variable) [create trigger hosts_insert after insert on hosts
for each row
insert into changelog (object,objectid,operation,clock)
values (1,new.hostid,1,unix_timestamp())]
2606691:20230412:144648.589 database upgrade failed on patch 06010049, exiting in 10 seconds
mysql GLOBAL log_bin_trust_function_creators ;
Переезд на другой сервант
# На новом сервереapt php mysql-server language-pack-rumysql zabbix utf8 utf8_bin; @ ; privileges zabbix @; quit;
# На старом сервереmysqldump root zabbix zabbix.sql zabbix.sql user192.168.1.10:homeuser# На новом сервереmysql zabbix zabbix homeuserzabbix.sql
Дальше установить новую версию Заббикса по инструкции, но не запускать.
Сначала нужно:
Привести в соответствие конфиг
/etc/zabbix/zabbix_server.confСоздать
/etc/zabbix/web/zabbix.conf.php, скопировав туда конфиг со старого сервера.В файле
/etc/zabbix/apache.confнастроить часовой пояс.
systemctl start zabbix-server
systemctl zabbix-server# После запуска пойдёт обновление базы# Посмотреть, обновилась ли база: varlogzabbixzabbix_server.log database
mysql zabbix; trends value_min value_avg value_max ; history ;
quit;
Мониторинг Wi-Fi
В данном случае агент установлен на Raspbian.
=varrunzabbixzabbix_agentd.pid
=varlogzabbix-agentzabbix_agentd.log
=
=192.168.1.100
=192.168.1.100# Link Quality (здесь шкала в 70 единиц, надо проверять в каждом конкретном случае)=wifi.linkquality,iwconfig wlan0 Quality # Signal level (dBm)=wifi.signallevel,iwconfig wlan0 level # TX Power (dBm)=wifi.txpower,iwconfig wlan0 Tx-Power # Access Point MAC-address - без последнего знака и двоеточий# В Заббиксе преобразовывается в десятичное число и настроен value mapping "Wi-Fi AP MAC addresses",# где десятичные числа, полученные из MAC-адресов, сопоставляются с именами AP.=wifi.apmac,iwgetid # SSID (Item в Заббиксе - текст)=wifi.ssid,iwgetid
=wifi.channel,iwgetid # Частота (в Item указывать значение Hz для автоматического пересчёта в GHz)=wifi.freq,iwgetid # Доступность сайтов - код возврата HTTP, в норме 200 (настроить value mapping)=wifi.avail.ya,curl wlan0 https:ya.ru devnull
=wifi.avail.google,curl wlan0 https:www.google.com devnull# Доступность серверов, если 0 - нет потери пакета, всё ОК (настроить value mapping)=wifi.avail.serv4, wlan0 192.168.1.231 packet
=wifi.avail.serv5, wlan0 192.168.1.209 packet
=wifi.avail.serv9, wlan0 192.168.1.210 packet # Время отклика (ms)=wifi.avail.serv4.time, wlan0 192.168.1.231 =
=wifi.avail.serv5.time, wlan0 192.168.1.209 =
=wifi.avail.serv9.time, wlan0 192.168.1.210 =
Мониторинг уровня сигнала на Wi-Fi адаптере с помощью Zabbix
Items в Zabbix
Графики удобно объединять так:
Сигнал Wi-Fi (Wi-Fi link quality, Wi-Fi signal level, Wi-Fi TX power, Wi-Fi channel)
Недоступность серверов по Wi-Fi (потеря ping) (все Items «Недоступность Server* через wlan0 (потеря ping)»)
Время ответа серверов по Wi-Fi (все Items «Время ответа Server* через wlan0 (ping)»)
Доступность внешних ресурсов по Wi-Fi (все Items «Доступность * через wlan0 (curl https)»)
Создать комплексный экран в шаблоне с этими графиками и выводить туда ещё текстом частоту, SSID и имена AP.
Мониторинг MySQL
 @ ; USAGEREPLICATION CLIENTPROCESS @;
quit;
=mysql.status, "show global status where Variable_name='$1';" =etczabbix mysql
 # Database may be a database name or "all". Default is "all".# Table may be a table name or "all". Default is "all".# Type may be "data", "index", "free" or "both". Both is a sum of data and index. Default is "both".# Database is mandatory if a table is specified. Type may be specified always.# Returns value in bytes.# 'sum' on data_length or index_length alone needed when we are getting this information for whole database instead of a single table=mysql.size,
client
=zabbix
=password_here
Restart the agent, bind the Template DB MySQL template to the host on the server.
Monitoring fail2ban
Setting up the target system for monitoring.
Add file /etc/zabbix/zabbix_agentd.d/fail2ban.conf (for Zabbix agent 2 — /etc/zabbix/zabbix_agentd2.d/fail2ban.conf):
UserParameter=fail2ban.status[*],fail2ban-client status '$1' | grep 'Currently banned:' | grep -E -o '[0-9]+'
UserParameter=fail2ban.discovery,fail2ban-client status | grep 'Jail list:' | sed -e 's/^.*:\W\+//' -e 's/\(\(\w\|-\)\+\)/{"{#JAIL}":"\1" }/g' -e 's/.*/{"data":[\0]}/'
Add a group for fail2ban, add the zabbix user there and give this group rights to the socket, since initially only root has rights.
groupadd fail2ban
usermod fail2ban zabbix root:fail2ban varrunfail2banfail2ban.sock g+rwx varrunfail2banfail2ban.sock zabbix fail2ban-client status# If warning: cannot change directory to /var/lib/zabbix/: No such file or directory varlibzabbix zabbix:zabbixvarlibzabbix
systemctl edit fail2ban
Service
=bin
=bin fail2ban runfail2banfail2ban.sock
=bin g+ runfail2banfail2ban.sock
systemctl restart zabbix-agent.service
Monitoring EventLog
Key (eventlog key reference)
eventlogSecurity,СUser,,,,,skip
HOST. NAME - 1CUser has been disabled
logeventidEventLogeventlogSecurity,1CUser,,,,,skip,,=# Recovery Expression (on successful login)logeventidEventLogeventlogSecurity,1CUser,,,,,skip,,=
Enable Allow manual close.
ISE events MS Windows Server Security Log
Ping from agent
Add to agent config on Windows:
UserParameterremote.ping powershell
On Linux (Zabbix forum ):
=remote.ping, devnull
SNMP
SNMP agent — documentation.
Find SNMP under Windows — MIB Browser.
The MIB Browser shows the SNMP keys as eg hrSystemUptime.0 or, if you go to the properties of this OID, .1.3.6.1.2.1.25.1.1. At the same time, in Linux, the same is displayed as iso.3.6.1.2.1.25.1.1.0, i.e., it is convenient to search for OIDs through the program, but it is better to insert OIDs into Zabbix the way they are displayed in Linux, otherwise item might just not work.
Although, options are possible:
.1.3.6.1.2.1.25.1.1.0
1.3.6.1.2.1.25.1.1.0
Macros
Beyond system, there are custom which are handy for flexible setting of values triggers, etc. The main convenience in inheritance is that the host macro has first priority, then the directly bound template, then the second-level template, third-level template, etc., and finally the global value of the macro, if on None of the previous levels were found. This gives the flexibility to override values at lower levels of the hierarchy.
There are also low-level discovery macros that allow you to set, for example, different trigger values for different drives on the computer.
Troubleshooting
Zabbix icmp pinger processes more than 75% busy
SSL web checks not working: SSL routines:tls12_check_peer_sigalg:wrong signature type
The reason is the crooked version of openssl (1.1.1f) included in the Ubuntu 20.04 LTS distribution, you need to upgrade it to at least 1.1.1g.
Best package (.deb), but you can also compile:
# version check
openssl versionhttps:www.openssl.orgsourceopenssl-1.1.1k.tar.gz
openssl-1.1.1k.tar.gz openssl-1.1.1k
.config
# May need apt install make gcc firstusrbinopenssl ~tmp
install.
usrlocalbinopenssl usrbinopenssl
ldconfig</pre
