
Хочу рассказать об одной полезной возможности nginx, которую регулярно использую в своих делах. Речь пойдет о настройке проксирования запросов на удаленный сервер с помощью nginx и директивы proxy_pass. Я приведу примеры различных настроек и расскажу, где сам использую данный модуль популярного веб сервера.
- Introduction
- Введение
- Socket. IO Configuration
- NGINX Configuration
- What About Static Files?
- Troubleshooting
- NGINX WebSocket Example
- Step 1 — Installing Nginx
- Setting up WSS with Nginx
- Передача https через nginx с помощью proxy pass
- Optional — Update OAuth URLs
- Conclusion
- Проксирование определенной директории или файлов
- Step 3 — Testing your Reverse Proxy with Gunicorn (Optional)
- Prerequisites
- Настройка proxy_pass в nginx
- About F5 NGINX
- Step 2 — Configure Jenkins
- Setting up WSS with Apache
- Step 1 — Configure Nginx
- Step 2 — Configuring your Server Block
- Передача реального ip (real ip) адреса клиента в nginx при proxy_pass
- Заключение
Introduction
By default, Jenkins comes with its own built in web server, which listens on port 8080. This is convenient if you run a private Jenkins instance, or if you just need to get something up quickly and don’t care about security. Once you have real production data going to your host, though, it’s a good idea to use a more secure web server such as Nginx handling the traffic.
This post will detail how to wrap your site with SSL using the Nginx web server as a reverse proxy for your Jenkins instance. This tutorial assumes some familiarity with Linux commands, a working Jenkins installation, and a Ubuntu 20.04 installation.
You can install Jenkins later in this tutorial, if you don’t have it installed yet.
This is my second post around WebSockets this month. I’m working a lot with WebSockets these days due to my two ongoing projects WebSocket.in and Groupwat.ch which require WebSockets.
If your website is on HTTPS, you can not connect to a WebSocket server running on WS (unsecured WebSocket protocol) and hence, setting up WSS (secure WebSocket protocol) on it is a real need these days with almost every website moving to HTTPS with LetsEncrypt’s free SSL certificates.
Let’s see how can we enable WSS for this simple Ratchet application
If this code looks unfamiliar to you, please read Ratchet’s getting started tutorial. Notice the curly braces around the route path? That’s because of Wildcard routing in ratchet.
A reverse proxy is the recommended method to expose an application server to the internet. Whether you are running a Node.js application in production or a minimal built-in web server with Flask, these application servers will often bind to localhost with a TCP port. This means by default, your application will only be accessible locally on the machine it resides on. While you can specify a different bind point to force access through the internet, these application servers are designed to be served from behind a reverse proxy in production environments. This provides security benefits in isolating the application server from direct internet access, the ability to centralize firewall protection, and a minimized attack plane for common threats such as denial of service attacks.
From a client’s perspective, interacting with a reverse proxy is no different from interacting with the application server directly. It is functionally the same, and the client cannot tell the difference. A client requests a resource and then receives it, without any extra configuration required by the client.
This tutorial will demonstrate how to set up a reverse proxy using Nginx, a popular web server and reverse proxy solution. You will install Nginx, configure it as a reverse proxy using the proxy_pass directive, and forward the appropriate headers from your client’s request. If you don’t have an application server on hand to test, you will optionally set up a test application with the WSGI server Gunicorn.
The issue seems to be largely version dependend.
On Ubuntu 14.04 LTS the default nginx is an outdated 1.4. First you need to install a PPA based version
shows how to do this with:
sudo add-apt-repository ppa:nginx/stable
sudo aptitude safe-upgrade
you should end up with:
does not work out of the box with 1.8.0. It’s probably meant as a hint only and not to be used as a configuration file as such or depends on another version.
I am testing with a apache2 based backend server A with SSL and self-signed client certificates enabled.
The Apache config SSLOptions are set to:
SSLOptions +ExportCertData +FakeBasicAuth + StdEnvVars
This makes debugging the situation easier since a phpinfo() script on the backend side will show the Server and Client Side information.
To verify this i used:
with the SSL certificate installed in the browser and I get sections like:
SSL_SERVER_S_DN_CN for the server certificate
and
SSL_CLIENT_S_DN_CN for the client certificate.
As a first start I used (fill in the parts in brackets) to configure nginx on the frontend server B:
uncomenting the SSL Client Certificate specific part just to check that the reverse proxy itself works.
Now http://frontend:8080/test/phpinfo.php works
The
SSL_SERVER_S_DN_CN for the server certificate is displayed
and
SSL_CLIENT_S_DN_CN for the client certificate is not (yet) displayed
Now after uncommenting:
http://frontend:8080/test/phpinfo.php works and
SSL_SERVER_S_DN_CN for the server certificate is displayed
and
SSL_CLIENT_S_DN_CN for the client certificate is displayed
so now we got things working as asked for.
Please note bug https://trac.nginx.org/nginx/ticket/872#ticket
I try to configure an Nginx server as a reverse proxy so the https requests it receives from clients are forwarded to the upstream server via https as well.
Here’s the configuration that I use:
Anyway, when I try to access a file using reverse proxy this is the error I get in reverse proxy logs:
Any idea what I am doing wrong?

asked Mar 20, 2014 at 11:18
I found what was the error, I needed to add
proxy_ssl_session_reuse off;
answered Mar 20, 2014 at 12:42
3 gold badges18 silver badges23 bronze badges
See nginx documentation:
Enables or disables passing of the server name through TLS Server Name Indication extension (SNI, RFC 6066) when establishing a connection with the proxied HTTPS server.
answered Jun 2, 2019 at 17:47

2 gold badges11 silver badges22 bronze badges
This fully solved the issue for me:
I also had to add proxy_ssl_name in order to make sure that nginx knew what name to pass to the upstream https server.
answered Mar 16, 2021 at 7:03

Введение
Немного расскажу своими словами о том, как работает модуль ngx_http_proxy_module. Именно он реализует весь функционал, о котором пойдет речь. Допустим, у вас в локальной или виртуальной сети есть какие-то сервисы, не имеющие прямого доступа из интернета. А вы хотите таковой иметь. Можно пробрасывать нужные порты на шлюзе, можно что-то еще придумывать. А можно сделать проще всего — настроить единую точку входа на все свои сервисы в виде nginx сервера и с него проксировать различные запросы к нужным серверам.
Расскажу на конкретных примерах, где я это использую. Для наглядности и простоты буду прям по порядку перечислять эти варианты:
- Суть в том, что вы настраиваете на любом виртуальном сервере эти чаты, помещаете их в закрытые периметры сети без лишних доступов и просто проксируете запросы на эти сервера. Они идут через nginx, который у вас смотрит во внешний интернет и принимает все входящие соединения.
- Допустим, у вас есть большой сервер с множеством контейнеров, например докера. На нем работает множество различных сервисов. Вы устанавливаете еще один контейнер с чистым nginx, на нем настраиваете проксирование запросов на эти контейнеры. Сами контейнеры мапите только к локальному интерфейсу сервера. Таким образом, они будут полностью закрыты извне, и при этом вы можете гибко управлять доступом.
- Еще один популярный пример. Допустим, у вас есть сервер с гипервизором proxmox или любым другим. Вы настраиваете на одной из виртуальных машин шлюз, создаете локальную сеть только из виртуальных машин без доступа в нее извне. Делаете в этой локальной сети для всех виртуальных машин шлюз по-умолчанию в виде вашей виртуальной машины со шлюзом. На виртуальных серверах в локальной сети размещаете различные сервисы и не заморачиваетесь с настройками фаервола на них. Вся их сеть все равно не доступна из интернета. А доступ к сервисам проксируете с помощью nginx, установленным на шлюз или на отдельной виртуальной машине с проброшенными на нее портами.
- Допустим, у вас большой проект, разбитый на составные части, которые живут на разных серверах. К примеру, на отдельном сервере живет форум, по пути /forum от основного домена. Вы просто берете и настраиваете проксирование всех запросов по адресу /forum на отдельный сервер. Точно так же можно без проблем все картинки перенести на другой сервер и проксировать к ним запросы. То есть вы можете создать любой location и переадресовывать запросы к нему на другие сервера.
Надеюсь в общем и целом понятно, о чем идет речь. Вариантов использования много. Я привел самые распространенные, которые пришли в голову и которые использую сам. Из плюсов, которые считаю наиболее полезными именно из своих кейсов, отмечу 2:
- Вы без проблем можете настроить https доступ к сервисам, при этом совершенно не трогая эти сервисы. Вы получаете и используете сертификаты на nginx сервере, используете https соединение с ним, а сам nginx уже передает информацию на сервера со службами, которые могут работать по обычному http и знать не знают о https.
- Вы очень легко можете менять адреса, куда проксируете запросы. Допустим у вас есть сайт, его запросы проксируются на отдельный сервер. Вы подготовили обновление или переезд сайта. Отладили все на новом сервере. Теперь вам достаточно на сервере nginx изменить адрес старого сервера на новый, куда будут перенаправляться запросы. И все. Если что-то пойдет не так, можете оперативно вернуть все обратно.
С теорией закончил. Перейдем теперь к примерам настройки. В своих примерах я буду использовать следующие обозначения:
In this post we’ll talk about using NGINX and NGINX Plus with Node.js and Socket.IO. Our post about building real‑time web applications with WebSocket and NGINX has been quite popular, so in this post we’ll continue with documentation and best practices using Socket.IO.
Socket.IO is a WebSocket API that’s become quite popular with the rise of Node.js applications. The API is well known because it makes building realtime apps, like online games or chat, simple. NGINX 1.3.13 and later and all NGINX Plus releases support proxying of WebSocket connections, which allows you to utilize Socket.IO. The WebSocket protocol allows for full‑duplex, or bidirectional, communication via a single TCP connection.
Socket. IO Configuration
To install Node.js, download the appropriate distribution (or install with a package manager). Run the npm install socket.io command to install Socket.IO.
NGINX Configuration
Now that the upstream group of servers is declared, a virtual server needs to be configured to direct traffic to it. At minimum, include the proxy_pass directive and name the upstream group. Because the WebSocket protocol uses the Upgrade header introduced in HTTP/1.1, we include the proxy_http_version directive.
What About Static Files?
To deliver static assets, you can have NGINX proxy requests to an upstream Node.js instance, but in most cases it’s more efficient to have NGINX serve them directly.
Troubleshooting
To try NGINX Plus, start your free 30-day trial today or contact us to discuss your use cases.

Free O’Reilly eBook: The Complete NGINX Cookbook
Updated for 2022 – Your Guide to Everything NGINX
The WebSocket protocol provides a way of creating web applications that support real‑time bidirectional communication between clients and servers. Part of HTML5, WebSocket makes it much easier to develop these types of applications than the methods previously available. Most modern browsers support WebSocket including Chrome, Firefox, Internet Explorer, Opera, and Safari, and more and more server application frameworks are now supporting WebSocket as well.
For enterprise production use, where multiple WebSocket servers are needed for performance and high availability, a load balancing layer that understands the WebSocket protocol is required, and NGINX has supported WebSocket since version 1.3 and can act as a reverse proxy and do load balancing of WebSocket applications. (All releases of NGINX Plus also support WebSocket.)
Check out recent performance tests on the scalability of NGINX to load balance WebSocket connections.
The WebSocket protocol is different from the HTTP protocol, but the WebSocket handshake is compatible with HTTP, using the HTTP Upgrade facility to upgrade the connection from HTTP to WebSocket. This allows WebSocket applications to more easily fit into existing infrastructures. For example, WebSocket applications can use the standard HTTP ports 80 and 443, thus allowing the use of existing firewall rules.
A WebSocket application keeps a long‑running connection open between the client and the server, facilitating the development of real‑time applications. The HTTP Upgrade mechanism used to upgrade the connection from HTTP to WebSocket uses the Upgrade and Connection headers. There are some challenges that a reverse proxy server faces in supporting WebSocket. One is that WebSocket is a hop‑by‑hop protocol, so when a proxy server intercepts an Upgrade request from a client it needs to send its own Upgrade request to the backend server, including the appropriate headers. Also, since WebSocket connections are long lived, as opposed to the typical short‑lived connections used by HTTP, the reverse proxy needs to allow these connections to remain open, rather than closing them because they seem to be idle.
NGINX supports WebSocket by allowing a tunnel to be set up between a client and a backend server. For NGINX to send the Upgrade request from the client to the backend server, the Upgrade and Connection headers must be set explicitly, as in this example:
Once this is done, NGINX deals with this as a WebSocket connection.
NGINX WebSocket Example
Here is a live example to show NGINX working as a WebSocket proxy. This example uses ws, a WebSocket implementation built on Node.js. NGINX acts as a reverse proxy for a simple WebSocket application utilizing ws and Node.js. These instructions have been tested with Ubuntu 13.10 and CentOS 6.5 but might need to be adjusted for other OSs and versions. For this example, the WebSocket server’s IP address is 192.168.100.10 and the NGINX server’s IP address is 192.168.100.20.
- For Debian and Ubuntu:$ sudo apt-get install nodejs npm
For RHEL and CentOS:$ sudo yum install nodejs npm - For Debian and Ubuntu:$ sudo apt-get install nodejs npm
- For RHEL and CentOS:$ sudo yum install nodejs npm
- Node.js is installed as nodejs on Ubuntu and as node on CentOS. The example uses node, so on Ubuntu we need to create a symbolic link from nodejs to node:$ ln -s /usr/bin/nodejs /usr/local/bin/node
- $ sudo npm install ws$ sudo npm config set registry http://registry.npmjs.org/Then run the sudo npm install ws command again.
- To test the server, we run wscat as our client:$ /root/node_modules/ws/bin/wscat —connect ws://192.168.100.20:8020Here we see that the client and server are able to communicate through NGINX which is acting as a proxy and messages can continue to be sent back and forth until either the client or server disconnects. All that is needed to get NGINX to properly handle WebSocket is to set the headers correctly to handle the Upgrade request that upgrades the connection from HTTP to WebSocket.
- WebSocket proxying at nginx.org
- NGINX and NGINX Plus feature comparison
- NGINX Plus Technical Specifications
- Configuring Proxy of WebSocket Traffic in:
Step 1 — Installing Nginx
Nginx is available for installation with apt through the default repositories. Update your repository index, then install Nginx:
update
nginx
Press Y to confirm the installation. If you are asked to restart services, press ENTER to accept the defaults.
Now you can verify that Nginx is running:
systemctl status nginx
● nginx.service — A high performance web server and a reverse proxy server
Loaded: loaded (/lib/systemd/system/nginx.service; enabled; vendor preset: enabled)
Active: active (running) since Mon 2022-08-29 06:52:46 UTC; 39min ago
Docs: man:nginx(8)
Main PID: 9919 (nginx)
Tasks: 2 (limit: 2327)
Memory: 2.9M
CPU: 50ms
CGroup: /system.slice/nginx.service
├─9919 «nginx: master process /usr/sbin/nginx -g daemon on; master_process on;»
└─9920 «nginx: worker process
Setting up WSS with Nginx
Restart the Nginx server and connect to the WebSocket server using: wss://example.com/wss2/your_path
Bonus tip: To avoid 404 errors on the WebSocket server, Nginx’s upstream name should match the hostname provided to $server = new RatchetApp(«localhost»,12345, ‘0.0.0.0’); as the first argument. In our case, localhost.
Hope this helps!
Передача https через nginx с помощью proxy pass
Если у вас сайт работает по https, то достаточно настроить ssl только на nginx_srv, если вы не беспокоитесь за передачу информации от nginx_srv к blog_srv. Она может осуществляться по незащищенному протоколу. Рассмотрю пример с бесплатным сертификатом let’s encrypt. Это как раз один из кейсов, когда я использую proxy_pass. Очень удобно настроить на одном сервере автоматическое получение всех необходимых сертификатов. Сейчас будем считать, что у вас стоит certbot и все готово для нового сертификата, который потом будет автоматически обновляться.
Для этого нам надо на nginx_srv добавить еще один location — /.well-known/acme-challenge/. Полная секция server нашего тестового сайта на момент получения сертификата будет выглядеть вот так:
Перечитывайте конфиг nginx и получайте сертификат. После этого конфиг меняется на следующий:
Проверяем, что получилось.
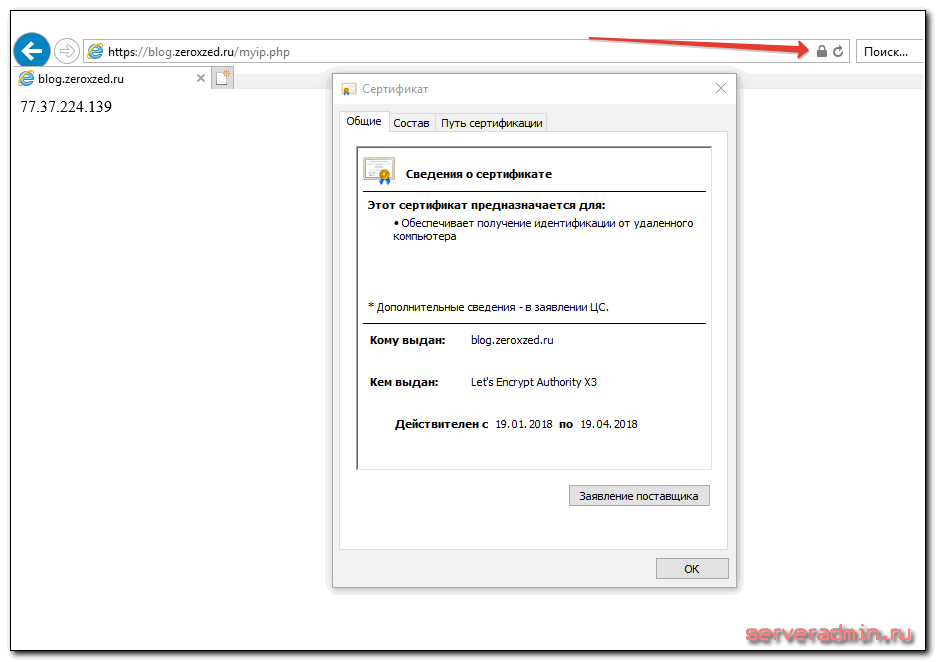
Наш сайт работает по https, при том, что мы вообще не трогали сервер, где этот сайт располагается. Конкретно с web сайтом это может быть не так актуально, но если вы проксируете запросы не на обычный сайт, а на какой-то нестандартный сервис, который трудно перевести на https, это может быть хорошим решением.
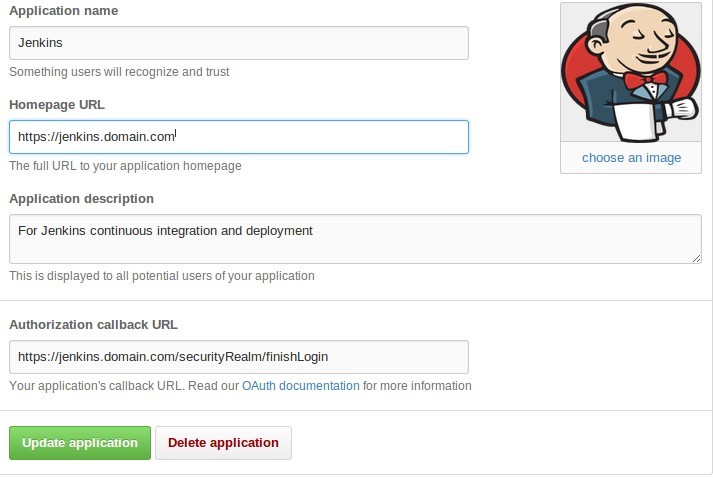
Optional — Update OAuth URLs
If you are using the GitHub or another OAuth plugin for authentication, it will probably be broken at this point. For example, when attempting to visit the URL, you will get a “Failed to open page” with a URL similar to http://jenkins.domain.com:8080/securityRealm/finishLogin?code=random-string.
Update the Jenkins URL to use HTTPS — https://jenkins.domain.com/

Conclusion
The only thing left to do is verify that everything worked correctly. As mentioned above, you should now be able to browse to your newly configured URL — jenkins.domain.com — over either HTTP or HTTPS. You should be redirected to the secure site, and should see some site information, including your newly updated SSL settings. As noted previously, if you are not using hostnames via DNS, then your redirection may not work as desired. In that case, you will need to modify the proxy_pass section in the Nginx config file.
Проксирование определенной директории или файлов
Рассмотрим еще один пример. Допустим, у вас форум живет в директории http://blog.zeroxzed.ru/forum/, вы хотите вынести форум на отдельный web сервер для увеличения быстродействия. Для этого к предыдущему конфигу добавьте еще один location.
Еще одно популярное решение. Вы можете отдавать картинки с одного сервера, а все остальное с другого. В моем примере, картинки будут жить на том же сервере, где nginx, а остальной сайт на другом сервере. Тогда у нас должна быть примерно такая конфигурация локаций.
Чтобы все это работало корректно, необходимо, чтобы сам сайт умел правильно размещать свои изображения. Вариантов это организовать множество. Можно как на сервере монтировать сетевые паки различными способами, так и программистам изменять код для управления размещением изображений. В любом случае, это комплексный подход к работе с сайтом.
Существует очень много директив для управления прокси-соединениями. Все они описаны в соответствующей документации nginx. Я не большой специалист по настройке nginx. В основном использую свои готовые конфиги, зачастую даже не вникая в суть, если получается сразу решить задачу. Подсматриваю что-то у других, записываю к себе, стараюсь разобраться.
Особое внимание следует уделить директивам кэширования proxy_cache, если в этом есть потребность. Можно существенно увеличить отклик веб сайта, если подходящим образом настроить отдачу кэша. Но это тонкий момент и нужно настраивать в каждом конкретном случае отдельно. Готовых рецептов тут не бывает.
Step 3 — Testing your Reverse Proxy with Gunicorn (Optional)
If you had an application server prepared and running before beginning this tutorial, you can visit it in your browser now:
Update your apt repository index and install gunicorn:
update
gunicorn
You also have the option to install Gunicorn through pip with PyPI for the latest version that can be paired with a Python virtual environment, but apt is used here as a quick test bed.
Next, you’ll write a Python function to return “Hello World!” as an HTTP response that will render in a web browser. Create test.py using nano or your preferred text editor:
environ start_response
start_response
This is the minimum required code by Gunicorn to start an HTTP response that renders a string of text in your web browser. After reviewing the code, save and close your file.
Now start your Gunicorn server, specifying the test Python module and the app function within it. Starting the server will take over your terminal:
gunicorn test:app
The output confirms that Gunicorn is listening at the default address of http://127.0.0.1:8000. This is the address that you set up previously in your Nginx configuration to proxy. If not, go back to your /etc/nginx/sites-available/your_domain file and edit the app_server_address associated with the proxy_pass directive.
Open your web browser and navigate to the domain you set up with Nginx:
Your Nginx reverse proxy is now serving your Gunicorn web application server, displaying “Hello World!”.
Prerequisites
To complete this tutorial, you will need:
- An Ubuntu 22.04 server, set up according to our initial server setup guide for Ubuntu 22.04,
- A domain name pointed at your server’s public IP. This will be configured with Nginx to proxy your application server.
Настройка proxy_pass в nginx
Рассмотрим самый простой пример. Буду использовать свой технический домен zeroxzed.ru в этом и последующих примерах. Допустим, у нас есть сайт blog.zeroxzed.ru. В DNS создана A запись, указывающая на ip адрес сервера, где установлен nginx — nginx_srv. Мы будем проксировать все запросы с этого сервера на другой сервер в локальной сети blog_srv, где реально размещается сайт. Рисуем конфиг для секции server.
Заходим по адресу http://blog.zeroxzed.ru. Мы должны попасть на blog_srv, где тоже должен работать какой-то веб сервер. В моем случае это будет тоже nginx. У вас должно открыться содержимое, аналогичное тому, что вы увидите, набрав http://192.168.13.31 в локальной сети. Если что-то не работает, то проверьте сначала, что по адресу директивы proxy_pass у вас все корректно работает.
Посмотрим логи на обоих сервера. На nginx_srv вижу свой запрос:
Как мы видим, запрос сначала пришел на nginx_srv, был переправлен на blog_srv, куда он пришел уже с адресом отправителя 94.142.141.246. Это адрес nginx_srv. Реальный же ip адрес клиента мы видим только в самом конце лога. Это неудобно, так как директива php REMOTE_ADDR не будет возвращать настоящий ip адрес клиента. А он очень часто бывает нужен. Мы это дальше исправим, а пока создадим в корне сайта на chat_srv тестовую страничку для проверки ip адреса клиента следующего содержания:
Назовем ее myip.php. Перейдем по адресу http://blog.zeroxzed.ru/myip.php и проверим, как сервер определит наш адрес. Никак не определит
Он покажет адрес nginx_srv. Исправляем это и учим nginx передавать реальный ip адрес клиента на сервер.
About F5 NGINX
F5, Inc. is the company behind NGINX, the popular open source project. We offer a suite of technologies for developing and delivering modern applications. Together with F5, our combined solution bridges the gap between NetOps and DevOps, with multi-cloud application services that span from code to customer.
Step 2 — Configure Jenkins
For Jenkins to work with Nginx, we need to update the Jenkins config to listen only on the localhost address instead of all (0.0.0.0), to ensure traffic gets handled properly. This is an important security step because if Jenkins is still listening on all addresses, then it will still potentially be accessible via its original port (8080). We will modify the /etc/default/jenkins configuration file to make these adjustments.
JENKINS_ARGS=»—webroot=/var/cache/jenkins/war —httpListenAddress=127.0.0.1 —httpPort=$HTTP_PORT -ajp13Port=$AJP_PORT»
Notice that the –httpListenAddress=127.0.0.1 setting must be either added or modified.
Then go ahead and restart Jenkins and Nginx.
jenkins restart
nginx restart
You should now be able to visit your domain using HTTPS, and the Jenkins site will be served securely.
Setting up WSS with Apache
We assume that your web-server is Apache and you are hosting example.com with it over SSL.
And add these two directives to it: ProxyPassMatch and ProxyPassReverse as shown below
Replace example.com and 12345 with your WebSocket’s host and protocol respectively.
My local working virtual host setup for WSS looks like this:
After these modifications in your Apache configuration, restart the server and connect to the WebSocket server using: wss://example.com/wss2/your_path
Easy, right!? However, I faced this weird issue with the reverse proxy setup for Ratchet WebSocket server on Apache, my connections were dropping 20% of the time with browser showing 503 errors.
I was able to eradicate this issue if I connected to the socket directly over WS protocol, which means the problem was somewhere with the connection between Apache and the unsecured WebSocket server with the reverse proxy setup as shown above. That’s why I chose to give Nginx’s reverse proxy setup a try and it worked out good for me! Connections were successful 100% of the time and people using WebSocket.in could rely on it.
Step 1 — Configure Nginx
Nginx has become a favorite web server for its speed and flexibility in recent years, which makes it an idea choice for our application.
Here is what the final configuration might look like; the sections are broken down and briefly explained below. You can update or replace the existing config file, although you may want to make a backup copy first.
You will need to update the server_name and proxy_redirect lines with your own domain name. There is some additional Nginx magic going on as well that tells requests to be read by Nginx and rewritten on the response side to ensure the reverse proxy is working.
Save and close the file. If you used nano, you can do so by pressing Ctrl + X, Y, and then Enter.
The first section tells the Nginx server to listen to any requests that come in on port 80 (default HTTP) and redirect them to HTTPS.
After that, the proxying happens. It basically takes any incoming requests and proxies them to the Jenkins instance that is bound/listening to port 8080 on the local network interface.

So, if you see this error, double-check your proxy_pass and proxy_redirect settings in the Nginx configuration!
Step 2 — Configuring your Server Block
Save and exit, with nano you can do this by hitting CTRL+O then CTRL+X.
All HTTP requests come with headers, which contain information about the client who sent the request. This includes details like IP address, cache preferences, cookie tracking, authorization status, and more. Nginx provides some recommended header forwarding settings you have included as proxy_params, and the details can be found in /etc/nginx/proxy_params:
proxy_set_header Host $http_host;
proxy_set_header X-Real-IP $remote_addr;
proxy_set_header X-Forwarded-For $proxy_add_x_forwarded_for;
proxy_set_header X-Forwarded-Proto $scheme;
With reverse proxies, your goal is to pass on relevant information about the client, and sometimes information about your reverse proxy server itself. There are use cases where a proxied server would want to know which reverse proxy server handled the request, but generally the important information is from the original client’s request. In order to pass on these headers and make information available in locations where it is expected, Nginx uses the proxy_set_header directive.
Here are the headers forwarded by proxy_params and the variables it stores the data in:
- Host: This header contains the original host requested by the client, which is the website domain and port. Nginx keeps this in the $http_host variable.
- X-Forwarded-For: This header contains the IP address of the client who sent the original request. It can also contain a list of IP addresses, with the original client IP coming first, then a list of all the IP addresses of the reverse proxy servers that passed the request through. Nginx keeps this in the $proxy_add_x_forwarded_for variable.
- X-Real-IP: This header always contains a single IP address that belongs to the remote client. This is in contrast to the similar X-Forwarded-For which can contain a list of addresses. If X-Forwarded-For is not present, it will be the same as X-Real-IP.
- X-Forwarded-Proto: This header contains the protocol used by the original client to connect, whether it be HTTP or HTTPS. Nginx keeps this in the $scheme variable.
Next, enable this configuration file by creating a link from it to the sites-enabled directory that Nginx reads at startup:
You can now test your configuration file for syntax errors:
With no problems reported, restart Nginx to apply your changes:
systemctl restart nginx
Nginx is now configured as a reverse proxy for your application server, and you can access it from a local browser if your application server is running. If you have an intended application server but do not have it running, you can proceed to starting your intended application server. You can skip the remainder of this tutorial.
Otherwise, proceed to setting up a test application and server with Gunicorn in the next step.
Передача реального ip (real ip) адреса клиента в nginx при proxy_pass
В предыдущем примере мы на самом деле передаем реальный ip адрес клиента с помощью директивы proxy_set_header, которая добавляет в заголовок X-Real-IP настоящий ip адрес клиента. Теперь нам нужно на принимающей стороне, то есть blog_srv сделать обратную замену — заменить информацию об адресе отправителя на ту, что указана в заголовке X-Real-IP. Добавдяем в секцию server следующие параметры:
set_real_ip_from 94.142.141.246;
real_ip_header X-Real-IP;
Полностью секция server на blog_srv в самом простом варианте получается следующей:
Сохраняем конфиг, перечитываем его и снова проверяем http://blog.zeroxzed.ru/myip.php. Вы должны увидеть свой реальный ip адрес. Его же вы увидите в логе web сервера на blog_srv.

Дальше рассмотрим более сложные конфигурации.
Заключение
На этом у меня все. Не рассмотрел еще один возможный вариант, когда вы проксируете https сайт и передаете инфу на бэкенд тоже по https. Нет под рукой готового примера, чтобы проверить, а заочно не стал рисовать конфиг. По идее, ничего сложного в этом нет, настраиваете nginx на обоих серверах с одним и тем же сертификатом. Но наверняка не скажу, что все заработает при этом. Возможно, есть какие-то нюансы с таким проксированием. Мне обычно не приходится так делать.
Как я уже писал в начале, в основном проксирую запросы с одного внешнего веб сервера на закрытый периметр сети, куда нет никому доступа. В этом случае у меня нет необходимости использовать https при передаче запросов на бэкенд. В качестве бэкенда не обязательно будет отдельный сервер. Это запросто может быть контейнер на этом же сервере.
With this tutorial you have configured Nginx as a reverse proxy to enable access to your application servers that would otherwise only be available locally. Additionally, you configured the forwarding of request headers, passing on the client’s header information.
For examples of a complete solution using Nginx as a reverse proxy, check out how to serve Flask applications with Gunicorn and Nginx on Ubuntu 22.04 or how to run a Meilisearch frontend using InstantSearch on Ubuntu 22.04.
