
On a docker container running the latest debian image I’m unable to install the openjdk-8-jdk package. Why not suddenly?
$ apt-get install openjdk-8-jdk
E: Unable to locate package openjdk-8-jdk
Why not, there it is: https://packages.debian.org/stretch/openjdk-8-jdk
$ cat /etc/os-release
PRETTY_NAME="Debian GNU/Linux 10 (buster)"
NAME="Debian GNU/Linux"
VERSION_ID="10"
VERSION="10 (buster)"
VERSION_CODENAME=buster
ID=debian
HOME_URL="https://www.debian.org/"
SUPPORT_URL="https://www.debian.org/support"
BUG_REPORT_URL="https://bugs.debian.org/"
Searching for openjdk-8-jdk packages:
apt-cache search --names-only '^openjdk-8*'
openjdk-11-dbg - Java runtime based on OpenJDK (debugging symbols)
openjdk-11-demo - Java runtime based on OpenJDK (demos and examples)
openjdk-11-doc - OpenJDK Development Kit (JDK) documentation
openjdk-11-jdk - OpenJDK Development Kit (JDK)
openjdk-11-jdk-headless - OpenJDK Development Kit (JDK) (headless)
openjdk-11-jre - OpenJDK Java runtime, using Hotspot JIT
openjdk-11-jre-headless - OpenJDK Java runtime, using Hotspot JIT (headless)
openjdk-11-jre-zero - Alternative JVM for OpenJDK, using Zero
openjdk-11-source - OpenJDK Development Kit (JDK) source files
openjdk-11-jre-dcevm - Alternative VM for OpenJDK 11 with enhanced class redefinition
I’m trying to install Zabbix on Ubuntu Server 16.
php_value max_execution_time 300
php_value memory_limit 128M
php_value post_max_size 16M
php_value upload_max_filesize 2M
php_value max_input_time 300
php_value always_populate_raw_post_data -1
# php_value date.timezone Europe/Riga
in the apache2.conf
Any suggestion on how and where to set the above value?
asked Feb 5, 2018 at 23:39

I had the same issue on Ubuntu 14.04.4 and I have the set the values in /etc/php5/apache2/php.ini as below.
You can also edit /etc/apache2/conf-enabled/zabbix.conf which is simlink to /etc/zabbix/apache.conf:
php_value max_execution_time 300
php_value memory_limit 128M
php_value post_max_size 16M
php_value upload_max_filesize 2M
php_value max_input_time 300
php_value always_populate_raw_post_data -1
php_value date.timezone America/Denver
20 gold badges68 silver badges100 bronze badges
answered Feb 19, 2018 at 10:27

2 bronze badges
sudo vi /etc/httpd/conf.d/zabbix.conf(you also use nano or another editor) and then insert the options you listed. After the empty file is show type an «i» to insert new lines and then copy/paste below settings. And then esc, w, q to exit edit mode, save (w) and quit (q):
php_value max_execution_time 300
php_value memory_limit 128M
php_value post_max_size 16M
php_value upload_max_filesize 2M
php_value max_input_time 300
php_value always_populate_raw_post_data -1
# php_value date.timezone Europe/Riga
answered Feb 19, 2018 at 10:32

39 gold badges563 silver badges704 bronze badges
It seems file paths tend to change a lot over the years, and documentation doesn’t stay up-to-date. Even the currently accepted answer here doesn’t seem to be right anymore (though I’m on Ubuntu 18.04 now).
Today, the file you need to edit is /etc/apache2/conf-available/zabbix-frontend-php.conf. And the install instructions don’t mention this, but you’ll need to create a symlink to the conf-enabled directory, like so:
ln -s /etc/apache2/conf-available/zabbix-frontend-php.conf \ /etc/apache2/conf-enabled/zabbix-frontend-php.confAlso, nowadays there are two identical lines in this file that you need to uncomment and edit. Don’t just edit the first one you see.
answered Aug 22, 2019 at 10:30

1 gold badge3 silver badges8 bronze badges
Current install of Zabbix 5.0.1 on Ubuntu 20.04. The paths and files have changed.
Edit the /etc/zabbix/apache.conf and make sure you uncomment both instances of the php_value date.timezone variable.
answered Jul 2, 2020 at 15:09


Правильно ли была проведена установка?
Пропиши команду, которая установит все зависимости:
apt install maven default-jdk default-jre openjdk-8-jdk openjdk-8-jre -y && apt install zlib1g-dev libncurses5-dev lib32z1 lib32ncurses6 -yЕсли есть какие-то ошибки — отпиши сюда, вместе с ошибками.
Дальше переустанови saint:
rm -r sAINT && git clone https://github.com/tiagorlampert/sAINT.git && cd sAINT && chmod +x configure.sh && ./configure.shОпять таки есть ошибки — пиши в эту тему.
Также есть вероятность, что ты что-то не так ввел, пока создавал билд или еще где-то.
- ответов
- Step 1: Install Zabbix server, frontend, and agent
- Step 2: Configure database
- a. Install MariaDB 10.6
- b. Reset root password for database
- c. Create database
- d. Import initial schema and data.
- e. Enter database password in Zabbix configuration file
- Step 3: Configure firewall
- Step 4: Start Zabbix server and agent processes
- Step 5: Configure Zabbix frontend
- a. Configure PHP for Zabbix frontend
- b. Restart Apache web server and make it start at system boot
- c. Configure web frontend
- Step 6: Login to frontend using Zabbix default login credentials
- Step 7: Optimizing Zabbix Server (optional)
- Step 8: Optimizing MySQL / MariaDB database (optional)
- a. Create custom MySQL configuration file
- b. Restart Zabbix Server and MySQL service
- Step 9: Create MySQL partitions on History and Events tables
- Step 10: How to manage Zabbix / MySQL / Apache service
- Step 11: Upgrade between minor versions
Правильно ли была проведена установка?
Пропиши команду, которая установит все зависимости:apt install maven default-jdk default-jre openjdk-8-jdk openjdk-8-jre -y && apt install zlib1g-dev libncurses5-dev lib32z1 lib32ncurses6 -yЕсли есть какие-то ошибки — отпиши сюда, вместе с ошибками.
Дальше переустанови saint:rm -r sAINT && git clone https://github.com/tiagorlampert/sAINT.git && cd sAINT && chmod +x configure.sh && ./configure.shОпять таки есть ошибки — пиши в эту тему.
Также есть вероятность, что ты что-то не так ввел, пока создавал билд или еще где-то.
У меня такая же проблема, но ничего из выше указанного не помогло. (тупо все обновилось и все)
Есть еще мысли на счет этого?
+------------------------------------------+
[*] The information above is correct? (y/n): y
Exception in thread "main" java.lang.IllegalArgumentException: Illegal group reference at java.base/java.util.regex.Matcher.appendExpandedReplacement(Matcher.java:1068) at java.base/java.util.regex.Matcher.appendReplacement(Matcher.java:998) at java.base/java.util.regex.Matcher.replaceAll(Matcher.java:1182) at java.base/java.lang.String.replaceAll(String.java:2126) at saint.ui.sAINT.replaceWord(sAINT.java:98) at saint.ui.sAINT.showGenerator(sAINT.java:365) at saint.ui.sAINT.showMenu(sAINT.java:221) at saint.ui.sAINT.main(sAINT.java:71)
root@kali:/home/sa/Soft/sAINT#
В чем трабла приблизительно понимаю но незнаю как исправить?

Заранее благодарен!
Всем привет, недавно столкнулся с серьёзной проблемой связанной с установкой sAINT
Суть, сводится к тому, что после введения следующей команды:
apt install maven default-jdk default-jre openjdk-8-jdk openjdk-8-jre zlib1g-dev libncurses5-dev -yПоявляется очень неприятная ошибка свзяаная с тем, что некоторые файлы небыли установленны:
root@kali:~# apt install maven default-jdk default-jre openjdk-8-jdk openjdk-8-jre zlib1g-dev libncurses5-dev lib32z1 lib32ncurses5 -y
Чтение списков пакетов… Готово
Построение дерева зависимостей
Чтение информации о состоянии… Готово
E: Невозможно найти пакет openjdk-8-jdk
E: Невозможно найти пакет lib32ncurses5
Но самое обидное, что попытка их установки ни приводит абсолютно ни к чему:
root@kali:~# sudo apt-get install openjdk-8-jdk
Чтение списков пакетов… Готово
Построение дерева зависимостей
Чтение информации о состоянии… Готово
E: Невозможно найти пакет openjdk-8-jdk
root@kali:~# sudo apt-get install lib32ncurses5
Чтение списков пакетов… Готово
Построение дерева зависимостей
Чтение информации о состоянии… Готово
E: Невозможно найти пакет lib32ncurses5
Не помогли и руководства с этого сайта:
Ссылка скрыта от гостей
Подскажите пожалуйста, что сделать, чтобы всё установилось и заработало!
Порт 10050 — это порт для общения между сервером и его агентами. В инструкции, которую ты привёл ставится конфиг для апача. Теперь тебе осталось зайти на тот порт, на котором слушает апач.

Я пытаюсь зайти по apache, но вместо zabbix у меня появляется обычная веб страница (html файл из var)
Смотри, что настроено в виртуалхостах апача. Включён ли нужный виртуалхост. Обычно там где-нибудь в /etc/apache2/sites-available/ или в /etc/apache2/conf.d/ должны лежать конфиги виртуалхостов. Нужно, чтобы симлинк на файл настроек заббикса инклудился в основной файл настроек. У меня не осталось живых апачей под рукой, чтобы посмотреть. Это вкратце. В общем, покажи настройки апача, посмотрим.
Есть в /etc/apache2/apache2.conf:
DefaultRuntimeDir ${APACHE_RUN_DIR}
PidFile ${APACHE_PID_FILE}
Timeout 300
KeepAlive On
MaxKeepAliveRequests 100
KeepAliveTimeout 5
User ${APACHE_RUN_USER}
Group ${APACHE_RUN_GROUP}
HostnameLookups Off
ErrorLog ${APACHE_LOG_DIR}/error.log
LogLevel warn
IncludeOptional mods-enabled/*.load
IncludeOptional mods-enabled/*.conf
Include ports.conf
<Directory /> Options FollowSymLinks AllowOverride None Require all denied
</Directory>
<Directory /usr/share> AllowOverride None Require all granted
</Directory>
<Directory /var/www/> Options Indexes FollowSymLinks AllowOverride None Require all granted
</Directory>
AccessFileName .htaccess
<FilesMatch "^\.ht"> Require all denied
</FilesMatch>
LogFormat "%v:%p %h %l %u %t \"%r\" %>s %O \"%{Referer}i\" \"%{User-Agent}i\"" vhost_combined
LogFormat "%h %l %u %t \"%r\" %>s %O \"%{Referer}i\" \"%{User-Agent}i\"" combined
LogFormat "%h %l %u %t \"%r\" %>s %O" common
LogFormat "%{Referer}i -> %U" referer
LogFormat "%{User-agent}i" agent
IncludeOptional conf-enabled/*.conf
IncludeOptional sites-enabled/*.conf
В /etc/apache2/sites-availavle у меня имеется:
000-default.conf default-ssl.conf
charset.conf other-vhosts-access-log.conf zabbix.conf
javascript-common.conf security.conf
localized-error-pages.conf serve-cgi-bin.conf
Ну вот. Для начала командой a2enmod zabbix надо его включить, если он не был включён и посмотреть внутрь этого конфига, чтобы понять, на каком порту и на какое имя он должен отзываться.
при запуске a2enmod zabbix:
ERROR: Module zabbix does not exist!А в самом файле порта нет( :
# Define /zabbix alias, this is the default
<IfModule mod_alias.c> Alias /zabbix /usr/share/zabbix
</IfModule>
<Directory "/usr/share/zabbix"> Options FollowSymLinks AllowOverride None Order allow,deny Allow from all <IfModule mod_php.c> php_value max_execution_time 300 php_value memory_limit 128M php_value post_max_size 16M php_value upload_max_filesize 2M php_value max_input_time 300 php_value max_input_vars 10000 php_value always_populate_raw_post_data -1 </IfModule> <IfModule mod_php7.c> php_value max_execution_time 300 php_value memory_limit 128M php_value post_max_size 16M php_value upload_max_filesize 2M php_value max_input_time 300 php_value max_input_vars 10000 php_value always_populate_raw_post_data -1 </IfModule>
</Directory>
<Directory "/usr/share/zabbix/conf"> Order deny,allow Deny from all <files *.php> Order deny,allow Deny from all </files>
</Directory>
<Directory "/usr/share/zabbix/app"> Order deny,allow Deny from all <files *.php> Order deny,allow Deny from all </files>
</Directory>
<Directory "/usr/share/zabbix/include"> Order deny,allow Deny from all <files *.php> Order deny,allow Deny from all </files>
</Directory>
<Directory "/usr/share/zabbix/local"> Order deny,allow Deny from all <files *.php> Order deny,allow Deny from all </files>
</Directory>
<Directory "/usr/share/zabbix/vendor"> Order deny,allow Deny from all <files *.php> Order deny,allow Deny from all </files>
</Directory>
А в самом файле порта нет
Значит слушает дефолтные порты 80 и 443.
А судя по содержимому конфига, вебморда доступна по адресу http://<server-ip>/zabbix
Я крайне рекомендую почитать хотя бы основы по администрированию Linux. У тебя не выйдет настроить заббикс дальше. Там многое не очевидно без хорошего бекграунда.
root@Debian11SA-local:/etc/apache2/conf-available# a2enmod zabbix.conf
ERROR: Module zabbix.conf does not exist!
А. Точно. Оно же в конф. Значит уже включено. Проверяй http://<server-ip>/zabbix
Все заработало, спасибо)
Итак, я только что установил Ubuntu, и это мой первый раз, когда я работаю в среде Linux, поэтому потерпите мое отсутствие здесь.
в любом случае, я загрузил Java 8 JDK непосредственно из Oracle, но я понимаю, что есть также OpenJDK для Java 8. У меня два вопроса.
в чем разница между версией Oracle и OpenJDK. За / Против?
когда я пытаюсь получить OpenJDK 8, я не могу. Я вставляю терминал. команду и сообщение об ошибке я получаю здесь, надеясь на совет. Опять же, очень новый для Linux, был на моем первом дистрибутиве Linux когда-либо менее часа здесь на данный момент.
user@computer:~/Java$ sudo apt-get install openjdk-8-jdk
Reading package lists... Done
Building dependency tree
Reading state information... Done
E: Unable to locate package openjdk-8-jdk
любая помощь будет оценили. А пока я просто воспользуюсь пакетом Oracle. Спасибо.
Итак, теперь у меня новая проблема. Я установил OpenJDK 7, он пришел с Maven и только что установлен, прежде чем я понял, что получаю сделку два-за-один. Теперь у меня есть JDK 7, и Eclipse, и Maven, и все они работают, но я застрял на JDK 7, а не 8.
Я видел, что есть ссылка ниже, я намерен проверить это утром, это 2 часа ночи, и я устал прямо сейчас. Любые другие советы по этому новому вопросу будут оценены, иначе я обязательно проверю эту ссылку первым делом утром.
ответов
обновление: установка без привилегий root ниже
я советую вам не устанавливать пакеты вручную в системе ubuntu, если уже есть (полуофициальный) репозиторий, способный решить вашу проблему. Кроме того, используйте Oracle JDK для разработки, просто чтобы избежать (очень спорадических) проблем совместимости (я пробовал много лет назад, теперь это, безусловно, лучше).
добавить webupd8 repo в вашем система:
sudo add-apt-repository ppa:webupd8team/java
sudo apt-get update
установите предпочитаемую версию jdk (доступны версии от java-6 до java-9):
sudo apt-get install oracle-java8-installerвы также можете установить несколько версий jdk, смешивая версии openjdk и oracle.
Затем вы можете использовать команду обновление-java-альтернативы для переключения между установленной версии:
# list available jdk
update-java-alternatives --list
# use jdk7
sudo update-java-alternatives --set java-7-oracle
# use jdk8
sudo update-java-alternatives --set java-8-oracle
если вы add-apt-repository: command not found обязательно software-properties-common установлено:
sudo apt-get install software-properties-commonесли вы используете более старую версию Ubuntu:
sudo apt-get install python-software-propertiesустановка JDK без привилегий root
если у вас нет прав администратора на вашей целевой машине, ваша самая простая ставка-использовать sdkman для установки сертифицированного Zulu openjdk:
curl -s "https://get.sdkman.io" | bash
source "$HOME/.sdkman/bin/sdkman-init.sh"
sdk install javaПримечание: sdkman позволяет установить также официальный Oracle JDK, хотя это не опция по умолчанию. Просмотр доступен версии с:
sdk ls javaустановите выбранную версию с помощью:
sdk install java <version>sdk install java 9.0.1-oracleadd-apt-repository
<PPA_id>: Ubuntu (как и все производные Debian и, вообще говоря, каждый дистрибутив Linux) имеет главный репозиторий пакетов, которые обрабатывают такие вещи, как зависимости пакетов и обновление. В Ubuntu можно расширить основной репозиторий, используя PPA (Личный архив пакетов), который обычно содержит пакеты, недоступные в системе (так же, как oracle jdk) или обновленные версии доступных (пример: LibreOffice 5 в LTS доступен только через это PPA).
в нашем случае: команда sudo add-apt-repository ppa:webupd8team/java мы сообщаем системе, что следующее обновление репозитория должно получить информацию о пакетах также из репозитория webupd8.
С sudo apt-get update мы фактически обновляем системный репозиторий (все эти операции требуют привилегии суперпользователя, поэтому мы добавляем судо к командам).
sudo apt-get install oracle-java8-installer
ls -l /etc/alternatives/java*
в нашем случае: sudo update-java-alternatives --set java-8-oracle обновить символические ссылки в /etc / alternatives, чтобы указать на исполняемые файлы java-8-oracle.
человек
<command>: начать использовать человек, чтобы прочитать действительно хорошо написанную и подробную помощь по (почти) каждой команде оболочки и ее параметрам (каждая команда, которую я упоминаю в этом маленьком ответе, имеет man-страницу, попробуйтеman update-java-alternatives).apt-cache
search <search_key>: запросите кэш APT для поиска пакета, связанного с предоставленным search_key (может быть именем пакета или некоторым словом в описании пакета).apt-cache
show <package>: обеспечивает APT информация для конкретного пакета (версия пакета, установлена или нет, описание).
как вы можете видеть, у меня установлен только java 1.7 (на машине Ubuntu 14.04).
update-java-alternatives -l
java-1.7.0-openjdk-amd64 1071 /usr/lib/jvm/java-1.7.0-openjdk-amd64
чтобы установить Java 8, я сделал,
sudo add-apt-repository ppa:openjdk-r/ppa
sudo apt-get update
sudo apt-get install openjdk-8-jdk
потом, теперь у меня есть java 7 и 8,
update-java-alternatives -l
java-1.7.0-openjdk-amd64 1071 /usr/lib/jvm/java-1.7.0-openjdk-amd64
java-1.8.0-openjdk-amd64 1069 /usr/lib/jvm/java-1.8.0-openjdk-amd64
добавлен бонус (как переключаться между различными версиями)
- выполните команду follwing с терминала:
sudo update-alternatives --config javaThere are 2 choices for the alternative java (providing /usr/bin/java). Selection Path Priority Status ------------------------------------------------------------ 0 /usr/lib/jvm/java-7-openjdk-amd64/jre/bin/java 1071 auto mode 1 /usr/lib/jvm/java-7-openjdk-amd64/jre/bin/java 1071 manual mode * 2 /usr/lib/jvm/java-8-openjdk-amd64/jre/bin/java 1069 manual mode Press enter to keep the current choice[*], or type selection number:
как вы можете видеть я запуск открытого jdk 8. Чтобы переключиться на jdk 7, Нажмите 1 и ударил Enter ключ. Сделайте то же самое для javac С, sudo update-alternatives --config javac.
проверять версии, чтобы подтвердить изменение: java -version и javac -version.
Я получаю OpenJDK 8 из официальных репозиториев Debian, а не какой-то случайный PPA или несвободный двоичный файл Oracle. Вот как я это сделал:
sudo apt-get install debian-keyring debian-archive-keyring
deb http://httpredir.debian.org/debian/ jessie-backports mainPackage: *
Pin: release o=Debian,a=jessie-backports
Pin-Priority: -200затем, наконец, установить:
sudo apt-get update
sudo apt-get -t jessie-backports install openjdk-8-jdk
Zabbix server is installable on any Linux distribution, but in this tutorial, I will show you how to install and optimize the latest Zabbix Proxy 6 LTS or 6.4 standard release on 22.04 LTS (Jammy Jellyfish) / Ubuntu 20.04 (Focal) / Ubuntu 18.04 (Bionic).
Zabbix is 100% free open-source ultimate enterprise-level software designed for monitoring availability and performance of IT infrastructure components. You can read a case-study about Zabbix popularity and find out more about open-source movement in this article.
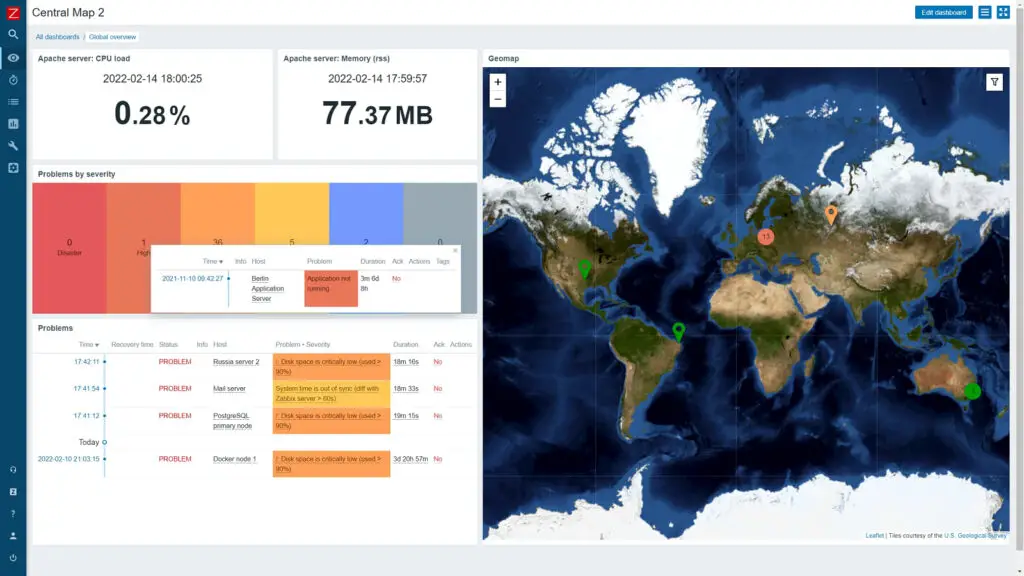
Enough of talk lets do some work! First, we will install and configure Zabbix server, then a database and lastly the frontend – check the picture bellow for a better understanding of Zabbix architecture.

This guide is for installing Zabbix monitoring system (Server) on Ubuntu, while guide for installing Zabbix-proxy on Ubuntu can be found on this link.
Step 1: Install Zabbix server, frontend, and agent
Install Zabbix 6 .deb package on your Ubuntu OS (22.04, 20.04, 18.04 and 16.04 are supported).
Zabbix 6.0 LTS version (supported until February, 2027)wget https://repo.zabbix.com/zabbix/6.0/ubuntu/pool/main/z/zabbix-release/zabbix-release_6.0-4+ubuntu$(lsb_release -rs)_all.deb
sudo dpkg -i zabbix-release_6.0-4+ubuntu$(lsb_release -rs)_all.deb
sudo apt update
sudo apt -y install zabbix-server-mysql zabbix-frontend-php zabbix-apache-conf zabbix-sql-scripts zabbix-agent  ORZabbix 6.4 standard version (supported until November, 2023)wget https://repo.zabbix.com/zabbix/6.4/ubuntu/pool/main/z/zabbix-release/zabbix-release_6.4-1+ubuntu$(lsb_release -rs)_all.deb
sudo dpkg -i zabbix-release_6.4-1+ubuntu$(lsb_release -rs)_all.deb
sudo apt update
sudo apt -y install zabbix-server-mysql zabbix-frontend-php zabbix-apache-conf zabbix-sql-scripts zabbix-agent
Step 2: Configure database
In this installation, I will use password as root password and as Zabbix password for DB. Consider changing your password for security reasons.
a. Install MariaDB 10.6
sudo apt install software-properties-common -y
curl -LsS -O https://downloads.mariadb.com/MariaDB/mariadb_repo_setup
sudo bash mariadb_repo_setup --mariadb-server-version=10.6
sudo apt update
sudo apt -y install mariadb-common mariadb-server-10.6 mariadb-client-10.6
sudo systemctl start mariadb
sudo systemctl enable mariadb
b. Reset root password for database
Secure MySQL/MariaDB by changing the default password for MySQL root:
sudo mysql_secure_installation
Enter current password for root (enter for none): Press EnterSwitch to unix_socket authentication [Y/n] yChange the root password? [Y/n] yNew password: <Enter root DB password>Re-enter new password: <Repeat root DB password>Remove anonymous users? [Y/n]: YDisallow root login remotely? [Y/n]: YRemove test database and access to it? [Y/n]: YReload privilege tables now? [Y/n]: Y
c. Create database
sudo mysql -uroot -p'rootDBpass' -e "create database zabbix character set utf8mb4 collate utf8mb4_bin;"
sudo mysql -uroot -p'rootDBpass' -e "grant all privileges on zabbix.* to [email protected] identified by 'zabbixDBpass';"
d. Import initial schema and data.
Import database shema for Zabbix server (could last up to 5 minutes):
sudo zcat /usr/share/zabbix-sql-scripts/mysql/server.sql.gz | mysql --default-character-set=utf8mb4 -uzabbix -p'zabbixDBpass' zabbix
e. Enter database password in Zabbix configuration file
Open zabbix_server.conf file with command:
sudo nano /etc/zabbix/zabbix_server.conf
and add database password in this format anywhere in file:
DBPassword=zabbixDBpass
Step 3: Configure firewall
If you have a UFW firewall installed on Ubuntu, use these commands to open TCP ports: 10050 (agent), 10051 (server), and 80 (frontend):
ufw allow 10050/tcp
ufw allow 10051/tcp
ufw allow 80/tcp
ufw reload
Step 4: Start Zabbix server and agent processes
sudo systemctl restart zabbix-server zabbix-agent
sudo systemctl enable zabbix-server zabbix-agent
Step 5: Configure Zabbix frontend
a. Configure PHP for Zabbix frontend
Edit file /etc/zabbix/apache.conf:
sudo nano /etc/zabbix/apache.conf
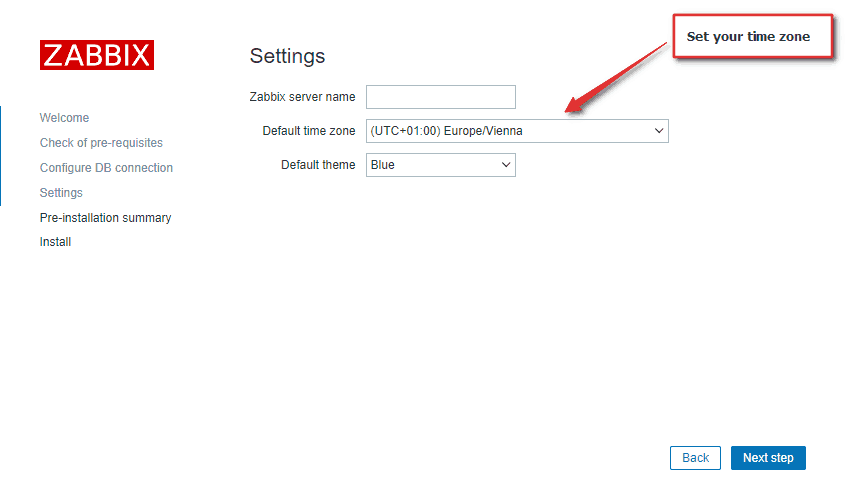
Uncomment 2 lines in apache.conf that starts with “# php_value date.timezone Europe/Riga” by removing symbol # and set the right timezone for your country, for example:
php_value date.timezone Europe/Amsterdam
b. Restart Apache web server and make it start at system boot
sudo systemctl restart apache2
sudo systemctl enable apache2
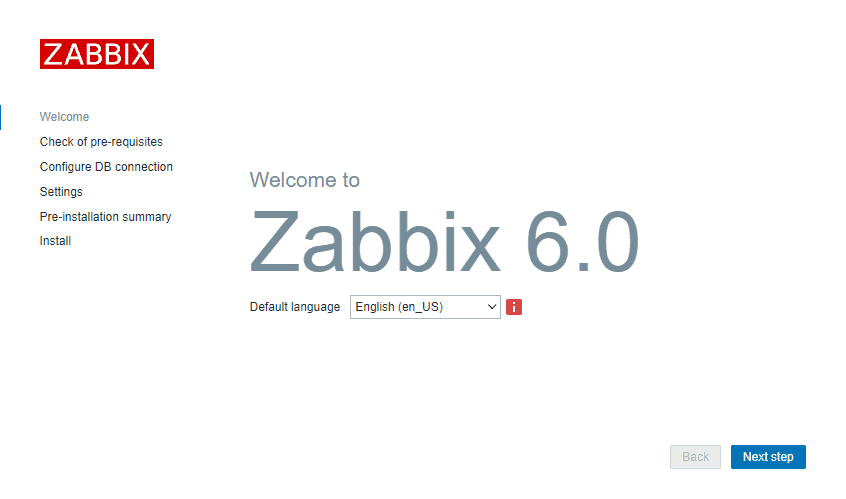
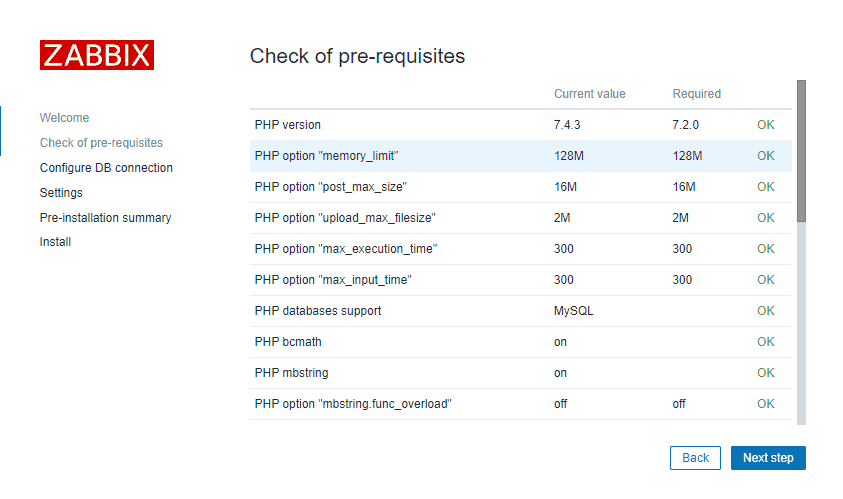
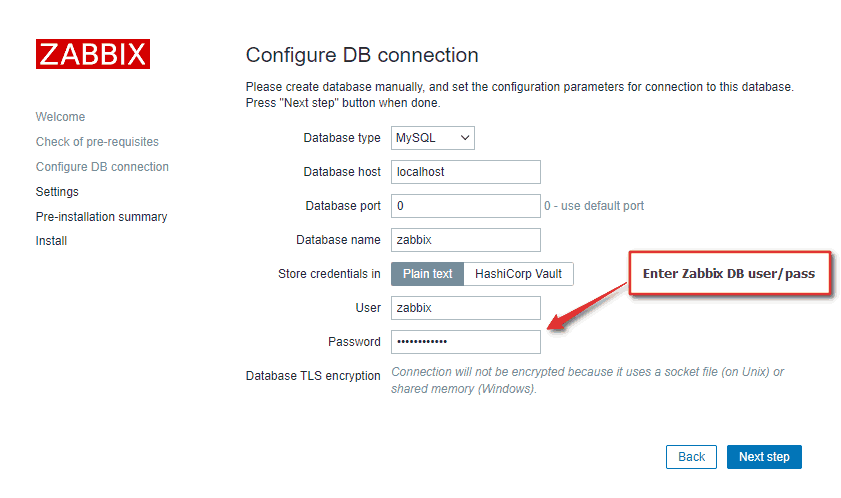
c. Configure web frontend
Connect to your newly installed Zabbix frontend using URL “http:///zabbix” to initiate the Zabbix installation wizard.
In my case, that URL would be “http://192.168.1.161/zabbix” because I have installed Zabbix on the server with IP address 192.168.1.161 (you can find the IP address of your server by typing “ip a” command in the terminal).

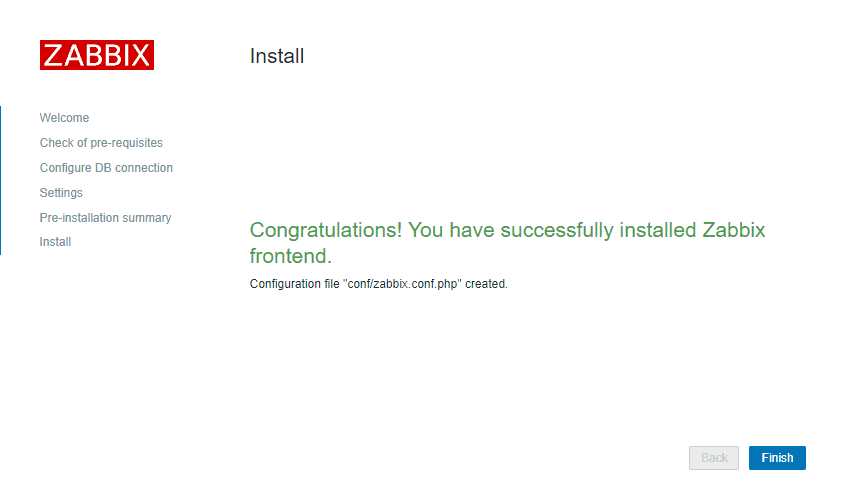
That’s it, you have installed Zabbix monitoring system!
Step 6: Login to frontend using Zabbix default login credentials
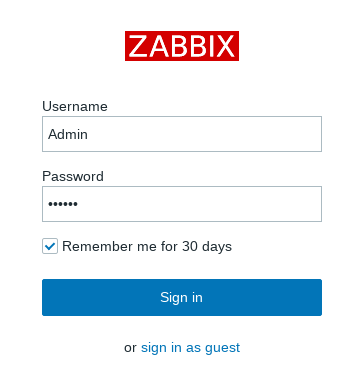
In my example, I have installed Zabbix on server 192.168.1.161 so I will enter in my browsers URL field http://192.168.1.161/zabbix (you can find the IP address of your server by typing “ip a” command in the terminal)
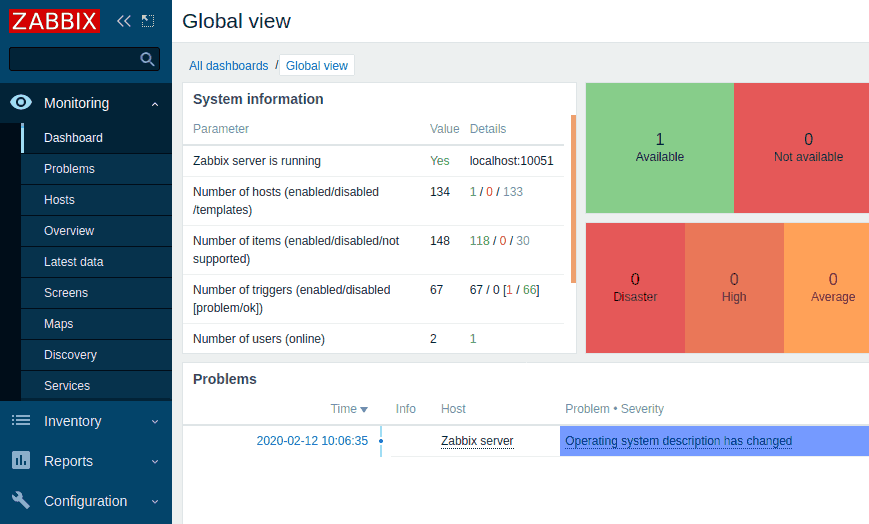
CONGRATULATIONS!
You have successfully installed Zabbix 6 on Ubuntu and now you can monitor anything!
No need to change anything else as other steps are optional.
Step 7: Optimizing Zabbix Server (optional)
Don’t bother with this optimization if you are monitoring a small number of devices, but if you are planning to monitor a large number of devices then continue with this step.
Open “zabbix_server.conf” file with command: “sudo nano /etc/zabbix/zabbix_server.conf” and add this configuration anywhere in file:
This is not a perfect configuration, keep in mind that you can optimize it even more. Let’s say if you don’t use ICMP checks then set the “StartPingers” parameter to 1 or if you don’t use active agents then set “StartTrappers” to 1 and so on. You can find out more about the parameters supported in a Zabbix server configuration file in the official documentation.
Step 8: Optimizing MySQL / MariaDB database (optional)
a. Create custom MySQL configuration file
Create file “10_my_tweaks.cnf" with “sudo nano /etc/mysql/mariadb.conf.d/10_my_tweaks.cnf” and paste this configuration:
sudo chown mysql:mysql /etc/mysql/mariadb.conf.d/10_my_tweaks.cnf
sudo chmod 644 /etc/mysql/mariadb.conf.d/10_my_tweaks.cnf
Two things to remember!
Configuration parameter max_connections must be larger than the total number of all Zabbix proxy processes plus 150. You can use the command below to automatically check the number of Zabbix processes and add 150 to that number:
The second most important parameter is innodb_buffer_pool_size, which determines how much memory can MySQL get for caching InnoDB tables and index data. You should set that parameter to 70% of system memory if only database is installed on server.
However, in this case, we are sharing a server with Zabbix and Apache processes so you should set innodb_buffer_pool_size to 40% of total system memory. That would be 800 MB because my Ubuntu server has 2 GB RAM.
I didn’t have any problems with memory, but if your Zabbix proxy crashes because of lack of memory, reduce “innodb_buffer_pool_size” and restart MySQL server.
b. Restart Zabbix Server and MySQL service
Stop and start the services in the same order as below:
sudo systemctl stop zabbix-server
sudo systemctl stop mysql
sudo systemctl start mysql
sudo systemctl start zabbix-server
Step 9: Create MySQL partitions on History and Events tables
Zabbix’s housekeeping process is responsible for deleting old trend and history data. Removing old data from the database using SQL delete query can negatively impact database performance. Many of us have received that annoying alarm “Zabbix housekeeper processes more than 75% busy” because of that.
That problem can be easily solved with the database partitioning. Partitioning creates tables for each hour or day and drops them when they are not needed anymore. SQL DROP is way more efficient than the DELETE statement.
You can partition MySQL tables in 5 minutes using this simple guide.
Step 10: How to manage Zabbix / MySQL / Apache service
Sometimes you will need to check or restart Zabbix, MySQL or Apache service – use commands below to do that.
Zabbix Serversudo systemctl <status/restart/start/stop> zabbix-serverMySQL Serversudo systemctl <status/restart/start/stop> mysqlApache Serversudo systemctl <status/restart/start/stop> apache2Zabbix Agentsudo systemctl <status/restart/start/stop> zabbix-agent
Step 11: Upgrade between minor versions
I wrote about these upgrade procedures in my post about Zabbix upgrade. Zabbix’s team releases new minor versions at least once a month. The main purpose of minor upgrades is to fix bugs (hotfix) and sometimes even bring new functionality. Therefore, try to do a minor upgrade of Zabbix at least once a month.
There is no need for backups when doing a minor upgrade, they are completely safe. With this command you can easily upgrade smaller versions of 6.0.x (for example, from 6.0.1 to 6.0.3):
sudo apt install --only-upgrade 'zabbix*'
And restart Zabbix server afterward:
sudo systemctl restart zabbix-server
