В интернете полно инструкций о том, как настроить ssh авторизацию по ключам. Каждый раз, когда мне надо это сделать, я иду в поиск и делаю, так как забываю нюансы. В этот раз решил записать для себя и для всех остальных краткую инструкцию и небольшое дополнение от себя, которое нигде не встретил, по поводу логирования отпечатков ключей.
Если у вас есть желание научиться строить и поддерживать высокодоступные и надежные системы, рекомендую познакомиться с онлайн-курсом «DevOps практики и инструменты» в OTUS. Курс не для новичков, для поступления нужно пройти вступительный тест.
- Введение
- Создание ssh ключей для putty
- Настройка ssh на сервере для авторизации по сертификатам
- Логирование ssh подключений по сертификату
- Помогла статья? Подписывайся на telegram канал автора
- Overview
- Step 1 — Creating CA certificates
- Host CA SSH key pair
- Step 1a — Signing the CA’s Host Certificate
- Step 2 — Distributing and trusting the CA certificates
- Step 2b — Making clients to trust the host CA certificate
- Step 4 — Creating SSH User Certificates
- Benefits of using SSH certificate based authentication
- Генерация SSH ключей на клиенте Windows
- Настройка OpenSSH в Windows для авторизации по ключам
- Вход по SSH ключу для локальных администраторов Windows
- Подготовка папок
- Предварительная настройка сервера
- Настройка SSH сертификатов на сервере
- Настройка подключения PuTTY
- Настройка подключения PuTTY с использованием SSH сертификата
- Финальная настройка сервера
- Storing the Public Component of the Certificate Authority on the Server
- Processing an Existing Public Key
- Files Associated with SSH Host Certificates
- Steps for Using SSH Host Certificates
- Creating a Certificate Authority
- Fetching and Signing the Host Key
- Publishing the Host Certificate.
- Updating Clients to Acknowledge the Designated Certificate Authority
Введение
За все время моей работы с серверами у меня никогда не было проблем, связанных с авторизацией по паролю, поэтому я считаю пустой тратой времени какие-то дополнительные действия в этом плане, если нет особой необходимости. Доводы о том, что пароль могут сбрутить выглядят несостоятельными. Пароль должен быть сложным, и брутить его никто не будет. Даже если будут, то есть fail2ban, который быстро отключит желающих побаловаться. Хотя я сомневаюсь, что сейчас кто-то занимается брутом ssh.
Уточню важный момент — все сказанное выше относится к ситуациям, когда я единственный администратор сервера и кроме меня на него больше никто не заходит. Если это не так, то тут уже возникают нюансы, в зависимости от ситуации, где нужно использовать сертификаты, разные учетные записи пользователей и sudo, к примеру, для логирования действий различных пользователей.
Об одном таком нюансе я и расскажу. Мне понадобилось настроить авторизацию ssh по сертификату. Причем авторизовываться будет сразу пользователь root. Заходить будут как по паролю, так и по сертификату. Мне необходимо вести учет того, кто по какому сертификату подключился по ssh к серверу.
Создание ssh ключей для putty
Для управления серверами я использую windows машину и ssh клиент putty. В составе программного комплекса putty есть утилита для генерации ключей — puttygen. Скачивайте ее по ссылке с официального сайта — https://the.earth.li/~sgtatham/putty/latest/x86/puttygen.exe. После запуска нажимайте на кнопку Generate и двигайте мышкой, пока не сформируется пара ключей — открытый и закрытый.
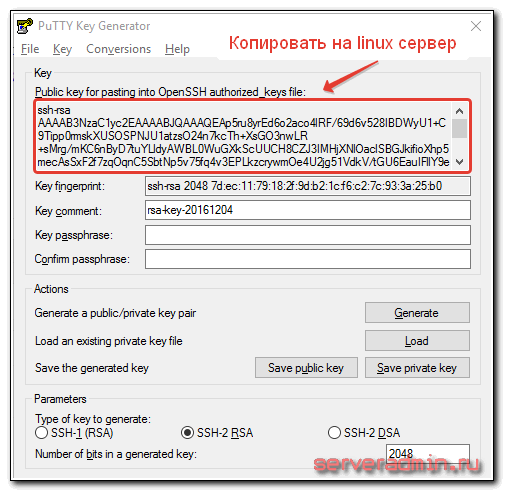
Формат ключей, которые создает puttygen не подходит для openssh, который стоит на сервере, поэтому содержимое открытого ключа в нужном формате копируем из окна puttygen. Я указал этот ключ стрелочкой на скриншоте. Именно это содержание пойдет на сервер. Сохраняйте ключ в формате openssh, а так же два других с помощью кнопок Save key.
Настройка ssh на сервере для авторизации по сертификатам
Здесь все просто. Во всех известных мне дистрибутивах авторизация по сертификатам уже настроена, нужно просто добавить этот сертификат на сервер. Сделаем это.
# mkdir ~/.ssh
# chmod 0700 ~/.ssh
# touch ~/.ssh/authorized_keys
# chmod 0644 ~/.ssh/authorized_keys
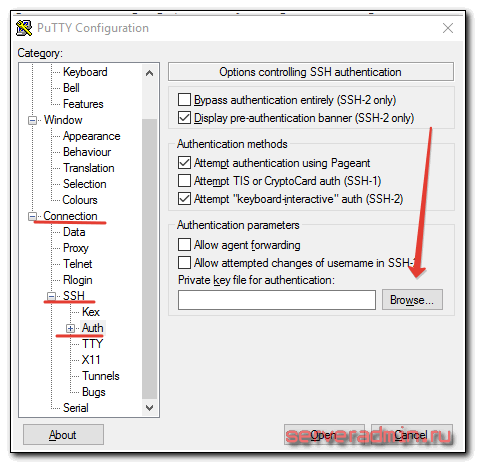
Выбрать нужно приватный ключ, у которого расширение .ppk. Напоминаю, что на сервер мы отправили публичный ключ. Этот ключ можно использовать на множестве серверов, так что нет необходимости для каждого сервера генерировать новую пару ключей. Везде можно использовать один и тот же.
Теперь можно подключаться, необходимости перезапускать службу ssh нет.
Логирование ssh подключений по сертификату
Мне необходимо знать, когда и какой сертификат подключался к серверу. По-умолчанию такой информации чаще всего в логах не остается. Исключение я заметил только в CentOS 7. Там с дефолтными настройками ssh и уровнем логирования INFO отображается отпечаток ключа в логе:
# cat /var/log/secure
По отпечатку становится понятно, какой сертификат подключился. Для каждого сертификата отпечаток можно посмотреть в puttygen. В CentOS более ранних версий, в Ubuntu 12 и 14 в логах будет только такая информация:
# cat /var/log/auth.log
Информации о самом ключе нет. Я так думаю, это зависит от версии OpenSSH. В первом случае 6-я версия, во втором 5-я. Специально я не проверял. Если у вас нет информации о ключе в лог файле, исправить это очень просто. В файле /etc/ssh/sshd_config меняем параметр:
и перезапускаем службу:
# service ssh restart
Пробуем снова подключиться по ssh, используя сертификат, и проверяем лог:
Теперь в логе будет отображаться отпечаток подключившегося сертификата и мы сможем идентифицировать пользователя.
Если у вас есть желание научиться строить и поддерживать высокодоступные и надежные системы, научиться непрерывной поставке ПО, мониторингу и логированию web приложений, рекомендую познакомиться с онлайн-курсом «DevOps практики и инструменты» в OTUS. Курс не для новичков, для поступления нужны базовые знания по сетям и установке Linux на виртуалку. Обучение длится 5 месяцев, после чего успешные выпускники курса смогут пройти собеседования у партнеров.
Проверьте себя на вступительном тесте и смотрите подробнее программу по ссылке.
Помогла статья? Подписывайся на telegram канал автора
Анонсы всех статей, плюс много другой полезной и интересной информации, которая не попадает на сайт.
SSH public key based authentication has several drawbacks and operational challenges that could potentially compromise your organization’s SSH access security. We discussed the drawbacks in detail in our earlier blog on: Tightening SSH access using short-lived SSH certificates.
SSH certificate based authentication addresses most of these security problems while simplifying certificate and key management.
In this article, we’ll discuss how to configure and set up SSH certificates for SSH access to your servers and cloud resources.
Overview
Here is an overview of what we are about to discuss in this article.
- We’ll be creating an SSH host certificate for each host and sign it using the host CA’s private key.
- Finally, we’ll discuss the benefits and drawbacks of using SSH certificate based authentication.
Step 1 — Creating CA certificates
Enter fullscreen mode
Exit fullscreen mode
Host CA SSH key pair
We are requesting an RSA type key using the -t flag and the key length to be 4096 bits using the -b flag. The longer the key, the harder it is to crack.
The above command would have generated an SSH pair — public key and a private key, in the default .ssh folder in your home directory. For example: /home/bob/.ssh/
Step 1a — Signing the CA’s Host Certificate
# ssh-keygen -s ~/.ssh/ssh_host_ca -I my-ca -h -n my-ca.example.com -V +52w ~/.ssh/ssh_host_ca.pub
The -s specifies the host private key to be used for signing the certificate. The -h option is used for generating a host type certificate.
The -n option above sets the FQDN (Fully Qualified Domain Name) of the host as the principals in the certificate.
The -V option sets the validity period of the certificate.
In the example above, the certificate will be valid from today and expires one year (52 weeks) from now.
Copy the CA’s host certificate to the /etc/ssh/ folder in the CA server.
Step 2 — Distributing and trusting the CA certificates
Restart the host to make the config change to take effect.
# systemctl restart sshd
Step 2b — Making clients to trust the host CA certificate
To create the host certificate, we needed an SSH key pair to work with. Let’s create one as usual using the ssh-keygen command. Login to the host machine that needs the certificate and execute the below command.
# ssh-keygen -t rsa -b 4096 -f ~/.ssh/ssh_host
The above command will generate a public key (ssh_host.pub) and a private key (ssh_host) in the .ssh folder in the home directory (/root/.ssh/).
You should retain the private key safely within the host system. You should never copy or transfer the file to any other location.
We’ll copy just the host public key the CA server using the scp command as shown below:
Next, create the host certificate from the host public key and sign the certificate using the host CA’s private key.
Now configure the host to use the signed host certificate for any connections coming from the SSH clients. Edit the /etc/ssh/sshd_config file and set the HostCertificate directive to point to the host certificate as shown below:
Finally, restart the SSH server for the configuration changes to take effect.
Step 4 — Creating SSH User Certificates
The host public key in the ~/.ssh/known_hosts file is irrelevant for SSH certificate based authentication because it uses the host CA certificate to validate the signature in the host certificate.
Benefits of using SSH certificate based authentication
В этой статье мы настроим SSH аутентификацию в Windows по RSA или EdDSA ключам для безопасного доступа к удаленным компьютерам/серверам. Рассмотрим, как сгенерировать открытый и закрытый ключи (сертификаты) в Windows и настроить сервер OpenSSH в Windows 10/11 и Windows Server 2019/2022 для аутентификации по ключам (без паролей).
Аутентификация по SSH ключам широко используется в мире Linux, а в Windows этот функционал появился относительно недавно. Идея заключается в том, что на SSH сервере добавляется открытый ключ клиента и при подключении сервер проверяет наличие соответствующего закрытого ключа у клиента. Таким образом удаленный пользователь может аутентифицироваться в Windows без ввода пароля.
Генерация SSH ключей на клиенте Windows
На клиентском, компьютере, с которого вы будет подключаетесь к удалённому серверу Windows с OpenSSH, вам нужно сгенерировать пару ключей (открытый и закрытый). Закрытый ключ хранится на клиенте (не отдавайте его никому!), а открытый ключ нужно скопировать в файл authorized_keys на SSH сервере. Чтобы сгенерировать SSH ключи на клиенте Windows, вы должны установить клиент OpenSSH.
В Windows 10/11 и Windows Server 2019/2022 клиент OpenSSH устанавливается как отдельный встроенный компонент с помощью PowerShell:
Add-WindowsCapability -Online -Name OpenSSH.Client~~~~0.0.1.0
Запустите обычную (непривилегированную сессию PowerShell) и сгенерируйте пару ED25519 ключей:
ssh-keygen -t ed25519
По умолчанию утилита ssh-keygen генерирует ключи RSA 2048. В настоящий момент вместо RSA ключей рекомендуется использовать именно ED25519.
Утилита попросит вас указать пароль для защиты закрытого ключа. Если вы укажете пароль, то каждый раз при использовании этого ключа для SSH авторизации, вы должны будете вводить этот пароль. Я не стал указывать пароль для ключа (не рекомендуется).
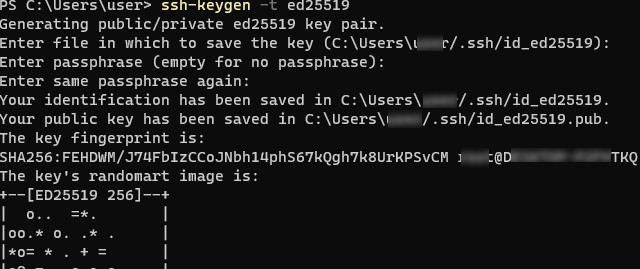
- id_ed25519
– закрытый ключ (если вы сгенерировали ключ типа RSA, файл будет называться
id_rsa
) - id_ed25519.pub
– публичный ключ (аналогичный RSA ключ называется
id_rsa.pub
)

После того, как ключи созданы, вы можете добавить закрытый ключ в службу SSH Agent, которая позволяет удобно управлять закрытыми ключами и использовать их для аутентификации.
SSH Agent может хранить закрытые ключи и предоставлять их в контексте безопасности текущего пользователя. Запустите службу ssh-agent и настройте автоматический запуск с помощью PowerShell команд управления службами:
Set-service ssh-agent StartupType ‘Automatic’
Добавьте ваш закрытый ключ в базу ssh-agent:
Настройка OpenSSH в Windows для авторизации по ключам
SSH сервер (в этом примере это удаленный компьютер с Windows 11 и настроенной службой OpenSSH).
Если каталог .ssh в профиле отсутствует, его нужно создать вручную.

Можно скопировать ключ на SSH сервер с клиента с помощью SCP:
В один файл authorized_keys можно добавить несколько открытых ключей.
По умолчанию в OpenSSH сервере в Windows отключена аутентификация по ключам. Вы можете проверить это в конфигурационном файле sshd_config. Проще всего получить список разрешенных способов аутентификации в OpenSSH с помощью такой PowerShell команды (Select-String используется как аналог grep в PowerShell):
#PubkeyAuthentication yes
#HostbasedAuthentication no
# HostbasedAuthentication
PasswordAuthentication yes
#GSSAPIAuthentication no
В этом примере строка PubkeyAuthentication закомментирована, значит этот способ аутентификации отключен.
Откройте файл sshd_config с помощью блокнота, раскоментируйте строку:
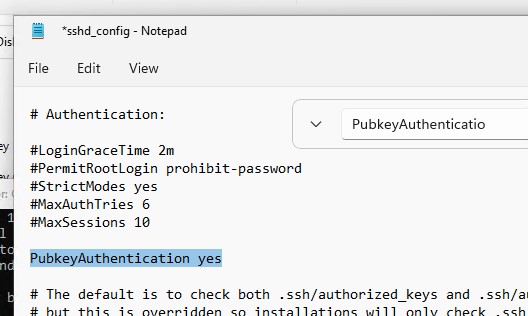
Также в конфигурационном файле sshd_config придется отключить режим StrictModes. По умолчанию этот режим включен и запрещает аутентификацию по ключам, если закрытый и открытый ключ недостаточно защищены. Раскомментируйте строку
#StrictModes yes
, измените на
StrictModes no
.
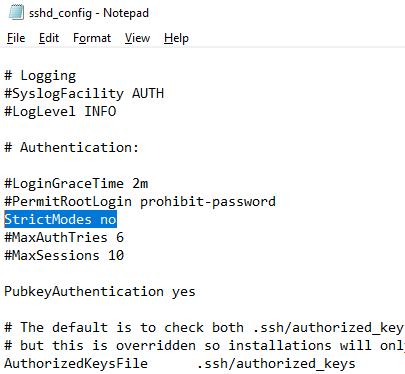
Сохраните файл и перезапустите службу sshd:
Теперь вы можете подключиться к SSH серверу без ввода пароля пользователя. А если вы не задали пароль (passphrase) для закрытого ключа, вы сразу автоматически подключитесь к вашему удаленному серверу Windows.
Для подключения через SSH к удаленному хосту используется следующая команда:

При успешном подключении с помощью ключа в журнале появится событие:
EventID 4
sshd: Accepted publickey for locadm from 192.168.14.1 port 55772 ssh2: ED25519 SHA256:FEHDWM/J74FbIzCCoJNbh14phS67kQgh7k8UrKPSvCM
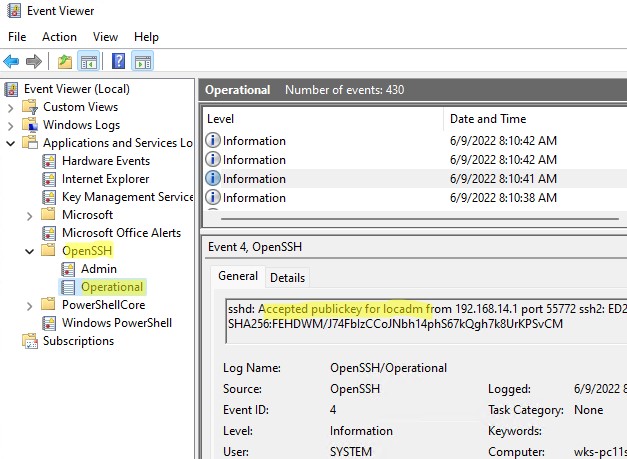
Если вы не смогли подключиться к вашему SSH серверу по RSA ключу, и у вас все равно запрашивается пароль, скорее всего пользователь, под которым вы подключаетесь, входит в группу локальных администраторов сервера (SID группы S-1-5-32-544). Об этом далее.

Вход по SSH ключу для локальных администраторов Windows
В OpenSSH используются особые настройки доступа по ключам для пользователей с правами локального администратора Windows.
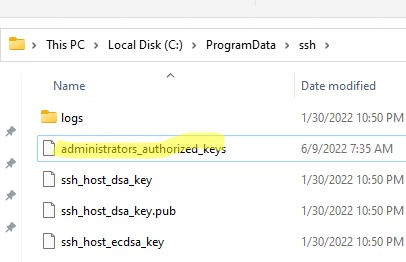
Вы можете изменить NTFS права на файл с помощью:

После этого SSH аутентификация по ключам работает даже при отключенном режиме StrictModes
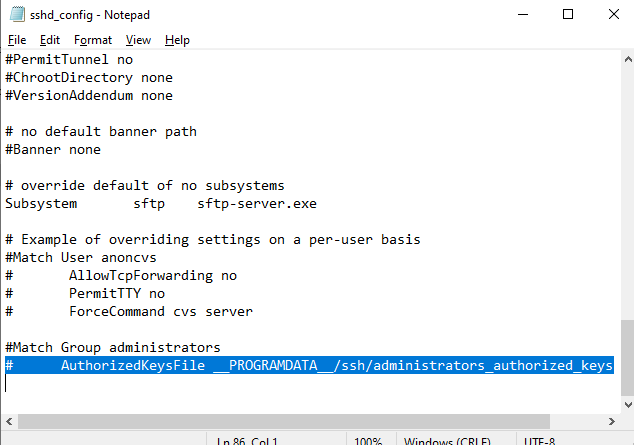
Дополнительно в файле sshd_config вы можете запретить SSH подключение по паролю по паролю:
После сохранения изменений в файле sshd_config не забудьте перезапустить службу sshd.
Если вы установили PasswordAuthentication no, и некорректно настроите аутентификацию по ключам, то при подключении по ssh будет появляться ошибка:

В OpenSSH на Linux доступна опция PermitRootLogin, позволяющая ограничить доступ к SSH серверу под аккаунтом root. В Windows OpenSSH эта директива не доступна и для ограничения доступа администраторов нужно использовать параметр DenyGroups.
Итак, вы настроили SSH аутентификацию в Windows по открытому RSA-ключу (сертификату). Теперь вы можете использовать такой способ аутентификации для безопасного доступа к удаленным северам, автоматического поднятия проброса портов в SSH туннеле, запуска скриптов и других задачах автоматизации.
Настройка входа на сервер используя SSH сертификаты, является отличным способом повышения безопасности сервера (перебор паролей SSH станет бесполезным). А использование пароля для приватного сертификата снизит риск взлома ключей (при копировании сертификата входа).
В инструкции рассматриваются вопросы создания и настройки SSH сертификатов на сервере Ubuntu 18 и клиентском приложении — PuTTY.
Подготовка папок
Выполняем подготовку папок и файла ключа на сервере.
Важный момент при настройке авторизации SSH по ключам — это указать правильные Права доступа на папку и файл ключа.
Предварительная настройка сервера
Разрешим вход с использованием публичного сертификата SHH на сервер и укажем путь до сертификата в настройках SSH, файл sshd_config.
Раскомментируйте или добавьте значения:
PubkeyAuthentication yes
AuthorizedKeysFile .ssh/authorized_keys
Настройка SSH сертификатов на сервере
Выполним генерацию ключей SSH.
ssh-keygen -a 1000 -b 4096 -o -t rsa
Укажем путь хранения ключа и его имя
💡 В моем случае при создании сертификата для root оказалось важным указать жесткий путь /root/.ssh/, вместо относительного ~/.ssh/ чтобы избежать ошибки SSH Server refused our key.
Система так же создаст публичный ключ по данному пути.
Указываем ключевую фразу для доступа к приватному ключу.
Добавляем содержимое файла публичного ключа к файлу сертификата авторизации SSH.
sudo service ssh restart
Настройка подключения PuTTY
💡 При попытке использовать скопированный ключ, PuTTY покажет ошибку: Unable to use key file (OpenSSH SSH-2 private key (new format)).
- Скопируйте приватный ключ id_rsa (или содержимое ключа в файл) на локальный компьютер;
- Запустите программу puttygen (из папки PuTTY);
- Нажмите кнопку Load и выберите файл приватного ключа;
- Введите пароль на приватный сертификат;
- Нажмите Save private key для сохранения приватного ключа в нужном формате (вы можете изменить Key comment, это не повлияет на работу ключа).
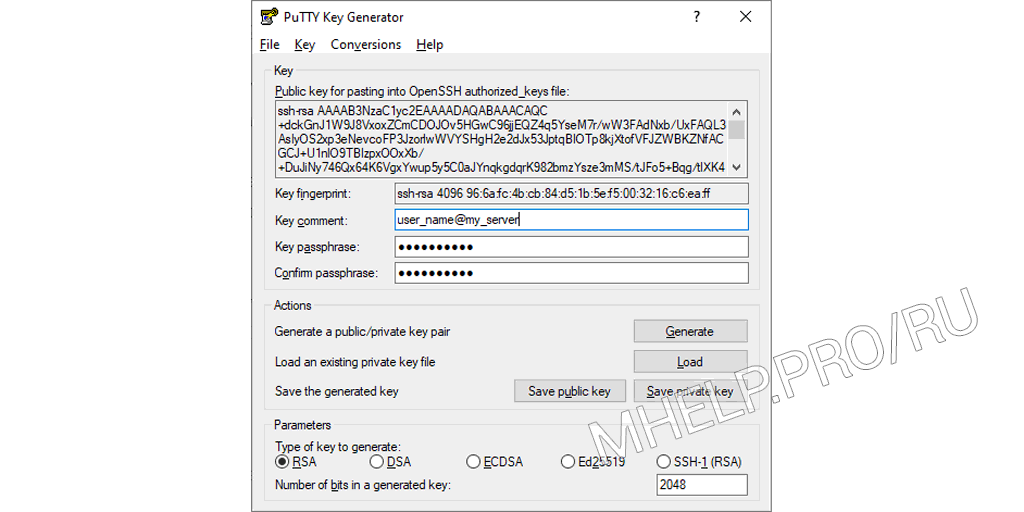
Загруженный RSA ключ в PuTTY Key Generator
Настройка подключения PuTTY с использованием SSH сертификата
Добавьте приватный сертификат в подключение:
При успешном подключении после ввода имени пользователя, выйдет запрос ключевой фразы сертификата, после чего вход на сервер должен быть успешно выполнен.
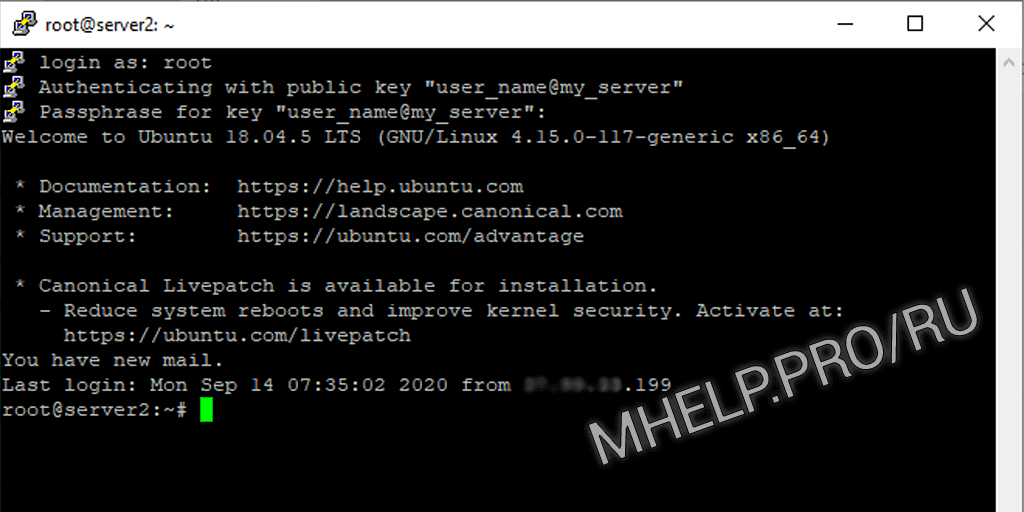
Успешный вход на сервер с SSH сертификатами
💡 Если при входе на сервер вы получаете сообщение SSH Server refused our key, проверьте правильность прав на папку .ssh и файл authorized_keys, а так же что вы входите под тем именем пользователя, в authorized_keys которого добавлен ваш ключ.
Финальная настройка сервера
Последний шаг настройки SSH — отключение возможности входа на сервер по паролю, в файле конфигурации.
Раскомментируйте или добавьте значениe:
После чего перезапустите службу SSH.
Настройка авторизации по сертификату SSH — завершена!
Как настроить SSH сертификаты для входа на Ubuntu сервер и вариант исправить ошибку SSH Server refused our key , обсуждалось в этой статье. Я надеюсь, что теперь вы сможете настроить вход на сервер и клиент SSH с использованием сертификатов. Однако, если вы столкнетесь с каким-то проблемами при настройке сервера и клиента SSH, не стесняйтесь написать в комментариях. Я постараюсь помочь.
X.509 is an ITU Telecommunications Standardization Sector standard which defines the format of public key certificates.
When using certificates either the client or the server are pre-configured to accept keys which have themselves been signed by another key specially designated and set aside for just the purpose of signing the keys actually used for work. That other key is known as a certificate authority, or CA for short. Like with normal keys, certificates are used to generate signatures used in authentication. However, rather than looking up the matching public key in a file, the public key is filed with a signature and the signature used to verify the public key and then the public key is used to ensure that they negotiations are happening with a client in possession of the matching private key. So a prerequisite for using certificates is at least a passing familiarity with normal SSH. See the chapter on Public Key Authentication. The mechanics of normal key-based authentication are described briefly there in the introduction. SSH uses its own simpler certificate format and not the X.509 certificate format.
Two of the main advantages of certificates over keys are that they can use an expiration date, or even a date range of validity, and that they eliminate need for trust-on-first-use or complicated key verification methods. Mostly they facilitate large scale deployments by easing the processes of key approval and distribution and provide a better option than copying the same host keys across multiple destinations.
It is even possible to restrict the source of incoming connections or force specific commands using options like force-command and source-address similar to normal SSH public keys. These restrictions are set at the time of signing. If those options are to be changed, the key must be resigned or else become invalid.
The next one is kept on the server itself:
The last three files are kept on the client systems:
- Private SSH Key — the private key used for authenticating to the server or remote device
- Public SSH Key — the matching public key which has been signed by the Certificate Authority
The private key created here should be kept somewhere other than the servers. However, the servers will have access to the public component so as to be able to verify the signature that will be put forth by the clients.
Storing the Public Component of the Certificate Authority on the Server
Double check to make sure the file permissions are correct.
Then any number of accounts can be used with that certificate authority.
Processing an Existing Public Key
Even though the public key itself is not strictly needed after that on the client side for logging in, it can be good for the client to keep. But if the public key has been lost, a new one can be regenerated from the private key, though not the other way around. When the private key is gone, it is gone. So keep a proper backup schedule. If a file exists with the name the public key should have, it had better be the public key itself or else the login attempt will fail.
The logistics for getting the public key and delivering the certificate are outside the scope of this book. But at this point, the resulting certificate should be transferred back to the person working with the key that was submitted.
Once things are working manually a shortcut can be made using ssh_config(5) on the client. Use of IdentitiesOnly might also be needed if an agent is used and there are multiple keys in the agent.
server01 server01.example.org
server01.example.org
fred
yes
One of the main uses of keys by OpenSSH is the authentication of a remote host to a client so that the client can verify that it is connecting directly to the right system and not an impostor of via an intruder in between. For that, once acknowledged, the known_hosts file usually keeps a copy of the public key in a register of host keys paired with host names or IP addresses.
The difficulty with host keys in general is in populating the known_hosts file on clients for large pools of client machines or when connecting to new systems for the first time. In a data center or lab or Internet of Things deployment, machines are always coming and going. That means new SSH host keys each time. If there are a lot of hosts involved, then that adds up to a lot of keys in the register. Using a host certificate instead, an arbitrarily large pool of hosts using the same certificate authority need only one entry in the known_hosts register, even as new hosts are added to the pool. By signing the host keys which a new server or device uses to identify itself, it is still possible to roll out new systems with unique keys but have them recognized correctly and safely by clients on the first try without risking the potential for a man-in-the-middle.
By using host certificates, these identifying host keys are signed and the signature can be verified against the agreed upon certificate authority, thus greatly easing the otherwise involved process of collecting and verifying the host’s public key when making the first connection.
Files Associated with SSH Host Certificates
The next three files are kept on the server itself.
- Certificate public key — the public component of the certificate authority
- Host Public Key — the actual key that the SSH daemon uses to identify itself to the clients
- Host Certificate — the signature made for the Host Public Key using the Certificate Authority
Then on the clients, either in the client’s register or the system-wide register of recognized hosts:
When the clients find and use a valid host certificate, no entry for the individual host will be added to the known_hosts register.
Steps for Using SSH Host Certificates
There are four general stages in working with host certificates. Step one, creation of a certificate authority, is done just once per server or pool of servers or devices. Step two, signing the host keys, is done once per server device as is step three. Step four, configuring the clients, can be repeated for as many client machines or individual login accounts as needed.
With each step, mind the paths. There is no one-size-fits-all solution, so it will be necessary to decide where the files should go.
Creating a Certificate Authority
Again, a certificate authority, or CA, is just another SSH key. However rather than using it for authenticating the servers or clients directly, it is used to sign and then validate the other keys which are then actually used for authentication.
ssh-keygen -t ecdsa -f ~/.ssh/ca_key
-C ‘Host Certficate Authority for *.example.com’
The private key created here should be kept somewhere other than the servers where they will be used.
The public key in this step must be distributed out of band to the clients which will then use it to verify host identities upon first connection.
Fetching and Signing the Host Key
Only the public key gets signed. Fetch the remote host’s public host key via a reliable method, sign it, and then upload the resulting certificate to the server. The -h option indicates that this shall be a host certificate and the -s option points to the key used to do the signing. Here a copy of the host key ssh_host_ecdsa_key.pub has been acquired from its server and will be worked on locally:
ssh-keygen -h -s ~/.ssh/ca_key -V -I abcd -z
-n server.example.com ./ssh_host_ecdsa_key.pub
Signed host key /etc/ssh/ssh_host_ecdsa_key-cert.pub: id «abcd» serial 1 for server.example.com valid from 2020-05-05T09:51:00 to 2020-05-06T09:52:01
The validity interval set by the -V option is time span relative to the date and time when the key signed. So it would be possible to make a certificate valid for only an hour tomorrow using the formula -V ‘+1d2h:+1d3h’. If no start time is set, then the value is interpreted as the stopping time. If a specific stopping time or date is required, that is best done by having a script calculate that and then call ssh_key-gen(1). If no time is given at all, the certificate will be considered valid indefinitely.
The -I option assigns a label for the purpose of identifying the certificate.
The -z option manually assigns a serial number to the certificate. That serial number must be extracted from the old certificate and then incremented if it is to be kept in sequence. The default is to not have a serial number. The -n option assigns a set of principals, that would be which hosts may use the certificate in the context of host certificates.
The contents of the certificate can be reviewed using the -L option.
ssh-keygen -L -f ssh_host_ecdsa_key-cert.pub
Public key: ECDSA-CERT SHA256:kVSFLH5MP/3uJWU57JxD8xVFs7ia8Pww8/ro+pq4S50
Signing CA: ECDSA SHA256:INewUSvbnfVbgUhtLBhh+XKL0uN99qbXjsi0jvD/IGI (using ecdsa-sha2-nistp256)
Key ID: «abcd»
Valid: from 2020-05-05T09:51:00 to 2020-05-06T09:52:01
Critical Options: (none)
The certificate for the public host key must be transferred over to where the server can use it. That usually means the same directory where the regular public host key is found, which is/etc/ssh/ by default. Check to be sure that the certificate has the right permissions after copying it in place.
ls /etc/ssh/ssh_host_ecdsa_key*.pub
ls -nlh /etc/ssh/ssh_host_ecdsa_key*.pub
-rw-r—r— 1 0 0 653 May 4 16:49 /etc/ssh/ssh_host_ecdsa_key-cert.pub
-rw-r—r— 1 0 0 172 Feb 21 16:09 /etc/ssh/ssh_host_ecdsa_key.pub
Publishing the Host Certificate.
The SSH daemon must then be instructed to reload its configuration file. The exact method varies from sytem to system but ultimately the daemon will receive a HUP signal.
Updating Clients to Acknowledge the Designated Certificate Authority
Finally add a reference to the certificate authority in the client’s known_hosts file:
-authority *.example.com ecdsa-sha2-nistp256 AAAAE2VjZHNhLXNoYTItbmlzdHAyNTYAAAAIbmlzdHAyNTYAAABBBFJQHK0uoOpBfynyKrjF/SjsLMFewUAihosD6UL3/HkaFPI1n3XAg9D7xePyUWf8thR2e0QVl5TeGLdFiGyCgt0=
That’s it. However, it is important to realize that each of the above steps will fail more or less silently and the client will fall back to the usual approach of verifying the host’s identity without reporting any error for its part. Any useful debugging information will be in the daemon’s logs and even that will be of limited nature. See the chapter on Logging and Troubleshooting for examples.
However, it is important to note that the certificate authority can be kept in an agent. Investigate about the -U option for signing.
The certificate can be made valid for a planned time period, called here as a validity interval. The validity interval can have a specific starting date and time, ending date and time, or both. However, each certificate may have only a single validity interval.
Be sure to look closely at the resulting output to ensure that the range is what it needs to be.
Relative intervals can be used, too. Here is a certificate which is good for only five minutes, starting right away:
Note that the seconds are included and are counted from when the signing is initiated not when the passphrase is eventually entered and the signing finally completed. So if the certificate signing is initiated at 35 seconds past the top of the minute, the expiration time will also be at 35 seconds past the fifth minute. And, again, look closely at the resulting output.
awk
ssh-keygen -Lf —
A certificate can be limited to a specific CIDR range.
The CIDR range must be valid.
If the certificate is at hand, it is possible to look at it in detail and see which limitations apply, certificate-side. Below is an example certificate for the account ‘fred’, two LAN ranges, and just over one hour of access.
ssh-keygen -Lf server01.ed25519-cert.pub
Public key: ED25519-CERT SHA256:hSy7QrAApIU1LgDCUrtBK2F2TZxhvincnJ0djSDow7I
Signing CA: ED25519 SHA256:dVgTW1INbhvHjHbeAe10R9Niu8BpejifO286RZ7/niU (using ssh-ed25519)
Key ID: «edcba»
Valid: from 2020-06-24T15:17:00 to 2020-06-24T16:23:47
force-command /bin/date +»%T»,source-address=192.168.0.0/16,10.11.9.0/26
Obviously the certificate itself cannot show any additional restrictions made server-side in the SSH server’s configuration.
- Stephen Harris (2016-10-30). «Using SSH certificates». Retrieved .
- Maggie Danger (2014-08-07). «How to Harden SSH with Identities and Certificates». Magnus Achim Deininger. Retrieved .
- Mike Malone (2019-09-11). «If you’re not using SSH certificates you’re doing SSH wrong». Smallstep Labs, Inc. Retrieved .